Search the Community
Showing results for tags 'p650sg'.
Found 3 results
-

[HARDWARE MOD]**Clevo P650SG / Sager NP8652 4K display UPGRADE**
stevemadden posted a topic in Clevo
Dear fellow Clevo P650SG/NP8652 owner and future owner, I wanted to share my experience with upgrading the very disappointing 1080p LVDS display to the beautiful eDP Sharp 4k display, and yes it is possible! However it is not given to everyone to do, it is not an easy process, but if you are careful, skilled with fine soldering and care for gently taking apart and rebuild your brand new laptop, don’t mind losing warranty and get a bit of stressful time then it might be interesting for you. Before this, I’d like first to give you some background : After months of searching for the perfect laptop that offer raw performance (latest 4Ghz CPU, 32GB RAM, light weight (ideally <2.2kg) with great GPU with VRAM, M.2 PCie 4x ,etc.. ) I finally made decision to go for P650SG that is somewhat one of the closest to my dream spec , even if weight is still a too high, and CPU not so out there (since resellers don't carry the 4980hq, too expensive and overheat problem). I ordered the laptop from Sager, it was very smooth. Got help from a friend in US, who carried it back to me during its last international travel. My total budget was ~ $3000 USD including the other parts that I bought separately. I am based in China, the Clevo reseller here is named Terran Force, and their price are ridiculously high. Sager was a good choice although I knew that any return to US in case of problem with the laptop would be impossible, shipment is not a valid option, Chinese customs can hold your laptop in hostage asking to pay extra unrealistic fees. HEAR ME OUT : already hit by California tax for ordering with Sager, I did not have any extra $350+tax to pay for 4k Sharp display upgrade. And for a $3000 laptop I was really really REALLY UNHAPPY with the default 1080p screen. Why $3000 ? If you buy Clevo like me is that you look for raw performance and top of the line hardware, with similar build: RAM = 32GB G.SKILL Ripjaws DDR3L 2133 F3-2133C11Q-32GRSL SSD main (1.2GB/s)= SM951 256G SSD NGFF M.2PCI-E3.0x4 SSD work (530MB/s)= 850PRO 512GB HDD(storage) = HGST HTS721010A9E630 1TB 7200tr WIFI Killer AC 1525 After adding those items which seem to be very important to me, I am hoping to get a better price/performance compare to Apple Macbook PRO or Razer blade , both 3k range laptop, otherwise why bothering going for a custom build ? But I had no budget left for 4K display upgrade ! and here in China, one can buy the QFHD SHARP IGZO (LQ156D1JX01B) for just 800 RMB ($130) if not less... Being an engineer in the field of displays I thought I could do the change myself specially that it is a possible upgrade when buying the laptop on all reseller’s website. How difficult could it be ? This laptop is my new everyday work best friend for the next 10 years, it has to have a 4k display. I work with CAD tools that requires strong CPU for intensive simulations. Some of them can benefit from the GPU cores, which is also the reason for getting a good GPU. I am not a gamer. I am a designer, this is my workstation. I told Sager by email before passing order that I was going to buy the laptop and that I was going to upgrade the display myself because I could not afford the $410 (350+tax) extra. Thanks to the community support, the Service Manual ( P65XSG_ESM.pdf ) helped me to find out that I needed a different cable to be used with the Sharp display. Sager was really kind to sell that cable separately (6-43-P6501-051-1C), which I received in the same package with the new laptop. I received the laptop, OMG ! really great ! not perfect but really great. (PS : supply power is almost heavier than the laptop itself ! LOL , so much for my dreamed 2.3kG max laptop…) Now the frustration begins … should I change /no change the display ? hummm, that would probably break the warranty … but as soon as you see the 1080p display , I wanted to CRY !!!!! I am replacing a 10year old MSI barebone MS-163K core duo P8600, 4GB ram, bought on ebay for $450. I can’t describe my sadness when comparing both laptop screen ! … my 10year old $450 laptop has a much better display than this crazy ugly 1080p screen… For anyone skeptical about this : just starts The elder scroll Skyrim and see how the grey smoke over black from the main menu is … pixelated and UGLY !!! WHY ???? …… WHAT ???? a 6-bit color display ?????? a $3,000 laptop ???? IPS whatever I don’t care, I am so disappointed to find out it is only 6-bit color. SHAME Today we are all using smartphone with high DPI, 720p for 4.7inch with better color rendering! ======================================================================== If - CLEVO - is reading those lines : Why do you even miss out so badly on the display quality when the rest is so good ? We customers buy this laptop for high-end alternative to Apple MBP and Razer Blade Pro, why using a such 10 year old technology of 262k colors when everywhere else it is 16M color or even 1 billion color ? which I am used to see on my 50inch TV using 10-bit color panel bought for $850 (Skyworth 50U790E) ? ======================================================================== I am sorry, I can’t understand and feel really bad about this. And this is not because LVDS. LVDS can support 8-bit or 10-bit, I know , I am an LVDS IC designer. I am upset , but ok since I already planned to swap displays ….my new best friend is asking for it, I mean screaming for it ! I swapped the cable and put in the new 4k SHARP display…. And then NOTHING ! dead screen … black ! I put back the 1080p one, …. Nothing, black ! At this moment you wonder why you have so much bad luck ! to realize that the default 1080p display is LVDS and SHARP display uses eDP !!! to realize that the motherboard is indeed NOT COMPATIBLE ! and easy to burn something with the wrong connector. A quick call to Sager support, confirmed my fear, that they actually don’t do any “upgrade” per say, it is fake, it is just a different model. Why call it an upgrade ? very confusing for customers, It leads to make us believe we can swap parts… well this is not Apple product, right ? we are all tech guys who know better and like upgrade freedom and Clevo is our good partner right ? At this point I feel so cheated… my $3000 laptop , with ugly display.Cheated by Sager who never said that motherboards are not compatible and who could have shipped an eDP version instead with another default 1080p eDP display, and feel cheated by Clevo for not using eDP always which is used by CPUs since 2004 to try to save few bucks. I feel disappointed by Clevo/Sager that 4k display comes with $400 overpriced price tag, when they indeed don’t even do any extra manual swap of the screen because it is done at assembly in factory, for that price I could change my old cellphone to a latest Xiaomi flagship phone or what not. I naively thought... well , I need to pay for wages for an US tech support person to do the swap plus display cost… maybe could make sens why not…, but it is not the case! a $300 scam ? I got the 4k SHARP display for $130 , meaning factory cost & high volume could just be $10-70, (Alibaba can be found for $10-$25) minus the existing 1080p LVDS display maybe $10-20 and the eDP/LVDS converter Realtek RTD2136N-CG IC and extras, few $ , we are looking at a $10-30 saving factory cost…putting a so bad display into a “to be” $3000 USD high end laptop. ??? <><> SORRY MY BRAIN DOESN”T COMPUTES RIGHT! Numbers are probably off, but you get my point ! I am IN RAGE, but what can I say? Sager did their job as reseller, they sell so many different laptop, how could they really pay attention to details, my experience with them was ok and very helpful they provided me the extra cable, and Clevo, well , I am glad they exist, giving us a good alternative for solid laptop solution, how can I not forgive this mistake compare to all the good things they do for me? Then it is only you and me , my friend, I will take care of you… yeah I know the warranty loss … but I can’t bear seeing you like this anymore… let’s go to the operating room ! ==================================================================================== DISCLAMER : I PERSONALY DO NOT RECOMMEND TO DO THOSE MODIFICATIONS IF YOU PLAN TO BUY A NEW P650SG/NP8652 LAPTOP. THE RISK TO BURN SOMETHING, MENTAL STRESS, WORK TIME & EFFORT, IT IS JUST NOT WORTH IT, BETTER FIND A WAY TO PAY THE $400 EXTRA COST TO GET FULL WARRANTIED PRODUCT WITH 4K SCREEN, AND SAVE YOURSELF POSSIBLE HEART ATTACK. I OFFER NO WARRANTY FOR THE FOLLOWING INSTRUCTIONS, DOING SO IS AT YOUR OWN RISK. I HAD NO CHOICE BECAUSE I COULD NOT SEND BACK THE LAPTOP TO SWITCH DUE TO MY LOCATION, AND COULD NOT BARE TO SEE THIS UGLY 6-BIT COLOR DISPLAY FOR THE NEXT 10 YEARS. ==================================================================================== What you need : Screw drivers Flat table with clean space Cups to put the screen into ( so they don’t fall on the floor or disappear) Electrostatic discharge equipment, (or at least, wear only cotton on you, operate in a room with stone tiles flooring, no carpet, etc… ) Wash your hands often, to avoid leaving finger grease and sweat marks Download and study P65XSG_ESM.pdf What to buy : Electrostatic discharge equipment : clothes Shoes Discharge tester Ground strap [*] GELID GC-Extreme paste for CPU & GPU (or whatever paste you can find with very high performance ) [*]Display QFHD sharp IGZO (LQ156D1JX01B) on taobao.com Alibaba (I can not confirm this is a good source or not) fortunetechnology.com (I can not confirm this is a good source or not) [*]Cable 6-43-P6501-051-1C fortunetechnology.com (I can not confirm this is a good source or not) [*]Components : QTY=1 DIODE LBAV99LT1G SOT-23 {ED1} QTY=11 CAPACITOR 0.1uF X7R 16V 0402 {EC1 to EC11} QTY=9 RESISTOR 0 Ohm 1% 0402 {ER1, ER3, ER4, ER7 to ER12} QTY=1 RESISTOR 1K Ohm 1% 0402 {ER2} QTY=2 RESISTOR 100K Ohm 1% 0402 {ER5,ER6} =============================================================================== A] GENERAL We will first add eDP support to motherboard, then swap the 1080p LG display. Here is referenced the cables and respective compatible displays Schematic shows that motherboard PCB is the same for eDP and LVDS version, and changing it is just question of removing VRx/VCx and adding ERx/ECx. B] PUT APPART - MOTHERBOARD Remove the 14x screw in the back, remove the carter. Pay attention 2 screw are extra long, they fit in the corners near on the display side. ADVICE: Take pictures along the way so you remember your steps. Unplug the battery, wait 1 min for PCB to discharge. Remove HDD case, Pcie SSD, Battery, WIFI, Remove CPU FAN. ( it is not attached to CPU heatsink) (KEEP CPU HEATSINK, NO NEED TO REMOVE IT UNLESS YOU WANT TO RE-PASTE CPU) Unplug the display cable and wrap the cable plug with paper, so it doesn’t touch anything on PCB.(to be short safe) Remove the GPU heatsink + FANS (1 block) Disconnect all the Flat cables from back side mother board. Remove keyboard : Now look at the back cover there is a hole that is for removing keyboard. Use something with a flat tip to go in this hole and push gently the keyboard out. It will bent a bit , try to grab it with fingers on display side and un-clips it . The touch pad side is different, I have difficulty to explain, see the service manual. Be gentle, there are 2 flat cables connected under the keyboard. Need to be skilled to remove/put back the FPC (flat cable). First time, is surprising, so go slowly, take your time. Under the Keyboard, we need to remove - the 4 screws & cap that hide the RAM, - disconnect gently the 5 connectors - and remove the 2 screws that keep the MB fixed to a smaller side board. Remove the 8x screws (see red arrows) that keep the Motherboard without removing the Ethernet sub-board. Once all the screws are removed you can gently unclips both boards, the MB and the ethernet one, and rotate the MB so it free up itself and can slide out (DP & USB3 connectors can get out of the cover) What remains .... And NOW we are READY !!!!! C] remove LVDS & Add eDP support Those composents are really TINY ! it is not easy to solder. In RED are the components that we need to remove : VR4, VR5, VR6, VR7, VR8, VR9, VR10, VR11, VR12, VR13 VC8, VC9, VC10, VC11, VC12 & VC13. On below pictures you will see I removed VR16, VR17, VR18, VR22 but those are not necessary looking at the schematic. Also as explained later, we need to NOT SOLDER ER3, and remove VR14, VR27, R80. In GREEN are the components that need to be populated / soldered. QTY=1 DIODE LBAV99LT1G SOT-23 {ED1} QTY=11 CAPACITOR 0.1uF X7R 16V 0402 {EC1 to EC11} QTY=8 RESISTOR 0 Ohm 1% 0402 {ER1, ER4, ER7 to ER12} QTY=1 RESISTOR 1K Ohm 1% 0402 {ER2} QTY=2 RESISTOR 100K Ohm 1% 0402 {ER5,ER6} In YELLOW are components that could need to be totally removed to be clean, but we will keep them in case they do play a role. I have no time to check them and since they are not part of the modular components in the schematic of the service manual , we will keep them. FRONT SIDE BACK SIDE IT IS RECOMMENDED TO TAKE PICTURES IN MACRO MODE AND ZOOM ON A COMPUTER OR USING A SMARTPHONE TO SEE IF ALL THE SOLDERS ARE MADE CORRECTLY. ============================================================================ At this point, I did put back the laptop together, and ... IT WORKED !!!!! wonderfull ! but after couple days I started to get some brightness loss, something was wrong with the PWM brightness control. Using a scope I noticed that this signal was clamped to ground (could not reach 3.3V, was about half way there), something was pulling the signal to ground and the bad guy was the eDP to LVDS converter IC, RTD2136 that I did not removed. I am affrait I create more problem by removing it, I tried to find a powerdown pin but no success and and already too much time involved in this project. After isolating the problem, I found a solution by removing ER3 & R80, along with VR14 and shorting ER3 directly to R80 with a wire. ============================================================================ VERIFY and VERIFY AGAIN THAT YOUR SOLDERING IS CLEAN.... visual checks very important. D] PUT BACK TOGETHER Hopefully you took good notes of putting appart the laptop and you are ready to put it back together. When putting back the motherboard, first slide with and angle the Display ports /USB3 connectors into the holes then bring the motherboard totaly in and snap in the connectors between Motherboard and ethernet PCB. You can then add the 2 screws to make sure they don't get pressure on the connector. Be GENTLE ! Last when putting all the screw back in the back side, make sure you don't use any hole use by one of the final 14 screw that hold the back cover. Also remember 2 of the 14 screw are longer, goes in the corners display side. E] SWAP DISPLAY and CABLE To remove the black plastic frame around the display, use a credit card to go between the screen and the frame, gently remove the frame which is clipped at several places. The rest you know how to do... When display is removed. On right bottom , we are missing a small extension to screw the display, but it's ok, we can manage without it. Make sure to place the cable in a clean way , that it doesn't get pinched. @@@ VICTORY IS SWEET @@@ ENJOY YOUR NEW QFHD 4K 3840x2160 SHARP IGZO DISPLAY !!!!!- 13 replies
-
- 6
-

-
- display upgrade
- edp
- (and 3 more)
-
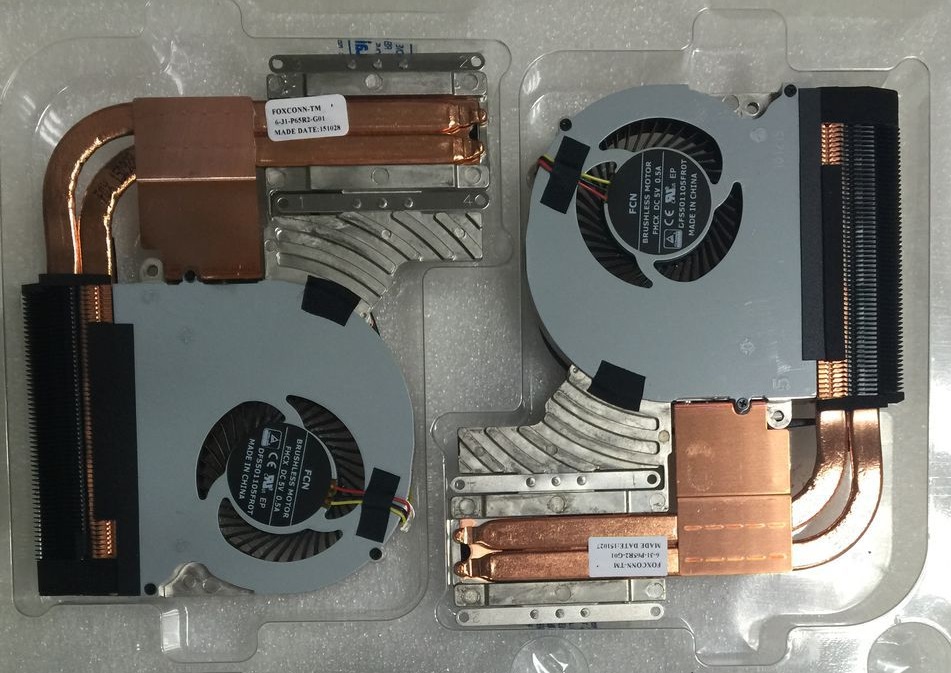
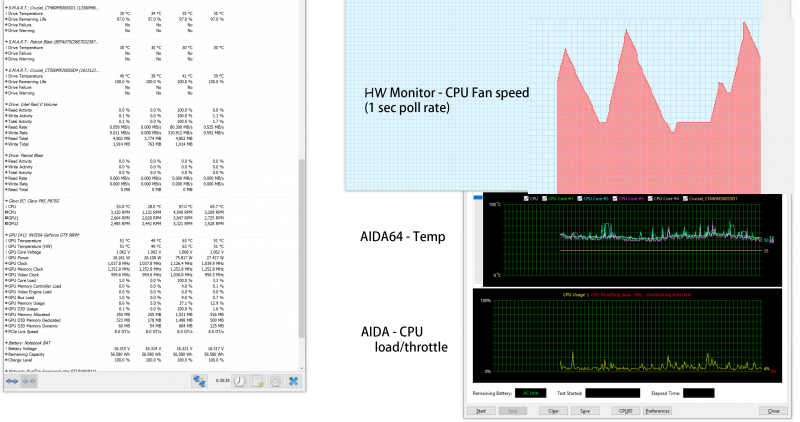
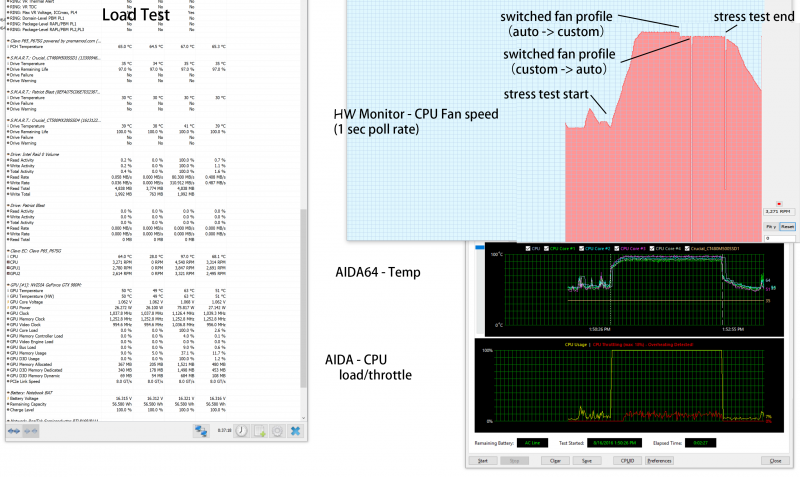
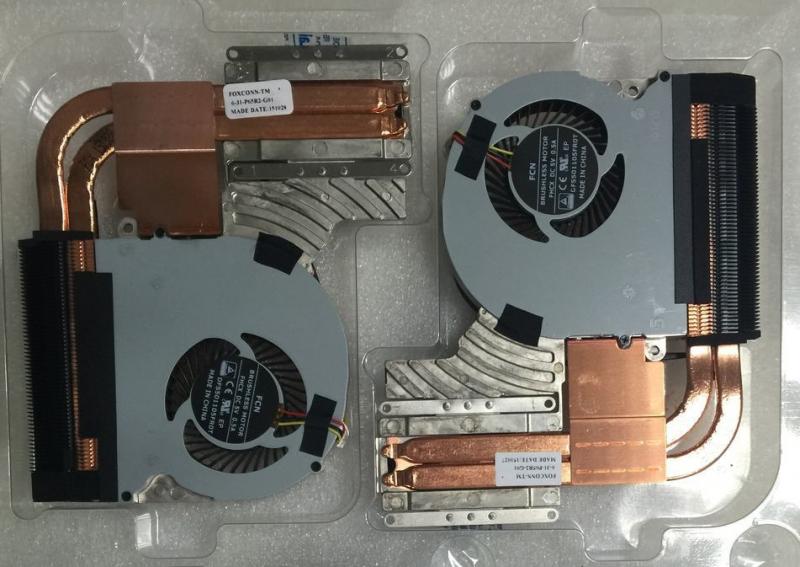
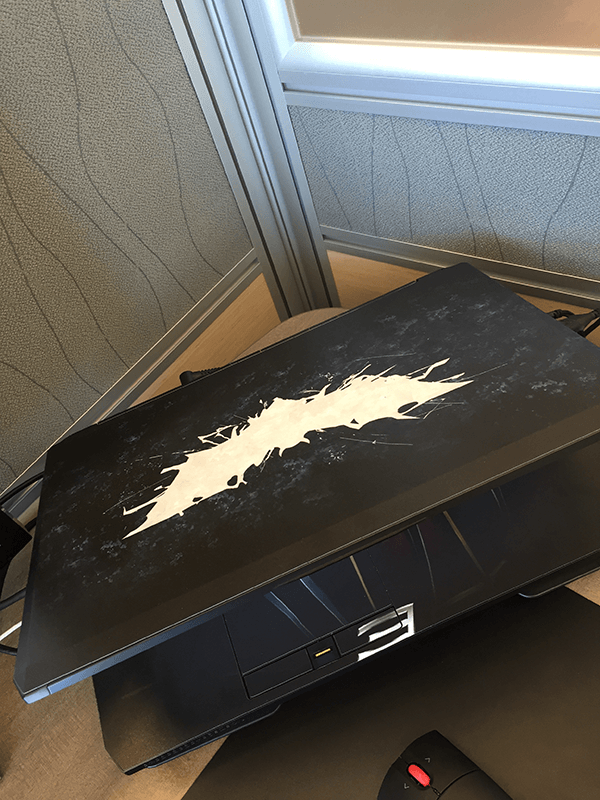
Update 1 (Sept 19, 2016) : I have fixed my CPU fan issue, I have copied the post about it in the main thread, but do read the posts, a lot of gem in there. EDIT: My GPU fans work perfectly, and never had speed dip or slow ramp up. It keeps the gpu under 75C all time, and under 90C with +250 +300 OC. Hi all, I have a P650SG (Eurocom), and I have been having this weird CPU Fan problem for a long time... The CPU Fan would suddenly stop for no apparent reason (i can hear the fan just suddenly went silent), and it will take around 1-2 second to restart and ramp up to top speed really slow... Also it react to the temp change really really slow... the CPU would jump to 97 degree and throttle, then the fan speed will slowly increase.... Here is the Idle and Load test graph: Idle: Load: In the graph you can see the CPU fan ramp up rather slow, and it have a 4000->0rpm dip when I switched fan profile in Clover Control Center, and a 4000->1000rpm dip when I stopped the benchmark...(it shows dip to 1000rpm, but i think it dipped to 0rpm from what the fan sounds like) I have tried different BIOS and EC, 1.03.04 to 1.05.01, non helped. Right now I'm on Premamod v2, it is not improved. This is really bizarre to me... I don't know what is causing this problem, I did an RMA with eurocom but their inspection shows no problem with the cpu fan... Is the cpu fan failing? or is the power delivery failing? PWM failing? I have no clue now... Please someone point me to the right direction... Thanks. UPDATE1: I have fixed this problem. Just an update in case anyone else have the same problem in the future, this CPU fan problem is because my CPU fan is failing, and also the cooling module is not that good. This is actually quite common, Clevo have a new version of CPU cooling module in P651SG. I bought the newest version of CPU cooling module for P651SG on taobao, changed it on with the 5583 thermal paste(this thing is so much better than my Arctic Silver 5 or MX4), and the problem is gone. The new fan even sounds less aggressive at 100% fan speed. Temp has been very good, stay below 85. I also bought the custom cooling pipe that connect CPU heatsink to GPU heatsink, it is said to lower CPU temps more since the GPU fan will help a little. I didn't bother putting it on since temp is very much improved already. I bought the CPU cooling module for about 40 USD, and the heatpipe 10 bucks, way lower than the quoted price of around 50 CAD for only the fan + 30 bucks shipping I did a couple weeks ago with eurocom. BTW some pic after I changed the CPu cooling module, broken case corner, and applied vinyl skin.
-
I want to open up the laptop and clean out the fans and/or change the thermal paste. The cpu (i7 4720hq) temps hit the high 90s when running any kind of games and I am a little concerned. I haven't been able to find any videos or guides to take out the heat sink/fan.