Search the Community
Showing results for tags 'zbook'.
Found 2 results
-
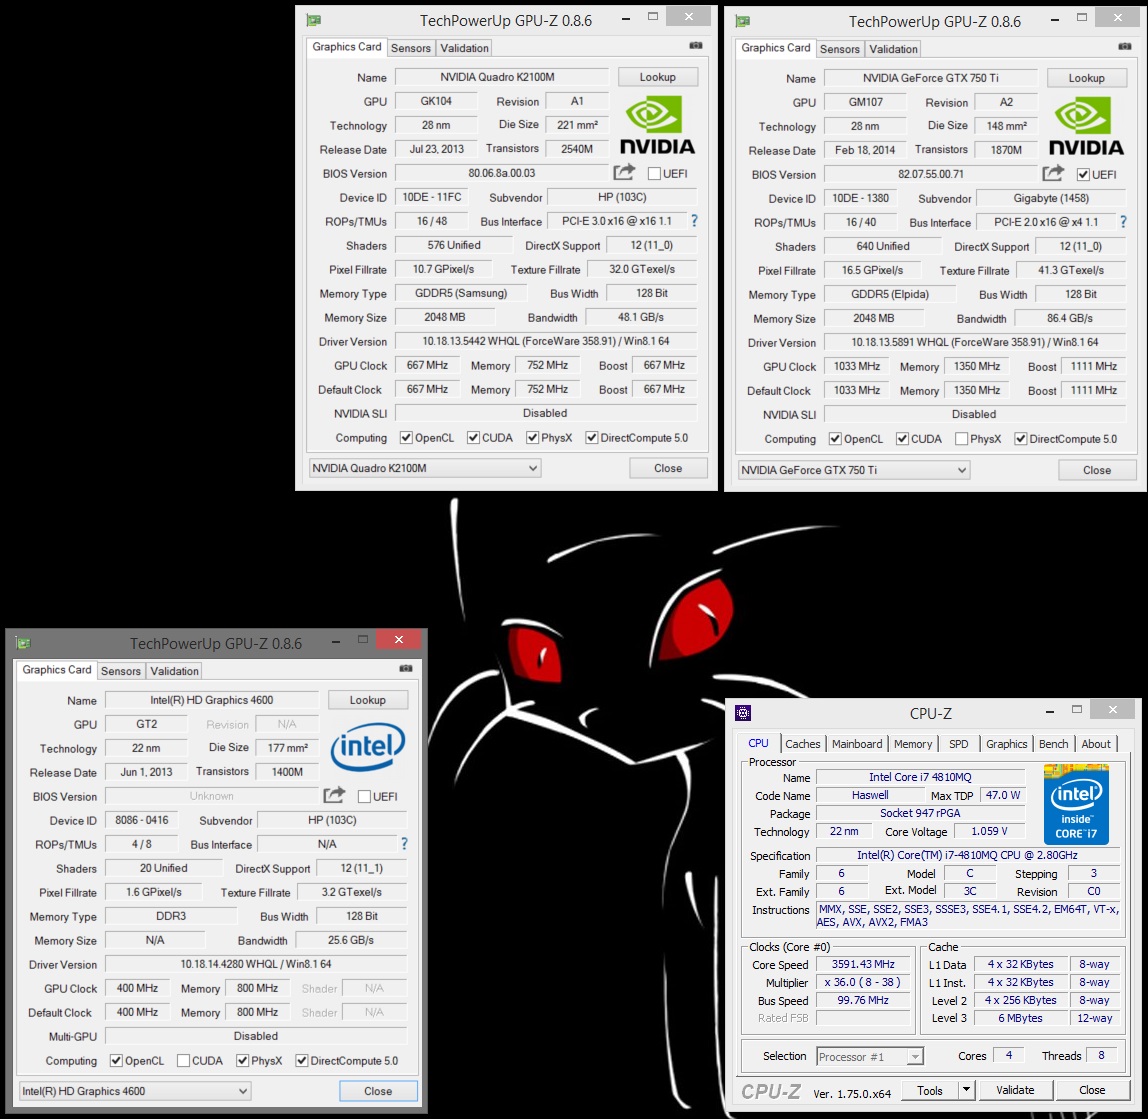
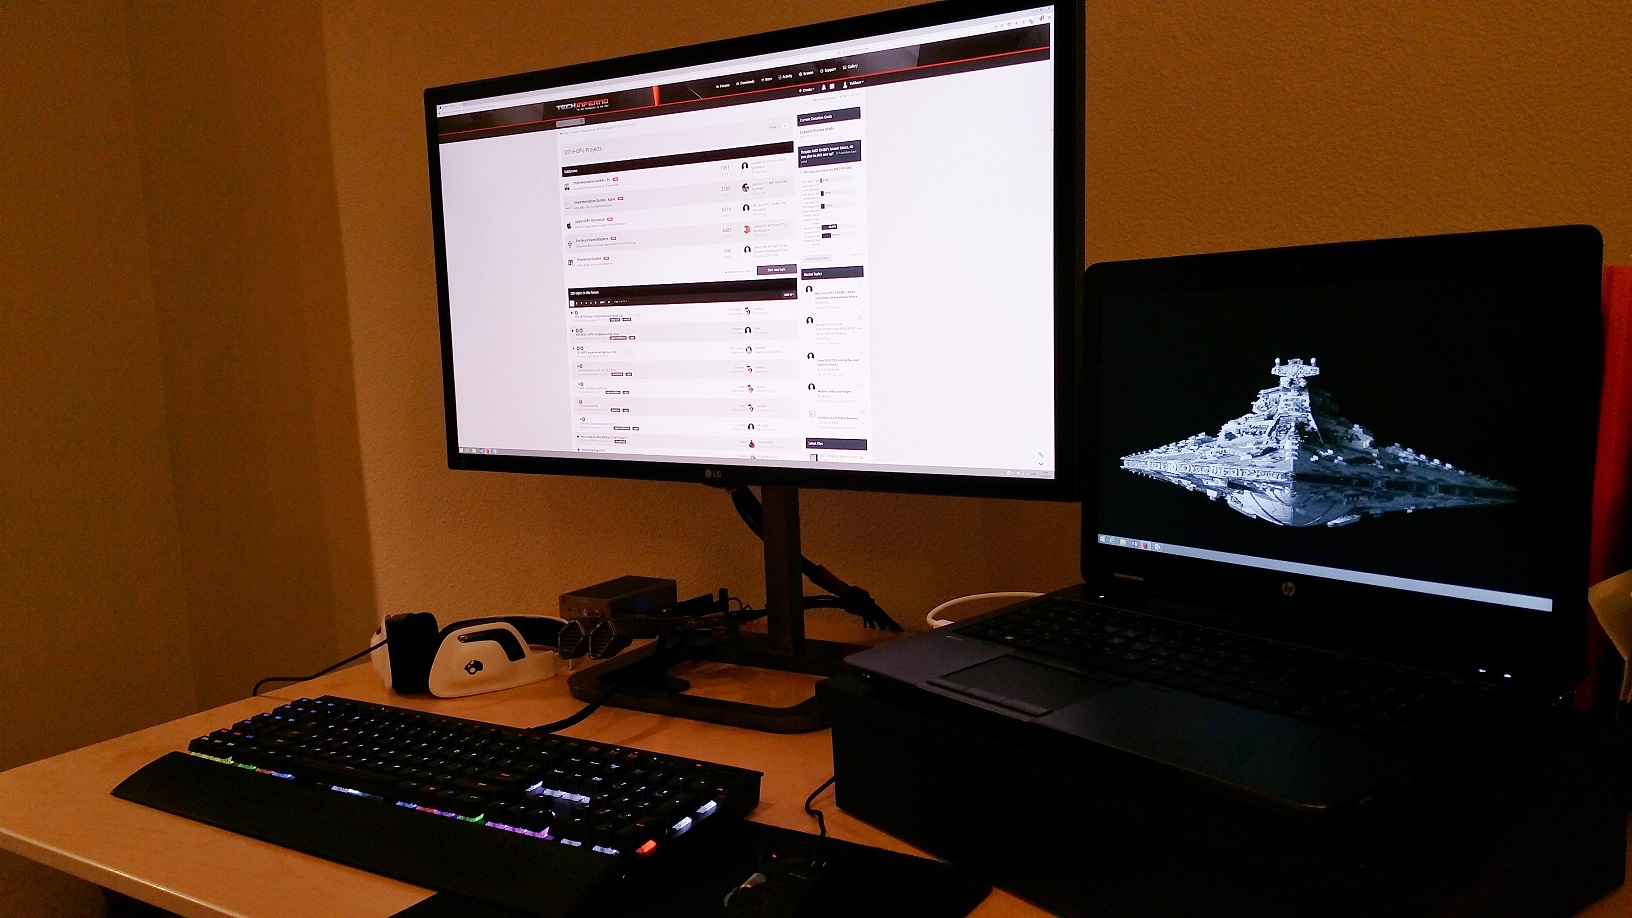
 A couple of months ago, I have received a ZBook 15 G2 from work. This laptop comes with a Thunderbolt2 port, and my six-year old desktop was getting a bit long in the tooth, so I decided to ditch it altogether (as the laptop was better by every single parameter except the video card). After browsing the excellent guides and information repository here on the site I have decided to go for my second eGPU build (the first was a Lenovo X230 running a HD7950 via an Expresscard slot). This is a summary of my experience. What makes it a little different from other, similar, builds is that I am constrained by an Enterprise operating system and I cannot tweak my system to the extent that most home users are able to (I cannot reinstall the OS, I cannot hack the BIOS, I cannot add special bootloaders and so on). Software: Windows 8.1 64-bit Enterprise installed on a GPT (UEFI) partition (No BIOS mods or any bootloaders added, as this is an enterprise managed system and I cannot do these things). Hardware: Laptop: HP ZBook 15 G2 CPU: Intel Core i7 4810MQ iGPU: Intel HD4600 dGPU: nVidia Quadro K2100M (2Gb GDDR5) RAM: 2x8Gb DDR3 1600Mhz SSD: Intel Pro 2500 480Gb (Disk encryption enabled) External Monitor: Samsung 2333T (via HDMI to DVI cable) eGPU Enclosure: AKiTiO Thunder2 eGPUs Tested: Sapphire HD6570 (1Gb GDDR3) [Initial Testing] Gigabyte Low Profile GTX750Ti (2Gb GDDR5) [Final Setup] Setup Choice Thought Process: 1) I have opted to not modify the Thunder2 enclosure in order to not void my warranty. This constrained me to sub-75W video cards. As a result I chose the GeForce GTX750Ti as the best candidate. I picked the low-profile Gigabyte because it was the cheapest GTX750Ti available locally (go figure). 2) The 60W adapter included with the Thunder2 would not be sufficient to power my video card at full load, so I would need an improved power delivery method. 3) I wanted a compact, aesthetic, mobile, plug and play setup (or at least as plug and play as possible). This meant that running an open enclosure or an ATX PSU was not an option. 4) Thankfully, I found out that the Thunder2 can accommodate a 75W card if it is provided with a better power-brick (source) and I also realized that the Dell-branded power-brick from my previous Expresscard setup (on my previous Lenovo X230 work laptop) has the same barrel plug and the same output voltage, but with a higher wattage. Installation Instructions: 1) Install the video card into the Thunder2 enclosure and connect the enclosure to its power source. 2) Power off the laptop. 3) Connect the external monitor to the eGPU's video outputs. 4) Connect the Thunder2 to the laptop via the Thunderbolt2 cable. 5) Power up the laptop and boot to windows. Note: During the initial setup, windows detected and installed the eGPU drivers automatically. 6) Either the eGPU is immediately functional, or the driver will fail to load with a Code 12. 7) In the case of a Code 12, disable the eGPU in the device manager, enable it again and reboot the system when prompted by windows. 8) When the system boots up again, the eGPU will be fully functional, as will be the iGPU and dGPU. Note 1: The Code 12 mentioned above only happens (and not always) once per docking. If the laptop shuts down (or reboots) with the eGPU connected and is powered up again with the eGPU still connected, then the Code 12 issue will never occur. It will only appear occasionally on the first docked boot after the laptop was used without the eGPU attached. The above mentioned solution works without fail, however. Note 2: Note that I only connect/disconnect the eGPU only when the laptop is off since this satisfies my use cases - I did not yet try "true" plug and play. Since I use the laptop docked at home and without the eGPU on the road and I do not hibernate (or sleep) my machine, I never ran into the case where I needed to connect or disconnect the eGPU with the machine powered up. Note 3: I prefer to use an external monitor as my main one so I have no need to run the internal monitor off the eGPU and I did not try to get this to work. Note 4: When booting without the eGPU for the first time after disconnecting the dock, sometimes the laptop would do a double POST (the HP logo would appear, disappear, then reappear, then the windows boot will commence). This has no ill effect (other than adding a couple of seconds to the boot time). Consequent boots without the eGPU are not affected (until you dock and undock again at some later point in time). Note 5: Dynamic PCIe link speed is working. So when the eGPU is under low load, it will drop its PCIe link speed to x4 1.1 instead of x4 2.0. You will see this happen in the attached GPU-Z screenshot. It ramps up back to x4 2.0 when the eGPU is loaded. Note 6: I did not perform synthetic benchmarking at this time. I did confirm the eGPU works, however: I played Borderlands and Cities: Skylines at max graphical settings at 1080p and tracked eGPU clock rates, PCIe link speed and eGPU load and memory use. All seems to be in order and the eGPU is being properly utilized. Note 7: I was able to direct all PhysX processing to the dGPU K2100M in the nVidia control panel. Not that I really play anything with PhysX enabled, but the option was available. See next post. Note 8: The fan in the Thunder2 is incredibly annoying. It is noisy as hell and is audible even at a reasonable distance. Since the GTX750Ti is a very cool running card, I have tried removing the fan from the enclosure. The setup is much quieter, but the temps rise under prolonged loads, reaching a top of 81C. It isn't horrible, but that would kill pretty much any OC room I might have, so I have reinstalled the enclosure fan. Note 9: Another way to get rid of the Code 12 issue on docking is to power up without the Thunderbolt cable connected, stop the laptop's boot at the BIOS menu (hitting ESC on boot), connect the Thunderbolt cable, then choose the boot drive. When booting to Windows the eGPU is properly accommodated and the Code 12 does not appear.
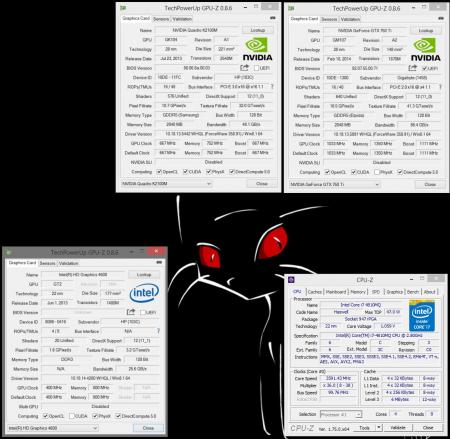
-
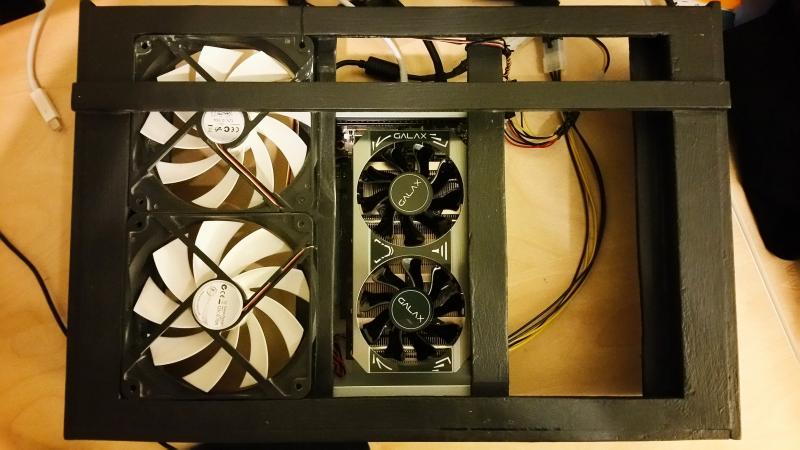
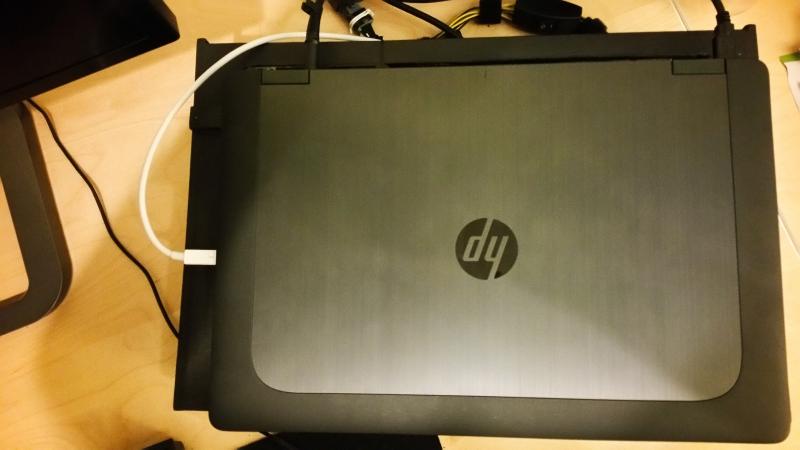
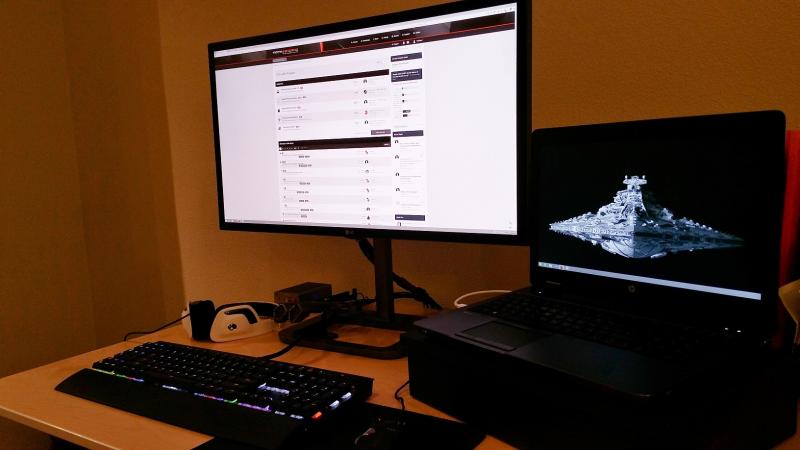
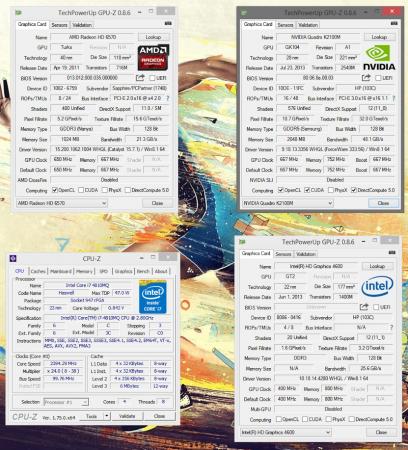
This is essentially an upgrade of my previous setup from a Gigabyte GTX750Ti 2GB to a Galax GTX960 4GB that was available on clearance for 94$ about a week ago. The Galax GTX960 Mini (but not the EXOC) fits inside the Akitio if you remove the front fan, which in my case is immaterial because I am using the enclosure open, on its side, and using it as a base for my homebuilt laptop cooling pad so that fan was blocked anyway. It takes a single 6-pin power plug which meant that I needed to replace my 180W barrel-plug power supply with something that could feed an extra power connector. The power solution is the ubiquitous 220W Dell DA-2 for 10$ off ebay: I split the connector with a 6-pin PCIe splitter and then soldered a power switch between the sense contact and one of the grounds. That lets me power it up and down easily and avoids paperclips. One of the 6-pin connectors goes into the PCIe 6-pin power on the video card, while the other was split into a 4-pin ATX plug (like the ones used for CPU power on a desktop motherboard) and a regular molex connector that has an independent power switch. The molex is used to power up the fans in the cooling pad (hence the separate power switch for when that is not needed) while the 4-pin connector powers the barrel plug (which has a 4-pin female connector to match). Laptop: HP ZBook 15 G2 Core i7 4810MQ 16 GB DDR3 1600Mhz RAM Intel Pro 2500 480GB SSD nVidia Quadro K2100M 2GB GDDR5 dGPU (Note: The iGPU is disabled in the BIOS) Windows 8.1 Enterprise 64-bit eGPU and External Monitor (I do not run the eGPU with output on the internal screen): Galax GTX960 OC Mini 4GB Dell DA-2 220W PSU Akitio Thunder 2 0.5m Apple Thunderbolt cable LG 31MU97-B (4096x2160) monitor connected to the eGPU via Displayport Setup: As stated in my previous build: This is my work laptop. As a result, I cannot fiddle with boot loaders, replace operating systems and in general I am under the constraints of the whims of the IT department. I suspect that Win10 would be a lot easier to work with here, but alas I cannot upgrade past 8.1, at least for now. This results in the following procedure to get this working once I get home from work. Note that I have the iGPU disabled in the BIOS, as it was giving me some trouble. It is a lot easier to work with just the nVidia driver, as opposed to both the Intel one and the nVidia one. If the laptop is powered off: 1) Connect the Akitio's Thunderbolt cable to the laptop. 2) Power up the Akitio via the DA-2's power switch that I added. 3) Boot up the laptop and log into windows. 4) Either the eGPU will work, or it won't be recognized, or it will be recognized but the external monitor connected to it won't be detected, or it will Code 12. i) If it works: All is great. Enjoy! ii) If it is not recognized: Reboot the laptop, it will work after the reboot. iii) If it is recognized, but the external monitor is not detected: Reboot the laptop, it will work after the reboot. iv) If you get a code 12, then open up the Device Manager, right-click the eGPU and choose "Disable". Then right-click it again and choose "Enable". Windows will prompt you for a reboot and everything will work perfectly after the reboot. If the laptop is on: 1) Power up the Akitio. 2) Connect the Thunderbolt cable to the laptop. 3) Either the eGPU will work, or it will Code 12. 4) If it works, great. If it Code 12s, do the disable-enable trick I described in the "If the laptop is powered off" step 4.iv and reboot. I did not run into Code 43s or any other issues. Removing the eGPU while the laptop is powered up is possible if you disable it in the Device Manager first (since I don't have Windows 10, I don't have the neat nVidia tool to do it directly). Removing the eGPU cable without disabling the device first will lead to an immediate BSoD. The image below shows a view from the top of my cooling pad with the open Akitio at its base. The two fans on the left blow up into the laptop's cooler intakes. The Akitio's floor serves to separate them from the downward airflow from the video card's fans. You can see some of the cabling, but there is a better photograph of the cables in the next post. This is the laptop on top of the cooling pad. The screen is closed and you can see the three cables I need to connect to get all my peripherals working once docked: The Thunderbolt cable (white), the laptop's charger at the top left and the USB3.0 cable leading to the USB3.0 hub in the monitor at the top right. I apologize for the poor lighting, but here you can see the whole setup. The K2100M runs the laptop's internal display, while the GTX960 runs the external one. The laptop sits on top of the cooling pad/eGPU assembly.