Search the Community
Showing results for tags 'aspire'.
-
Hello, I want to share the modded Bios I created for the Acer Aspire E5-572G notebook. The official bios 1.09 was used as a base. I'm offering three flavours: Microcode 01, Microcode 07 and Microcode 21. Microcode 21 is the latest available microcode, this is the Bios you want to use unless you want the special properties of the other microcodes. Microcode 07 is the latest microcode that allows using the full turbo clock speed on all cores (using single core turbo with all cores). Microcode 01 is the one you should take if you want to try this. I wasn't able to get it to work on mine (i5 4210m, HM86), but your mileage may vary. In case you want to always use an older microcode, I'm offering a script for windows that'll keep the OS from using a newer microcode (compatible with Windows Vista to Windows 10). Frequency and other things can be set up with ThrottleStop (use the latest version). I've also included an overclocking enabled ME firmware that should (hopefully) allow overclocking on the HM87 equipped notebooks. There are two flavours of this notebook available: Ones that use the HM87 chipset and others that use the HM86 chipset. Overclocking is only possible with HM87 as HM86 isn't capable of overclocking (tested it myself). Additionally I offer a collection of Bios, EC, ME and FD files of this device, in case anyone wants to experiment with these for a bit (EC Modding, etc.). I will update this bios in case there are newer parts available. Any feedback is welcome! Features: -Advanced Bios Options unlocked (Advanced, Power tabs and additional options in the existing tabs) -Nvidia 840M/940M VBioses replaced with adapted 940MX VBios with unlocked TDP Limit, unlocked Boost Table and some OC (1306,5MHz GPU/1070MHz Memory - with general usability in mind) + all voltage sliders unlocked -Intel Management Engine: Updated to 9.1.37.1002 + All Locks Unlocked + Overclocking Enabled For HM87 Notebooks + PAVP (Protected Audio/Video Path) Enabled -Flash Descriptor unlocked -Microcode updated to version 21 (respectively downgraded to 07 and 01) -Intel GOP Driver updated to 5.5.1033 -Intel VGA Bios updated to 1042 -Intel RST OROMs updated to 15.1.0.2545 -Realtek Lan OROMs updated to 2.037/2.64 -Applied a few useful BIOS patches by CodeRush (Unlock CPU Power Management Register (useful for Hackintosh Users)/Disable BIOS Lock/Disable SMI Lock) Flash procedure: 1. Copy the BIOS file to an empty and with FAT16/32 formatted usb stick. 2. Unplug the AC adapter. 3. Remove the battery of the notebook - you can unlock the battery on the backside. 4. Plug in the USB flash disk. 5. Press and hold <Fn> and <Esc>, and then plug in the AC adapter while still holding <Fn> and <Esc>. 6. Press the Power button. You can now stop holding <Fn> and <Esc>. 7. The BIOS flash should now begin, the fans will spin up at max speed and the power led should blink. It should take between one to two minutes. 8. After everything is done, you can reinsert the battery and go to the BIOS (F2). There you may want to change some settings (the BIOS flash erases all previously chosen settings). Recommended Bios settings: Main: F12 Boot Menu ---> Enabled D2D Recovery ---> Disabled Advanced: Boot Configuration: Numlock ---> On Thermal Configuration: Cpu Thermal Configuration: Bi-Directional PROCHOT# ---> Disabled Chipset Configuration: RTC Lock ---> Disabled Chipset Configuration: IFR Update ---> Disabled Chipset Configuration: BIOS Lock ---> Disabled ACPI Table/Features Control: TCO WatchDog Support ---> Enabled ACPI Table/Features Control: WatchDog ACPI Table ---> Enabled ACPI Table/Features Control: ACPI Memory Debug ---> Disabled ACPI Table/Features Control: PEP Graphics ---> Disabled Extended ICC: Use WatchDog Timer For ICC ---> Enabled Extended ICC: ICC Locks after EOP ---> All Unlocked Security: User Access Level ---> Full Power: Wake on LAN ---> Disabled Advanced CPU Control: xAPIC Mode ---> Enabled Advanced CPU Control: Package C-State Demotion ---> Enabled Advanced CPU Control: Package C-State Un-Demotion ---> Enabled Advanced CPU Control: ACPI 5.0 CPPC Support ---> Enabled Advanced CPU Control: ACPI 5.0 CPPC Platform SCI ---> Enabled Advanced CPU Control: Package Power Limit MSR Lock ---> Disabled Advanced CPU Control: Long Term Power Limit Override ---> Enabled Advanced CPU Control: Long Term Time Window ---> 128 Module names (for replacement/update): GOP Driver: 7755CA7B-CA8F-43C5-889B-E1F59A93D575_256.ROM Intel RST: 382F560D-17A9-4887-BD9C-EB439C1CC482_1654.ROM and 501737AB-9D1A-4856-86D3-7F1287FA5A55_1781.ROM Intel VGA Bios: 8DFAE5D4-B50E-4C10-96E6-F2C266CACBB6_1743.ROM Nvidia 840M VBios: D336DBCB-33C1-4D15-A06F-C3FF405C6A68_1749.ROM Nvidia 940M VBios: C09F4207-D557-47D0-A4B5-1E4B6459E519_1761.ROM Realtek LAN: 0A33D14A-7B60-4C58-9194-DED0812F9B2B_1767.ROM and E8991F69-D813-4116-A2C2-61E304ECBD72_1533.ROM Intel Microcode (integrated in file): PADDING_2702.ROM Management Engine: Integrated in BIOS image, HEX Editor needed for replacement Credits: -Donovan6000 for his very helpful guides and insights on Insyde bios modding -Andy P whose PhoenixTool I used to replace the modules -Plutomaniac for providing the used Intel ME firmware and the Intel ME System Tools to properly configure it for this notebook -Ultrax5 from TechInferno for providing his OC enabled ME firmware for 8-series systems which I used as a reference to unlock the feature for this notebook -SoniX for his Intel VGA Bios update guide and the OROM, Microcode and Intel VGA Bios database he maintains -Pacman for sharing the latest Intel RST 15.1.0.2545 OROMs -CodeRush for providing the included BIOS patches -WerePug from overclock.net for providing the way to unlock the Nvidia VBIOS voltage sliders for editing in Maxwell II BIOS Tweaker -The author of the Maxwell II BIOS Tweaker which I used for editing the Nvidia VBioses -All the other people who shared the used OROMs/Microcodes/Firmwares/Useful Information etc. Changelog: -13.09.16: 1.09a - Initial release -03.10.16: 1.09b: Unlocked a few more options that I missed before - everything that can be unlocked should be available now Overclocking enabled ME is now included by default (no disadvantages for HM86 notebooks) Applied a few useful BIOS patches by CodeRush (Unlock CPU Power Management Register (useful for Hackintosh Users)/Disable BIOS Lock/Disable SMI Lock) -22.10.16: 1.09c: Changed Nvidia GPU idle voltage from 0,94V to a more correct value of 0,76V - thanks to Maison1 from win-raid.com for bringing this matter to my attention Unlocked all sliders in the Nvidia VBIOSes for editing with Maxwell II BIOS Tweaker - thanks to WerePug from overclock.net for posting the way to do this Files: Acer Aspire E5-572G - BIOS 1.09c - Microcode 01 Acer Aspire E5-572G - BIOS 1.09c - Microcode 07 Acer Aspire E5-572G - BIOS 1.09c - Microcode 21 DeleteMicrocode Script for Windows Acer Aspire E5-572G BIOS-ME-EC-FD Collection
-
Hi ! First of all, thank you for all the informations posted around the forum and to this great community ! So, here is my succesful setup : Notebook 15" Acer Aspire 5750G Intel Core i5-2450M 15.6" HD LED LCD 8 GB DDR3 RAM Windows 7 64bit Nvidia GeForce GT 630M (dGPU) Intel HD Graphics 3000 (iGPU) Gygabite Windforce GTX 750 TI OC2 2GB DDR5 RAM (eGPU) PE4C-PM060A V3.0 Gen3 (mPCIe) Segotep SG-D600 (ATX power supply) eGPU Setup 1.3 (Tech Inferno Fan) Some pictures first to show the hardware setup : http://postimg.org/gallery/i20gkbj6/ Hardware installation was easy. TIP : Although a great adapter build, DO NOT force cables, slots etc... Have patience ! As you can see in the pictures, I had some trouble : cable direction is right towards mouse I had to cut a piece from my laptop to make room around mPCIe slot improvised higher stand for laptop to make room for the cable did not figure out how to make a confortable DYI case, yet eGPU setup 1.3 : check all hardaware is connected and ATX is set ON boot into BIOS > set video from "switchable" to "integrated" reboot boot into DYI Setup 1.3 choose 3rd option with menu-based startup.bat > Reset Chainloader > use mbr PCIe ports > hot reset port > nvidia PCIe ports > Gen2 link > nvidia (you should see a change in the right table : the alloc size goes from 128 to 512) PCIe compactation > endpoint > 56 25GB 36bit PCIe compactation > Run compact > eGPU > none startup.bat > test run chainloader > test run > win7 Benchmark : internal display used CPU hyperthreading enabled 3dmark might be inaccurate due to the warning from pictures GPU-z confirms x2 link speed Currently I play WOT, GTA 5 and they work flawless with at least high settings All in all, it does the trick and I am very satisfied with it. Most important, Acer temperature problem disappeared. On load, now I have max 55 Celsius on CPU and 44 Celsius on eGPU. Good luck ! Last edit : Just some update on what I have noticed. 1. On every boot you should : go to DYI eGPU Setup choose "menu-based" option PCIe ports > Gen2 link > nvidia (you should see a change in the right table : the alloc size goes from 128 to 512) startup.bat > test run chainloader > test run > win7 I always open Device Manager and GPU-Z to see if any problems occur I do this because the gen 2 link retraining is neccesary every time. 2. Sometimes my laptop kind of "forgets" about the eGPU. Not sure why, but rarely happens. To check if eGPU is still functional do this : check Device Manager for any problems on display open GPU-Z you might notice some of the options/informations are grayed out if so, go to Device Manager and disable/enable eGPU display.
-
This is my first topic here at techinferno so hopefully i'm doing this right. I'm from Sweden and my native language is not English so bare with me please. I have a; Acer Aspire v3-571g-7363161 S/N NXM7EED0023041284B3400 intel i7-3632QM @2.2 ghz Intel HM77 Express Chipset Nvidia Gforce 730m 16gb RAM I would like to upgrade my GPU. The only game i need it for is CS:GO and i want to play this game with good quality. I also do some CAD work professionally but since the computer is working fine for this today i don't really need to upgrade it for this reason. I like the computer in all aspects but the GPU and that's why i want to upgrade it instead of getting a new one. I also really like the idea of beeping able to upgrade a laptop. After some research i have found that the easiest way to do this is to disconnect the wifi to plug the egpu in there. Is this correct? As i like to use the WiFi in the future i would need to have the wifi from somewhere else. If i were to use a wifi usb stick, do i loose a lot of performance? The Wifi is connected trough a PCI Express? Is this a 2.0 or 3.0? Does this matter? Is there a limit in the bandwidth that will affect the performance? I'm looking at a Nvidia Gforce 960, is this overkill or will i be able to use the power in the card? Do you have any tips or ideas of what eGPU adapter i should get? I'm quite comfortable to shrew the laptop into pieces, i have done so a couple of times to clean it from dust. As it was a while ago i don't remember hos the dGPU (730m) was connected. Is there a way a can connect my egpu to where the dgpu is today? if so, is there any pros and cons i should know of? Do you think this is worth doing? Will a be able to use the computer as a laptop and simply disconnect the Egpu in the future if i connect it trough the PCI port? I have seen some video tutorials of this, but as i'm eager to learn more please don't hesitate to provide me with links! If someone has any other ideas of how to upgrade this laptop i'm up for any ideas. I probably have about 100000 more questions, but i'll leave it for now. Best regards Martin
-
Hi Guys, I hope I'm posting this in the right section and yes, I used Google, the search function and the troubleshooting guide. I'm trying to get an eGPU setup up&running but I encountered some major problems. First of all, here are the specs for the hardware: Laptop: Acer Aspire V3-772G CPU: Intel Core i7-4702MQ, 2.2GHz - 3.2GHz boost dGPU: Nvidia Geforce GTX 760m RAM: 16GB DDR3 eGPU: PE4C-PM060A V3.0 (via mPIC-E) http://www.bplus.com.tw/Adapter/PE4C%20V3.0.html PSU: Cooler Master B600 Ver.2 - 600W/+12V/PCI-E GPU: MSI Geforce GTX 970 4G - 4GB vRAM I don't really know where to start, so lets begin how everything is connected. The Acer-Aspirve V3-772G has 2 mPCI-E Slots. Both were previously occupied (SSD MMC, and an Wifi-Bluetooth card in the half/small port). I tried the following steps on both mPCI-E slots without any changes. For the first try, I just removed my WIFI card and connected the PE4C to my laptop. Next I inserted the new GPU and connected the power from the PSU (1x24p ATX directly from PSU to PE4C, 1x6pin and 1x8pin from the 6/8p output from PE4C to the graphics card). On the first boot, nothing happened, the screen stayed black but the gpu-fans started spinning and the status-leds switchted to green, so I tried different troubleshooting steps. Summary: Different boot-delay settings for the eGPU - made no difference, the screen stay always black (no signal) but it seemed to result in different fan-speeds on the gpu My next steps seemed to work at first, because the GPU-fans started spinning really fast, without any crashes or "not working display". But in every case, neither the GPU or the PE4C could be detected by windows. Turn eGPU ON when windows initializes Turn eGPU ON after standby (booting with eGPU OFF) Hot-Swap WIFI and eGPU (from standby - with and without wifi card on boot) After this, I completly removed the nvidia drivers (for mobile) and deactivated the dGPU via device-manager and repeated the above steps (hot swapping...) but with the same results. Either it halts on boot with "no signal" or it doesnt get detected at all. After further research, my next guess was that the dGPU messes with the eGPU on startup, so I bought eGPU Setup 1.30 After making a USB-Bootable drive, I booted the setup "with menu" First, I booted with the Wifi-Card, wich worked fine (detected) and gave me the pcie port, where my eGPU should be setup. After this I continued with the previous steps (turn egpu on at boot, in menu, hotswapping...) With each variant, (after disabling the dGPU) I tried to initialize , reset, deactivate/activate the correspondent pcie port - including different gen setups. The result stayed the same as in Windows, the eGPU won't get detected in eGPU Setup 1.30 (the pciport shows nothing after his id -> pci3 1.2x: ) Now I am out of ideas and wonder if I am just doing something completly wrong or the eGPU Adapter is simply not working with my laptop. Of course I researched before buying the equipment... which should work fine with my laptop... I also can refund my GPU (today or monday) but would prefer not to I appreciate every helping hand, who can give me a clue how to fix this. cheers, d00t3y
- 10 replies
-
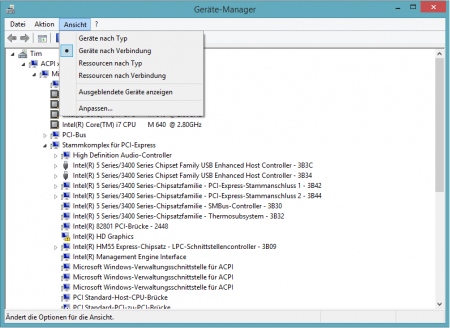
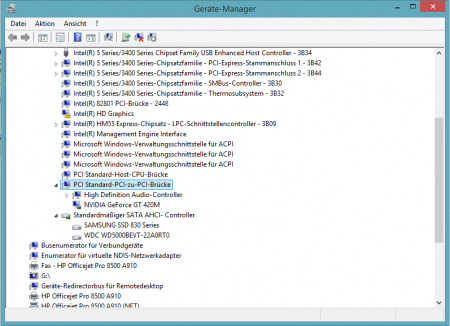
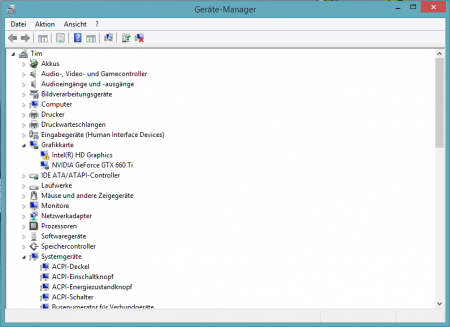
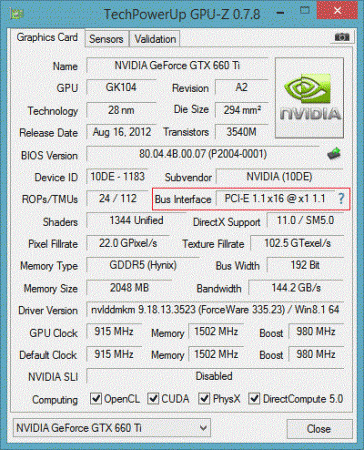
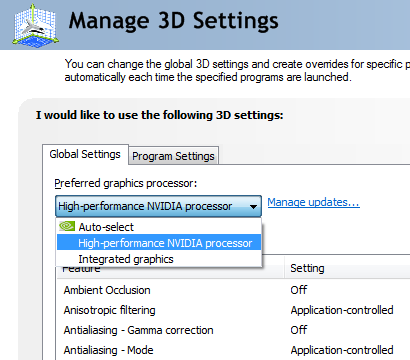
masterblaster 2.0 comment>> This is the first Windows 8.x implementation where a dormant iGPU was activated to enable x1.Opt (x1 pci-e compression) on a 1st gen i-core (dual core) system supplied by the manufacturer with a dGPU only. First I want to say thank you for Tech Inferno Fan for his huge help the whole project and I want to apologize for my bad english. I'm from Germany and still a student so be surprised A long time ago I saw a video with an graphics card running external connect to an notebook. I always thought about doing this by myself and one day I decided to order an eGPU adapter and the graphics card. First the specs of my notebook: Model: Acer Aspire 5742G CPU: i7-640m (upgraded from an i3-370m) with dormant Intel HD iGPU not connect to LCD GPU: Nvidia GeForce GT420m dGPU only RAM: 8GB DDR3 So now we are getting to the things you need: free mPCI slot (unfortunately the Aspire 5742G has only one slot, so you need to remove the Wifi-Card. In my sitution no problem because I'm using lan either way.) PCIe -> mPCIe adapter (PE4L, PE4H or what I used the PE4C) A GPU of your choice (I chose a Nvidia GeForce GTX660Ti) A PSU that has enough power (I used an PSU with 550W found in the basement) Setup 1.x (buy it from Tech Inferno Fan for 25$) -> it's necessary, without you wouldn't be able to run the eGPU A case or something to store you eGPU + GPU (not necessary, but looks tidier) Windows 8.x (I wasn't successful with Win 7. If you want to know more about it, you can read more here.) External Display -> internal isn't working because the dGPU is disabled and the iGPU isn't connected to the LCD Some explanations: The biggest problem about the whole process is that the Aspire 5742G has a iGPU but it's not connect to the LCD and even if you have enabled it via Setup 1.x you are always getting Error 43 in device-manager. As seen on the screen here. So the point is to enable the iGPU and disable the dGPU under Win8.x to get a working x1.Opt setup. The way of just disabling the dGPU via Setup 1.x is ending up in freezing and you have to restart the notebook. So I tried a lot of things with Tech Inferno Fan. So many things and I was close to just give up all. But then he had the great idea to just disable the PCI port where the dGPU is connected on. And that's the way how it's working Let's get started: 1. You need to buy the Setup 1.x from Tech Inferno Fan. Here you will get more information about it. 2. Install it as mentioned in the email. 3. Then navigate to "C:\eGPU" and run the "eGPU-Setup-mount.bat" batch file to install Setup 1.x. Now you will see a new drive named "DIYEGPUIMG (V:)" 4. Go to "V:\config" and just replace the "startup.bat" with my startup.bat startup.zip. (It's just to make the whole process easier. It's configured by Tech Inferno Fan and optimized by me. So it's easy and fast to boot up.) 5. If you have done this all correctly you should get an option "DIY eGPU Setup 1.30" on startup. (When not make you sure you missed no step or done it wrong.) 6. Select the Setup 1.30 and run the "automated startup" (You are now using the startup.bat you have downlaoded an replaced with the stock.) 7. Some lines will now come up and then you get an message that your eGPU isn't connected. Just power on your eGPU (PSU + PCI adapter. Make sure, the switch shows "ON") and connect the mPCI adapter to your notebook. 8. If done correctly you now should be back in the selection menu where you can select Windows 8.x or the Setup 1.30. Now select Windows 8.x. 9. Windows is booting normal and you should see your desktop. (If not -> make sure you did everything right.) 10. Go to device manager and you will see two new devices. Click on install drivers and wait until it finished. (eGPU driver took about 10 minutes so don't be impatient.) Important: It can happen that you get an bluescreen while installing the iGPU driver. I don't know why, perhaps because it isn't connected to the LCD. When this happens just start at point 6. and go on. 11. Now download the graphics card driver that is compabtile to your graphics card. Uninstall your old driver and install the new one. (You can do this step before starting with the eGPU but I don't think there is any difference in doing this after.) 12. When you have successfully installed your Nvidia driver now it's getting tricky but still such simple 13. Go to device manager and select "devices on connection" (German: "Geräte nach Verbindung") and search where the dGPU is connected on and just disable it. (I got an blackscreen and I needed to restart my laptop via the power button. But it doesn't matter you need to restart your notebook anyway to get fully working x1.Opt Setup. 14. After restart (just like point 6. you can check the device manager and you should only see the "Intel HD Graphics [iGPU] and your video card that you bought. In my situation the GTX660Ti [eGPU]. (If not -> check the steps above.). 15. You should now have a fully working (expect the internal screen isn't working) x1.Opt Setup. You can check this in the Nvidia cobtrol panel by checking if the "High-performance Nvidia processor" is available. Or go to GPU-Z and check it there. 16. At the end you can run 3dMark06 or other benchmark tools to compare your results with others. Or just play a game and enjoy it Here is my 3dMark06 score. With the same notebook you should get similar results. (+/- depends in you graphics card.) Something else to say: There are some downsides of using the eGPU Setup with an Aspire 5742G. I'll list some of my established. Need of removing wifi card You need to plug the eGPU in after running the automated startup. Otherwise you'll running into reboot loop. You are not able to go into sleep mode and wake up successfully (biggest downside for me) You won't get the full graphics power as on an desktop computer If you have any question or you think I forget something - feel free to ask me. startup.zip


