


tunico5
-
Posts
23 -
Joined
-
Last visited
Content Type
Profiles
Forums
Downloads
Posts posted by tunico5
-
-
Sheltoe I'm having some help from nando to do the boot way.
I've already noticed that DIY eGPU 1.1x can't recognize GTX 690 probably because of the 2 GPU's it has inside. GeForce 8500GT it recognized
I'll post the findings here
-
Okay, Iºve done what nando said with his codes, but when I use DIY it says eGPU not found! how can i found the codes i need
-
Okay, can you help me figure it out?
what informations you need me to get?
-
I don't understand why you're saying this
I have a problem that when I install DIY eGPU 1.1x I don't have the \pci.bat
What's the problem?
-
Briefly: i5-3210M 2.5 13" MBP + TH05 + GTX660@x2 2.0 Win8 DIY eGPU implementation
I managed to get my hands on a 2012 13" Macbook Pro which I paired successfully with a TH05 + GTX660 + Win8. I concur the findings of users Shelltoe and oripash - there are two ways of installing Win8 which significantly affect the ease of eGPU use.
The first (UEFI MODE) requires a little more skill to get Win8 loaded initially but the eGPU functionality is plug-and-play thereafter. It's the recommended mode to use. The second (BIOS MODE) is the default Bootcamp 4.0/5.0 method so it's likely users will find themselves in this less desirable mode. More details of both are below:
1. UEFI MODE [recommended]
If install Win8 using oripash's guide http://forum.techinferno.com/diy-e-gpu-projects/2494-macbook-air-11-2012-gtx-660ti-%40-2-2-no-opt.html#post33280 and Teknotronix' http://forum.techinferno.com/diy-e-gpu-projects/2385-17-macbook-pro-late-2011-th05-win-8-setup-guide.html#post31839 then just need to set TH05 SW1=1 (PERST# from PortRidge), SW2=2-3 (x2..x16) . Boot into Win8 where the eGPU will work out of the box. There will be no error 12. It's a plug-and-play configuration.
Unlike Teknotronix, I found no need to use a surrogate system to install the UEFI version of Win8. I could boot the MBP, hit ALT key and select either the Win8 Pro MSDN Installation DVD or USB stick copy of it and perform the installation. Only important point being I had to select the "EFI" DVD or USB stick.
2. BIOS MODE [avoid if possible]
A Bootcamped MBP runs a MBR type partition system. It requires a special sequence to get the eGPU detected. I found Win8 would *always* get an error 12 against the eGPU and if don't get the timing right I could end up with either no eGPU on the PCI BUS or if use the TH05 setting as UEFI mode above (SW1=1), the Macbook will power itself off when trying to boot Win8.
The 100% successful method to get the eGPU on the PCI BUS in this mode is to set SW1=3 (6.9s), SW2=2-3 (x2..x16) on the TH05, poweron the eGPU+TH05, poweron the Macbook. Hit ALT during boot to get a boot selection. Watch the RED PERST# LED on the TH05. When it's no longer red then the eGPU is on the PCI BUS so can select your required OS. It's also possible to flick switch SW1 to SW1=2 (500ms) to hasten the process of getting PERST# to no longer be RED while at the ALT screen or Setup 1.1x screen if the delay is too long for your system. The delay turns out to be more like 30s than 6.9s.
The most convenient fix for the error 12 that will be seen in Windows 8 is:
- Install Setup 1.1x onto a USB stick.
- Configure it's \config\pci.bat to contain a replica of the same configuration UEFI boot uses for the eGPU, captured and translated below:
echo Performing PCI allocation for 2012 MBP (BIOS) matching the UEFI settings . . .
:: The X16 root port
@echo -s 0:1.0 1c.w=6030 20.l=AE90A090 24.l=CDF1AEA1 > setpci.arg
:: Underlying Bridges in order from high to low
@echo -s 4:0.0 1c.w=5131 20.l=AB00A090 24.l=C9F1B801 >> setpci.arg
@echo -s 5:4.0 1c.w=4131 20.l=A700A200 24.l=C5F1B801 >> setpci.arg
@echo -s 8:0.0 04.w=7 1c.w=3131 20.l=A300A200 24.l=C1F1B801 28.l=0 30.w=0 3c.b=10 >> setpci.arg
@echo -s 9:0.0 04.w=7 1c.w=3131 20.l=A300A200 24.l=C1F1B801 28.l=0 30.w=0 3c.b=10 >> setpci.arg
:: The NVidia GTX660
@echo -s a:0.0 04.w=400 0C.b=20 24.w=3F81 10.l=A2000000 14.l=B8000000 1C.l=C0000000 3C.b=10 50.b=1 88.w=140 >> setpci.arg
setpci @setpci.arg
set pci_written=yes@echo off
- Configure the \config\startup.bat to do the pci-e fixups and then chainload to Win8.
call speedup lbacache
:: wait for eGPU to be on the PCI BUS
call vidwait 60 10de:11c0
:: initialize NVidia eGPU
call vidinit -d 10de:11c0
:: Perform the pci-e fixups
call pci
:: Chainload to the MBR
call grub4dos mbr:: Speed up end-to-end runtime of startup.bat using caching
- Confirm this fixes error 12 against the eGPU as it did for me.
Once confirmed to work, streamline this into the more convenient and faster booting disk image install of Setup 1.1x. It's more convenient as you'll no longer need to hit ALT to boot the USB stick. Instead, you'll have a DIY eGPU Setup 1.x Win8 bootitem.
Proceed to copy your \config\pci.bat and \config\startup.bat from your USB stick to the Setup 1.1x disk image V:\config directory as mounted within Win8. The reason can't just use the disk image install for everything is because a Macbook doesn't do the disk mapping correctly so can't be used within the Setup 1.1x pre-boot environment to configure the system. Instead, the USB stick is used for initial configuration and when done, the pertinent configuration files copied across to the disk image for read-only access.
After installing 1.x I dont have the file ~pci.bat
- Install Setup 1.1x onto a USB stick.
-
Okay, I've already done this
Iºve installed Windows 8 too
can you help me do the nando version? All his codes are right for the macbook pro retina 15?? I've noticed that my pc on windwos 8 notices right away my egpu but has the error 12 problem. But at least you can always see the egpu, and it recognizes it as plug and play
-
I'm having a problem now, my windows 8 is crashing and restarting non-stop
I can't install windows 8 on bootcamp and try to get egpu work somehow?
Like the bios mode from nando?
-
Another thing, my internet is not working, even with apple drivers the wifi won't work
-
It shouldn't help to have all the drivers ready? sound and etc?
installation is done
when i reboot and press alt it shows macintosh / recovery / EFI Boot (this means it's all set?)
what the next step?
When I try to get in the win8 it freezes on a black screen and then says it got error and a sad face.
Then It restarts and starts win8
-
Ok, Installing...
After this and before refit I download the bootcamp drivers?
-
Okay, install windows in which place?
I have 4:
partition 1: EFI (probably because of previous try i've done)
partition 2: 558.8 gb (I believe its osx here, i've put it to 600G
partition 3: 619 mb (don't know what this is)
Unnallocated space on unit 0: 140.1 gb (that's the rest of my ssd)
After installing I go to apple and download the bootcamp drivers?
-
That is to size my macintosh hd I already have?
Wouldn't it be easier to size my macintosh hd via diskutility without creating a new partition? Like this:
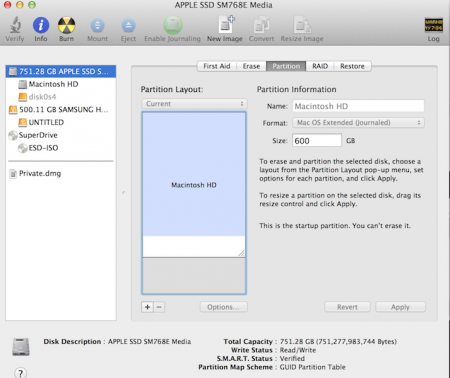
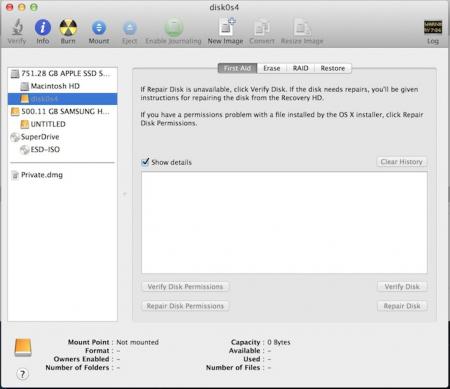
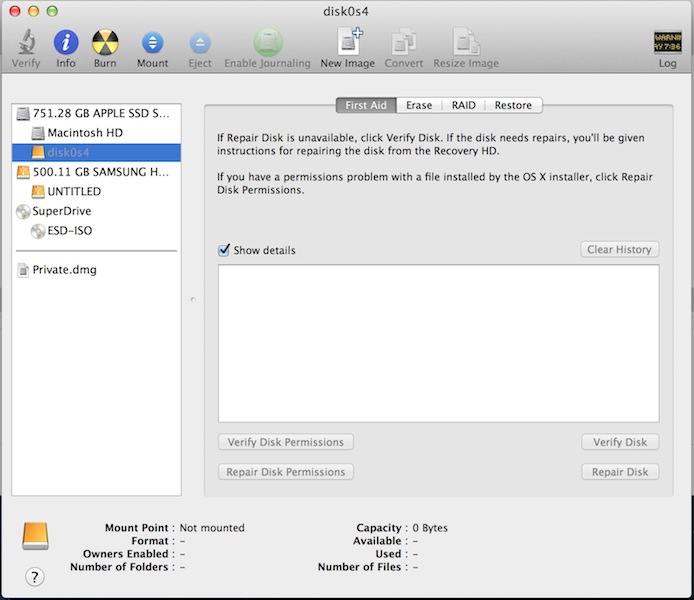
something happened when i deleted my bootcamp via Disk Utility, it showed a disk0s4 in it's place, what I do about this?
And for last, when I need to do the process you mentioned before:
1. Install rEFIt
2. In Mac OS mount the EFI partition using terminal:
3. Create a textfile called "startup.nsh" in it's root:
4. Reboot while eGPU is connected (SW1=1) and select "start EFI-Shell" in rEFIt.
"startup.nsh" launches and Windows 8 starts up with eGPU enabled.
-
I've downloaded win 8 and put it on a dvd
Now I delete the bootcamp (win7) partition from within osx?
-
How did you downloaded from within osx? you don't need to run that program they tell you to download?
And matters the type of windows you get?
And I need an answer about the deleting bootcamp
-
Ok, I'm gonna put here those instructions with my questions in red right next to it.
But before that there's another step that I need help.
In my mac I have 2 partitions: 1. Macintosh HD and 2. BOOTCAMP
I need to know if this is what I need to do:
1. Log in windows 7 on bootcamp
2. Wipe my usb drive using this code:
run command prompt as administrator
> diskpart
> list disk
(check which disk number your USB disk appears as, use it in the next commands)
> select your-usb-disk-number-from-previous-step
> clean
> convert gpt
> create partition primary
> select partition 1
> format quick fs=fat32
> assign
> exit
3. Buy and download Windows 8
4. Put ISO of windows 8 inside that usb drive
5. Go back to Mackintosh HD
6. Delete BOOTCAMP partition along with it's windows 7
-
I've found a good tutorial, is this what I gotta do? http://paullabs.wordpress.com/2012/02/29/windows-8-on-mac/
But instead of step 4 I use your steps of creating an EFI?
I think I understand something now, I need to update my current win 7 to win 8 before the refit right? So these 2 processes are completely separate?
Independently of where or how I have my win 8 on my pc, the code you created "startup.nsh" will work? that's it?
I'm sry for all the questions, but I really want this to work and I've been trying for almost half a year. And I really need all the aswers for all this questions so that I can understand.
-
Why did you need xp vm?? and I can only install it with professional or better version no? I only have home premium
Ok, I download the upgrade and put it in a usb.
But can I get the upgrade using my win 7 home premium?
I'm understanding this:
Download the upgrade, put it on a usb stick and then boot off from it in the efi, right?
But here' the thing, the upgrade only works to upgrade, how I'll install it on nothing? unless the version you download is the FULL, but it needs to confirm first you have the previous windows
Here is another type of question: Using this method you were able to use the screen of the laptop? For that you wouldn't need some kind of Virtu MVP?
-
But how I install win 8 if there's only upgradable to buy?
-
Okay, let's do the Setup 1.x first... I did everything that you said, but in the V: I don't have the file \config\pci.bat
But when i start windows i have the option of windows 7 or DIY
In DIY it says this:
(DRV=C, RAMD=R>RDISK_10-MB. Copy c:\config->R:\config (clobbered USB ctrl p.)
DETECTED dGPU=10de : 0fd5 (NVidia)
CUTEMOUSE v2.1 beta4 [FreeDos]. Error: device not found.
DOSLFN 0.41a (haftmann#software & jmh 1/2012): loaded consuming 11776 bytes.
Invalid Opcode at IDEA 0988 0216 38EE FFFE 021E 3911 1B84 0297 DC8B 0C78 3942 3928
I'm already seeing that windows 8 will be easier to make no?
And how you installed windows 8? there's only upgradable versions
-
Wait, how can I do your way? It seems to work better
what I need to do? I would like, if its not a problem, a step by step help, I really don't understand the technical stuff
If you want me to do nando's way I need to know where is \config\pci.bat
And know if the code he posts there can be used in my macbook pro retina
GTX 690 is SLI because it has 2 gpus inside it
-
Hi there, I have installed on my macbook pro via bootcamp windows 7
In my windows 7 it says MBR
what i do now?
Another question, this will really work? beause I couldn't make my egpu work because of memory space.
And I currently have a GTX 690, I know that I'll use only 30% of its power, but will it work correctly? or I'll need to disable the SLI to work? I can see that I'm gonna be the one to test this^^
Just to check, I have a macbook pro retina 15" 2.7 ghz 16gb ram, that will affect something?
-
Hi there,
I have a macbook pro 15" retina and I'm having trouble trying to do what you guys write. I'm not professional in coding or similar.
I've been trying this for half a year. There's any way you could make a video tutorial or translate the professional steps to easy steps?
Thank You

2012 15" rMBP GT650M + GTX560Ti@8Gbps-TB1 (TH05) + Win8.1 [Shelltoe]
in Implementation Guides - Apple
Posted
If my GTX 690 doesn't work and my GeForce 8500 GT does, which will probably happen, I'll buy a GTX 660 which is relatively cheap compared to 690 and I can use it almost 100% with this generation thunderbolt. With GTX 690 TH05 I'll probably only use 20-30% due to bandwidth.
But even if a normal single GPU graphics card doesn't work I'm gonna have to try EFI again^^, at least until I wait for someone to modify DIY eGPU 1.1x to work with dual GPU cards.
The reason I gave up of EFI was the wireless problem and the system was really slow. That + no sound it made me nervous^^
I'll tell you here if it works.
- - - Updated - - -
And once again I need to thank you for all the assistance you've gave me