


whoa
-
Posts
2 -
Joined
-
Last visited
Content Type
Profiles
Forums
Downloads
Posts posted by whoa
-
-
Hello everyone!
I finally got my eGPU setup working after many endless hours, and decided to write and implementation guide for users struggling with similar setups.
Notebook Details
13" Lenovo Thinkpad Edge E330
i3-3120M 2.5Ghz
HD4000 iGPU
8 GB RAM
Windows 8.1
eGPU Gear
EXP GDC Beast v8.0 eGPU adapter with mPCIe cable lead
450W Corsair CX450M PSU
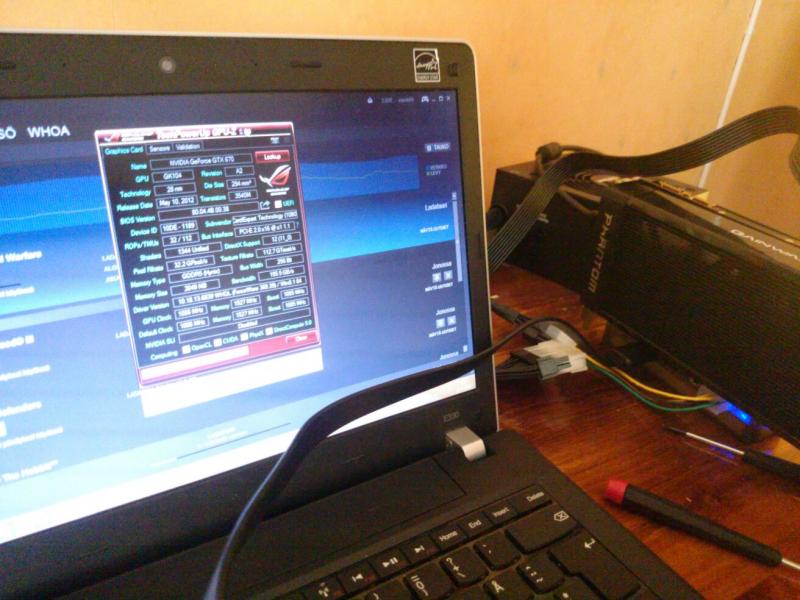
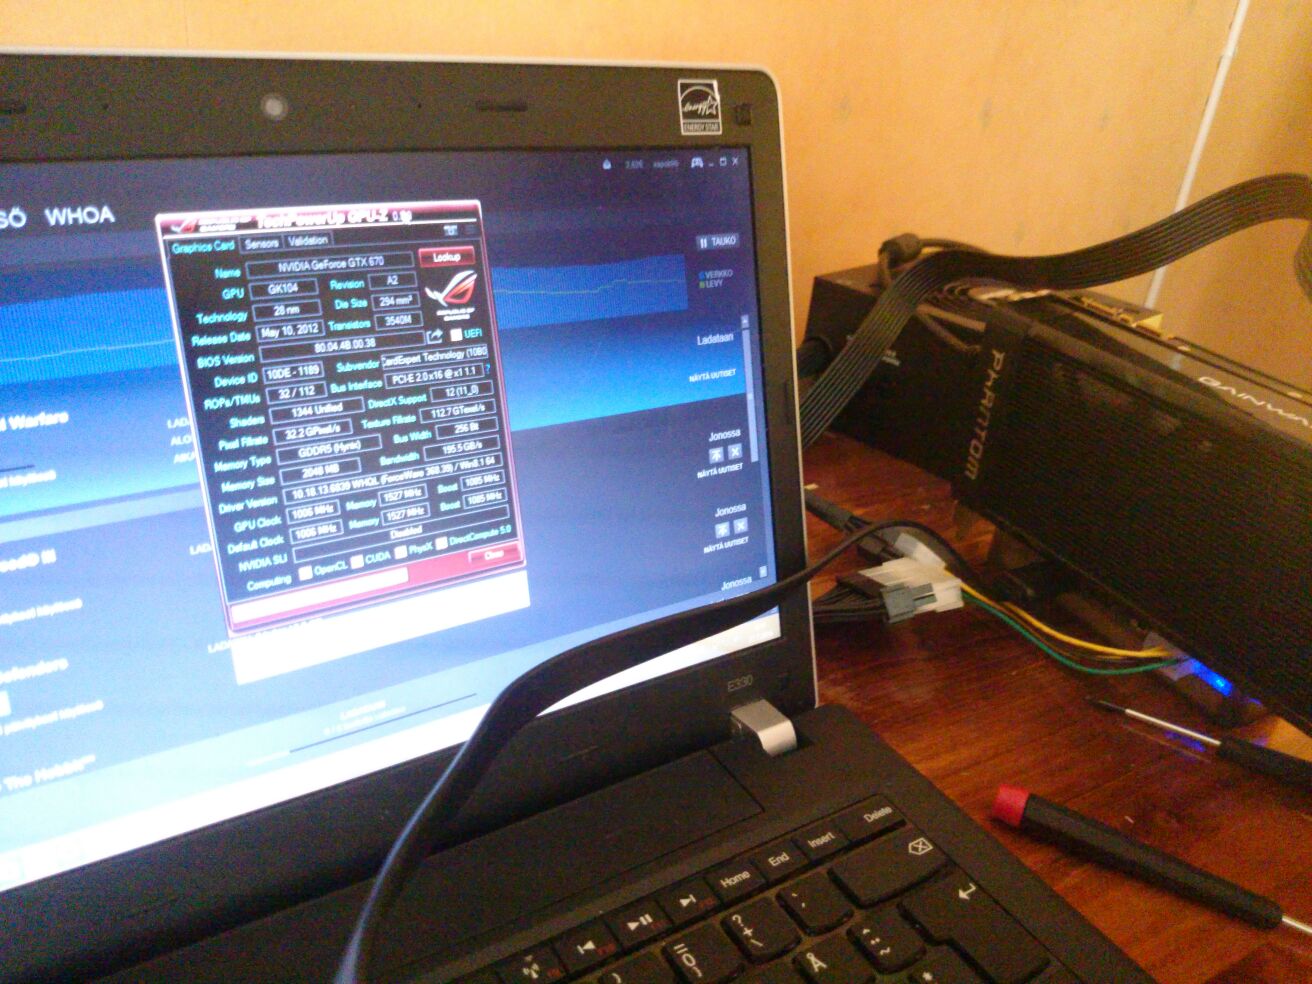
Gainward GTX 670 Phantom edition 2GB GDDR5 225W TDP
Performance Results
will include later
Now for the build itself...
Implementation Guide
As Lenovo Thinkpad Edge's TOLUD is 3,5GB leading to Windows error 12, and Lenovo is well known for using whitelisting, the build might seem like a lost cause. However when there is a will, there will eventually be a way.
1.Error 12
!!! DO A BACKUP FIRST !!!
To overcome the error 12 I followed the guide on this thread:
QuoteGet the 'DSDTEditor-Linux-Mac-Win.7z' here:
(source: olarila.com • View topic - DSDT editor and patcher) I included the asl.exe file required as well to the zip in with the program's folder.
1. Run DSDT Editor.bat
2. File -> Extract DSDT
3. Wait a bit, then click 'Device PCI0' - it should be just after your Processor.
4. Scroll down until you see your DWordMemory stuff, go to the bottom of this list.
5. At the bottom add:
0x0000000000000000, // Granularity
0x0000000C20000000, // Range Minimum
0x0000000E0FFFFFFF, // Range Maximum
0x0000000000000000, // Translation Offset
0x00000001F0000000, // Length
,, , AddressRangeMemory, TypeStatic)QWordMemory (ResourceProducer, PosDecode, MinFixed, MaxFixed, Cacheable, ReadWrite,6. I made it look nice and pretty after pasting that in (made it match).
(These next steps are optional I think, I have no idea if they are necessary, but I did them.)
o1. IASL -> Compile (or hit F5)
o2. Fix errors if you have any.
(Back to important stuff.)
7. File -> Save DSL as..
(I named mine dsdtoverride.dsl - I will use this name for future steps - I would put this file in the DSDT program directory with asl.exe and iasl.exe)
8. Close the DSDT editor.
9. Open up command prompt (maybe as admin? probably a good idea).
10. Go to where you saved your dsdtoverride.dsl (in command prompt).
11. In command prompt run:
iasl dsdtoverride.dsl(Make sure the previous command made a .aml file. It may have made the name as dsdtoverride.aml, but mine was dsdt.aml)
12. Then run
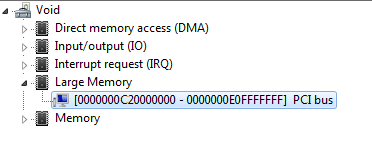
asl /loadtable dsdt.amlReboot and check for a 'Large Memory' section in Device Manager -> Resources by Connection -> Memory
See the official DSDT override post for more info: http://forum.techinferno.com/diy-e-gpu-projects/7476-%5Bguide%5D-dsdt-override-fix-error-12-a.html#post102517
Windows 8.1 and 10 users please note that you have to run the following command as and Admin user in command prompt
bcdedit -set TESTSIGNING ON2.Whitelisting
Now we only have to overcome the whitelisting. The only way to overcome it elegantly is with a bios mod. However you are only able to install bios mod if you have bios version 1.09 or older as Lenovo Thinkpad Edge E330's bioses 1.12-> have EEPROM write protection thus installing a bios mod requires certain flashing device and an skilled user.
As bios modding is a dangerous thing to do, and can lead into a seriously overpriced paperweight (your laptop!!), I myself didn't feel the urge to do it.
I settled for hotswapping: Boot the laptop with whitelisted WIFI card attached > Boot into setup 1.30 menu > hit F5 > carefully remove the WIFI card and attach the eGPU and voila! Setup 1.30 should now detect your eGpu
3.Booting to windows
After succesfully completing a DSDT override, and overcoming the whitelisting, now what is left to do is to boot into Setup 1.30 (using above hotswapping method or not if you have a bios mod) and run a pci compaction 36-bit on eGPU and then chainload to windows and start gaming (YEAHH!!!! THAT'S RIGHT BITHCES)
#OPTIONAL#
(4.Almost forgot)
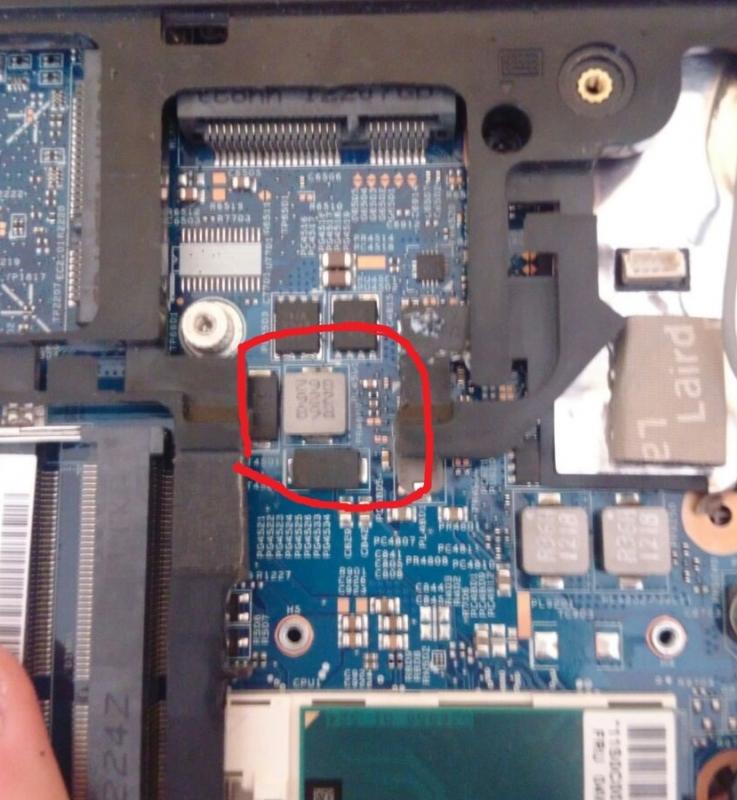
As Lenovo Thinkpad Edge E330 has an half-miniPCIe slot I removed a tiny piece of plastic to make the EXP GDC mPCIe adapter fit better
#OPTIONAL#
I myself got a huge gaming boost out of this and enjoyed doing it, however your mileage may vary...
Thanks to:
@Tech Inferno Fan for setup 1.30 and eGPU threads
@angerthosenear for DSDT override guide
-
 1
1
-


13" Lenovo Edge E330 + GTX670@4Gbps+c-mPCIe2 (EXP GDC 8.0) + Win8.1 [whoa]
in Implementation Guides - PC
Posted · Edited by whoa
@bringmeyoursours sorry for taking so long to answer...
Have you gotten your setup to work already or are you still stuck at the black screen?
If you are still getting only black screen at boot you might want to try solution presented in this thread:
So basically it would look something like this:
(ps. look at how perfect red loop I made in paint WITH MY TRACKPOINT, oh and I totally didn't sped 15 mins on that...)
edit: seems like you had already gotten it to work my bad