


senzazn12
-
Posts
39 -
Joined
-
Last visited
Content Type
Profiles
Forums
Downloads
Posts posted by senzazn12
-
-
lol i am the one currently owning his laptop. the matte screen is legit and non reflect alright. i had to do something about the bezel though. overall great asset to alienware and i'd say its must have compared to reflective display. also, loving his custom bezel alienware logo.
Would you sell it to me? Haha. Sorry so desperate for him to do this mod for me. I pm'd him a few months ago but no reply back. : (
Sent from my iPod touch using Tapatalk
-
Nonsense.
Will upload the revised mod when I get the chance. Trying to catch up on all the stuff.
Sorry I posted in wrong thread. I meant the AW 14 needs solder mod for an unlocked bios. Is that correct?
Sent from my iPod touch using Tapatalk
-
I also could do with a14 unlocked. Anyone can help unlocked a11 vs unlocked a13 vs locked a14
Needs hardware solder mod.
Sent from my iPod touch using Tapatalk
-
yes, below it
Just wondering did you replace thermal pads on the memory and voltage regulators with just thermal paste?
Sent from my iPod touch using Tapatalk
-
must go under the black piece of iron that is screwed with the two screws on top of the sink, open the photo for a better look, the 2 you should clarify all
Oh is the foam packing you put that black little rectangular thing?
Sent from my iPod touch using Tapatalk
-
Svl7 has replied about gtx 880m moded vbios at #3724
Here is what he said:
Sup dudes, busy days... thanks for sharing your vbios copies, really appreciate it!
800m series mods will come. 880m mod is actually ready for quite a while now, those who followed our benchmarks etc are probably aware of that. It's not like we don't like to share, that would be a ridiculous assumption, especially looking at the 600m and 700m series mods, however we have some reasons to relax a bit and wait... can't ask anyone to understand this, but please... some patience would be nice. Also I have hardly seen any 800m benchmark at stock clocks or overclocked with stock vbios so far... yet so many are screaming for a vbios mod. Would be interesting to see what the refreshed cards are capable at stock...
I think all we can do is have patience and wait.
Okay good to know. Patience is key.
Sent from my iPod touch using Tapatalk
-
He doesn't say a specific reason for not releasing it.. And yes I read the whole review
His review:
http://www.techinferno.com/2014/01/31/review-nvidia-gtx-880m/
No idea... Hope he does

Enviado do meu SM-N9005 através de Tapatalk
Why wouldn't it be released?
Sent from my iPod touch using Tapatalk
-
was added on top of the card in order to block the air that goes up the middle and then funneling it all sink in, GPU die only if the air is blocked between the fan and the heat sink, even if 90 degrees is thy hope all automatically
Could you show us a picture of how it was applied? I am still confused. Sorry for my noobness.
Sent from my iPod touch using Tapatalk
-
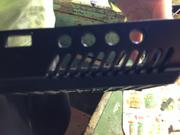
Hi everyone, I recently upgraded my r2 from a 5870 to a 7970, you know how the results are amazing even if it is a machine "old" today I'm going to do it gray / silver, while it warmed up I was looking for some way to turn down the temperature further for the new card, what I have seen and also noticed is that the dispersion of the air does not go 100% in the sink but also the revenue side open very little, this causes to people like me who want to use the pc on bed to overheat even if it is in idle or some light gaming (imperium etc.), the method and fully open the holes;
first:


Removing logos with hot air gun:

Next:


I wanted to paint my alienware also because I got broken in the first slot of the video card, thanks to the fiberglass has adjusted all without leaving a trace;
first:

Next and painted:
then I put a piece of foam packing between the heatsink and the piece that screws on it after this mod I had a cooler 10-15 degrees! , Another thing I did change the pads and thermal paste even just putting on the inductors at the top of the card, removing the pad has a greater pressure on the heat sink and thus lower temperatures, then I removed the aluminum and even under them added to other thermal paste (it is not very useful because you will earn a few degrees):
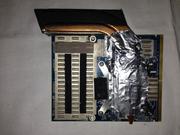


as soon as I finish painting the top part of the perfectly place photo:Banane06:
Im confused where you put foam packing? Did you put on top of the heatsink? I am thinking if you put it between heatsink, than it would have been on GPU die.
Sent from my iPod touch using Tapatalk
-
I have no absolutely no usb stick at hand.
Besides the obvious risks (of system freezes, etc) is there any other reason why I couldn't use nvflash for windows to flash my 780m?
I think thats the main reason.
Sent from my iPod touch using Tapatalk
-
...
Worked great!
Sent from my iPod touch using Tapatalk
-
Plan to do any new Dell 680 2GB vbios update anytime soon?
Sent from my iPod touch using Tapatalk
-
A huge thank you to Svl7 flashed my Dell 680m's instant improvement

What vbios version did you use to give you best results?
Also what is the difference between the first Dell GTX 680M OC Revision Vbios and the last Dell GTX 680M OC Revision on the list? I see there are two besides the OV versions.
Sent from my iPod touch using Tapatalk
-
Did you run NVidia Inspector as an Administrator? Right click NVidia Inspector icon and select 'Run As Administrator': I have to do this in order for the selected clocks & voltages to stick. Don't know what to suggest beyond that.
- - - Updated - - -
If I was you I'd try the vBIOS roms that have the lower voltage, and then see how you go. If you want more performance, and temperatures are ok, then select one with a higher voltage.
What modded vbios you using Robbo?
Sent from my iPod touch using Tapatalk
-
Guys which Dell vbios mod is the most stable and does not throttle a lot? I am using an M17X R2 A10 unlocked bios with a Dell 2GB GTX 680M card.
Sent from my iPod touch using Tapatalk
-
For all you users who modded their Dell 2GB GTX 680M card with one of SLV's modded bios, which VBIOS is the best one to put on the Dell 2GB GTX 680M. I see there are several Dell 2GB GTX 680M modded bios to choose from. Kind of lost on which one I should use. I am using an M17X R2 with the A10 modded bios from the wiz by the way.
-
Would love to see an M11X R4!
Sent from my iPod touch using Tapatalk
-
any recent users of this bios? will it work for all R3s?
It does work on all M11X R3 models.
Sent from my iPod touch using Tapatalk
-
senzazn12, I know you purchased the 4930MX and posted the results on the NotebookReview forum, you might want to post them here for people that are not on both boards.
I know when we discussed the upgrade via the NotebookReview forum my main concern was going to be the increased wattage that the 4930MX requires vs. the 4700/4900 that comes stock in the AW14.
Did you have to go with a higher wattage power supply, or were you able to still use the stock? and, have you tried running on just battery to see how it performs?
Temp wise it is okay during video rendering but not sure about high benching tests which I don't do.
Im using a modded 330W adapter for the AW 14 and had to use the new ThrottleStop adaptive voltage feature to avoid getting BSODs. I was using XTU to increase my voltage on the i7 4930MX but ThrottleStop seems more stable to me.
Running it on the stock adapter is fine too. I was able to run at 4.3 GHZ with the stock adapter with the GTX 765 not over clocked.
It does create a little more heat at stock but nothing drastic. I do have modded cooling gear to keep it cool. Also I can always lessen the heat by reducing multiplier if I need to if I am out in about.
Sent from my iPod touch using Tapatalk
-
What's unclear? It's really simple:
1. backup
2. flash
3. reboot
Never mind got it to work!
Successfully flashed my GTX 765M on AW 14 with your modded vbios. Thank you.Sent from my iPod touch using Tapatalk
-
What's unclear? It's really simple:
1. backup
2. flash
3. reboot
Just the inbetween stuff. So I'm looking at the NVFlash folder and was wondering which files are supposed to go to into the USB. Is it supposed to be these two files? These are the two files in the NVflash folder. It is NVFLASH and CWSDPMI. Also the rom I want to use is this. Dell 765m (AW14) - 80.06.64.00.01_OCs.ROM. I know this would have to be in the USB too but I would need to rename the file correct? When I do backup flash, do I literally type "filename" or does it have to be the name of the stock bios? Sorry if I'm not getting it. I just really would prefer to see a video tutorial.
-
Can someone post a video tutorial of this or try to express in simpler form the process? Would really appreciate it?
Sent from my iPod touch using Tapatalk
-
Hello folks. I just recently acquired a Dell Alienware 14 (Haswell 2013 model) and it is working great. It currently has the i7 4700 MQ and I was offered to purchase an i7 4930MX CPU for $600.00. I was wondering would the i7 4930MX CPU be compatible with my Alienware 14 motherboard and bios? Does anybody know if the i7 4700 MQ CPU is not soldered and is socketed on the Alienware 14 to do any CPU upgrades and if anyone can provide me with a list of compatible CPU upgrades to the Dell Alienware 14? I plan to have it installed at a computer tech place. Unfortunately they don't know the answer to my question about the CPU upgrade. All they know is how to install the CPU onto the motherboard. Any insight on this would be grateful.
-
I am curious. How did you overclock the BCLK to 104.5? Could you please let me know? What is the max limit you raised the BCLK on your system and was it stable?
I was able to overclock the BCLK from 99 to about 105 on my i7 2617 using Intel XTU after installing the modified bios. Granted, it is only a small boost but it has helped in shaving off some time in video rendering.


Temperature of 780m in clevo SM series
in Clevo
Posted
Do you sand the gpu die or the heatsink copper contact?