Search the Community
Showing results for tags 'overheating'.
Found 12 results
-
 Hey guys, first post, but I thought I’d discuss my heatsink fan retrofit in my old M14x r1. Old fan was loud and not very efficient: the air transfer rate was around 2 cfm (I’m assuming cubic feet per minute). Finally had enough and decided to swap out the crappy r1 fan/coughing pinwheel for a r2 fan (rated at 10.4cfm). I found an old r2 heat sink on eBay (beware though that the heat sink for the r2 will NOT fit the gpu/cpu configuration for the r1. HOWEVER, the fan of the r2 heat sink it is attached to is a carbon copy fit into the r1 MoBo. A few philips head screws and a seal of good electric tape and BAM, you’ve got a significantly cooler and MUCH quieter intake fan in your old R1. My CPU temps from before were around 87-88 max load in FSX, 65 for the GPU; bear in mind this is after a repaste. Now with the new fan, I’m not going over 77 degrees on the CPU, and the gpu stays around 58, all while being MUCH quiter. I’ll post pics of the walkthrough if anyone is interested. Just thought I’d share with all you fellow loonies trying to squeeze every last frame and degree out of our “portable toaster ovens with a screen and keyboard”.
 -
I have tried the following and my laptop still shuts off randomly when playing games: 1. I have already cleaned the fans and parts from dust 2. I have already put brand new Thermal Grease (I followed the recommend amount found on this picture) THINGS I NOTICED: 1. In Safe mode, my laptop does not shutdown randomly 2. My BIOS VERSION : 04.06.05 3. My Core Temps (After Long Use) 4. Hot Air blowing out of the back exhaust[on the right side] after few minutes of start up (idle) SHOULD I UPDATE THE BIOS to this: http://forum.techinferno.com/asus-gaming-notebook-forum/2538-%5Bg75vw%5D-modified-bios-vbios-higher-overclocking.html WILL THIS FIX THE PROBLEM?
-
This is my first post and I'd appreciate any help you guys can offer. I've been using my AW M18x r1 since I bought it new. Basics: I7 2760qm sandybridge Bios A5 16 gb ram Radeon 6990m 2gb I used to run 2 6990m's, but the primary died 3 yrs ago and I replaced it with the secondary card. Been working great until this week. I'm using hwinfo64 for fan monitoring. I started having lock-ups to black screen, grey screen or black with white vertical lines. I noticed my shader temp on my GPU was running out of control whenever I start game or even run a video. The other temps seem to be in the normal range. The shader will jump from 39 C to 70 C almost immediately and then upwards from there. Over 100 C when I 1st caught it. I assume it's thermal shutdown. I'm using the legacy driver for my card 15.7.1. I'm willing to buy a new card, I'm looking at a 780m, but I want to figure out if it's just an issue with the card. Any suggestions on testing for other issues? Why would it be the shader only, or is that just an issue with Hwinfo64? Thanks in advance.
-
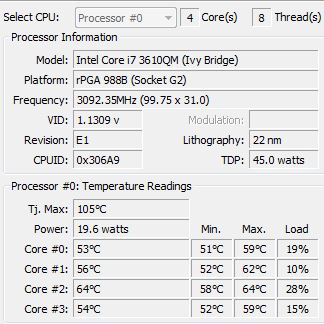
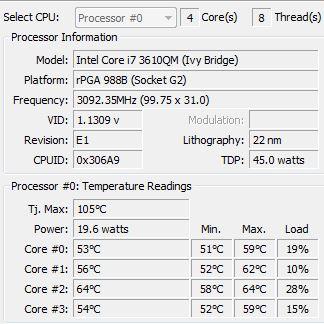
During normal wildstar gameplay my CPU and both GPU's reach 90+ degrees C. This seems abnormally hot to me. Does anyone else have these hot temperatures? Will disabling hyperthreading have a significant effect in cooling down my cpu during load?
-
Hey guy I recently bought a Lenovo Y510P and I am NOW quite aware of its issues but a cool machine non the less. As I was taking it apart to replace the thermal compound I was also replacing the thermal pads with thicker ones (all that I had) now my temps haven't changed not sure maybe its due to the thinker pads but as I was removing the old ones. I saw that 2 or 3 still had the sticker on the side facing the heat sink. Normally I remove both adhesive sides of the thermal pads where as these still had one side with the plastic on it. What do you guy make if this? Thanks.
-
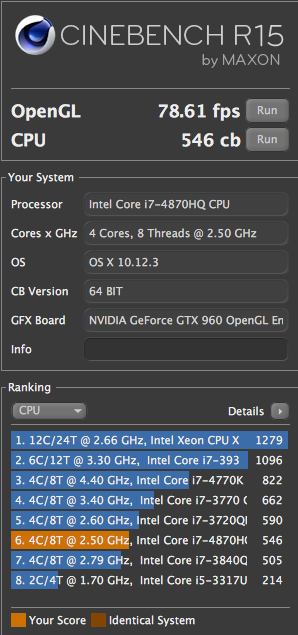
 Hey everyone. Inspired by P-Mac's eGPU build, I decided to finally go ahead and build one. It was a toss up between building a Hackintosh beast or eGPU for my MBP, and I decided the eGPU for cost. I'm avidly against Windows as an OS so I'm using Sierra. Long story short, I knocked it all together in about an hour and a half, ran the scripts and fired it up. No issues recognising the eGPU is there, it's running my 32" 720p TV I've been using for a monitor no problems. I essentially wanted some more oomph out of my gaming experience (I'm a relatively dedicated WoW player) so I was very excited to fire up the game and max out some settings. However, booting into the game I was getting less FPS than what I was getting on the GT 750m. I had the settings tweaked to allow 60fps in low load situations. Using the eGPU I was getting around 40, and my recommended settings went from 4 to 1. The GPU also got hot FAST and the fans spooled up, which I read is uncommon. The MBP also starts ventilating quickly. I've used Cinebench to benchmark the setup and got 77fps within OSX. To me this seems like I should be able to run WoW at high settings on 720p... Tips for what I've done wrong in the setup, or what I can change or implement? Do I need to use Optimus? EDIT: I just ran the CPU benchmark as well and got what seems like a low(?) score, could this be affecting my setup? Thanks all.
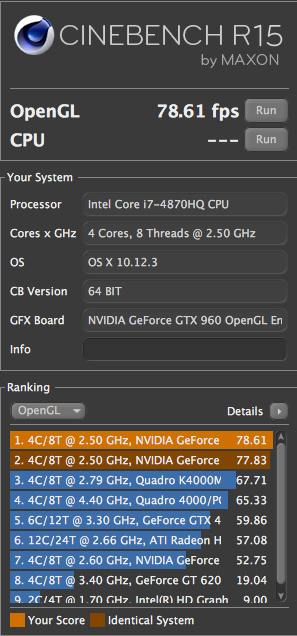
-
Hi! So, I am new here, and I was hoping that I could get some advice regarding flashing the vBios of my GTX 680M, residing within my GT70 (Valkyrie CZ-17, from iBuyPower). As time have progressed, what was once a cutting edge graphics chip is now struggling to retain the flair it once held, and I with to restore it to its former glory, ie) squeeze every ounce of performance that I can out of this card. This being said, while I have a basic-intermediate knowledge of overclocking, I am entirely new to the concept of flashing a vBios, and thus I am a bit apprehensive as the last thing that I want to do is fuck up a $600 graphics card. I currently run a moderate overclock of 800 MHz, and 2000 MHz on the memory, using the stock vBios. My goal is to achieve a base clock of 900+ MHz, perhaps even 1000ish with a sudo-boost of sorts, if that is possible. I have an MSI GeForce GTX680M (4GB) Running - GeForce 335.23 WHQL - as a driver. The current BIOS is - 80.04.33.00.24 And the GPU is (obviously) a GK104, revision A2. I have been looking through the forums, and found what I thought to be a good BIOS, but it said that I didn't have access to the download, and all that I can find now is a vBIOS for a Clevo 4GB 680, and I have an MSI 4GB 680, so I worry of the consequences of using a such a combination of soft and hardware. ____________________________________________________________________________ Additionally, I have a question in regards to managing the thermals in this laptop. I currently have two external solutions, one moderately priced cooling pad with a 92mm fan, and a Jerry-rigged solution with a 10" desk fan that can successfully keep the laptop below 68C (stock clocks), with an ambient temp of ~20C. So, my question regarding cooling, are there any internal modifications that can be done to increase the potency of the internal fan, if the internal fan can be upgraded for a more effective model, or if there are any software tricks to turn the fan up to 11, metaphorically speaking. Any and all help would be greatly appreciated. -Emma (Seriously, I would really appreciate some advice here)
-
Hello I have a m14xr1 555m which has been repaired by dell 4 months ago. Despite a terrible service from the technician and two MOBO replacements, everything was working fine until few weeks ago when I was playing diablo3. FPS dropped to 5 and the game since then has been unplayable. I noticed my GPU temp was too HI reaching 99c causing GPU throttling. I have been reading a lot about same issues from several people with the same machine claiming different causes: (Nvidia drivers, GPU physics load, Virtual Sync config, Blizzard patches, processor cores load, Dust in fan, etc). I have tested all suggested solutions and even re-pasted with IC diamond 24. After all this it seems that the FPS drops and thermal increase vary from machine to machine for Daiblo3, so I decided to test with any other game and discovered the thermal increasing was happening again. Before calling Dell again I would like to know if somebody knows what is the cause for those thermal increases in such way as idle remains between 50 to 60c. I acknowledge the GPU rise in temp with heavy load (even max settings) but shouldn't go beyond 80's Many thanks for your time
-
Hi guys! I have a lenovo notebook y510p, I have obtained a ErgoStand II coolerpad to reduce even slightly its temperature, but I have not noticed significant difference, I have seen on many forums that recommend NotePal X3 for play equipment, need to know if anyone has had the oprtunidad to test both cooler and give me advice, greetings, sorry for the bad English.
-
I have Alienware 17 laptop with i7 4930mx 3.9 ghz. I bought this 5 months ago but since a month, it overheats and shuts down. I took out the CPU fan and heatsink and cleaned them but didn't solve. Any suggestions how to solve this?
-
This cooling mod was originally performed by Ashterfere and is being reproduced here:
- 22 replies
-
- 2
-

-
- alienware
- cooling mod
- (and 2 more)
-
Constructing a Power Supply Cooler *Time to complete project under an hour. To complete this project you will need -Some kind of powertool to help cut metal and drill holes -Bolts to mount hardware -Small screw driver philips or flathead depending on the bolts and screws you have -Pliers to fasten hardware with bolts -A case fan or cpu fan -An adapter that changes the fan wire to that of the kind of powersupply wire you are using -A basic powersupply from an old computer -Rubber or foam pads for feet and spacers -A steady hand when cutting metal -Most of these fans operate at 12volts DC. For a fan power cable that uses 3pin fan mainboard cable such as certain fans from cpu coolers that connect to the motherboard, use 3pin fan to 4pin molex converter cable (the fan in the cooler used in the guide used a 3pin fan to 4pin molex connectionfan connection I used the 3pin to 4pin 12volt powersupply connector). *Possible parts to purchase -3pin fan to 4pin molex connector $1.99 http://www.tigerdirect.com/applications/SearchTools/item-details.asp?EdpNo=4602357&CatId=82 -Hard Drive Cooler $6.99 *uses 4pin molex 12volt power supply connector http://www.tigerdirect.com/applications/SearchTools/item-details.asp?EdpNo=39596&CatId=495 -Case Fan $2.99 *uses 4pin molez 12volt power supply connector http://www.tigerdirect.com/applications/SearchTools/item-details.asp?EdpNo=6666430&CatId=494 -Case Fan 2 $3.99 *uses 4pin molex 12volt powersupply connector http://www.tigerdirect.com/applications/SearchTools/item-details.asp?EdpNo=6721529&CatId=494 -Power Supply Power Cord $4.69 http://www.amazon.com/gp/offer-listing/B000Q7Q420/ref=dp_olp_all_mbc?ie=UTF8&qid=1300268611&sr=1-1&condition=all -Powersupply $9.99 *has 4 4pin molex 12volt power cables http://www.tigerdirect.com/applications/SearchTools/item-details.asp?EdpNo=6610958&CatId=4324 -External 3 1/2inch hard drive enclosure $14.99 *12Volt PSU included would use 4pin molex (similar to one used in guide) http://www.tigerdirect.com/applications/SearchTools/item-details.asp?EdpNo=3950007&CatId=2780 http://forum.techinferno.com/members/brian-k--albums3-200.htm Pic 18 This shows the type of bolts I used. Note you can screw them together end to end. These are basic mounting bolts for a motherboard to sit on and bolt to. http://forum.techinferno.com/members/brian-k--albums3-207.htm Pic 12 This shows the pliers I used, the philips screw driver and the foam pads. http://forum.techinferno.com/members/brian-k--albums3-199.htm Pic 19 Shows the type of fan you can use with the proper power wire and a converter from standard power cord to that of a cpucase fan. http://forum.techinferno.com/members/brian-k--albums3-192.htm Pic 23 Shows a common cpu heatsink and fan combo common to hardware that's a little older. No one wants old computers all the better to get free spare parts from. If you can salvage an old system, even if it's just to utilize the old power supply and cpu or case fans then your already recycling and saving money. http://forum.techinferno.com/members/brian-k--albums3-215.htm Pic 5 Shows the inside of the external hard drive enclosure I chose to re-use for this project. The hard drive enclosure is displayed opened up andshowing how the hard drive sits inside case. Note the hard drive, it's a 3 1/2 inch drive connected with an ide drive cable. http://forum.techinferno.com/members/brian-k--albums3-204.htm Pic 14 Shows the holes made through top of the enclosure. The holes I made are just a little smaller than the thickness of a bic pen. A drill will work just fine here. It's up to you how many holes and their spacing. Though having giant holes will leave only enough room for a few holes and too much air will be directed only through the holes directly over the fan we will be installing instead of spreading over the entire surface of cooler and powersupply. http://forum.techinferno.com/members/brian-k--albums3-218.htm Pic 3 Shows the fan in place on the inside of the aluminum enclosure. The fan is faced so air is pulled into the aluminum enclosure. The large hole on the bottom of the enclosure matches up with the size of the inner guards of the fan so that inner circle encompassing the fan blade is the same size as the hole made in the bottom of the coolers chassis. I would trace a marker around the inside piece of the fan on to aluminum enclosure in order to accurately cut the right size hole. I used a dremel to cut the hole out. I found if you hold the dremel with two hands and find a way to secure enclosure from moving, that short but firm traces over the marked circle is usually accurate enough to cut. If you try to go fast or have the dremel on to fast it makes it harder to cut and you tend to bounce and skim the surface. Also if a dremel is not available but a drill is you can use the same theory but hold tighter on drill, go slower and I would even make sure the drill bit is in the drill as far as possible so when your pressing on drill bit side ways it don't break and you have more control over where it goes. Note the 4 bolts sticking out of the chassis. Mark the holes using the fan as a guide and drill the holes needed to mount the fan on the inside over the large hole on bottom of enclosure. http://forum.techinferno.com/members/brian-k--albums3-212.htm Pic 7 This is a picture of the need to hold the inside nut in place with small pliers while tightening the outside bolt to mount fan. http://forum.techinferno.com/members/brian-k--albums3-211.htm Pic 8 This is what it should look like inside when you've mounted fan over fan hole you made earlier. http://forum.techinferno.com/members/brian-k--albums3-206.htm Pic 13 Another shot of the end cap off of chassis and fan mounted over fan hole on inside of enclosure. http://forum.techinferno.com/members/brian-k--albums3-216.htm Pic4 You can see another angle of the bottom of the unit. I used a basic foam rubber pad found in shipping packaging as feet and as a spacer between cooler and power supply. The plastic end cap is also visible from this angle. http://forum.techinferno.com/members/brian-k--albums3-202.htm Pic 16 Here you can see the finished unit plugged in with it's own ac adapter like power supply... the one original to the hard drive enclosure. http://forum.techinferno.com/members/brian-k--albums3-191.htm Pic 24 Shows the unit ready for action plugged in and turned on. Testing the units ability to cool a overheating mobile powersupply http://forum.techinferno.com/members/brian-k--albums3-220.htm Pic 1 Screen shot before starting a test to show the powersupply heating up under a non-stock tdp of 98 and dells stock tdc of 62 with Throttle Stop. using Intel Burn test in 8 thread mode with maximum available memory to fully load all 4 cores of the 920XM, I took this screen shot showing what settings will be used for the duration of this demonstration. Note also Throttle Stop is on and chip-set clock modulation is set to 100% with the multiplier set to turbo so to prevent thermal and power throttling and maintain highest dynamic turbo frequency possible for a given moments temperature and power draw. If the previous mentioned settings allow the processor to run out of spec beyond it's thermal and power limits, which I will show raises the powersupply's temperature (with the powersupply flat on the table like most users place them) well beyond idle temperatures, average and heavy load temperatures for a laptop's AC/DC power-supply adapter. This could lower the life expectancy of any electronic device. http://forum.techinferno.com/members/brian-k--albums3-210.htm Pic 9 8:28pm, idle on desktop for 10 minutes @ 101-102 degrees Farenheit. The temps are being recorded by taping the contact point of a thermal wire coming from a volt-meter set in thermal mode on Farenheit. As a way to determine the validity of these temperatures, the temperature read for the room by not touching the contact wire to any surface at all (at the moment) read 80 degrees farenheit which is fairly accurate being that the ambient temperture in my computer room is about 78 on average unless I block my heat vent in my room. See temperature in picture below. http://forum.techinferno.com/members/brian-k--albums3-196.htm Pic 20 8:29PM I started IBT, immediately after launching I decided to adjust the TDP to 130 and TDC to 110 because I didn't see high enough frequencies to truly push the PS. Since the graphics weren't being stressed at the same time this was my way of exceeding the powersupplys's normal thermal and power specification. I set 100 tests to ensure IBT wouldn't finish or stop stressing the processor before my testing was done. 8:53PM 112 degrees has been reached so far. http://forum.techinferno.com/members/brian-k--albums3-195.htm Pic 21 Temps are 114 degrees and continue rising. http://forum.techinferno.com/members/brian-k--albums3-219.htm Pic 2 9:53PM 115 degrees is reached and maintained. That's 3 degrees higher than the powersupply was 1 hour before. With IBT still pressing on I decide to wait a little longer to watch if there is anymore increases in temperature. http://forum.techinferno.com/members/brian-k--albums3-213.htm Pic 6 Screenshot of Intel Burn Test continuing to stress the processor 9:54 pm while waiting to utilize cooler for second half of test. http://forum.techinferno.com/members/brian-k--albums3-208.htm Pic 11 10:01 pm with the power-supply still maintaining a temperature of 115 degrees I place the power-supply on the cooler off of the table where it had been sitting as designed on it's feet. http://forum.techinferno.com/members/brian-k--albums3-201.htm Pic 17 Immediately the temperature readout lowers by 1 degree to 114. 10:03 pm just 2 minutes later and still under maximum load from IBT the temperature reads as 112 degrees. 10:29 only 28 minutes after placing the power-supply on the cooler the temperature has dropped by 14 degrees from the 115 degrees to 101 degrees still under 100% load since 8:29. Nearly a hour and a half of building heat and stress the cooler has already managed the heat that is in excess of the idle temperature that came from IBT in only 28 minutes of using the cooler. Amazingly the cooler returns temperatures to the the idle temps recorded when we started, which were 101 to 102 degrees with Intel Burn Test still running 100%. I press on. http://forum.techinferno.com/members/brian-k--albums3-203.htm Pic 15 12:29 Intel Burn Test is still running 100% and temperature still dropped lower than idle temps with no cooler. At 98 degrees there has been a total drop under 100% load of 17 degrees over 4 hours of IBT running at 100% cpu usage about 2 1/2 hours of which the cooler had been utilized. After recording temperatures I proceeded to end the Intel Burn Test run. http://forum.techinferno.com/members/brian-k--albums3-209.htm Pic 10 I recorded 88 degrees about 20 minutes after ending the Intel Burn Test run. 14 degrees lower than the 102 degrees idle temps without cooler. http://www.youtube.com/watch?v=avpM0GWOxLs Video This video shows the cooler plugged in and running. After-Thoughts *You could also use sheet metal cut to the length of the power supply. The width will need to be about double the width of the powersupply plus about 2 inches for the height (that's 1 inch for each side and an extra inch to overlap ends). Drill extra 4 holes through top along seam where you would overlap the sheet metal about 1 inch. I would clamp the piece in place before drilling or mark out both ends and drill while the sheet is flat. Use small bolts and nuts to fasten the sheet metal together into an enclosure shaped like the the hard drive enclosue I used to make my cooler. Take the enclosure and shove it into a larger piece of styrofoam. Pull out the enclosure and cut out the rest of the styro-foam piece, use this piece to insert into the end of enclosure as a cap for your enclosure. Maybe tape end up firmly to make a good seal for air pressure. Repeat for other side except you'll need to make a slit in styro foam to stick your wires through on the other side. Drill holes on side with seam and make a large hole as big as the size of your fans fan blades on the bottom like in the guide above. Follow the above instructions the same with this sheet-metal enclosure in place of the aluminum pre fabricated enclosure I used. *You can buy a fish tank thermometer or any flat sticker-like thermometer and attach it to your power supply to keep track of your temperatures at a glance. *Attach a heatsink from one of those sealed liquid cooled heatsinks you can buy with the included radiator and fan to your powersupply. Place radiator in a place that can vent the heat. *Make a second unit to place on top of the powersupply (in addition to the first cooler unit) aiming down at the top. You can even utilize the same powersupply. *Please I encourage everyone to get creative or atleast find a similar cooling solution. You can buy a hard drive cooler which is not quite the same design but would work the same way if used it to cool your powersupply. Please post your ideas and your own projects or solutions you find for your powersupply here for everyone to build ideas from. *Depending on how many cables are available on the powersupply you use for the cooler you can plug in extra fans for an additonal cooling system for your laptop at the same time. This validates utilizing a seperate powersupply for your cooler. No waste here!