Search the Community
Showing results for tags 'm17x r2'.
Found 12 results
-
These modded vBIOS's are based on the Non-Enduro CLEVO 7970M vBIOS that was created for the CLEVO P270WM laptop. It's commonly referred to as the "RJTECH" vBIOS. The reason I created these were primarily for myself but also other M17x R2 users that were using CLEVO cards in their machines. This is the only proven safe vBIOS that doesn't damage our RGB screens. I also experienced a weird black screen with what looked like brightness on full after a few boots when using the Dell vBIOS from svl7's mod pack so I've been using the stock vBIOS ever since. This vBIOS should also work for the P170HM users as well (no HDMi though). There are two different sets in this pack. The first is for users who's cards voltage behaves normally, reporting the correct 1050v stock voltage. These are located in the "Normal" folder. The other set is for users like myself who's cards refuse to work at stock voltage and experience 3D voltage "stuck at 0.950v, 0.975v or 1.000v". These are located in the "Forced" folder. I have not adjusted any clocks as Overdrive is now enabled on all the modded vBIOS files included in the pack apart from the stock vBIOS in the root of folder. You may need to re-install your Catalysts in order for Overdrive to reflect correctly in CCC. You can then use it to set the clocks you prefer**. There are a few variations on 3D voltage ranging from 0.975v to 1.100v in 0.025v steps. Instructions: For flashing refer to svl7's guide: [GUIDE] AMD VBIOS flashing All the files have the same checksum which is 0xC200. You will have to rename them to an 8 character file name before flashing. Please make sure that the checksum of the file is correct using ATIflash before flashing. Flash at your own risk, you are responsible for your system and the changes you make on it. That said, I have tested these modded files on my machine and they work as intended. I would like to thank @svl7 for all his work. Without him, this vBIOS pack would not exist as I used his edited vBIOS files as a reference for creating these modded files. Thank you for creating the READ ME file as well that's included in this pack which I used as a template from your Dell vBIOS pack. I would also like to thank test2013, a Russian member on people.overclockers.ru who's guide helped me understand where the clocks are. Also kahboom, a member on overclock .net who's guide helped me understand where to find the voltage table and how to fix the checksums. And lastly @Aikei, thank you for your guide. It helped me understand more clearly how to fix the checksums. ** If you experience a delay from Overdrive setting your clocks at boot open Regedit and go to... HKEY_LOCAL_MACHINE -> SOFTWARE -> Wow6432Node -> ATI -> ACE -> Backup -> Settings -> CLI There should be a "Delay" Key with a value of 300. Change the value to 0. This is applicable to Windows 7 x64. Clevo 7970M vBIOS - P270WM - Mod pack.zip
- 58 replies
-
- 7
-

-
- 7970m vbios mod
- m17x r2
- (and 3 more)
-
Read all about it here: Unlocked Alienware M17x-R2 Bios Released! | Tech|Inferno and continue the discussion in this thread.
-
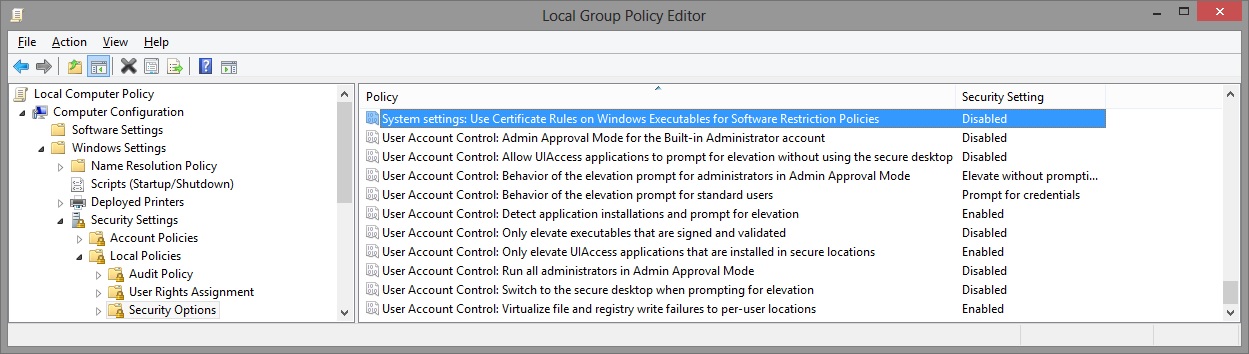
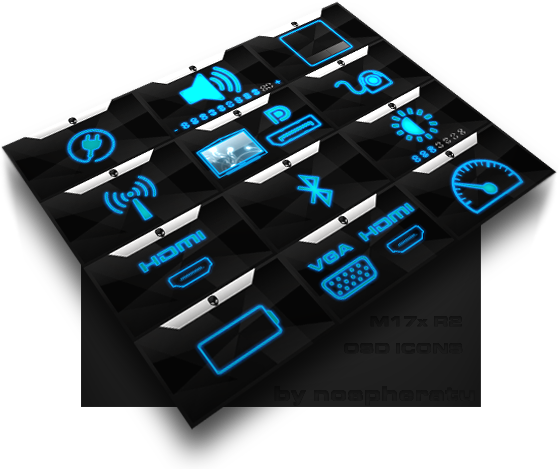
I've recreated the OSD Icons for the R1/R2/R3/R4 and R5 aka 17 as the standard ones are a bit dated. It should also work with the M15x though as my old M15x had the same setup for the OSD app. Regarding the R3 OSD, it seems its the same install for the M18x as well so it should work for you M18x owners too. I've also added the AW 17 OSD to the list. This exe is also compatible with the 14 and 18 as Dell uses the same OSD for all the new machines. There's also a set for you Area-51 m17 R1 owners. I've tried to give it a simular feel to the Invader Icon pack by Alienware. Hope you guys like it Install Instructions for R1 1. You need to end the OSD process in Task Manager since it may be using some of these icon files. Ctrl+Shift+Esc then find the OSD process and end it. 2. Backup your current icons if you want to revert to the originals (You can also uninstall and re-install the OSD application if you want to go back to the original icons) 3. Extract the attached "M17X R1-R2 & M15X.zip" contents to C:\Program Files (x86)\OSD\picture\. Overwrite if prompted. 4. Restart the OSD application. It is located in C:\Program Files (x86)\OSD\Launch.exe 5. Done! Install Instructions for R2 /M15x 1. You need to end the OSD.exe process in Task Manager since it may be using some of these icon files. Ctrl+Shift+Esc then find "OSD.exe" and end the process. 2. Backup your current icons if you want to revert to the originals (You can also uninstall and re-install the OSD application if you want to go back to the original icons) 3. Extract the attached "M17X R1-R2 & M15X.zip" contents to C:\Program Files (x86)\OSD\ICONs\. Overwrite if prompted. 4. Restart the OSD application. It is located in C:\Program Files (x86)\OSD\Launch_OSD.exe 5. Done! Install instructions for R3 / R4 / M18x 1. You need to end the OSD process in Task Manager since it may be using some of these icon files. Ctrl+Shift+Esc then find the AlienwareOn-ScreenDisplay.exe process and end it. 2. Backup the existing AlienwareOn-ScreenDisplay.exe by renaming it to "AlienwareOn-ScreenDisplay.exe.BAK" for example. Its in C:\Program Files (x86)\Alienware On-Screen Display\ 3. Extract the AlienwareOn-ScreenDisplay.exe from the appropriately named file depending on your OS and model to the C:\Program Files (x86)\Alienware On-Screen Display\ folder. 4. Restart the OSD application by double-clicking the file. 5. Done! Install instructions for 14 / 17 / 18 ** 1. You need to end the OSD process in Task Manager since it may be using some of these icon files. Ctrl+Shift+Esc then find the AlienwareOn-ScreenDisplay.exe process and end it. 2. Backup the existing AlienwareOn-ScreenDisplay.exe by renaming it to "AlienwareOn-ScreenDisplay.exe.BAK" for example. Its in C:\Program Files (x86)\Alienware On-Screen Display\ 3. Extract the AlienwareOn-ScreenDisplay.exe from the "AW 14-17-18 (Windows 8).zip" file to the C:\Program Files (x86)\Alienware On-Screen Display\ folder. 4. Restart the OSD application by double-clicking the file. 5. Done! The Area-51 m17-R1 install should be similar to the steps for the other laptop revisions above. They all basically follow the same process anyway, apart from filenames/paths. @robby_hd was kind enough to make a red version of these icons for the M17x R3 / M18x R1 which can be downloaded from his post here. **There seems to be a security issue with Windows 8/8.1 at this point in time since it doesn't allow modified exe's. I will update this post with a solution once it has been found. Also a few Alienware owners are having an issue with the unmodified OSD and Windows 8. Only the default Windows 8 OSD displays and not the Alienware version. Try the solution posted by Dell here and then attempt installing the mod. The below screenprint is a workaround by editing the security policies to allow the unsigned exe to run in Windows 8. If you are not aware of what these settings do and the repercussions of changing them, please do not attempt it. - Open the Group Policy Editor by typing "gpedit.msc" in the search or run text box. - Duplicate the settings below. Area-51 m17-R1.zip M17X R1-R2 & M15X.zip M17X R3-R4 & M18X R1-R2 (Windows 7).zip M17x R4 & M18X R2 (Windows 8).zip AW 14-17-18 (Windows 8).zip M17X R4 & M18X R2 (Windows 8.1).zip

- 171 replies
-
- 44
-
-
Hello, I am looking for a working vbios to 8970m. My problem is that the clocks freez at 450Mhz and the memory at 300Mhz. i heave vbios from http://forum.notebookreview.com/threads/m17x-r2-8970m-crossfire-upgrade.814434/ this guide and heave latest drivers 18.5.1, another driver not help, re-instal windows also not working
-
Hi, I read a lot of different threads about the maximum possible M17X R2 configuration. But after I was more and more irritated. What is at the end the best performant GPU solution (with unlocked bios and dirver mod) but WITHOUT manual fan control and such things. Because if I want to sell one day my M17X R2 I don't want to explain and force the buyer to control the GPU fan per hand.
-
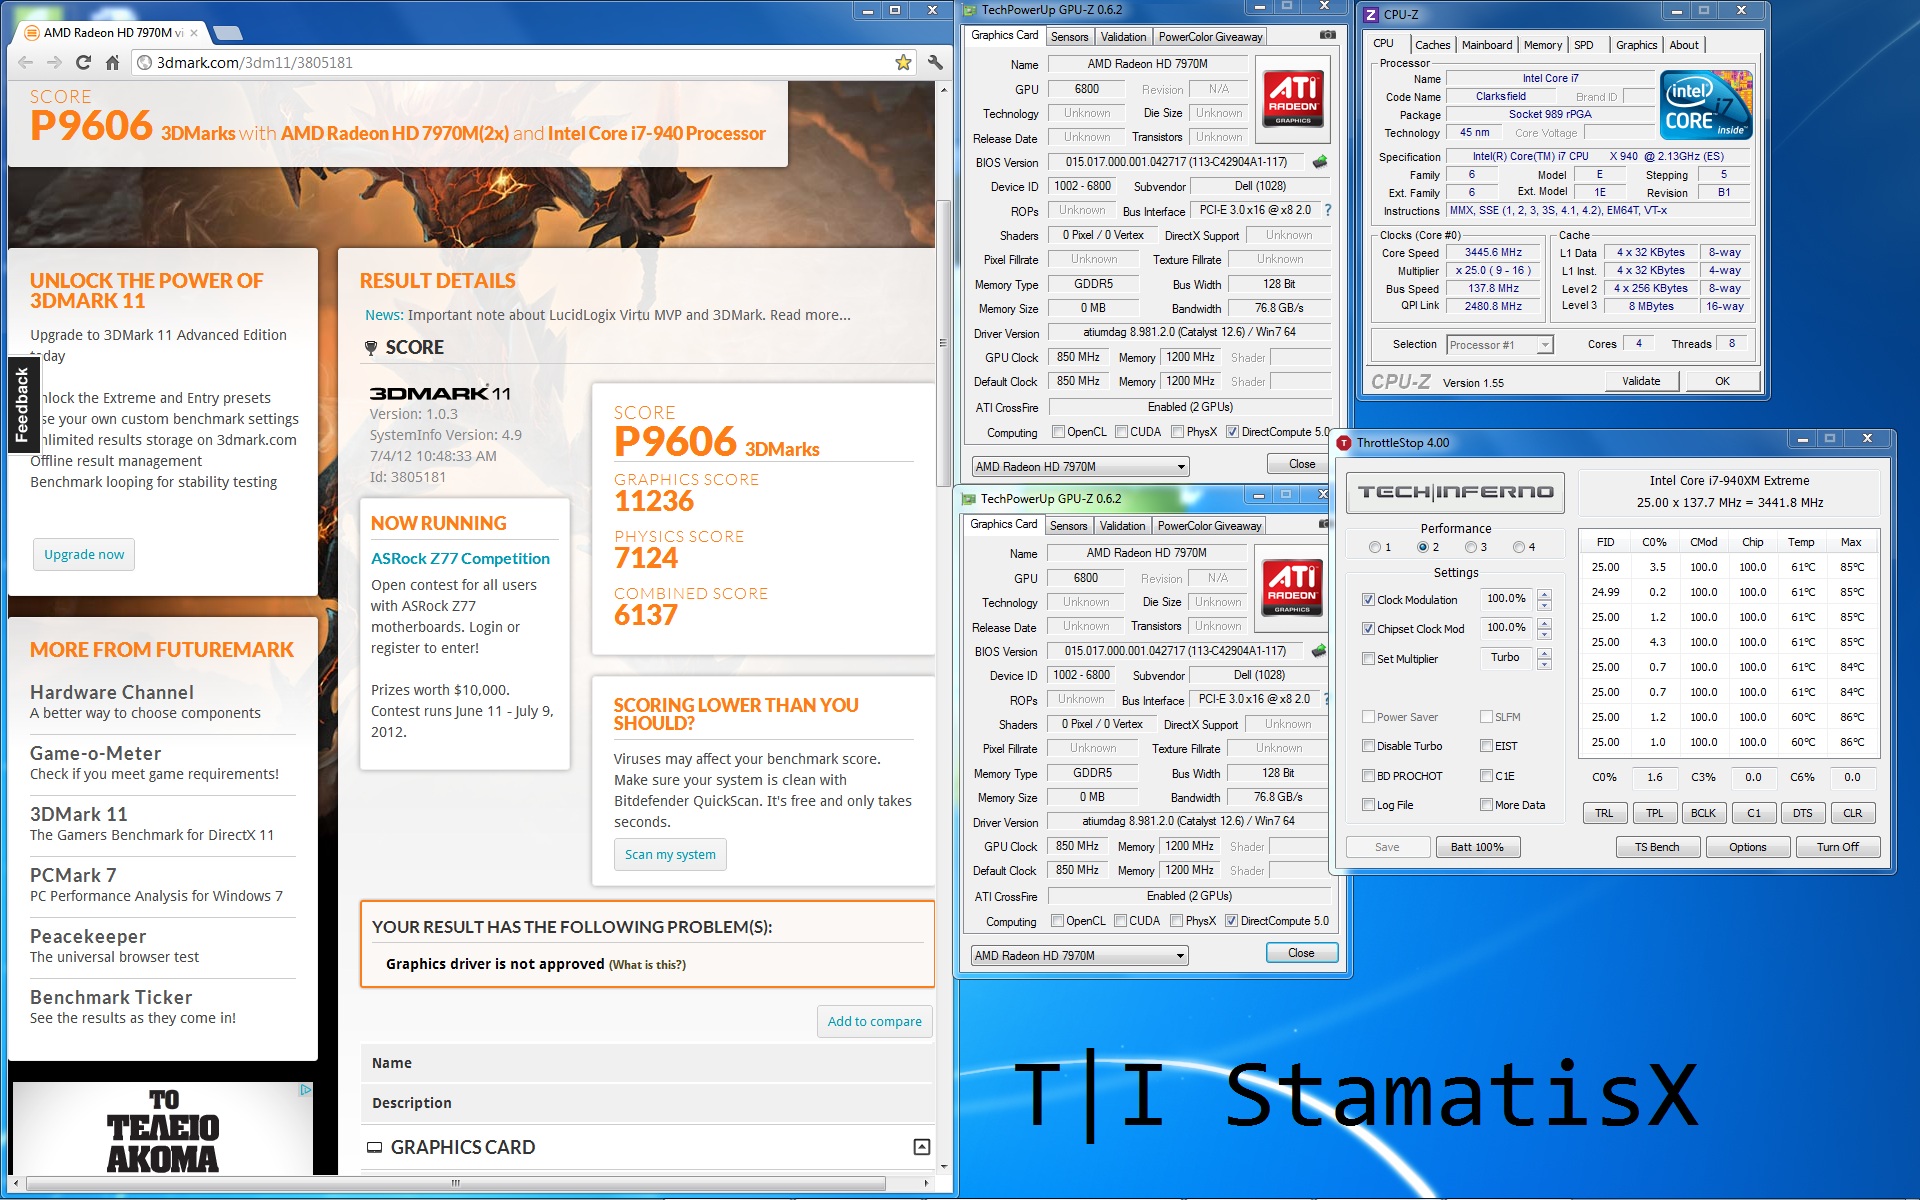
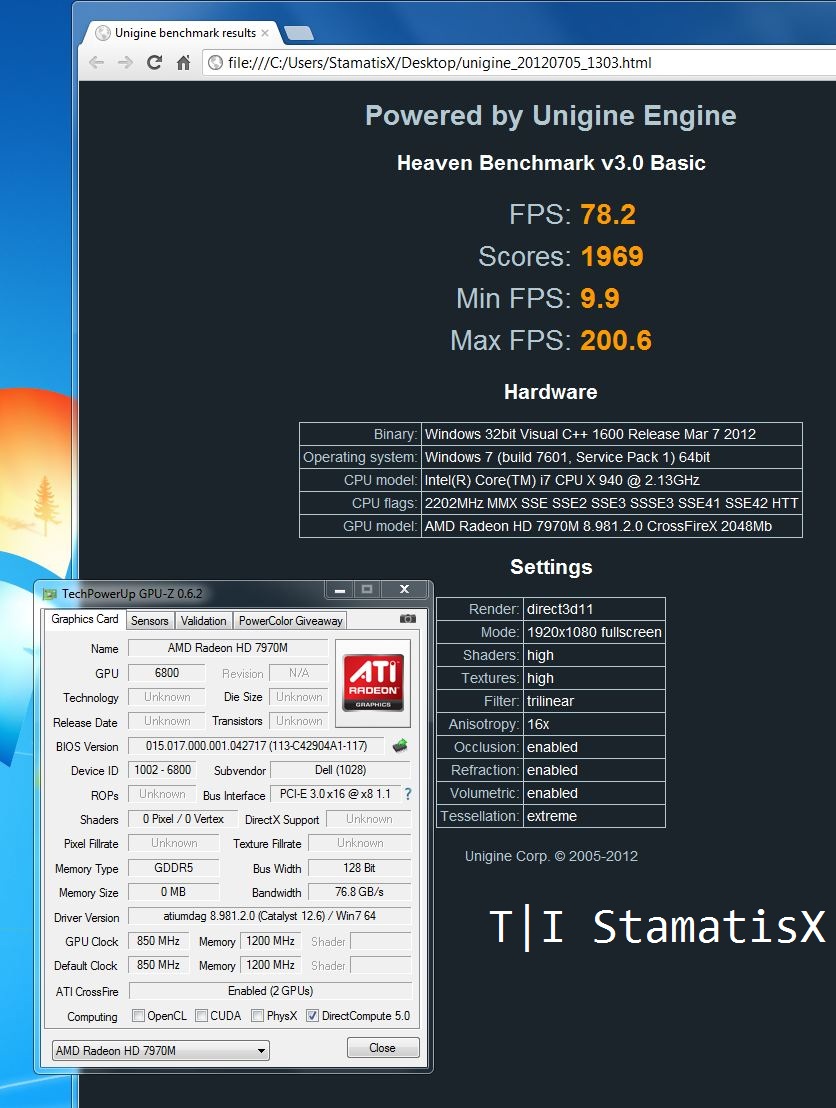
I received early in the morning a couple of 7970Ms and a cfx cable from MXM Upgrade Home Page 3DMark11 Unigine If you are upgrading from the 5870Ms, the screws are a bit bigger in diameter and they won't fit the backplate of the 7970M (probably a clevo card? I will find out soon). Other issues I encounter is that both display and HDMI port don't work so I attach my Dell 2410 with a VGA cable... Temps are fine and I am idling at 56-58 C with the external monitor attached (which brings the clocks up to 300/1200 @0,825V) so not that bad. 7970M.zip

-
Hey Guys! I bought the EXP GDC v8.0 to use with my laptops: Alienware M17x R2 (no iGPU) i7 920xm GTX 680M 16GB DDR3 RAM ExpressCard x1 Windows 7 x64 Ultimate Alienware M14x R2 (iGPU) i7 3840qm GT 650M 16GB DDR3 RAM mPCIe x2(?) Windows 7 x64 Ultimate I am using: ZOTAC GTX 970 300w PSU DIY eGPU Setup 1.30 My problem is that Windows does not detect anything on either setup. No drivers are ever installed for a "Standard VGA Adapter", and I always check Device Manager. I have tried everything on the TechInferno webpage here, but nothing happens once in Windows. I have entered into the DIY eGPU Setup (menu option) several times trying what it recommends to get the graphics card to be seen, and messed around a bit with the settings, but none of that works either. Sometimes certain options will cause the laptop to hang and force me to reboot. The ExpressCard slot and mPCIe slots of my laptops do work, I regularly use the ExpressCard with a USB 3.0 card, and I normally have a WLAN and a M.SATA SSD drive in the mCPIe slots (both I have extensively tried with the EXP GDC adapter). The graphics card only boots up (with fans on full blast) once the PSU is plugged in after the BIOS has loaded. If I have it connected from a cold boot, the card will attempt to turn on with slow fans and then turn off on either laptop. The graphics card is lightweight and fully inserted into the EXP GDC adapter. There is no switch on the PSU, so once everything is plugged in (and the laptop is on), it just goes. I thought it would at least work on the M17x R2 since there is an Amazon review comment stating that it does. The only other thing I can mention is that the GTX 680M was never officially meant for the M17x R2, so I have to hack the NVIDIA display drivers to get NVIDIA driver support. I don't think this has anything to do with the eGPU detection though (especially since the DIY eGPU Setup dose see the GTX 680M)... And, if it helps, I do have a Dell 220w power brick I can use instead. If anyone has any suggestions I can try, I will, as I really want this old laptop to run at its best before I move on. Thanks in advance!
-
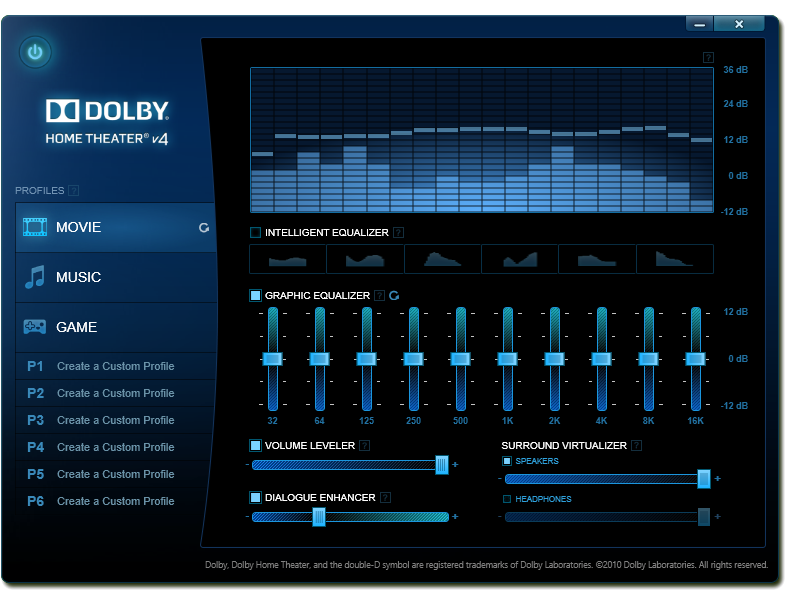
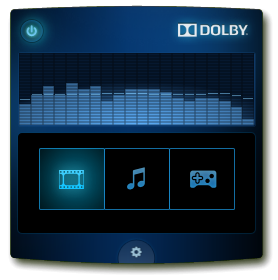
 Dolby Home Theater v4 - M17x R2 and IDT High Definition Audio So I decided I needed a headset with a mic and I'm a sucker for matching peripherals so I set my sights on the TactX headset (Rebranded SteelSeries 5HV2). There's some pretty appalling reviews of it online but I have to try them out for myself. One of the "problem" areas is an apparent lack of bass since its tuned for FPS gaming. In preparation I figured I should get some sound enhancement software. I've been using the Dolby Home Theater v4 application on my HTPC with a Xonar DX soundcard and its very effective particularly with movies and it's volume leveler feature. All processing effects can be switched off for music by just switching profiles using a handy system tray utility so its very convenient to use. You can read more about it on Dolby's official page. System Tray Utility I'm not sure if many users are still soldiering on with the M17x R2 but heres a fix if you wanted the use the Dolby Home Theater v4 application. Support for the IDT High Definition controller used in this machine is non-existant. The only driver I could use was the one's directly from Dell (apart from this Dolby Driver) so I hope this is of some help to fellow M17x R2 users who are looking for more customisable sound. I've replicated my steps a few times and I'm fairly certain should work without isue on an Alienware M17x R2 with Windows 8.1 as that's what I'm using. You could give it a try if you have an onboard IDT HD Audio card as well. Fixing the INF for use with an IDT High Definition Audio sound card 1. Uninstall all audio applications/drivers and reboot. Windows should install the default "High Definition Audio" driver. 2. Download the installation files from here. Extract the rar. 3. Extract the "Dolby PCEE Drivers.msi" installation file using msiexec and the command line. eg... msiexec /a "C:\Dolby PCEE Drivers.msi" /qb TARGETDIR="C:\Extracted Dolby PCEE Drivers" 4. Using the above extraction path as reference, go to C:\Extracted Dolby PCEE Drivers\Dolby PCEE Drivers\Drivers64\Release. You should see a file called PCEE4-DHT.INF 5. Open the file and find and replace all occurances of HDAUDIOFUNC_01&VEN_11D1 with HDAUDIOFUNC_01&VEN_111D. Save and close. 5.1 Optional depending on whether you're running Windows 8.1. Reboot with Driver signing off. ie. Hold down Shift when clicking Restart. Select Troubleshoot->Advanced Options->Startup Settings. Click Restart. Once the machine reboots press F7 at the Startup Settings screen to Disable driver signature enforcement. 6. Go back to the extracted Dolby PCEE Drivers folder and run "Dolby PCEE Drivers.msi". Select the "DHT(release)" driver. You should be prompted on whether to install the driver or not, select Install. Your drivers should now be installed. If you're using another machine (not an M17xR2) with IDT HD Audio and can hear a marked difference in sound when you go to your Playback Device's properties and switch between the Dolby profiles on the Dolby tab you can go ahead and install the "Dolby Home Theater v4.msi" application. If you do not have the Dolby Tab under your speaker playback device and have the Enhancements Tab instead read on. At this point if I plugged in a pair of Headphones into the 2nd or 3rd audio jacks, the Headphones properties under Playback Devices contained the Dolby Tab and the Dolby effects were working with the headphone playback devices. Enabling the Dolby Tab and effects on the Speaker Playback Device 1. Open regedit and go to HKEY_LOCAL_MACHINE\SOFTWARE\Microsoft\Windows\CurrentVersion\MMDevices\Audio\Render. There should be multiple entries here. Expand the entries and look for the ones with both "FxProperties" and "Properties" keys. To identify the Speakers playback device one of the "Properties" key values will have a string value called "{a45c254e-df1c-4efd-8020-67d146a850e0},2" with a data value of "Speakers". We're interested in the "FxProperties" key above this "Properties" key. 2. Under this "FxProperties" key, delete all values apart from (Default). 3. Copy and paste the below to Notepad making sure to change ****** to the name of the parent key of that particular "FxProperties" key. eg. Mines was called {36018a56-954a-437d-8bdb-0b6bbf830dbc}. The name will vary as it changes with every driver install. Windows Registry Editor Version 5.00 [HKEY_LOCAL_MACHINE\SOFTWARE\Microsoft\Windows\CurrentVersion\MMDevices\Audio\Render\*********************\FxProperties] "{b725f130-47ef-101a-a5f1-02608c9eebac},10"="Dolby PCEE4" "{d04e05a6-594b-4fb6-a80d-01af5eed7d1d},3"="{C53E5AAF-5F6F-41c2-9F63-ADEBBC9B6B64}" "{d04e05a6-594b-4fb6-a80d-01af5eed7d1d},0"="{00000000-0000-0000-0000-000000000000}" "{d04e05a6-594b-4fb6-a80d-01af5eed7d1d},1"="{BC8E3B67-3306-4eef-B230-6798E9A67F0B}" "{1da5d803-d492-4edd-8c23-e0c0ffee7f0e},5"=dword:00000000 3. Run this reg file and select yes when prompted on whether you want to add this information to the registry. If you have a look at the same "FxProperties" key again you will notice the above values have been added. 4. Reboot the machine. 5. You should now have Dolby effects working on your speaker device. Install the "Dolby Home Theater v4.msi" and you're done! Notes: The effects are only really worth while if you're using headphones, the M17x R2's speakers aren't that good. So this exercise is a bit pointless really. I'm not a fan of processed sound but what really annoyed me was that the effects only worked when the Headphones were plugged in. Hopefully some of you guys enjoy it. Credits: I'd like to thank @fr33jack from guru3d forums for providing the install files on his post here and @epguy19 also from guru3D for pointing out the flaw in the drivers INF for the IDT device ID on his post here. I'd also like to thank @erp-ster7n from the laptopvideo2go forums for the insight into the enhancement tab mods with his post here. DISCLAIMER: Perform this modification at your own risk. I take no responsibility for any damage caused by technical error, user inexperience or stupidity.
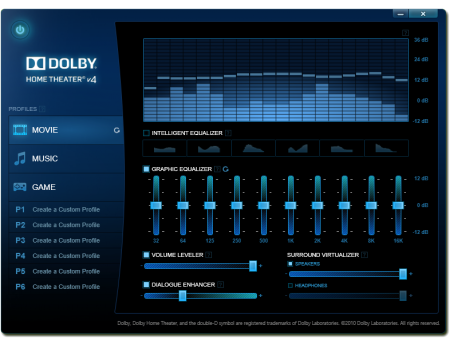
- 3 replies
-
- 2
-
-
- dolby home theater v4
- idt high definition audio
- (and 1 more)
-
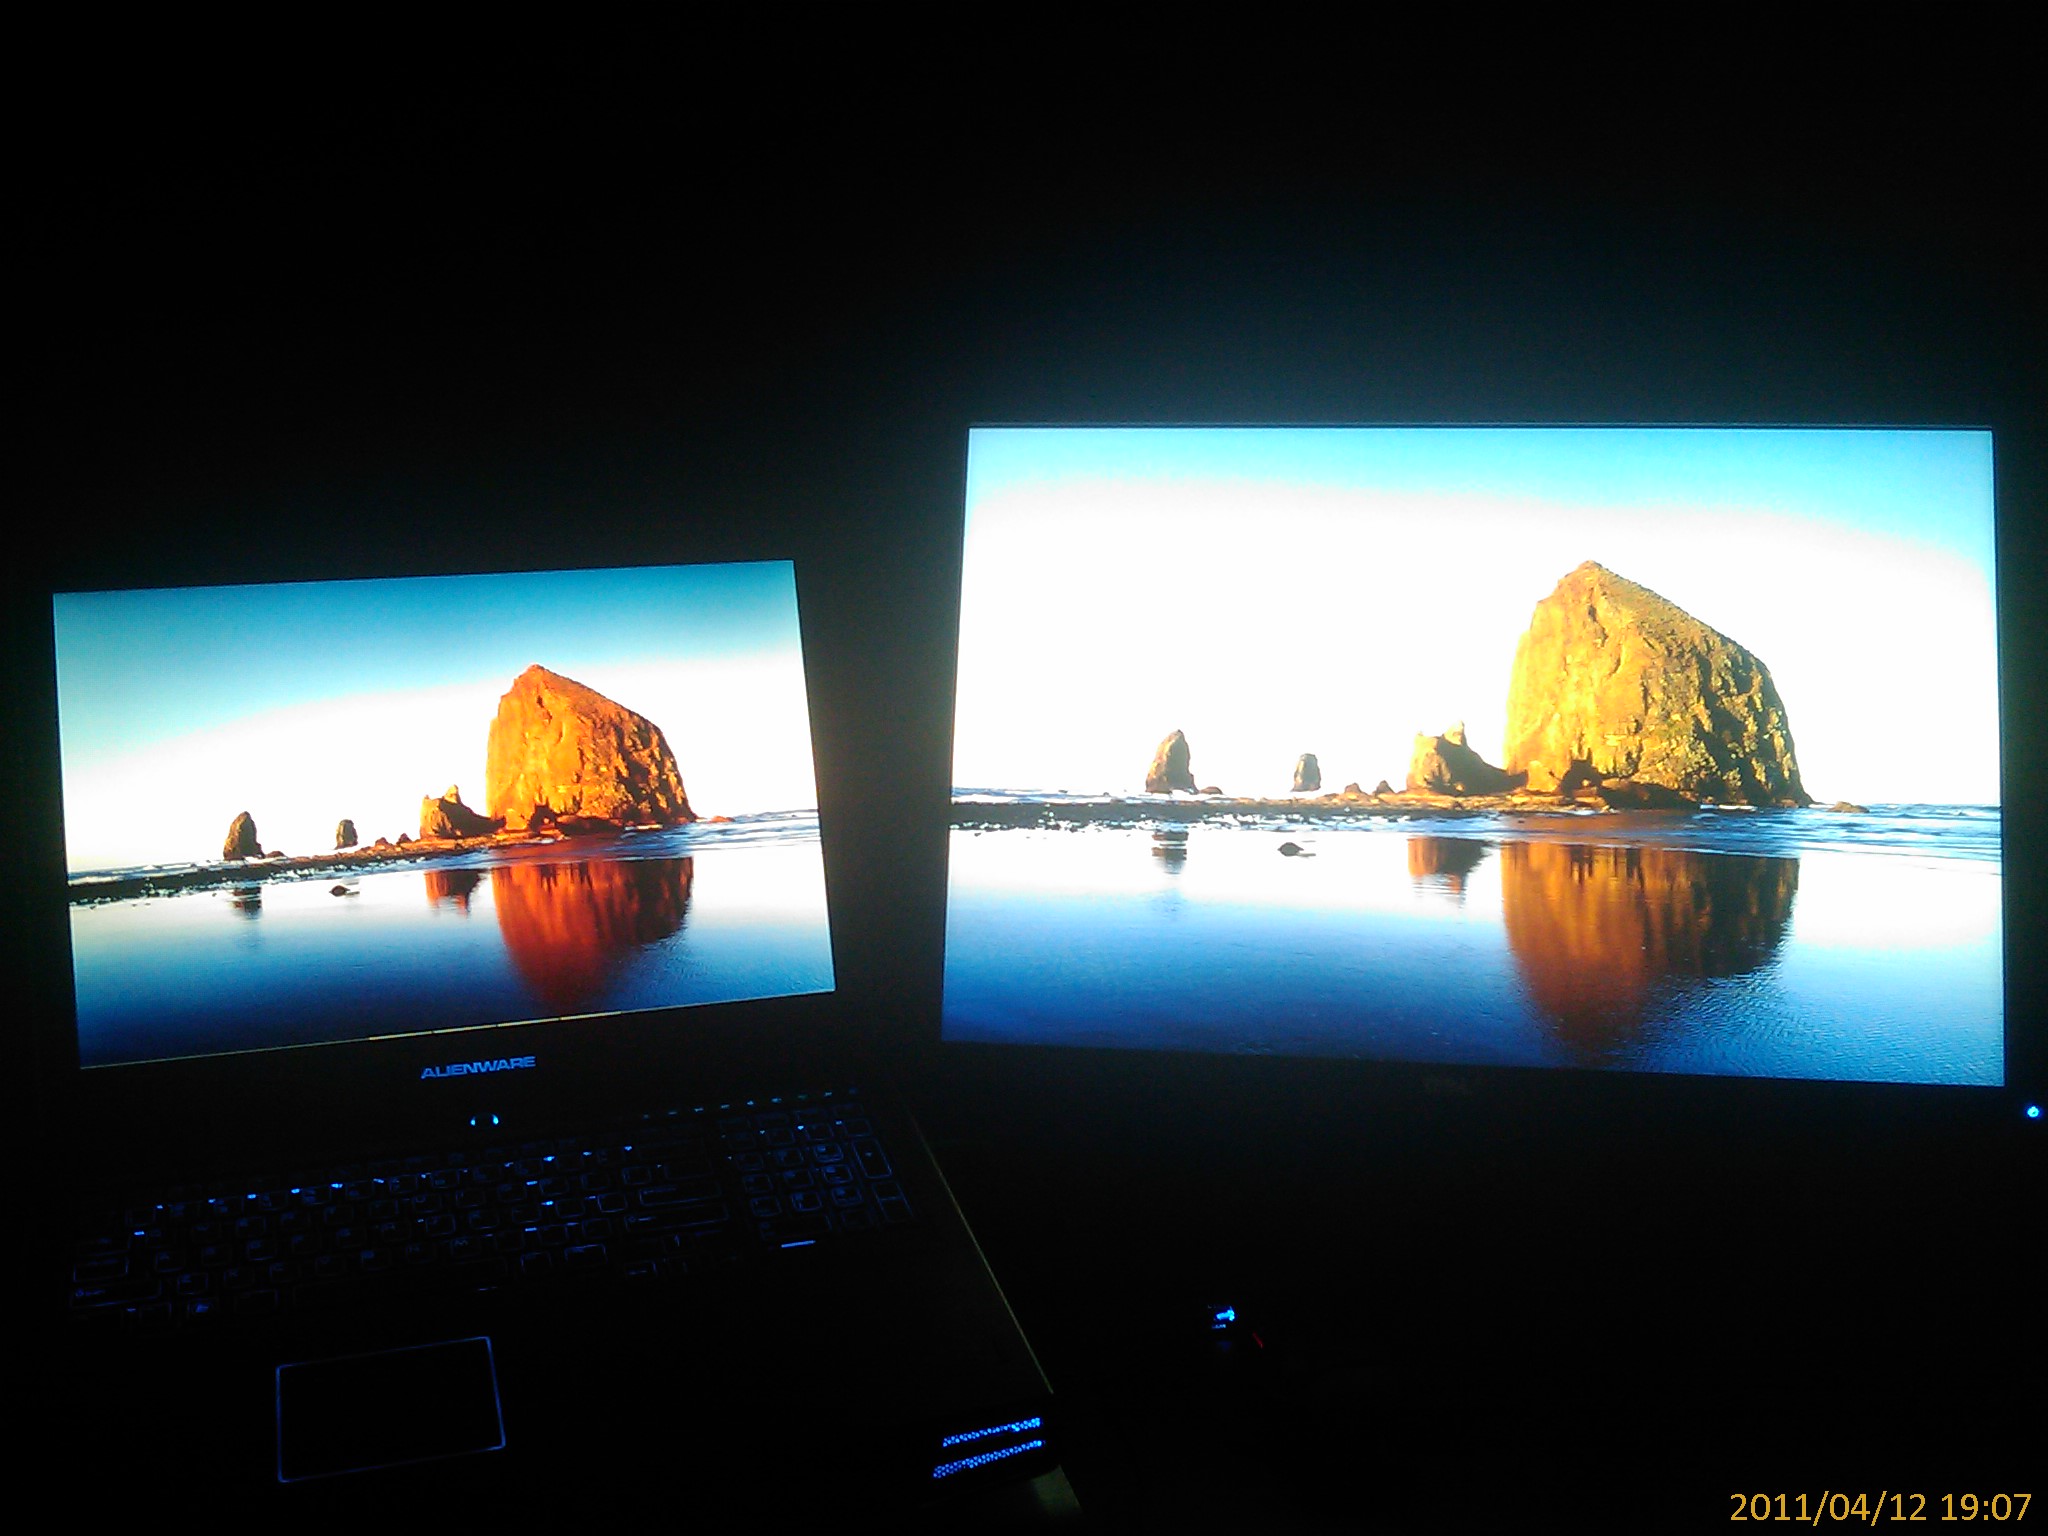
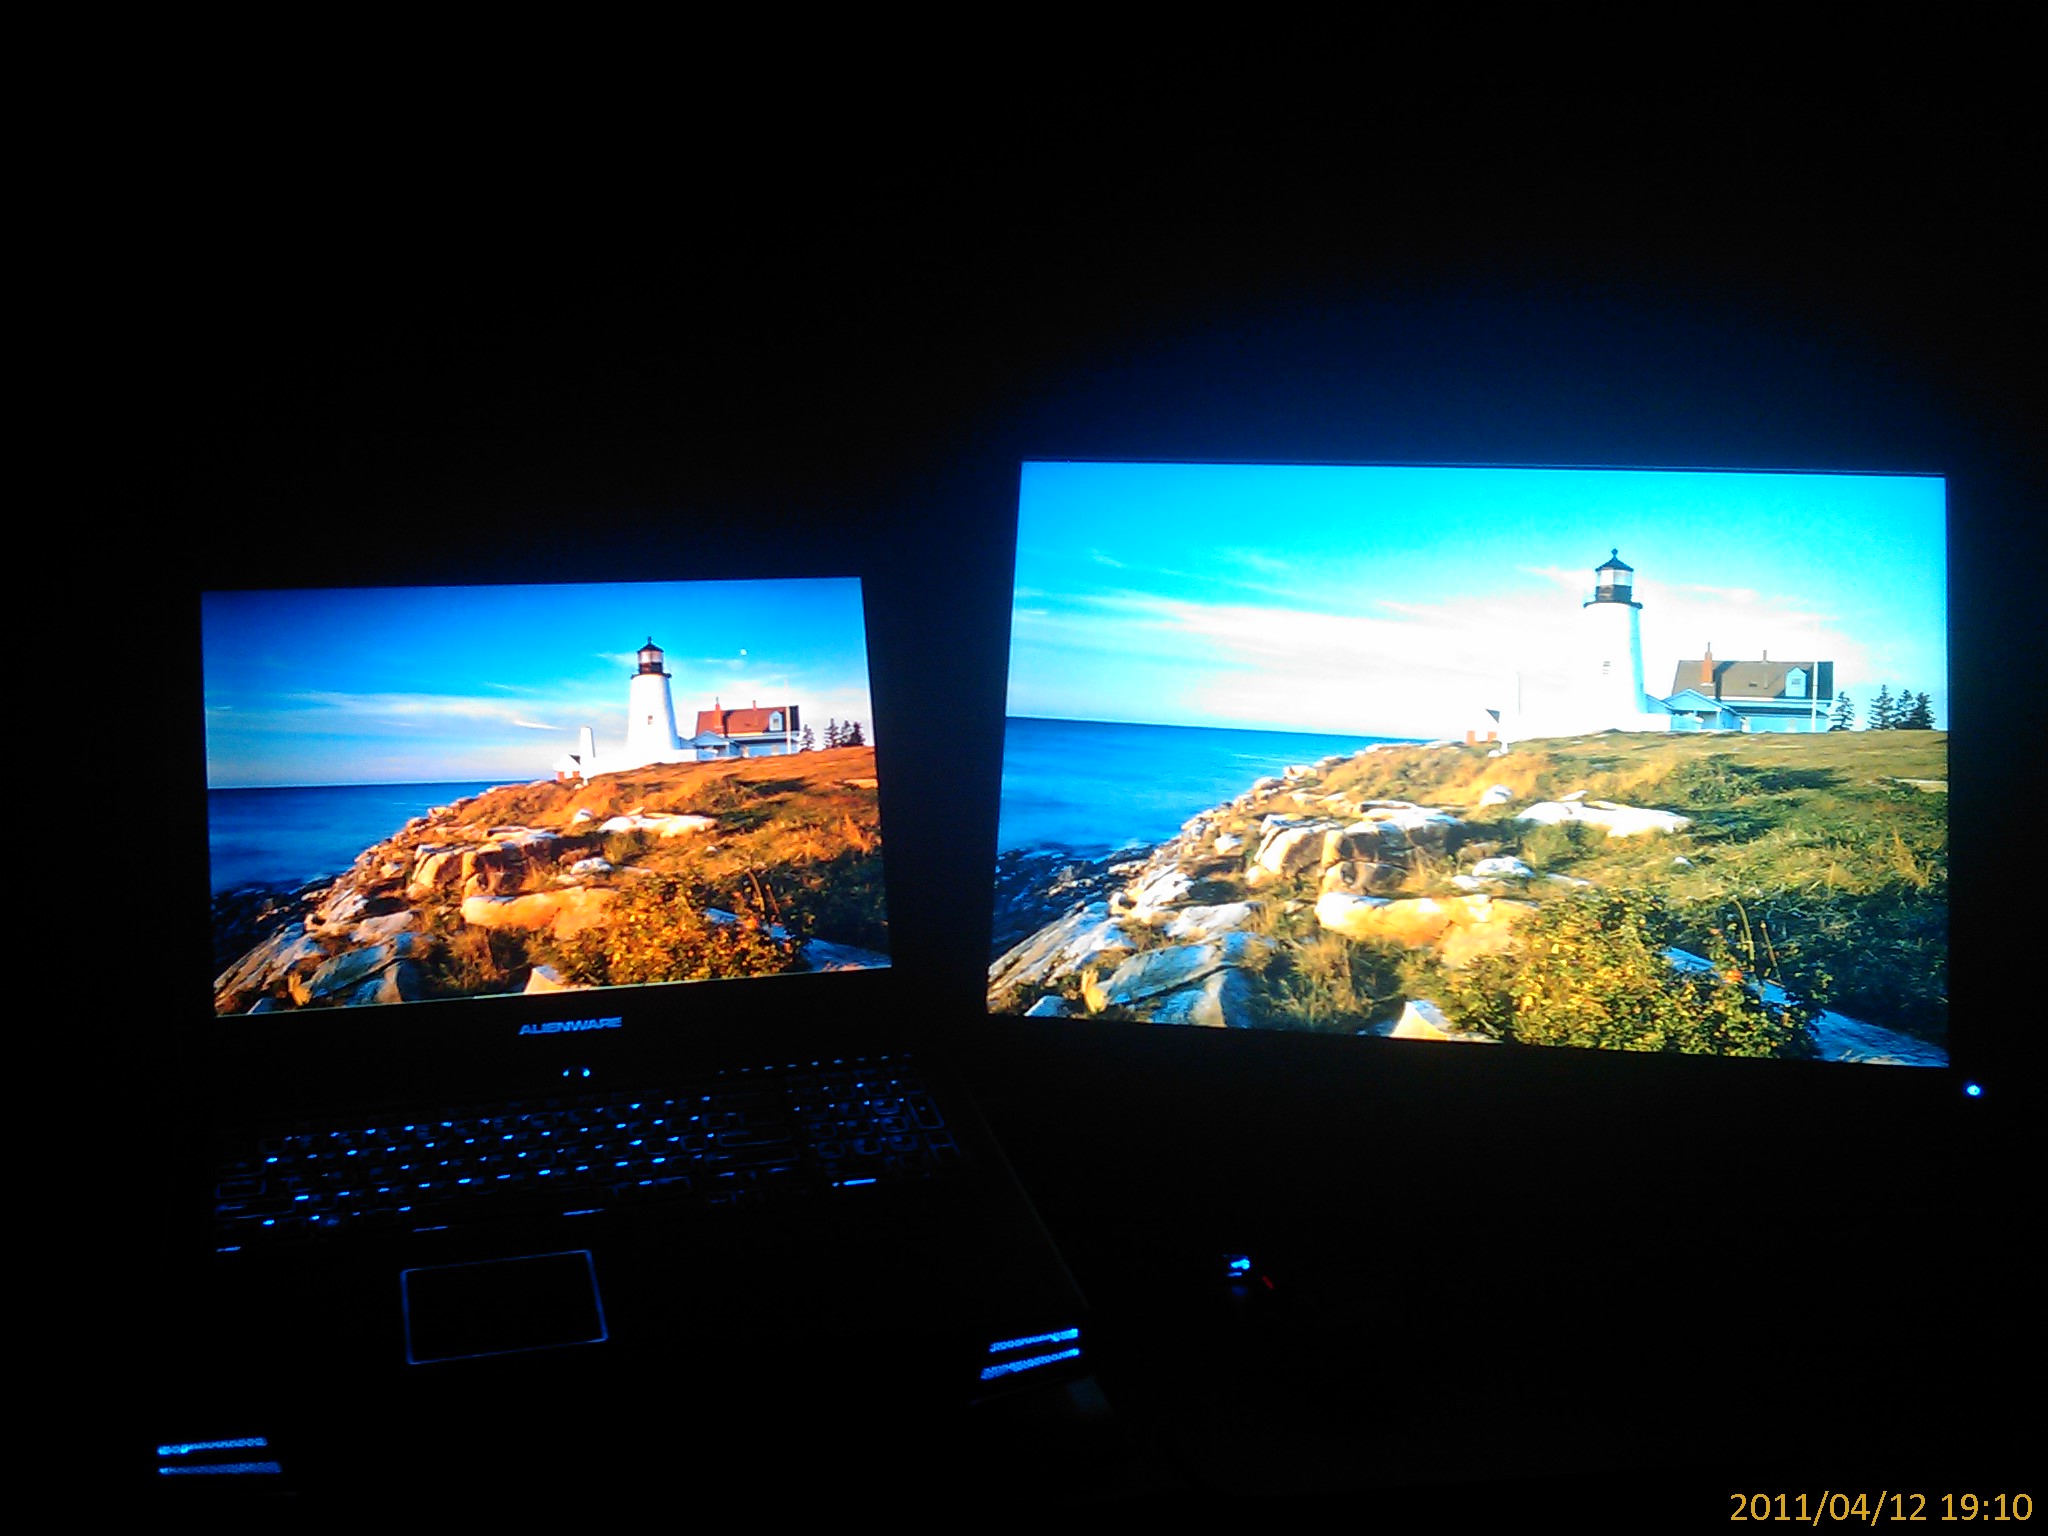
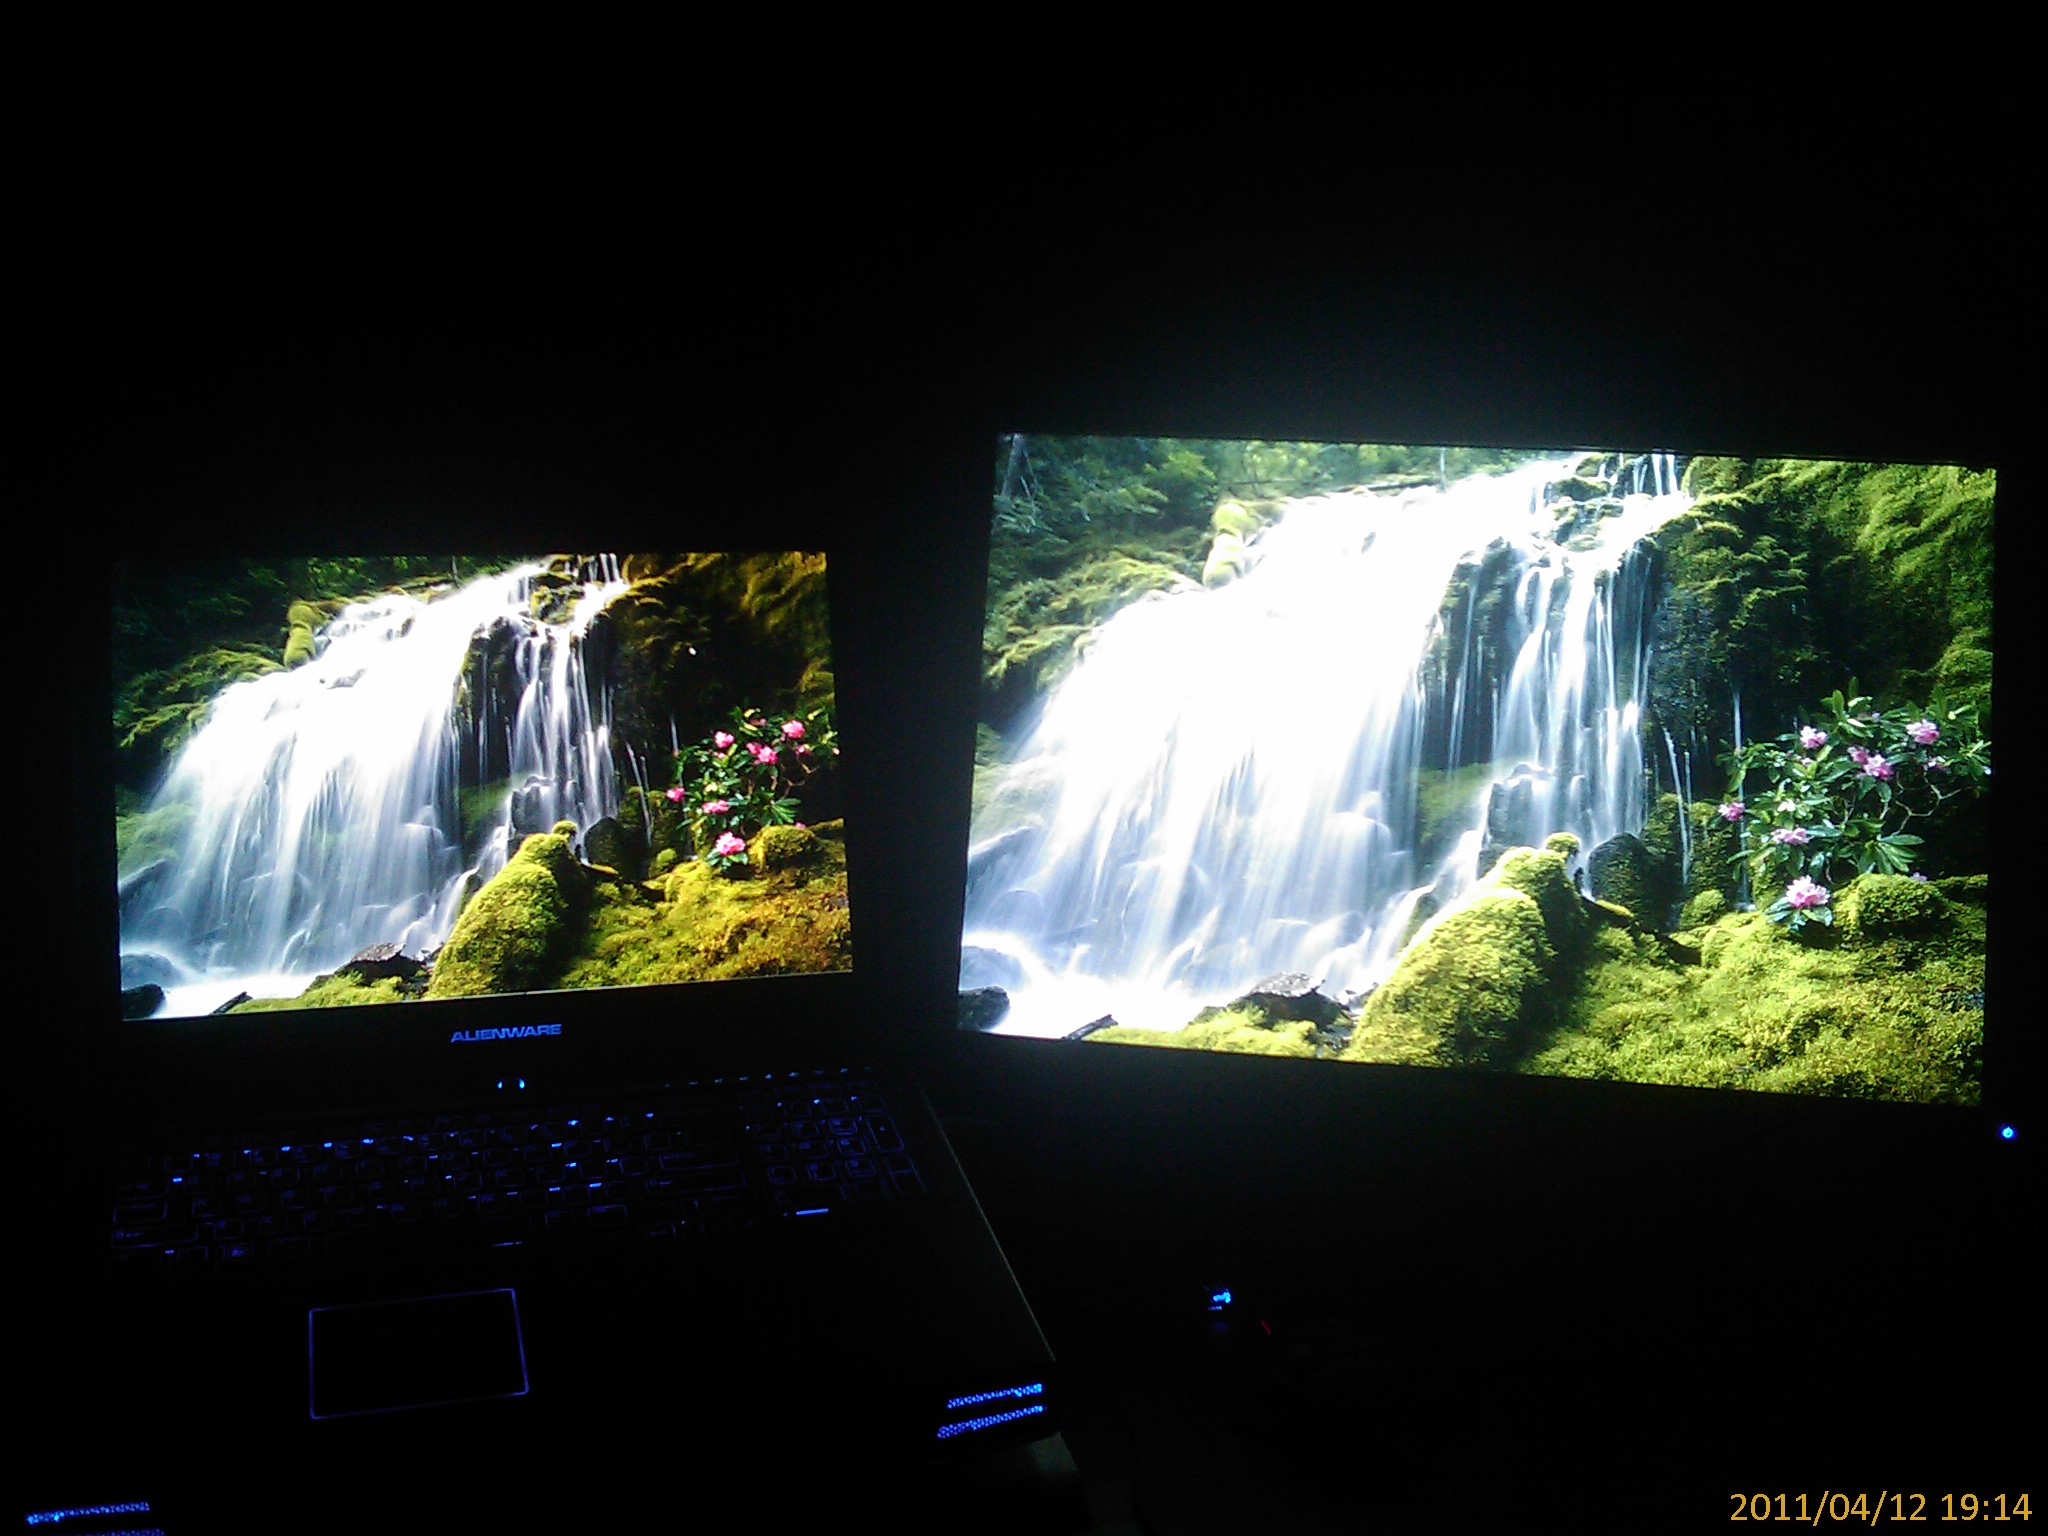
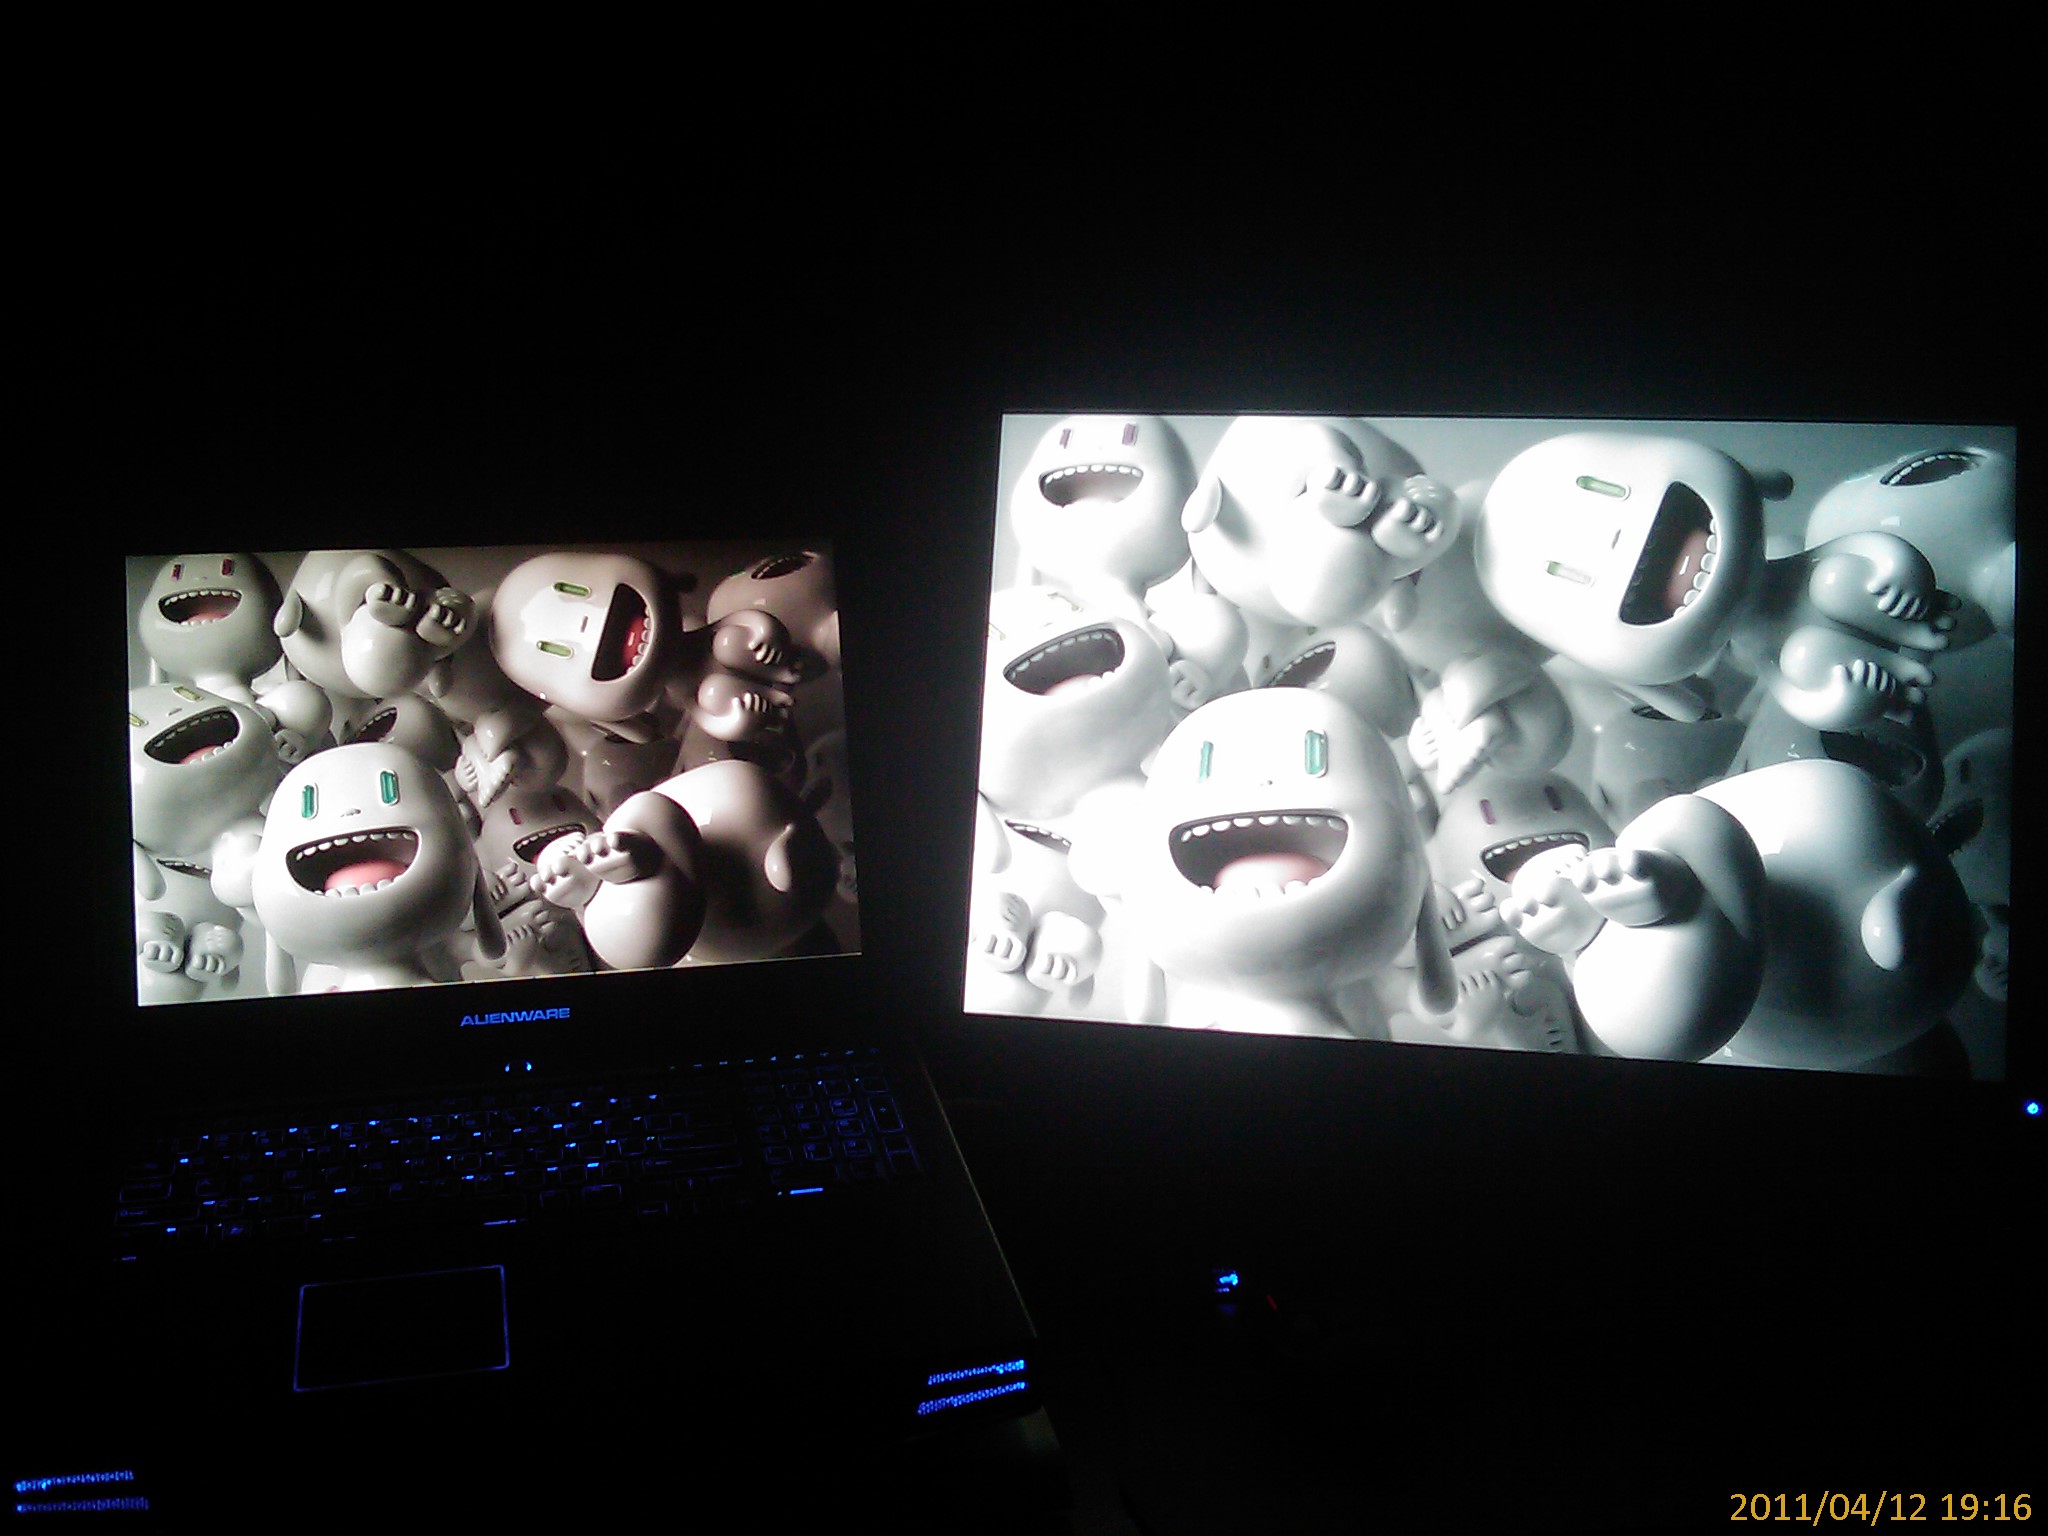
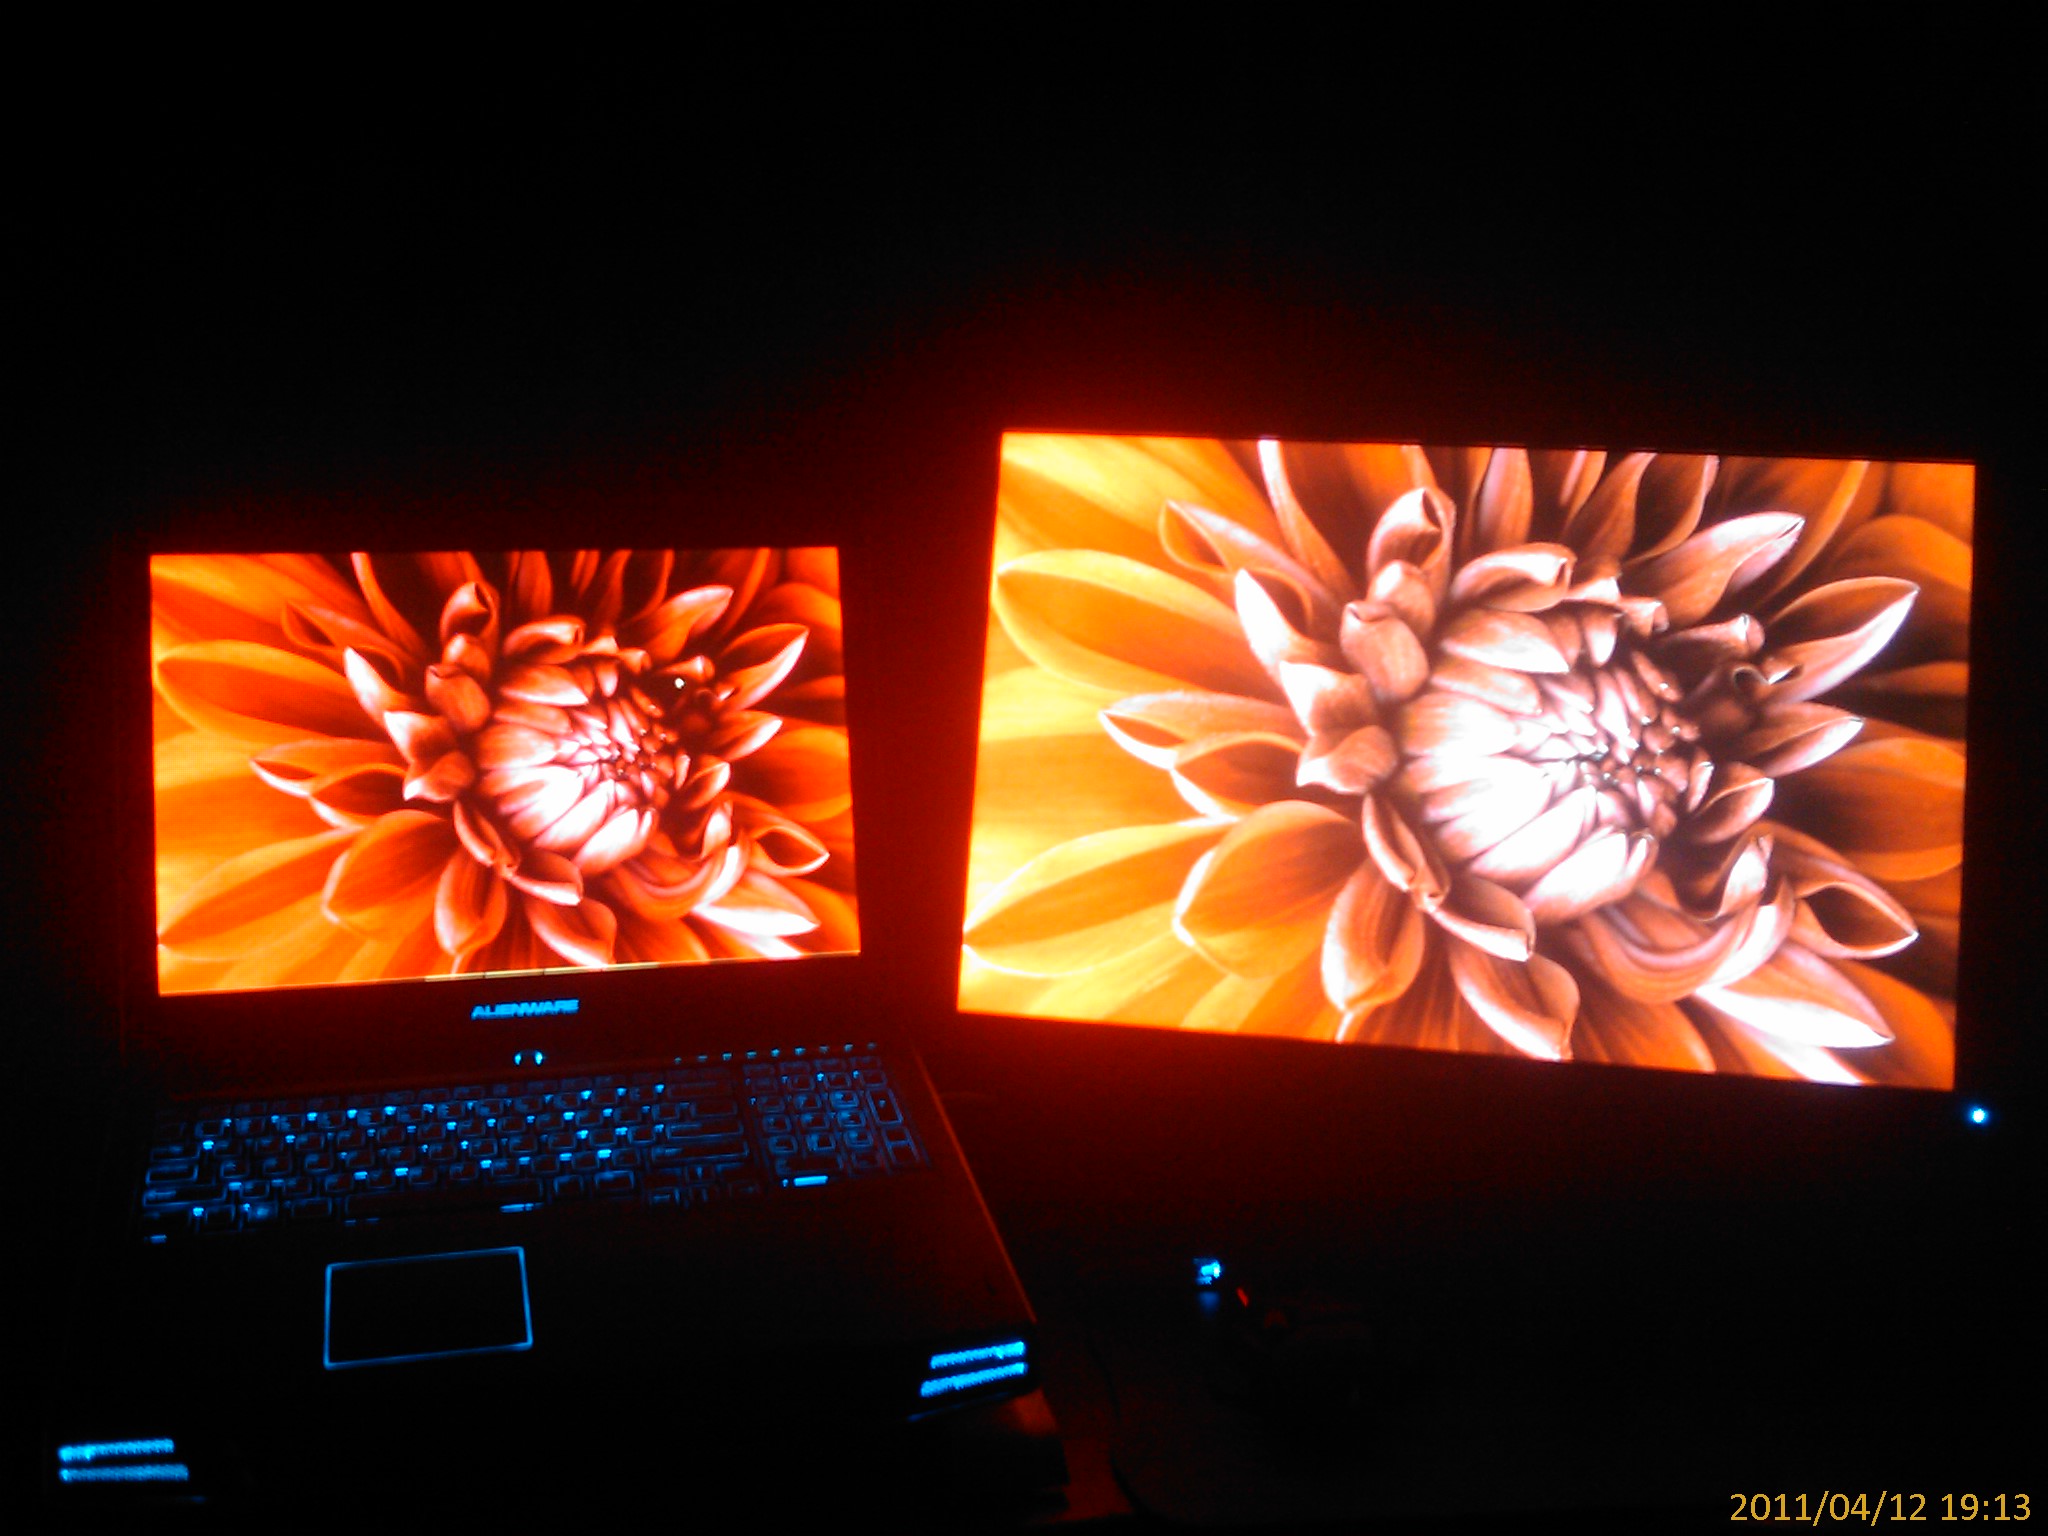
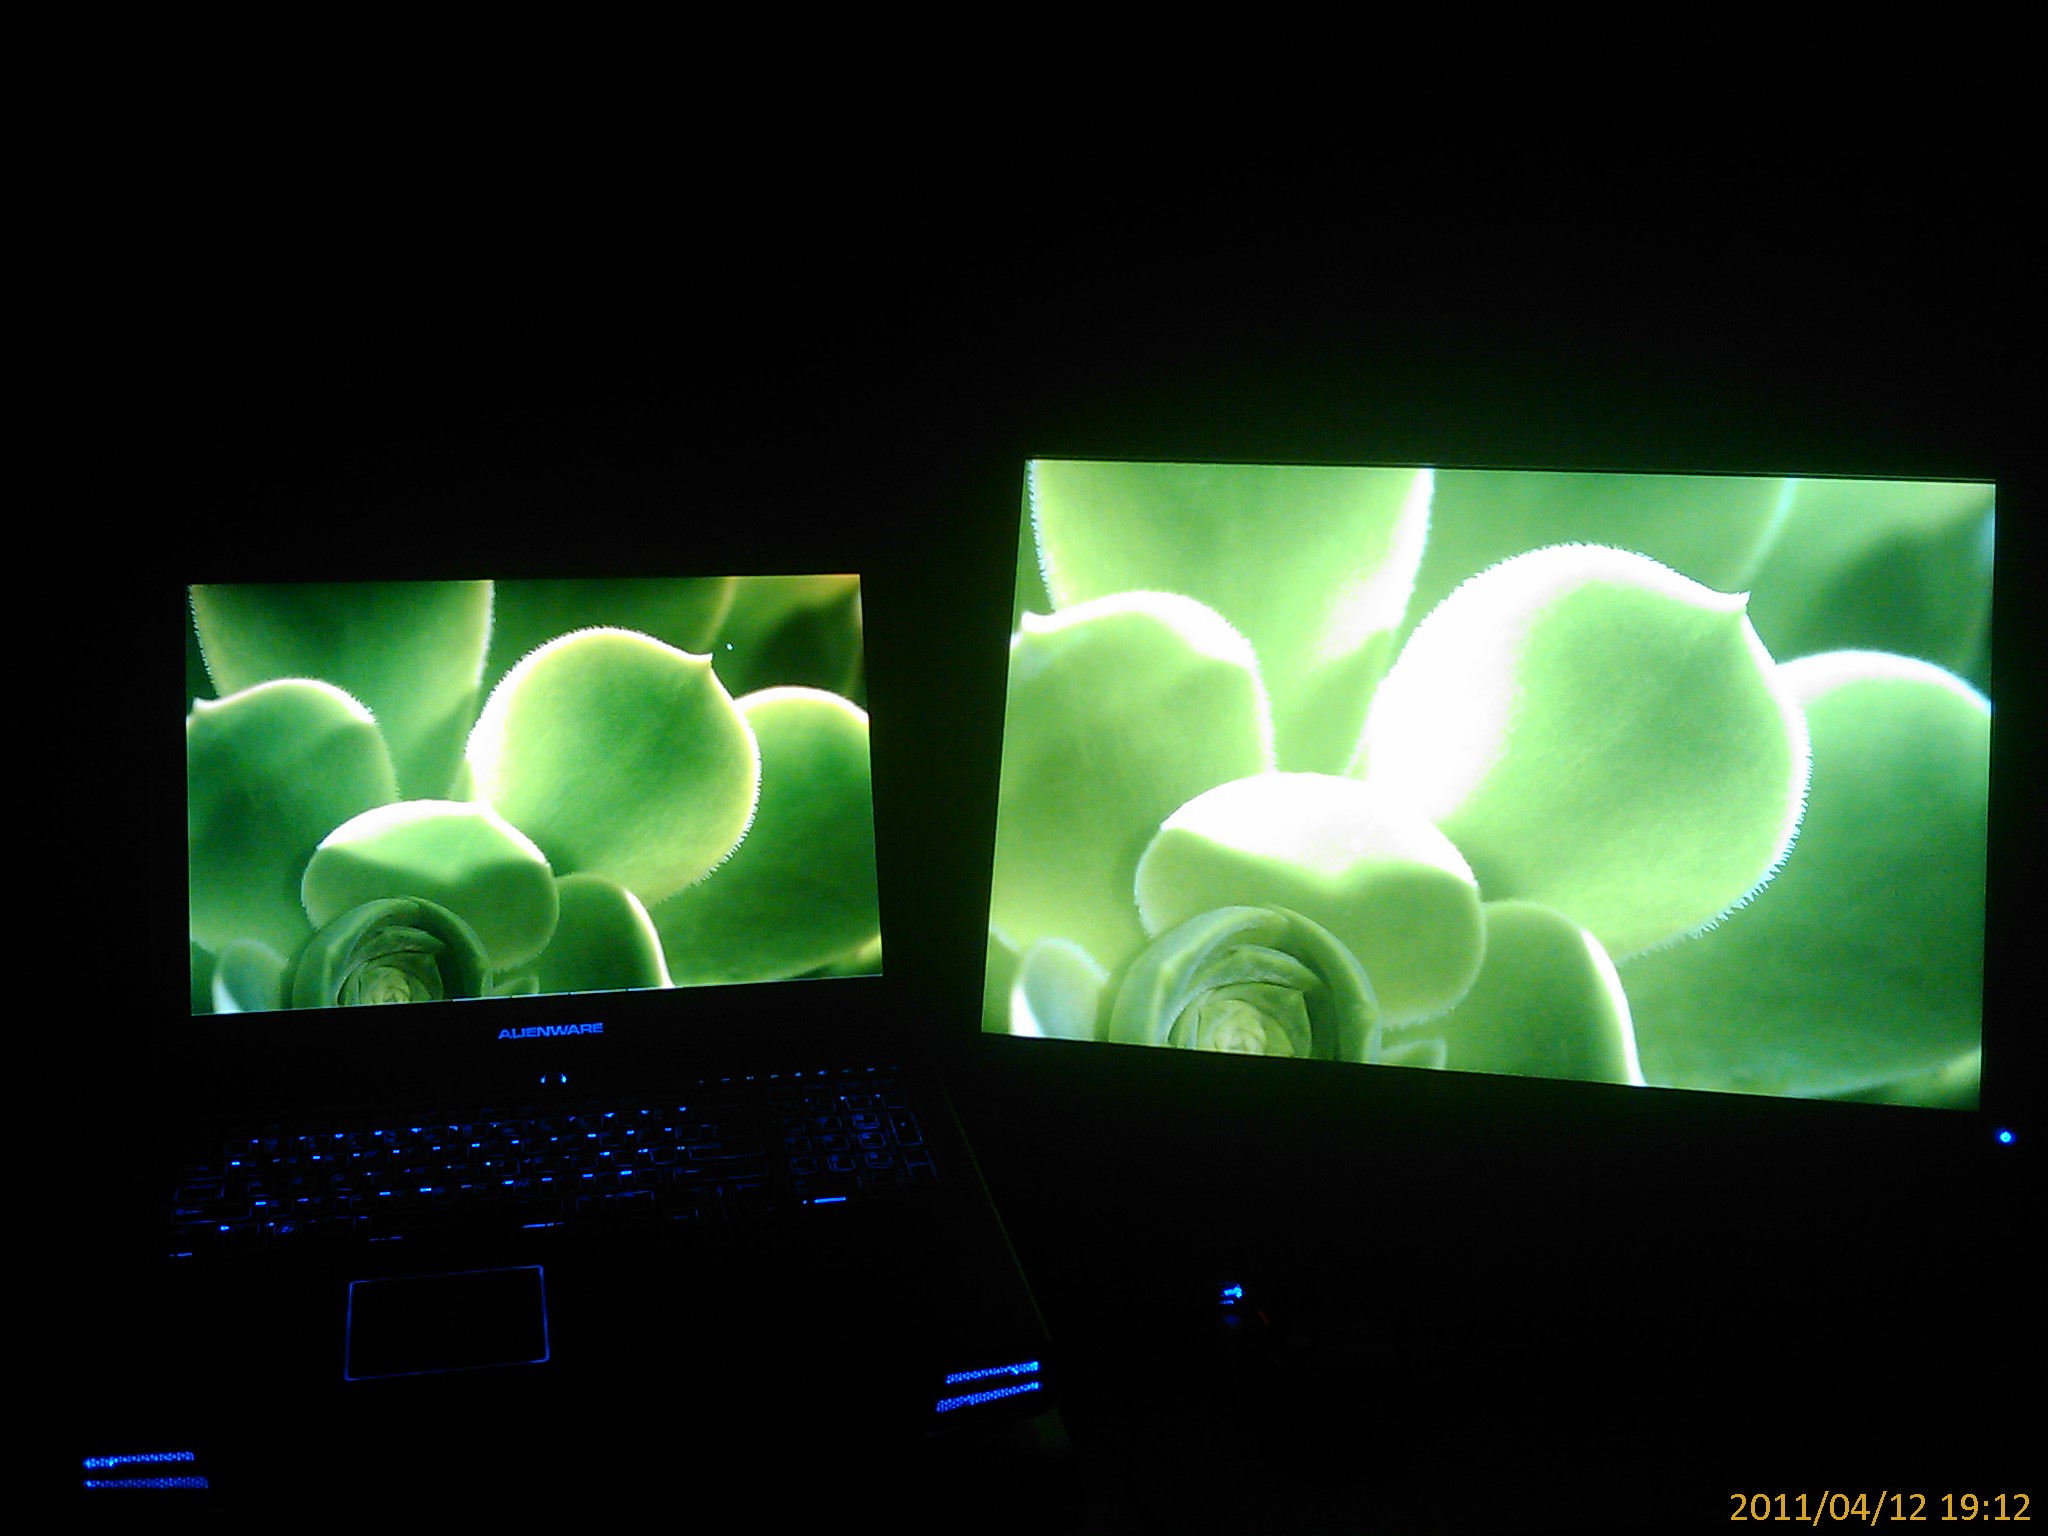
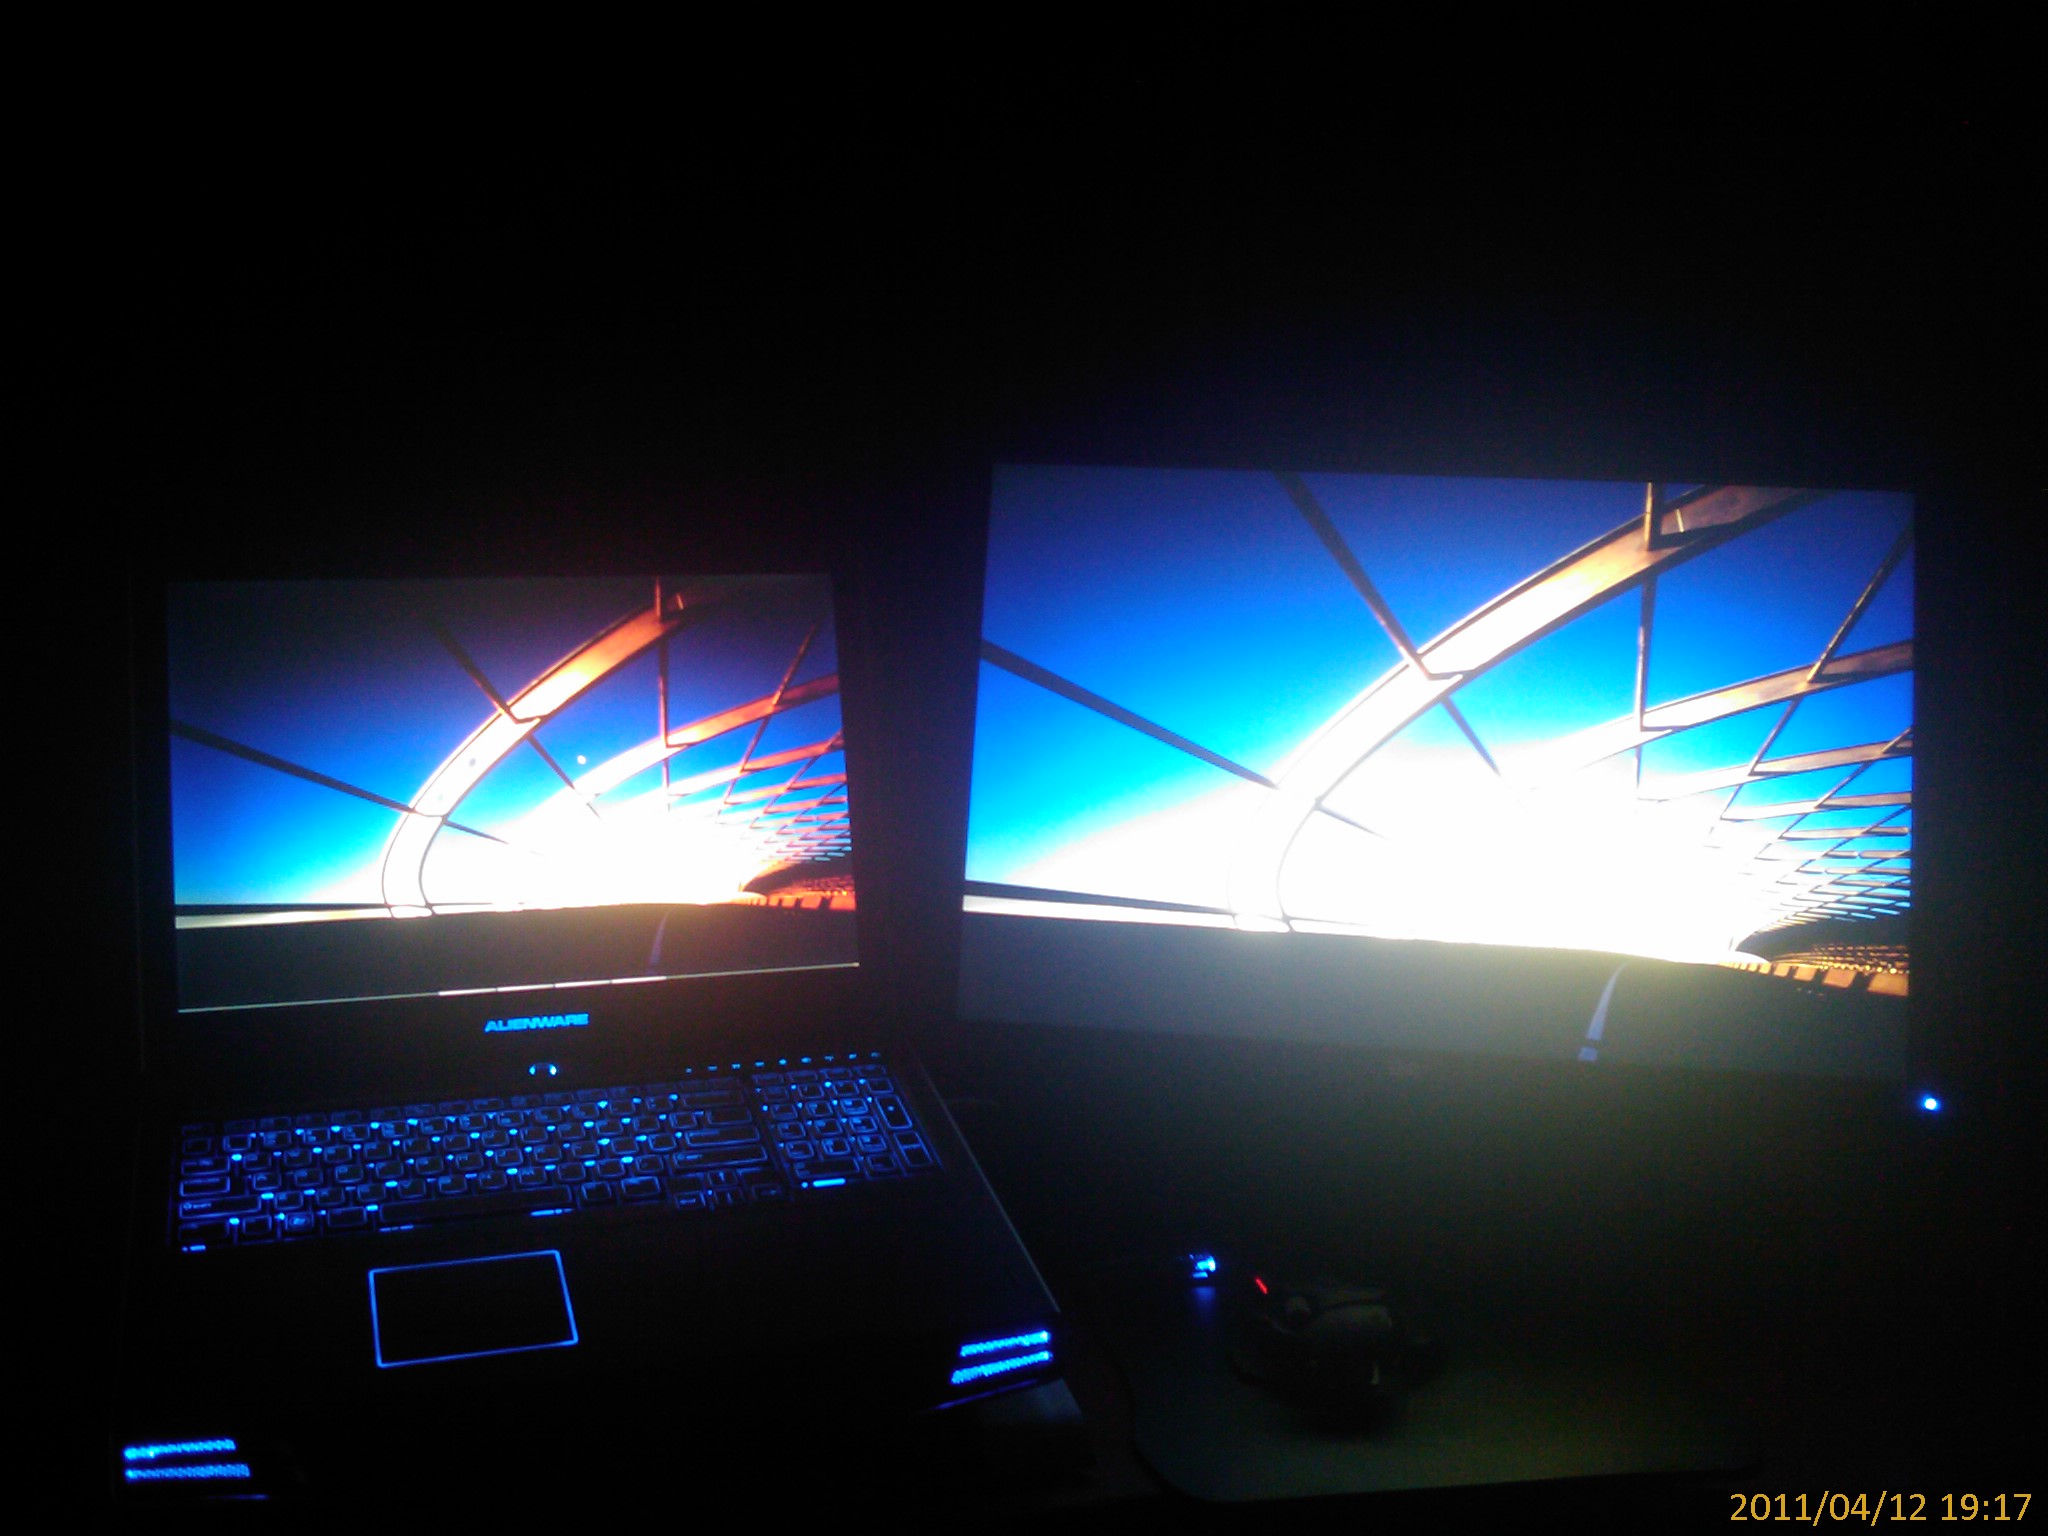
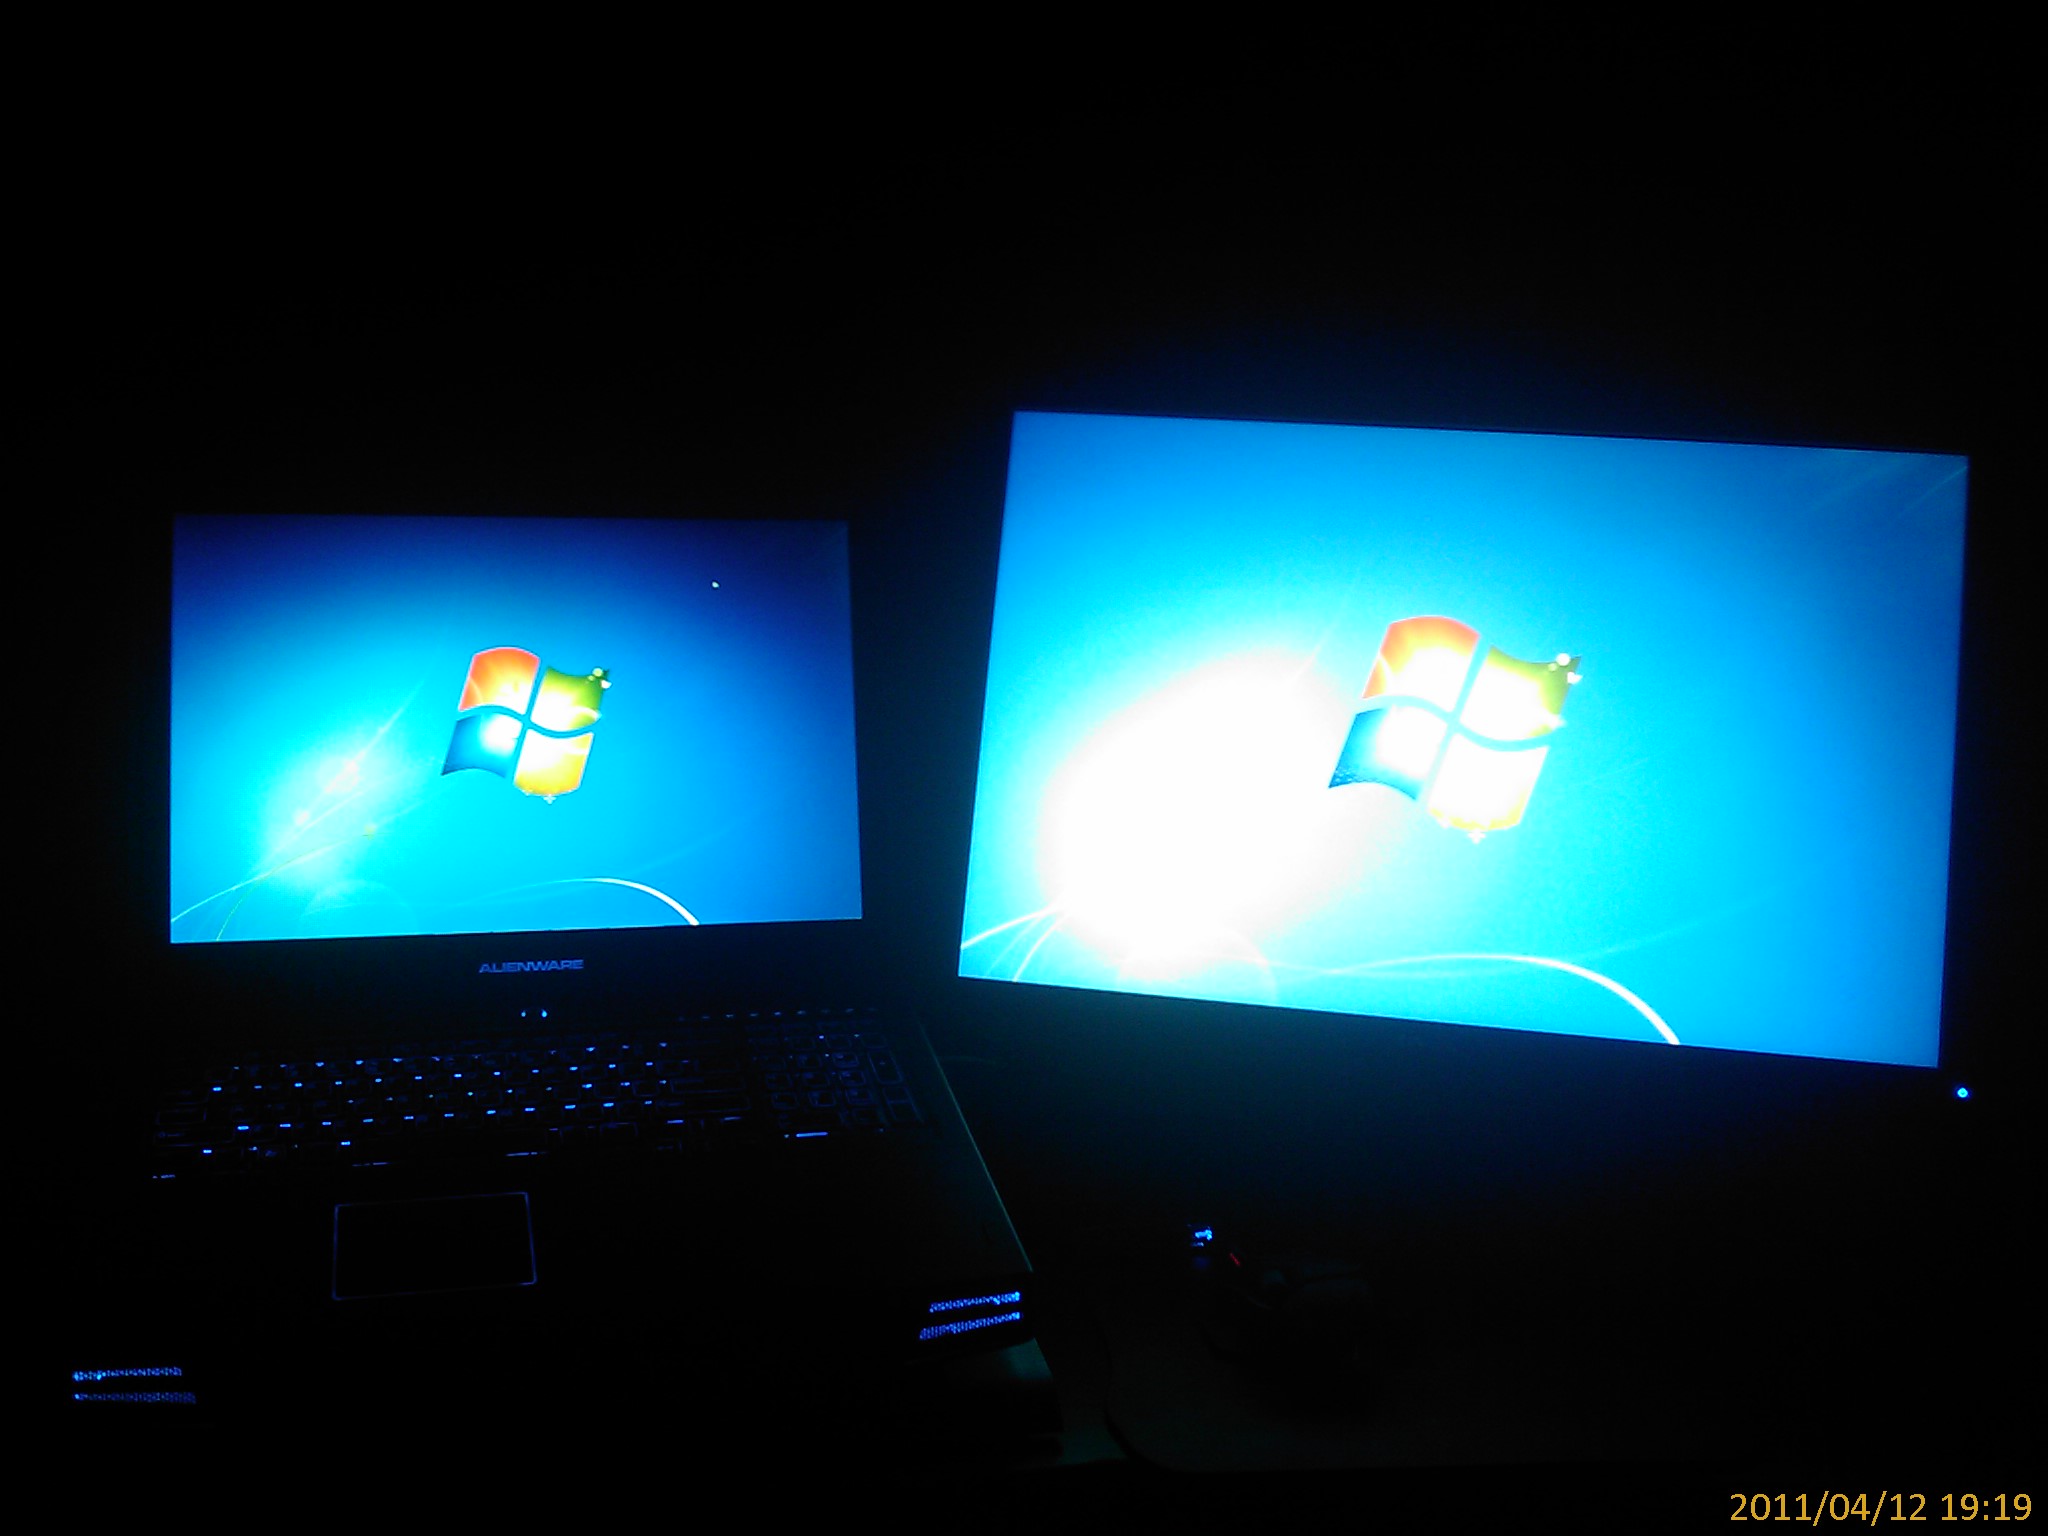
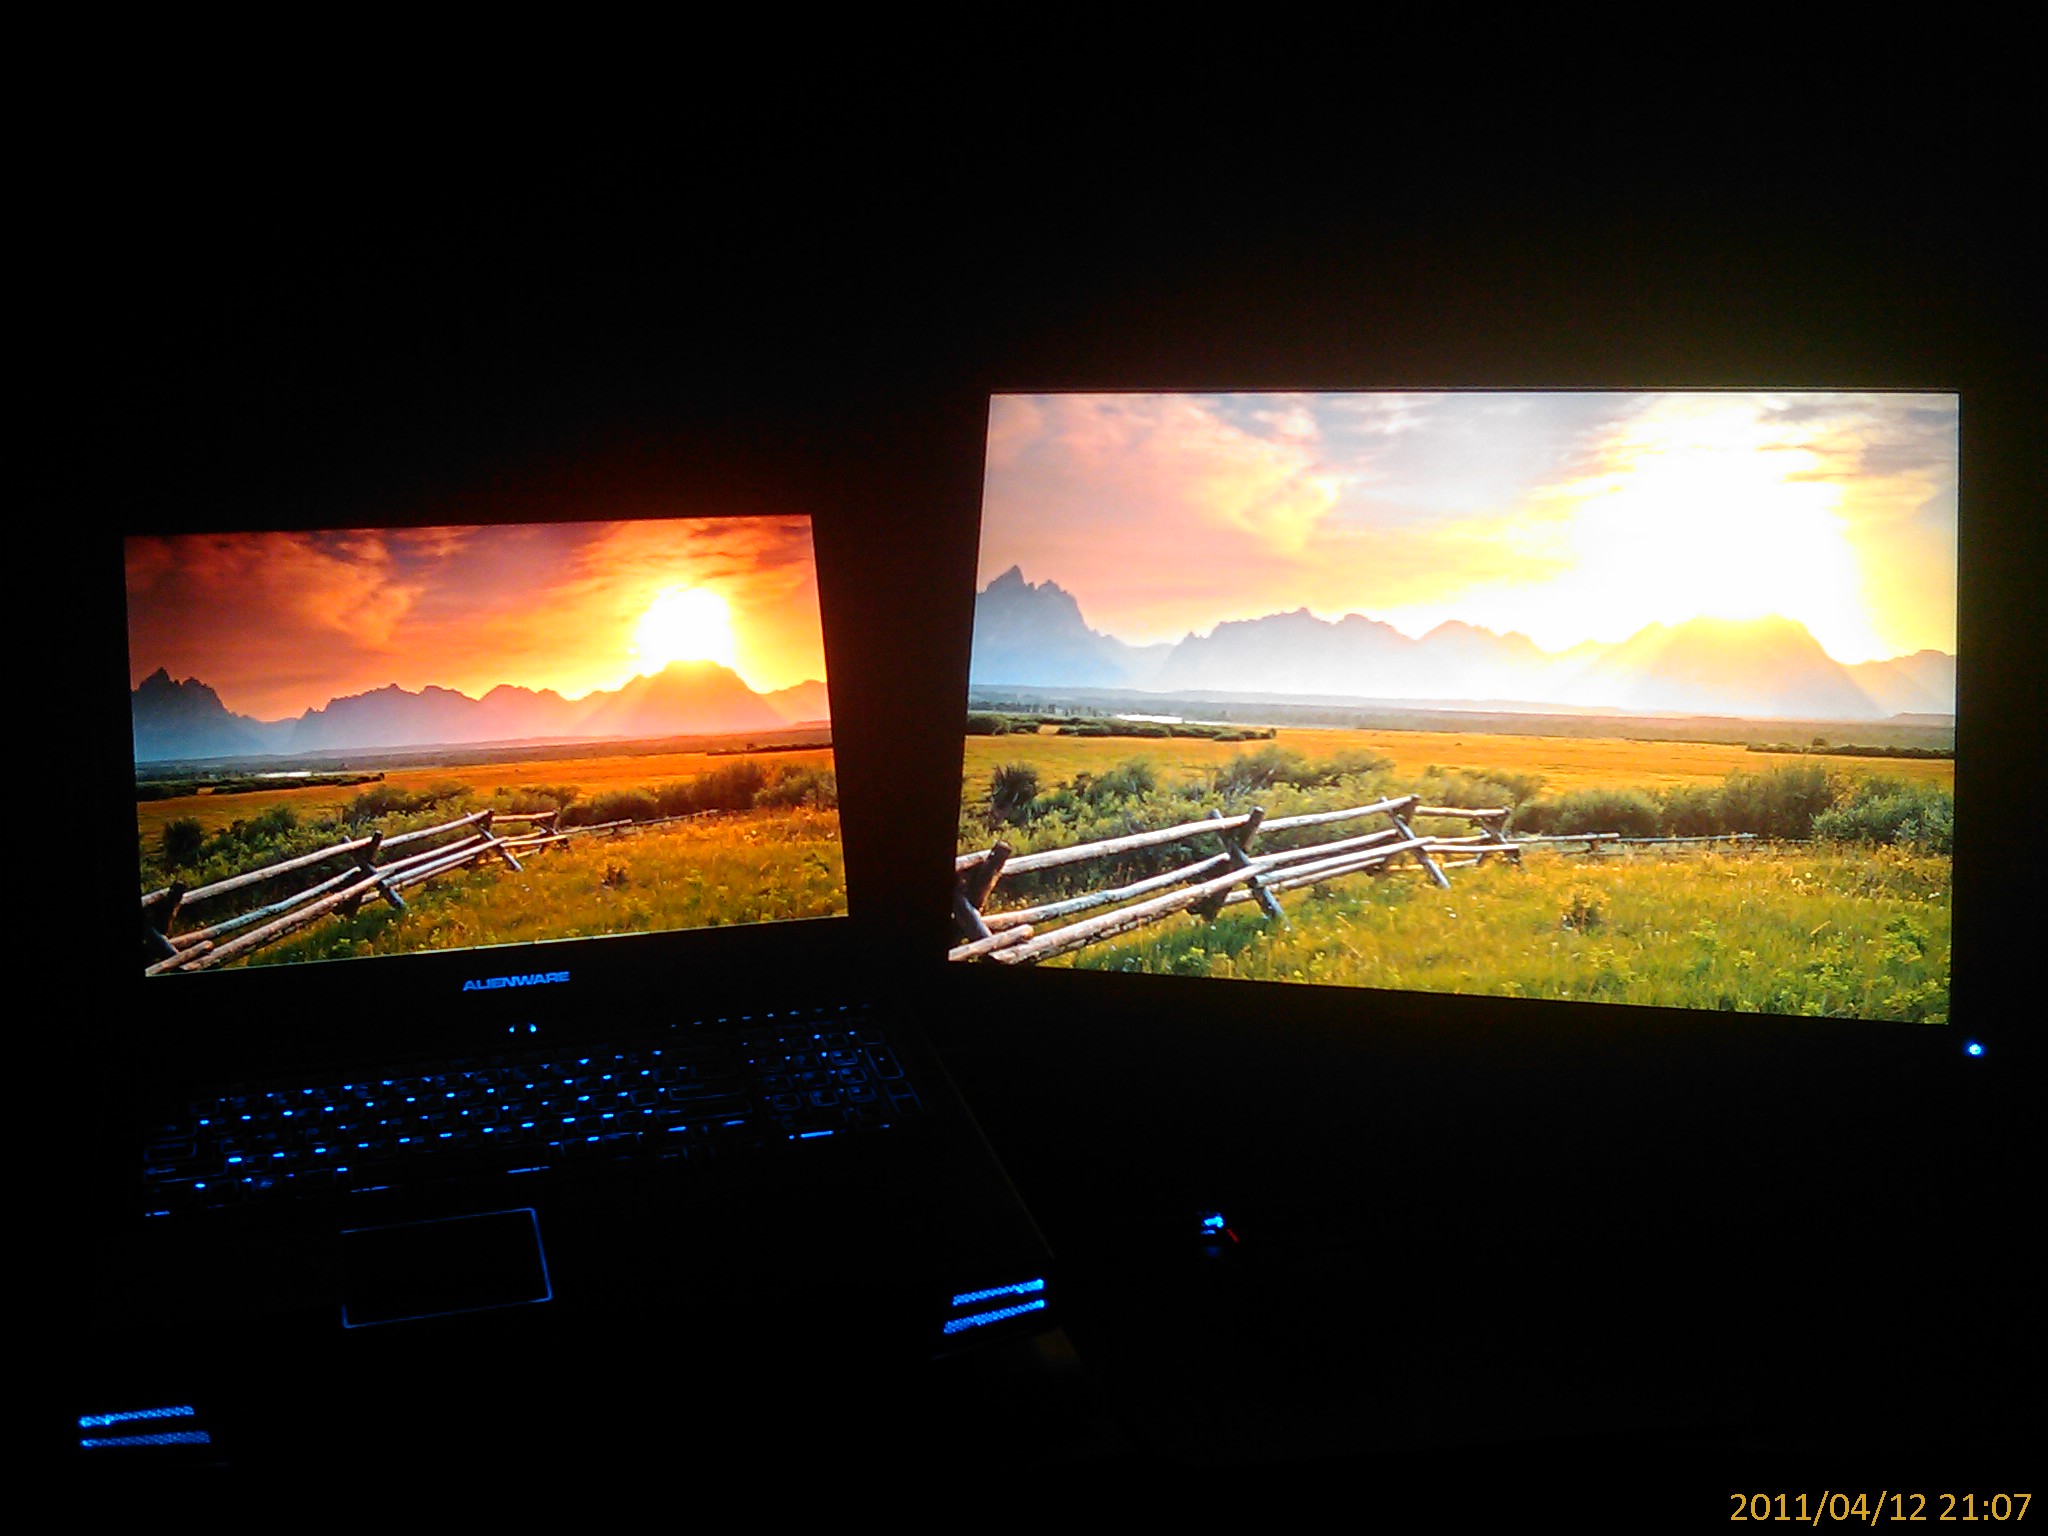
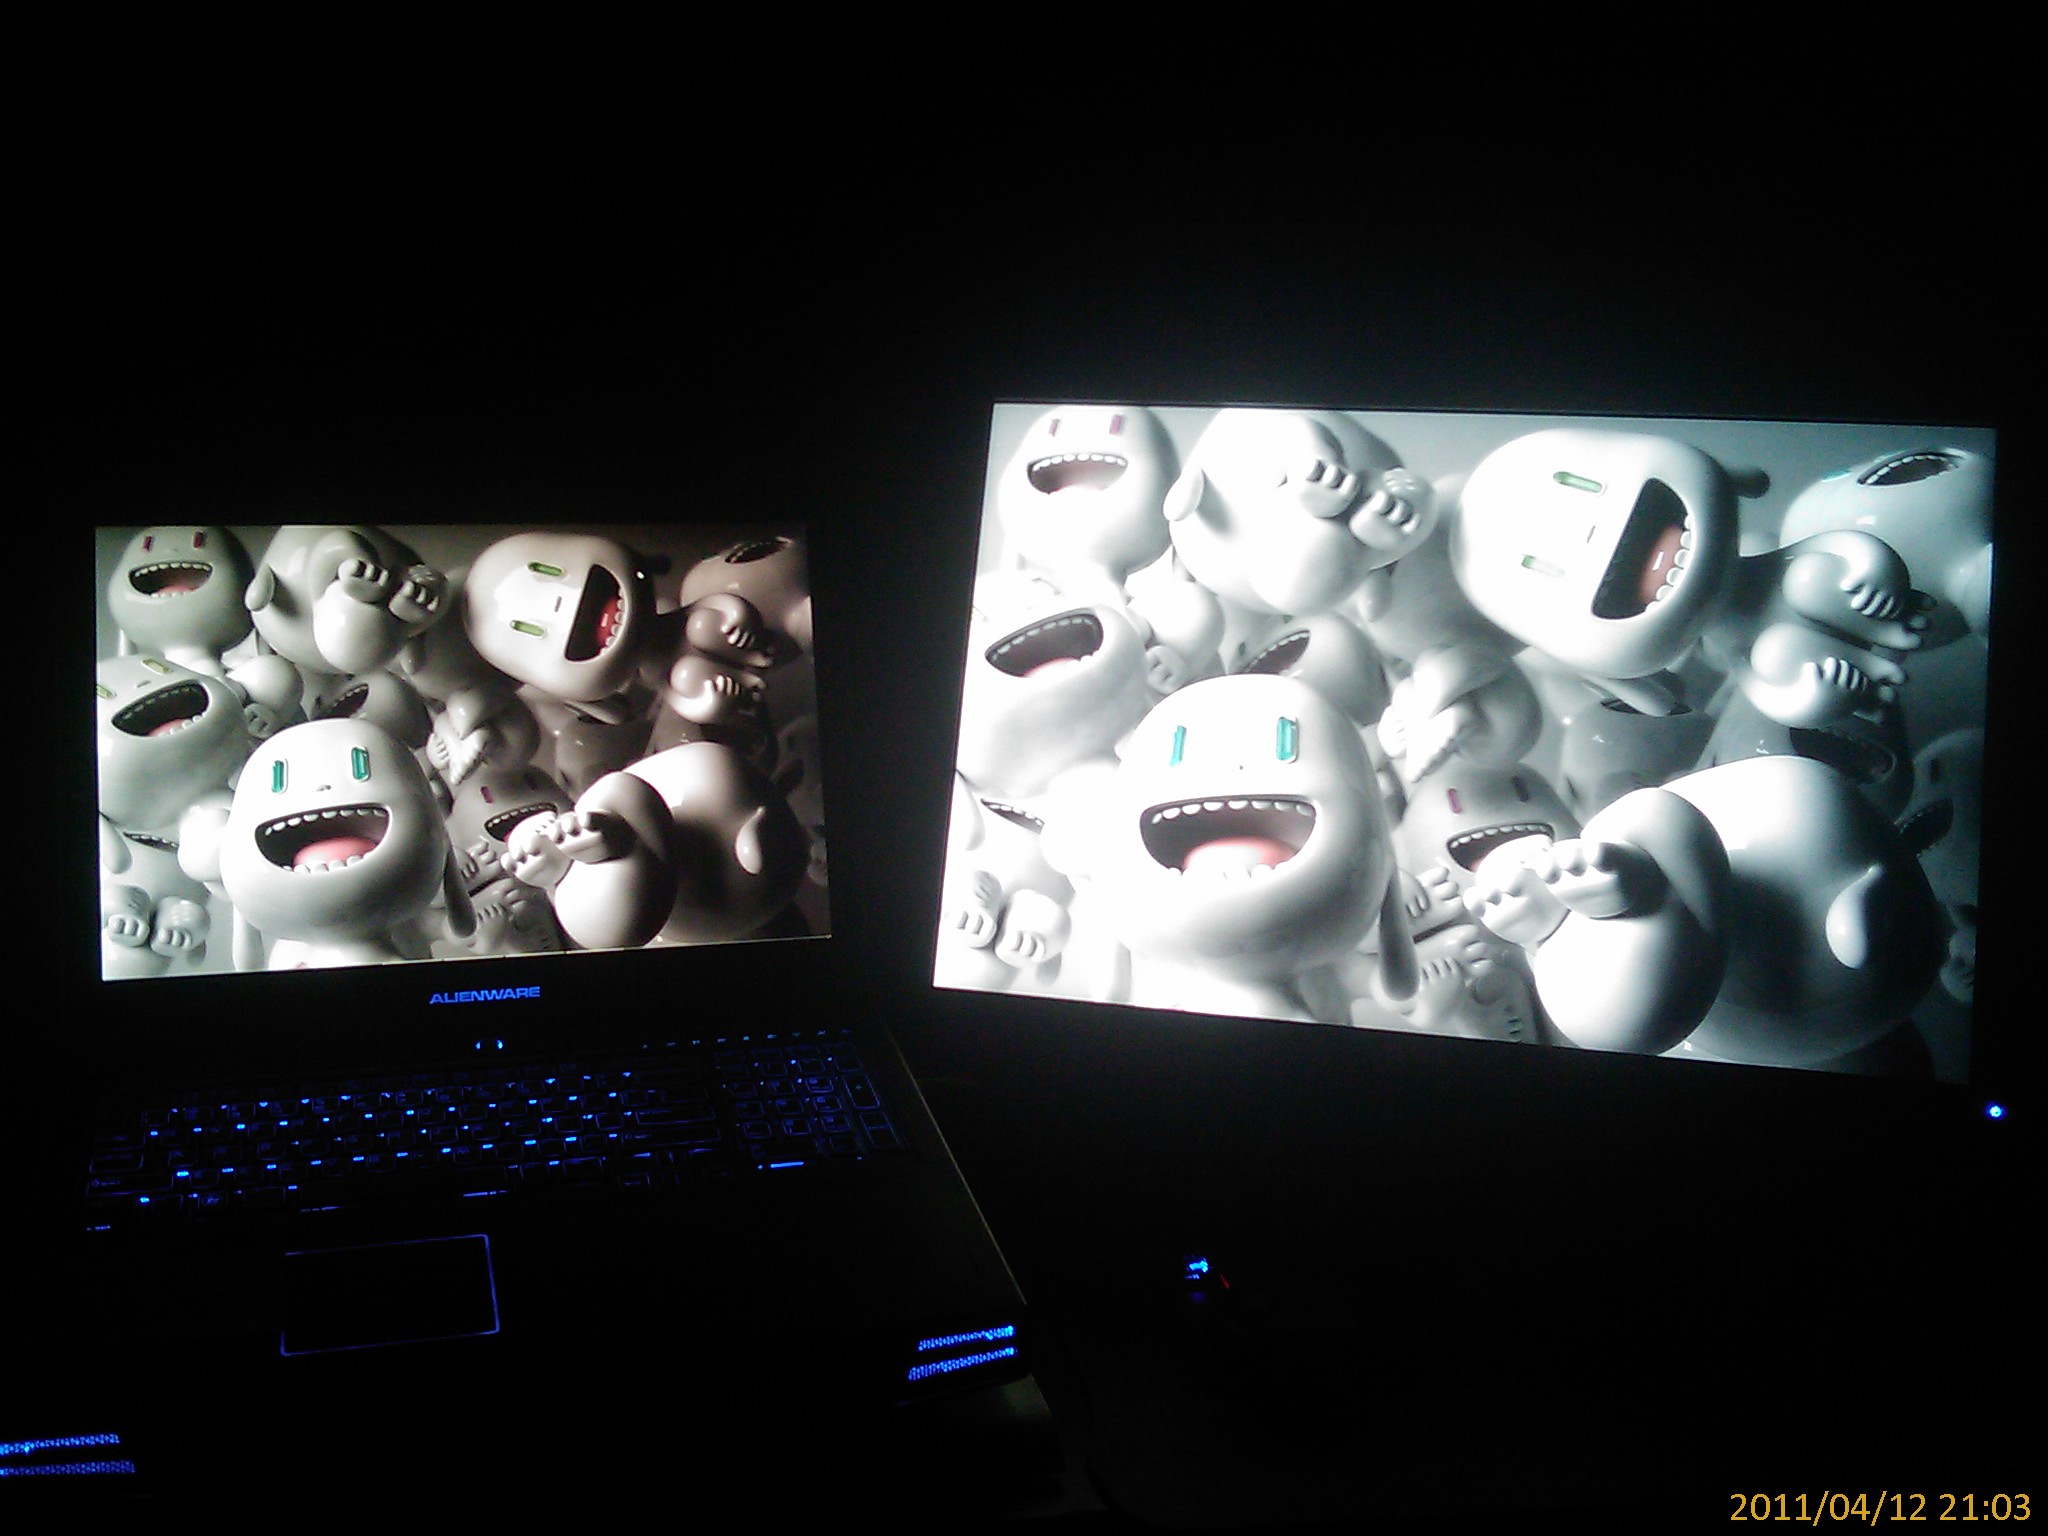
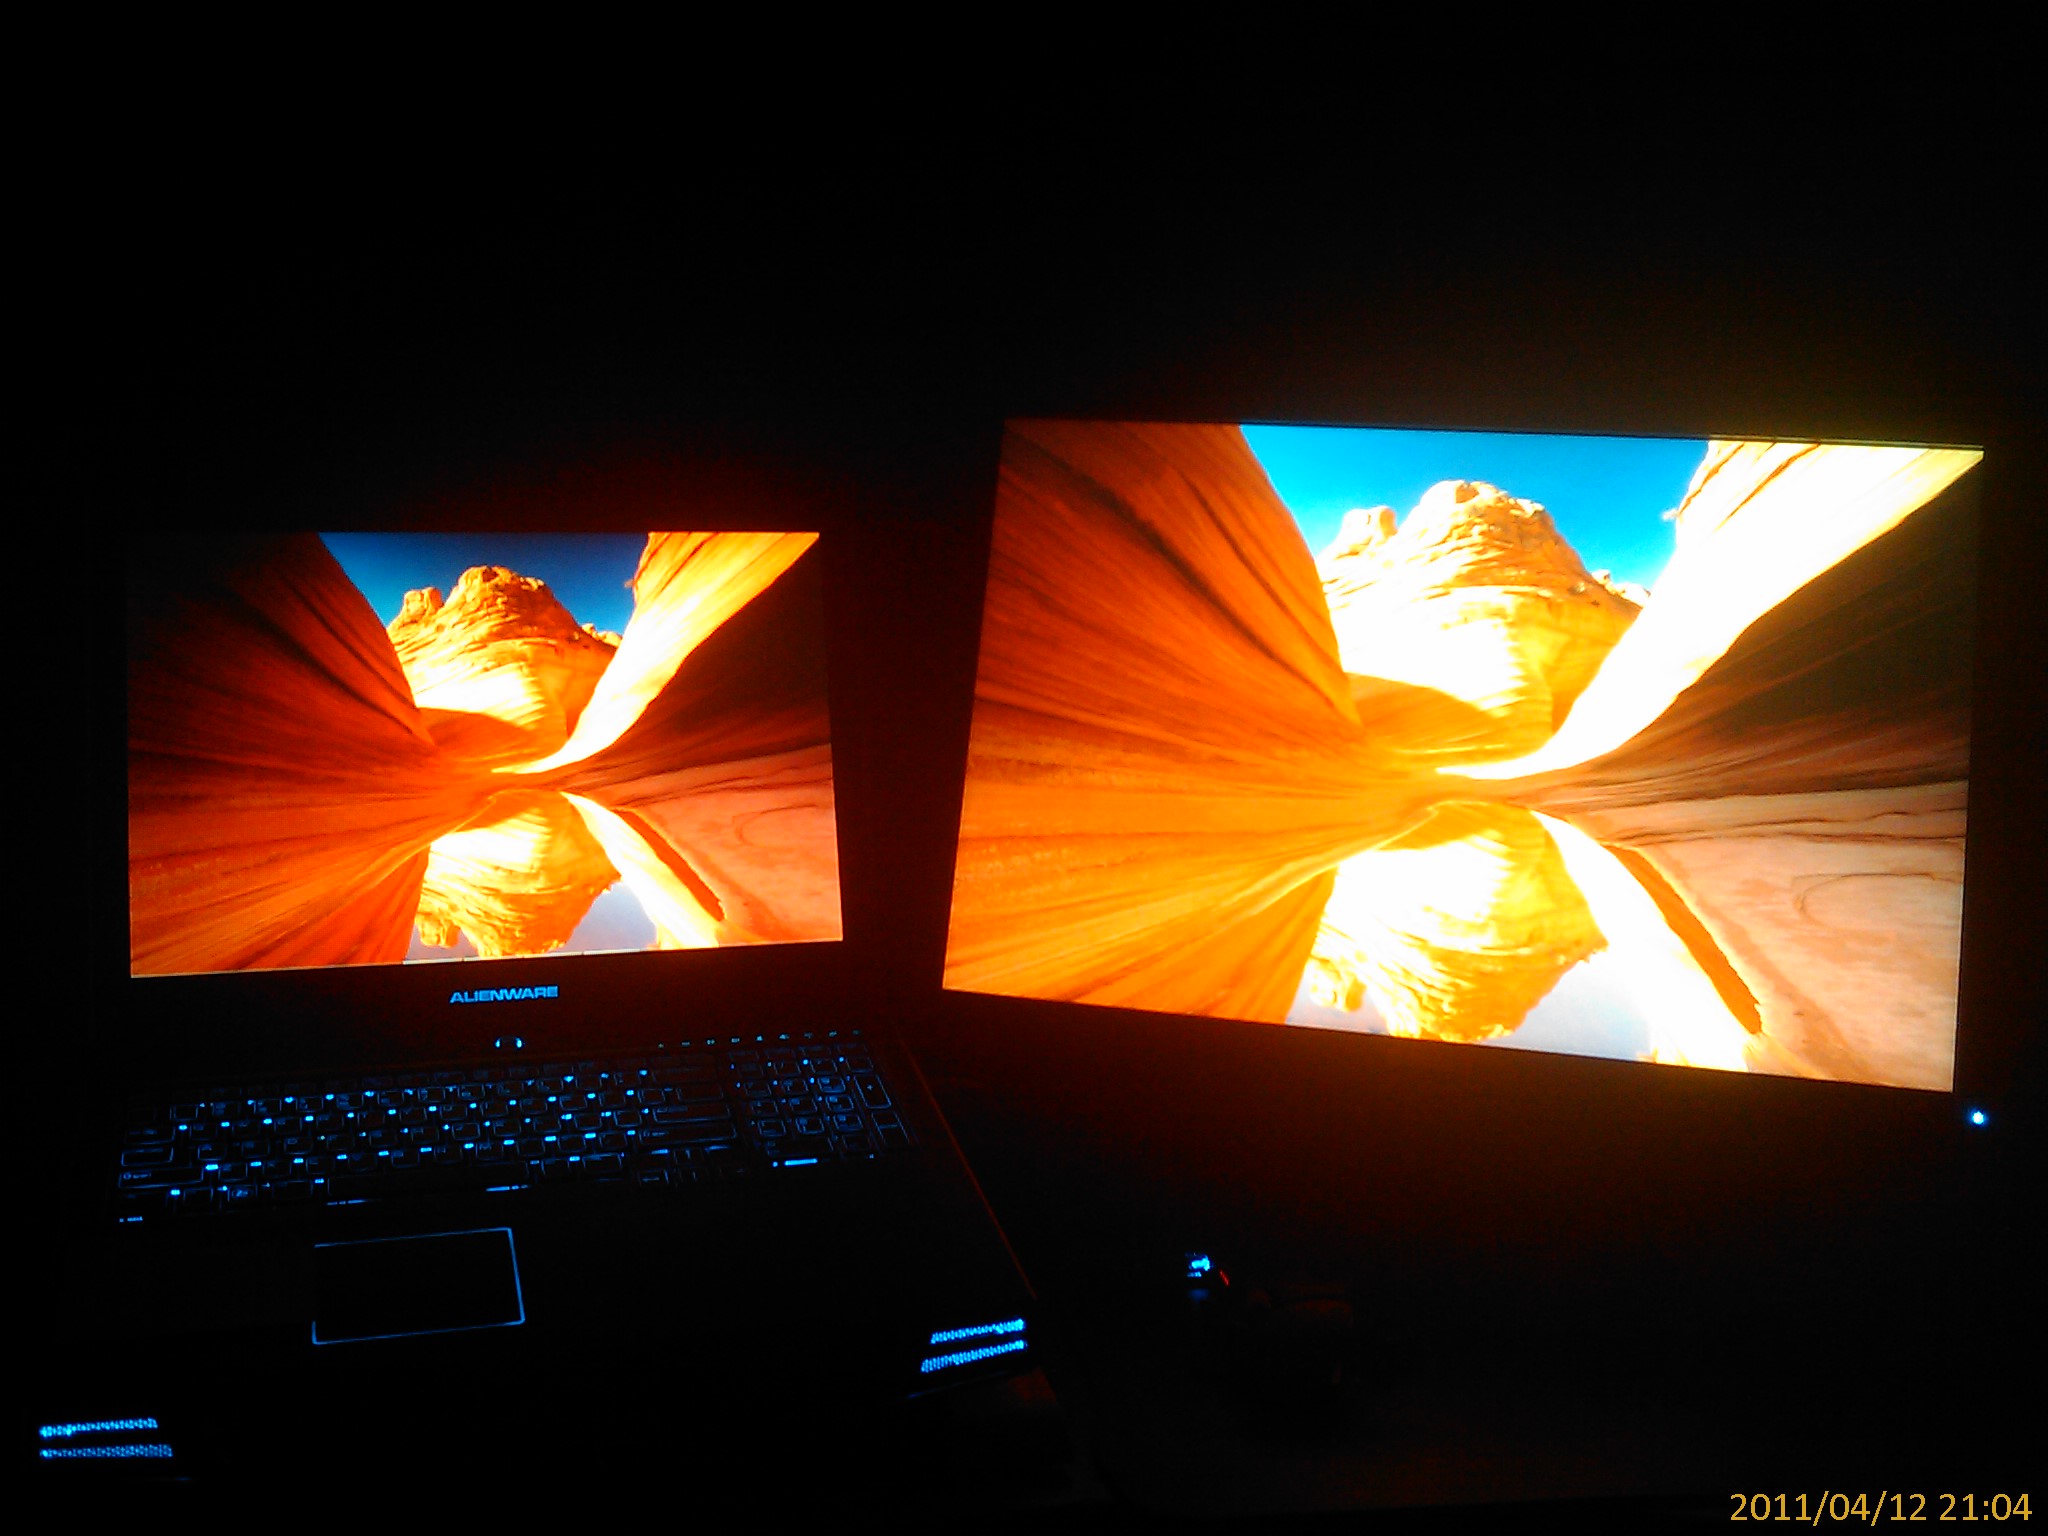
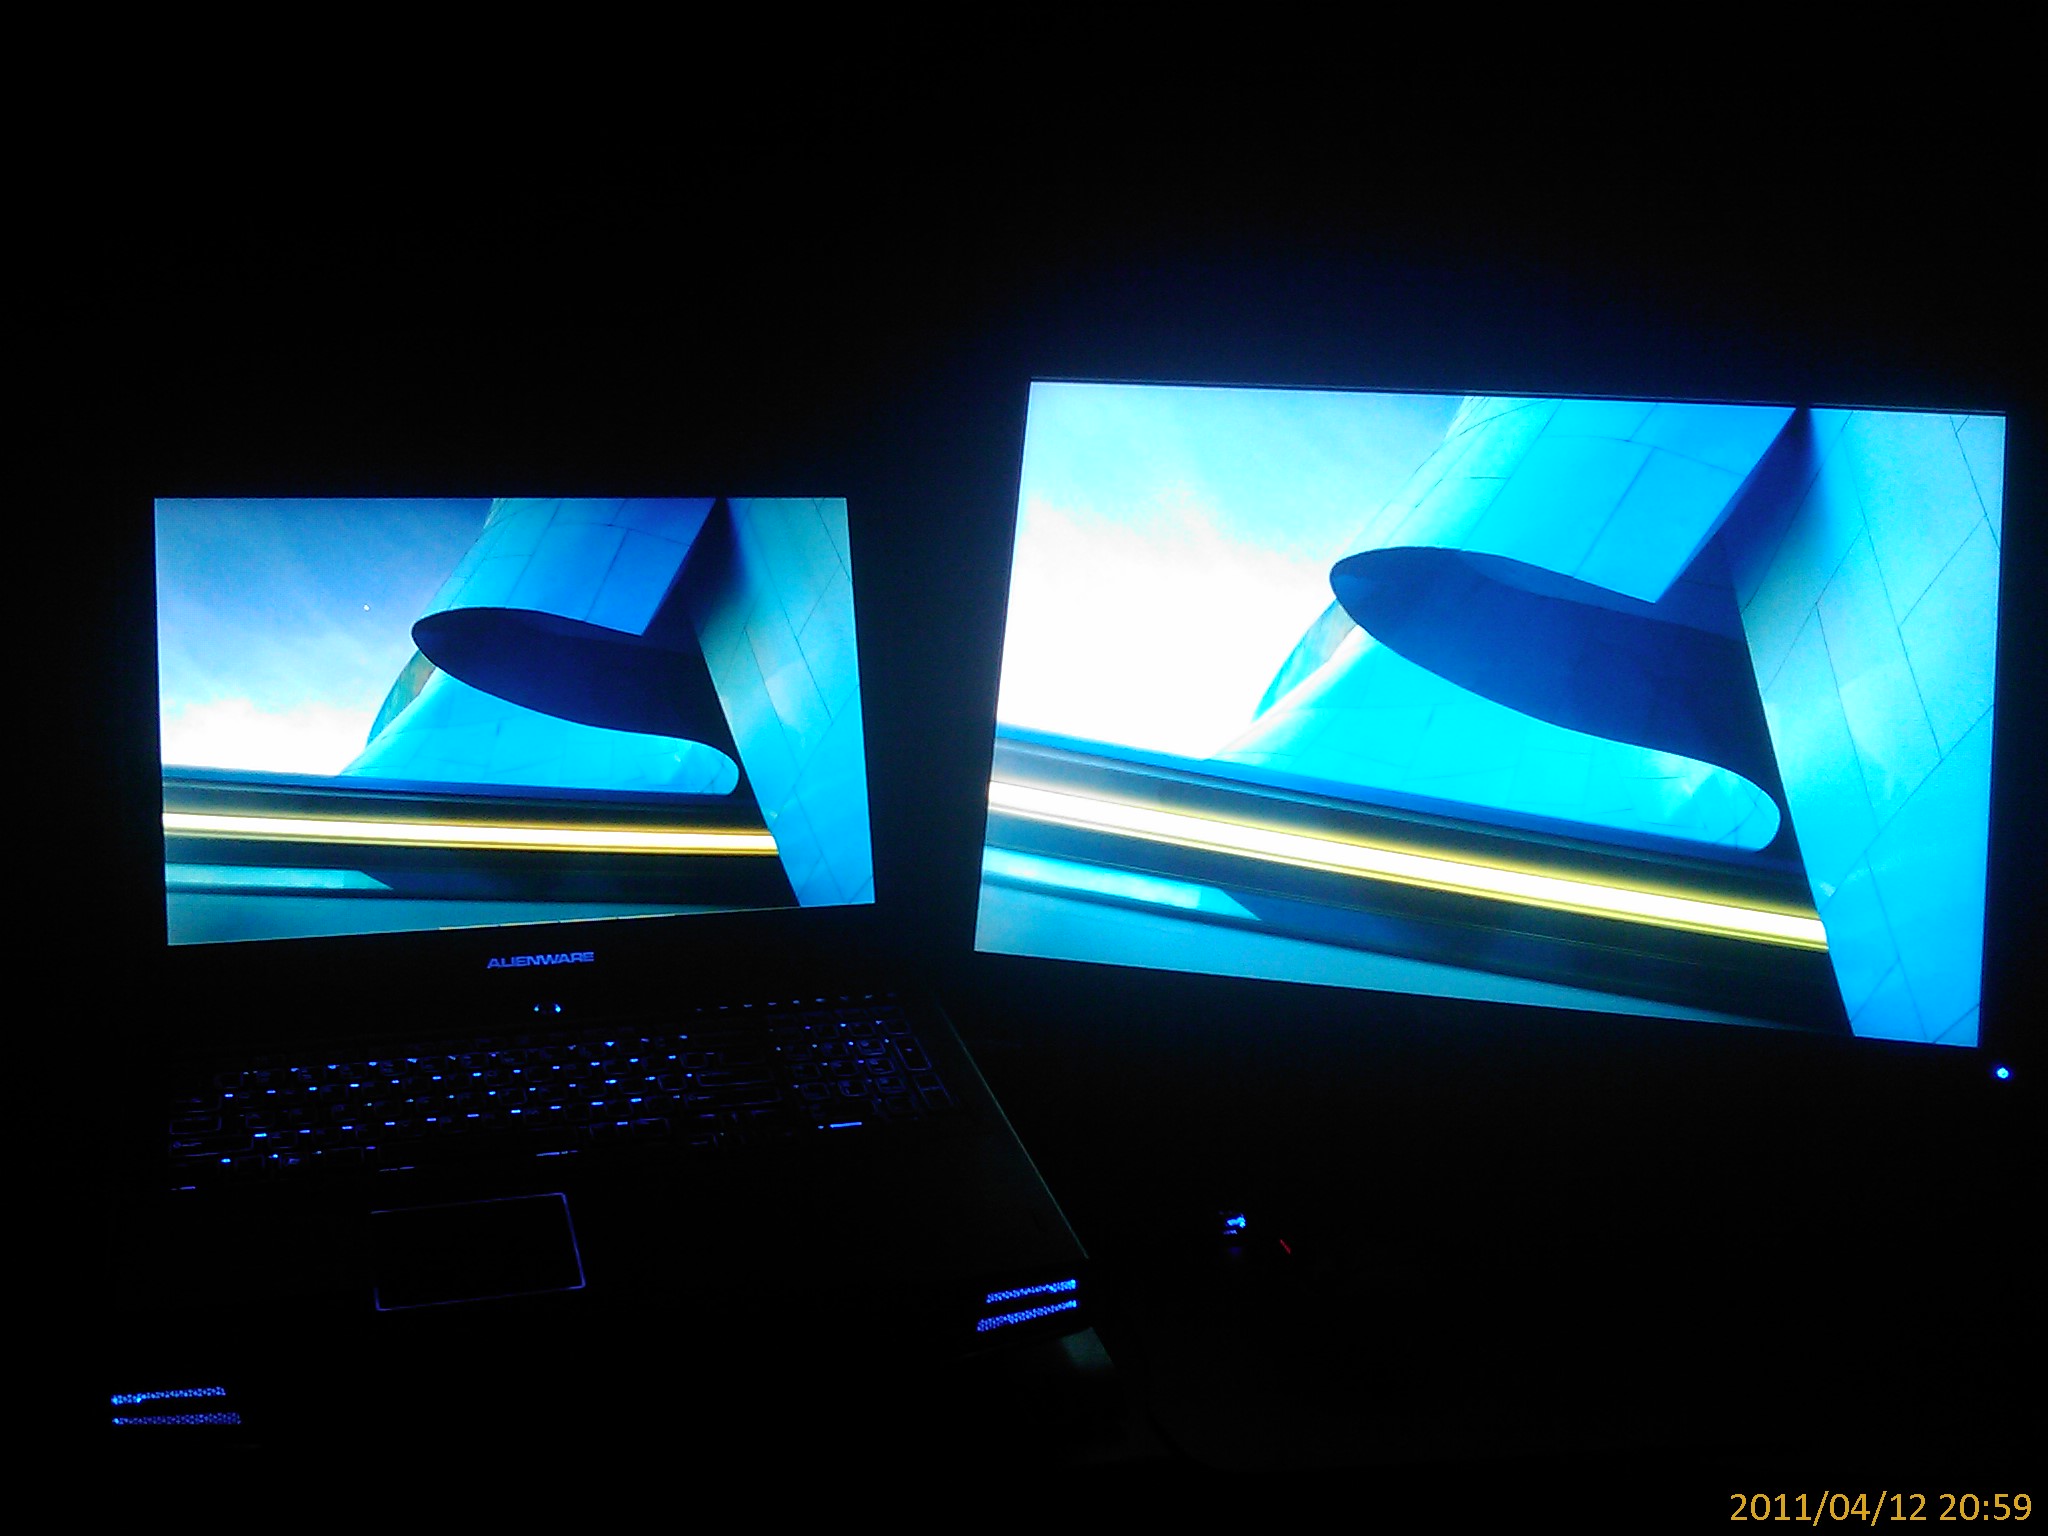
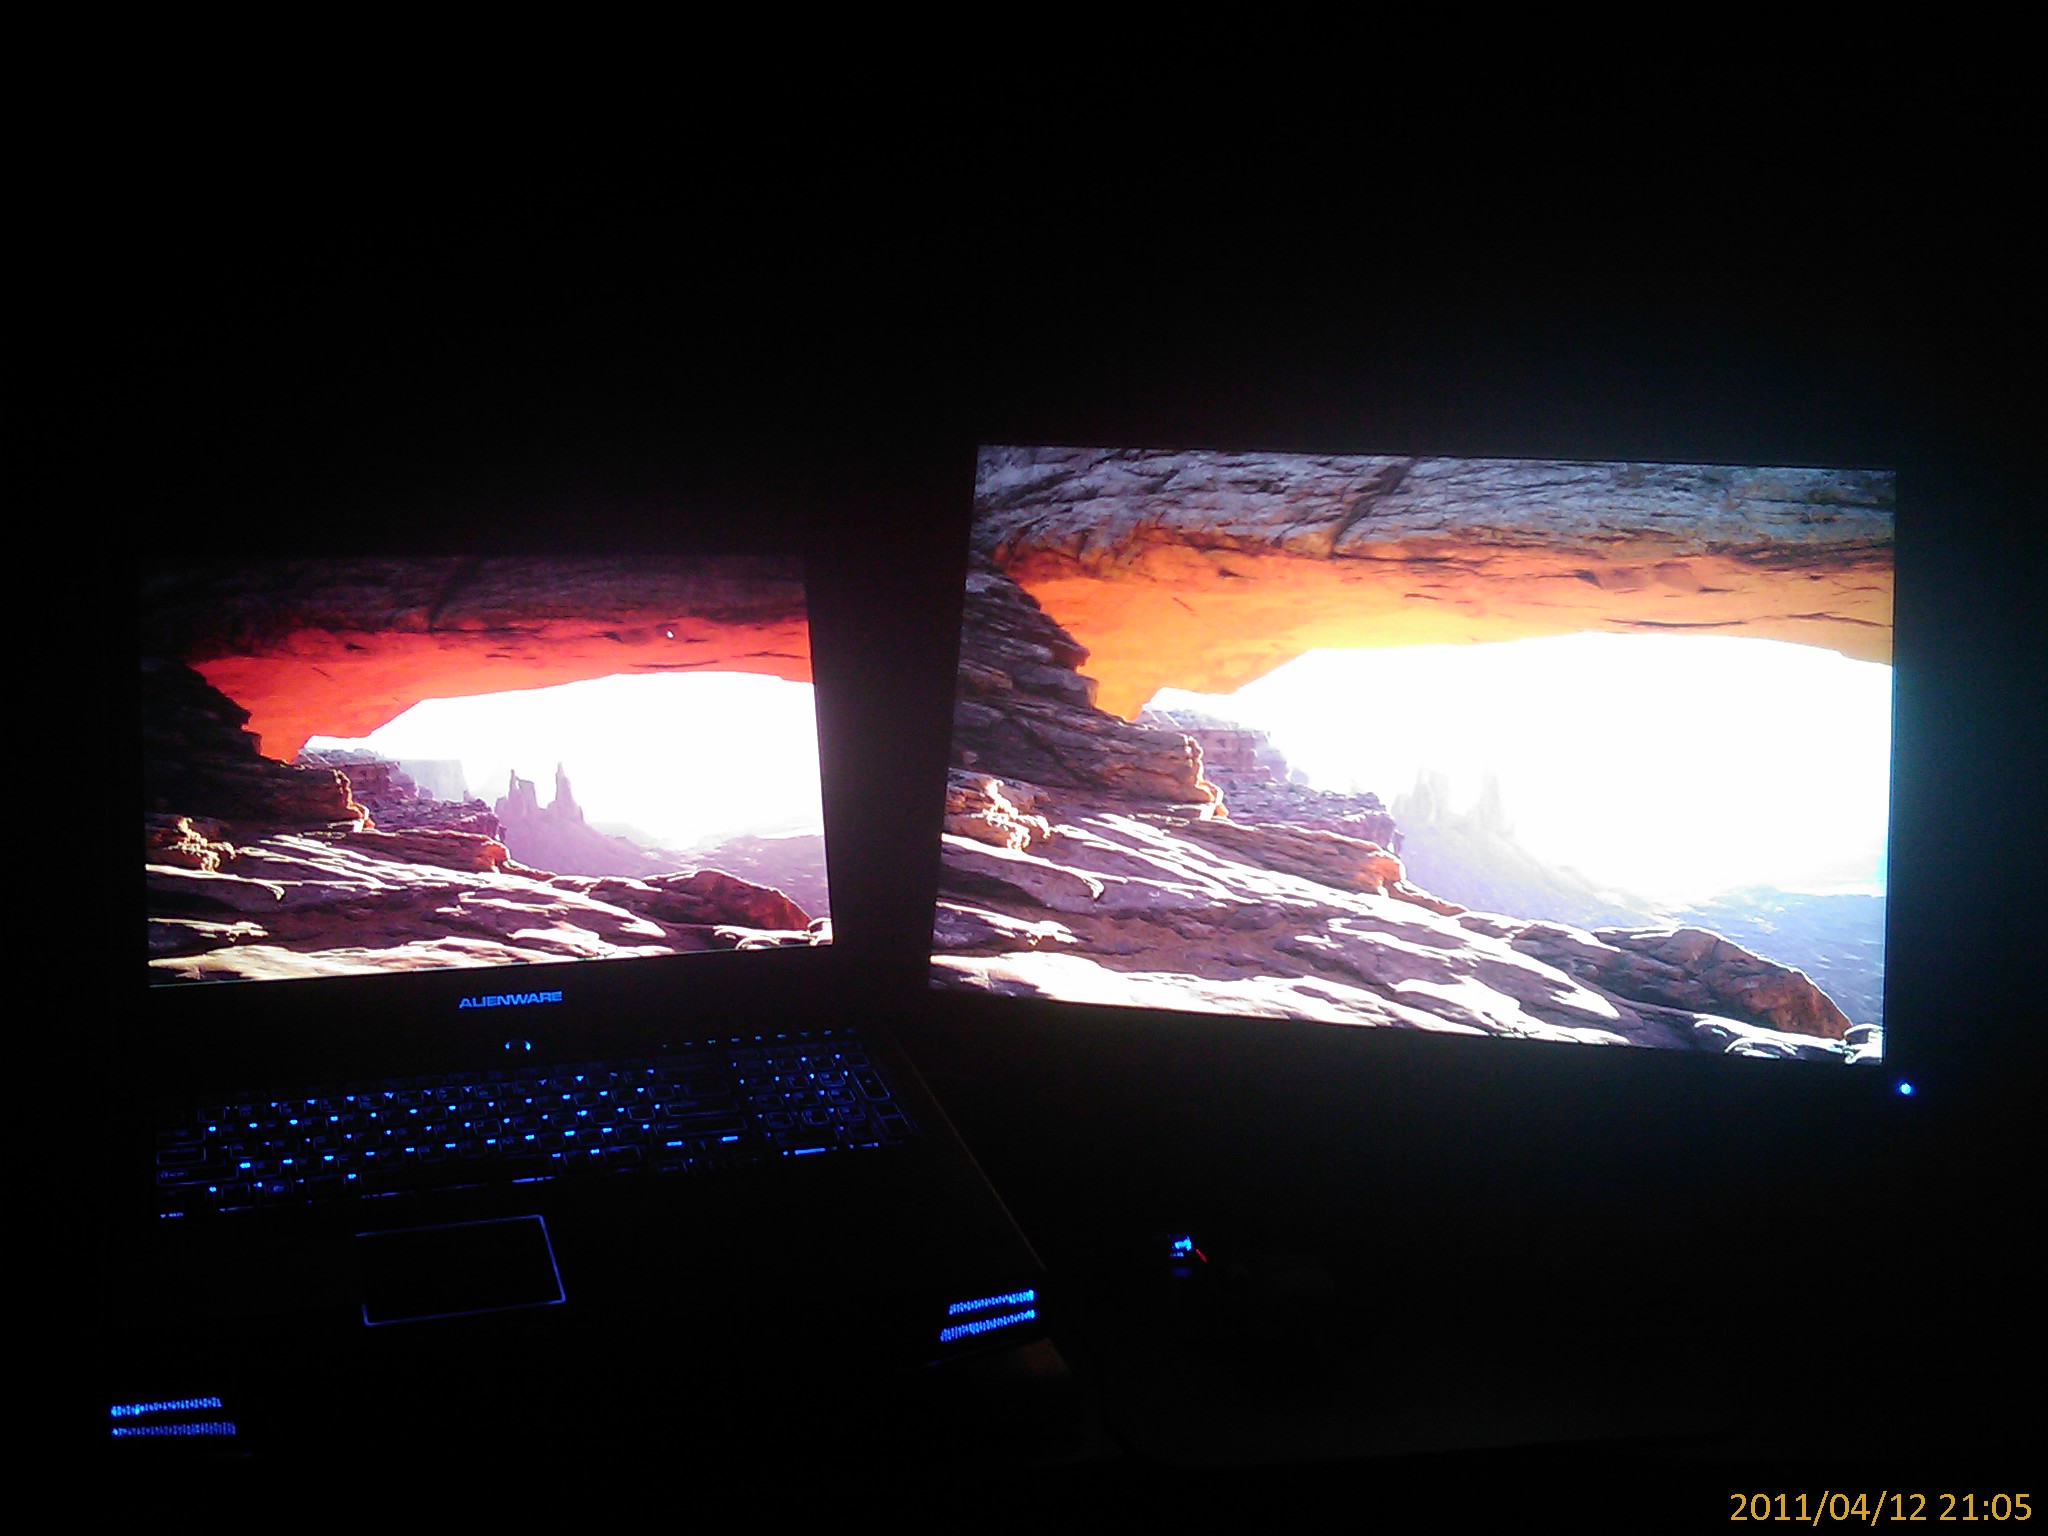
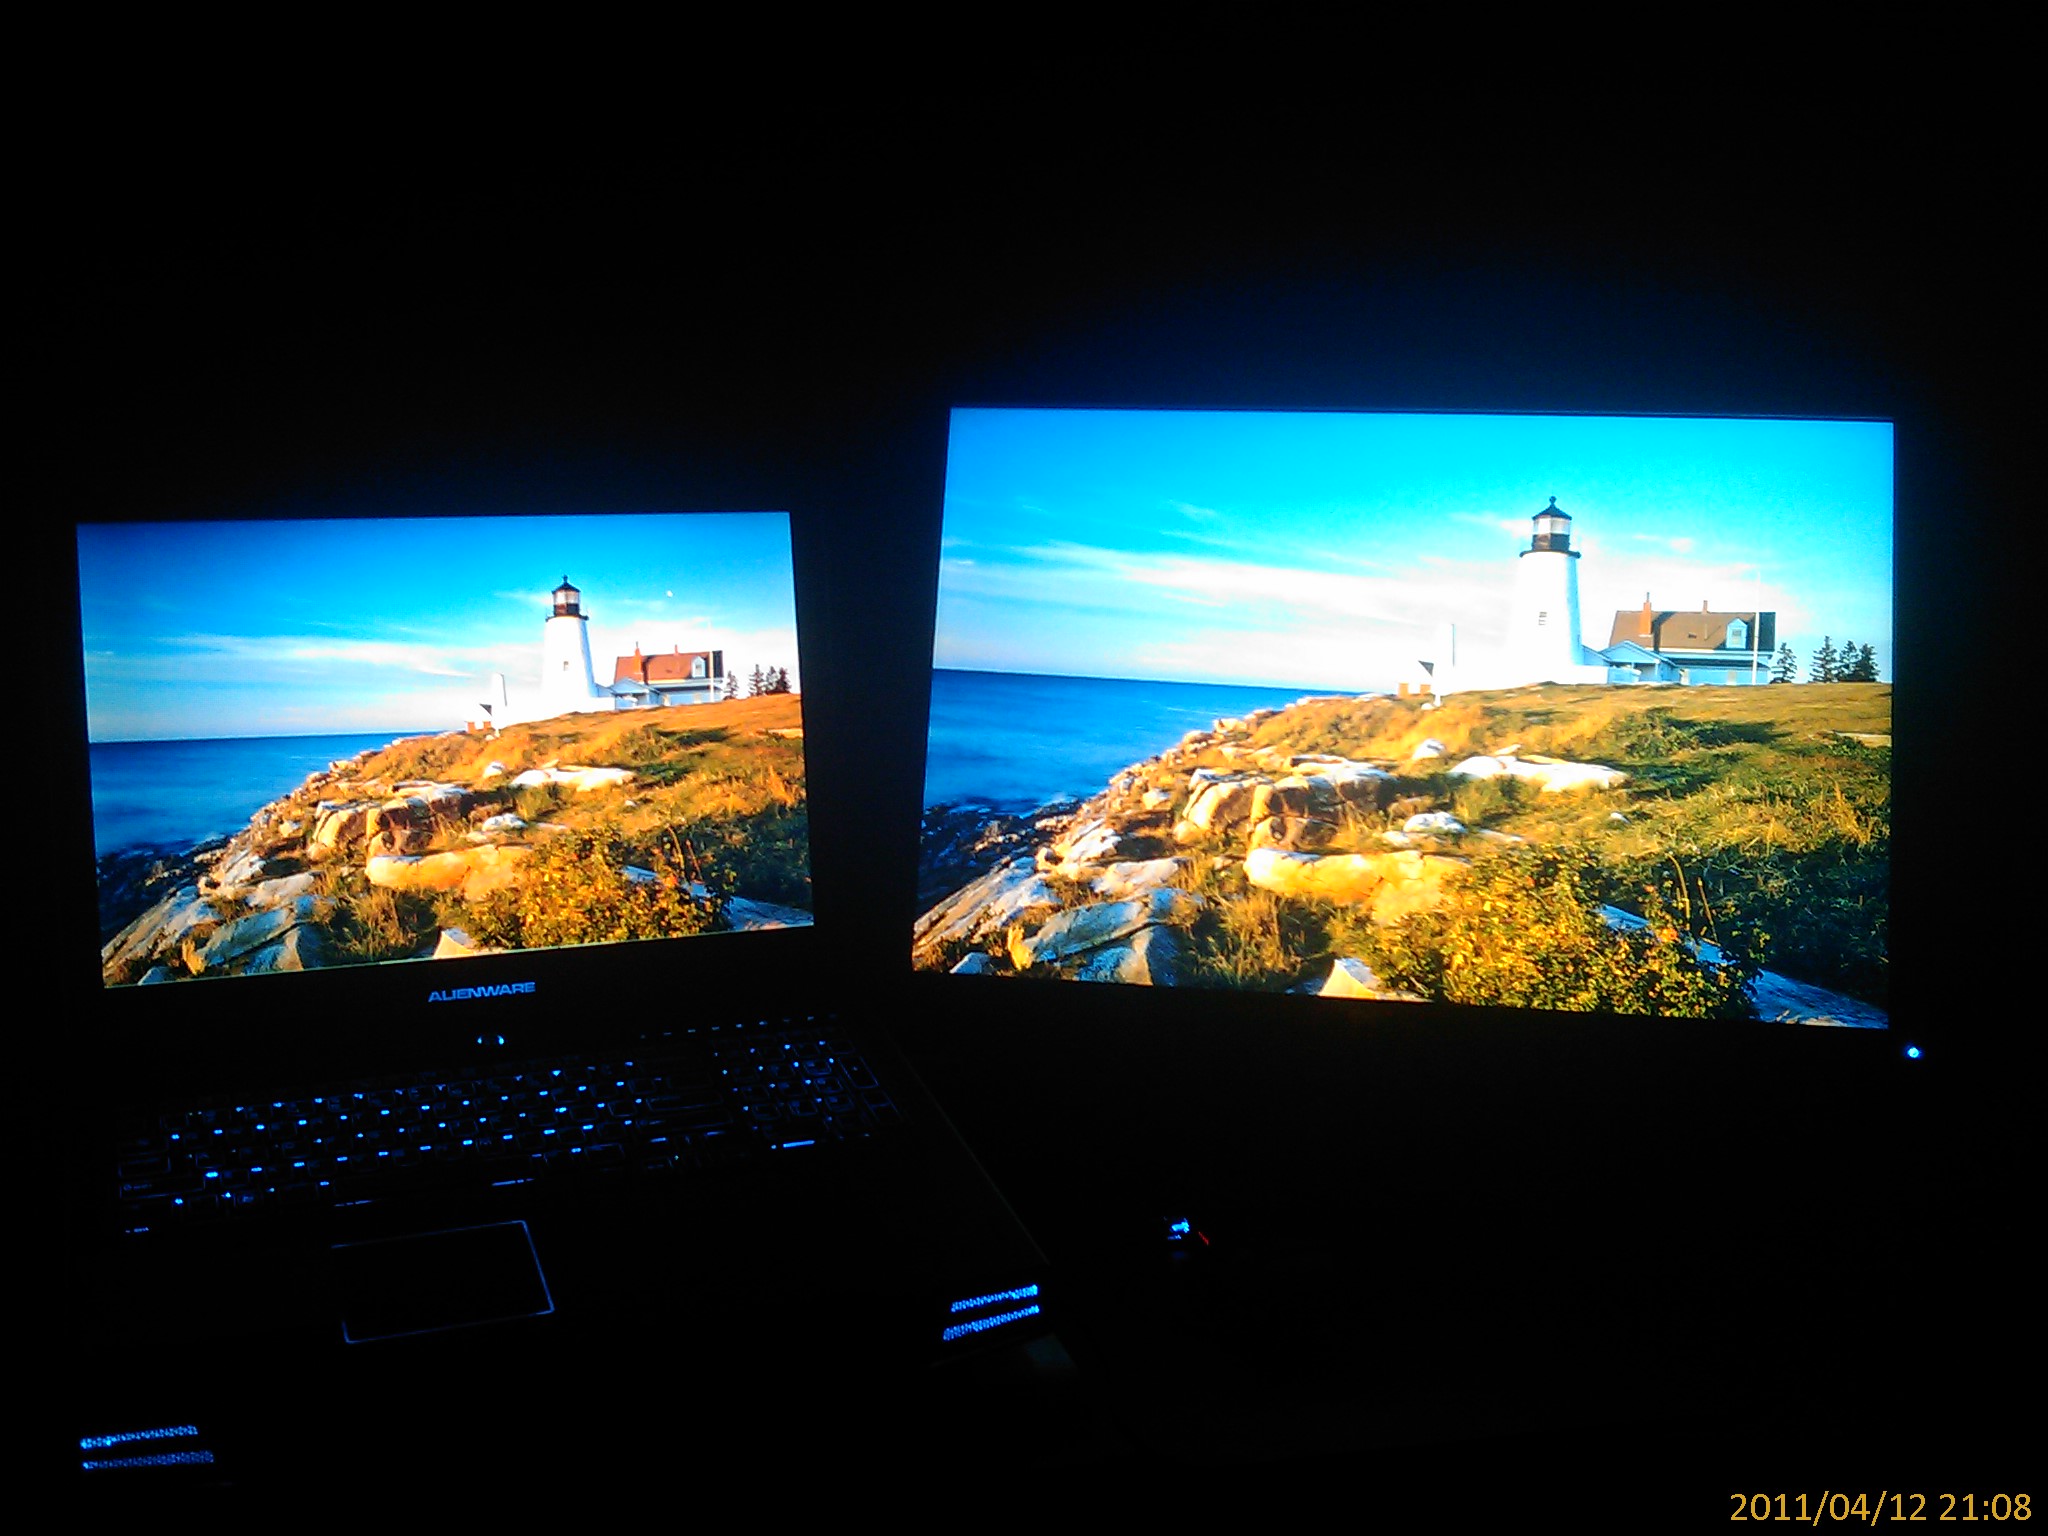
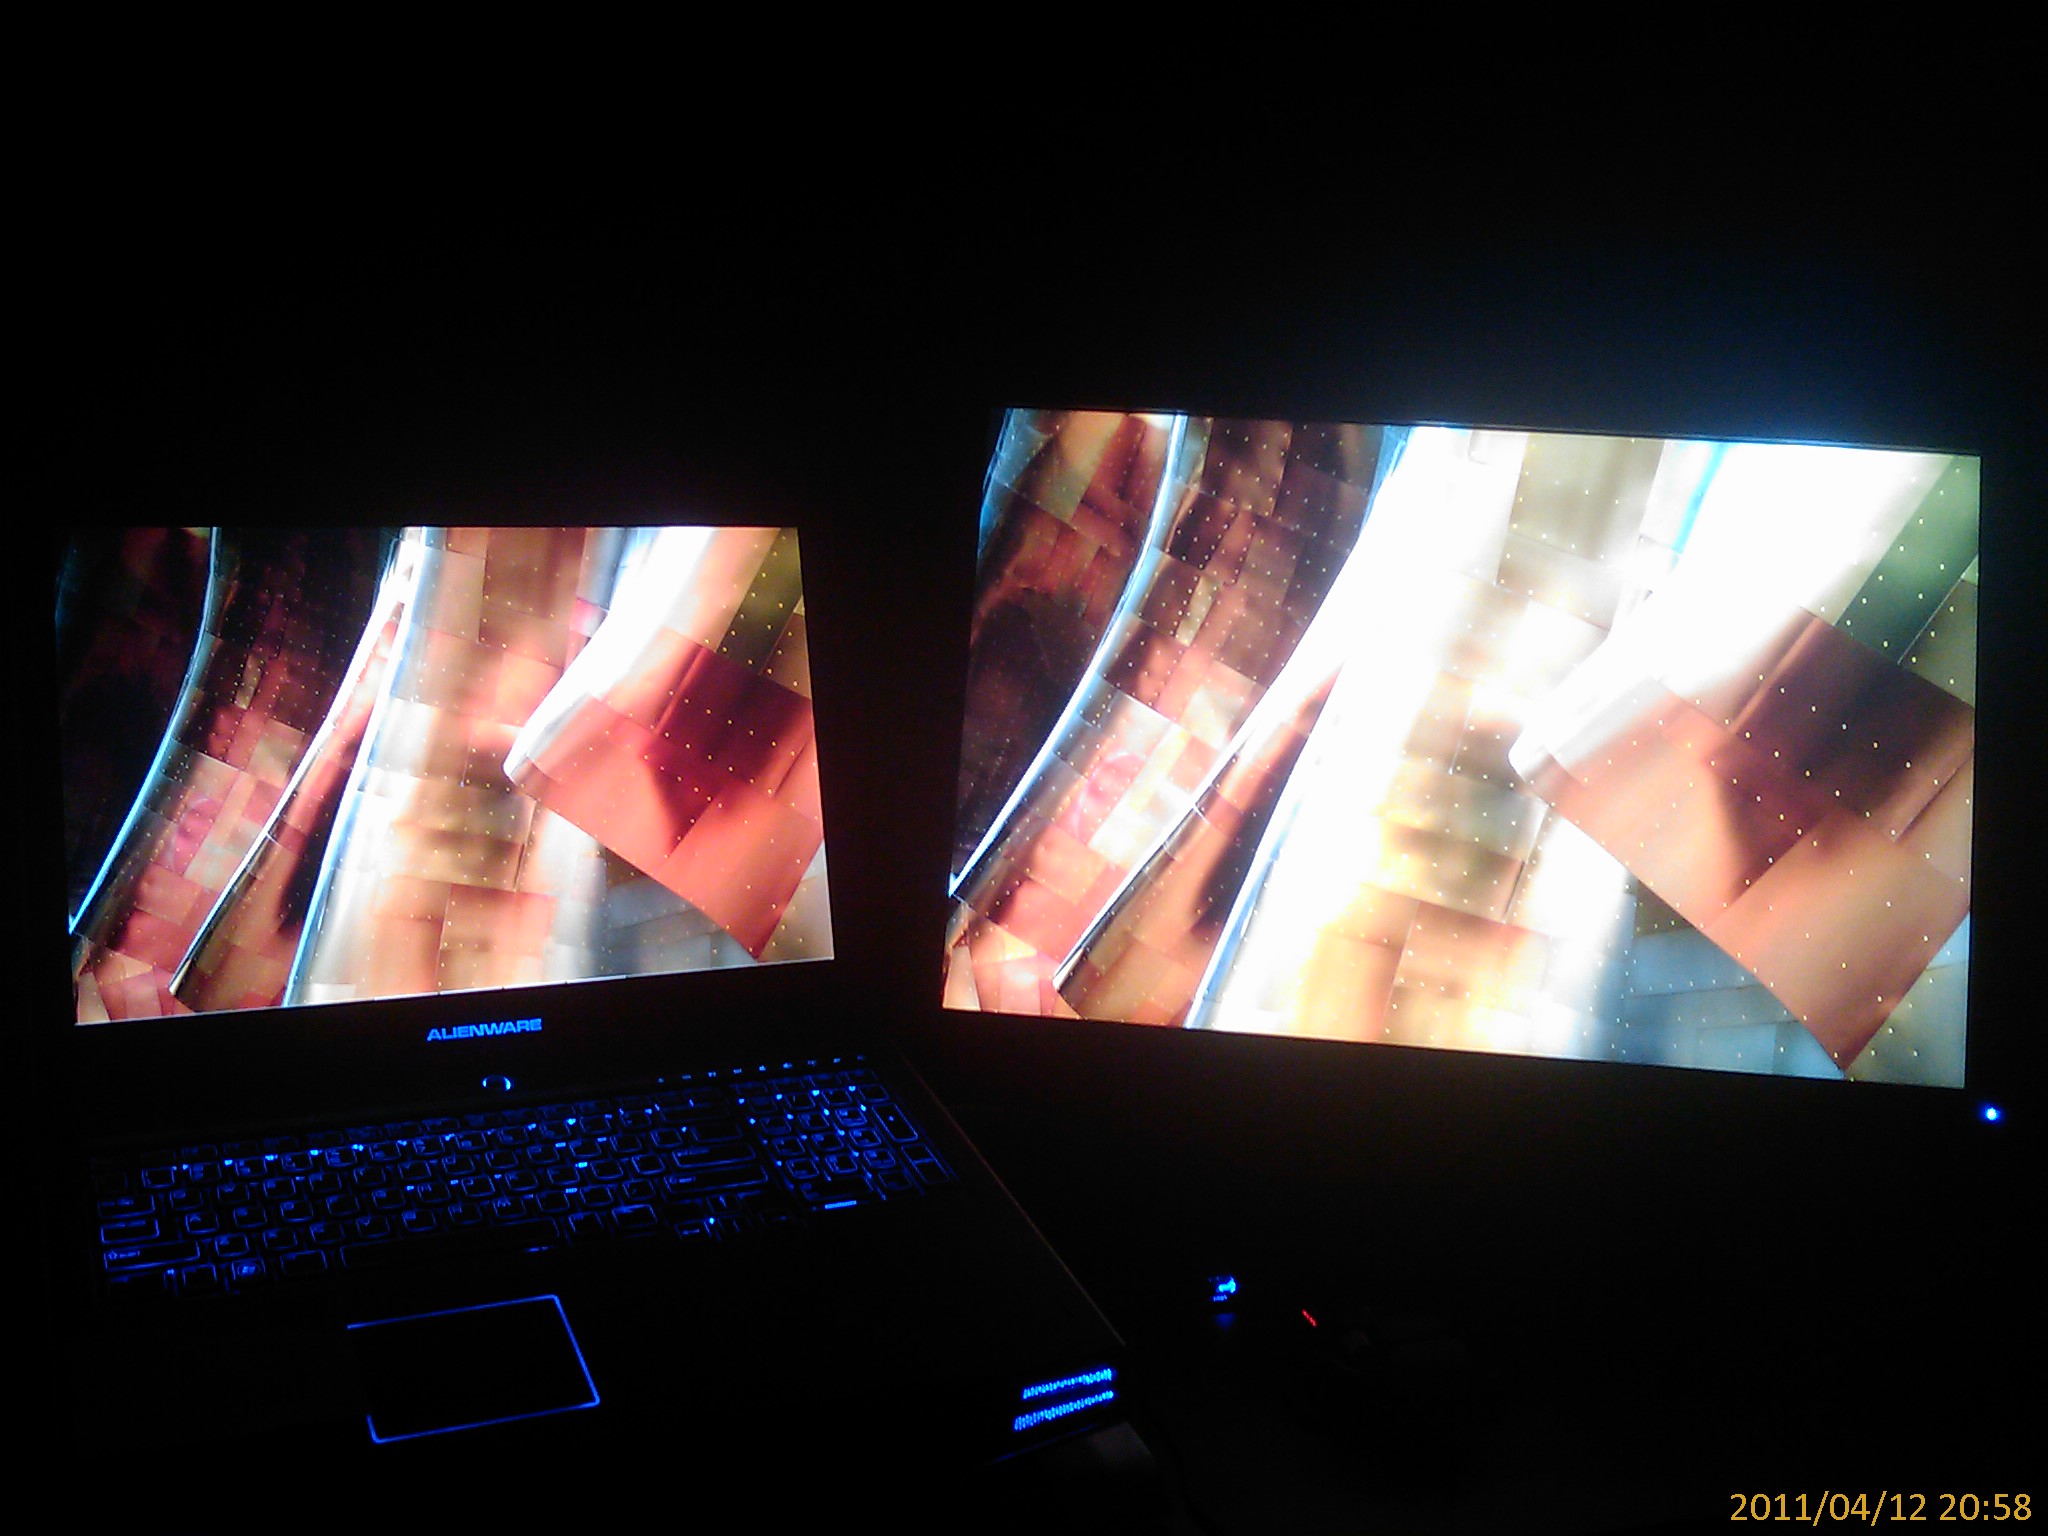
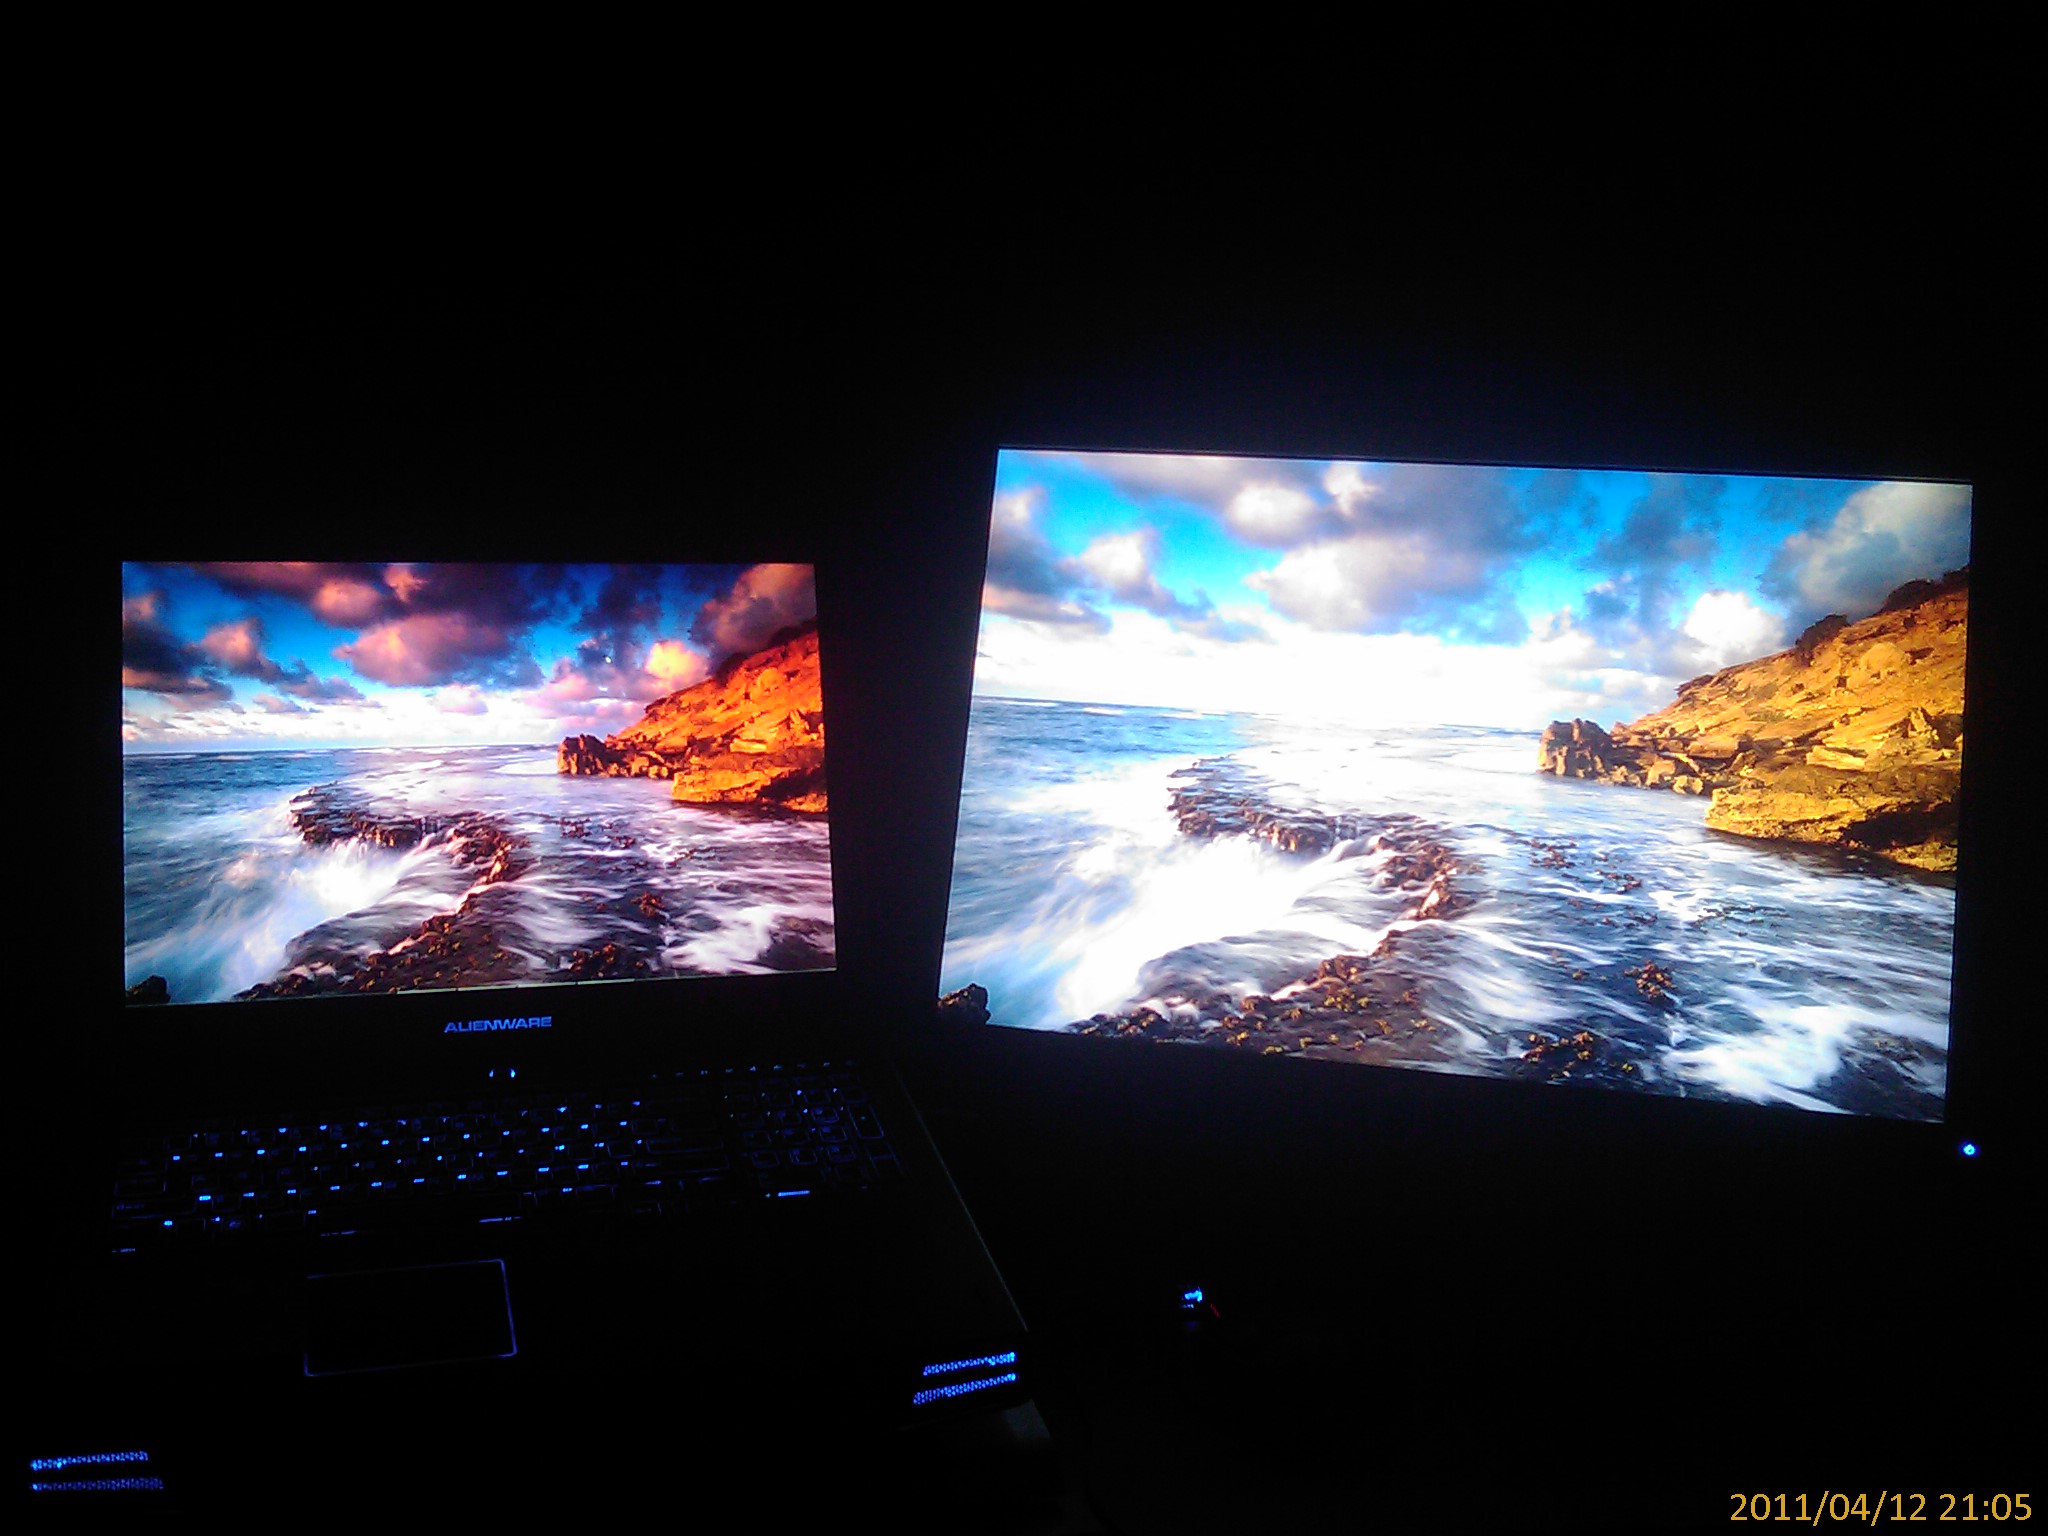
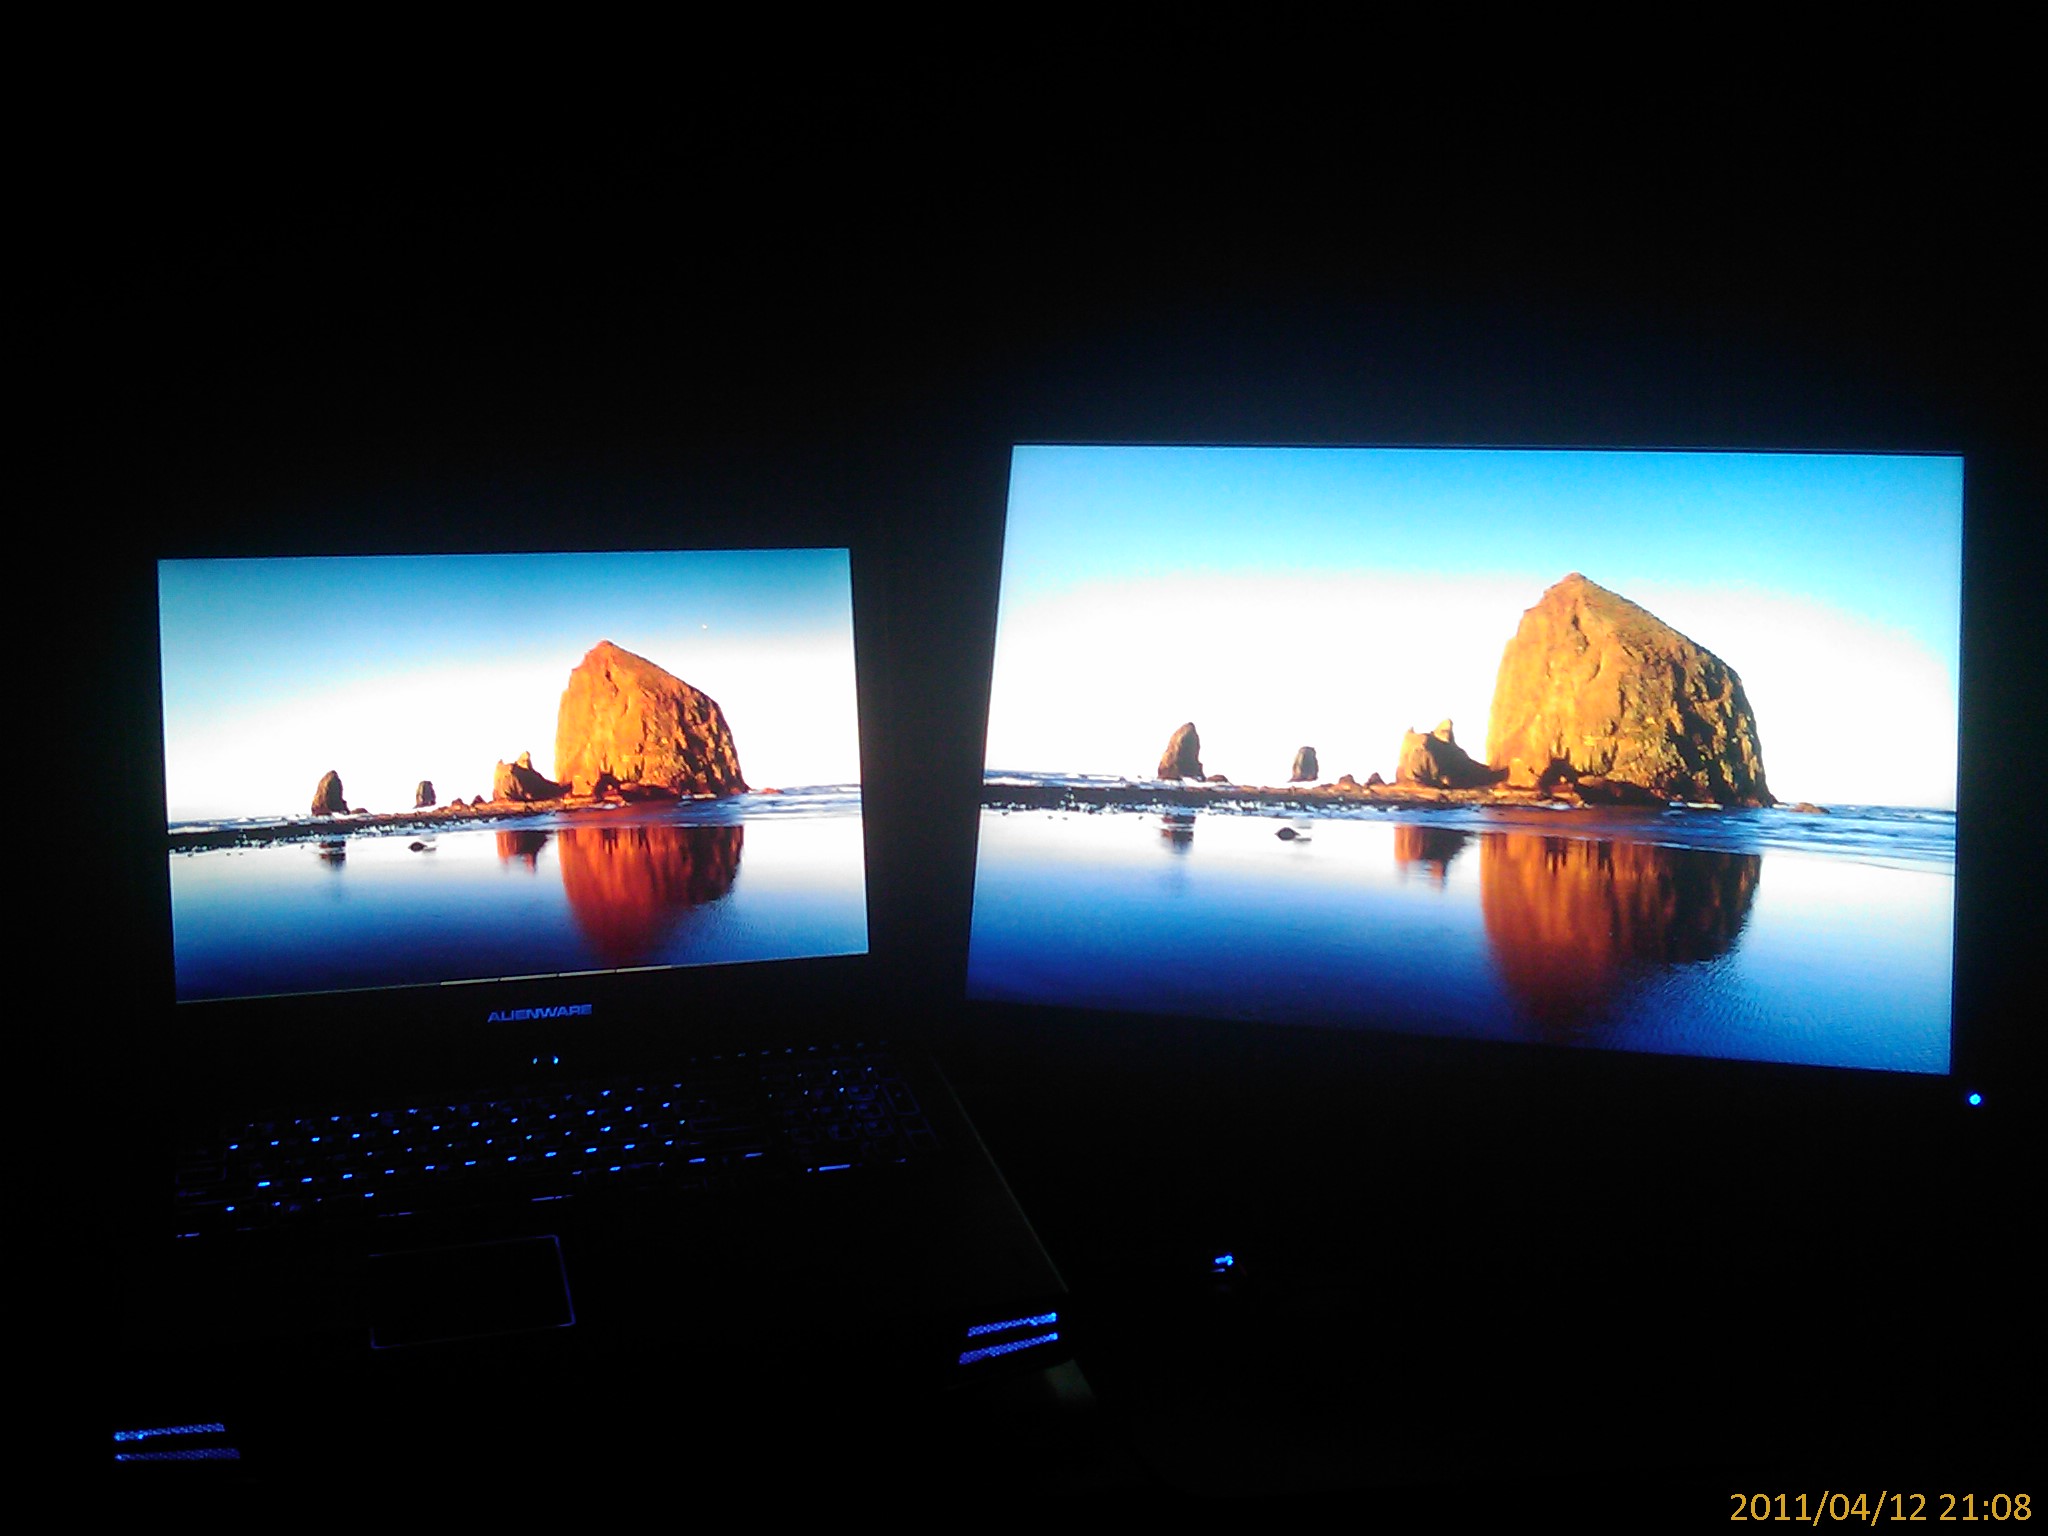
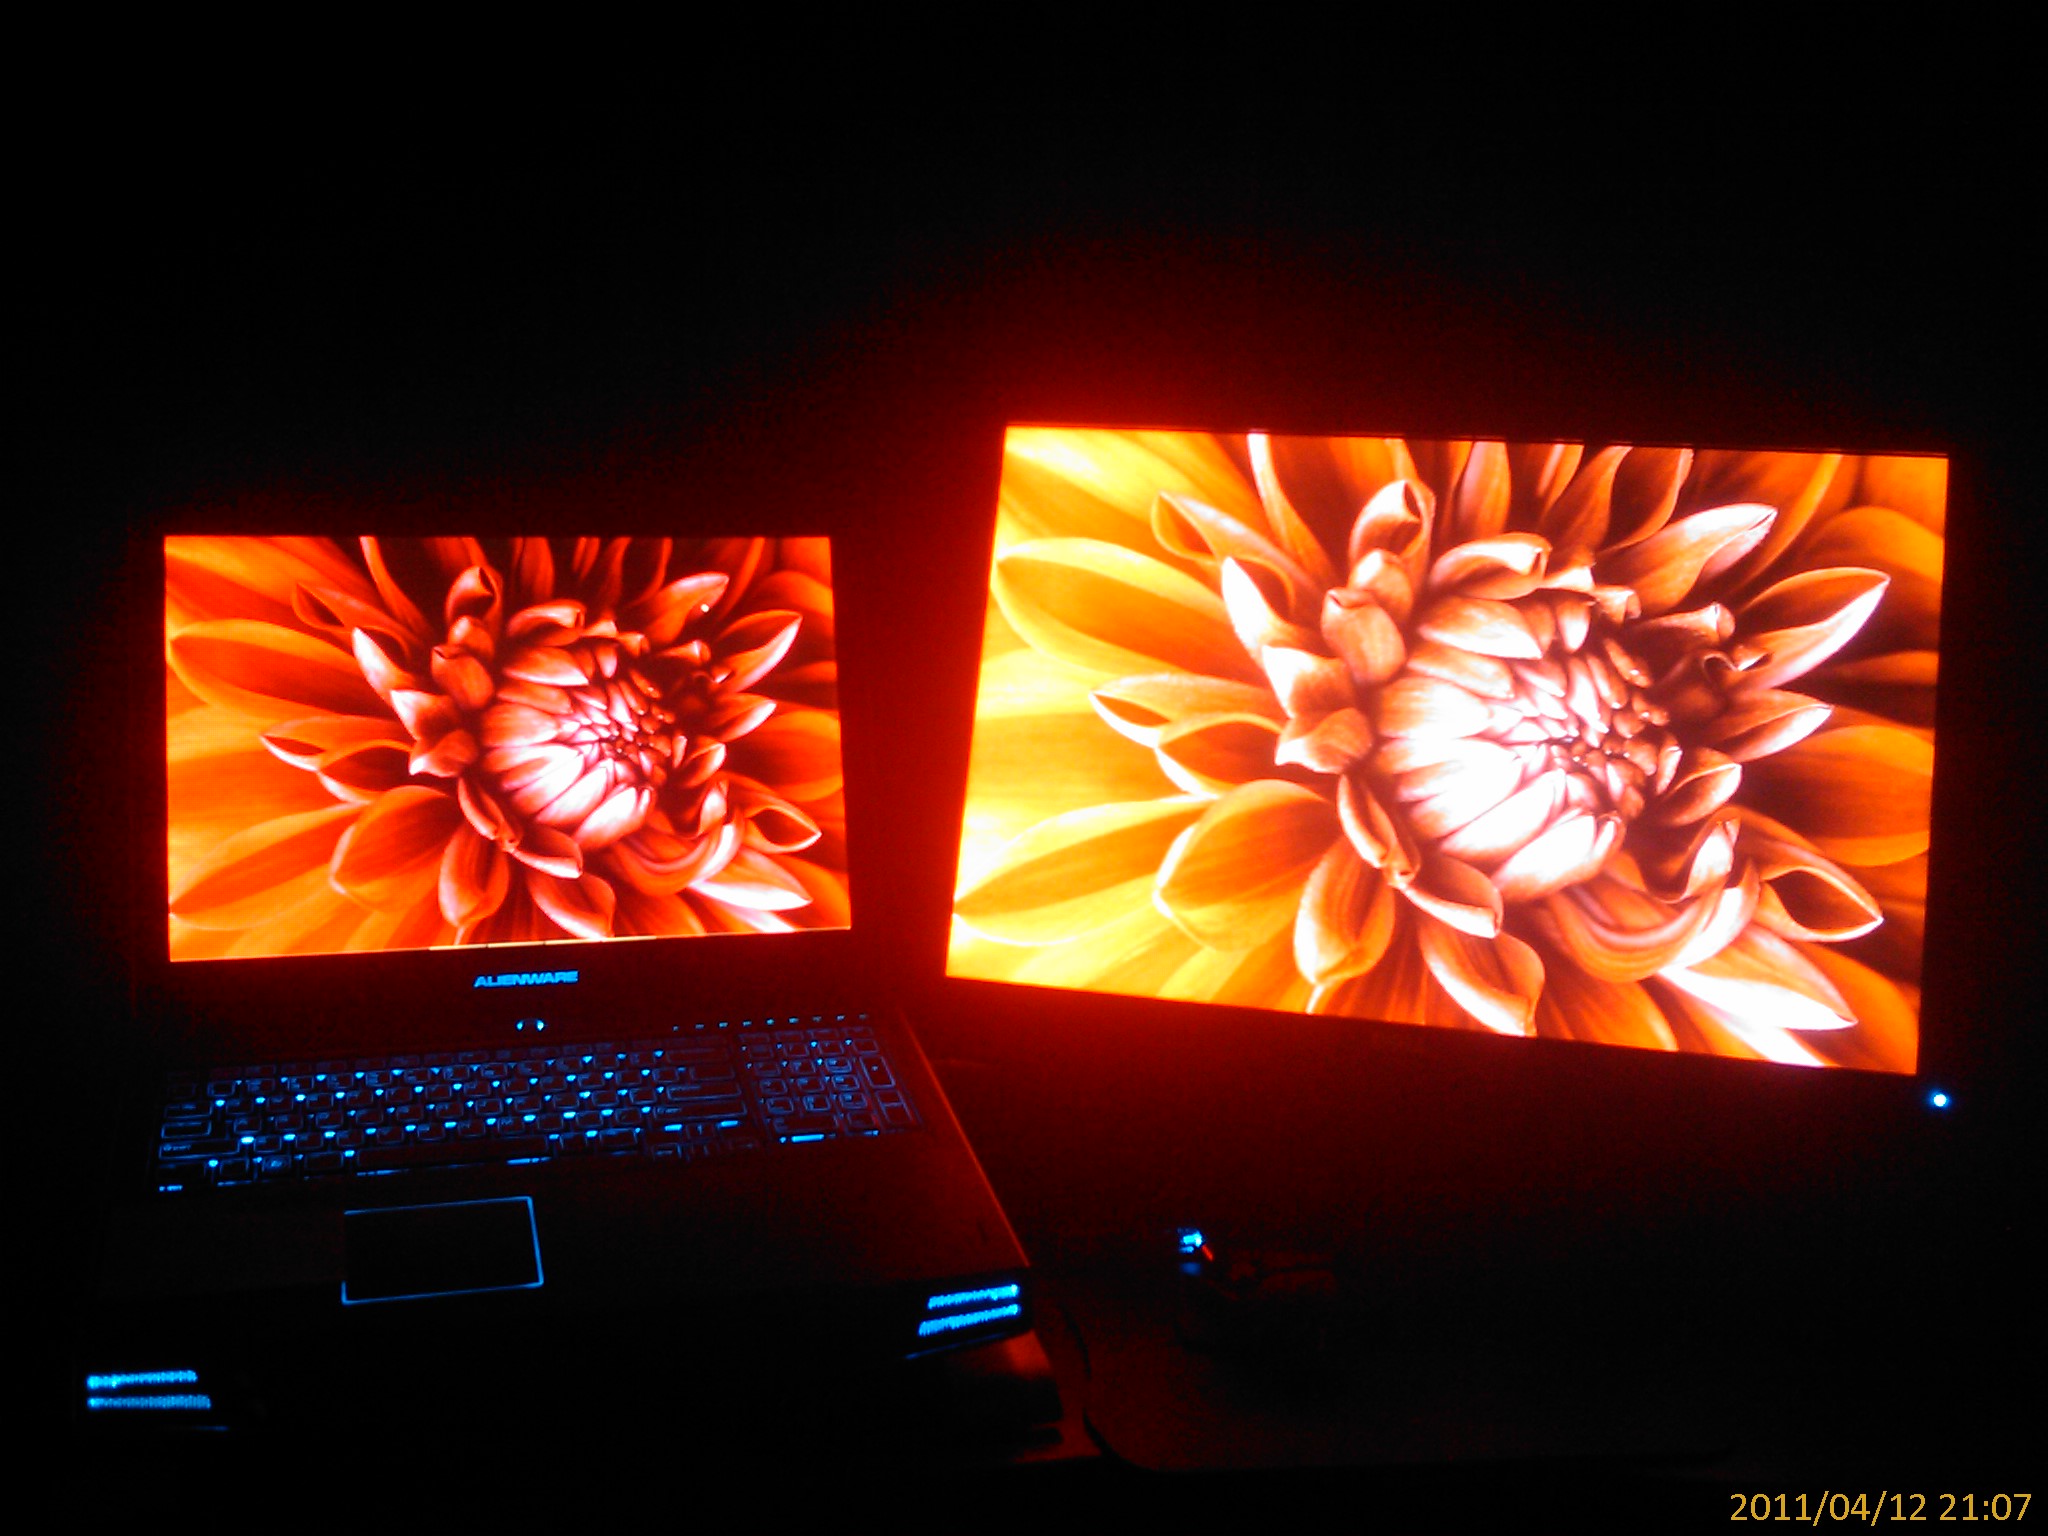
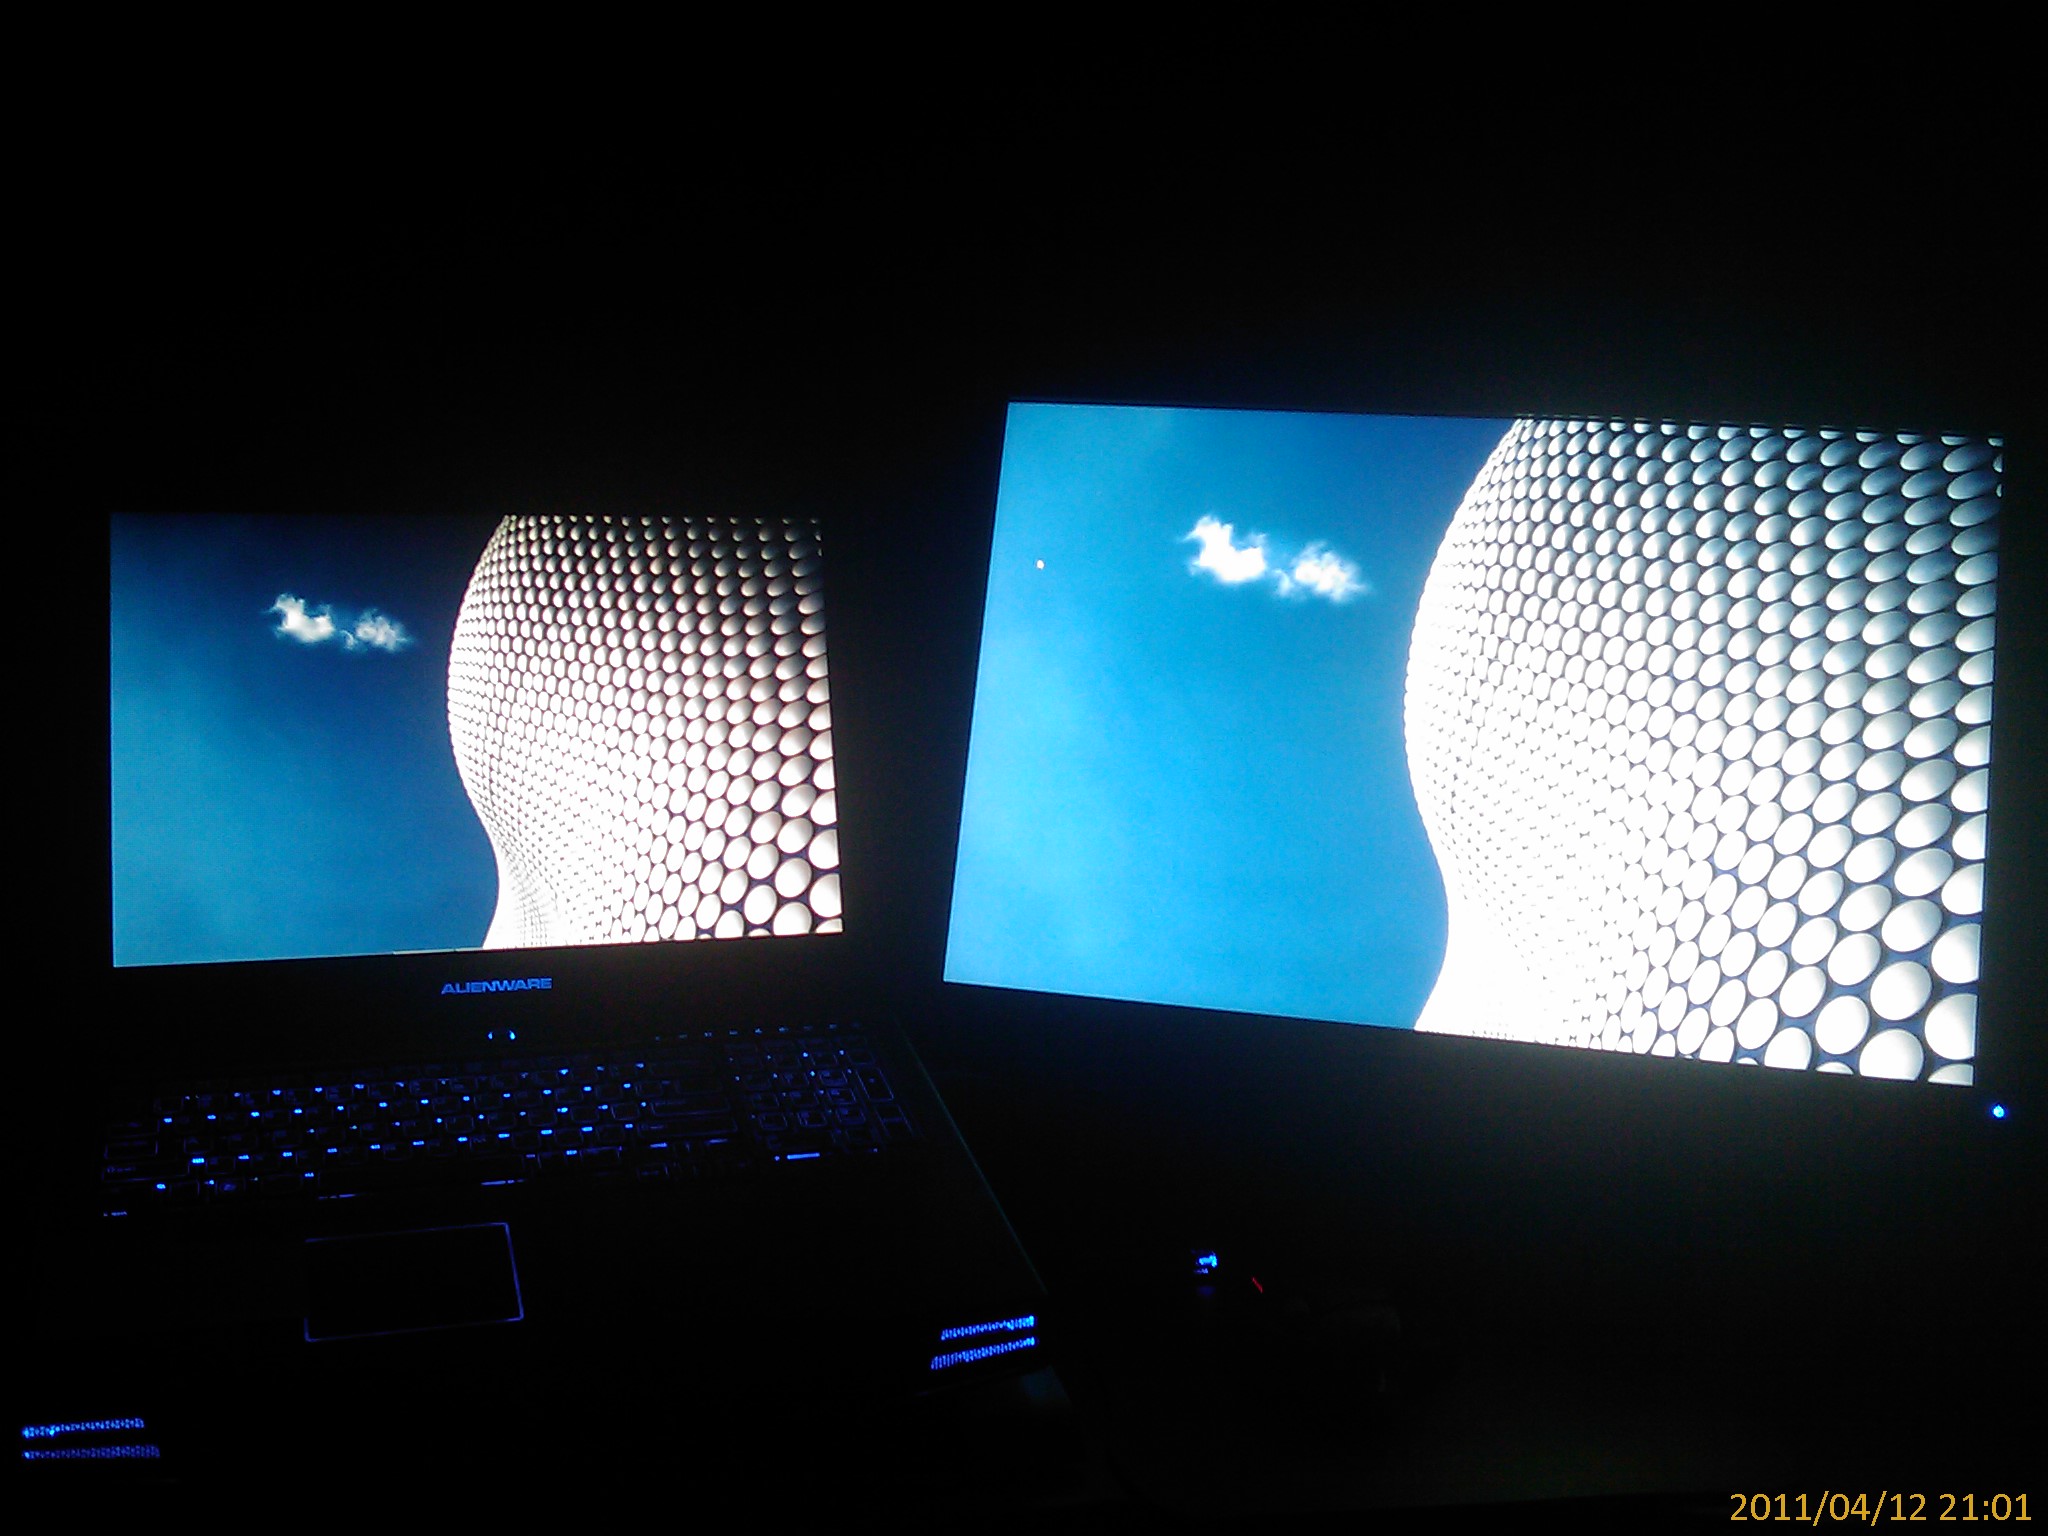
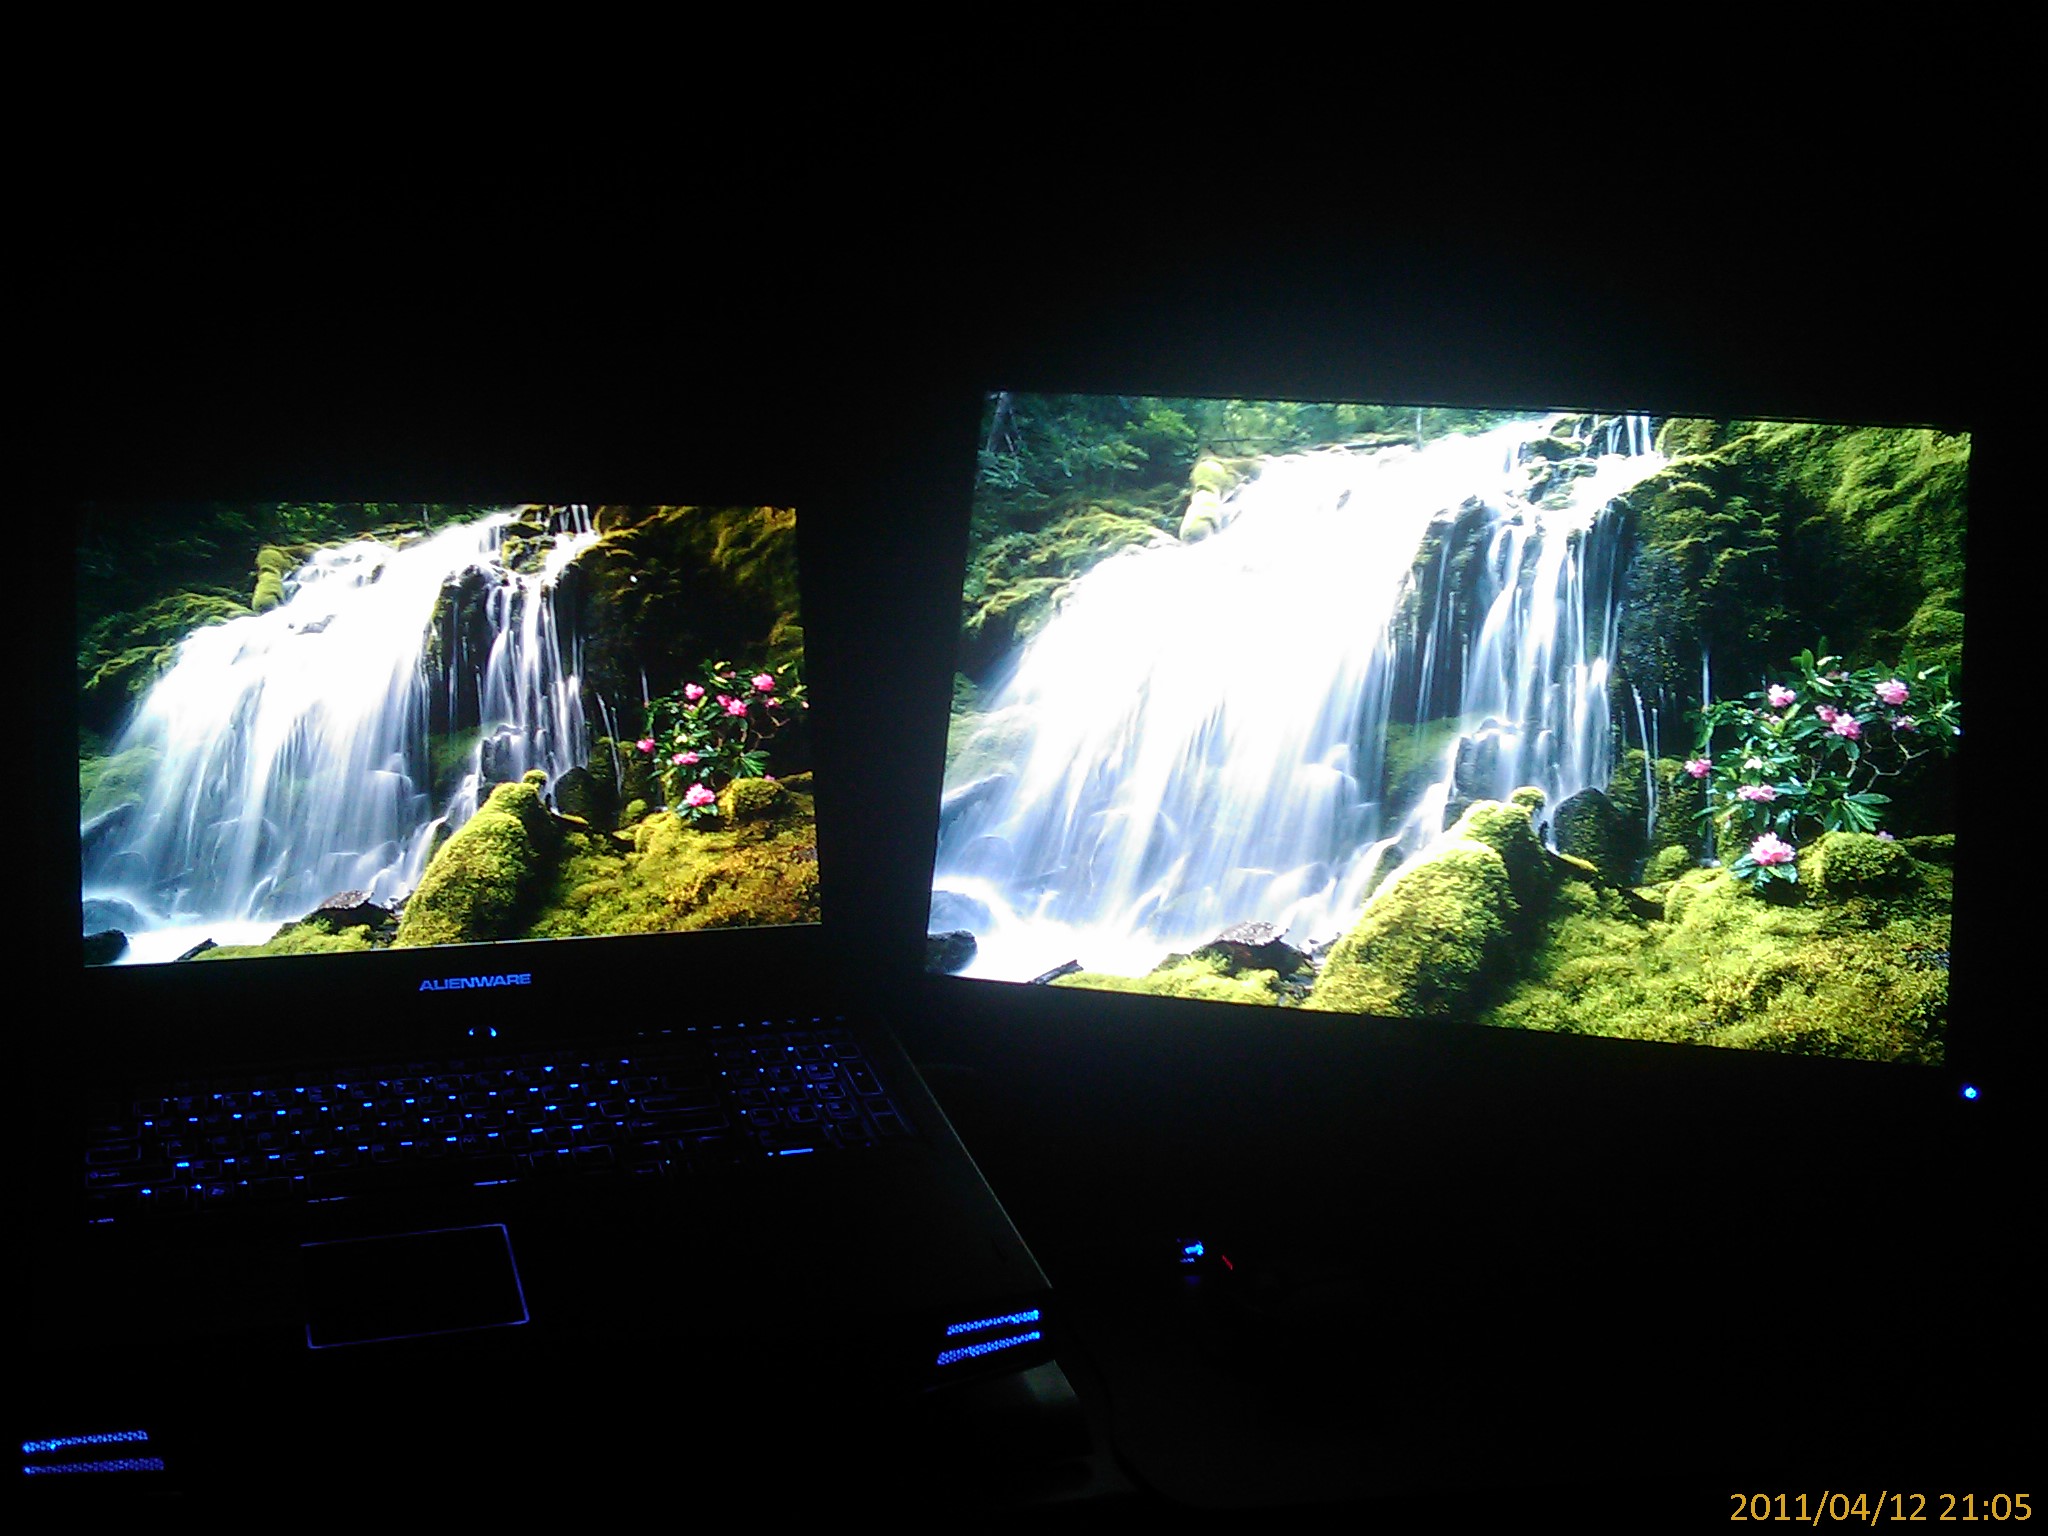
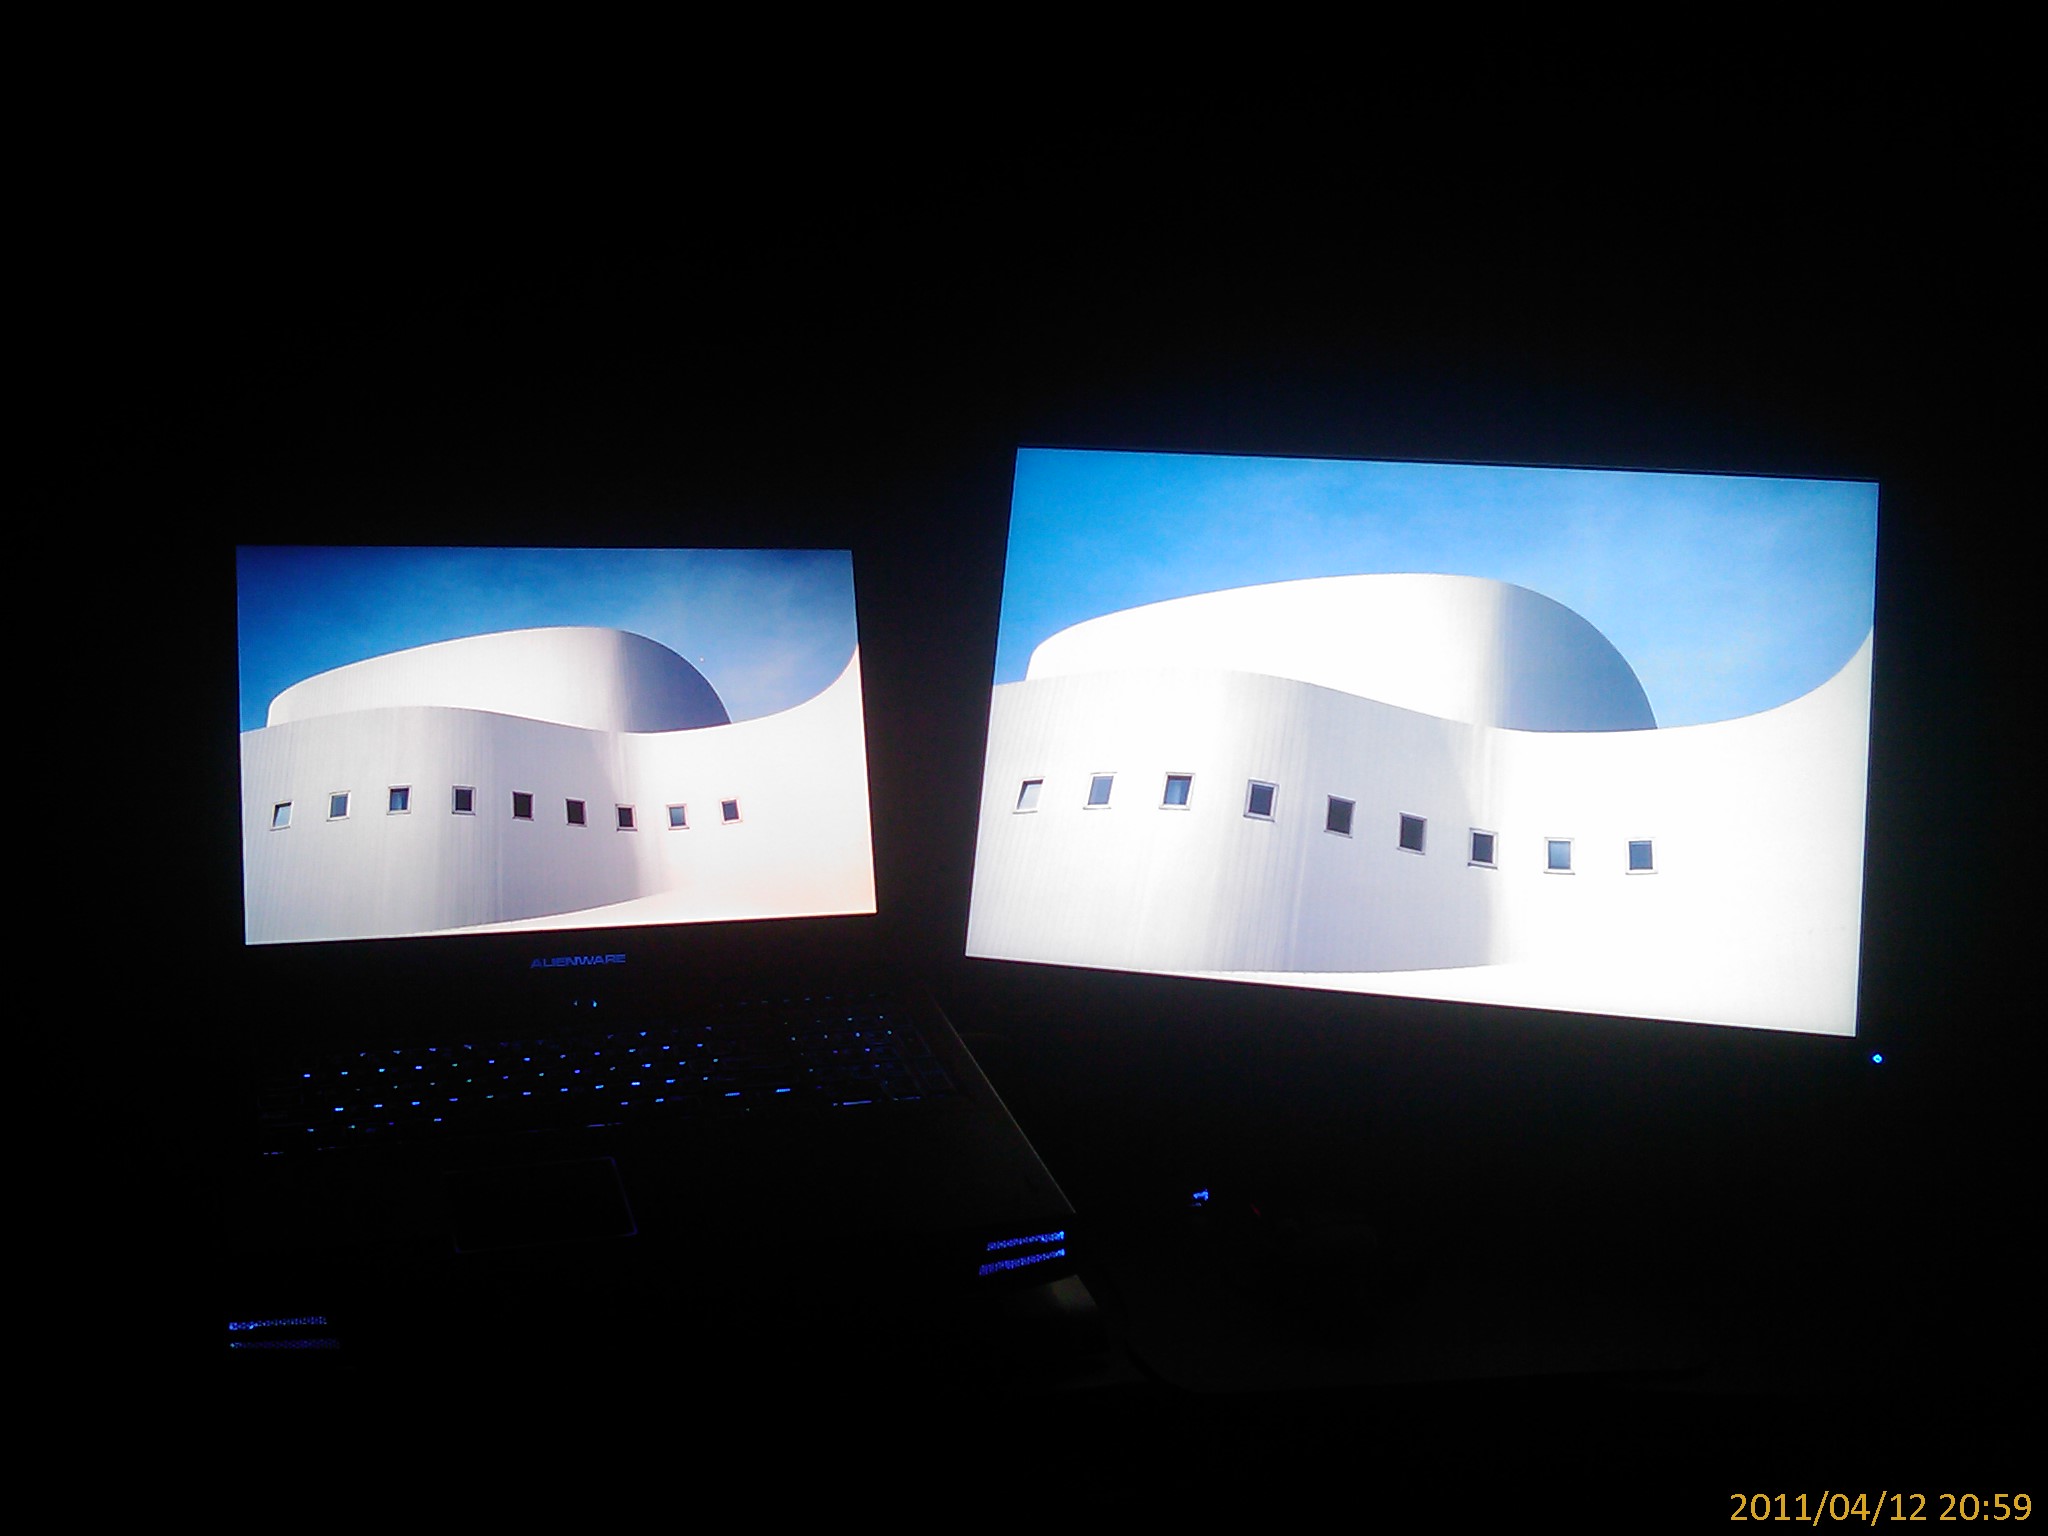
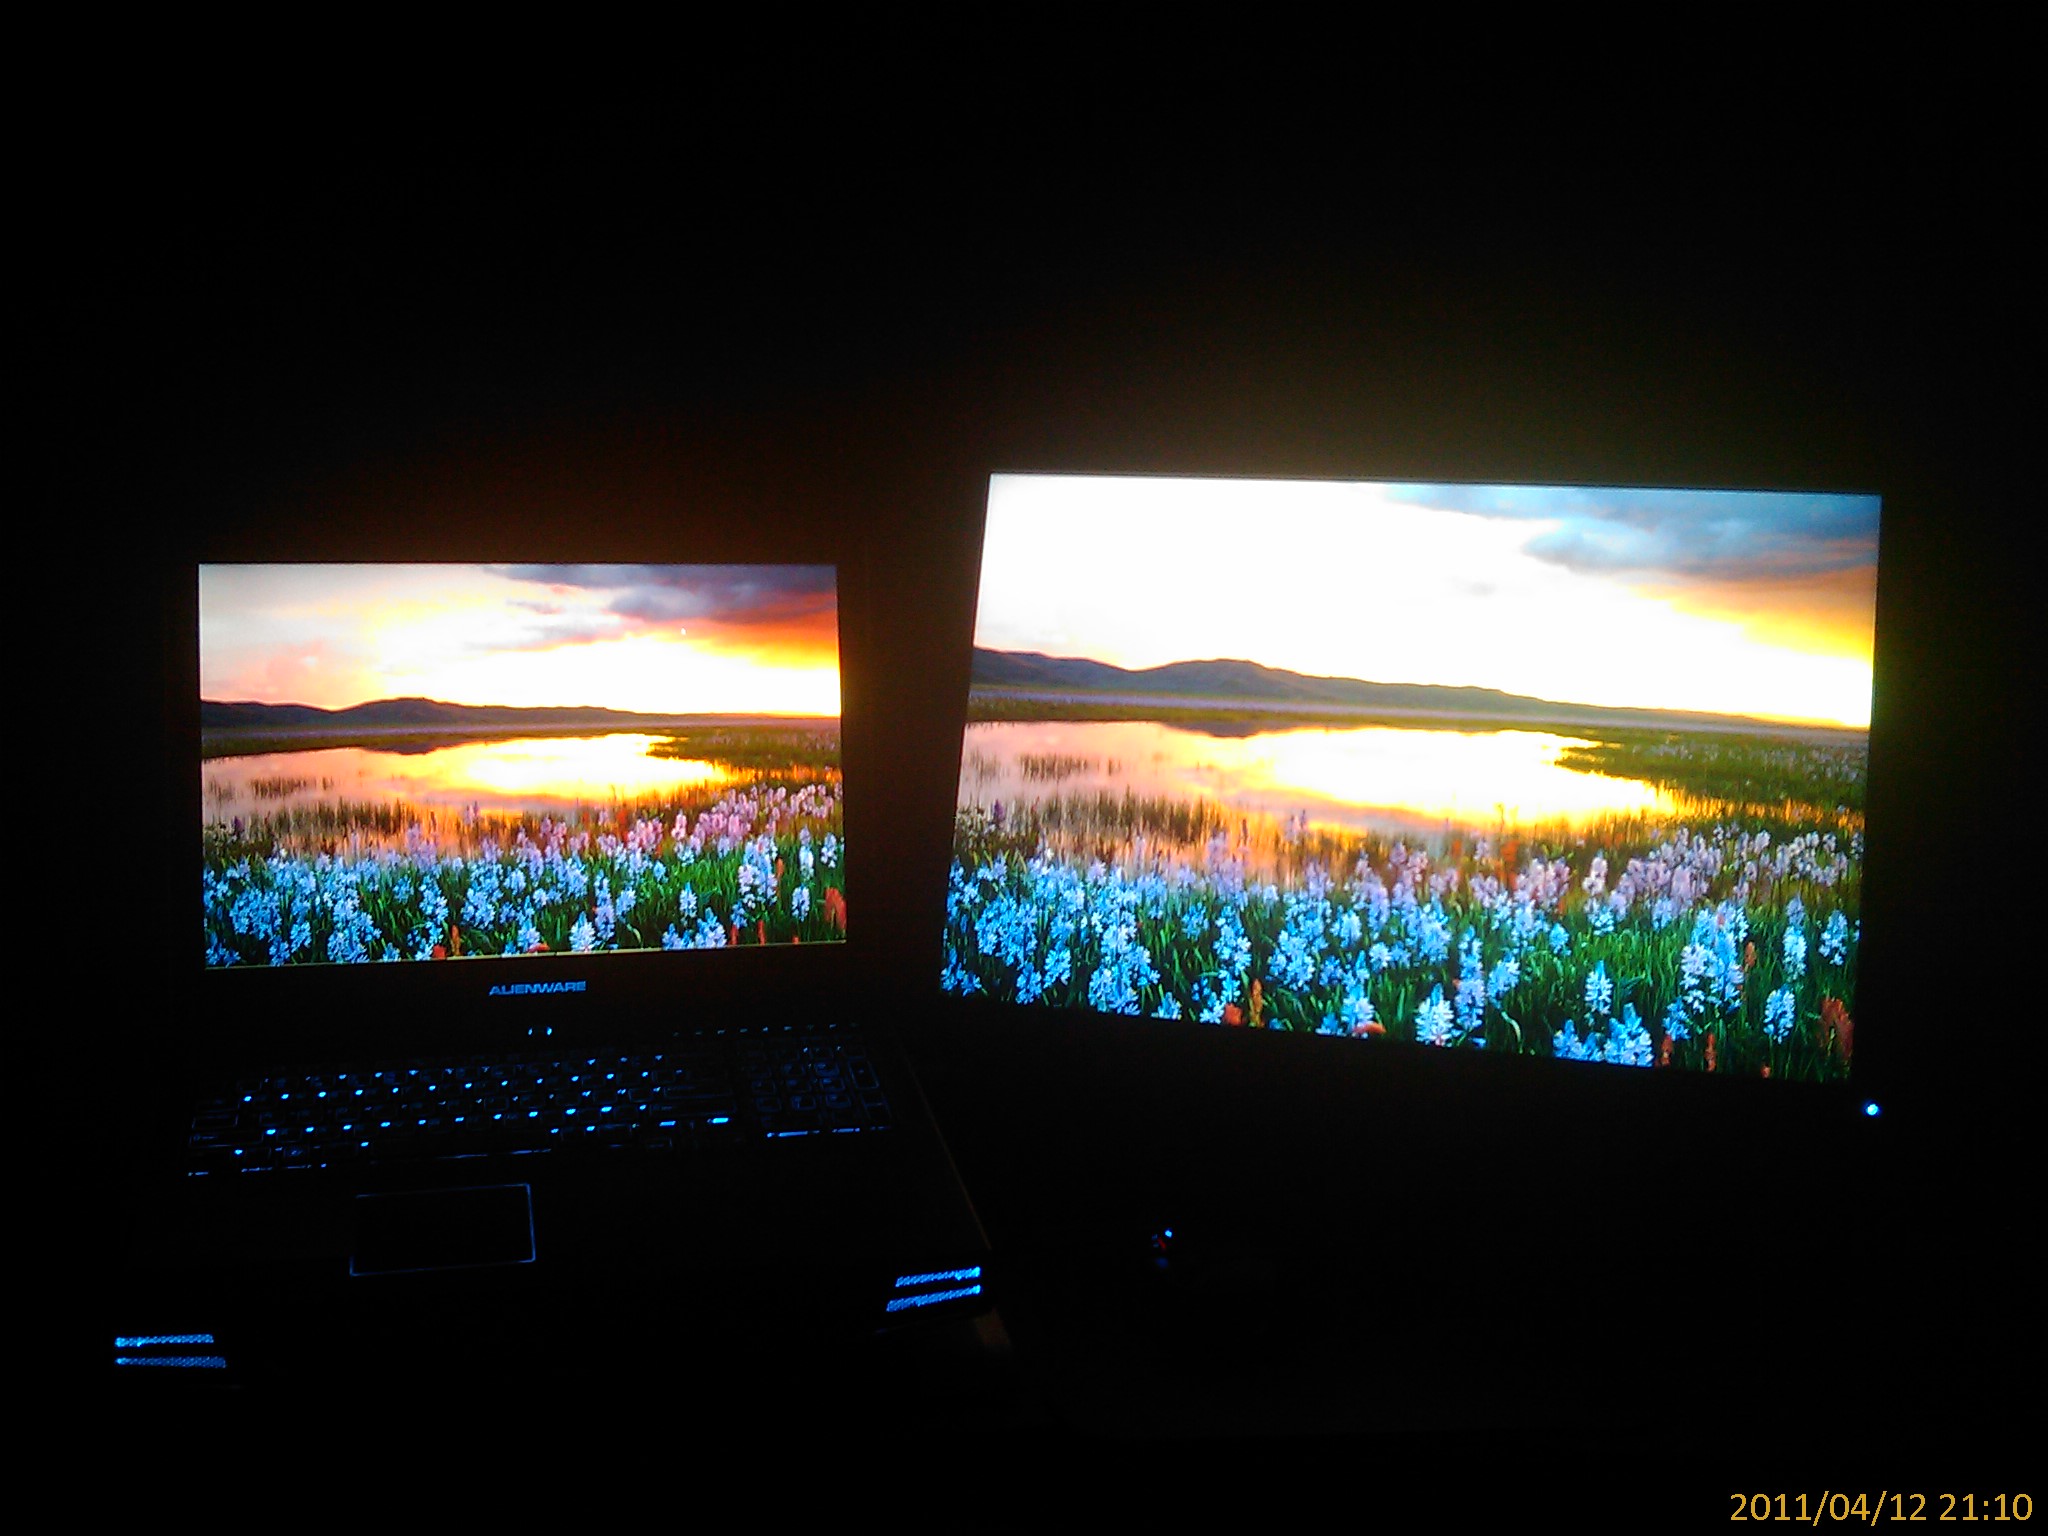
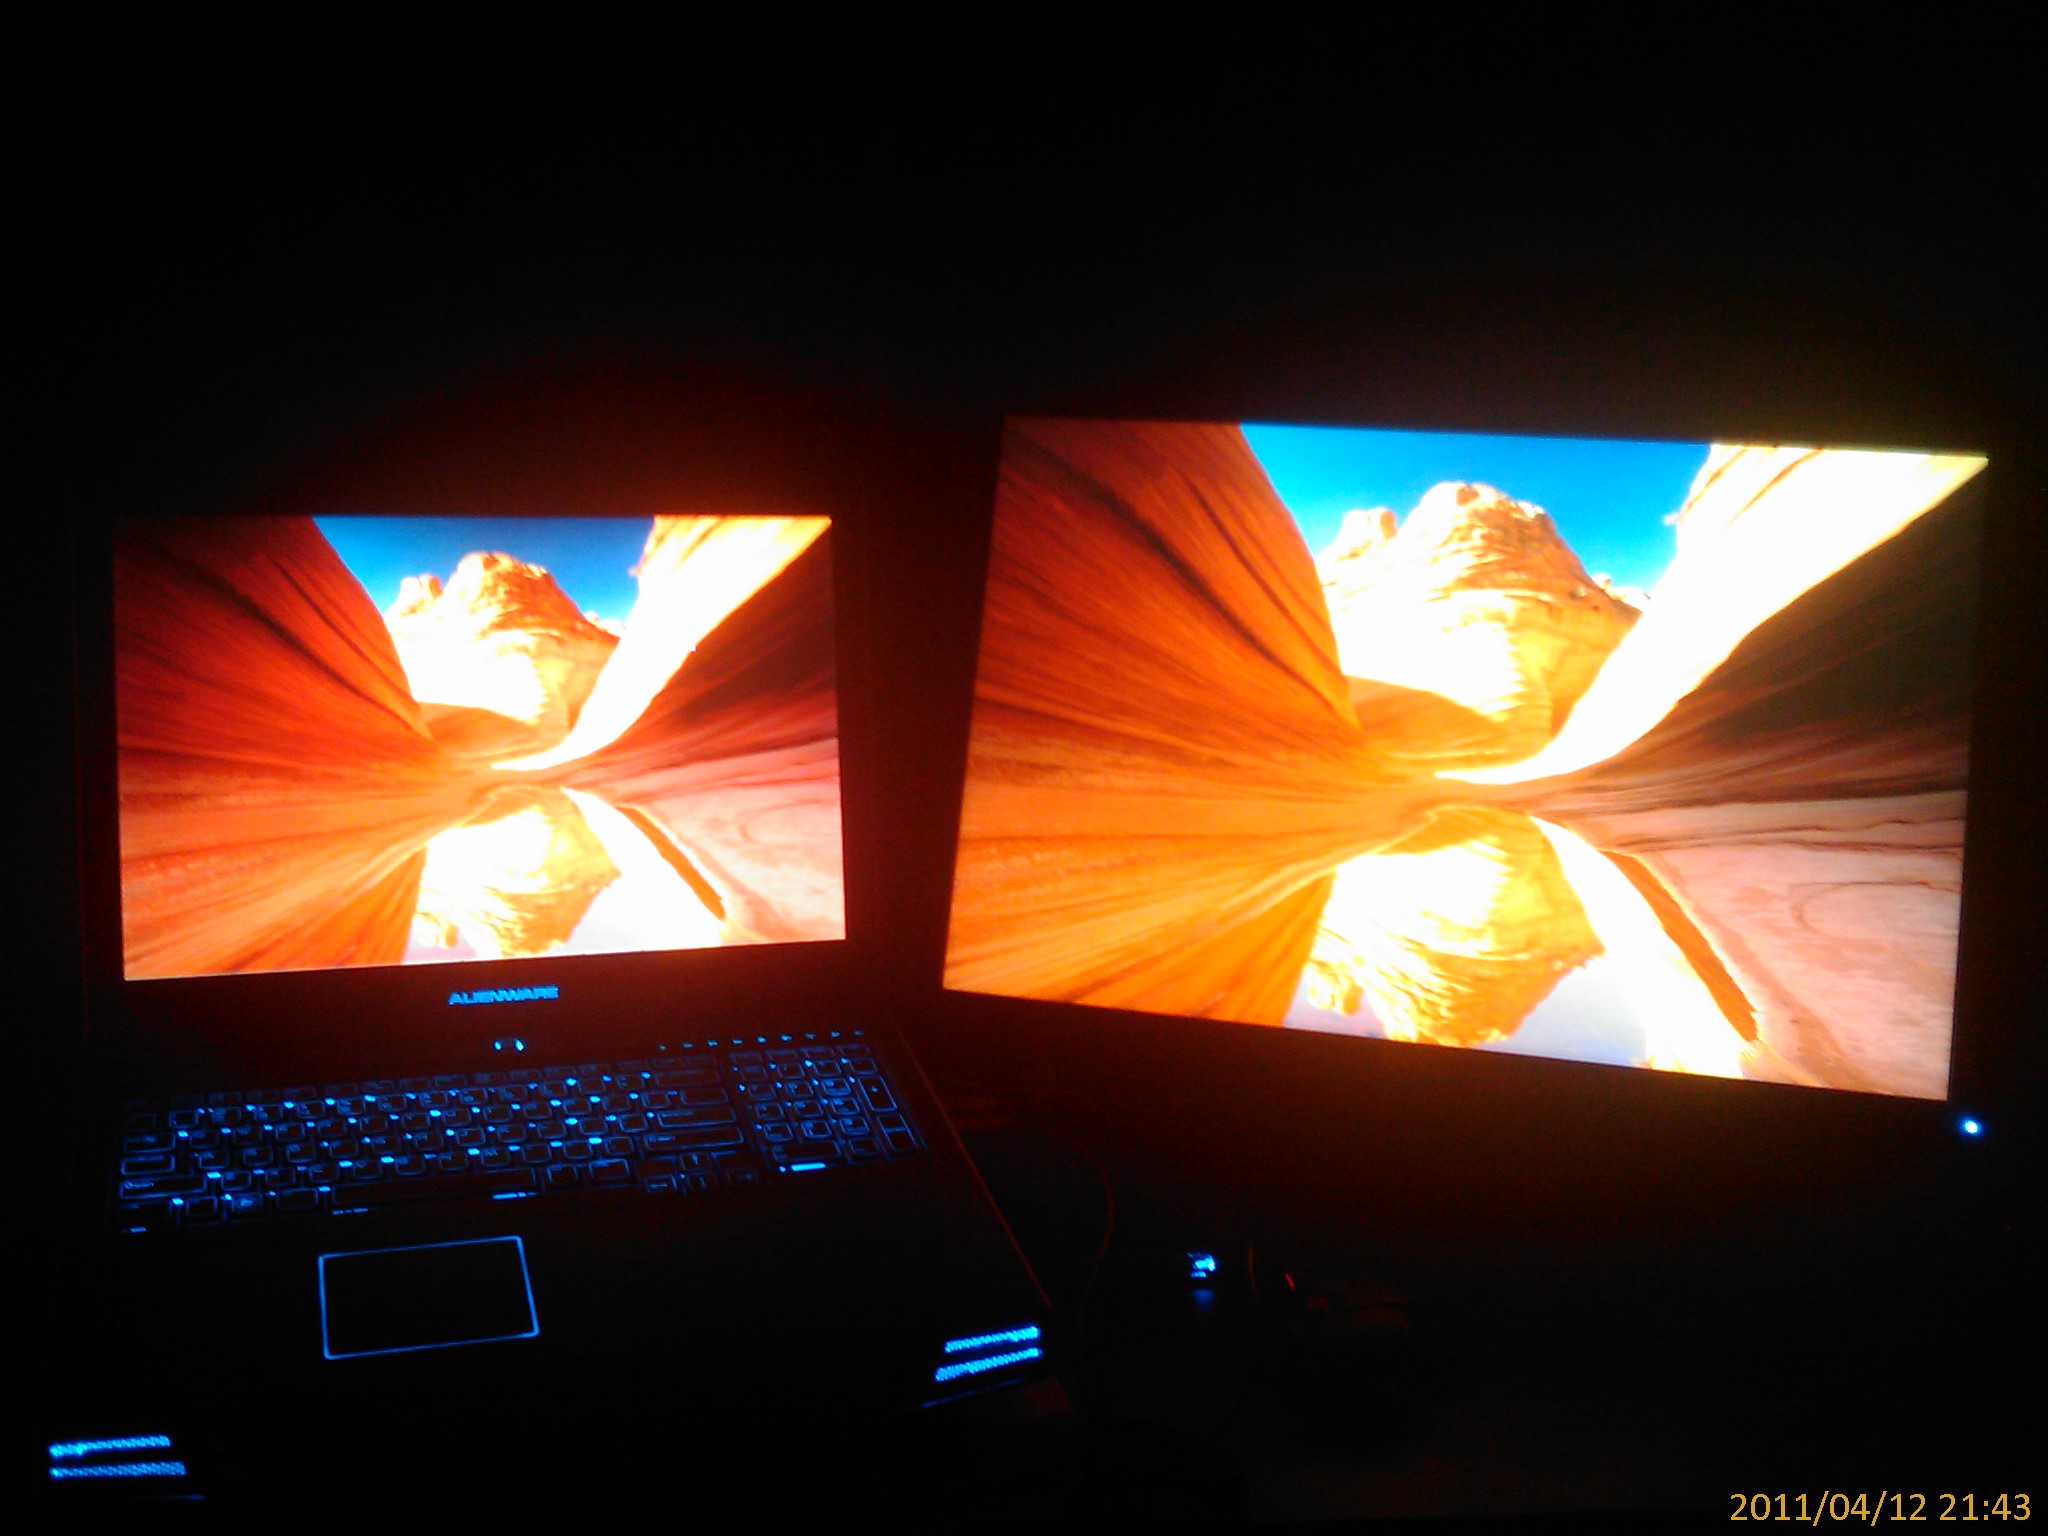
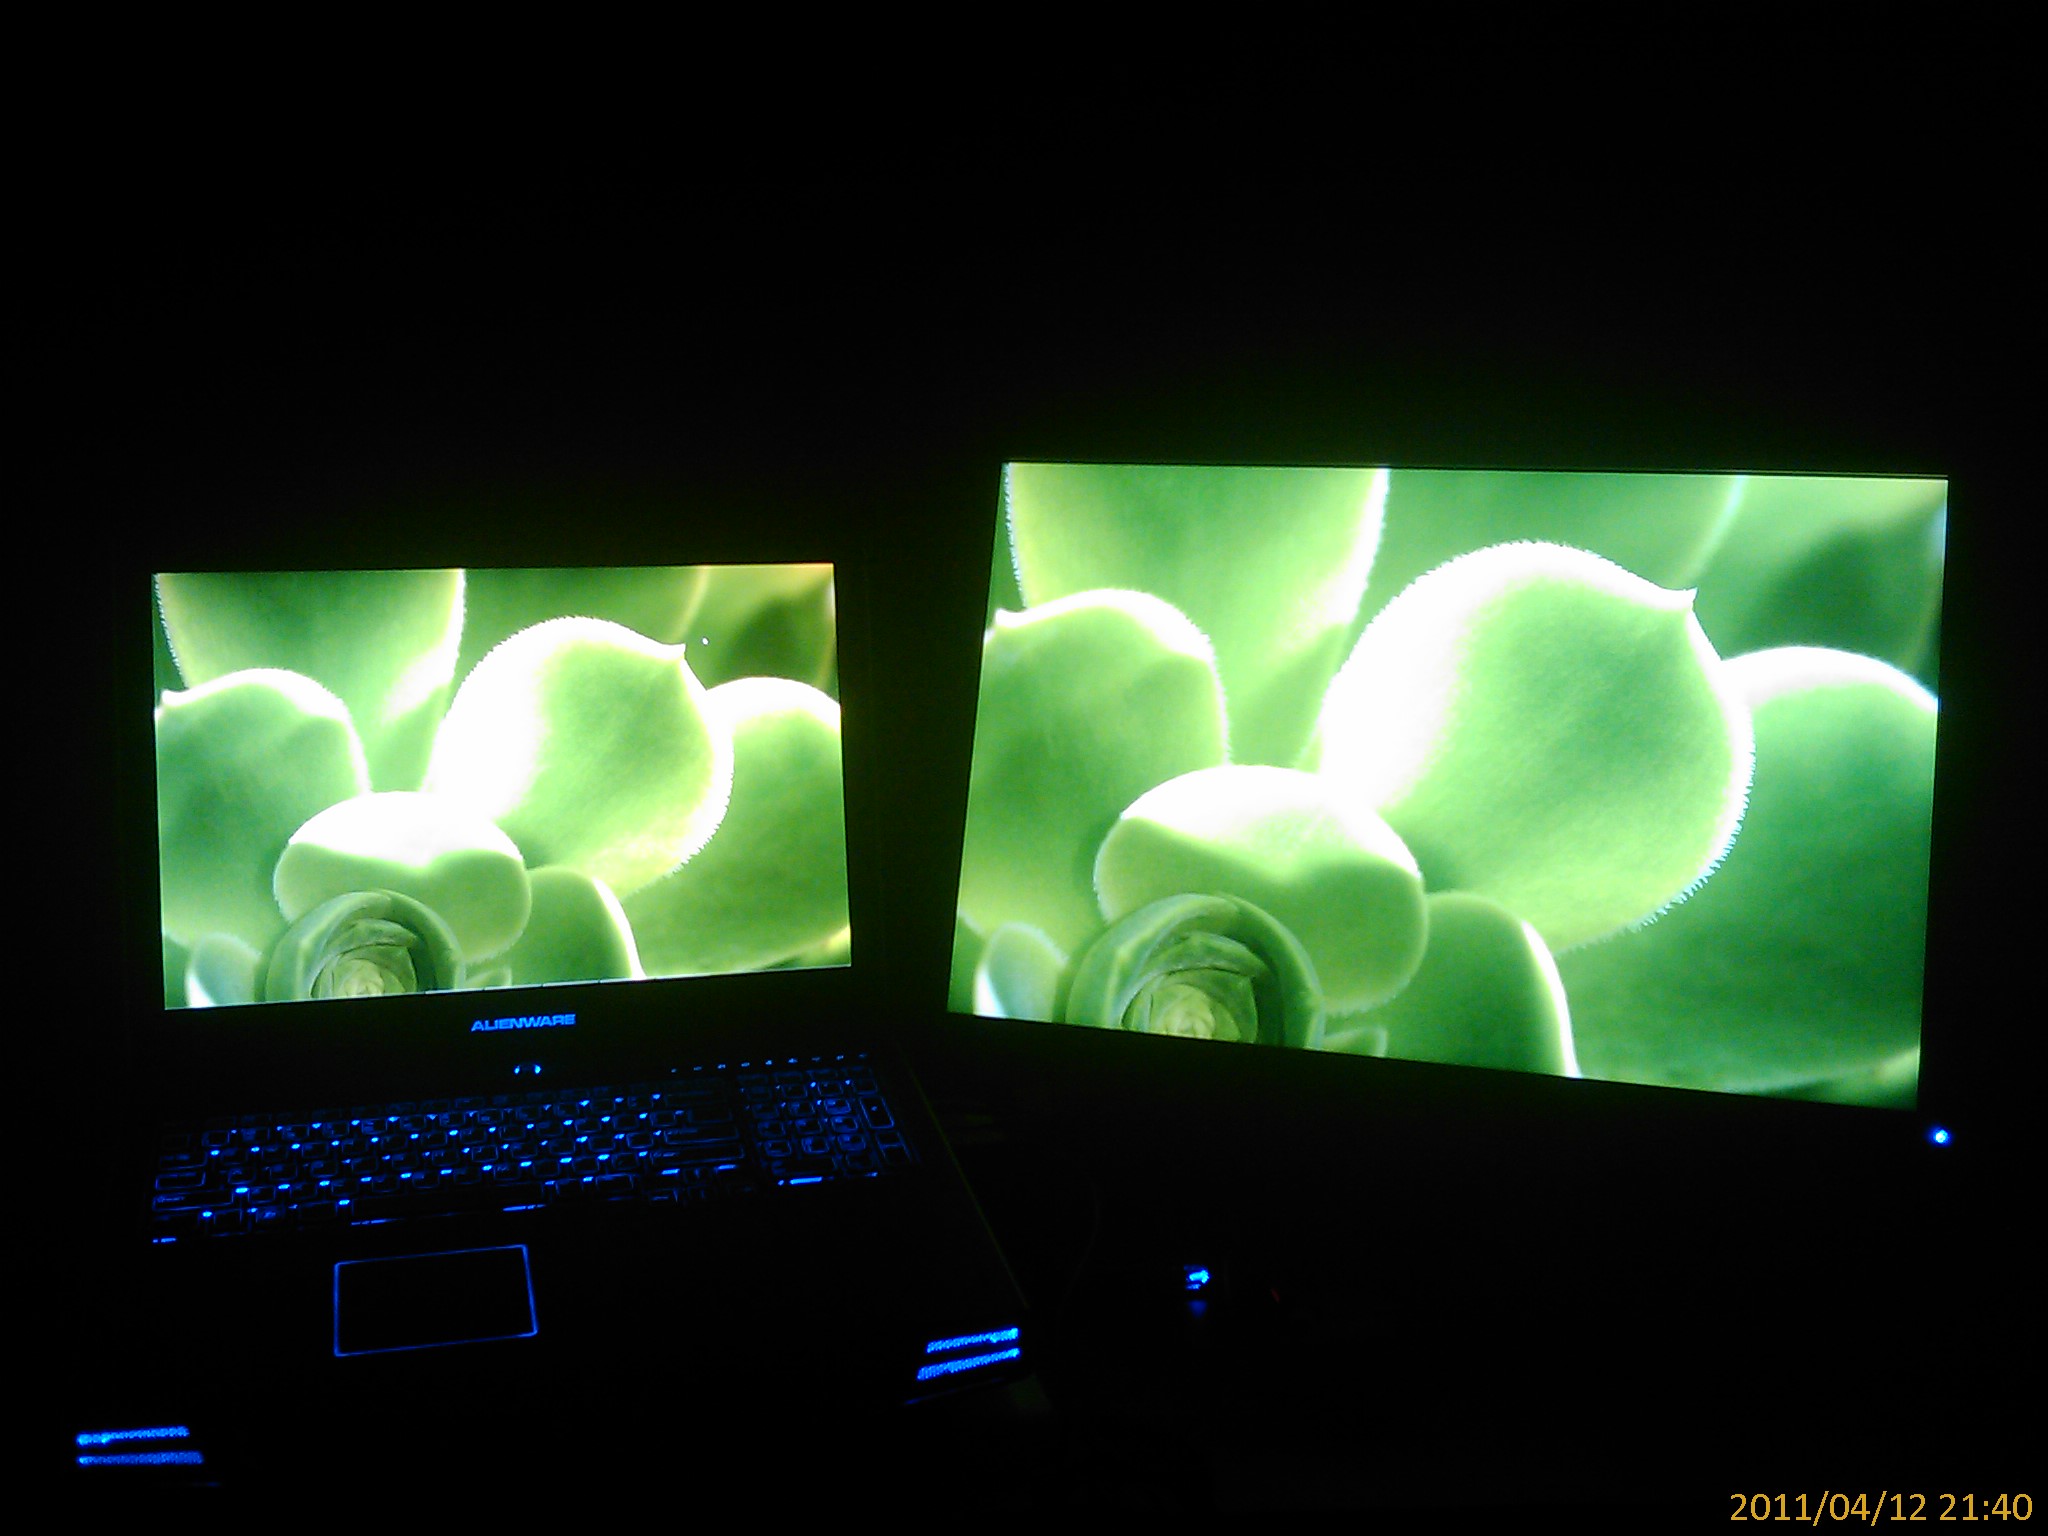
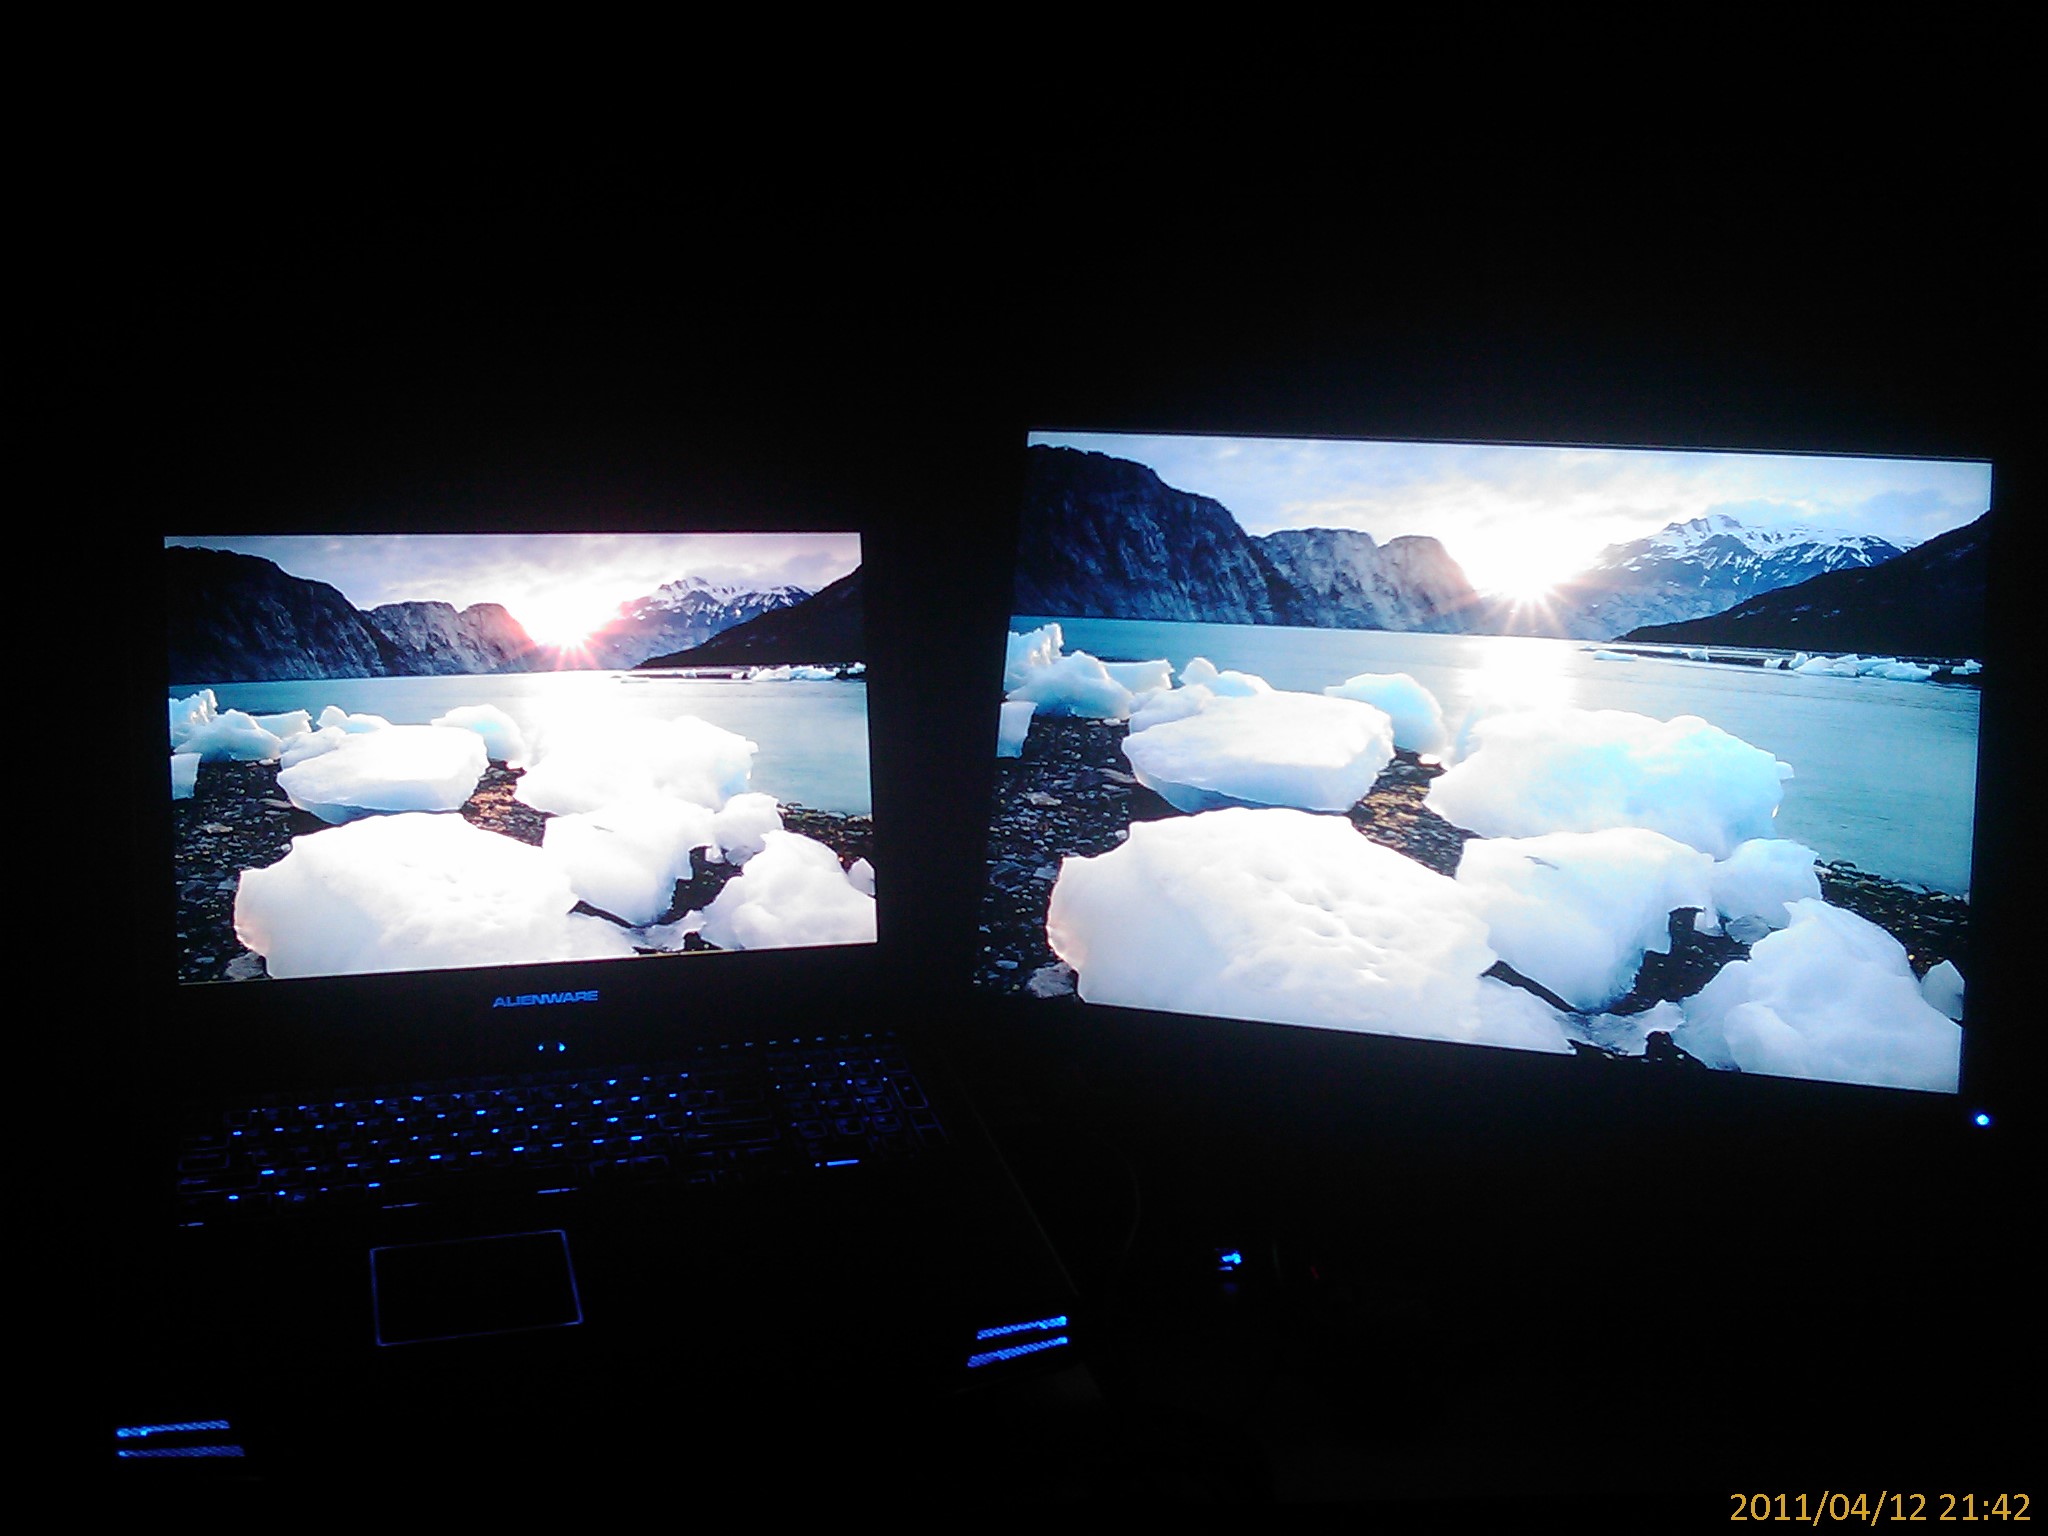
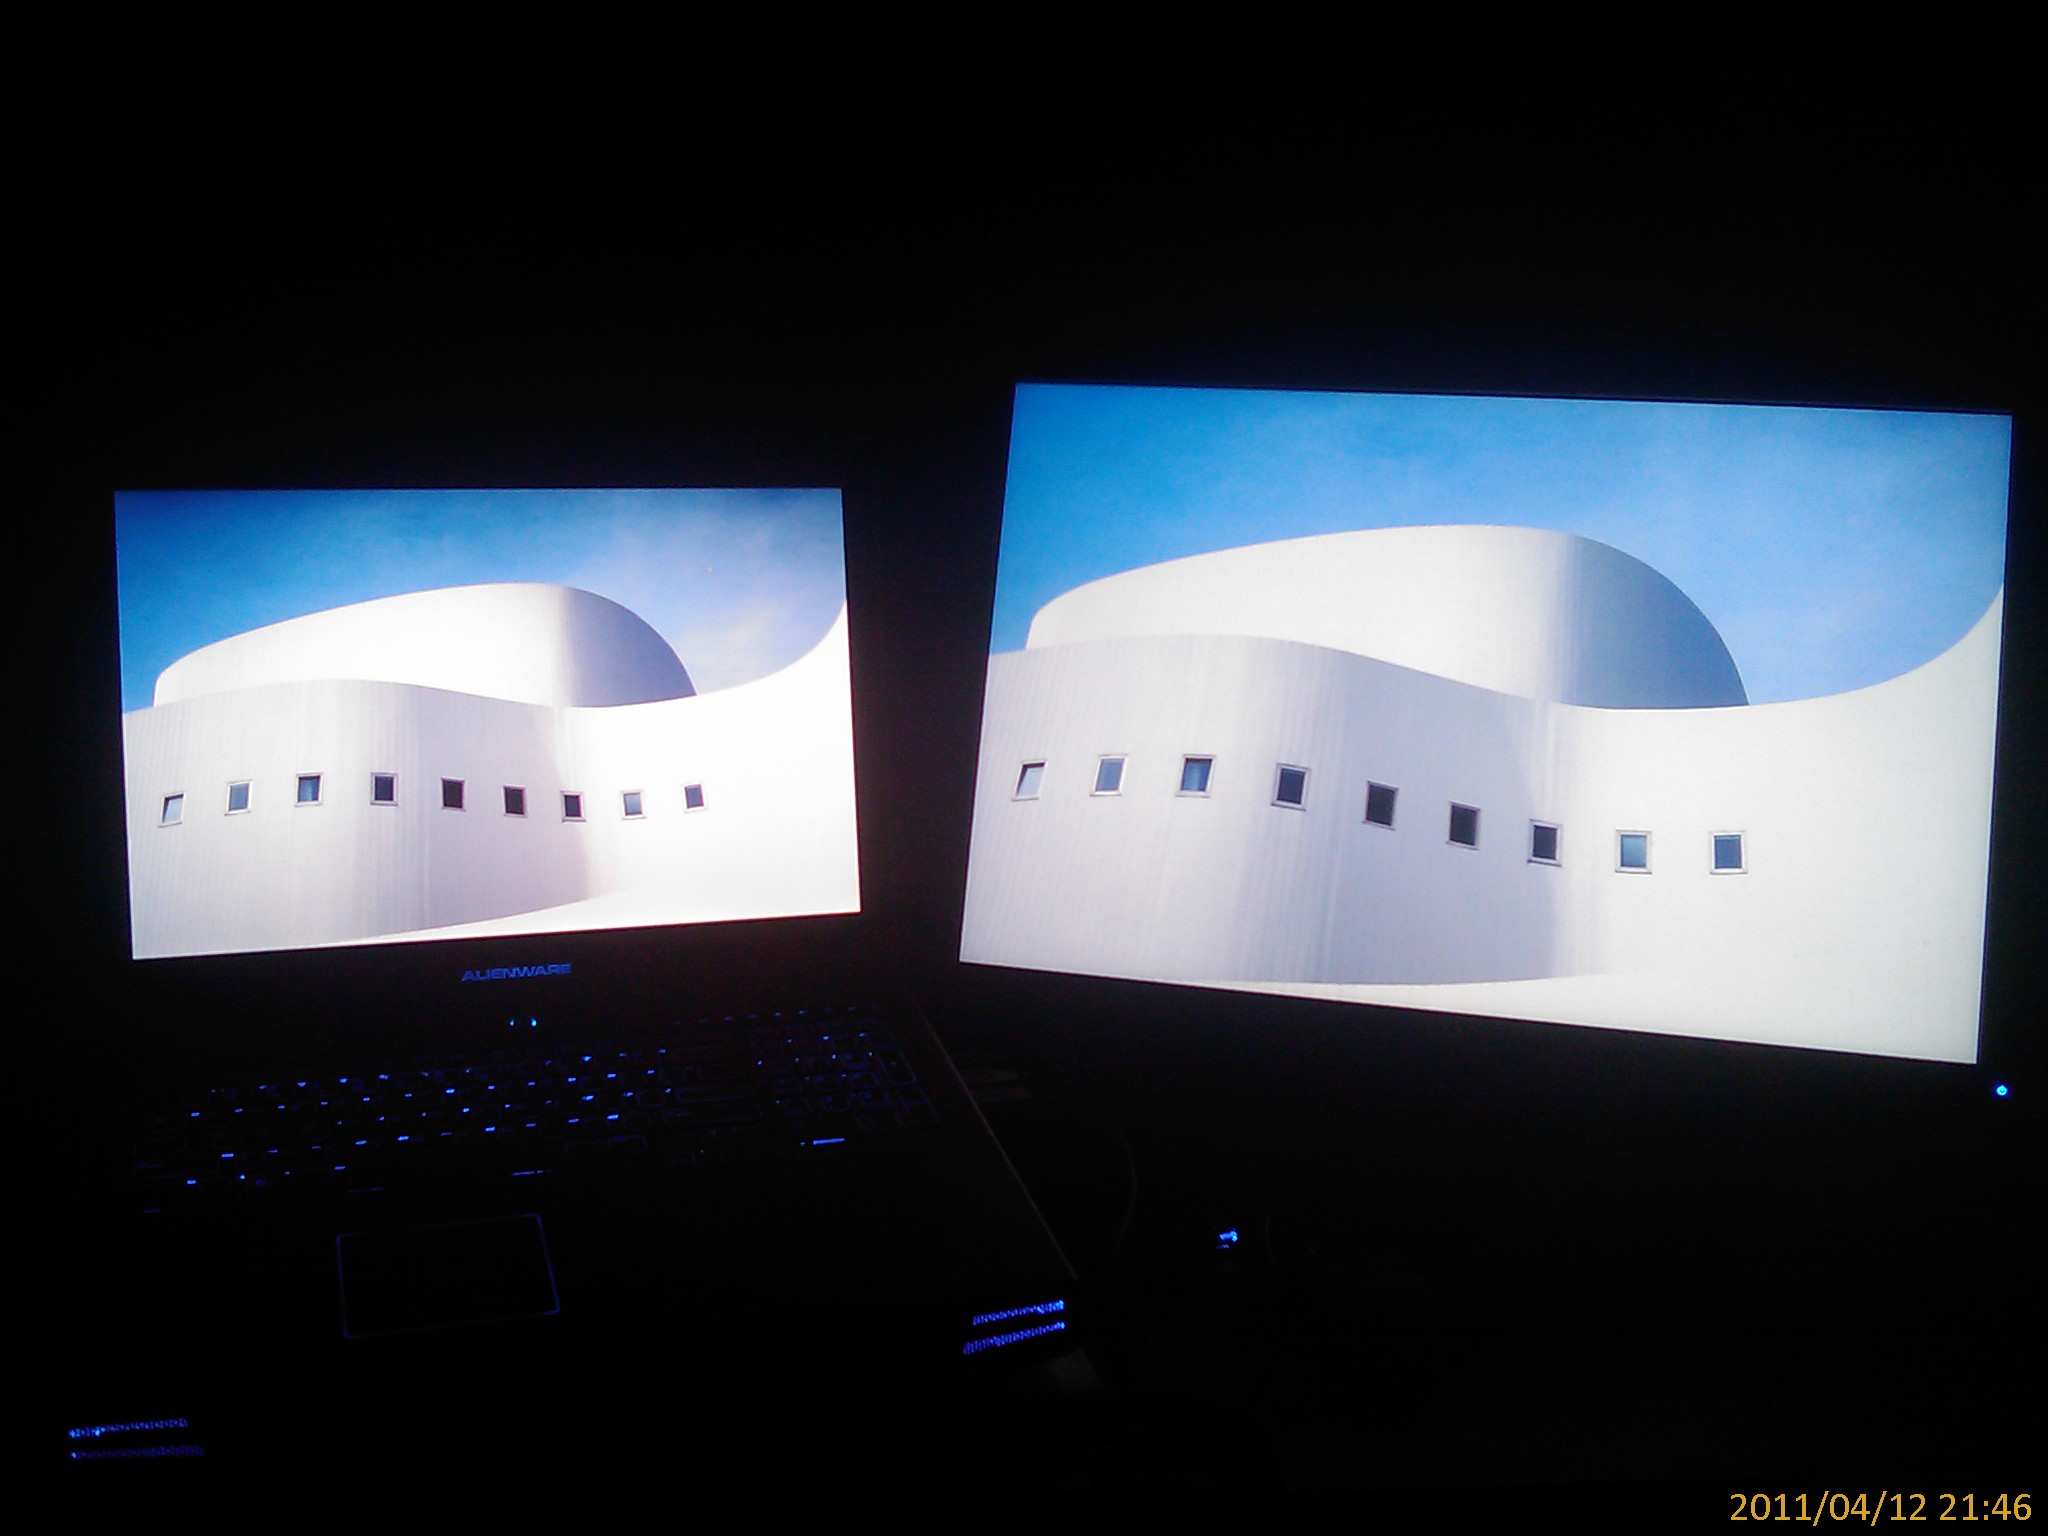
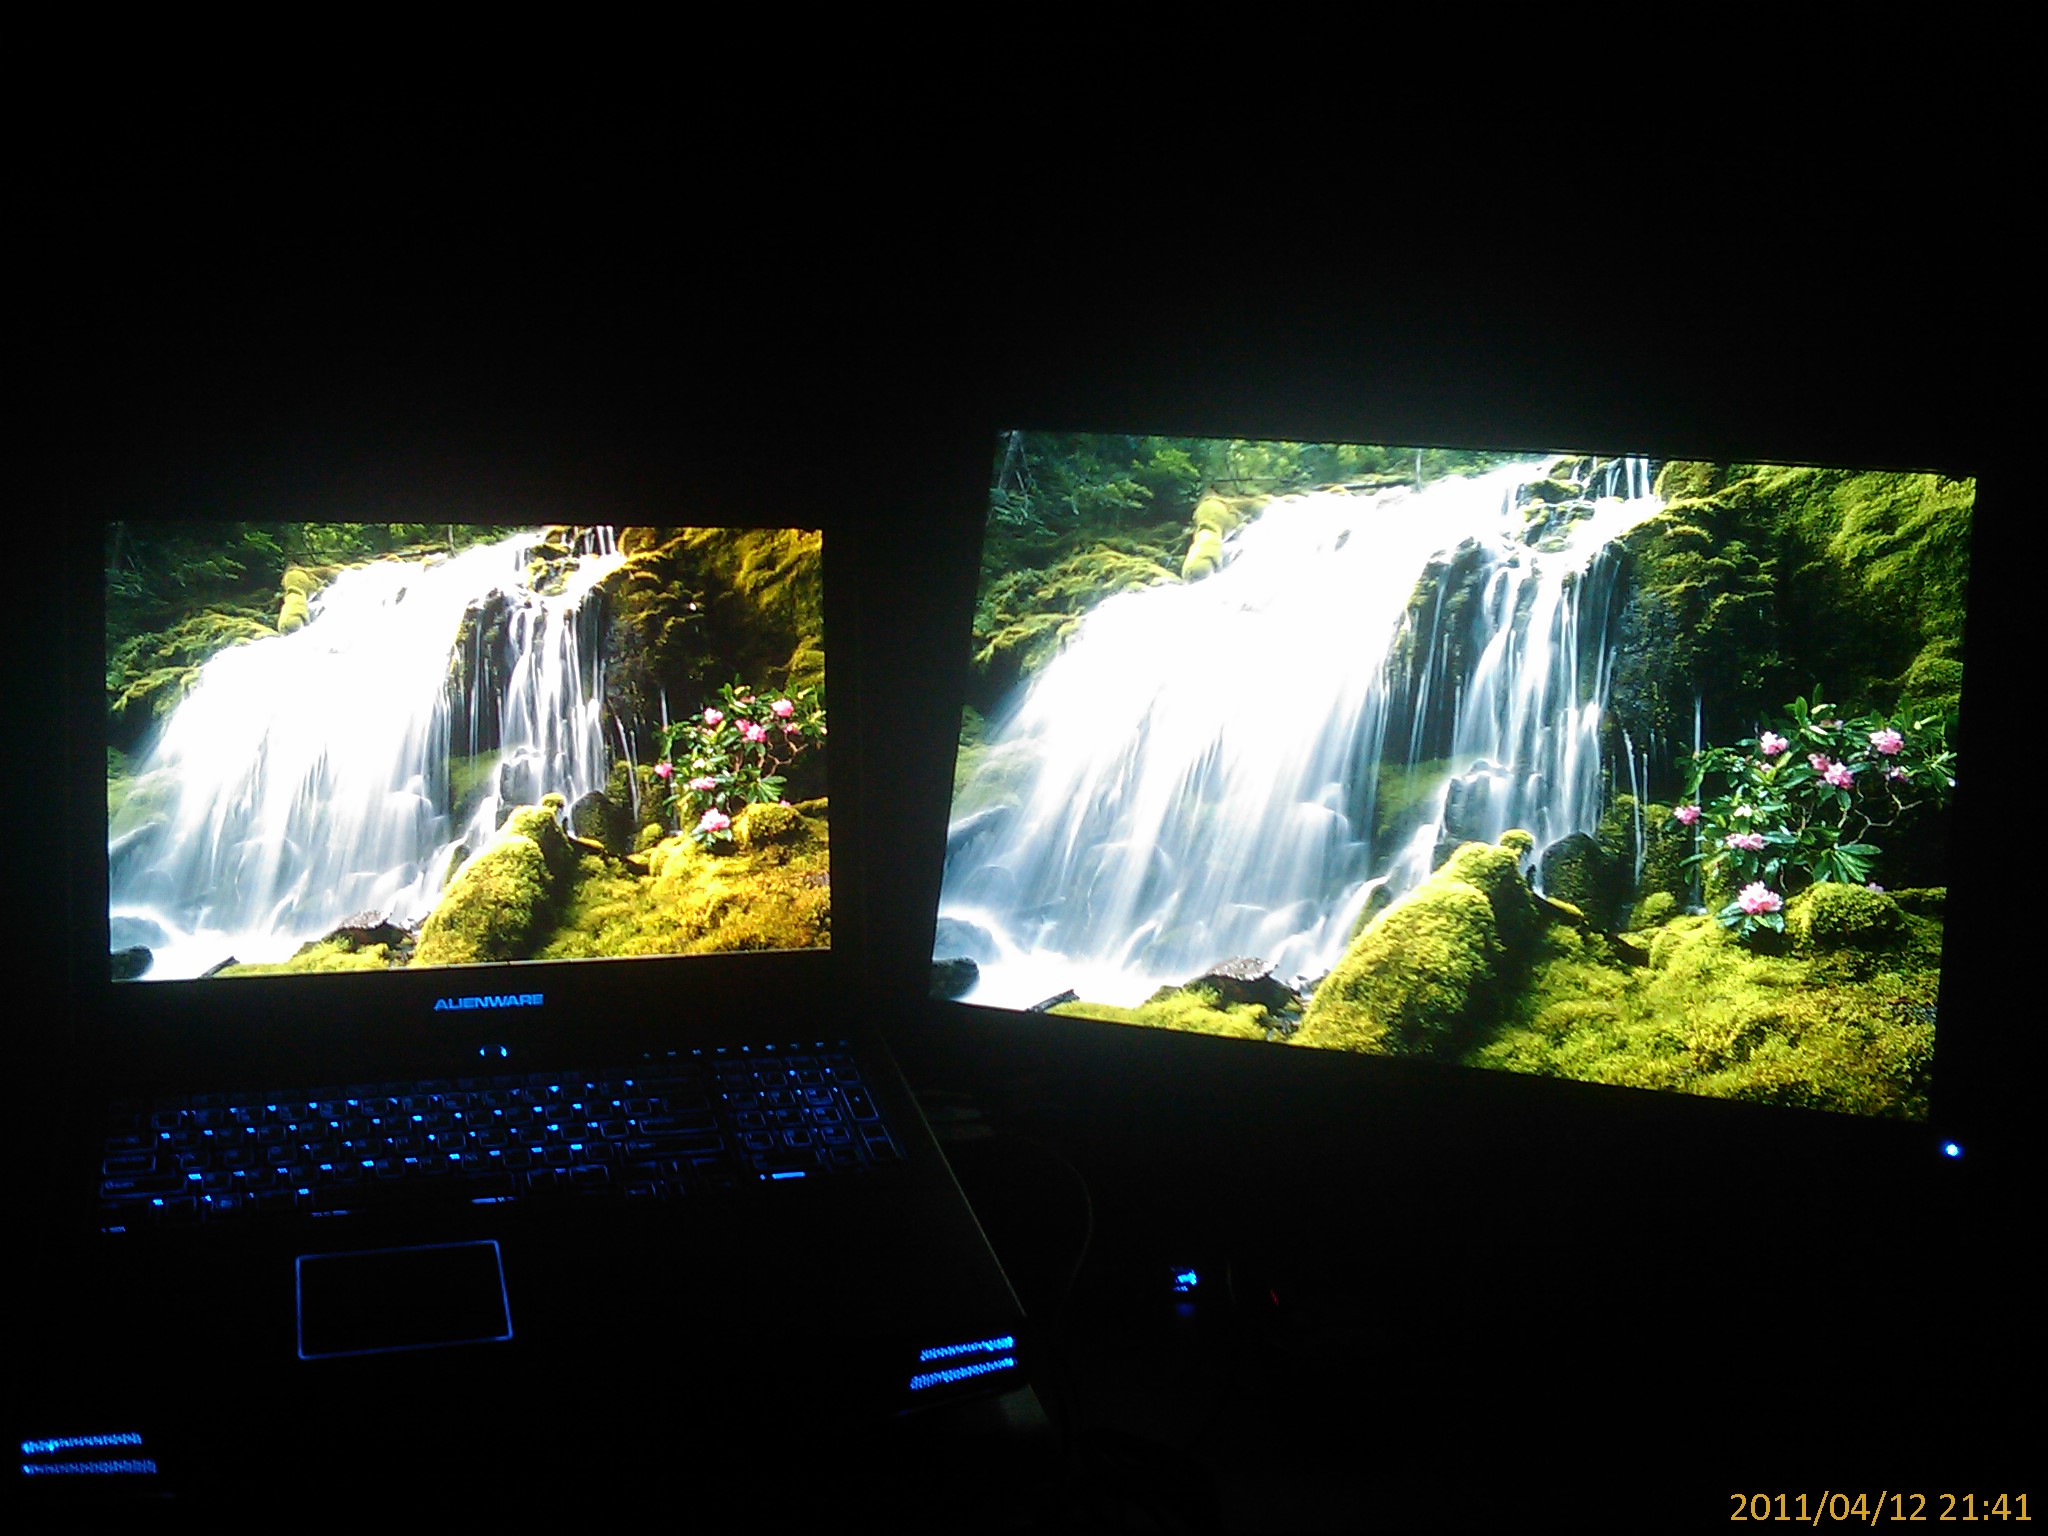
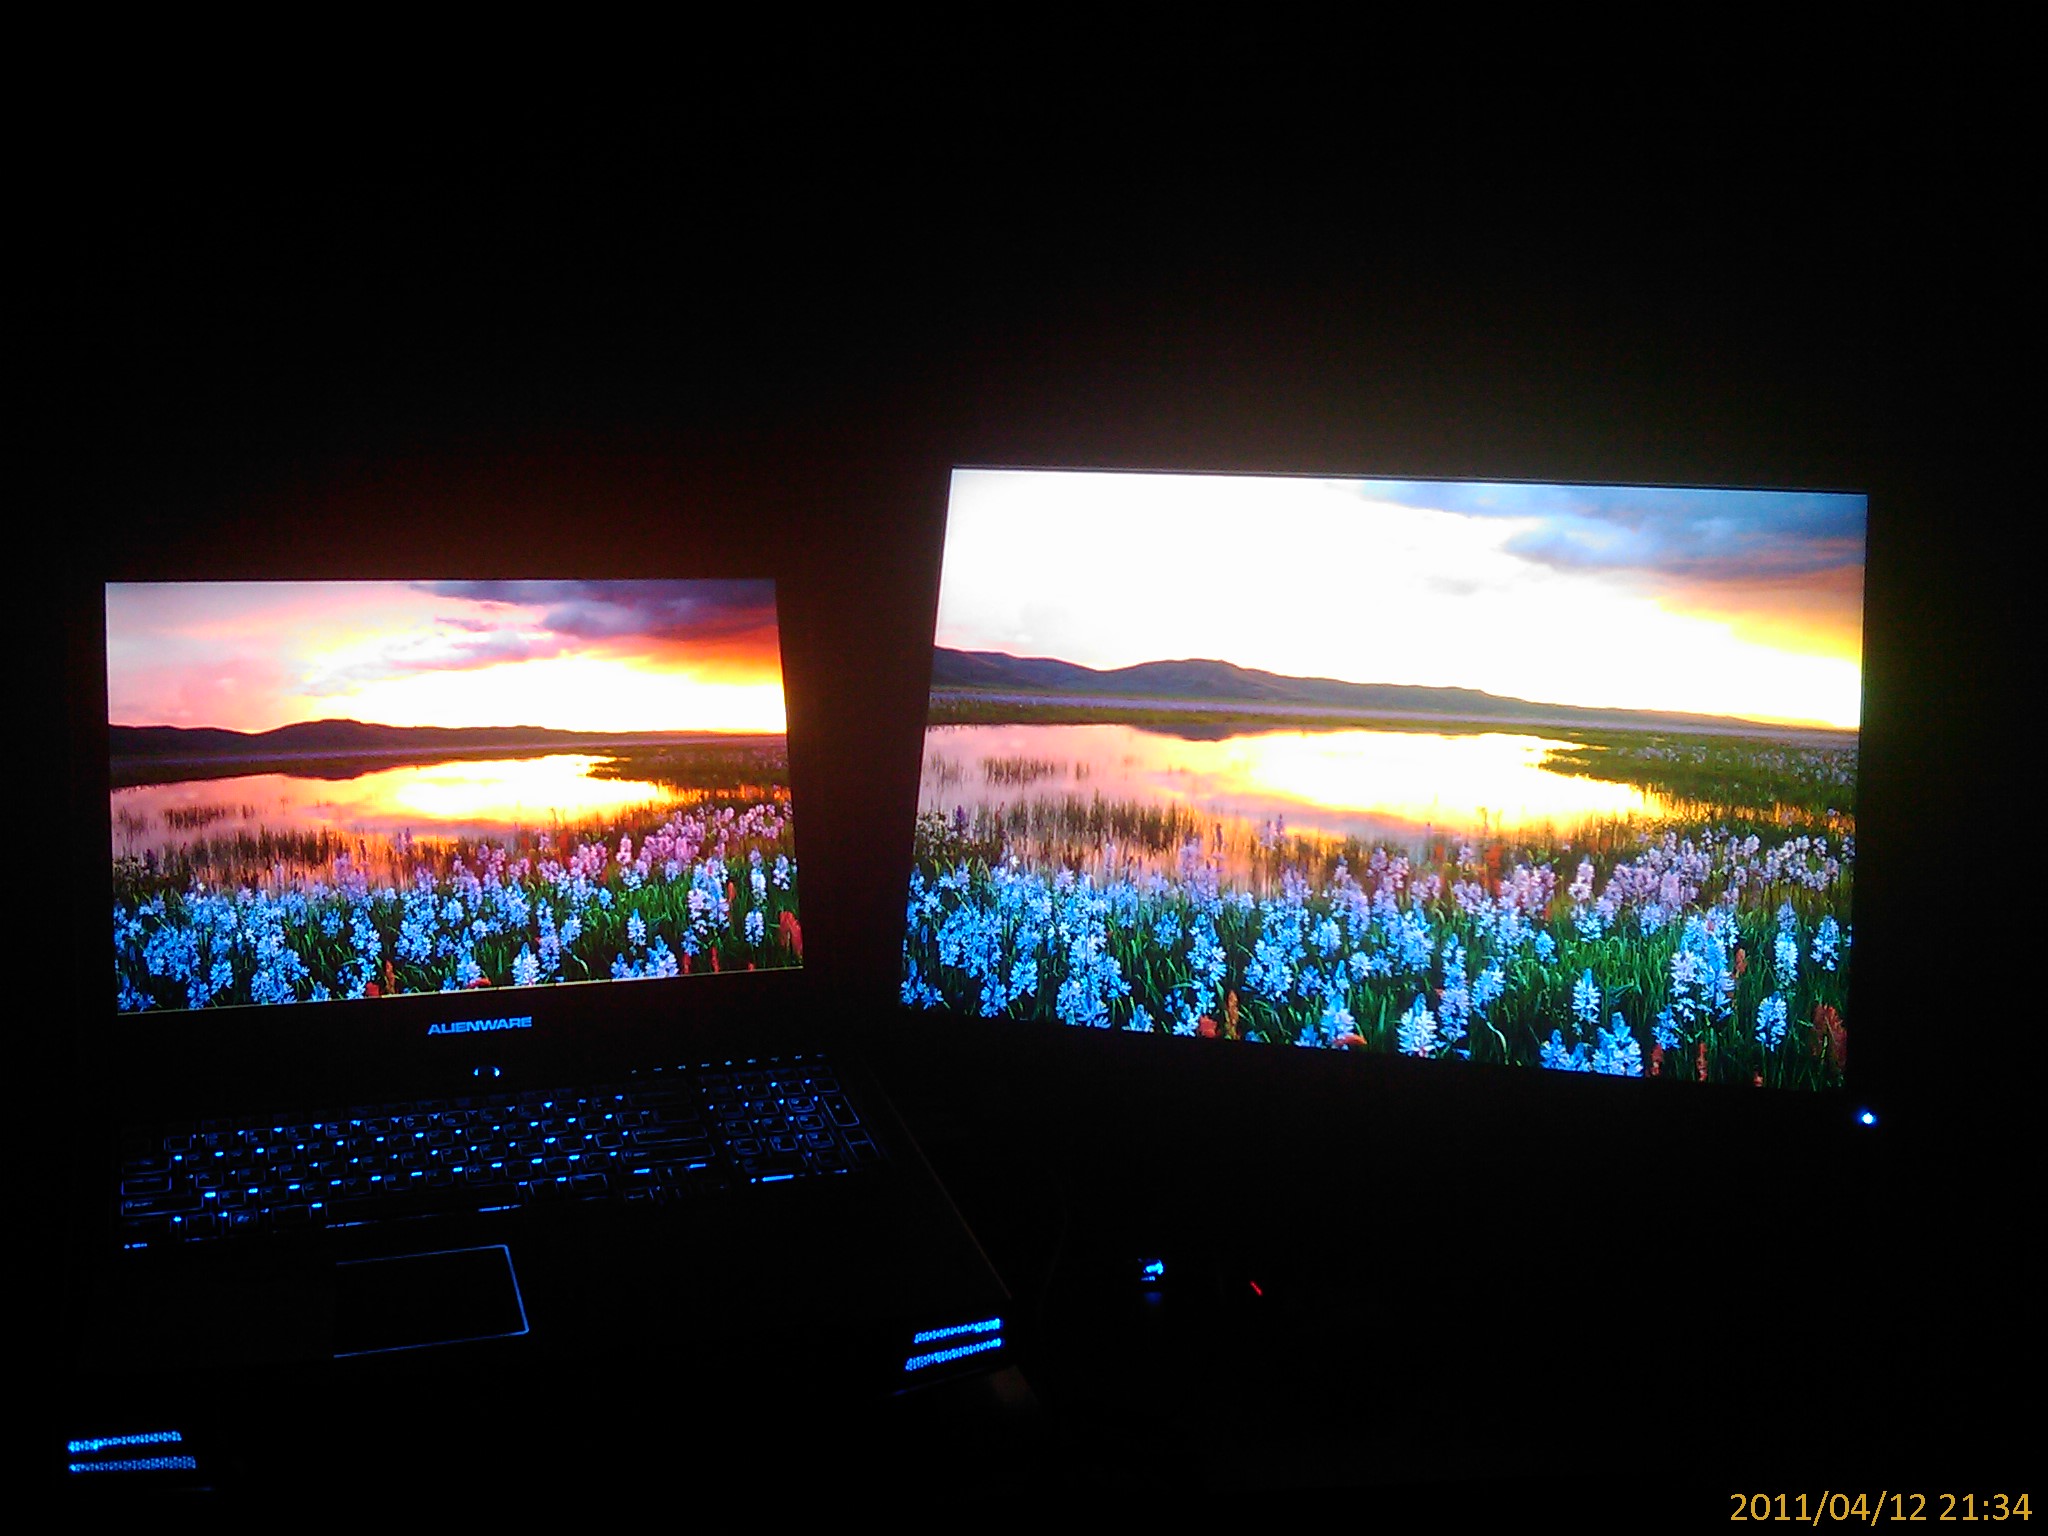
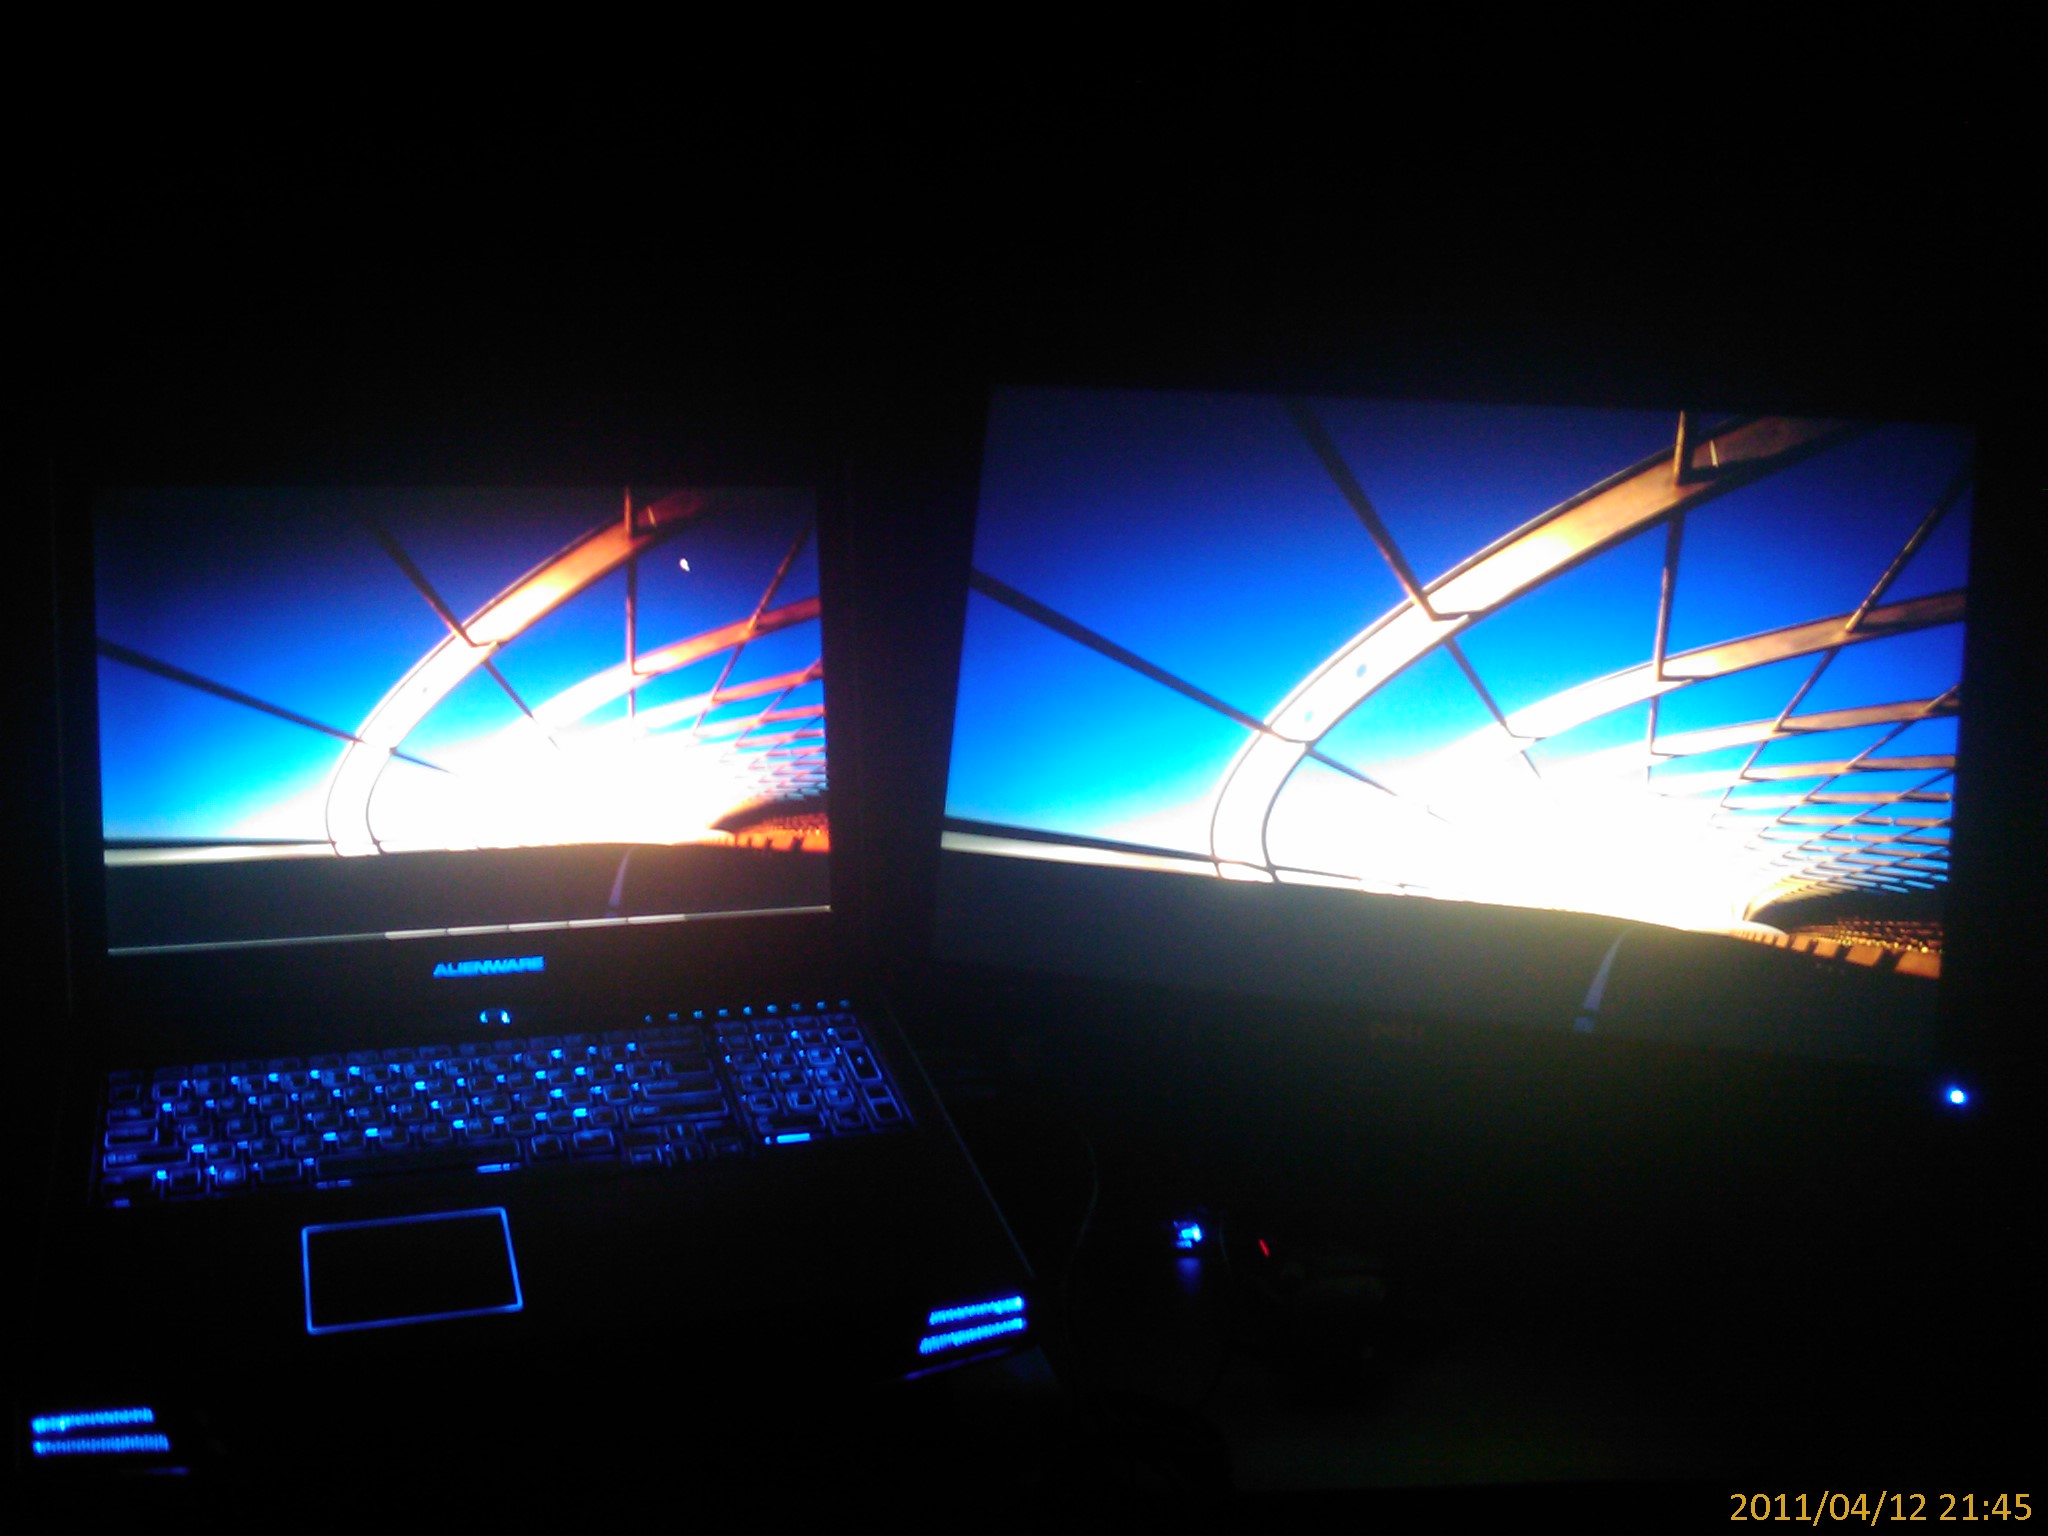
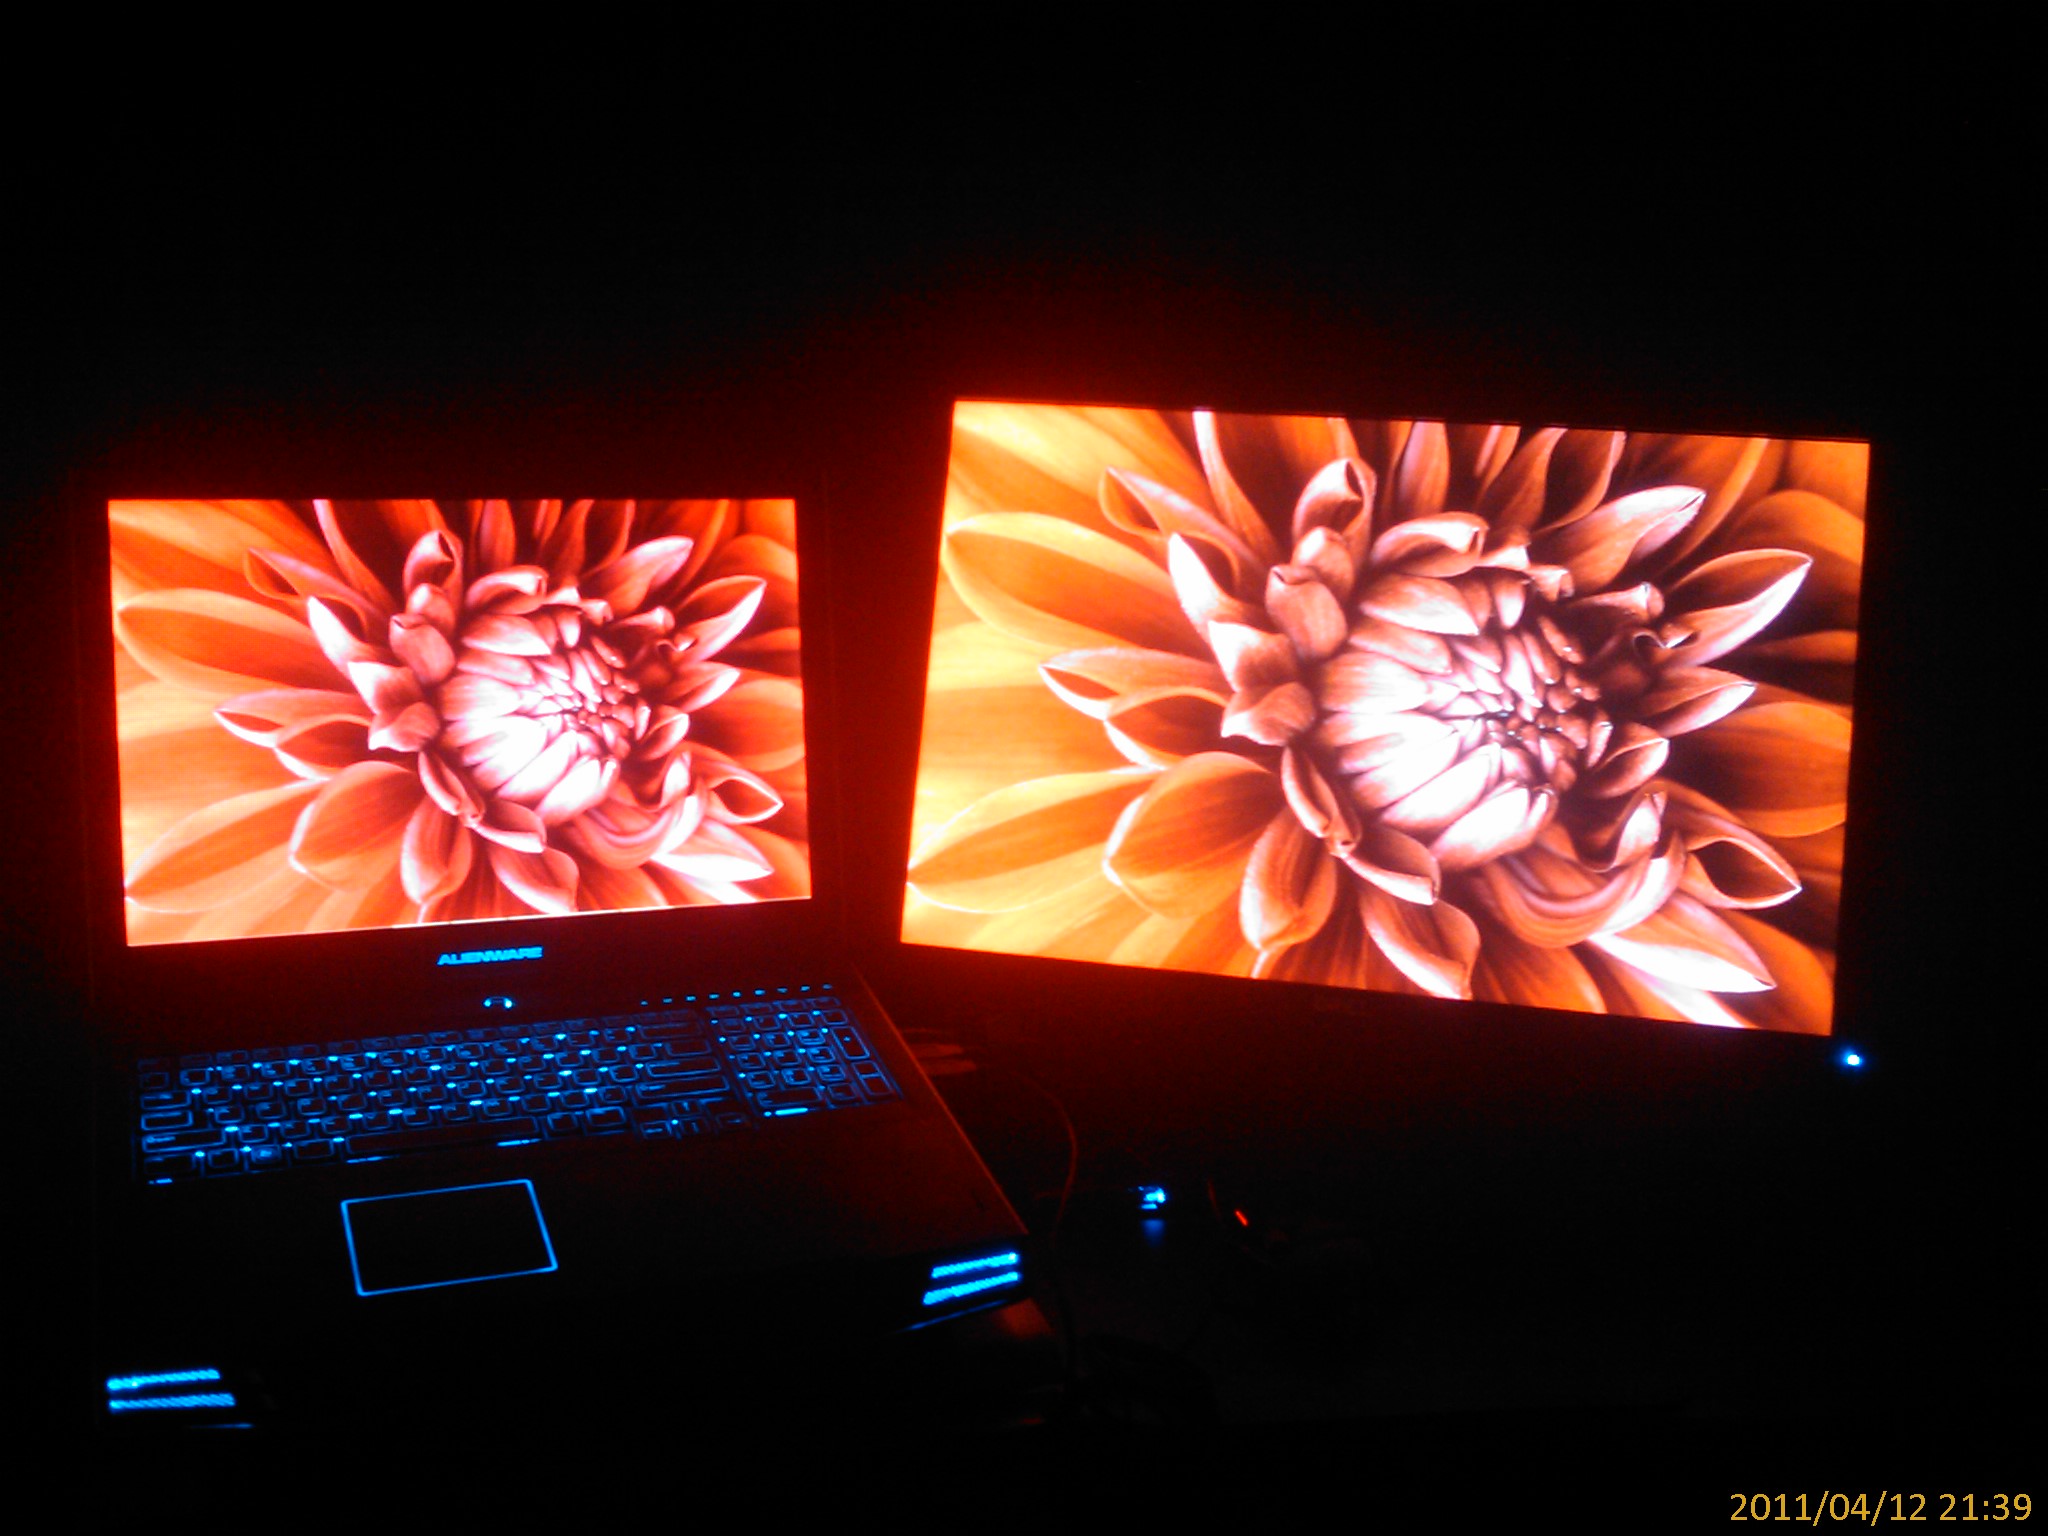
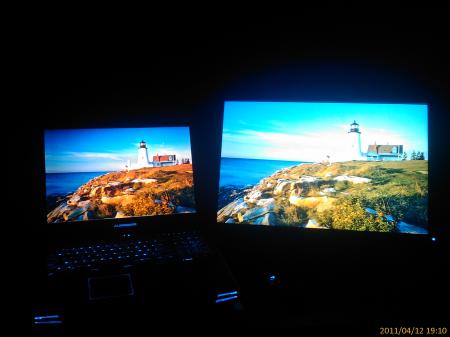
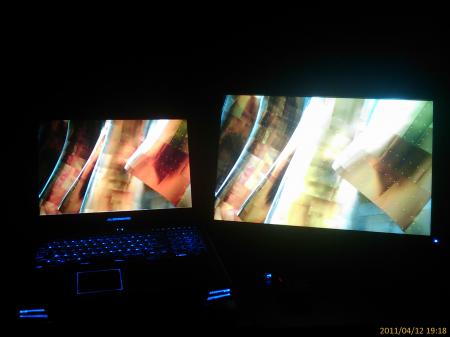
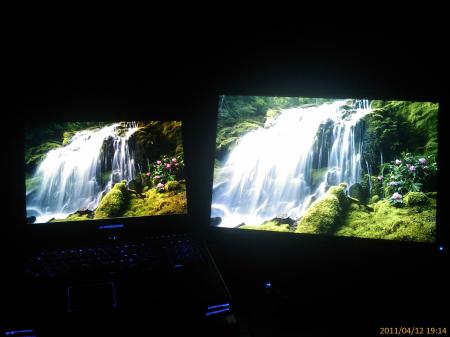
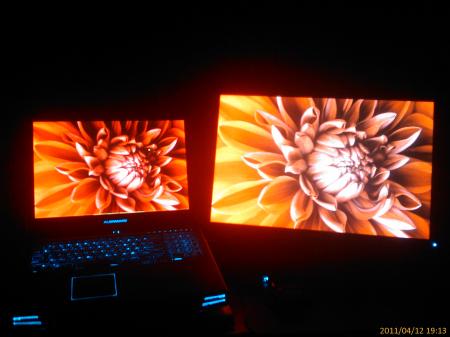
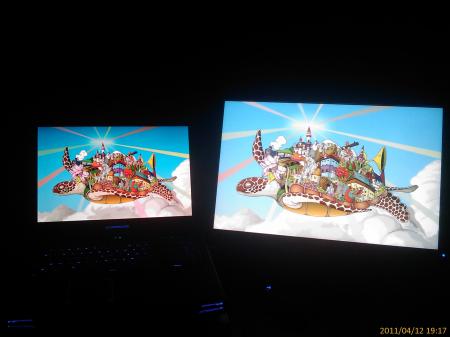
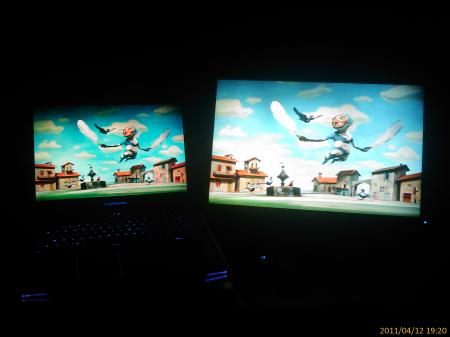
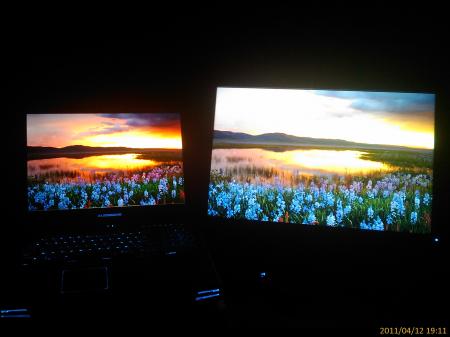
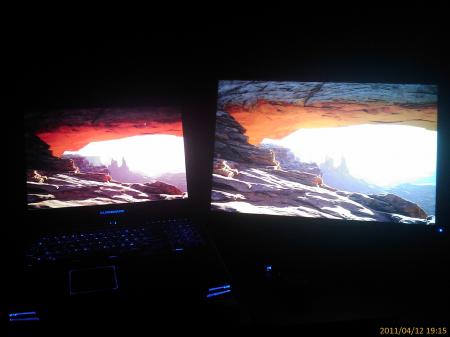
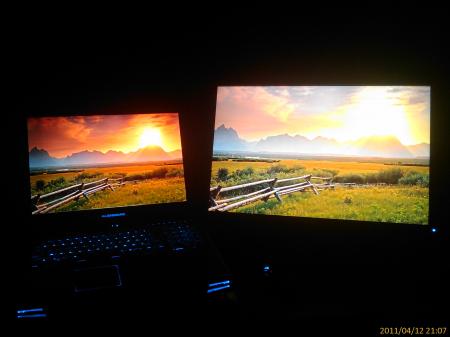
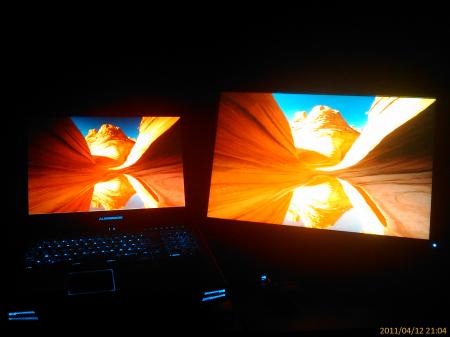
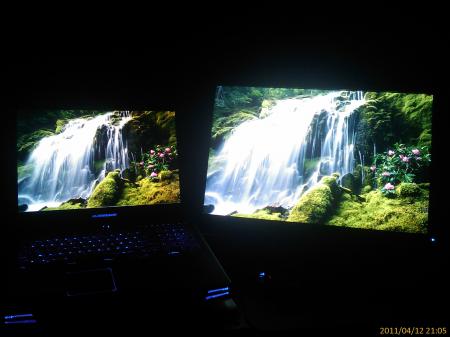
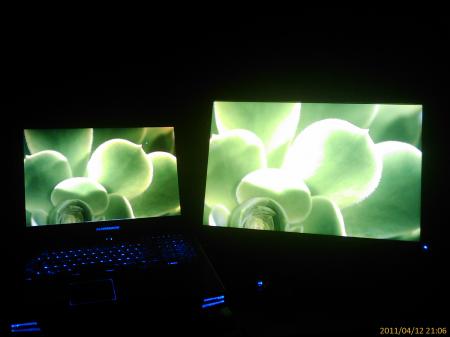
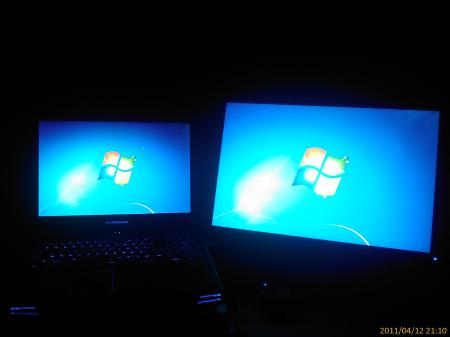
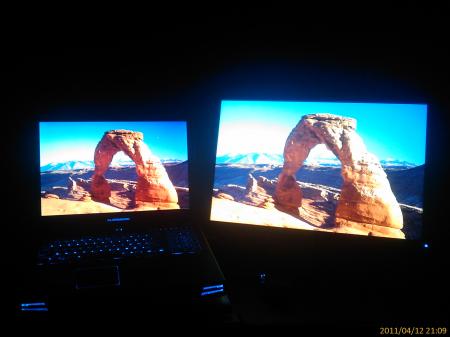
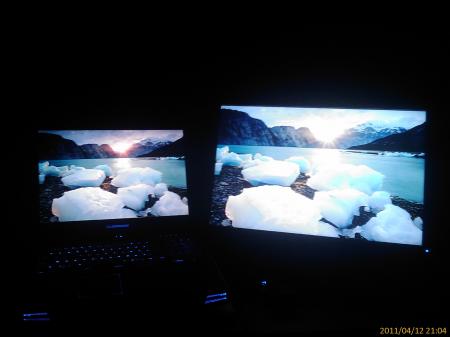
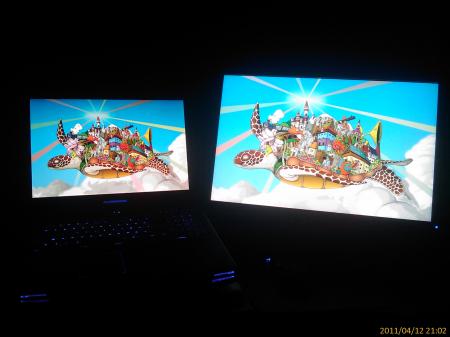
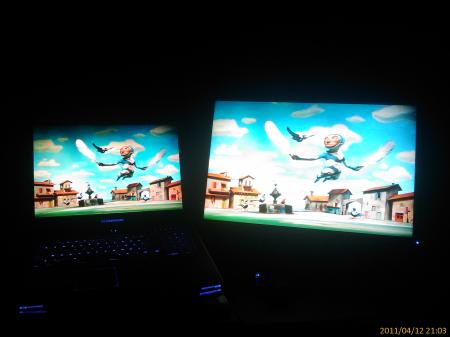
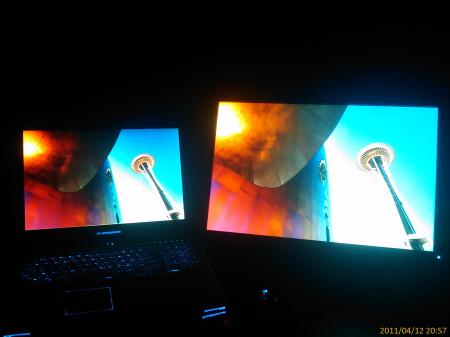
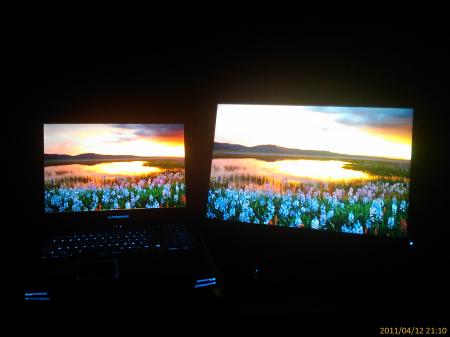
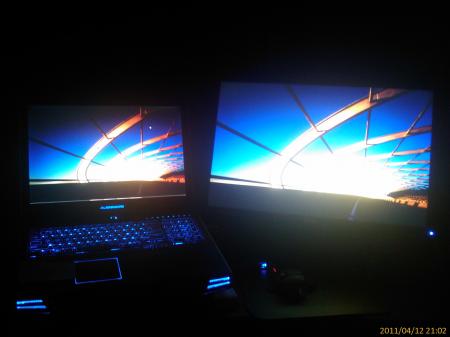
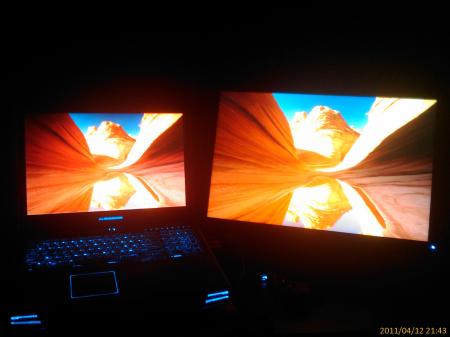
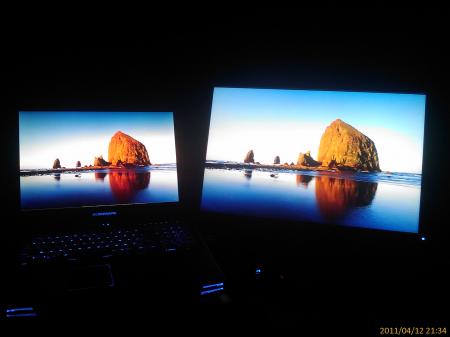
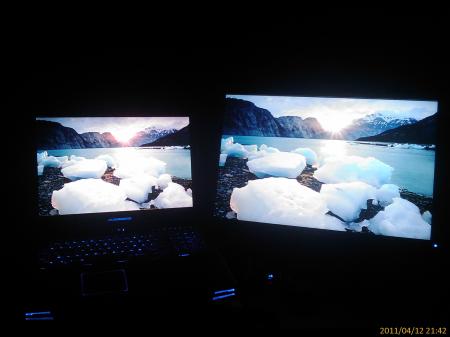
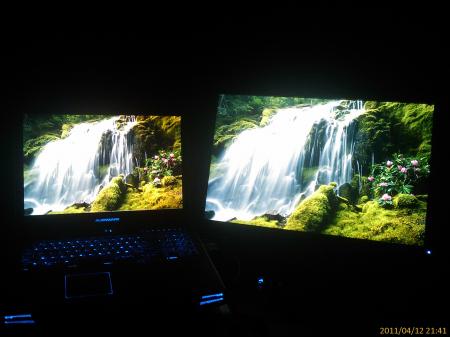
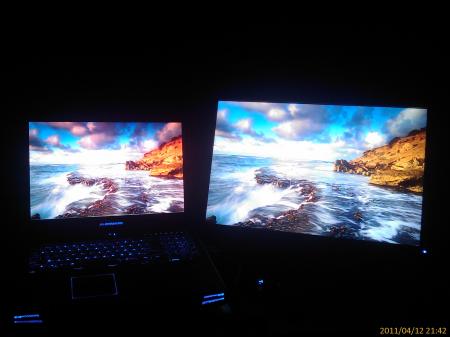
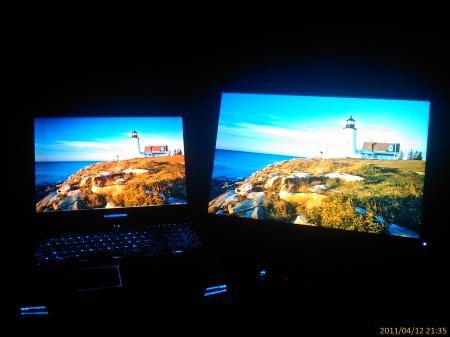
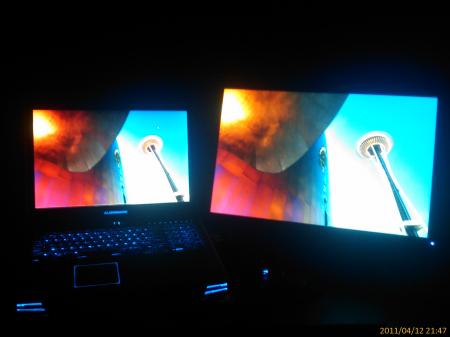
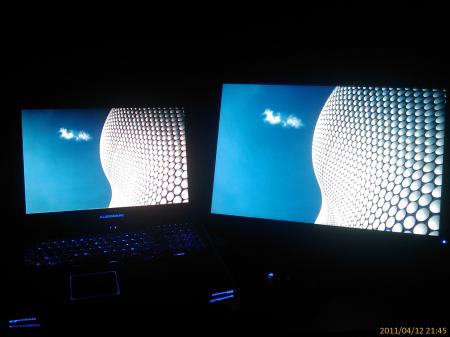
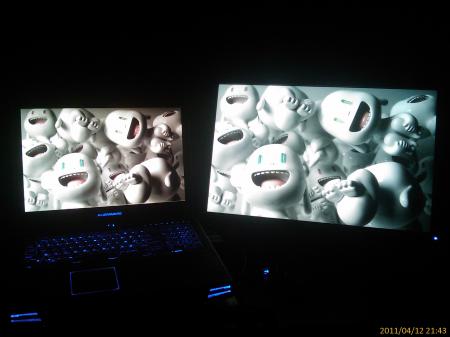
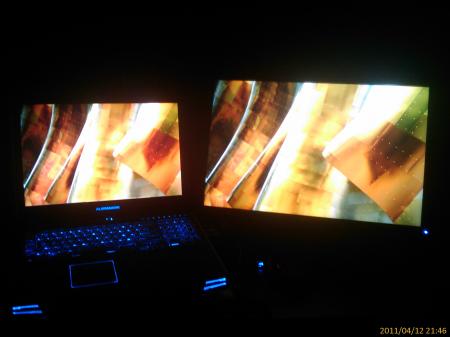
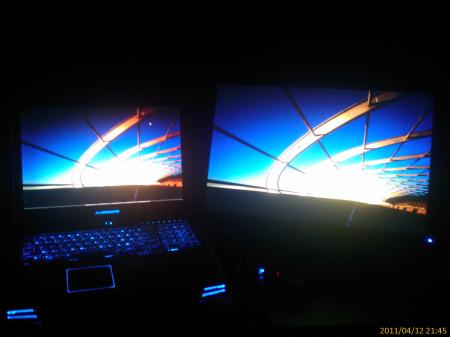
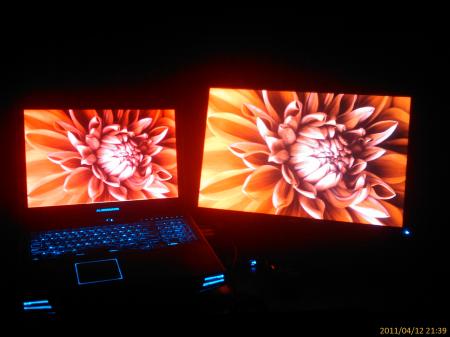
Both monitors where calibrated with the same Spyder 3 Pro calibrator The Dell monitor with sRGB profile selected, at 100% brightness, 50% contrast Dell with Adobe RGB profile selected, 75% Brightness Dell monitor with Adobe RGB profile, 30% Brightness I will stick with the 30% brightness since its not straining my eyes and the colors are very similar between the two screens. UPDATE Final settings are here http://forum.techinferno.com/alienware-m17x/286-dell-u2410-vs-alienware-m17x-r2-rgb-led-1200p.html#post2340 -note- Unfortunately I have borrowed my camera to someone else and I had to take pictures with my cellphone which sucks big time... the colors are completely different than those on the pics... anyways it's better than nothing. First chance I will have, I will upload better quality pics.


- 16 replies
-
- 4
-
-
- alienware
- calibration
- (and 4 more)
-
 I've decided that it's time to open my beast after i've noticed that one of my 4870's memory climbed above 93 degrees while playing Mass Effect. The idea behind photographing the process is to allow a better perspective than what the service manual gives. What was done? Cleaning the fins on both video cards heatsinks with compressed air Replacing thermal paste on both GPUs and the CPU to Shin Etsu G751 Replacing memory thermal pads on both GPUs from crappy stock ones to those Modding the retention clip as described here. All Credit goes to Ashtefere please rep him for that, he deserves it! Tools used small Phillips screwdriver - it matches all the screws inside your Alienware can of compressed air a small plastic prying tool that Dell once sent me, i used it to pry open the center control cover. Materials used Shin Etsu G751 thermal paste - i bought mine on eBay, but there are a lot of places that sell it. The reason i used it is because according to a lot of reviews this is one of the best performing pastes, only problem is that it's a pain to apply (there are guides for that too ) Thermal pads Step by step (More or less) Ok, here we go. Try to remember the sizes of the screws you are pulling out, and store them somewhere so they don't get lost (i use a vodka shot glass ) Removing the Center control cover i started with placing a towel on my working area to make sure i do not scratch the laptop while i work on it and removed the charger and battery. Unscrew two screws as shown to remove the compartment door. Unscrew the two screws located on both sides of CPU Fan, they are marked as M2.5XL17. Now turn the laptop around and open the screen as far as possible. using the pry tool, or a flat screwdriver, gently pry the control cover up. I found that in my case it's best to start from the right side. Be careful as there's a cable you need to disconnect before you pull it out. EDIT: For those of you who struggle a lot with taking the cover out, make sure you read this mod by Aikimox. Keyboard Unscrew the 5 little screws holding the keyboard and then gently pull it up. lift the keyboard up,disconnect those two cables and remove the it. Video cards. Since both video cards are going to get the same treatment, i'll describe just the master. We are going to pull it out, remove the heatsink, clean it and perform Ashtefere's retention clip mod Keep in mind that it will void your warranty! Remove the bracket. unscrew both screws that hold the video card. Disconnect the CF cable from the card, i used my nails to do it. Note that the location of the CF connector on the second card is under the heatsink and you'll need to remove the heatsink before disconnecting the CF cable there. Now pull the card up from it's outer side to remove it and expose the fan. blow compressed air to clean the heatsink and the fan. Unscrew the 4 screws that hold the heatsink down, following the numeration next to those screws. Now, after unscrewing those screws, the heatsink will probably be still attached to the video card pretty hard. Pry it up gently using the pry tool but make sure to do so where there's no electronic stuff under the tool. This is what you'll see. Next, clean the old thermal paste using alcohol pads, and remove the old thermal pads from the memory. Reapply thermal paste on the video card. I replaced the old thermal pads with with new ones, Ashtefere suggests applying a thick thermal paste on the memory (Shin Etsu would work since it's very thick).. Next, Ash's retention clip mod. I will not repeat him, he explained it beautifully in his guide. This is just to demonstrate how the screw looks like with the washer on it. Follow his guide to reassemble the heatsink on top of the card and return the card to it's place. (Don't forget the crossfire cable). Repeat with the slave card. CPU To access the heatsink of the CPU we will be removing the palmrest and the magnesium cover. With both video cards back in place and screwed in, turn the laptop, and unscrew three screws inside the battery compartment that are marked M2.5XL5 to release the palmrest. With the pry tool pry the palmrest down and then lift it up to remove the little cable that connects the touchpad. Ok, here i forgot to take a number of pictures so I will explain everything on this one. Basically what we're going to do is remove the magnesium cover. before we do that we will need to: disconnect LCD/Wifi/BT cables. They are marked with yellow. Next we will need to open the 10 screws that hold the cover down, those screws are marked with red and with a P letter on the cover itself. Disconnect the Crossfire cable from the master video card so you can pull it out. Finally, after the cover is removed, we'll unscrew those four screws that hold the heatsink down. They are marked with blue Clean the CPU and the heatsink from the old thermal paste with alcohol pads. Next i reapplied Shin Etsu G751 thermal paste on the CPU and replaced the thermal pad on the heatsink with a new one. That's it. Next, reversing the steps i reassembled the whole thing. I had a hard time putting the LCD cable back in place, took me maybe 3 tries before i got it right. Results Those are readings before and after, both after about 30 minutes of playing mass effect 2 so to me this comparison looks valid. Thanks to Ashtefere's mod,replacement of thermal paste and pads to better ones and cleaning the dust I can see about 5-7 degrees temperature drop on the CPU, and i have reason to believe that it'll keep dropping as Shin Etsu has about 3 days settle in time 11-19 degrees GPU temperature drop (!!!) 11-18 degrees GPU DISP/IO temps drop 19-24 degrees GPU /IO temps drop 15-20 degrees Shader temps drop 5 Minutes Furmark run No game warms the GPUs as furmark does, so after running it for 5 minutes and seeing the temperatures stabilize where they did i am very happy overall. EDIT: Additional Resources M17x Service Manual
- 68 replies
-
- 5
-
-
- alienware m17x r2
- m17x cooling
- (and 8 more)
-
 Ok so I recently bought a 5870M with the right side heat sink on it, and well.. my M17x R2 doesn't even want to boot up with both cards installed. It just turns on, all FX lights turn on, then the screen goes darker but unlit, BUT I can barely see the alien head that shows when the system is started up. Here is a list of things I've done to try to get this working: -Bought a 240 watt AC adapter ✓ -bought a crossfire cable ✓ (one that the seller of the card suggested from Eurocom) -flashed both cards to the latest Vbios ✓ -Flash laptop to A10 Bios ✓ -Cleaned the PCIe slot with compressed are ✓ -tried both cards with out Crossfire cable ✓ -I HAVE ORDERED A GPU FAN- Coming in the mail still- -Take out Bios battery and hold the power button for 30 seconds ✓ -I've even taken out 1 stick of ram and still nothing ✓ -I've tried both cards in the primary slot, and the swapping the cards in a crossfire configuration and nothing (they both work in the primary slot) Would the system as a fail safe not boot with out the second GPU fan installed? As I've said the system turns on, but freezes right at the alien head and the screen stays unlit. Also the laptop came in a non SLI/Xfire setup, just a single 5870M.
 -
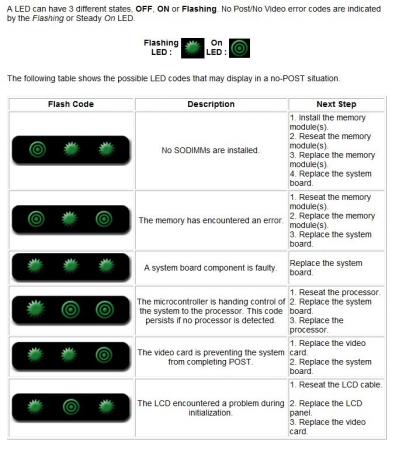
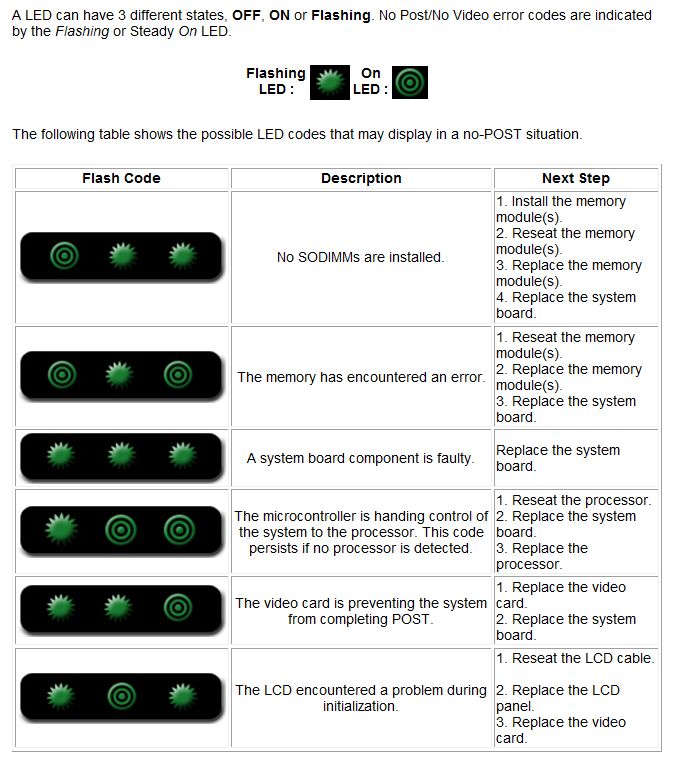
M17x and M15x LED Error Codes LED Error Codes Alienware™ M15x has a different keyboard status LED Layout, it is Scroll Lock, Caps Lock and Num Lock. source: Dell