Search the Community
Showing results for tags 'gtx 660m'.
Found 8 results
-
Hi everyone, I'm looking for the modified bios Prema of the W3x0ET (GTX 660m + i7 3630m) for months, the performance of the notebook is excellent despite its age, but it has already reached its limit and I know that it can deliver even more if someone being able to help me will be very grateful. Thanks!

-
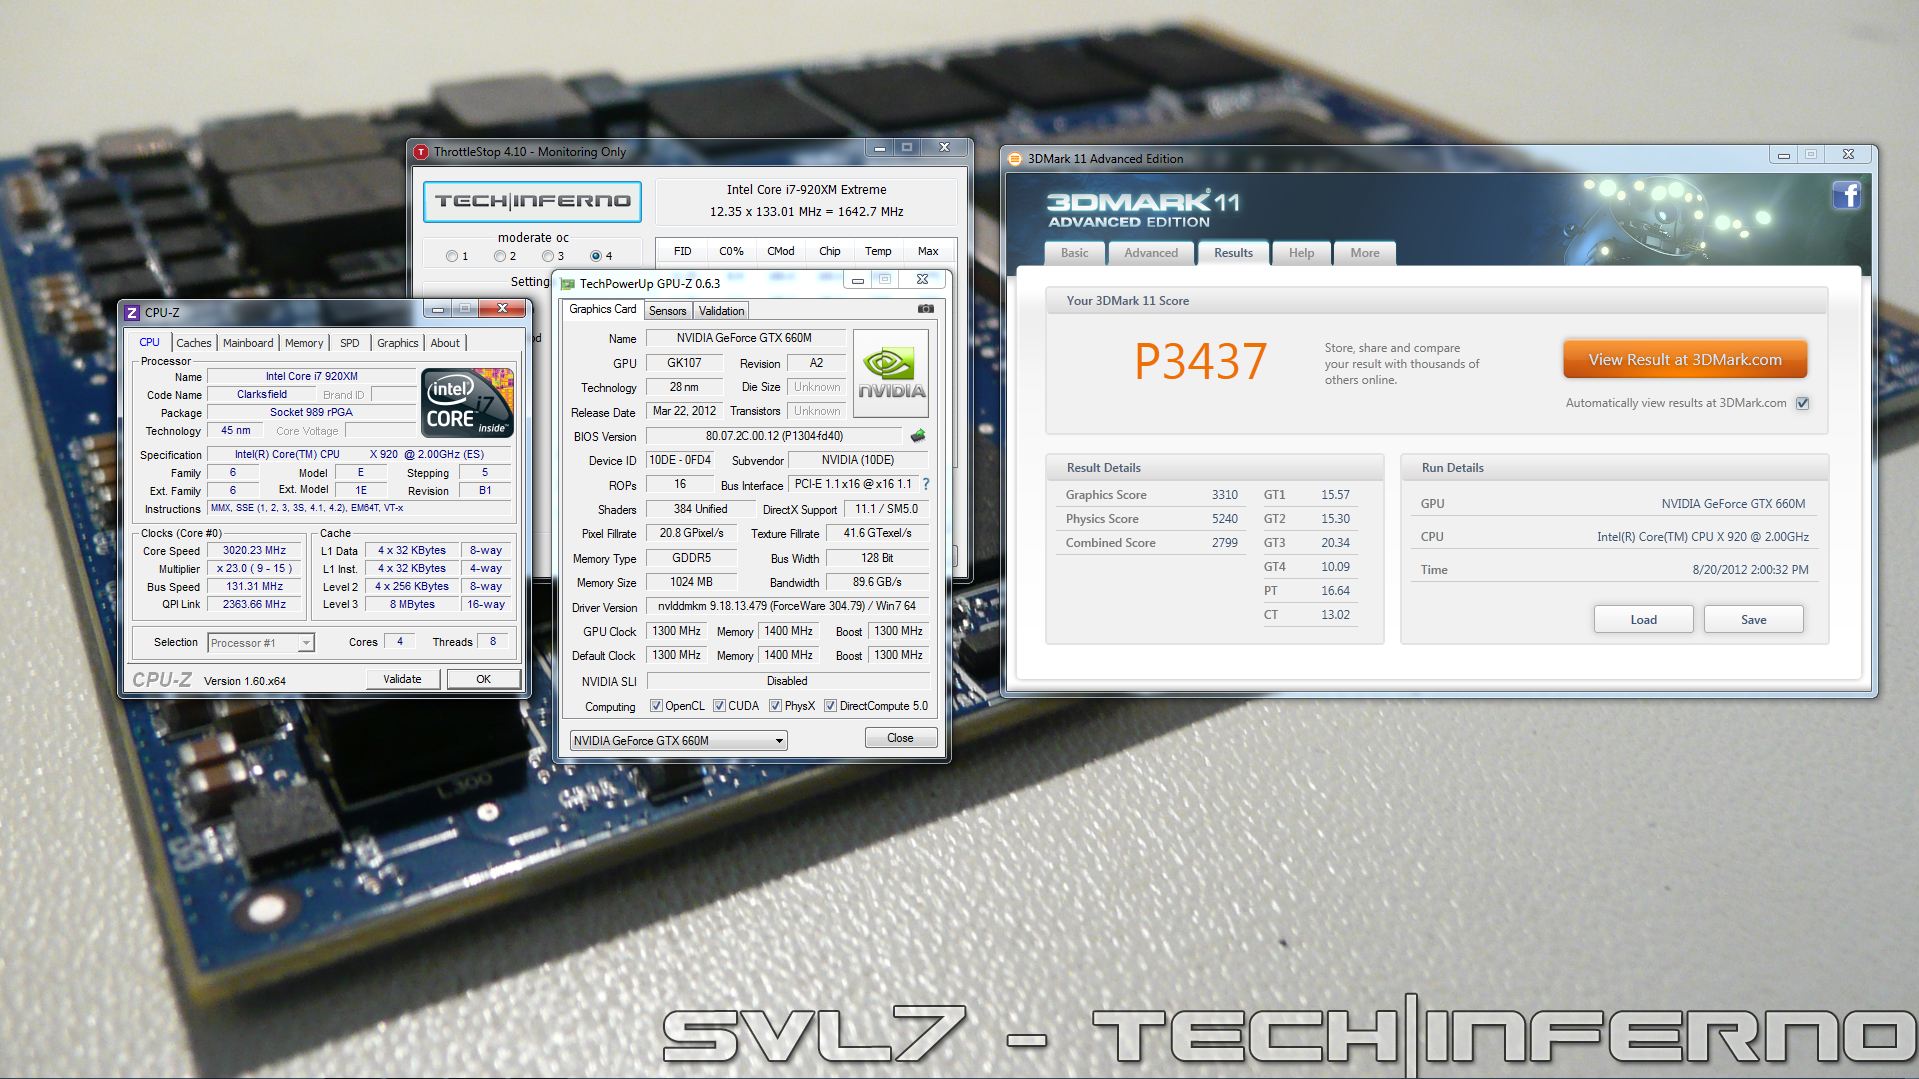
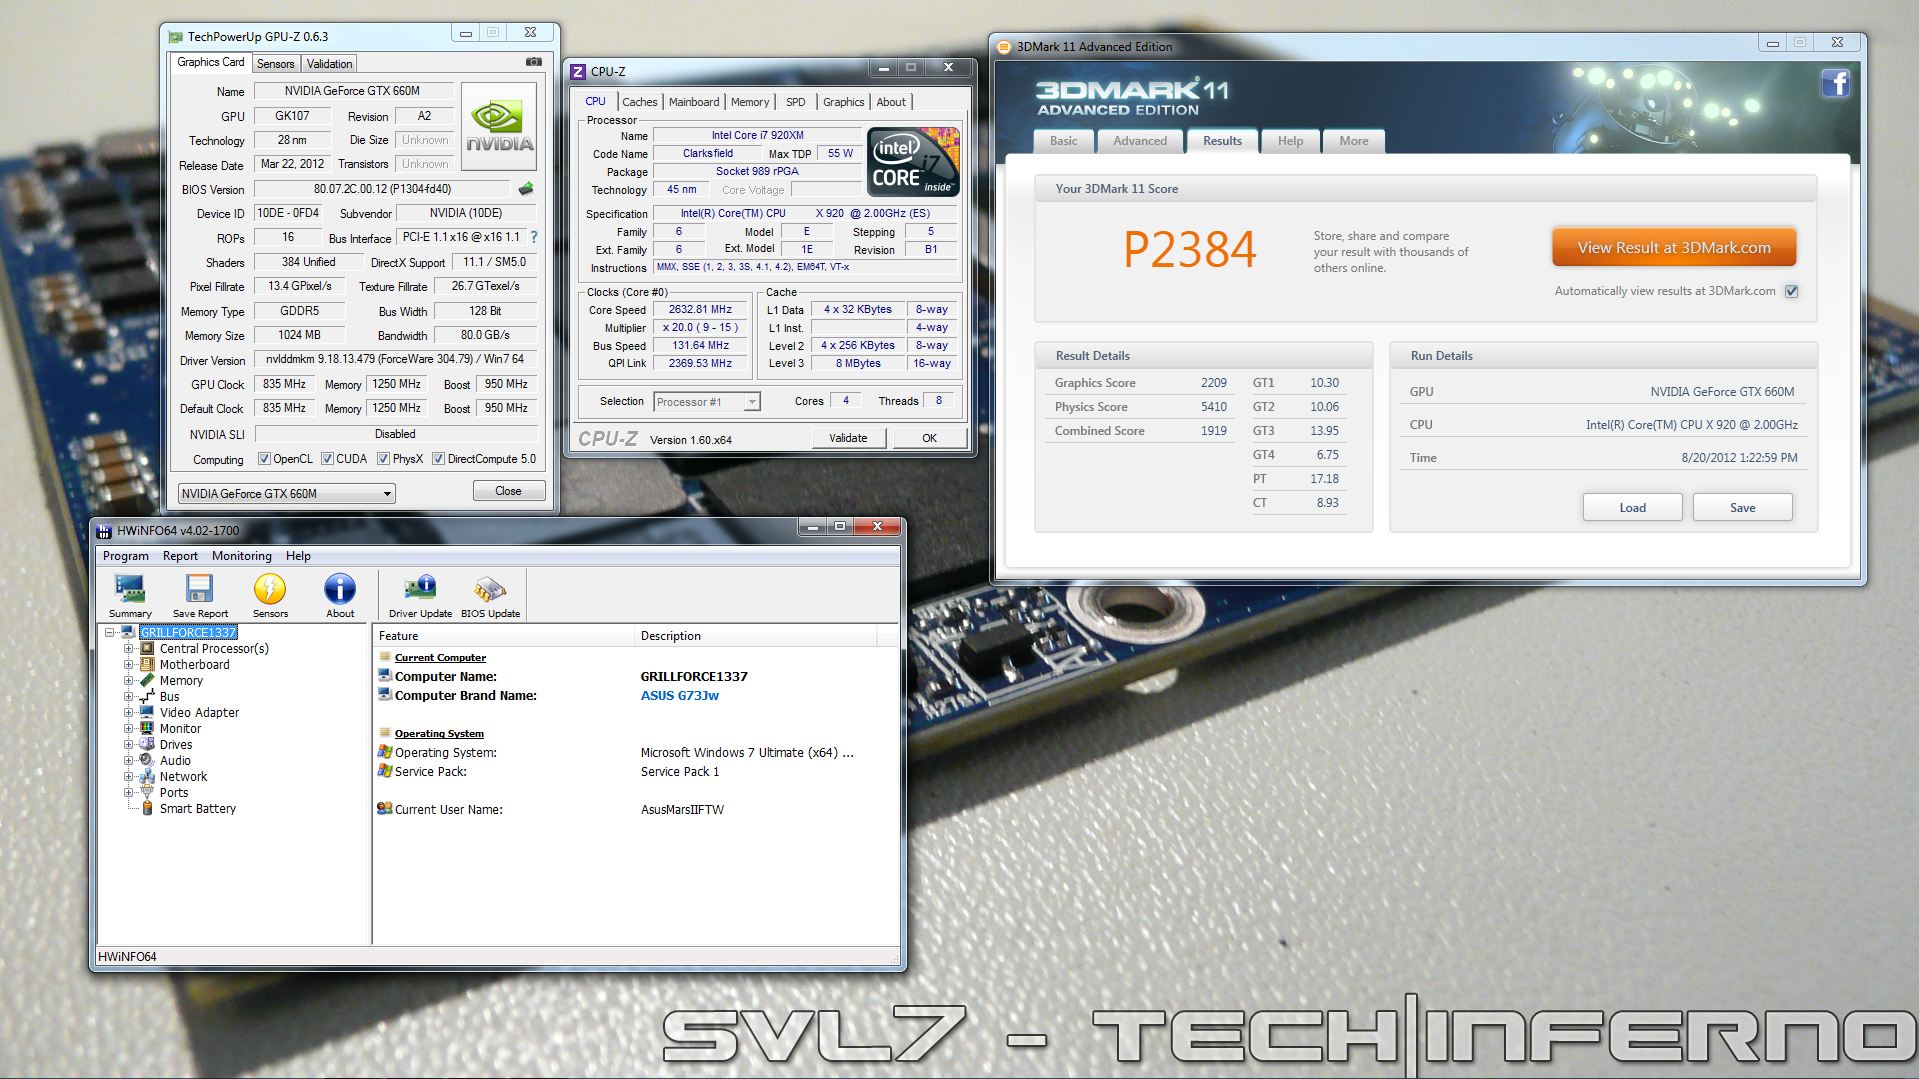
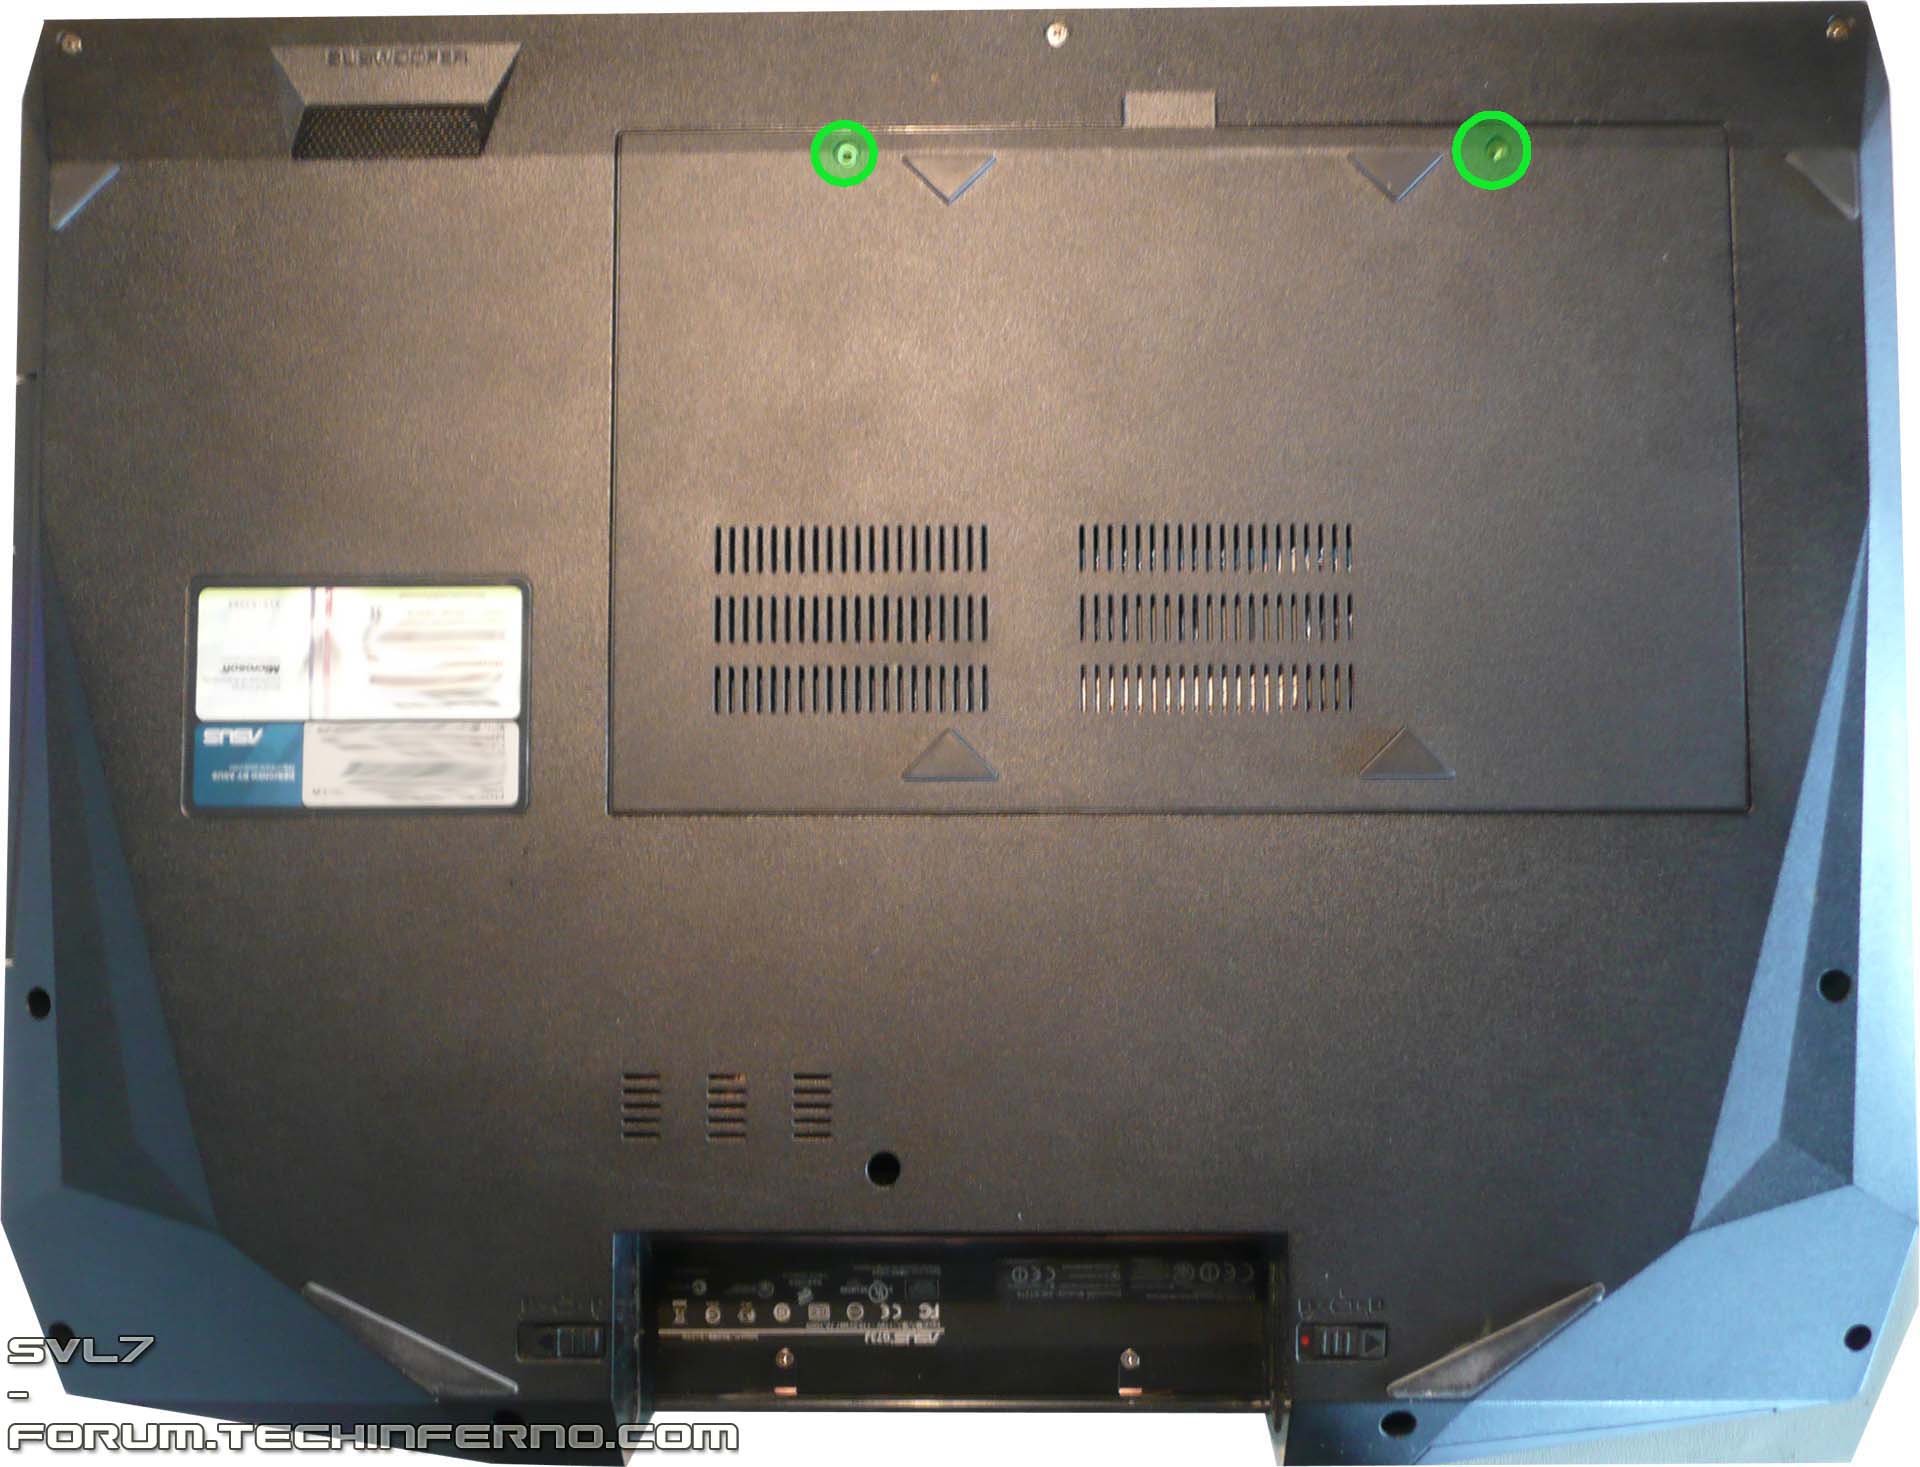
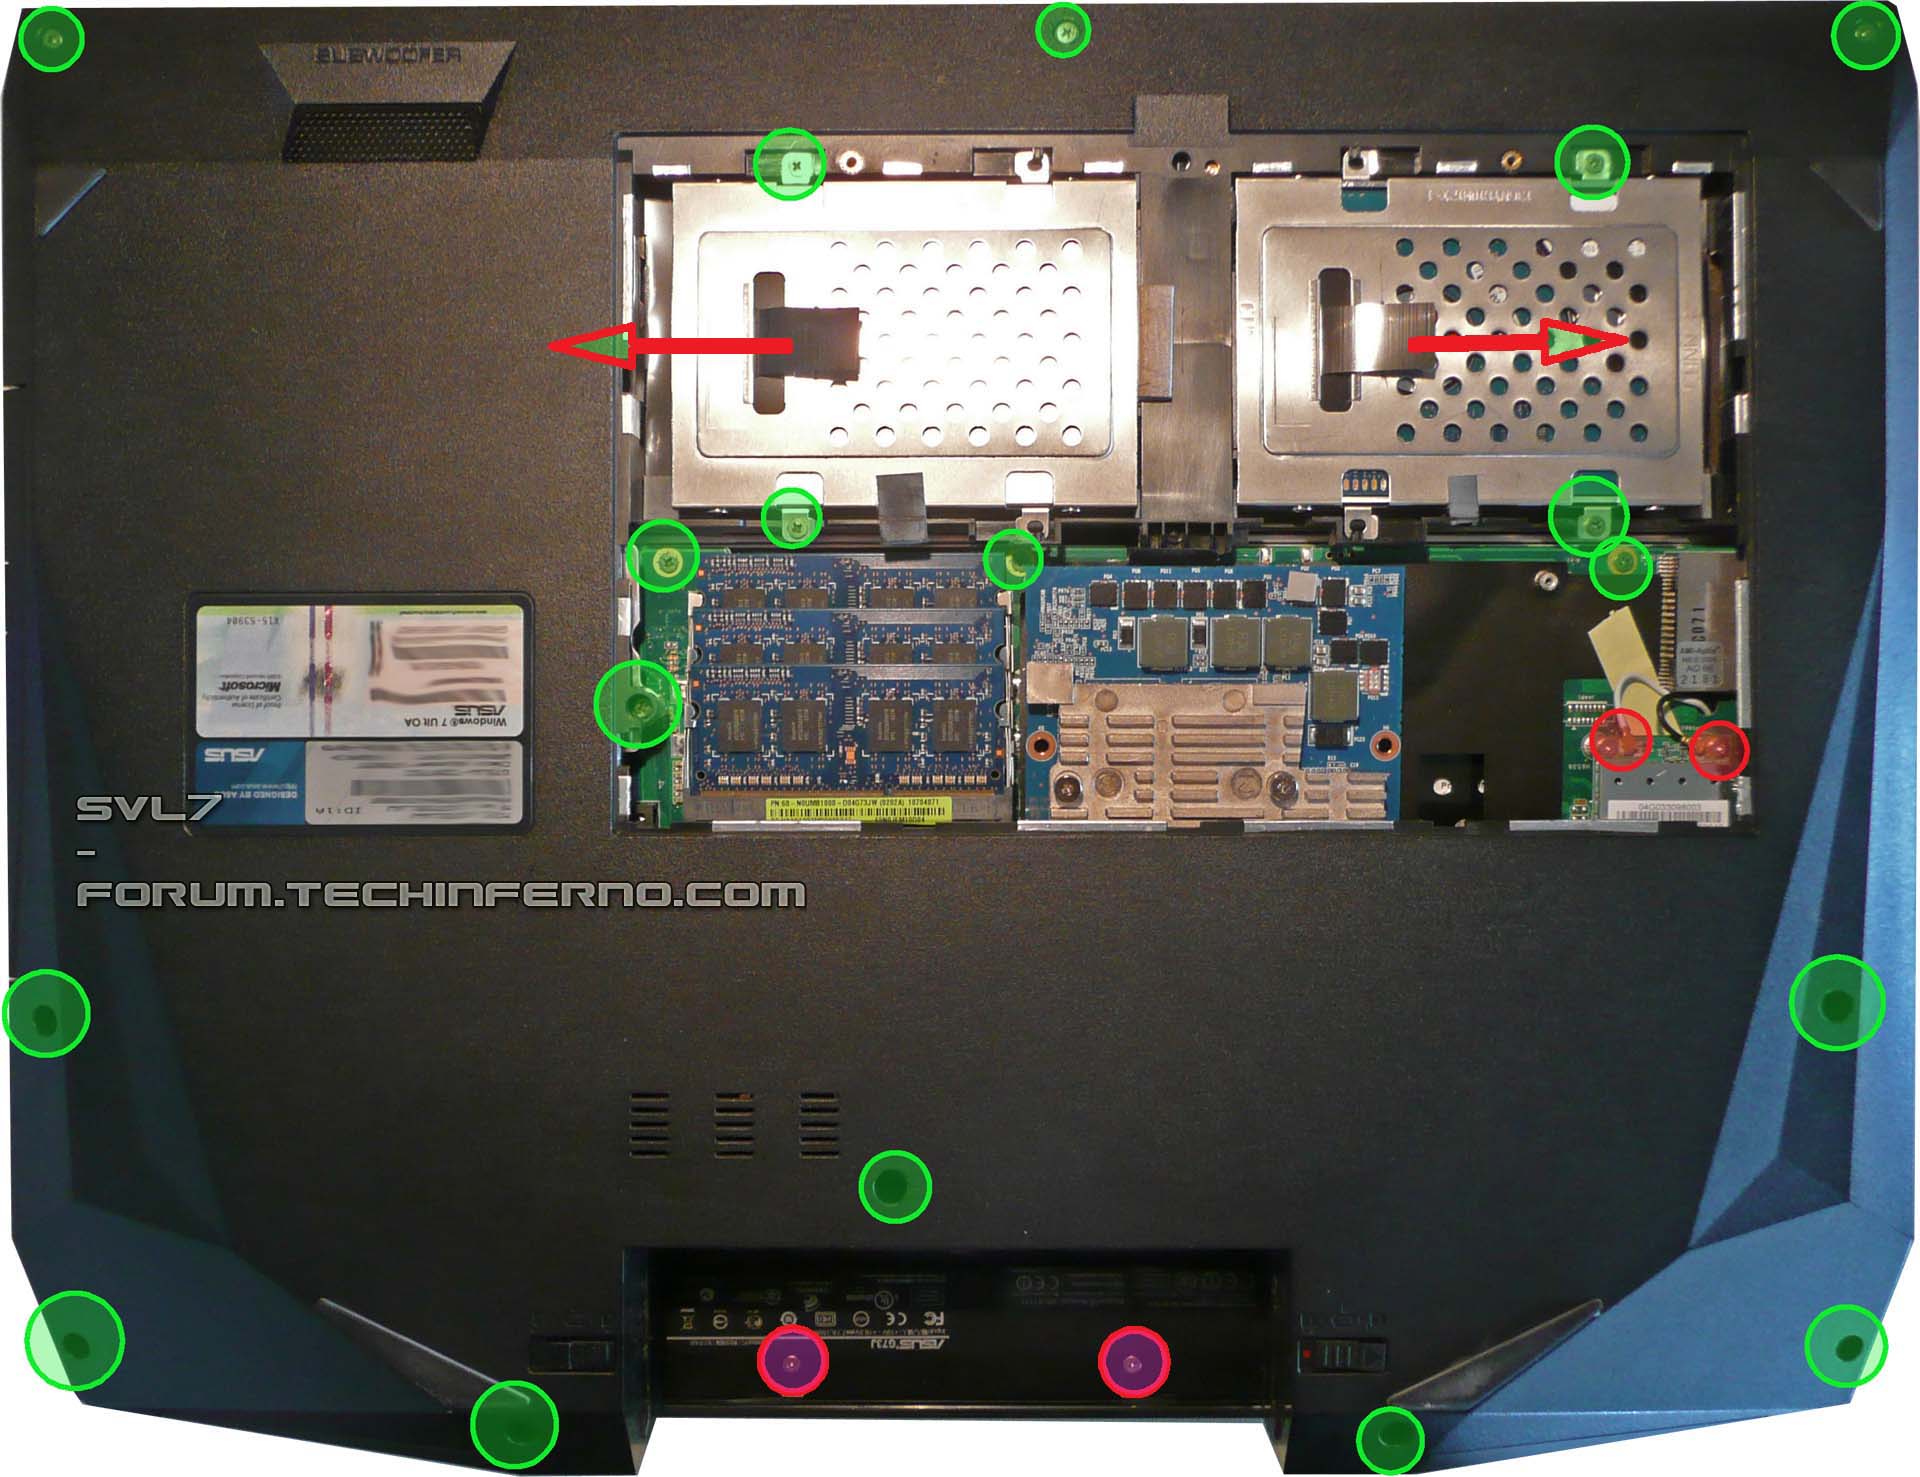
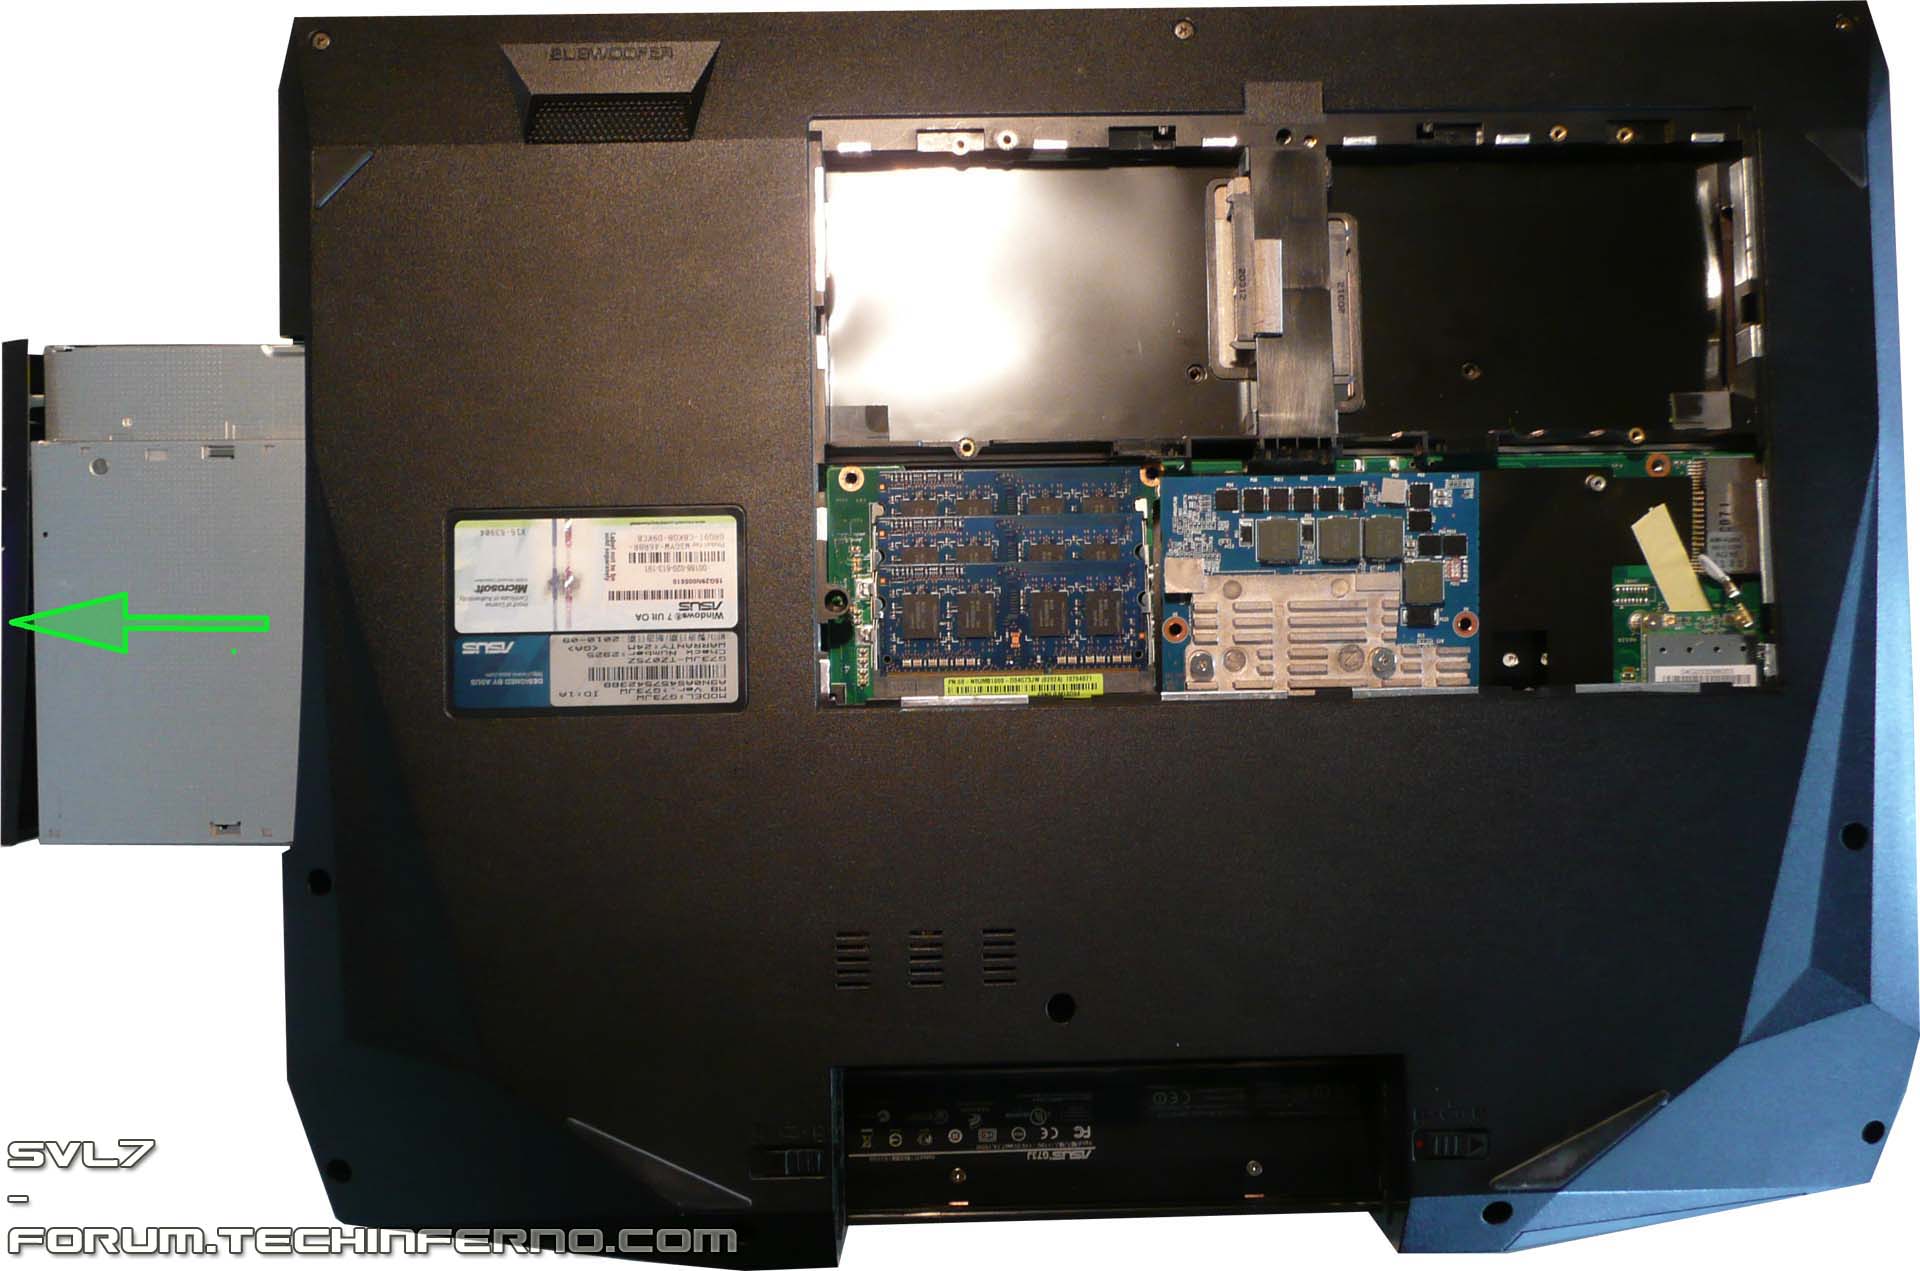
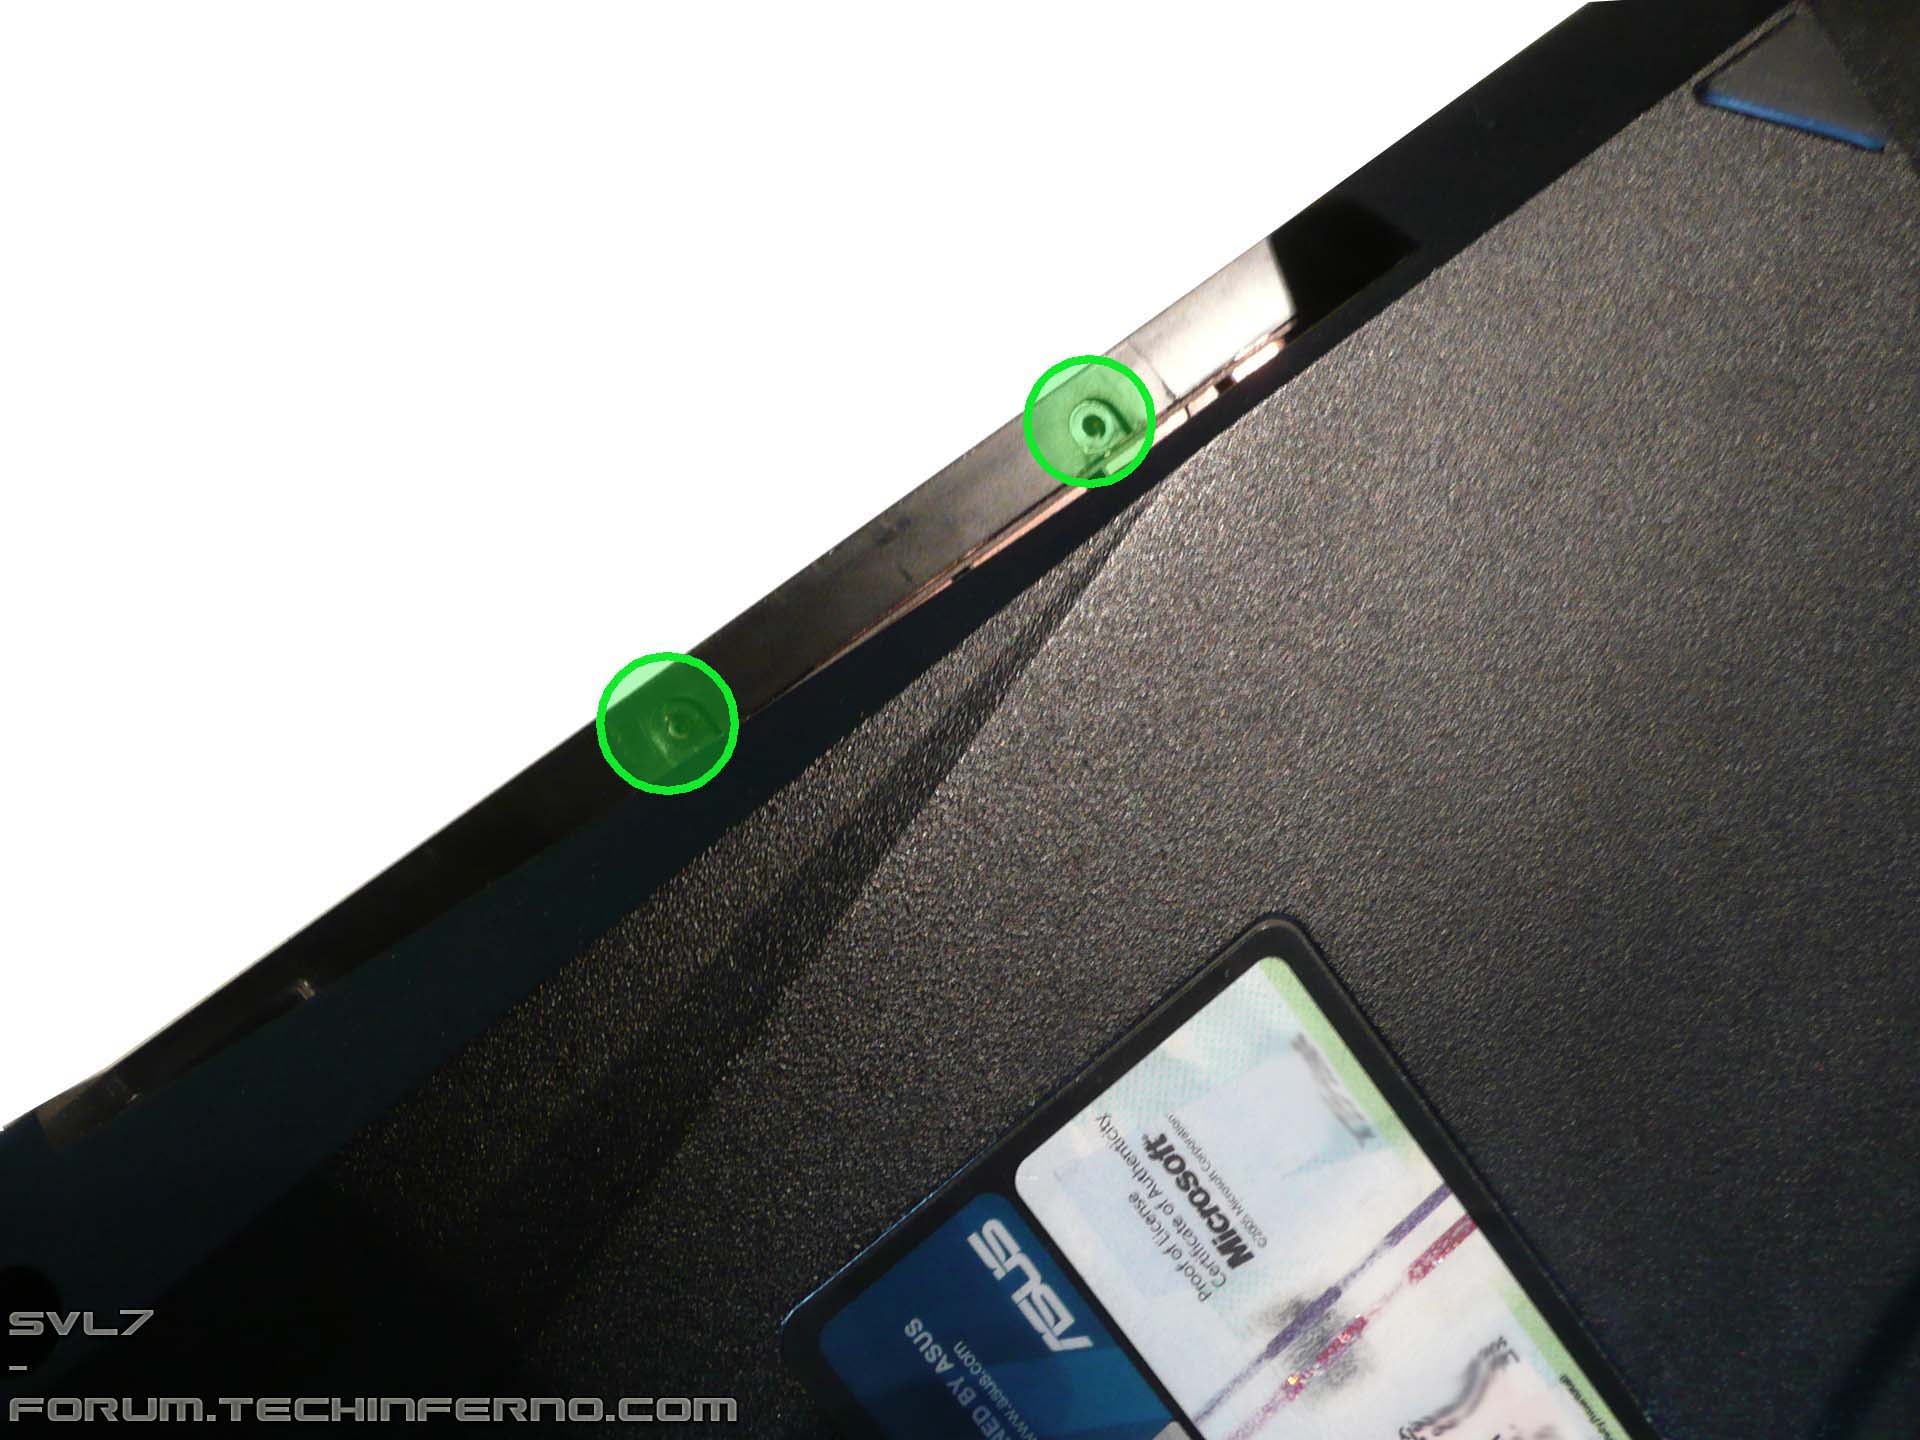
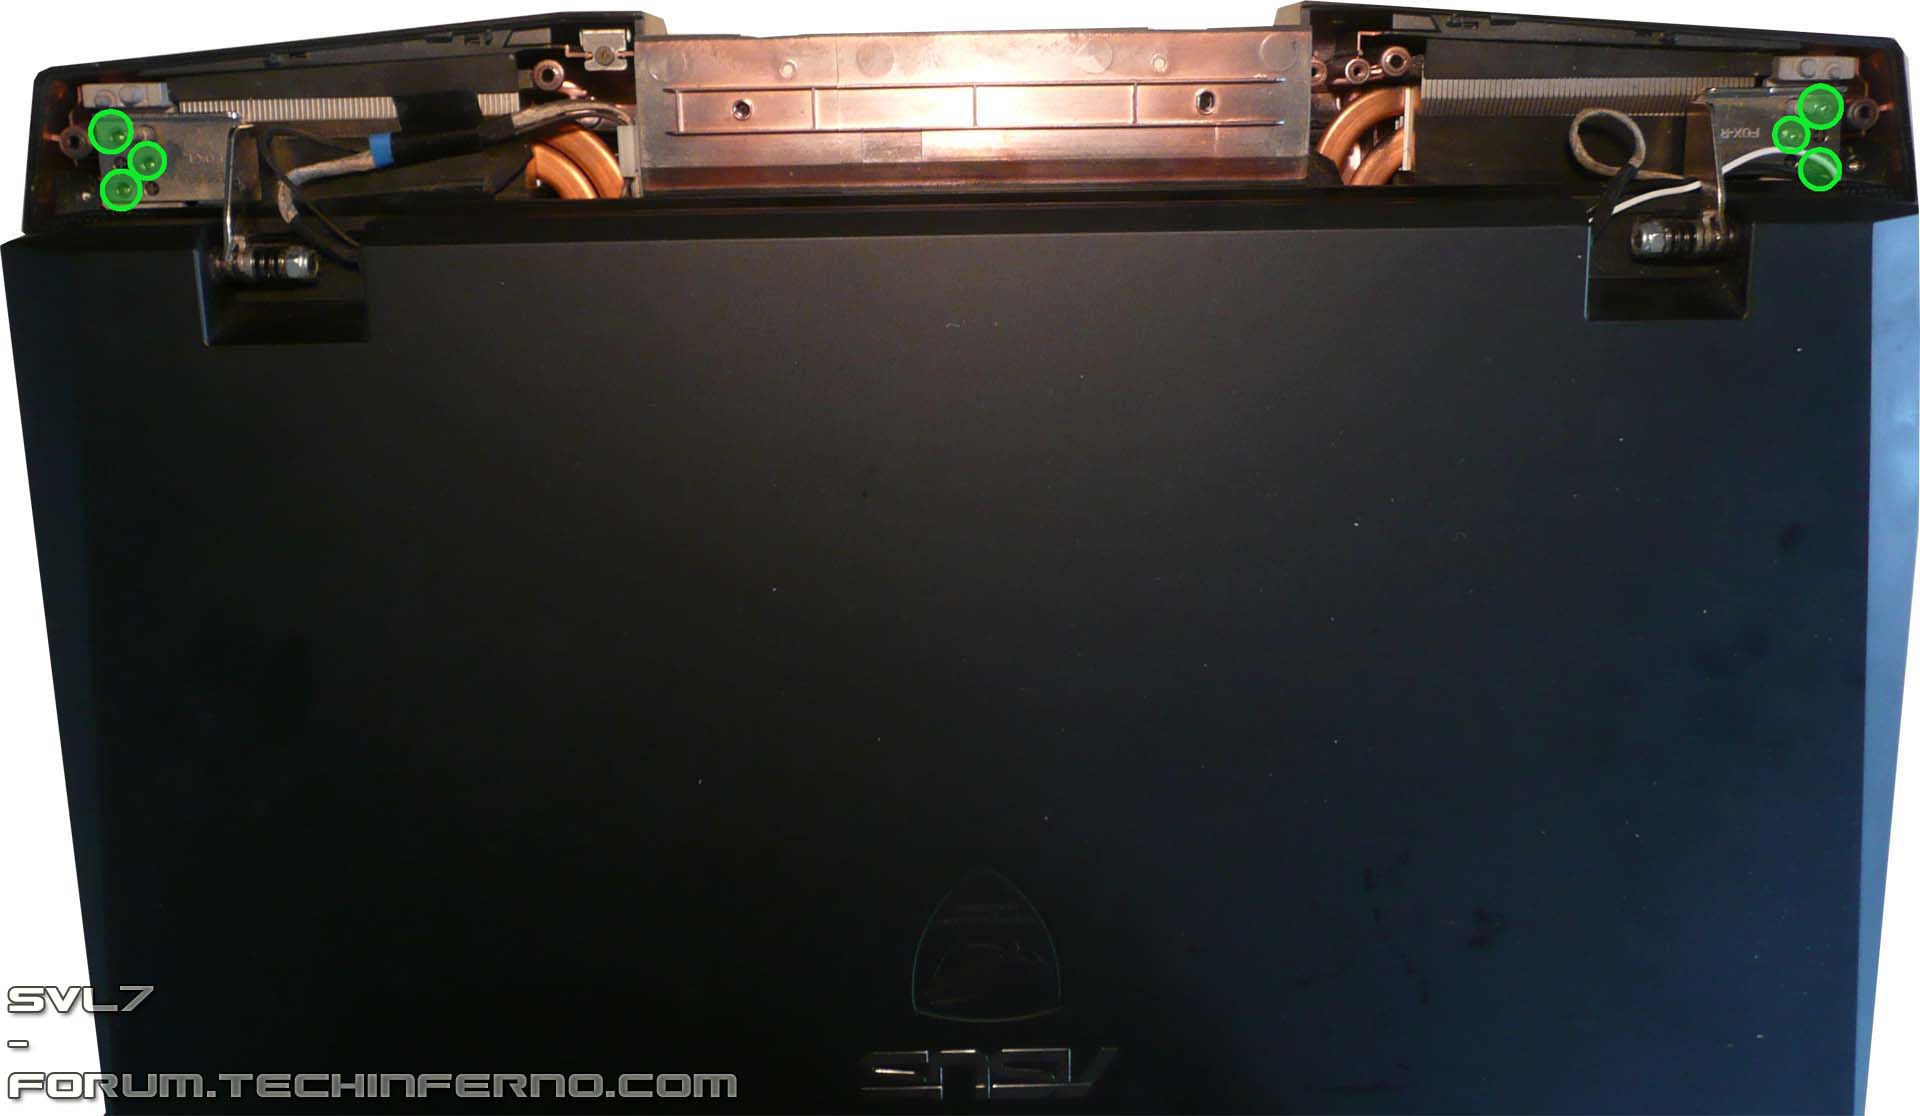
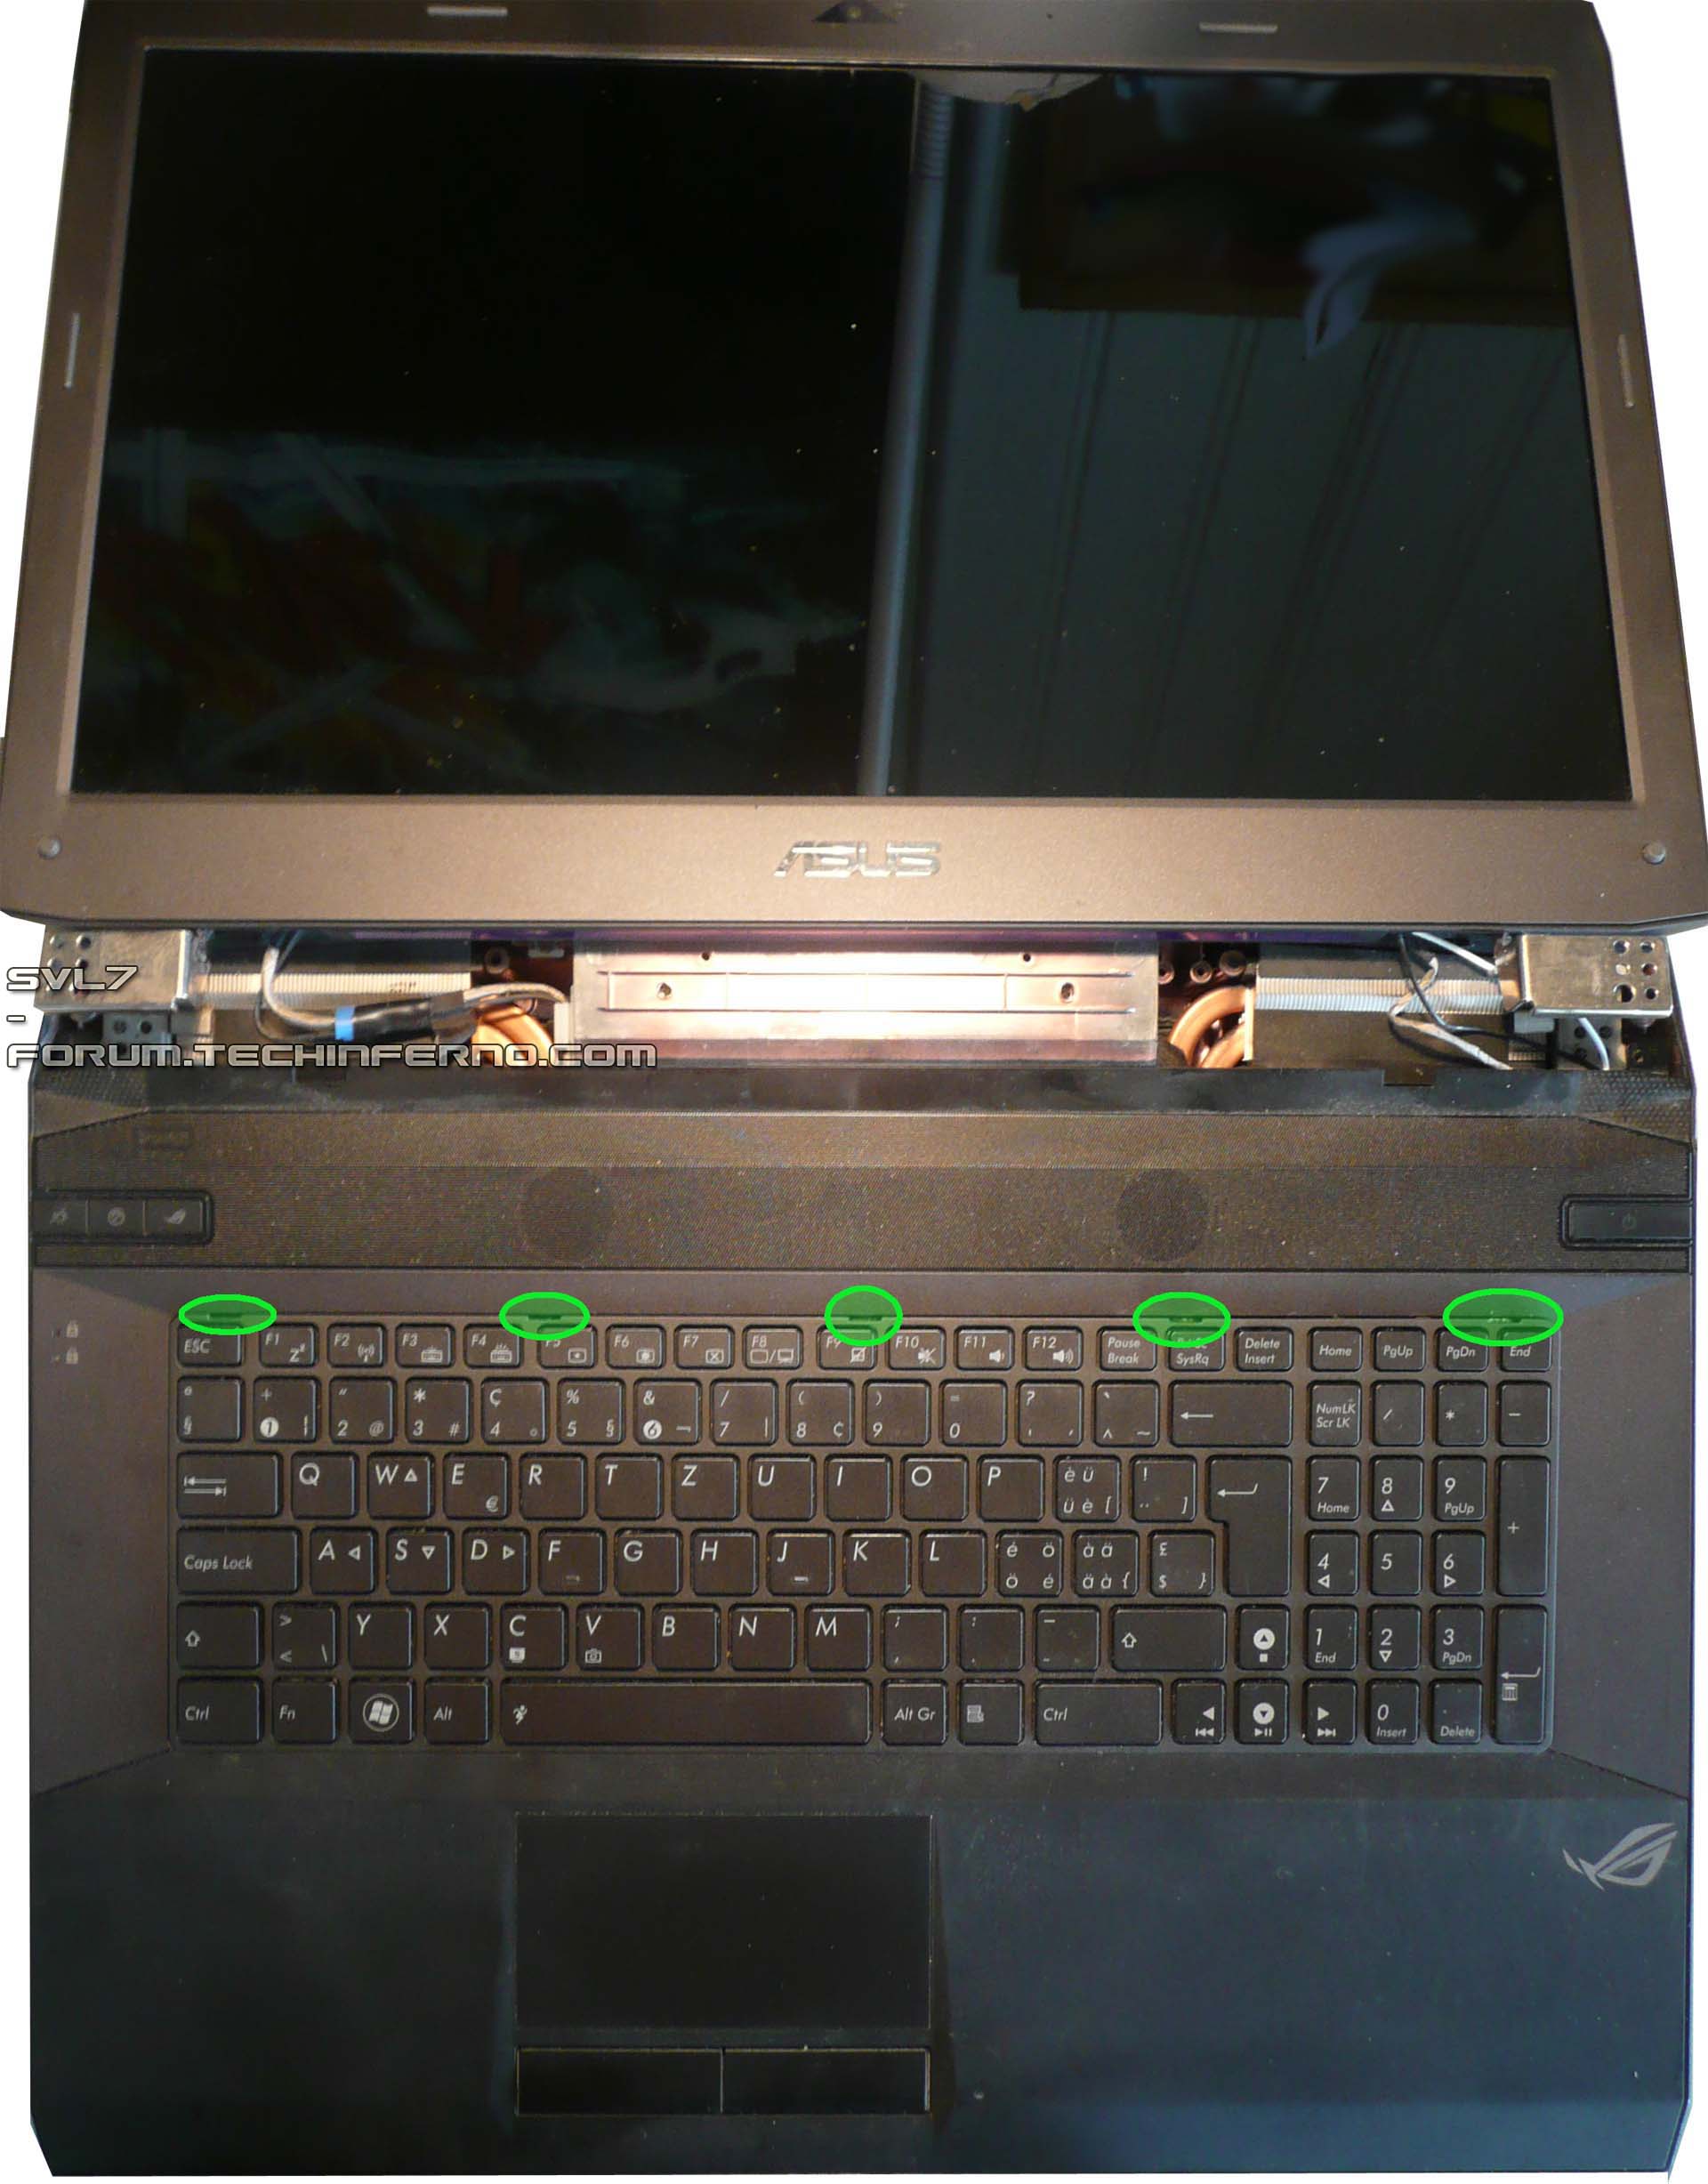
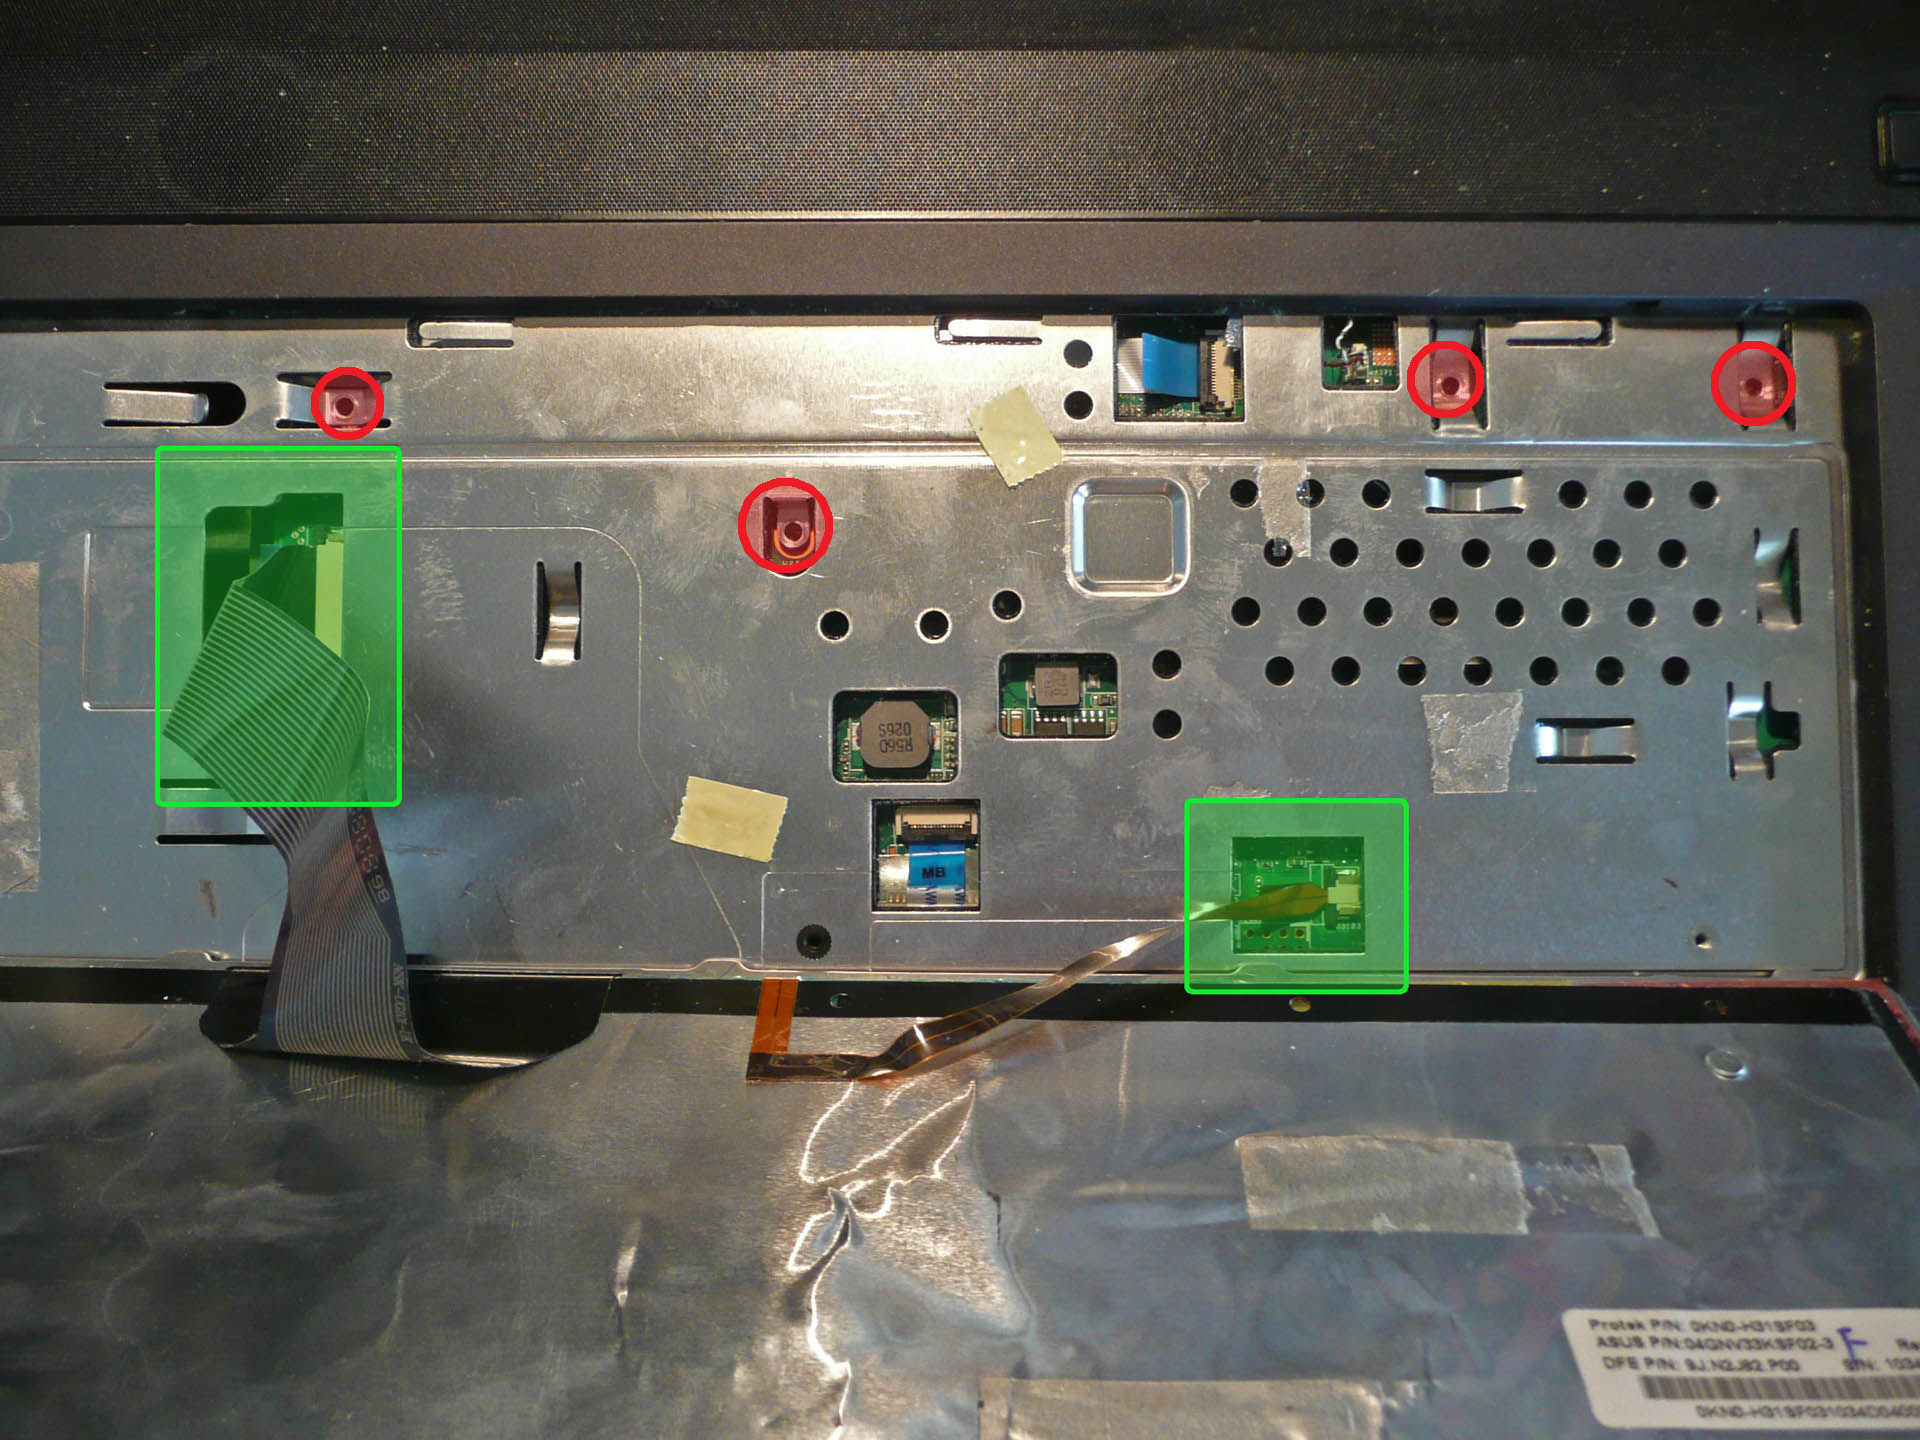
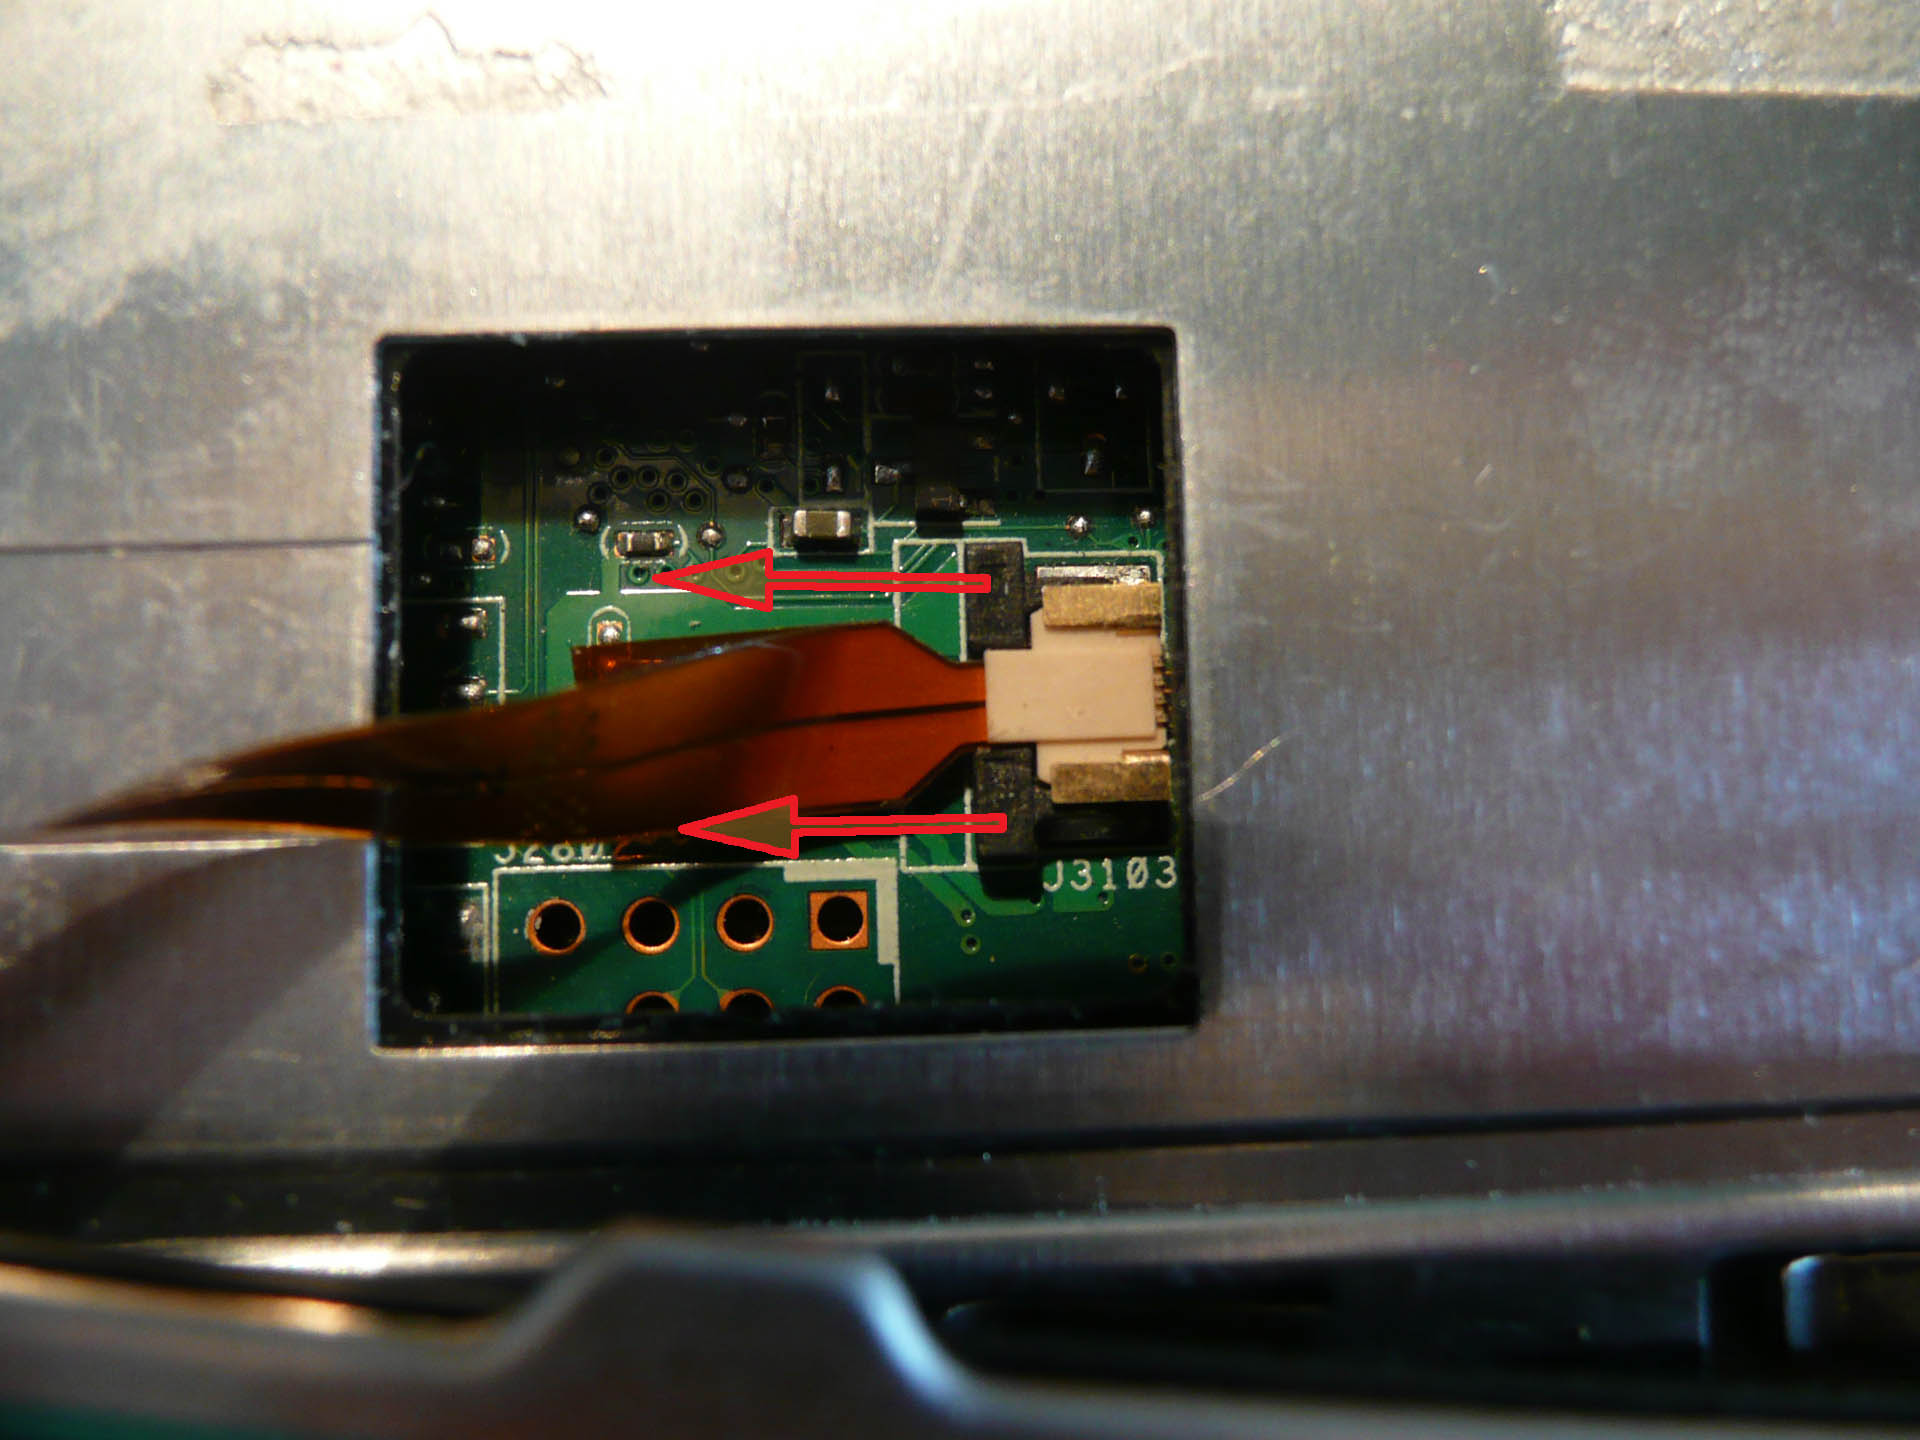
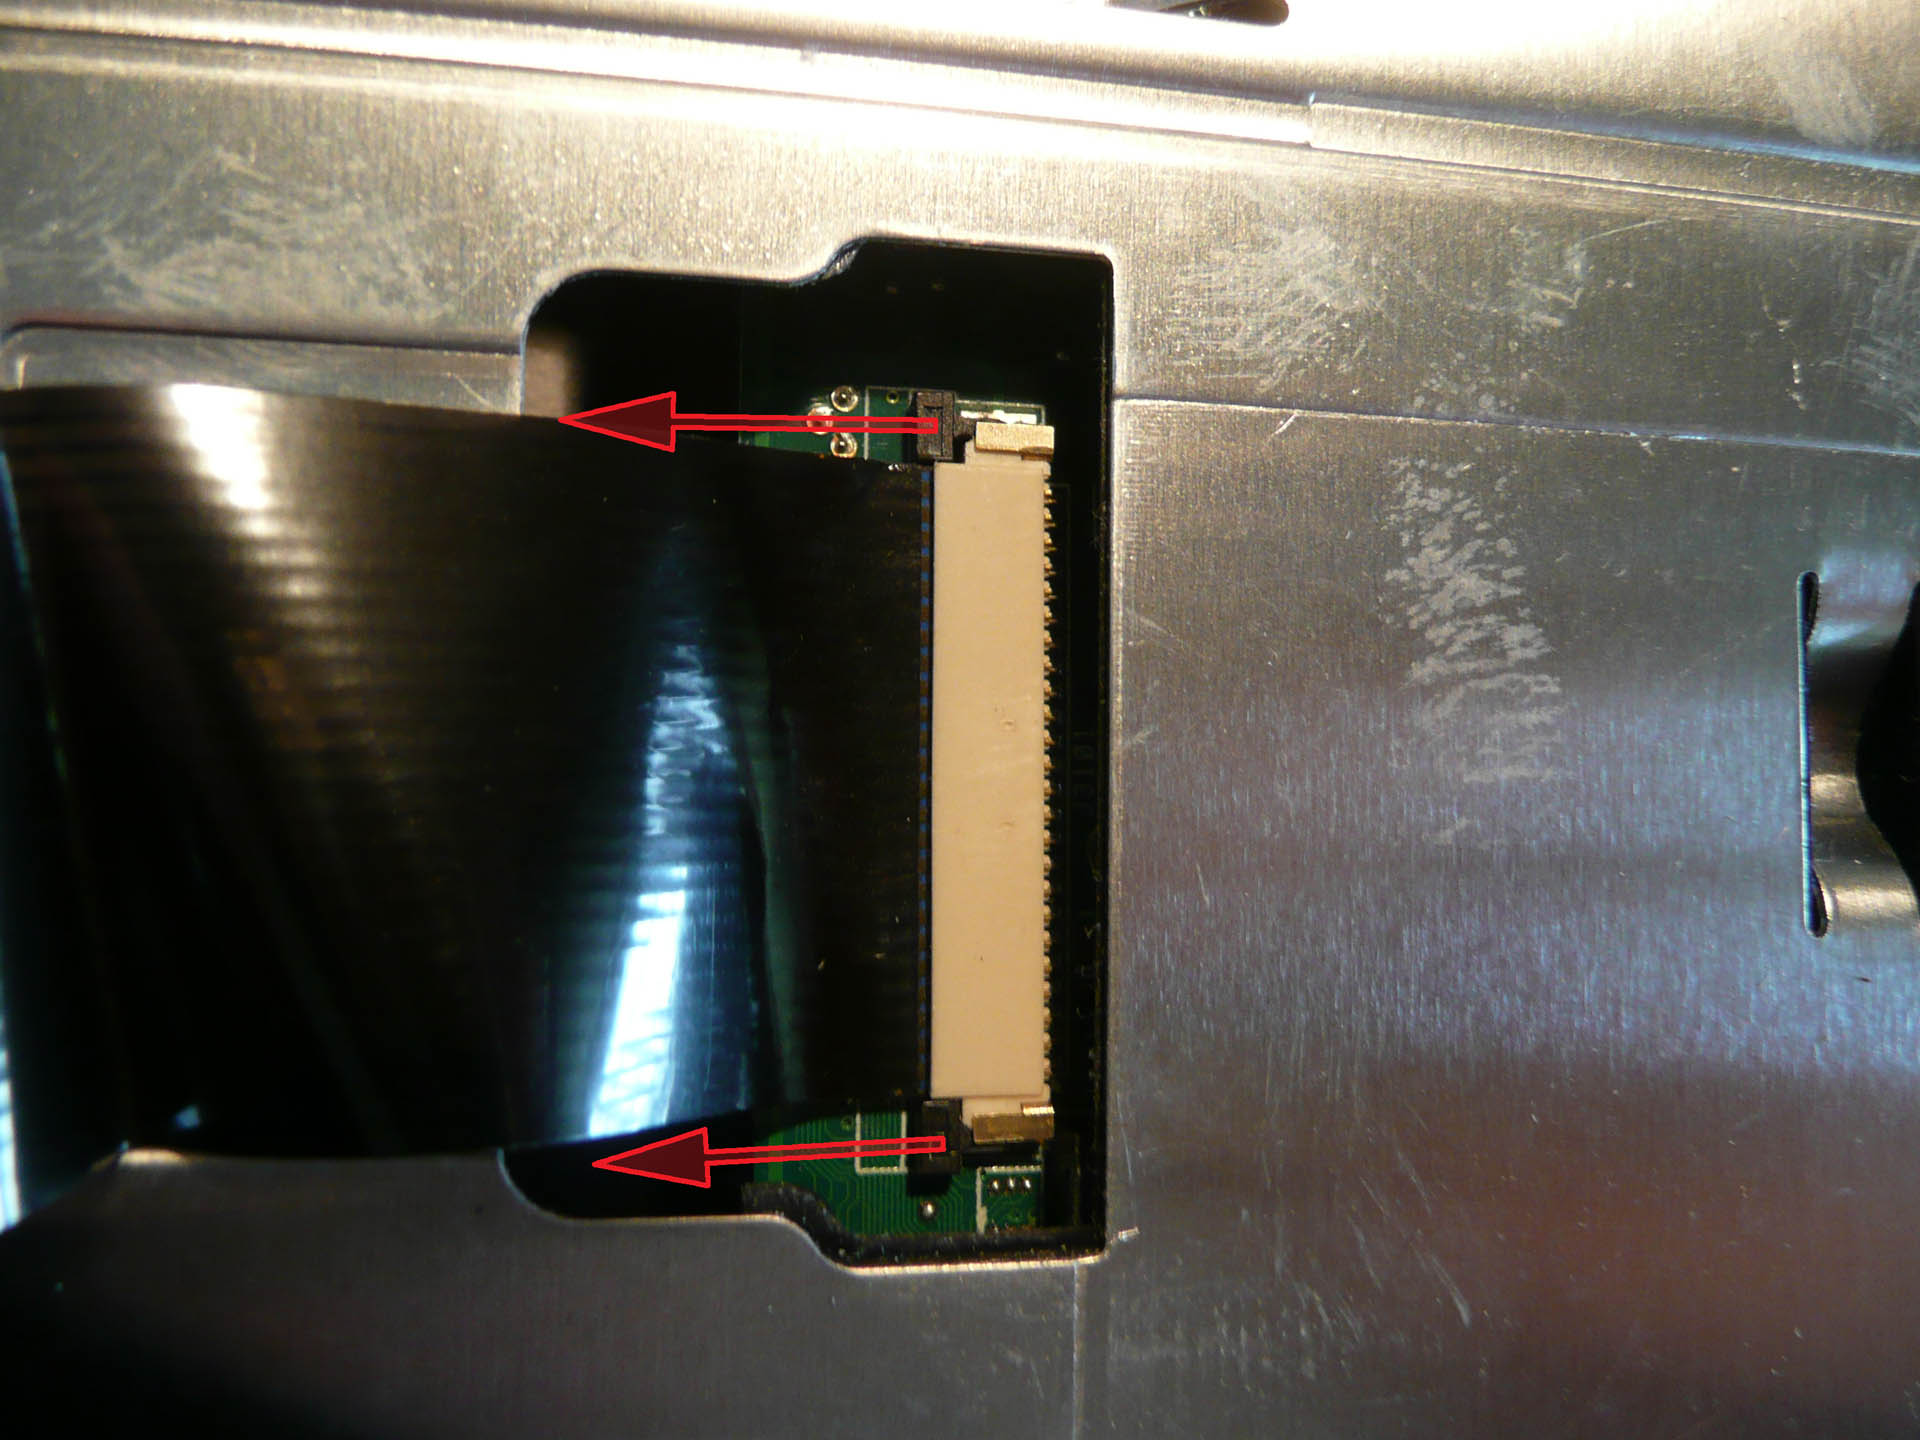
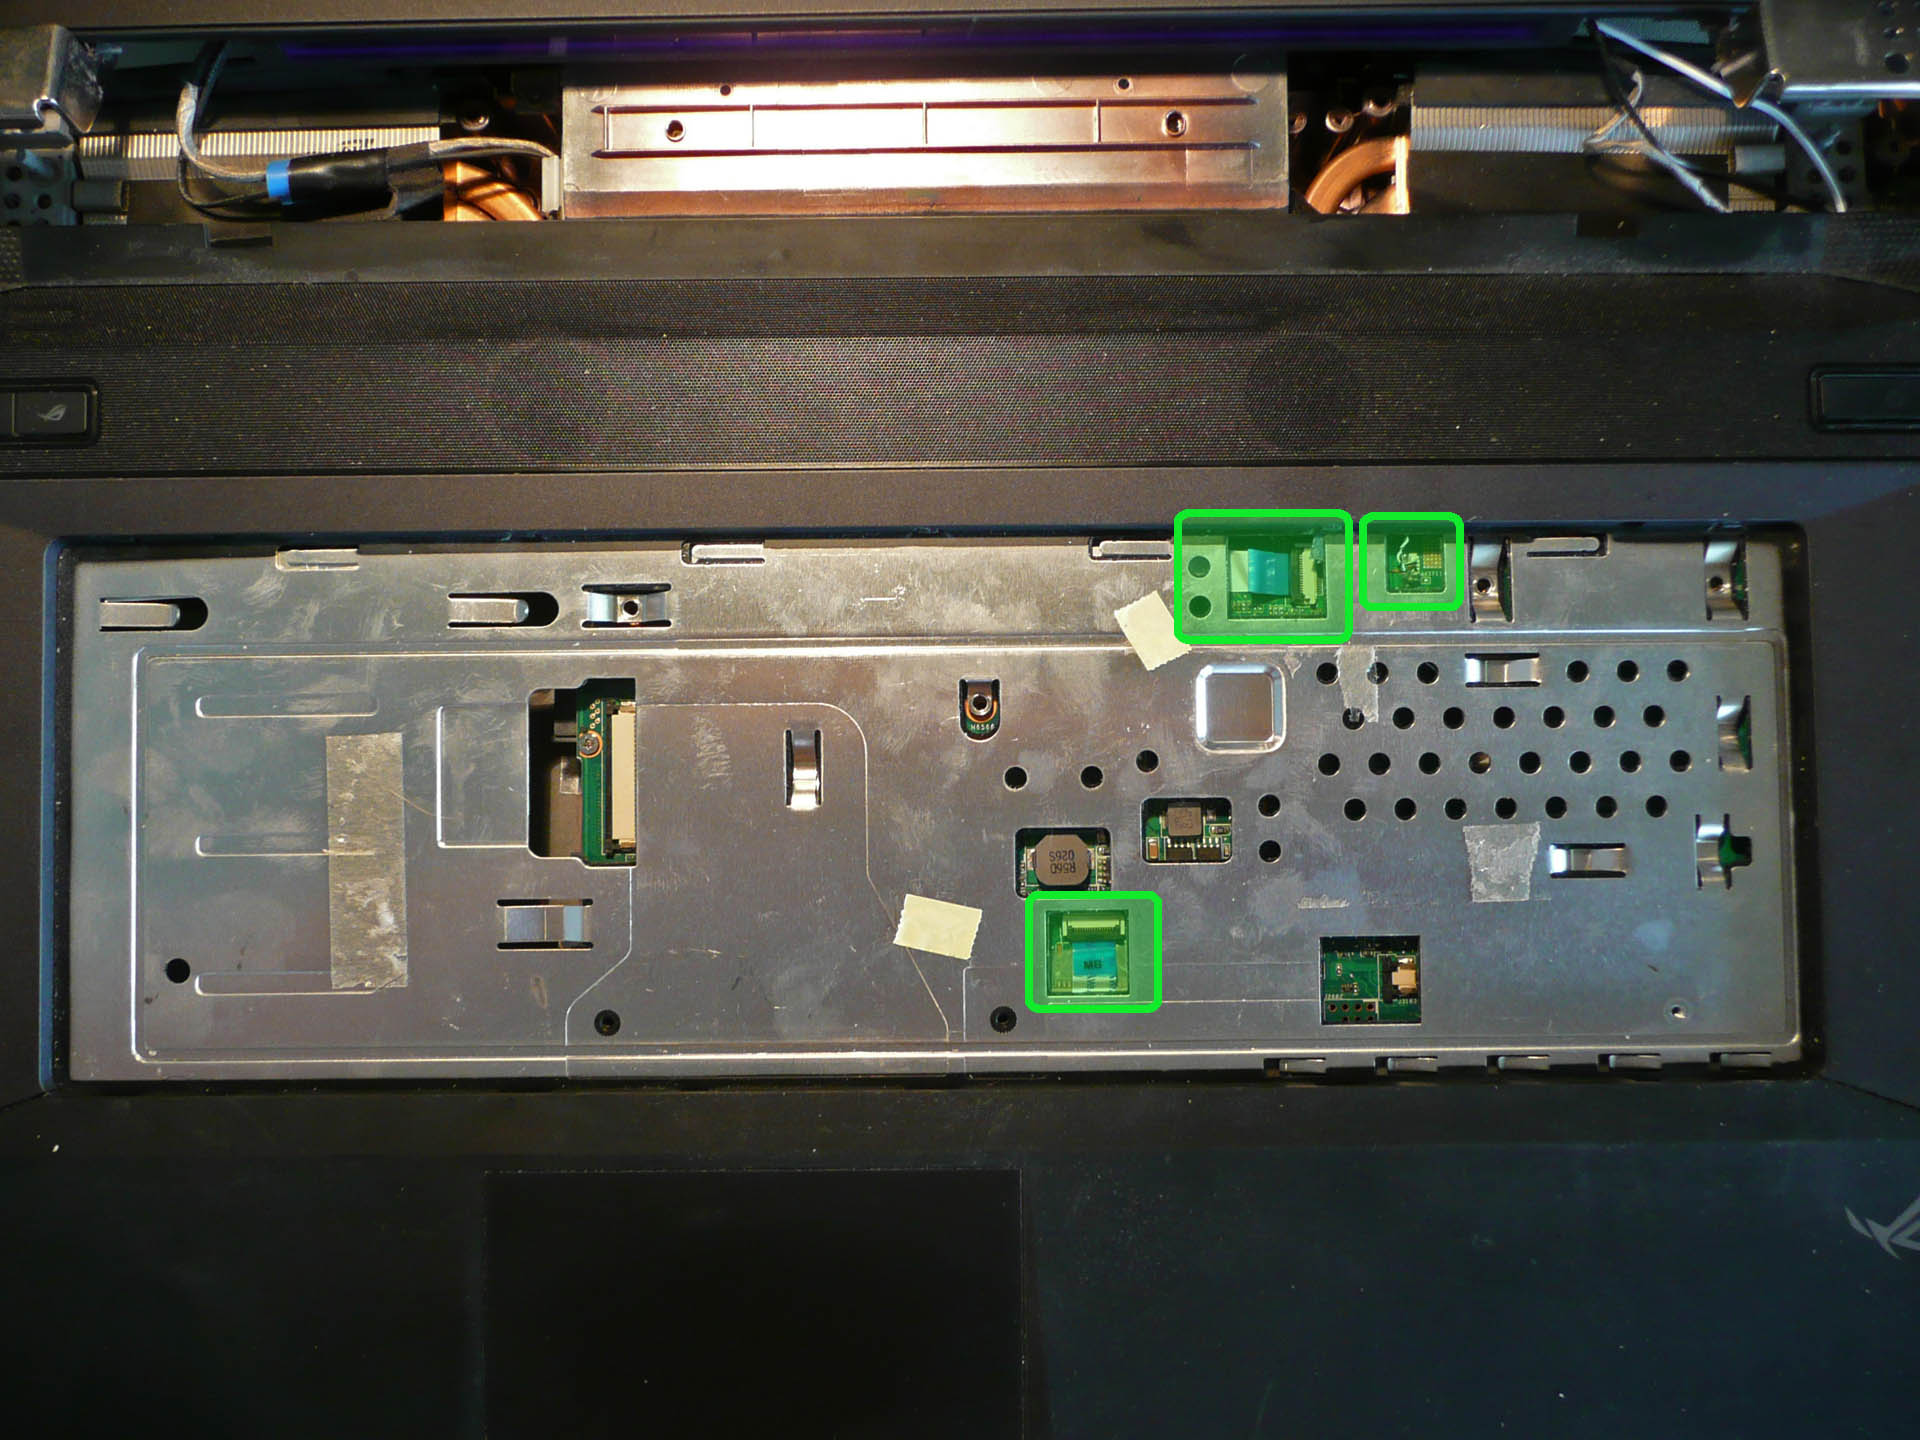
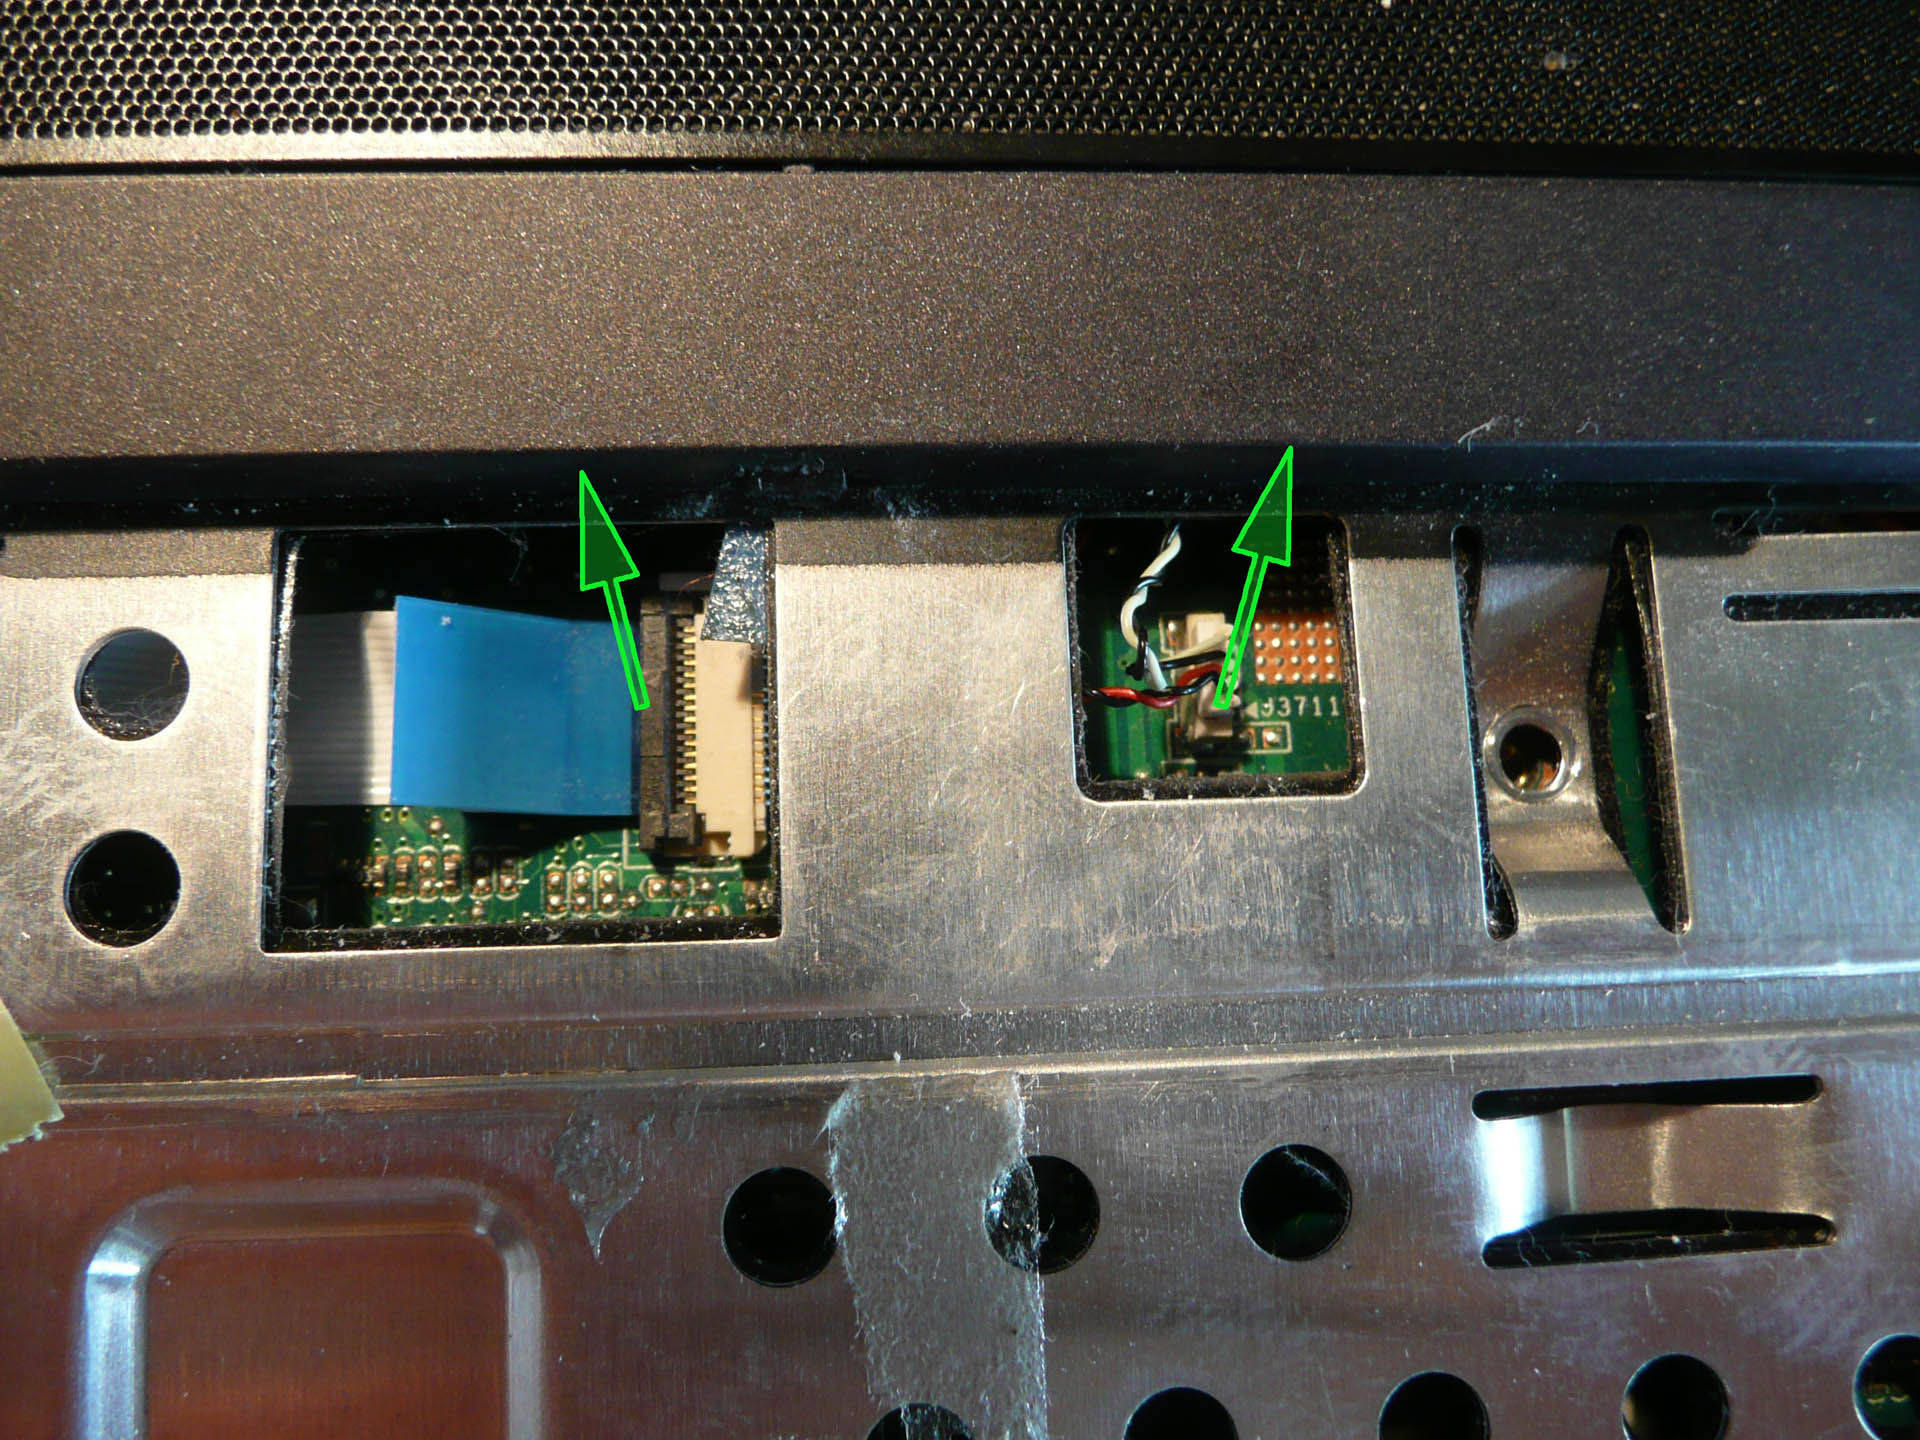
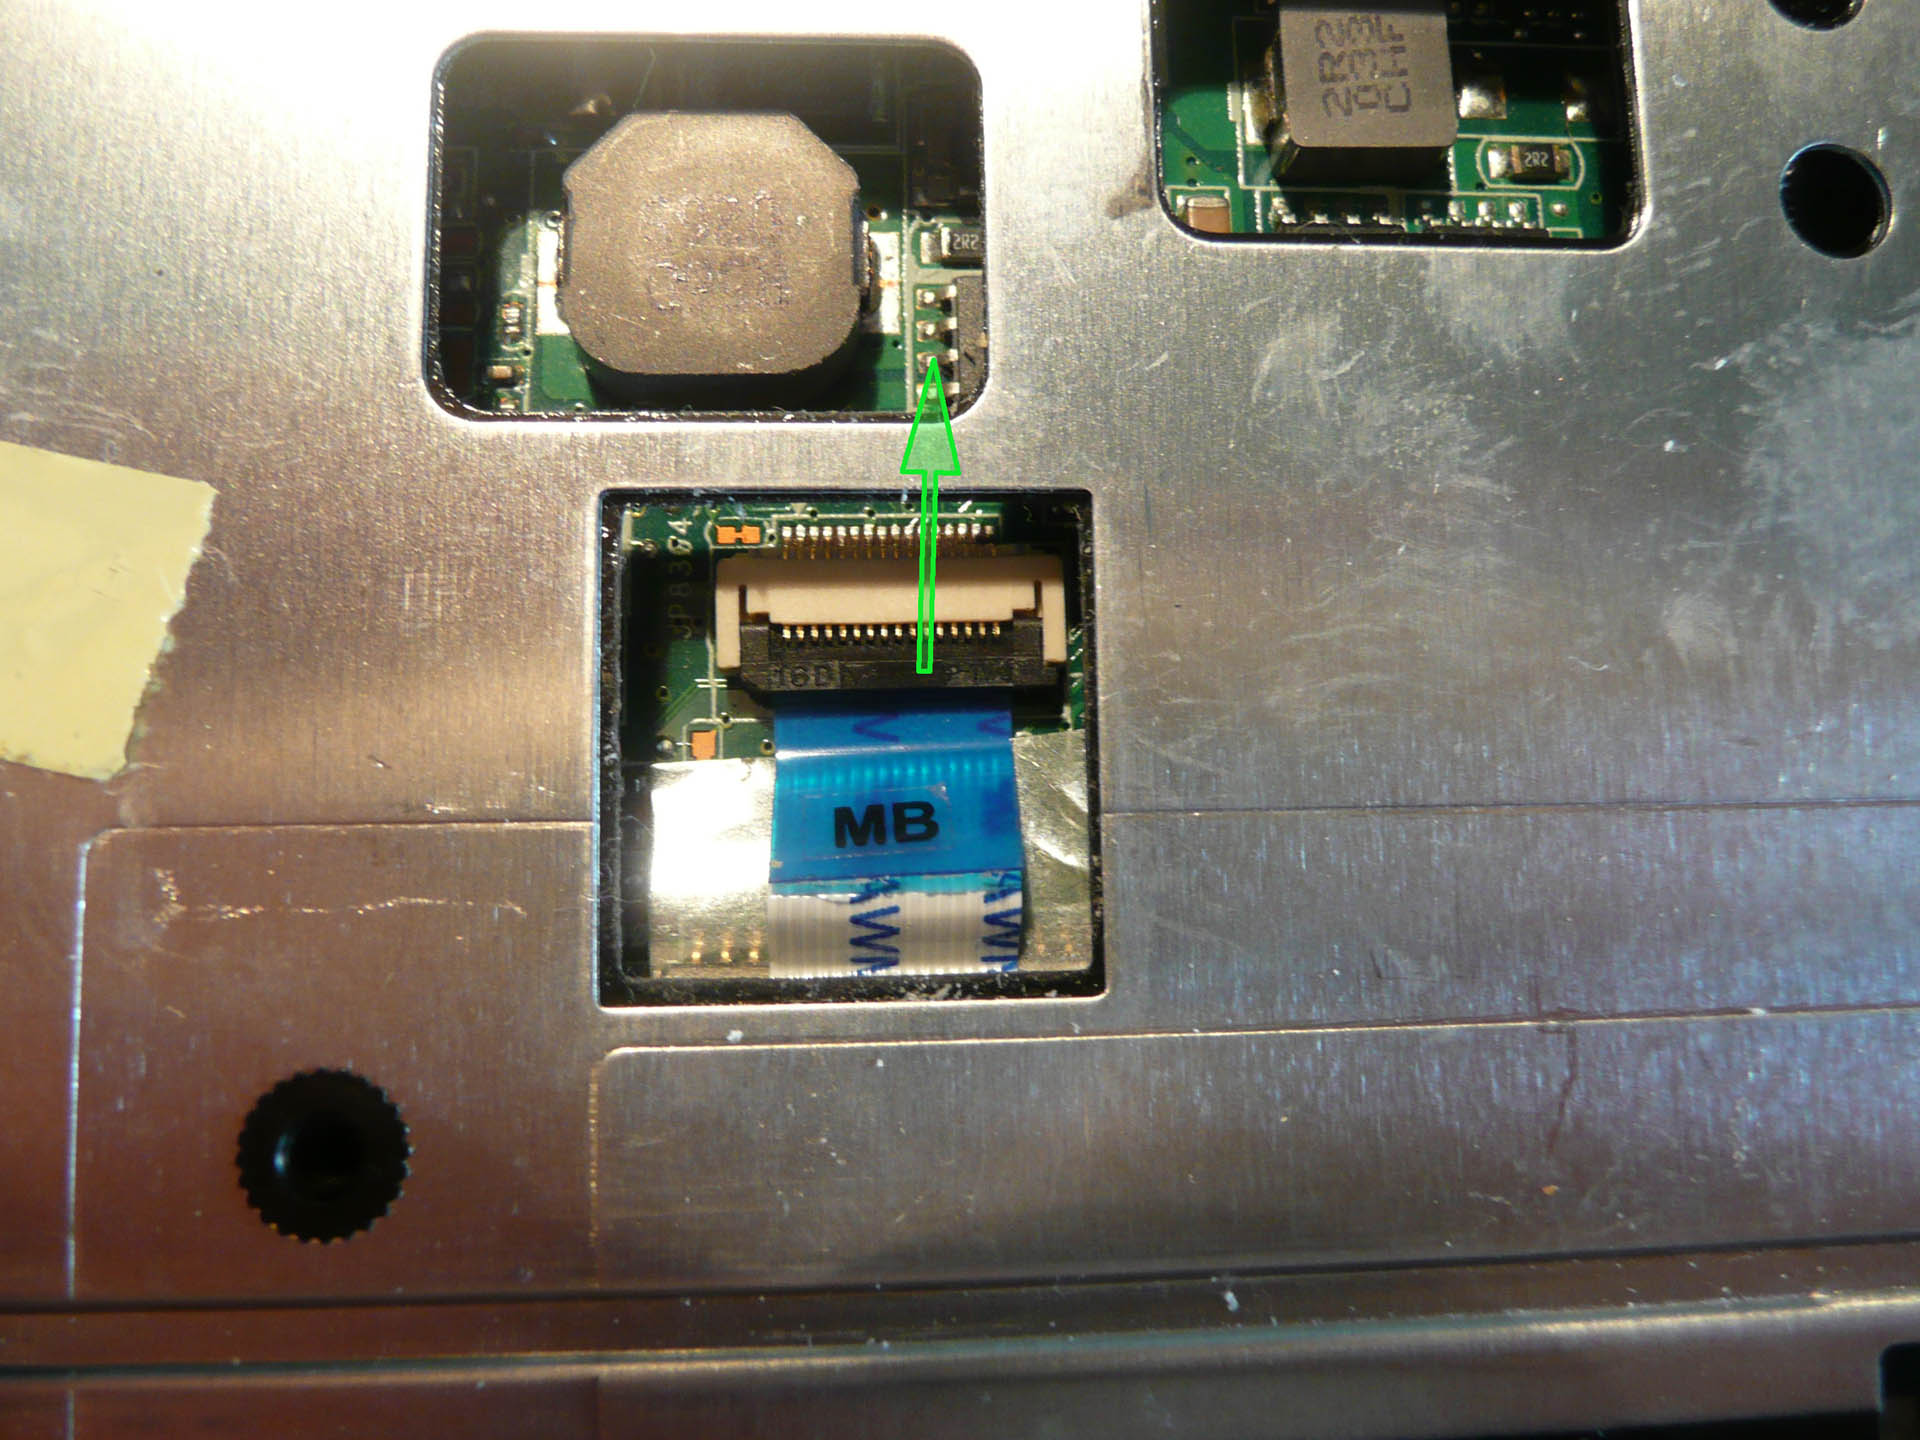
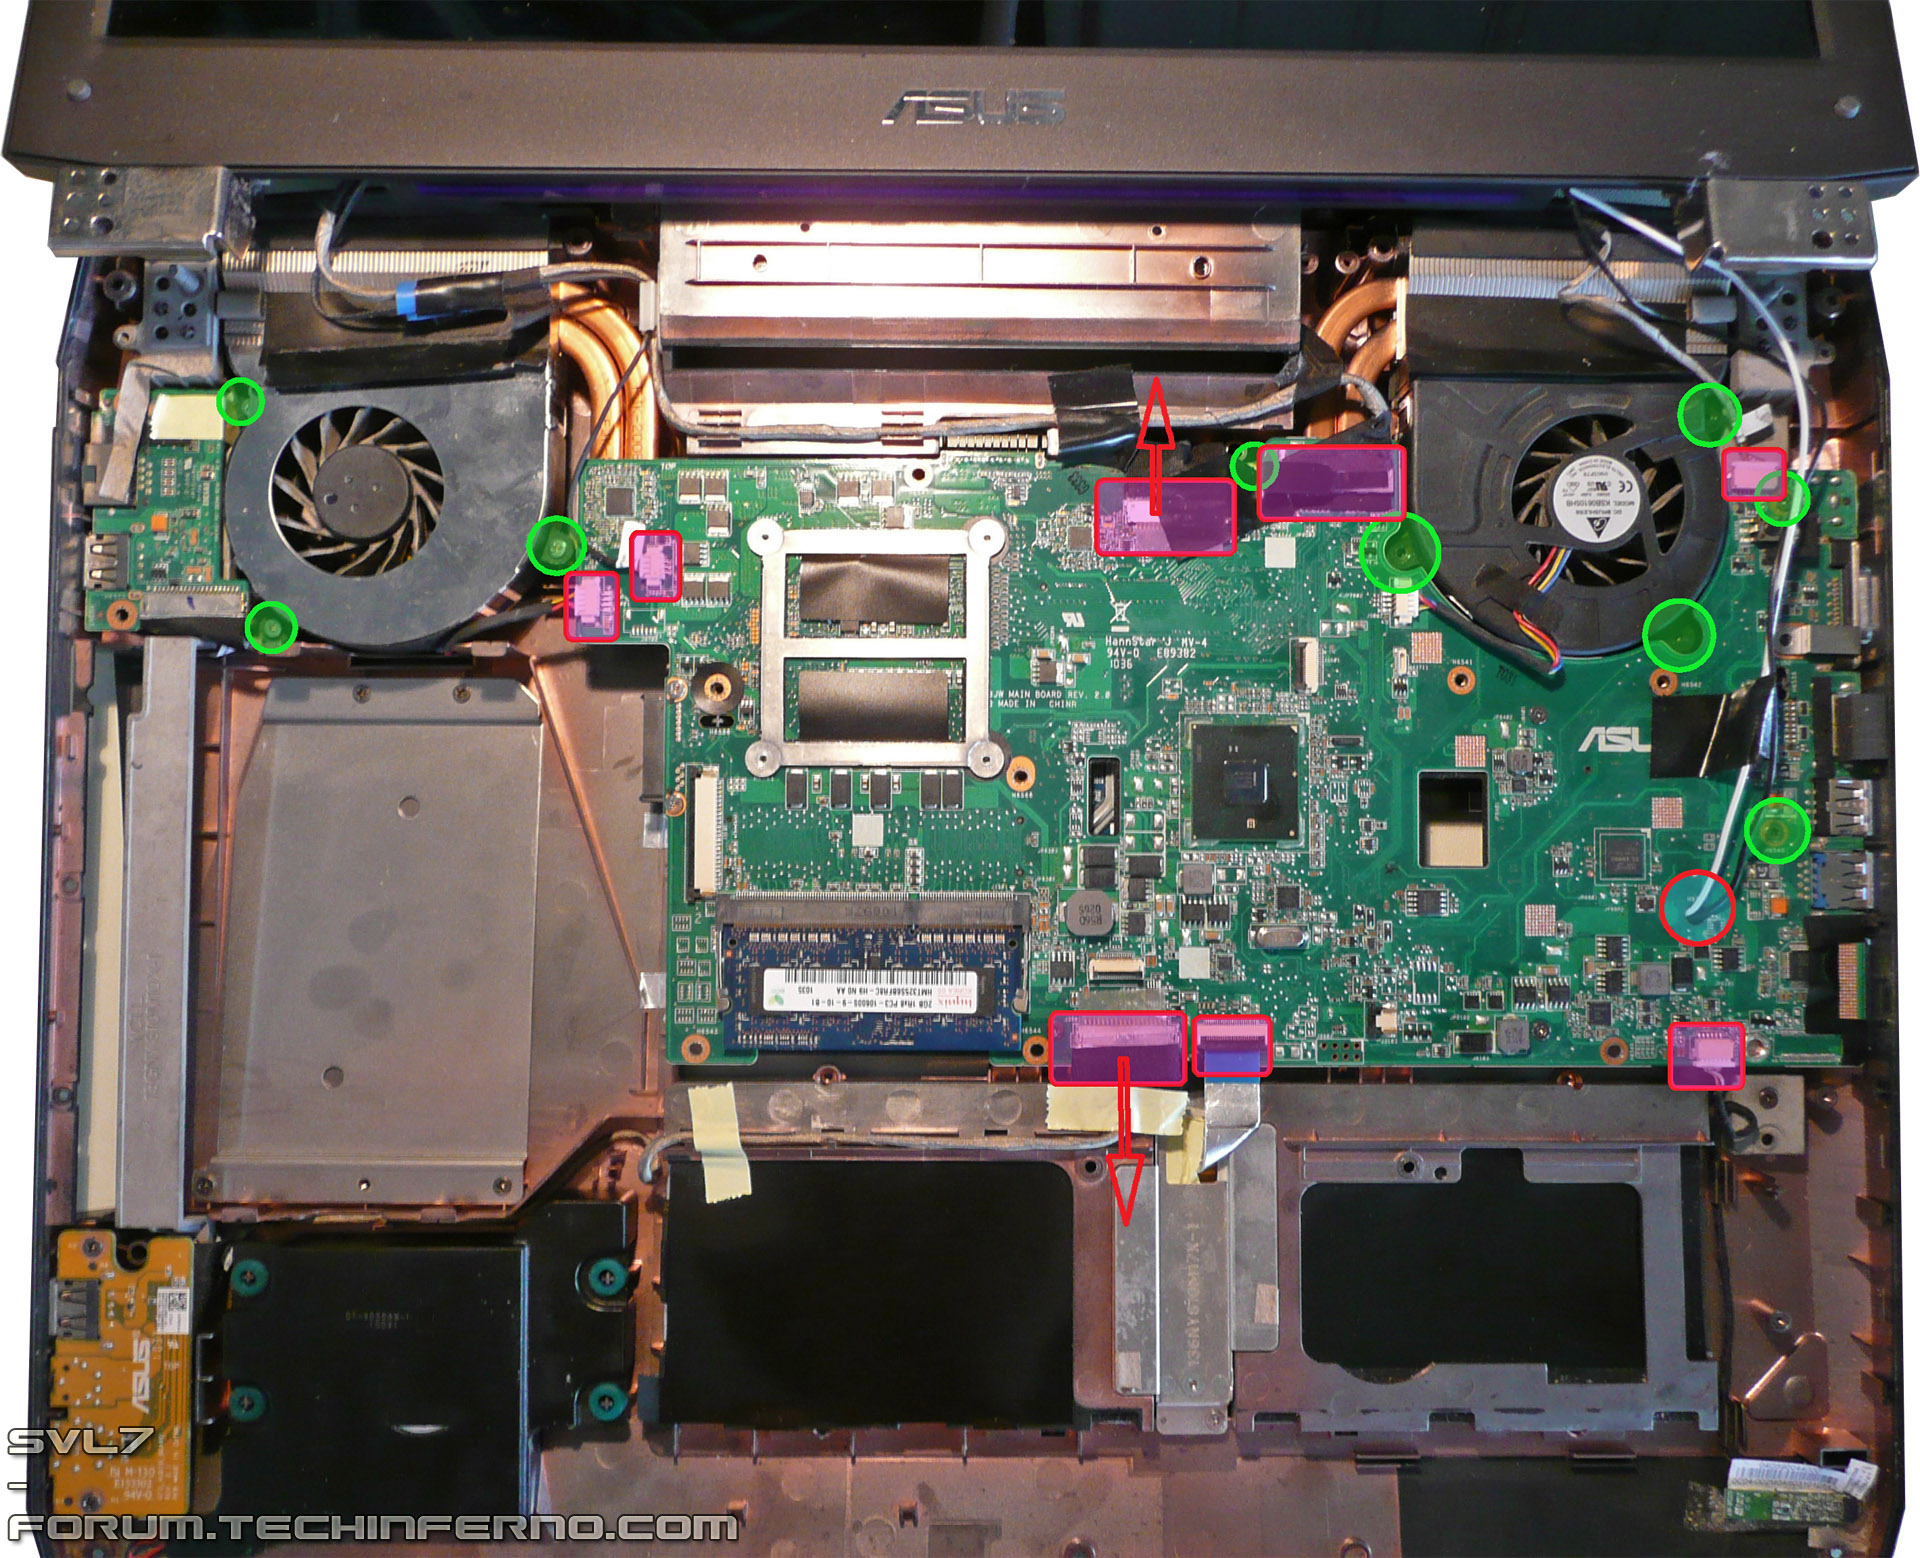
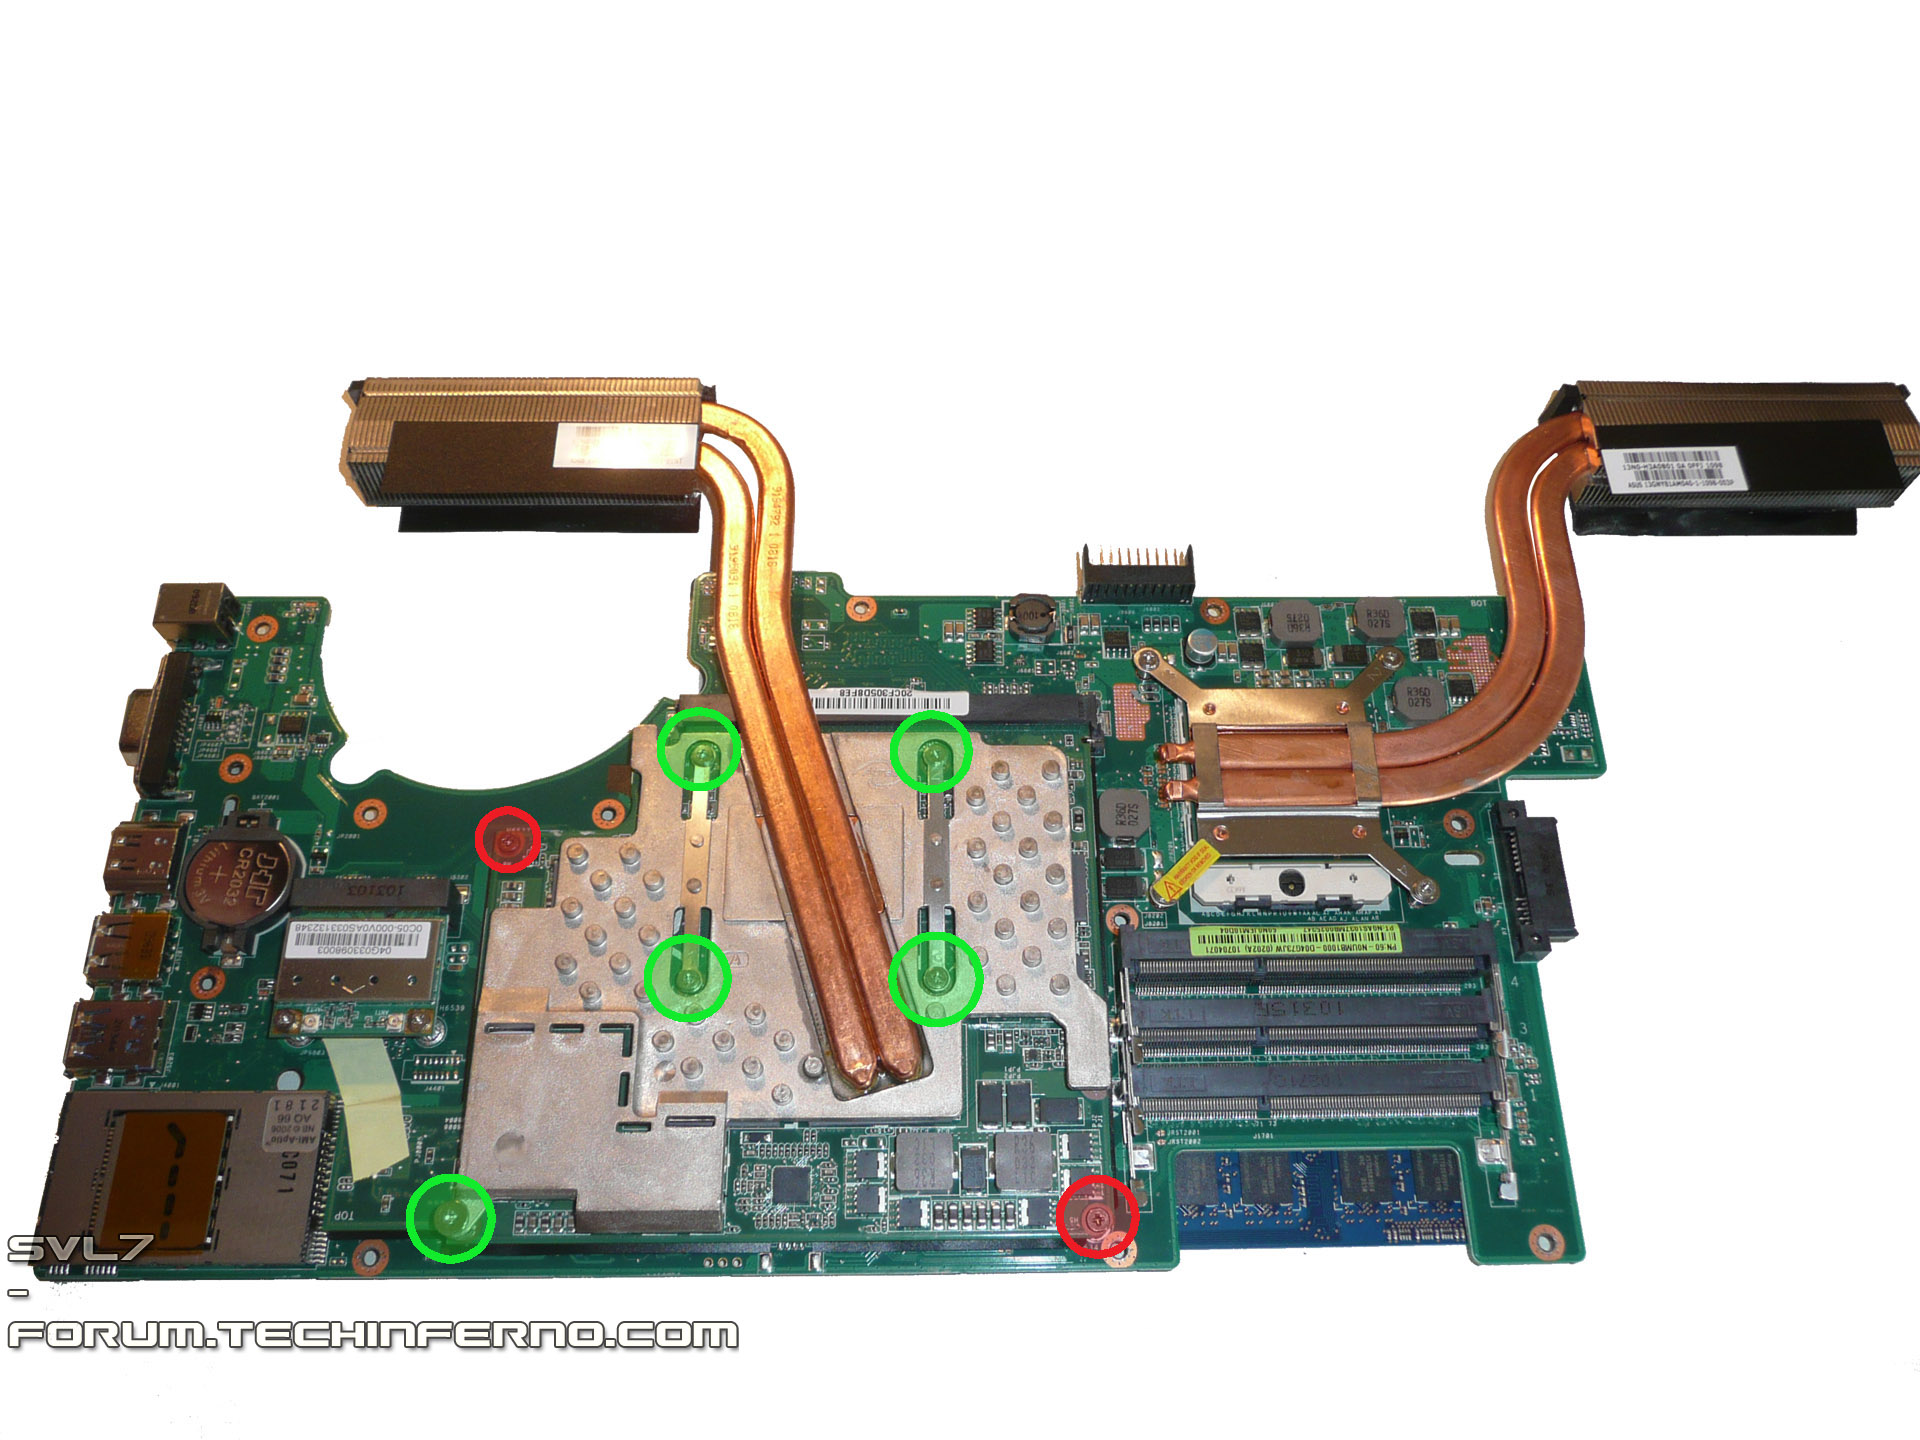
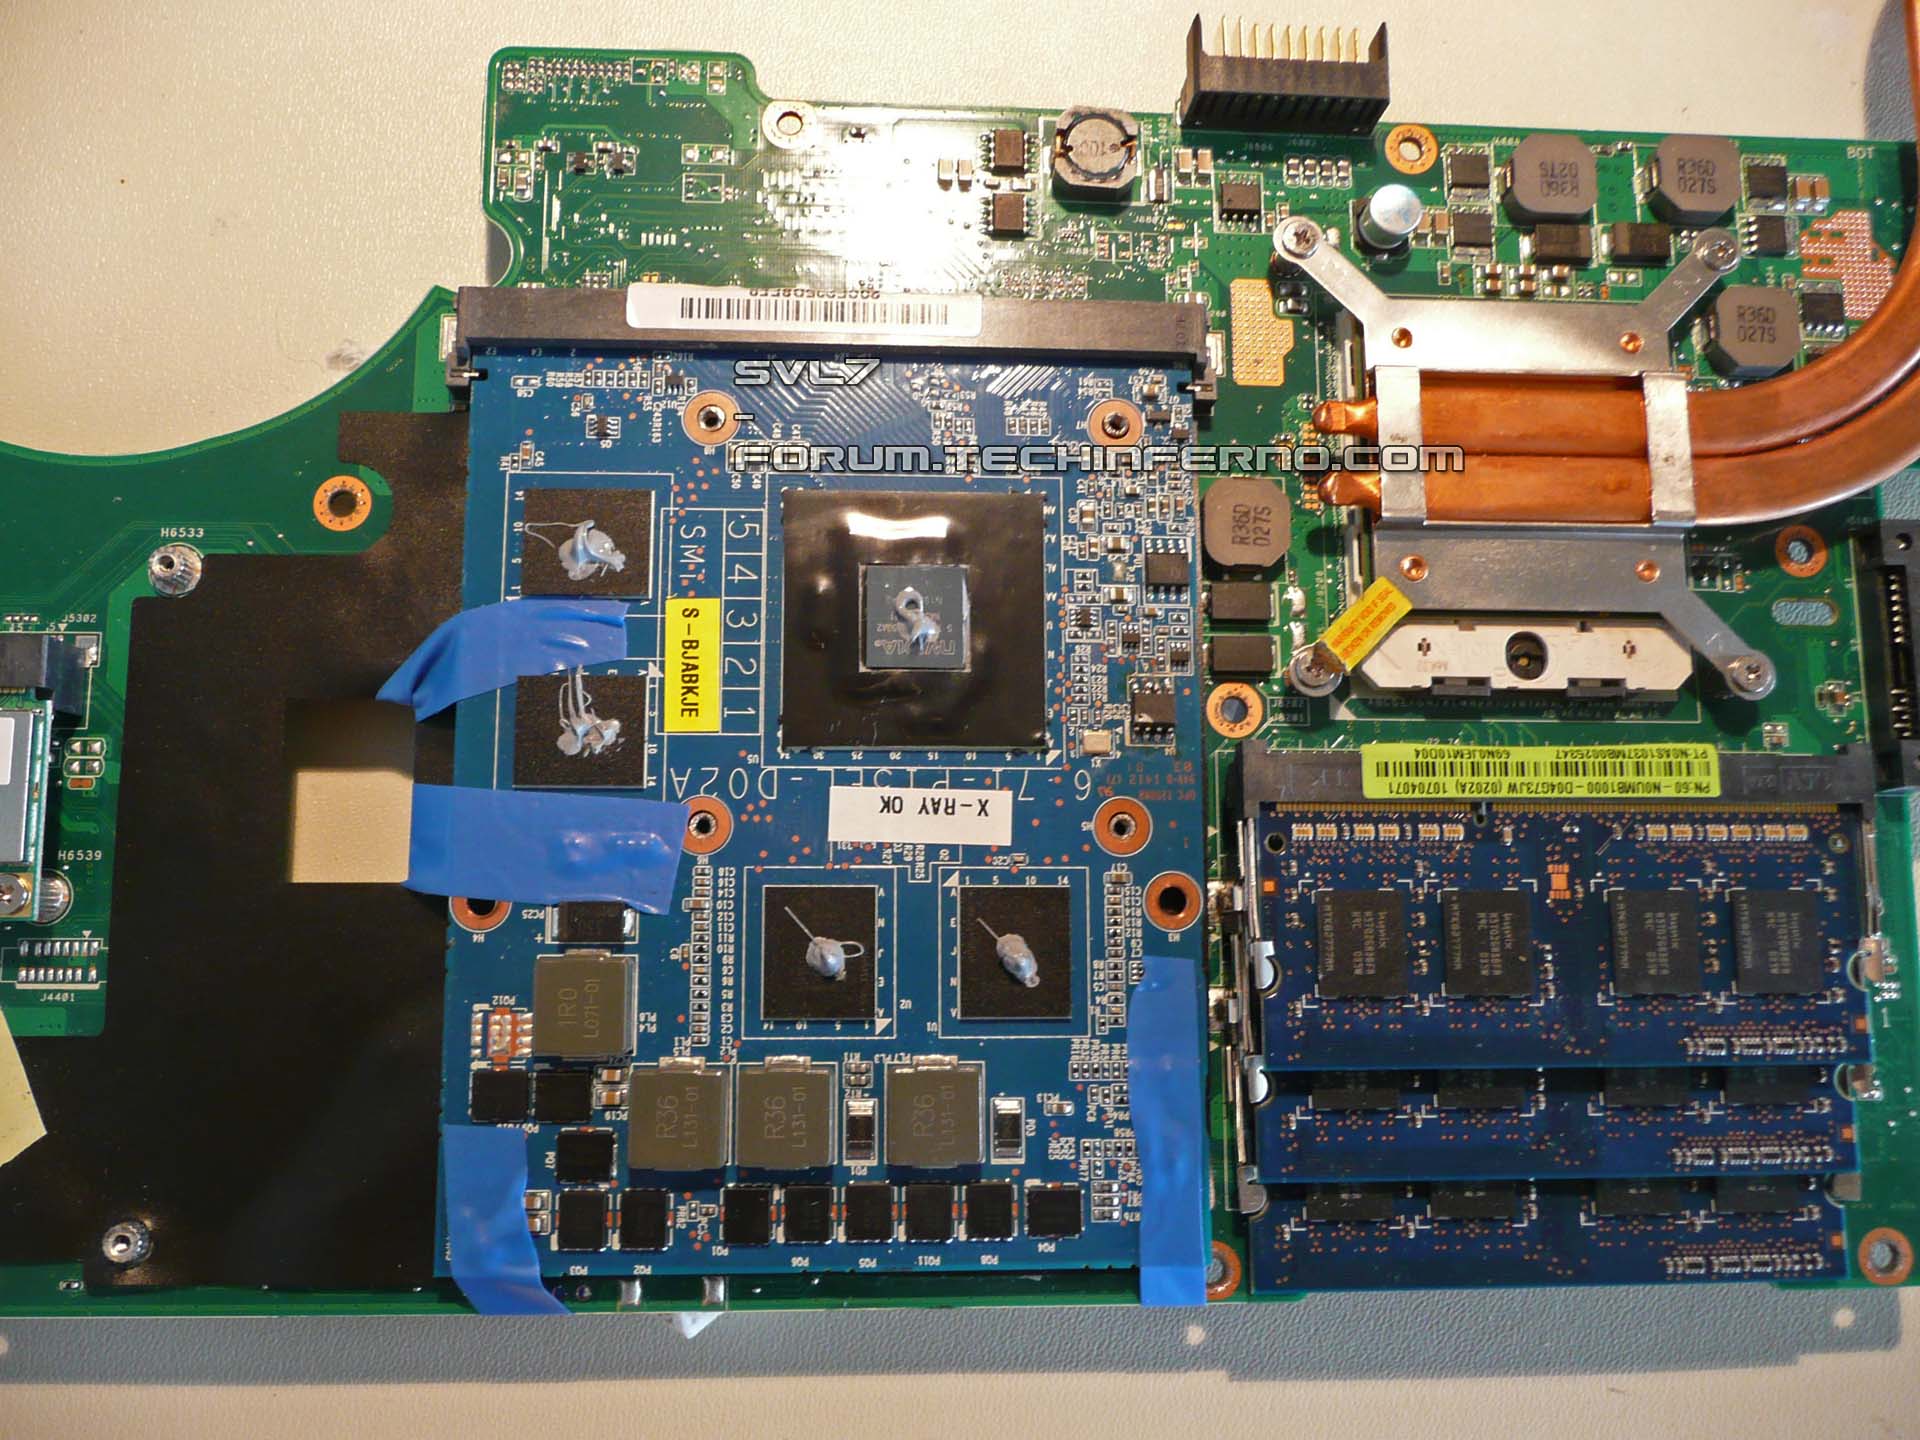
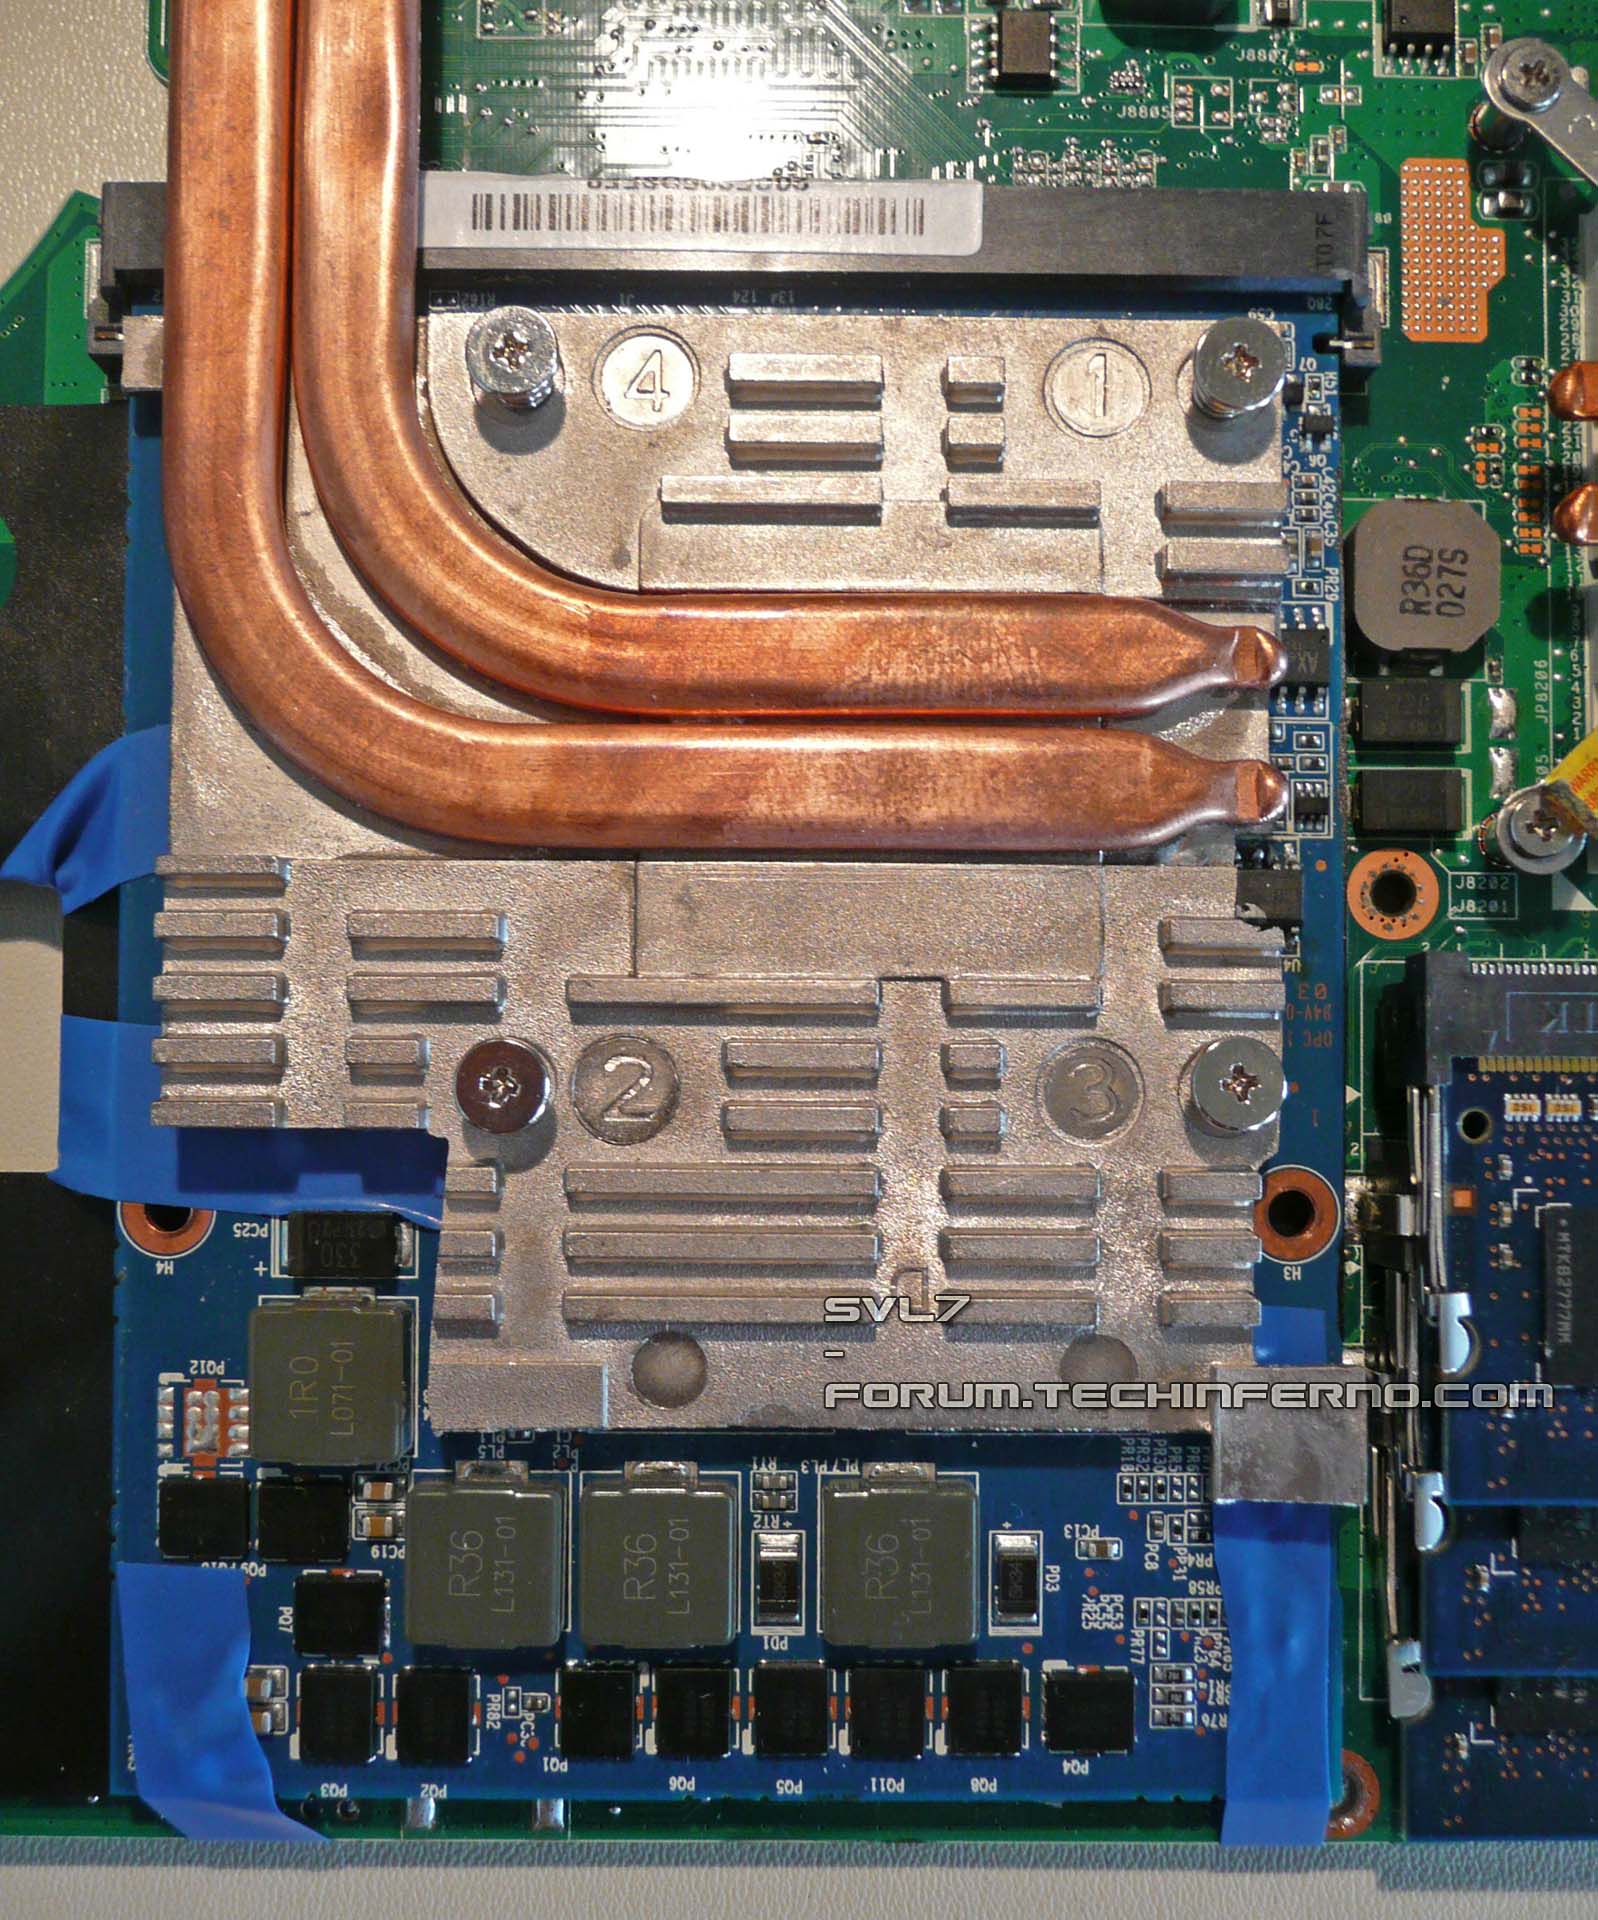
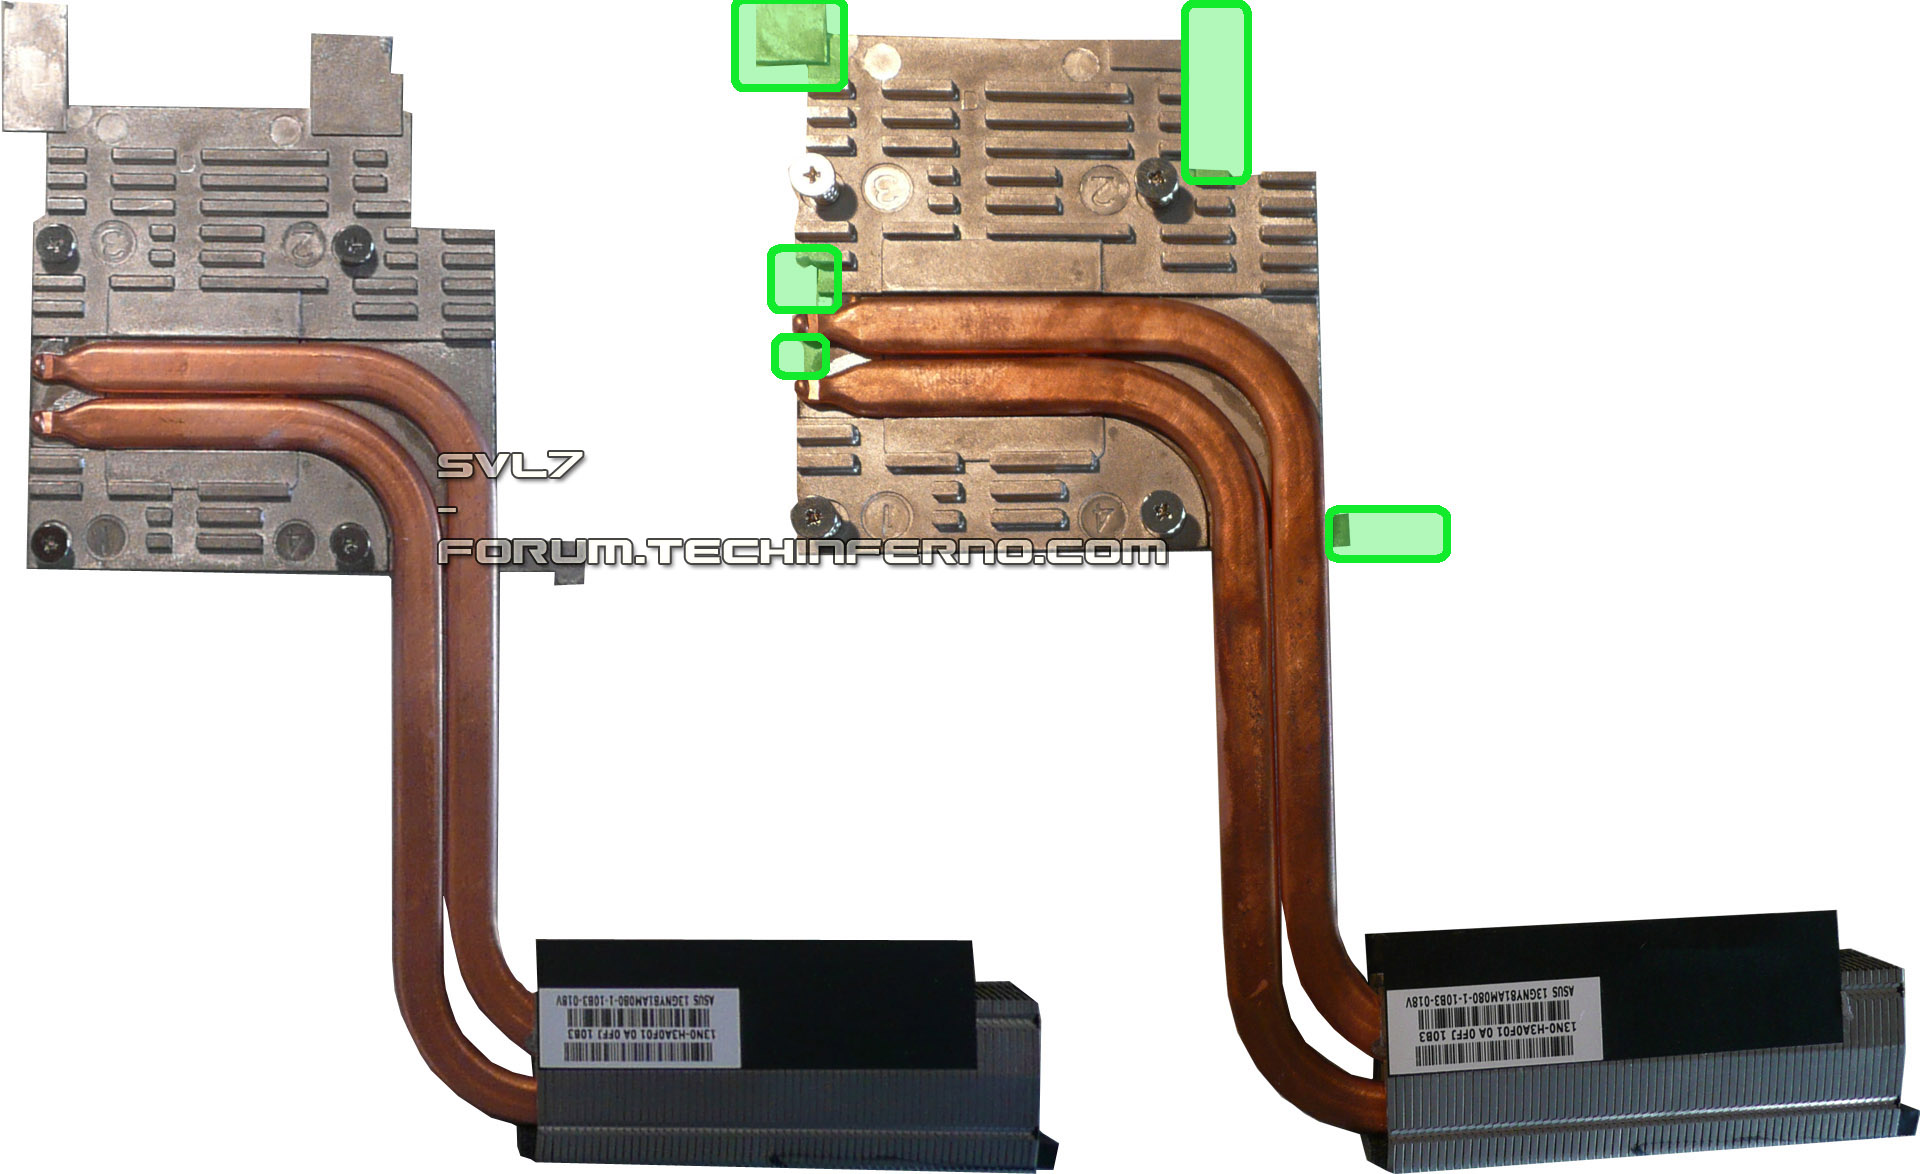
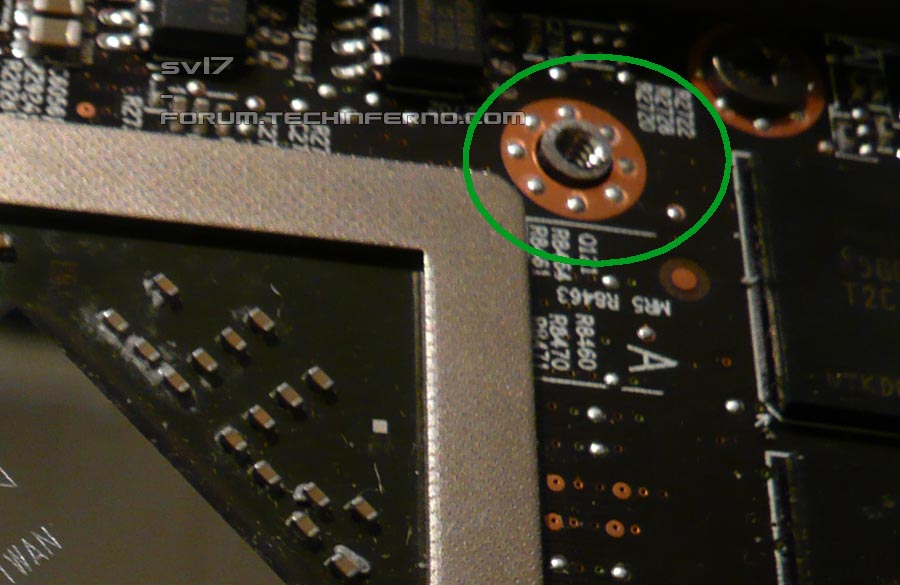
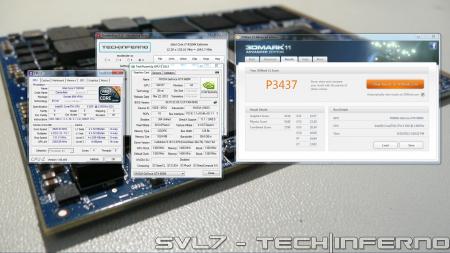
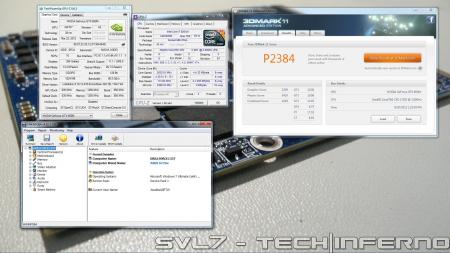
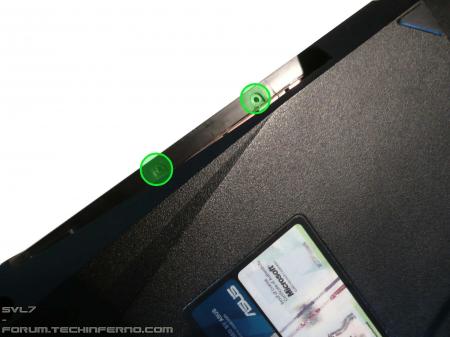
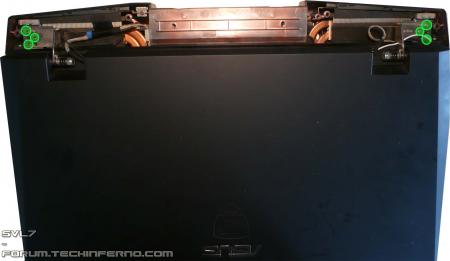
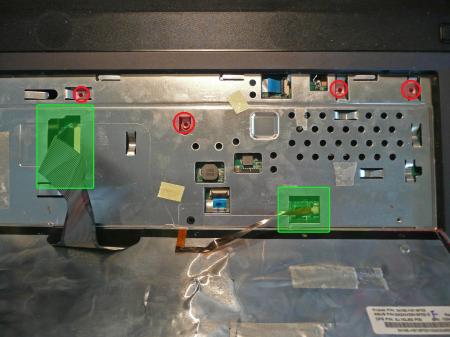
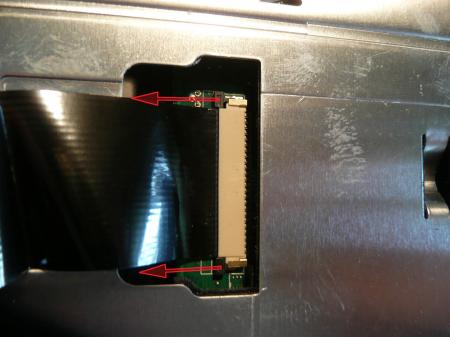
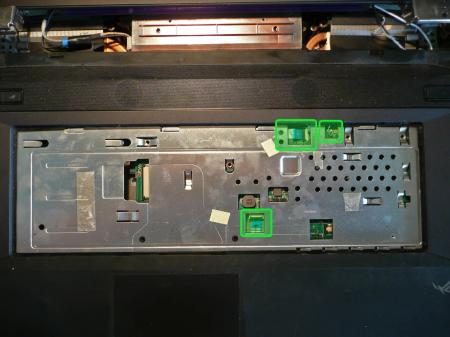
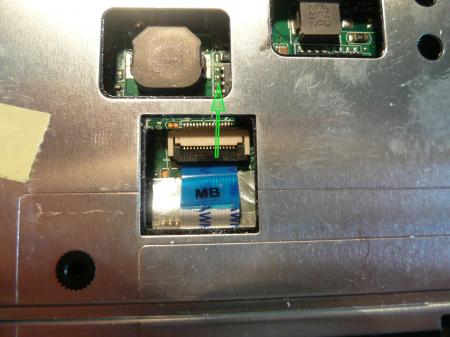
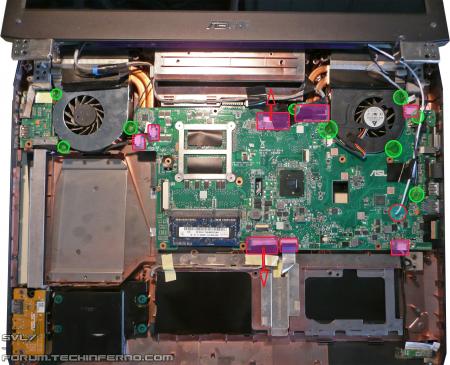
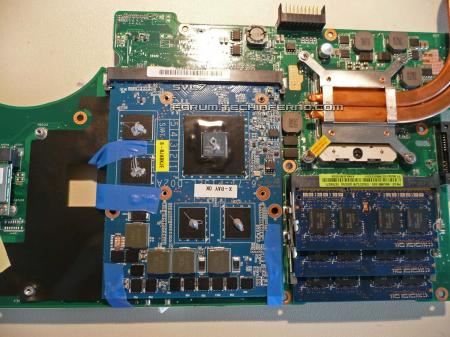
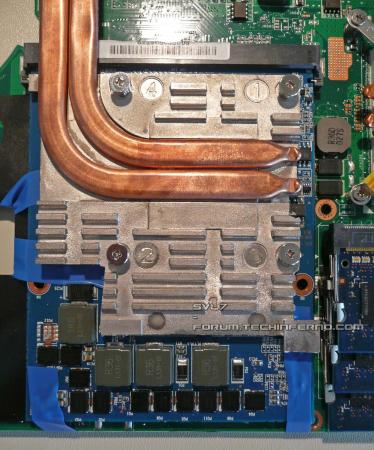
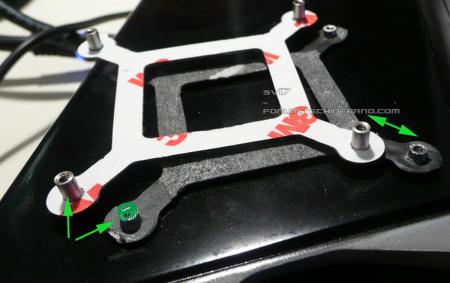
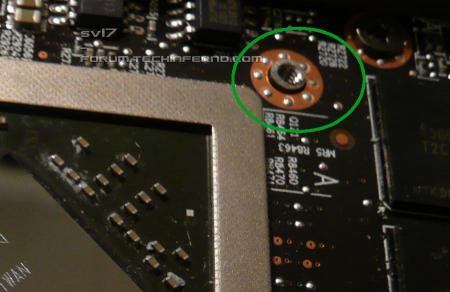
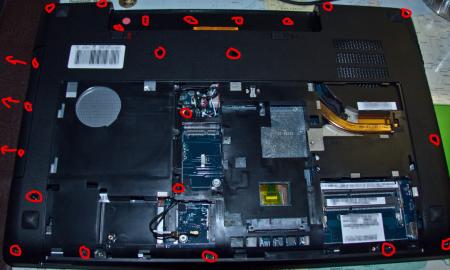
Yes, it works. The popular Asus G73JW can be upgraded with a Kepler card The G73JW isn't what I'd call "easy to disassemble", but it's doable. If you haven't disassembled this system before, follow the instructions very carefully. It's crucial not to rush anything, a lot of cables and plugs are really fragile. The upgrade is rather difficult, especially when you compare it with an Alienware / Clevo system, but it's really worth it. I want to thank MXM-upgrade for providing the test card, and @Conker for providing his G73JW for another experiment (we already disassembled this system several times... ). Check the end of the post to see some benchmarks. *** *** *** What you need for this upgrade: Nvidia GTX 660m, preferrably pre-flashed with the proper VBIOS. I assume MXM-upgrade.com will provide you the card ready for the upgrade, so you don't need to worry about the VBIOS and the involved procedures. In case you get your card somewhere else it's very likely you'll need to blind flash the card in order to get a picture on the screen. That's a relatively inconvenient procedure, especially since you can't be 100% sure whether it's your fault or possibly a defective card in case the blind flash doesn't work....I only tested the card from MXM-upgrade, other 660m may work as well, but I can't tell for sure. . . Asus G73JH GPU heatsink - The 460m which Asus put in the JW is a complete abomination when you compare it to an MXM card... it uses the same physical pin layout, but that's it. You won't be able to mount the JW heatsink on a proper MXM module, but it works with a (slightly modified) JH heatsink. You can grab one at asusparts.eu, ebay, other online notebook parts shops, etc., whatever you prefer. . . Screws which fit the backplate of the card you buy, or a Dell GPU backplate from a 6900m / 7900m series card (as those backplates have the proper thread size for the screws of the JH heatsink) . Screwdriver (make sure it really fits the screws) . Metal file or tool with similar effect to do some small modifications on the JH GPU heatsink . Thermal paste & some stuff to clean off the old paste (e.g. rubbing alcohol) . Some tape to keep the 660m in place . and I highly recommend: ESD-mat and wristband!! While it will also work without this equipment (you have to be really unlucky to damage your system by ESD), nevertheless, l won't recommend anyone to do so. Keep in mind that you're going to completely disassemble your system. Modifying the heatsink: No need for a lot of talk, it's pretty straight forward, look at the picture and you'll know what you need to do. When you're done with the modifications make sure it fits. Preparing the backplate: You need to slightly grind down the 'poles' of the backplate in order to get enough pressure on the die. Take a look at the pics and you'll see what I'm talking about. Without this mod the 'poles' are too high and won't allow you to properly mount the heatsink. Disassembling the system (step by step): - Uninstall your current Nvidia drivers. - In case your card doesn't already come with the required vbios: Set the first boot priority to USB (!!!) Else it will be rather difficult to blindly flash the card. - Shutdown your system, remove the battery and the AC adapter. - Press and hold down the power button for about 15 seconds. - Remove the quick-access panel of your G73: - Remove all the regular sized screws on the back (green), the two drives (red arrows), two small screws in the battery compartment (red) and unplug the WLan antennas (encircled red). Make sure you don't miss a screw. - Remove the optical disc drive. - Remove two small screws which previously have been hidden by the optical disc drive: - Now the display assembly, six screws. Then carefully lift the display and place it as shown in the next pic. - Once you have the display like this, remove the keyboard. You need a small flat tool for the five clips. Then lift it carefully. It gets hold in place with double sided tape, so you need to apply some force. Always use care, there are cables attached to it. - Four more screws. Then remove the cables which are connecting the motherboard with the keyboard. Carefully pull on the black part of the connector (see arrows) to unlock the cable, then you can remove it. - More cables: - Three screws on the mobo, 2x3 screws for the fans and a lot of cables to unplug. Also pull out the WLan antennas through the hole. Again, be careful with the cables. Once everything is detached, remove the fans and then the mainboard. - And finally... the heatsink(s). Remove the screws which are encircled with green first. Lift the heatsink and then you can unplug the card after removing the 'red' screws. - Put in the 660m and keep in in place with some tape. Unfortunately you can't use the screws as the holes on the motherboard aren't conform with the MXM standard. Put a small amount of thermal paste on the die of the GPU and as well on the VRAM modules. Using thermal pads for the memory isn't a good idea in this case since it would increase the distance between the die and the heatsink. Then mount the modified heatsink and reassemble the system. Make sure the heatsink really fits well and doesn't touch any component it shouldn't. After reassembling your G73, start it up. When your card already comes with the proper vbios it should boot just fine, else you messed up something during the dis- and reassembly. In that case check all the cables etc. If your card didn't come with the required vbios, then you need to blind flash your card now. That's why I stated earlier to set the first boot priority to USB in case the 660m doesn't already come with the proper vbios on it. The required vbios is attached to this post. Once your system is running and booted the OS it's time to install the GPU drivers. Download the desired drivers from Nvidia and unpack it, then put the modified .inf file (see post attachment) in the 'Display.Driver' folder, delete the old one with the same name in there. Then start the installation. That's it! Have fun with your upgraded machine!! And some benchmarks... 3dMark11 run at stock and overclocked... Gotta love the 660m, it's so much fun to overclock it, just look at the core clock Just ask if you have any question! As already mentioned, this upgrade procedure isn't easy for a beginner, but it's totally possible as long as you take your time, no need to hurry. 660m_G73JW.zip modified inf 660m G73JW.zip


- 146 replies
-
- 14
-

-
- 660m
- asus g series
- (and 8 more)
-
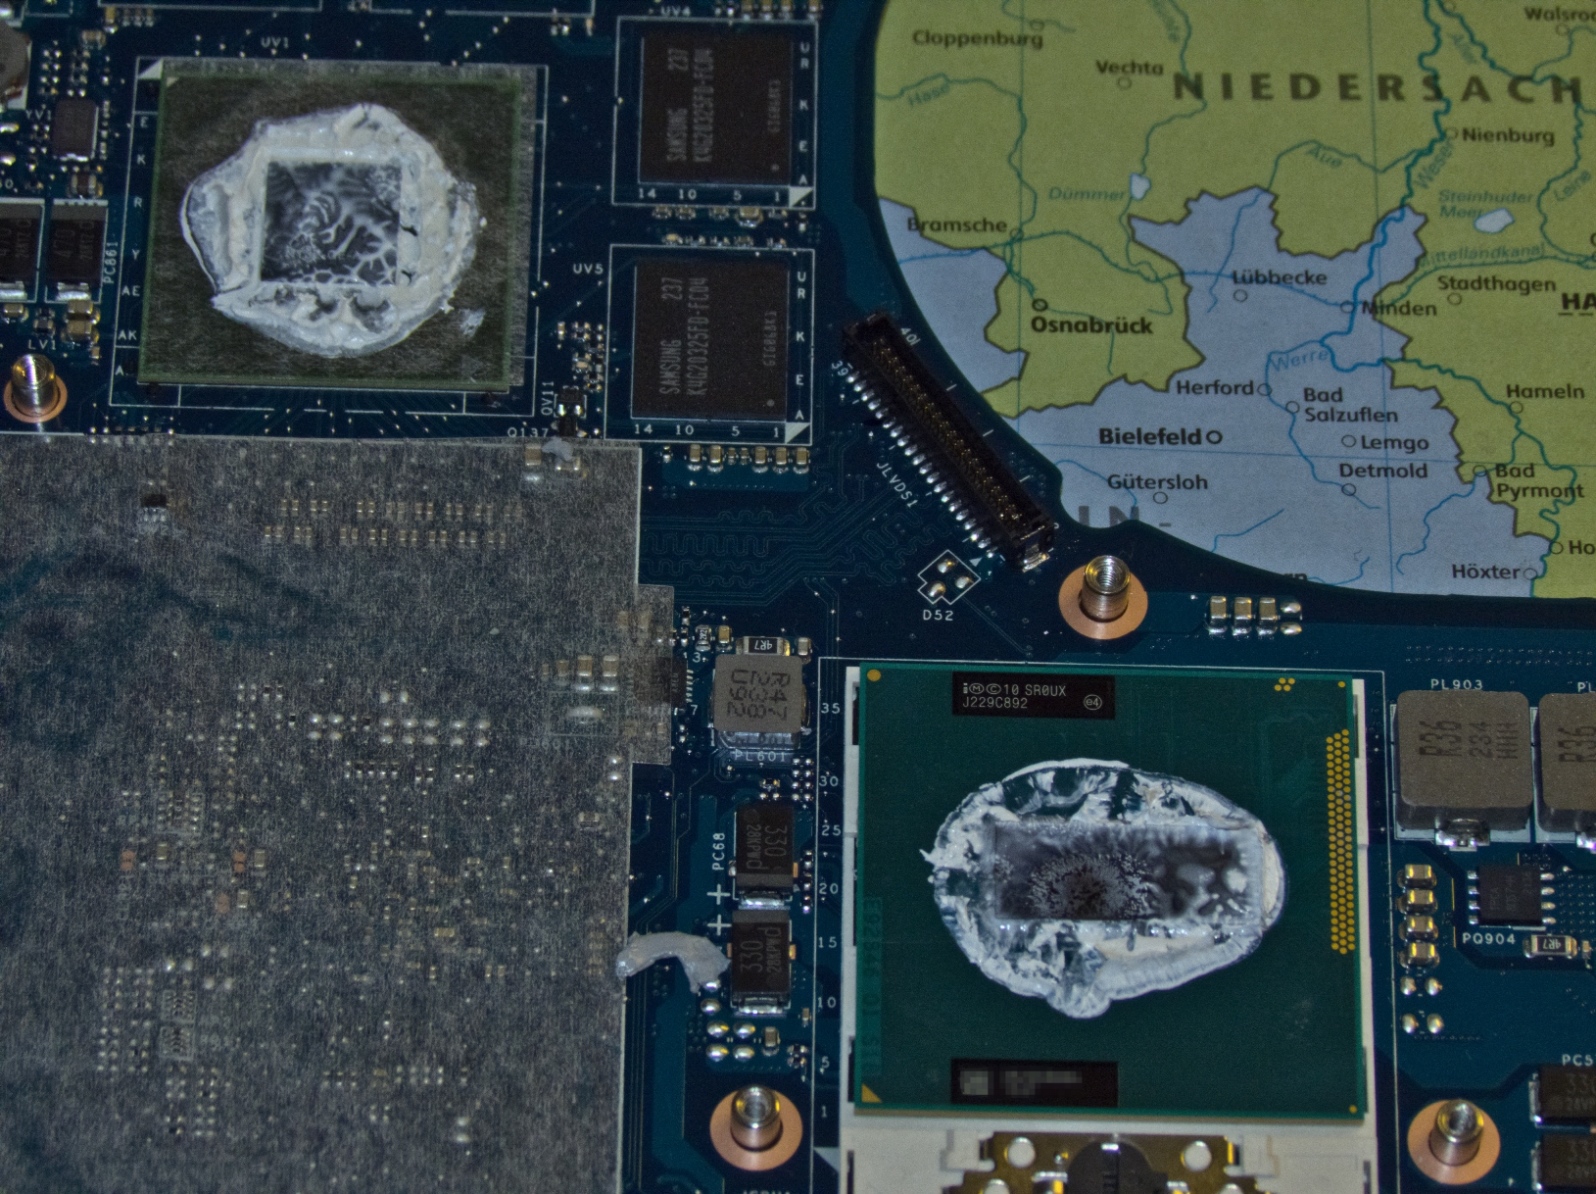
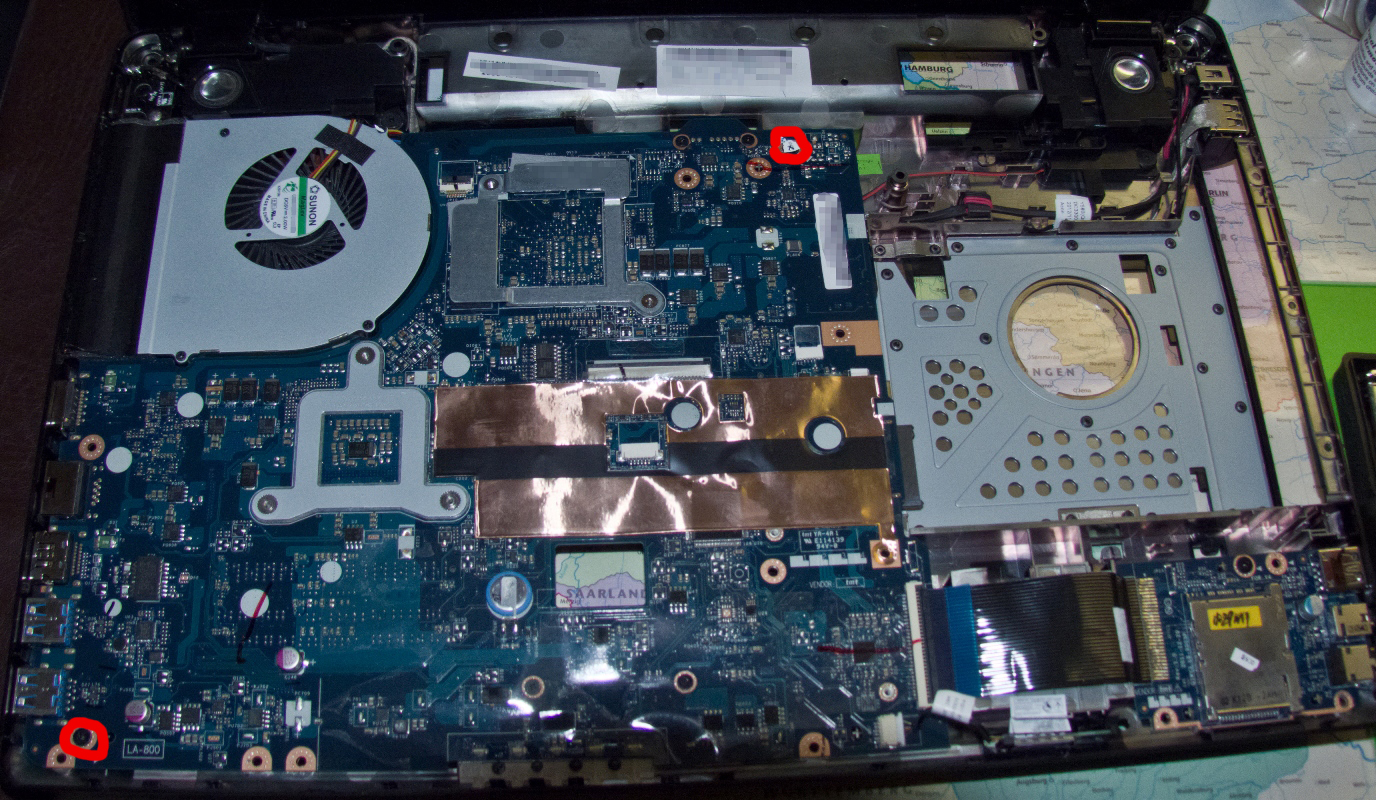
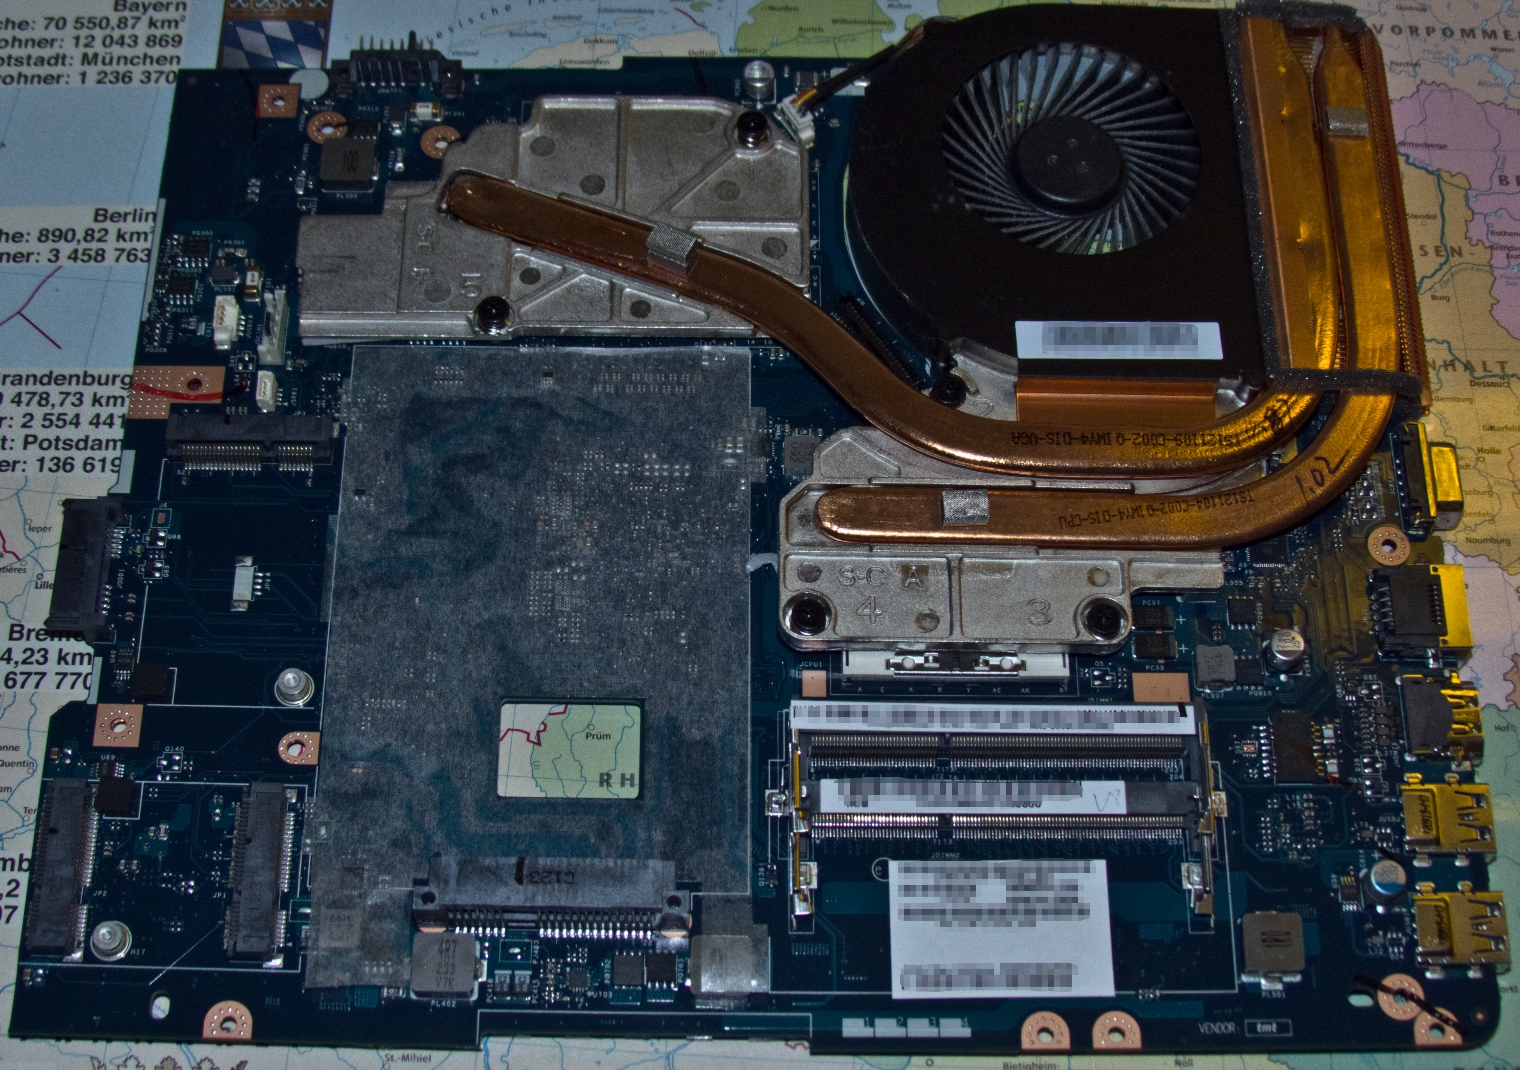
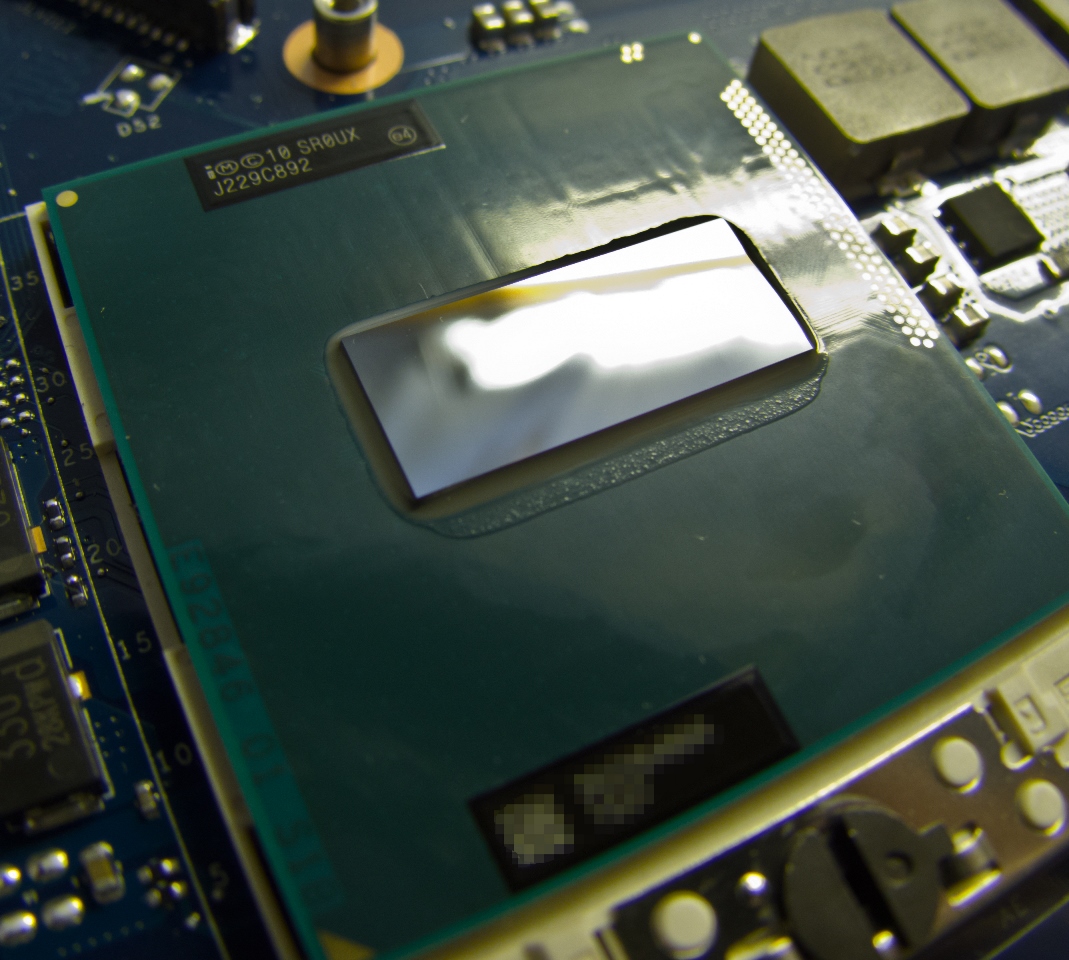
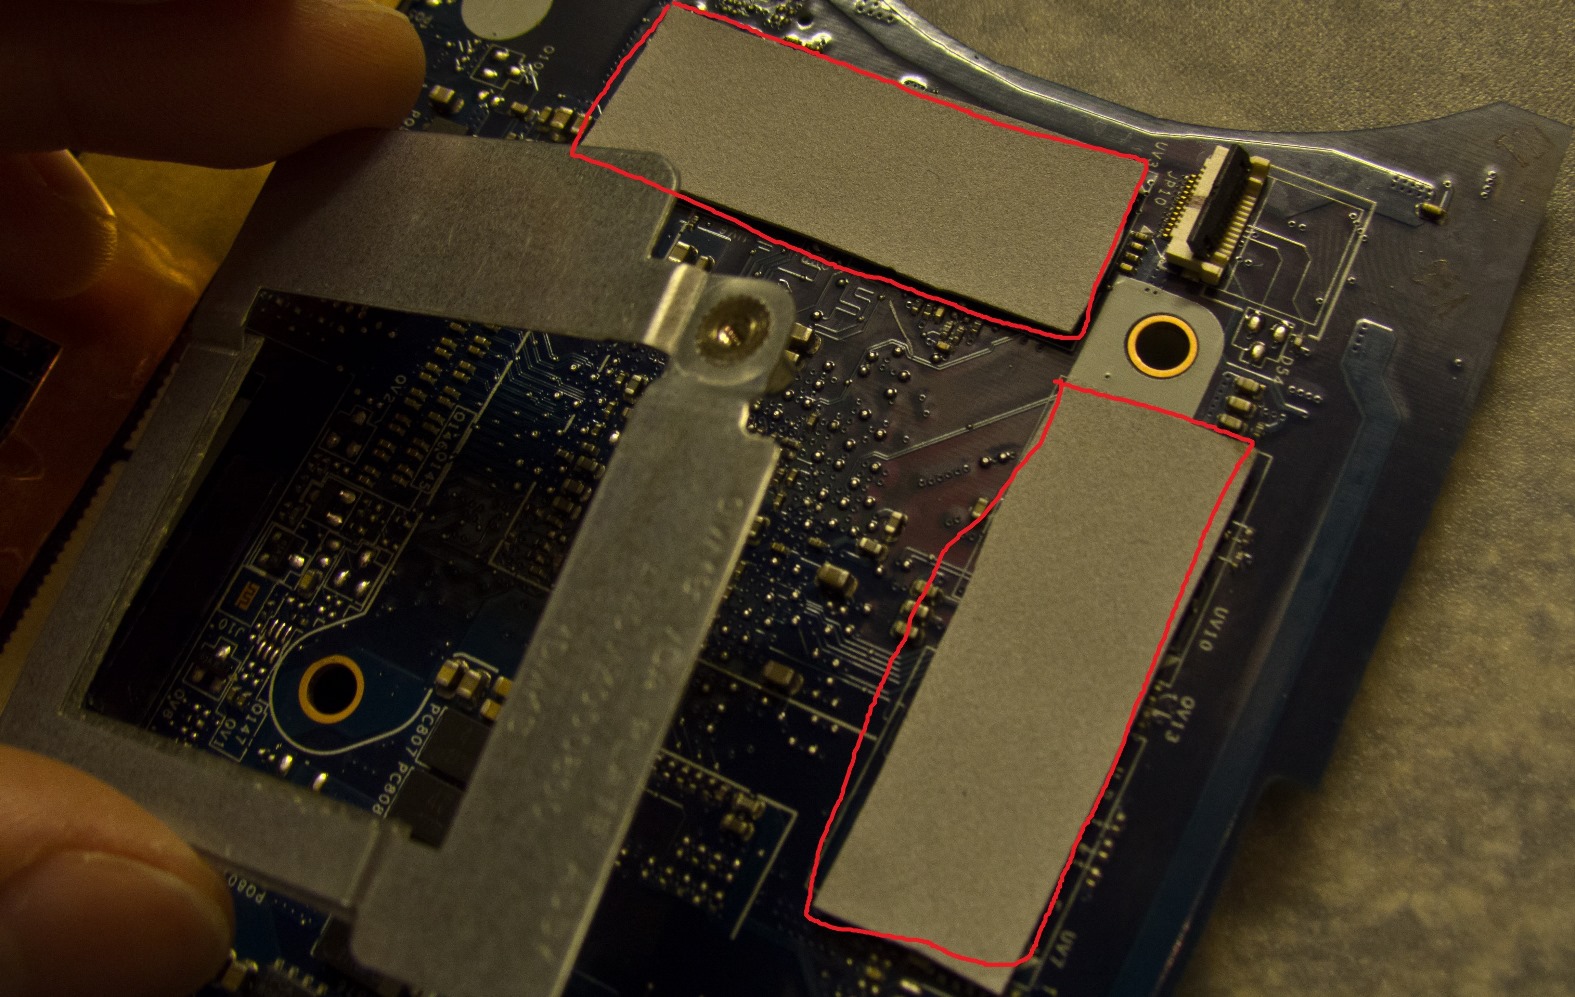
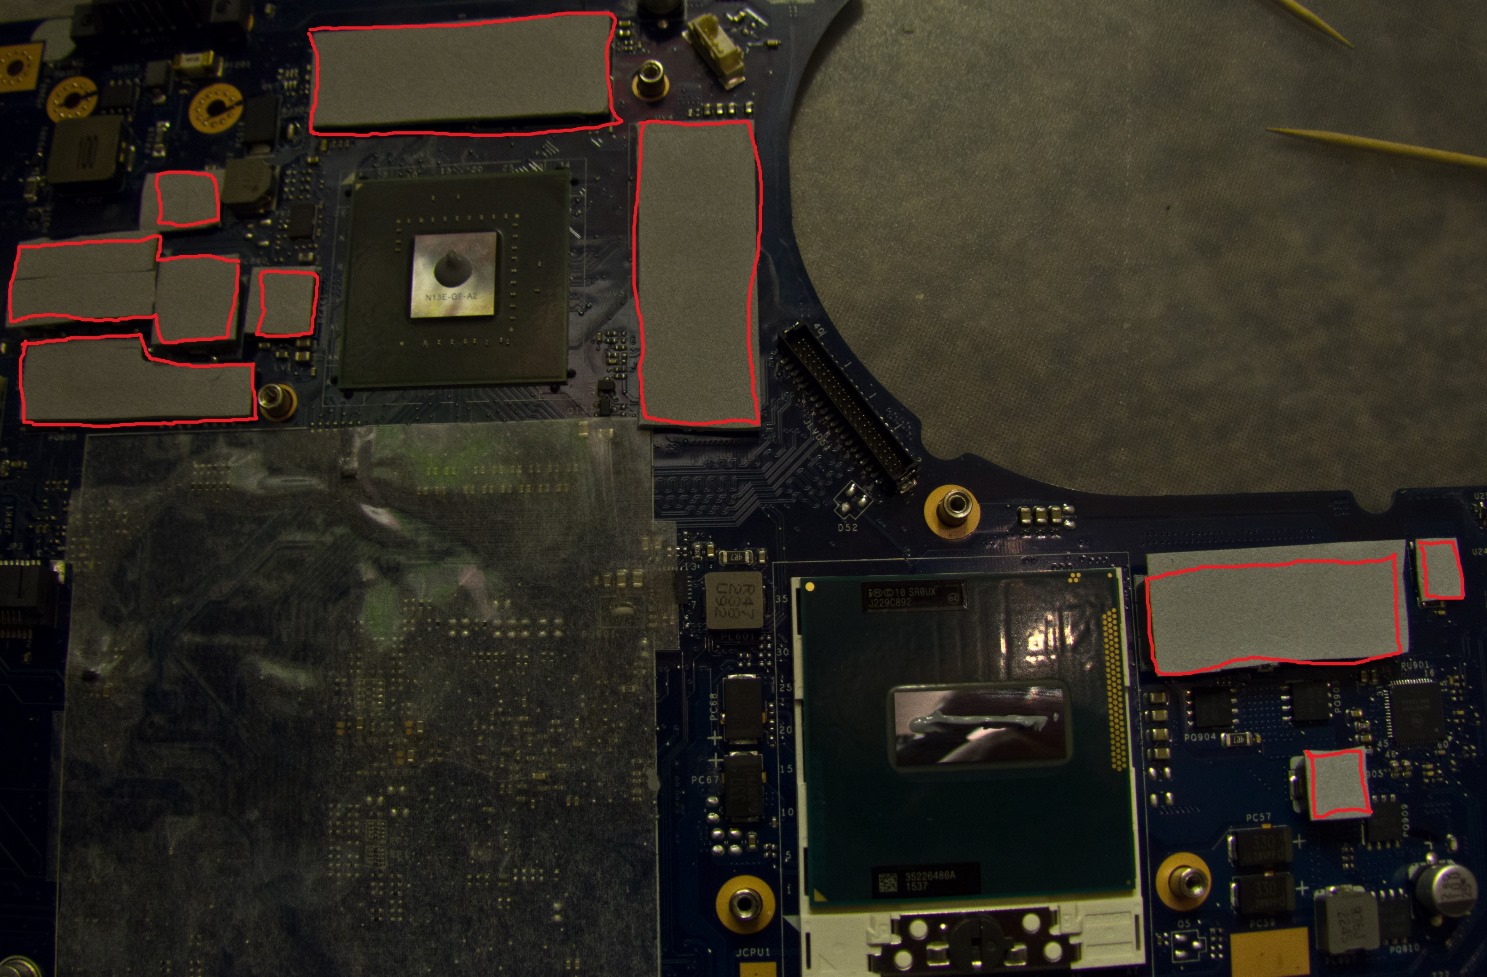
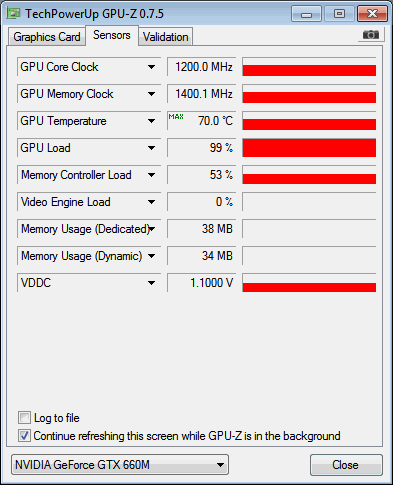
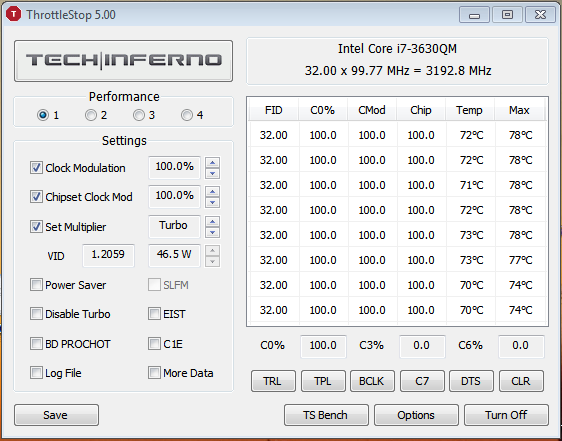
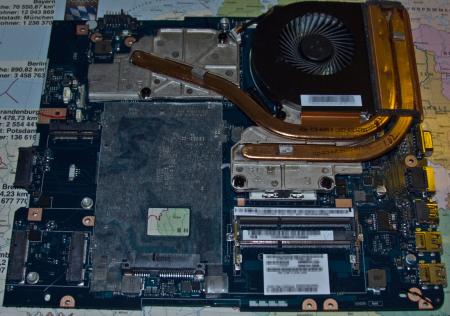
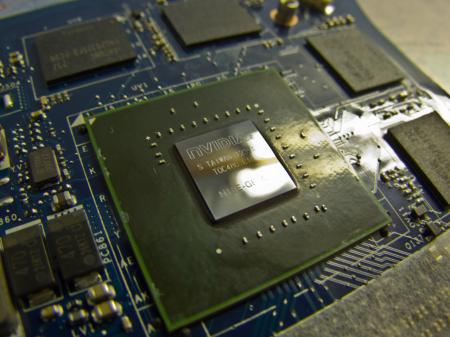
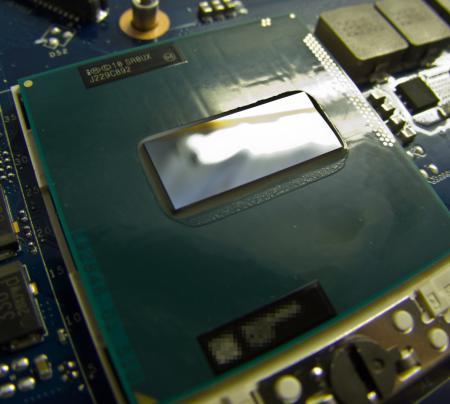
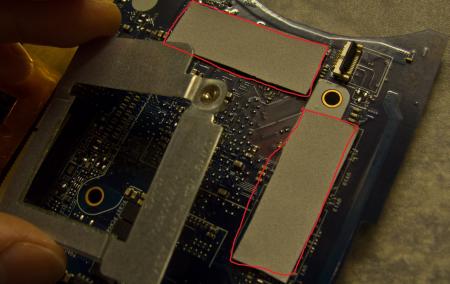
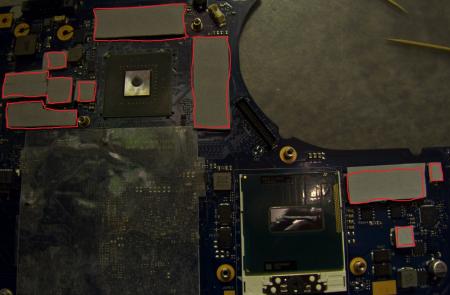
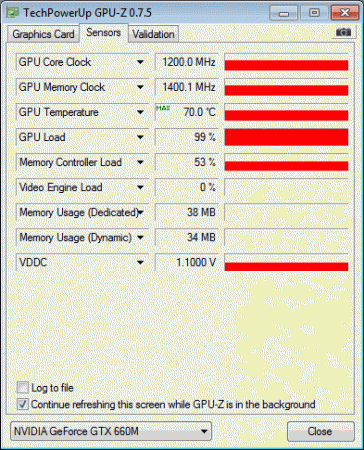
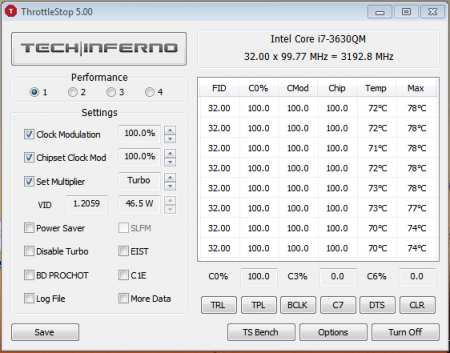
• Why should I repaste my Notebook? I think that picture says more than any words can say. There is to much thermal paste on the thermal surfaces. To get the best temperatures as possible, you need a good-pasted system. • What do I need? - time - a bit ''sleight of hand'' - screwdriver - something to remove the thermal paste (I used ''ArctiClean 1 & 2'', for thermal material removing and thermal surface purifing, alcohol should also work) - a lint-free cloth - a good thermal paste (IC Diamond or Arctic MX-4, i used the one from Arctic) - good thermal pads (with at least 6 W/mK thermal conductivity is nice) • How to do You have to remove the following hardware of the Y580 for repasting: • Battery pack • Hard disk drive(HDD) • Optical drive • Keyboard • Keyboard bezel • System board ... You have to remove these screws: Be really careful with removing the keyboard. Do it very slowly and smooth and nothing will broke This is how the Y580 looks like without the keyboard: The same applies to the keyboard bezel. Remove it slowly and smooth, be careful The Y580 after removing the keyboard bezel: Remove the two screws and you can take out the motherboard This is the motherboard with the fan and the two heatsinks for the CPU and the GPU • The repasting - remove all thermal pads - remove the thermal paste - clean all components until they ''shine'' like that: - after the cleaning replace at first the thermal pads at the back of the GPU (backside of the motherboard) like me: - take the new thermal paste and reapply the paste to the core of the 660m and to the CPU - place the thermal pads to the parts that I marked, there were the pads placed from factory: • The result For the testing i modified the vBIOS of the 660m. I rised the core-clock to 1,2 GHz and the memory-clock to 2800 MHz. I also modified the voltage. No overvolt, but i modified it that the voltage stays always at 1,1 V. The GTX 660m stays steady at the 1,1 V and it's maximum clocks of about 1200/2800 MHz. And for the CPU (i7-3630QM) i always use ''ThrottleStop 5.00'' to get the maximum performance and steady 3,2 GHz on all cores. -> My system is throttle-free thats why it can become really hot • The temperature of the 660m goes now to a maximum of 70 degrees celcius. Before the repasting the absolute maximum temperature for the gpu was 87°C high. (with my overclock) • The temperature of the processor, the i7-3630QM, maxes out at 78°C. Before the repasting the 3630QM maxed out at 98°C with throttlestop set at 32 multiplier, 100% clock modulation, 100% chipset clock mod and BD PROCHOT turned off. All in all, the time you have to spend on reapplying the thermal paste is definitely worth it. Lower temperatures means more stable overclocks for technique-enthusiast's or higher life-time of the laptop for the ''normal'' PC-user.


-
Some people are able to successfully overclock the GTX 660m to 1200mhz GPU Clock and 2500mhz Mem Clock but I keep experiencing driver crashes. Screenshot

-

GTX 660M black screen after installing driver
FoxKhan posted a topic in General Notebook Discussions
Hello, I own a custom laptop on an <st1:stockticker w:st="on">MSI</st1:stockticker> 16F2 platform. Few weeks ago my GTX 670M card died. Out of better options, I bought an used GTX 660M from an acquaintance. I had it installed, started Windows and everything looked OK. Then I installed the Nvidia drivers and after reboot, right after the loading screen, I got a black screen (with the screen still lit). I went into Safe mode and uninstalled the driver. Then installed again and got the same result. Went into Bios, change settings, tried resetting <st1:stockticker w:st="on">CMOS</st1:stockticker>, nothing worked. Installed Windows 7 Ultimate again, then Windows 8, same thing. I also tried modding the drivers, still nothing. I have no clue what is wrong. If you have any idea, please help me with this. Thank you, Fox -
Hi All! I have a problem with choice bios from svl7 for my Lenovo Y580 i7 gtx660m 16gb FullHD 1GB... I have got 5DCN89WW (8.00) version of bios.. but Svl7 offers only 5DCN90WW (8.00) and 5DCN90WW (8.01)... But i cant update my bios to 90WW because Lenovo support not released bios update for windows 8.1 yet.. What i can do now? I would be very grateful for help guys.. Regards!
-
I've been testing different speeds on my core clock and memory clock, and I seem to have found my card's breaking point. My GPU's voltage maxes out at 1.100, but I can keep my temps under 60 degrees Celsius. I know that if I can volt it a little more, I can get a bit of performance without having my chip melt. My voltage is locked, but I know that a modded VBIOS would solve that problem. The only problem is, I can't find any database or list or site containing any. Does anybody have a go-to site that hey trust to help me out? Thanks in advance . Specs: CPU - i7 - 3630QM 2.4Ghz-3.2Ghz Turbo; GPU: Geforce GTX 660m; RAM: 8GB GDDR5; Main Drive: 64GB SSD; Slave Drive: 750GB HDD; Notebook Model: G75V; OS: Windows 8
-
 Hey everybody, I installed a gtx 660m in my M15x and after finally installing the drivers, it works! But there is something weird about it. Here is a picture of what I mean: Laptop Forums and Notebook Computer Discussion Can someone tell me what's going on!!! (note: I can only overclock the memory not the core clock)