Search the Community
Showing results for tags 'thunderbolt'.
-
 Hi! So, i got a strange situation here. I have an old Asus ROG G751JM laptop connected to an old Samsung monitor (Model S20C301L) through a VGA connection. This monitor supports both DVI-D and VGA inputs, while my laptop can output through VGA, HDMI or Thunderbolt/Mini DIsplayport. I wanted to upgrade to digital signal, so i bought an Thunderbolt/Mini DIsplayport to DVI cable. At first, it was a nightmare. There was absolutely nothing i could do to get it to work. I spent hours troubleshooting, but the monitor just could not detect any signal, only VGA one. But then this happens. I was testing with only one connection at once and i got tired of plugging and unplugging the cables every time. So i had the idea to keep both cables plugged in and change the source detection in monitor's menu when i wanted to. So, with the TB/MiniDP cable already connected, i've then connected the VGA cable (while DVI was selected as input source). The display started flashing. After 2 seconds, voilà, it was working. And i was like, "what the f***???" I've then unplugged the VGA cable, signal lost. Plugged it again, got digital signal. Well, i'm happy that it's working now, but i simply don't understand what's happening here. Why is that i need both connections simultaneously to make it work? WIll that still happen if i use a HDMI to DVI cable? Fun fact: the image displays only after windows startup. So, if i want to enter BIOS setup for example, i need to switch back to VGA as input source. Sorry for my english. Update: Can't run games with It, i get bsod.
 -
Hi, just a quick question what would be the best EGPU adapter, because i see the really expensive ones but then you have the 400$ dollar one that Lowspecgamer used. Which do you guys recommend ?
-
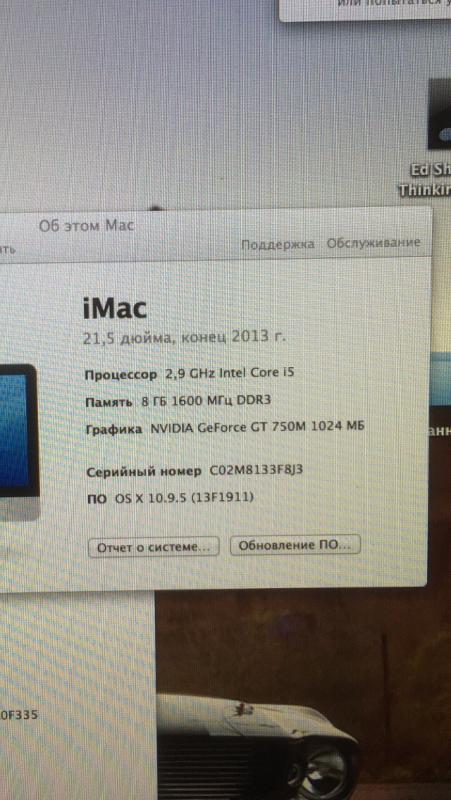
Hello! My name is Arman! I from Armenia, and sorry for my English! I have iMac Late 2013 with Intel core i5, 8Gb, NVIDIA GeForce GT 750M 1024 Mb. I have Boot Camp installation on my iMac (now i have 7 Windows, but i can update it to 10 or 8 Windows) I discover that there is an Akitio 2, wich can use with iMac 2013 for productivity increase. I want to use akitio 2 with GTX 1050 ti 4Gb, but i dont know how it is intalling on iMac? Who can write for me the process of installation ALL equipment (akitio 2 + GTX 1050 ti + imac)? What i must to do? I talking about from the very beginning to the very end. PLEASE everyone, help me. You are my last chance !!!!
-
Hello, I am using on a MacBook Pro (Retina, 15-inch, Mid 2015) 2,2 GHz Intel Core i7 with Intel Iris Pro 1536 MB, Akitio TB2, a water-cooled Nvidia 1080 TI using the driver Nvidia Web Driver 378.05.05.15f01 OS: macOS Sierra v10.12.5 Script: automate-egpu.sh I would like to ask you : is there any chance to overclock it on macOS? Components: V-tubler Thermaltake C 1000 coolant 2x luna 12 red + led band Radiator EK Water Blocks EK-CoolStream SE 240 (Slim Dual) Pacific PT40-D5 Reservoir/Pump Combo 250 Akitio Thunder 2 pcie expansion Plexiglass, acrylic, plastic isolation, screws Water cooling fittings, pipes, hard tubing, without actually bending the tubing Lian Li PW-PCI-E38-1 Riser PCIe x16 3.0, 380mm, flexibil, High Speed, EMI Shielding + powered Openframe case Thermaltake Core P1 RM650 gold PSU+Paperclip Graphic card: Zotac water cooled 1080 TI Fe (Zotac 1080 TI FE + Separate mount of Titan X nickel waterblock)

-
 I am running Windows build 16193 (Redstone 3) on a portable SSD as Windows to go. And macOS Sierra 10.12.4. Windows to Go was created using EasyUEFI's wintousb program. I have previously used Windows 8.1 to success and 10 which needed DSDT override. This is a guide on how i get Windows 16193 working successfully with RX 480: 1. Leave Thunderbolt cable unplugged from Mac before turning it on. 2. Press option to load Windows to go Portable SSD Windows 10 16193 build. 3. Enter DIY eGPU Setup 1.35 with iGPU connected only. Configure it as: Press 3 to enter Menu based setup PCI Compaction 》 Legacy mode checked 》 Closeunusedbridges checked 》 ignore none 》 Endpoint 》 56.25GB-36bit 》 Run compact 》 iGPU 》 force iGPU to 32-bit Chainload mbr Select Windows 10 from OS selection menu As soon as the Windows logo comes up hotplug eGPU. When OS is about to load up, change display output to Displayport. Voila! Every time you want this do be done automatically, reboot into DIY eGPU Setup 1.35 and hit ENTER (or allow 10s countdown to do it for you) on the default option 2 "automated startup via startup.bat". The Setup: 1. Use paperclip trick to get PSU turned on without motherboard. 2. Two molex connectors from psu to rocketstor 6361a molex connections. To give power to 6361a motherboard. 3. 8 Pin pcie connectors to GPU. And chassis bent to fit RX 480. 4. Modified back of chassis to allow Displayport connection into GPU while GPU can be screwed firm into chassis. Rocking games such as Far Cry 4 @ 4k high settings! Using AMD Crimson WHQL 17.2.1.
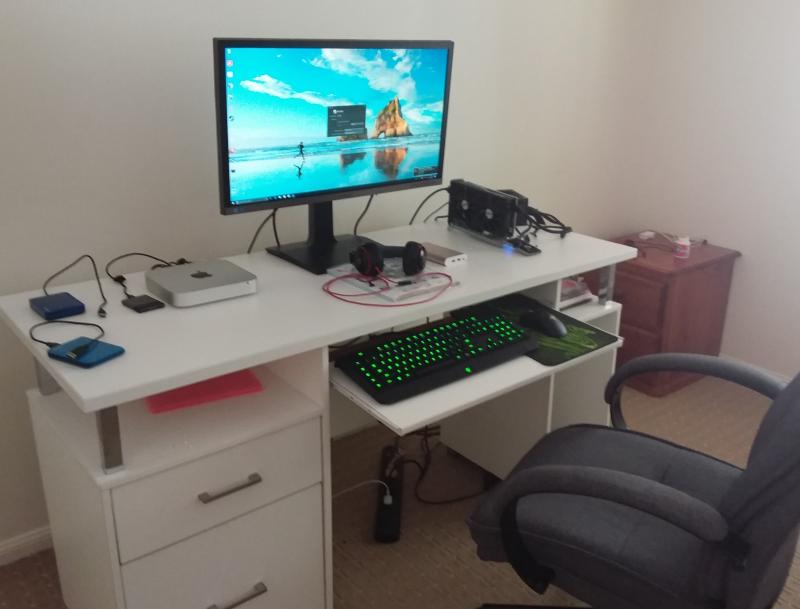
-
 Hi all, I have a macbook pro 15 inch retina mid-2015. I joined a Aikitio thunder2 with a graphics card GTX 1070 but there are problems with the internal monitor of my macbook. first of all we will list the specific to this topic. my macbook is equipped with two graphics cards, an integrated and a dedicated, integrated is an intel iris pro graphics while one dedicated is an amd radeon r9 m370x 2 GB gddr5, and obviously the eGPU GTX 1070. the problem is that with the external monitor connected via hdmi to egpu doesn't show any problem while using the internal monitor that should take the video signal from the thunderbolt has lagged. Mafia 3 with settings on external monitor turn 54 fps while on internal monitor turn 9 fps!!! i have windows 10 on bootcamp. There is not much difference and it occurs to me that the problem is the thunderbolt. members of tech hell please help me!
 -
 Hi, I'm looking for eGPU's over thunderbolt. I was looking to make it by myself, but I found nothing on internet. My idea is to buy a EXP GDC BEAST, a PCIEMM (Y19 H02) cable http://www.hwtools.net/Accessory/Y19-H02.html , and a thunderbolt 2 to HDMI adapter. The problem is that all the adapters from thunderbolt 2 to hdmi aren't thunderbolt adapters but mini displayport adapters, so my question is of a mini displayport to hdmi adapter will allow the theoretic 20 GBPS of thunderbolt 2, and if there is a chance that it will work. Thanks for your replies. PS: I'm not afraid to cut a cable and solder it with another cable or do other things like that.
 -
 First and foremost: this is a HASSLE-FREE BUILD. You will not find creative schematics, acrobatic soldering, custom BIOSes or anything like that: this is pure "just works eGPU" with Win10 bootcamp and an external display (so, no OSX support and no internal monitor either) Let's begin! Hardware: - Macbook Pro Retina Mid 2014 with nVidia GT750M - Akitio Thunder2 - MSI GTX 1070 Armor 8G OC - Dell DA-2 12V (ended up not using it) - Old Corsair 540W Modular PSU Setup: None. Absolutely no software setup. I had my previously working Win10 bootcamp machine installed, and it was a regular, apple-certified, Win10 installation done via bootcamp assistant, so no UEFI workaround or custom BIOS. The works Got my Akitio, unbox and open. Just 2 screws and voila. Removed the back plate (4 little screws) I unplugged both the fan and the led cable and removed the glued support for the cable, you can still see the glue Removing the fan was just a matter of removing 4 screws, the LED light took just a bit of force and it popped out of the socket. Here's all the things from the Akitio you will not use. As you can see from the hardware list, I decided to go with a full sized GTX card, and not just a full-sized one, a pretty big one at that. The MSI GTX1070 Armor OC does not have any LEDs or fancy things, just 2 big (and quiet) fans and that's that. So, of course, I had to bend the Akitio to make room for the card. I went with the "jeweller's screwdriver" technique. Fast and easy: just put a little flat screwdriver near the soldering at the bottom of the enclosure and work your way in lightly with a hammer. Took me 1 minute and the little solderings popped open. Now it was just a matter of applying a bit of brute force and bend the enclosure open. Not pretty, I know... but I'm not looking for pretty. Besides, the card is so long it covers the bent enclosure and then some! I gotta say, I was getting pretty impatient at this point. I put the card in, adjusted the two screws to set it in place and checked the spacing between the card and the bent enclosure. Everything was in order. Not pretty, again, but in order. At this point, I encountered a little snafu in my plan. I had bought the famous Dell DA-2 to power my GPU.. turns out this monster of a card has an 8 pin power slot, not a 6 pin one. Huh. Now what? Remember, this was supposed to be a hassle-free installation, no soldering or complicated workarounds. I remembered I had an oldish PSU from my desktop era sitting in a closed, took it out, plugged it in and got a nice 8-pin cable to power my GPU. (of course I had to use the paperclip-trick to power the PSU, but it's so basic, I'm not counting that as a hassle). To power the Akitio, since this a... let's say it again, everyone... hassle free build, I didn't want to use any custom made barrels or anything, so I used the original PSU, plugged it in and that's it. It was time to power it all up and see what the future brings. Thunderbolt cable connected, external monitor plugged in with a displayport cable, everything powered up... turn on MBP: nothing. Black screen. Huh. Powered down, tried to plug the thunderbold cable in AFTER the boot. Got a "hey I found something" sound from Windows, but nothing else. Reboot. Now the MBP started in Bootcamp, and Device Manager said there was a "Microsoft Basic Display Adapter". Bingo! Downloaded latest nVidia drivers, gave it a go: oh, damn! I have 2 video cards! Rebooted again The external monitor came to life, so I closed the lid on my MacBook (I'm using it in clamshell mode, I have no need for another screen) and there it was. With this solution, you don't even need to go and disable the "internal" 750M, Didn't have the time to make a 3D Mark benchmark, yet... but these were the settings of my WoW client yesterday and @2560x1440 with all ultra settings I had 67fps. Not too shabby Future implementations: - power the Akitio via the barrel to remove an external PSU - organize cables and spaces - switch PSU: this one has a terrible case of "coil whining", it looks like I'm skinning a cat... - IF I ever have any spare time, try and put everything inside a box: I'm thinking of one of those ikea metal boxes... Thank you all for your help and... comments appreciated! (everything but: "it's ugly!". That one I know )
 -
 Hi, a week ago i decided to build an eGpu Setup for my Macbook Pro. I installed Windows 10 (excidentley deleted OS X :/) and pluged the Zotac GTX 970 via Akitio Thunderbox into my Macbook(only Supports Thunderbolt 1). The device Manager detected the eGpu and i installed the latest Driver. Now the problem, when im triyng to play for example Company of Heroes the eGPU is obviously not in action. The Company of Heroes Benchmark says something about 1-4 fps. Im very confused because when im running this Benchmark with disabled Intel hd 4000 the GTX970 works well:http://www.geeks3d.com/gputest/. please help me, its so frustrating to see the egpu running in this Benchmark and dont see it in games.
 -
Hey guys, I am pretty new here. This is my first post (I posted a similar thing on Reddit). I have been a long time lurker and am keen to get your guys' input on what I have to offer. So I found the Akitio Node for sale from this UK company: http://www.equip-u.com/shop/index.php?main_page=product_info&cPath=45_896&products_id=20752 Seems like a legit site from what I can tell etc. And it's even linked on the Akitio official website 'Where to Buy' page for Europe (https://www.akitio.com/where-to-buy/akitio-sites). But there's nothing on their site about being in stock etc. Now I've been lurking for a while and it looks like none of the Thunderbolt 3 eGPU boxes(apart from the Razer Core) are actually available at all in Europe yet. Am I missing anything? TL;DR version: Is it worth ordering from these guys on the chance that they actually have it in stock?
-
 Published on Dec 6, 2016 I have seen a lot of people online lately asking questions and wondering if it is possible to have an external graphics setup via thunderbolt for an HP Spectre (Product name:HP Spectre Notebook Product number: W2K28UA#ABA). In general, i want to show an eGPU setup via any thunderbolt 3 connection. In this video i will show how to successfully setup and run an eGPU with 3 main components. Keep in mind that if you are going to use the Akitio PCIe thunderbolt 3 expansion box like i did, you WILL NOT be able to fit full length graphics cards, they must be half length and up to full height double width. Akitio Thunderbolt 3 PCIe expansion box: (around $260) --- https://www.amazon.com/gp/product/B01... EVGA NVIDIA GeForce GTX 950 Graphics Card: (actually around $200 - i said $300 in the video so thats a plus) --- https://www.amazon.com/EVGA-GeForce-C... Power Supply EVGA 430 w: (around $25) --- https://www.amazon.com/EVGA-WHITE-War... Also, here is a link below to download the Geforce Experience for driver installation and updates. --- http://www.geforce.com/geforce-experi... Grand total, just shy of around 500 bucks give or take shipping costs. A bit steep considering that the majority is spent on the expansion box however, it is good to have the freedom to expand upon mobile hardware. Its also important to note that when i clocked the stock GPU it barely ran on the same program. it scored a mere 2400 as compared to the eGPU setup which scored over 9000, equating to roughly a 450% increase in raw graphics capability. If you have any questions please ask away.
 -
I have hooked up my graphics card via akitio thunderbolt chassis . I have installed all the drivers necessary and still do not any image from HDMI out on card. The computer read my graphics card in that sections of system report before but now does not say it. I have downloaded CUDA and installed script for drivers and no image. Can anyone please help ?
-
 I bought this thingy-mabob so I can try an egpu build. It's an Sonnet Echo Pro Adapter. what it does is it able to connect to expresscard devices over thunderbolt. I bought the Pe4c (which is the thing to put your gpu at) and I put in an old gt 640 (yes it works). I crossed my fingers AND I prayed but all this shit does is make the fans spin at like 1000rpm (I got a nice little personal fan now). I tried updating BIOS and disabling dGPU I even fresh installed my computer (goodbye porn ) Anyway, I wanted to do this because in the long run, it would have saved me money instead of buying a new computer. All I would have needed to do was buy a new gpu and BAM! 4K gaming. But if anyone wanna help my sorry ass, please do so. I wanna play BF1 but 4 year old gpu is crap. Please anyone with knowledge of this subject or maybe even the legendary Nando4 can help. Thanks.
 -
Hi all! I will try as soon as possible new Apple Thunderbolt 3 to Thunderbolt 2 adapter they announced few hours ago. I really hope i can use my homemade Akitio eGPU with Nvidia 970GTX on my MacBook Pro 13" 2016 which i've ordered! I will post here my result, do the same if you can try it sooner than me http://www.apple.com/shop/product/MMEL2AM/A/thunderbolt-3-usb-c-to-thunderbolt-2-adapter?fnode=e09572c8ad662aab9372157e6c5dcb44a2b44e8e4960abe33ae51a78ac7c22dc5cb8482fc3bf74c8ef78faa5e3cc9bd0617e305f74aeb2ff79df0a8df9b311188dee46443435dbfc5beafe024c53a502fccecfedeba94a6629caf65f1a1f6e0f It would be awesome if we would be able to use our TB2 eGPU without issues.
-
Goodmorning everyone, I am happy owner of the object in title for 3 months. After a while I purchased a Thunderbolt 2 disk Lacie d2, 3TB. Right from the start it is ALWAYS been a pain to make it work. Often the hard drive is blinking, and the Mac does not see it, or even it doesn't turn on. After frequent rebooting, prayers and other tricks it maybe works, otherwise I have to use it via usb3. Tried to reset anything .. smc, nvram, the Mac itself (initialized) .. but nothing to do. Maybe you do not have the problem for a couple of times, then there falling back. I also tried changing the connection sequence (the Lacie instructions say to first connect the tb, then power the unit) I also went to the Genius Bar, but the outcome was always the same; after n trials, it all seems ok, then bang. I'm afraid it is a PC problem .. probably it's the same problem that randomly freeze my mac into boot for many seconds, then it wakes up like nothing (Tried to leave it work, often it takes a minute to start!) HW specs are Intel Core i5 (I5-4278U), 8 Gb RAM 1600 MHz DDR3L, Intel Iris 5100 Help == EDIT === 25-10-2016 Another visit to the genius bar .. this time I was told that it could be to change the logic board, because the TB2 circuit could be damaged. The fact that it works after reset nvram / smc may suggest an incorrect current distribution. Some idea? I want to clarify once again that when they work, I have NEVER had a problem .. disconnections or similar .. Basically I was told that the repair would be more than half of the Mac, so you might as well keep it and use the USB. The hardware diagnostic told that everything ok, though.
-
Hi, Before I would like to congratulate this community Well i'm trying to put together a build that is described in the subject, but i have everything set up but the PC does not recognize the graphic, but the fans and LEDs works to summarize, i got a EVGA souce 500 W (20 and 4-pin) for pe4c plate and an 8-pin auxiliary graphical source and then have an express card connection to the thunderbolt adapter and a cable connection (thunderbolt) thunderbolt adapter for pC, please i need help. What can I do?It will work my build?

-
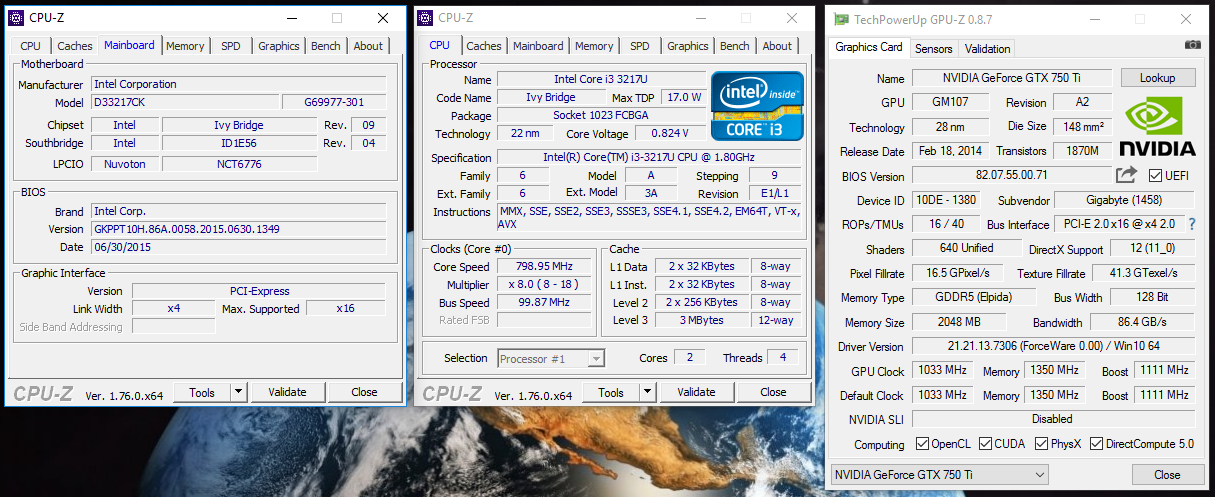
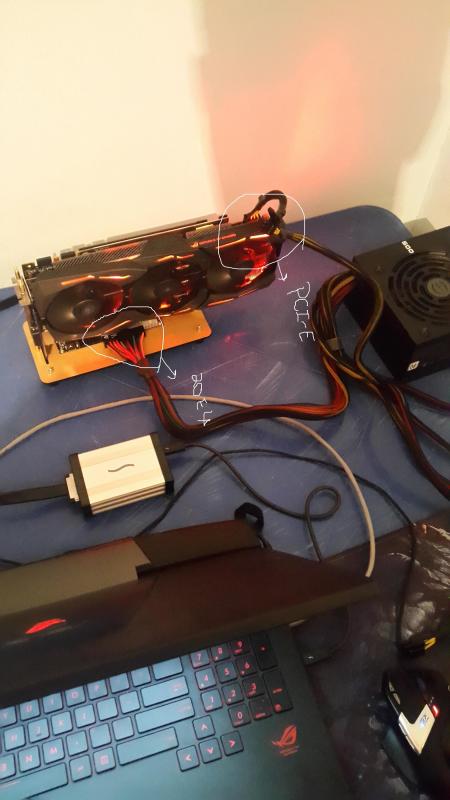
 This is probably the simplest eGPU setup I've dealt with so far. It is also rather silly, since the CPU is definitely the weakest link here. An Ivy Bridge i3 at 1.8Ghz isn't going to push high frame-rates in gaming, after all, and the performance improvement definitely doesn't justify the cost. An actual use for something like this would be to add HEVC decoding abilities to an existing NUC. Just use a cheaper enclosure (such as the 140$ Thundertek one) or opt for mPCIe instead of Thunderbolt to keep the price as low as possible. Obviously the GTX750Ti I used here doesn't decode HEVC in HW, but I suspect a newer low-range video card will work just the same and will do so. I guess I just had to try it. Anyway: Computer Components: Motherboard: Intel DC33217CK (CPU: i3 3217U @ 1.8Ghz) Case: Silverstone PT14 Aluminum NUC Case Memory: 2x4Gb DDR3 1600Mhz Storage: BP4e V2 120GB mSATA SSD Power Supply: FSP 65W NUC PSU OS: Windows 10 64-bit (with the Anniversary Update installed and completely up to date) eGPU Components: eGPU Enclosure: Akitio Thunder2 eGPU Power Supply: 180W Dell Adapter (this is the one that came with my PE4C ages ago) eGPU: Gigabyte Low-Profile OC GTX750Ti (60W TDP BIOS Mod) eGPU Thunderbolt Cable: 0.5m Apple TB Cable This is a truly "this just works" setup: Plug everything together with the NUC powered off, boot into windows, wait for the drivers to get installed, reboot if required, switch monitor output to the eGPU, done. Note: The card is reporting an x4 2.0 PCIe link - This is incorrect (the DC33217CK only has a Thunderbolt 1 controller) and CUDA-Z confirms the transfer rate to be about half of what my Thunderbolt2 ZBook gets. This means that GPU-Z is not a reliable indicator of the actual PCIe link established.
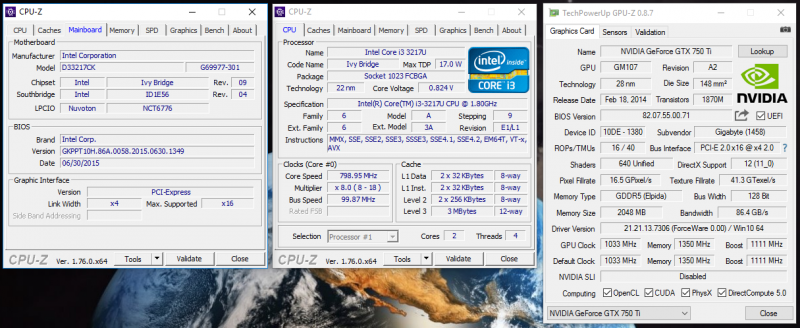
-
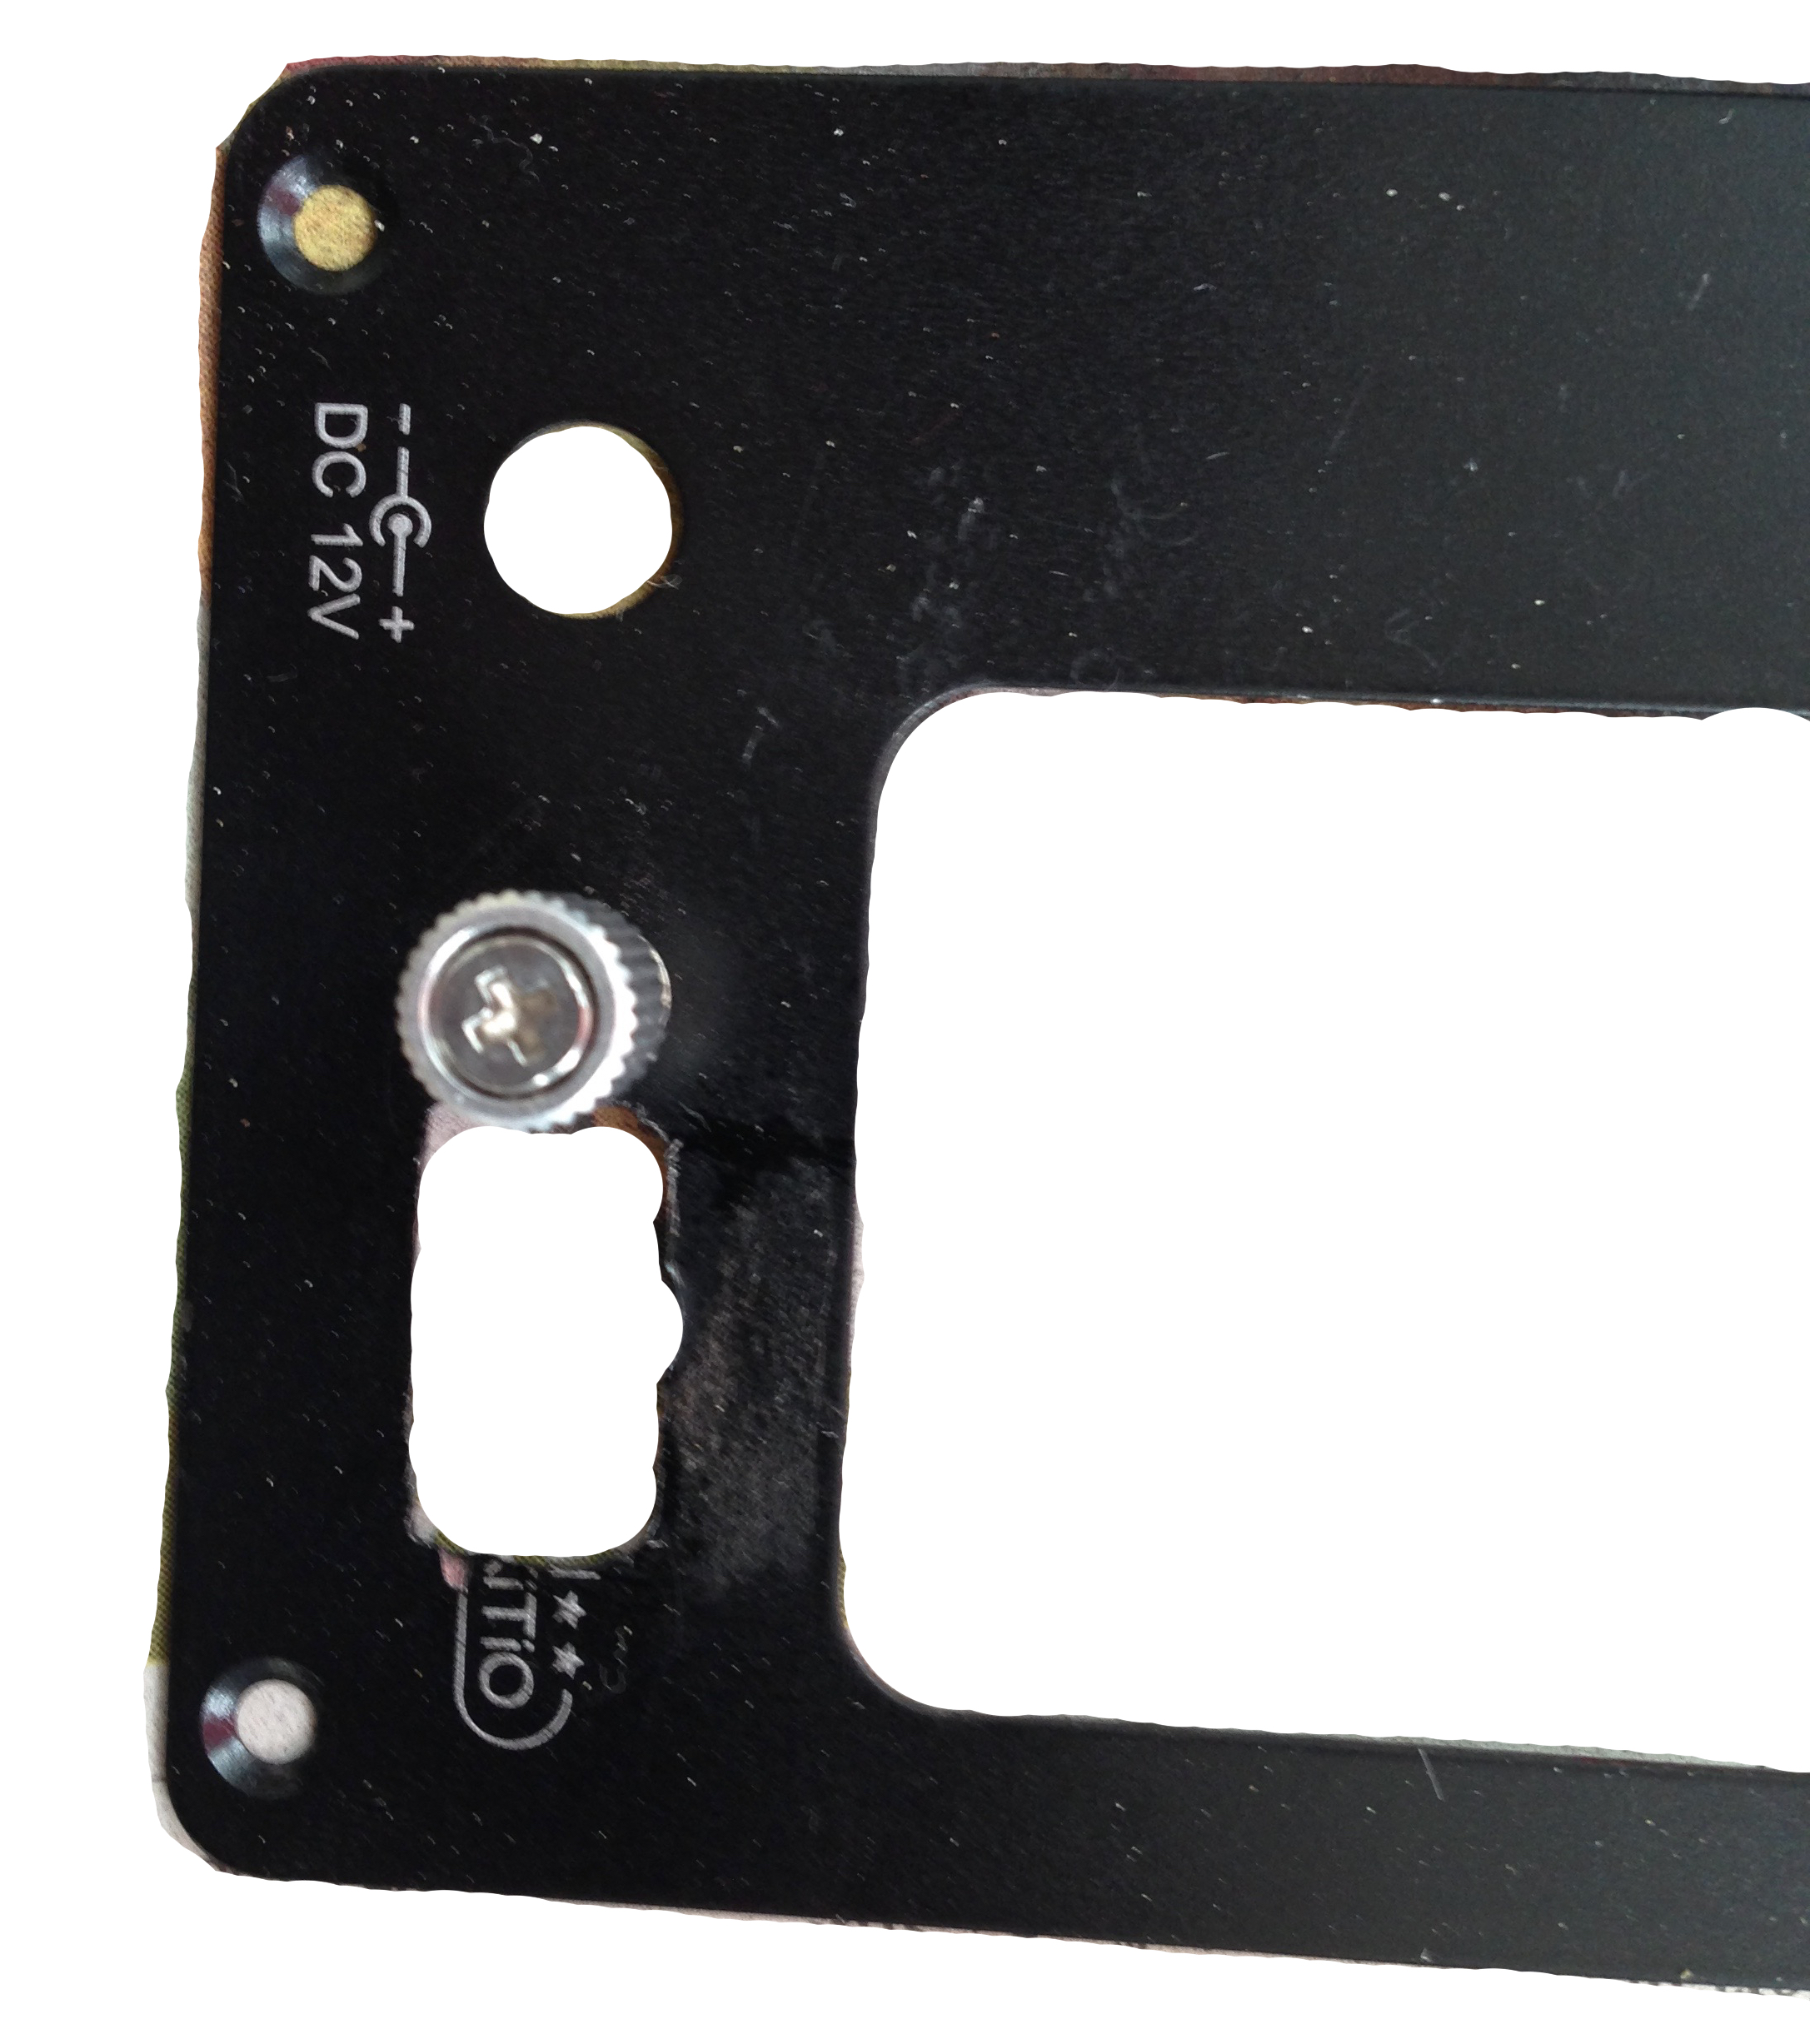
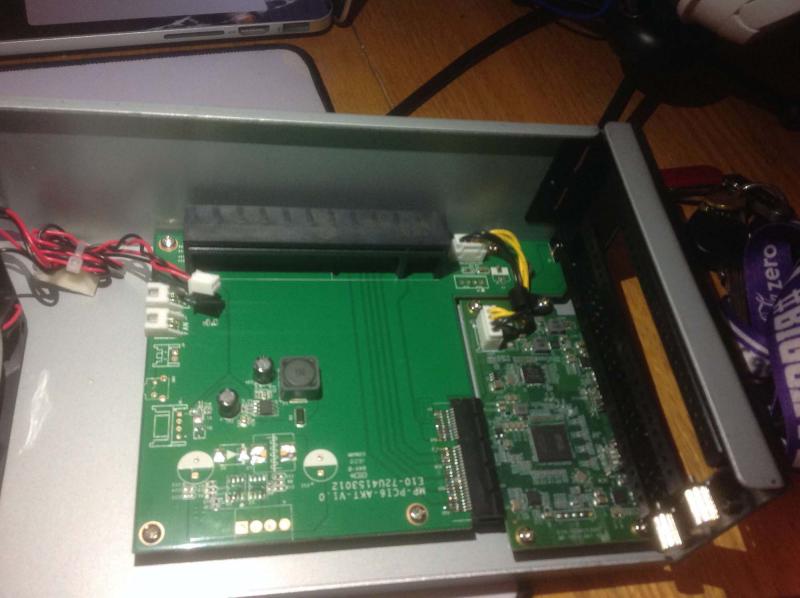
 Currently I have two different akitio thunder 2 setups and one runs with 970 (will be referred as setup 1) and other with 1060 (will be referred as setup 2). 970 uses a more basic cabling setup and it has wire mesh paper tray cut attached. The other one has 8pin male connector replacement for the adapter socket and drilled surface. In this post I would like to do a quick comparison in between those two for cooling and performance. BTW, I am just an amateur who enjoys playing rc toys, completely have an unrelated profession and wanted to build egpu setups as a hobby. Also, I have many macbooks around me and wanted to expand their lifespans increasing their graphical design, gaming and cuda computation capabilities. I could not have gone this far without @Dschijn @Nando @goalque and @seefew s setups and descriptive posts. To start with for sure you will need Akitio thunder 2 or preferably Thunder 3 and also a graphic card. I decided to fit graphics cards in to the boxes in order to carry them around with a camera bag (cheap canon or nikon camera bags are perfect to carry akitio setups and their adapters). My must have tool kit list: 1. Dremel rotary tool (even the cheapest will do the job), dremel work station with. Proxxon and bosch also have similar tools but the key is head should be capable of holding small cutting wheels for hobby crafting. 2. Soldering station capable of at least 350 degrees Celsius (if you are going to replace akitio thunder 2's adaptor socket you would need at least 350 for sure). 3. Heat gun to wrap cable tubes 4. A multimeter to mesure 5. Glue gun 6. Welding kit (if you will cut/expand the front but still make it use the front grill) Consumables: 1. Zip ties 2. Solder wire 3. Glue gun sticks 4. 2.5mm Drill bits (at least 20 for case drilling required) 5. Dremel metal cutting wheels (at least 5) and couple grinding and polishing heads. 6. PSU cables (18 AWG or something like that) Used parts and pieces in my Akitio setups (I have no endorsements or something like that from the brands but I will just write them so you guys can found them easily): 1. Frozencpu connectright 8pin male eps 12v p8 connector ( setup 1) $2.98 2. 4pin male and female connector (to attach capacitors with fashion) $0.55 each 3. Gold plated female and male pins - 4 pack and $0.99 for male and $0.99 for female 4. Mod/smart full pin removal kit (to remove back pin connectors if you will mess the cabling) 5. Full automated ksd9700 series thermal switch to attach to front fans (I preferred 70 degrees) 6. Noctua nf9x14pwm 92 x 14mm pwm fans $21.95 x 2 (you can fit 2 of those beasts and yes they are a game changer) 7. Moddiy.com 8-Pin CPU/EPS Male Header Connector - 90% Angled - Black 1.99 USD (setup 2) you need at least two in order to get couple extra long pin legs 8. Moddiy.com Mini 4-Pin GPU to 2 x 4-Pin PWM Fan Adapter (to connect noctua fans to graphic card's pwm socket to have digital spin controls) $5.99 9. Dell 220w DA-2 Ac Power supply adater $23.99 or Corsair sf450 mini psu $89 (Dell da2 are what I prefer for my setups but for larger graphics cards sf450 is the ideal) 10. 4700mf capacitors (I used 4) $0.8 each 11. 12v swich (I used round led switch for my setup 1 and stick switch for setup 2) $0.4 12. PCI-E 8 PIN Y SPLIT TO 90 DEGREE RIGHT LOW PROFILE PCI-E 6 AND 8 PIN (you can make one by yourself or buy one from ebay) 13. Cheap 60 x15mm fans (I used two of those) $4 Cabling for setup 1, takes around 4 hours to complete (I am going to describe only the difference between other setups posted in the forum): 1. Easiest way around is expanding low profile 8pin connector's cable to somewhere around 15-20 cms in order to make an L shape starting at the top where gpu's power socket rests and take it down to the akitio's power adapter sockets. At this point you can reduce the cables to one yellow and and one black and solder those two to the back of the power socket. Image below is from my setup 2 but it represents where you should solder the yellow and the black. 2. Bend left leg of the graphics card and place a 8 pin male connector and solder each yellow and black cables to get only one of each and solder those two cables to back of the akitio 2's power socket. So in total you would solder 2 sets of cables to the back to power the graphics card and to power the akitio's card using the power coming from the 8 pin connector. If you are using a psu such as corsair sf450 you can use all 4 black and 4 yellow cables to power the board but if you will use dell da2 you should use one for the power switch and other should be blank so only 6 cables will power the card. (this step is extensively described in other posts) 3. Cut back of the two plates in a rectangular 8pin shape using dremel rotary tool and steel cutting wheel. This step just requires attention but it is very easy to do in 3 minutes. Just use a pencil to draw the shape and slowly cut the plate. (image was on top of a document so I did a quick edit) . 4.I used a round led switch for my first setup and attached it to the front of the case. To fit the switch I first created a small hole with a 2.5mm drill bit and expanded that using a round dremel rotary head. Then attached one cable to one of the 8pin connector's line's to power dell da2's switch line and grounded it to one of the 3.4v sockets as the yellow cable at the right hand side of the card. 5. Cover all cables and sockets with tubes, or hot glue gun. Cabling for setup 2 takes around 4 hours to complete: 1. Using the soldering iron remove the existing power socket of the akitio from the board. Heat it from the back legs and it will drop. 2. Organize legs of Moddiy.com 8-Pin CPU/EPS Male Header Connector in order to match the holes. I soldered and grouped legs of 2s to fit only one positive and one neutral leg. 3. Soldered two separate cable lines to the legs to power gpu and attached a Y SPLIT TO 90 DEGREE RIGHT LOW PROFILE PCI-E 6 AND 8 PIN 4. Soldered 4 capacitors to 4pin connectors via cable then attached them to other soldered pair. 5. Soldered one yellow one black cable to the board in order to power front fans and soldered ksd9700 thermal switch to the black cable. 6. Paired two front fans cables with matching cables and soldered to the yellow cable (step6) and empty black cable coming from thermal switch. 7. Cover all cables and sockets with tubes, or hot glue gun. Ventilation for setup 1 takes around 2 hours to complete: 1. Cut the exterior of the box using steel cutting wheels following rectangular shape among yellow and blue sections of the diagram 2. Cut a rectangular mesh grill from the paper holder and slide it in to the box. 3. Stick mesh grill with a epoxy or weld it in. 4. Apply black spray paint (I took it to a auto paint shop for proper painting) Ventilation for setup 2: 1. Cut the front inner side in a rectangular shape to fit to 60mm fans on top of each other. To be able to do so you should weld sides of the front sides so it does not come apart. Place two fans. 2. First hit with a sharp steel to create small holes (punches) following the diagram. Then drill thousands of 2.5mm holes using dremel work station and rotary tool. (This step took my 22 hours) 3. Clean holes with sandpaper and paint. (In the attached image I was using it with the setup 1) Post will be edited soon...
-
- 2
-

-
- akitio
- thunderbolt
- (and 7 more)
-
 Hello everyone! I am currently working on an egpu/docking station project for my 2015 macbook pro, and I am having some issues mounting everything into the case I've chosen. So far, I have gotten it to work with my windows 10 installation (on an external samsung evo ssd inside the mini-itx case) with my gtx 970, but now I am trying to actually mount the akitio thunder2 board and the graphics card inside a mini itx enclosure. The power supply, hard drives, and usb hub are already mounted inside of the case with plenty of room left. The graphics card has to mount in the slot that it would use if there was a mini itx motherboard in the case, because it won't fit anywhere else. Here are my problems: If you look at the first attached image, this is the graphics card mounted where it would go normally. It is currently only being held in by the two screws holding the IO side of the card onto the case. As you can see in image 2, the pcie connector is underneath the card and very close to the bottom of the case. I bought a pcie riser, but having it being under the card and bent to the side put it under too much stress, and the cable tore. It also pushed the graphics card up so that it was just barely able to mount in place. What I decided I needed was a right-angle for the pcie connection, but every one I found online, and I mean EVERY ONE, went the wrong way (left instead of right) , which put the connecter against the wall of the case, making it worse. Can someone help me find a right angle adapter that bends the correct way, or find another solution? I accidentally bought this: https://www.amazon.com/gp/product/B007Q92R7M/ref=oh_aui_detailpage_o01_s01?ie=UTF8&psc=1 but it was not the pcie connector on my graphics card. It was a little different. Another problem is that the akitio thunder2 board has issues with facing the right way. If you look in picture 3, you can see the board in its enclosure. In order for the pcie connector to be oriented the same as the graphics card, the board has to be mounted so that the black plastic pcie connector is closest to the graphics card, and unfortunately, facing away. Also, the thunderbolt ports and power port end up smushed against the wall of the case, or close to it? Again, how can I fix this? I was so excited to get this project working and am now having a headache trying to make it all fit together! This community has been absolutely excellent in helping me get my egpu working, and I cannot thank those that have taken the time to make guides enough. Thanks in advance to anyone who has any ideas how to get this mess together. -Hunter
-
 Hello all, I recently put together my egpu configuration using the video below down to a T. Every part of my set up is in this video and I've done exactly like this guy has said to make my set up. I've gotten my egpu to work finally by plugging in the thunderbolt2 cord when both the MacBook and egpu are powered down. Then I power on my back into the selection screen to choose windows or mac. Then I turn on my egpu and hope for the best. I've found this works about 30-40% of the time so if someone has a way to increase my chances feel free to comment. I'm using a MacbookPro 13in Retina with dual core processor and Intel Iris 6100 (Late 2015 MacBookPro 13in retina). Anyways once I am booted into windows (I'm using windows to use the egpu on the internal screen because this was meant as more of a mobile device) and I've checked the device manager to make sure the gtx960 is working properly (sometimes I get "no drivers are installed for this device and I have to reboot and try again) I try and run a game. I use WoW as a test for my graphics card. I have msi afterburner installed and I play WoW off an external HDD since I have the 128gb version of the MacBook pro. The graphics card fan never starts to spin. I monitor afterburner and at 50degrees celsius it still hasn't kicked on. I've only upped the graphics on WoW to about half 5/10 and after a few minutes of being on that setting the game crashes and I get a blue screen telling me there was a problem with windows. I'm at a loss and really upset since I've payed 400-500$ for this and it's not working and has given me a lot of trouble. There has to be someone out there who has this set up and dealt with this issue. I can't be the only one. I think the graphics card tends to crash around 60 degrees celsius and even using msi afterburner I've tried to increase the fan speed but even at 100% the fan just tilts a little bit when I look at it and never takes off. When the system first turns on though the fan seems to spin at 100% but after about 20 seconds the fan stops even though the graphics card is detected. So if anyone has dealt with this issue or knows how to overcome it please let me know. I shouldn't have to buy anything else to make this work since the guy in this video seems to have his set up working just fine. Thanks in advance everybody. Ps. Please help!
 -
 Hello, Does anyone know of a fix for error code 43. I am using an akitio thunder2 with a GTX 1060 and a 2015 15 MBP Intel Iris. Everything was working perfectly until today there was an update from Nvidia when suddenly it stopped and is now giving error 43. I have reinstalled windows and still am getting the issue. I am going to revert back to the previous driver to see if that will fix it but we will see.
 -
Hi, I have MBPr 2014 + Sonnet Echo TB Box + 450W PSU I was using with GTX770 and no problem I powered box card fan start spinning plug TB cable to MacBook and power Mac all fine I recently swap GTX770 to GTX980, but when i switch power to box (GTX980 do nothing) once I have plugged TB cable and power MAC Once I power MB - MB send signal to start box and card is alive (LED + FAN) but I see just black screen no boot screen no chine ( I try hold ALT nothing happen, reset PRAM etc etc.) If I will start to OSX with box switched OFF OSX will start fine, Power On and I use https://github.com/goalque/automate-eGPU script detect GTX980 make all mods, but with reboot card go for second off and start with MB but again just black screen no chime. I think so i need " start " card first same as started GTX770 but I dont know how If I remove card OSX start fine
-
Hello, I am having an issue with connecting 2 or more GPUs to the mac pro 6,1 with 10.11.6. Essentially I have a MAC PRO 2013 — thunderbolt Akito — Amfetec PCI Host card — Amfeltec PCI backplane — (2) 980ti. When I plug in the first 980ti, works fine. Second 980ti, doesnt boot. I used the script from this site and it worked fine for a single card. Any thoughts? Been going nuts.
-
UPDATE: It is now available on Amazon. https://amzn.com/B01K5Z13I2 Hi guys, Just wanted to share this with you guys! If yall been waiting for a Thunderbolt 3 version. https://www.akitio.com/press-releases/2016/akitio-unveils-thunder3-pcie-box MSRP $299.99 Available sometime this month.
-
 This is probably the first trial online involving a TB3 to TB adapter. Update on Noon July 23rd 2016: works seamlessly with an external monitor. However, whenever I select Duplicate in projection mode, the rendering will be carried out on iGPU/dGPU(if you do not disable it) Update on Morning July 23rd 2016: Turns out the Optimus is only working for Furmark. i.e. No game would run on GTX970. Nor would 3DMark. It seems an external monitor is still a necessary fix. What's working: system recognizes gpu driver installed no problem on external screen [Partially] Optimus working, just don't disable the GTX960M in Device Manager. Only works for Furmark. Background In the spring, I came to the States for one-semester exchange. I obviously couldn't get myself a full-size gaming rig, so I chose to build an eGPU with my MBPr13 2015. I got my AkiTio Thunder 2 and GTX970 then, for about $500. Later in the summer, I purchased a XPS15 (discussed by the low-voltage cpu in my MBPr 13), was enthralled by its borderless display. It came with a TB3 port, but the only option out there for TB3 is Razer Core, another $500 investment. In the mean time, A few TB3 to TB adapters rolled out, currently only Kanex and StarTech.com models available, for around $80-100. I asked a bunch of questions regarding AkiTio Thunder 2 + TB3-TB adapter + eGPU on Amazon but no luck. So I decided to get one myself and try it out. About the adapter I got it on amazon for $100. https://www.amazon.com/gp/product/B01EJ4XL08/ref=oh_aui_detailpage_o01_s00?ie=UTF8&psc=1. In fact the StarTech.com one is 20 bucks cheaper, and I believe they should harness similar technology under the hood, but I would trust Kanex for I have already owned their USB3.0 hub and it worked pretty well. The hardware setup (Picture coming soon, when I get back dorm) The software setup Download the newest NVIDIA driver. update the TB3 firmware and TB3 management software on Dell.com, or as instructed on https://thunderbolttechnology.net/updates per manufacturer. In the UEFI settings, turn on all the checkboxes in Thunderbolt tab, and make sure the thunderbolt security settings is set to lowest (Cuz Akitio Thunder 2 is not verified for TB3). Or you can manually consent in windows, if the security level is normal. Plug the setup in, and power on. Windows should boot just fine. Use display driver uninstaller to remove the old drivers. http://www.guru3d.com/files-details/display-driver-uninstaller-download.html Install the newest driver downloaded in step 1 reboot, and you should be able to see all three graphics card in Device Manager. (Intel 530, GTX960M, GTX970). You are free to disable GTX960M, but that doesn't help anything so far. :-( Result summary Geforce experience recognizes GTX970 no problem NVIDIA Control Panel recognizes all three with no problem. Under internal display, no game would run with GTX970, even after disabling GTX960M. GTX970 shows up properly in the GPU indicator, but it's always 'inactive' It works! Just don't disable GTX960M, and tasks will be automatically assigned to GTX970 when needed. Only works for Furmark. No games and 3D Mark would work. External monitor works flawlessly. Can't get 'duplicate' projection mode to work though. Trying to fix the internal display (Optimus) problem As my MP-CL1 micro projector seems to defect, I've no access to external display yet to test the card out. And I'm not yet able to get the eGPU running on internal display either. What I have tried: modifying the nvidia driver per this video, with no avail. [in progress] just purchased this headless hdmi plug to simulate a dummy display, and use Win+P with screen share option. [just contemplating] maybe should get Razer driver to work? But Razer Synapse should only recognize Razer Core, so need a side-door. They say the driver is open-source, but I cannot find it on Github anyway. Just don't disable GTX960M and it partially works (only for furmark). Maybe furmark is rendering the content internally and pipe the image out through a different gpu manually? Windows 8.1 not working. I just installed a copy on my SanDisk SSD 500 external SSD. GTX970 cannot co-exist with GTX960M, and disabling GTX960M still doesn't enable rendering on GTX970. With external display Will update once I get my MP-CL1 working (hopefully it's just a drained battery), or when I get back to Hong Kong. Just remembered there's a common area in my dorm with a TV. Got to try it out some time. Tried out on the TV, able to achieve ~20000 on Sky Diver. With GTX960M it's around half
- 18 replies
-
- 2
-
-
- akitio
- thunderbolt 3
- (and 6 more)