Search the Community
Showing results for tags 'modified bios'.
-
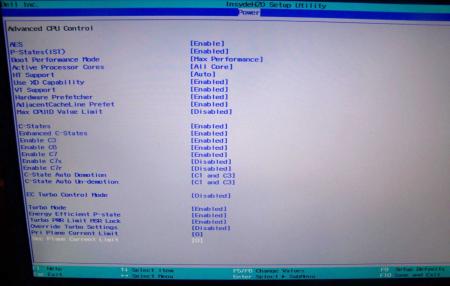
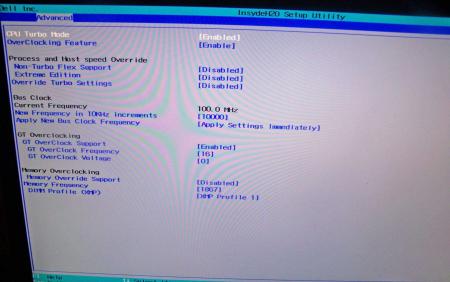
.If you're interested why not all modified BIOS versions can be flashed the 'usual' way with the official tools, read this:http://forum.techinferno.com/alienware/2252-information-about-bios-updates-a07-a08-higher-m14xr2-m17xr4-m18xr2.html M18x R2 - 'unlocked' BIOS versions The following BIOS of the Alienware M18x have been modified so that all hidden menus and options are visible. It will allow you to further tweak your system and optimize its peformance. Most of the options are only meant for advanced users. Don’t change anything you’re not sure about. It's possible that you see options which don’t work for your system, so be careful when changing settings. In case you mess up and your system refuses to boot applying new settings, remove the AC adapter, battery and coin cell battery in order to clear the non-volatile ram of the BIOS. This should fix most issues. *UPDATE*Instructions: There are two ways to flash the modified BIOS: Downgrade to stock A03 by using the USB recover procedure. (Thanks @Scott Matusow for summarizing the procedure). Make sure to closely follow the instructions, and wait until the system is done with the flash. Once you're on A03 flash the modified BIOS using the regular way (using the tools provided by Dell)..This method seems to work very well on the M18x R2, at least as long as you do as instructed. It can be a bit scary though since you can't see what's happening. .. Flash the BIOS from DOS with the FPT tool. This will only flash the BIOS part and leave out the EC and so on. It's a really safe option when done properly and less scary since you see the progress and information on the screen. For the USB recovery method follow the instructions in the link above. Second possibility - flashing from DOS: Prepare an USB drive so that it can boot DOS. If you don't know how to do this, check the instructions in the spoiler. . Grab the DOS version of fpt for flashing, and my 'prr tool' to circumvent write protection.. Download a '[FPT]' labeled version of the unlocked BIOS. Put the DOS version of the flash tool on the root of the prepared USB stick (fpt.exe and fparts.txt), along with the prr.exe and the file you want to flash (plus the included flash.bat). . Restart the system and boot from your USB stick. Run prr.exe, then flash the bios by executing the flash.bat file. Wait until the tool completes the flash. If the verification is okay, reboot, else flash again.. Go to the bios, load the default settings and reboot. Done. NOTE: If you want to use an unlocked BIOS newer than A03 I highly recommend to first flash the desired version of the unmodified BIOS (grab it at the Dell download site). Once you're on the version you want to unlock, follow the DOS flashing procedure described above. If you want to go A03 or earlier, the best thing to do is using the USB recovery method. Here two pics of the most interesting options: ********** Thanks @Riri-Fifi for the pics and testing! Thanks @johnksss for testing my prr tool! ********* Flash and use at your own risk. I don't take any responsibility for possible damage on your system. ___ The software which I provide here ('prr tool') comes with absolutely no warranty to the extent permitted by applicable law. Download the bios files referened in this post from here:
- 518 replies
-
- 35
-

-
- bios modification
- m18x overclocking
- (and 8 more)
-
Hello, I need modified bios For AsUs G75vw with Gtx670MX i try someone moded bios but it didn't works for me ..laptop just died ... im w8ing for the Ch341a programer i orderd .. when it cames i'll revive at default ..so need somebody to made that bios for me.
-
Dell recently posted a new BIOS for the M11x R3 on their support site - A05. Grab it here: M11x R3 - BIOS A05 Release notes: Since that's only half the fun I also unlocked the hidden menus, see attachment. As always with modified BIOS - use at your own risk, don't change anything you aren't familiar with. _ M11x-R3_A05_[unlocked].zip
- 86 replies
-
- 13
-

-
Hi guys! I really wanted 5ghz on my Lenovo Y510p, so I took my Intel Advanced-N 6205 from my desktop and put it into my Lenovo Y510p. I did modify/unlock the BIOS according to the AWESOME tutorial on here. The thing is....using this Intel Advanced-N 6205 wireless card doesn't allow me to use the 2.5ghz band, only the 5ghz. I know that this wireless chip/card is designed for desktop use only...but why isn't it working on dual channel for my laptop? It seems weird that it works on 5ghz, considering that the Lenovo Y510p came with a 2.4ghz card. Is there a way to switch or turn of the 5ghz band on my card so I can choose to use which band? (It seems like it can only support one band at a time, or 5ghz only...) Thanks!
- 2 replies
-
- intel wireless
- lenovo y510p
-
(and 1 more)
Tagged with:
-
Ahmed Mossam at bios-mods.com has uploaded an unlocked BIOS for the M15x, based on the Dell version A09. A very big thanks to him for his work!! Here's the link to the original thread at bios-mods: M15x BIOS unlocking request I have flashed this BIOS and the system works just as with the regular BIOS, the only difference is that there are several new menus accesible in the "Advanced" tab of the BIOS: -IGD - LCD Control Sub-Menu -SATA Control Sub-Menu -SATA Hard Drive The performance options have new sub-menus as well: -Plaform Thermal Configuration -Clarksfield QPI-Sub-Menu -Clarksfiled Memory Sub-Menu Unfortunately there are no frequency ratio options in the bios. Each of those has a couple of further submenus. Check out the pics of the screen in the spoiler for all details: Not every of the new options will be useful though, e.g. enabling eSata port multiplying won't do any good since the PM55 chipset doesn't support this feature. I haven't tested all the new options yet, but I'll definitely take a closer look at them. Instructions for flashing: - Download the unlocked BIOS files, they can be found here. - Download the BIOS A09 executable file (R293649.exe) from the Dell driver site and extract it and copy the files to the root of a DOS bootable USB drive. - delete the following files W6702M.A09, W6702MB.A09.bin, W6702MB.A09 from the USB drive - extract the .zip archive with the modded BIOS files and copy the three files to the root of your USB drive - rename the modded files (W6702M_SLIC.A09, W6702MB.A09_SLIC.bin, W6702MB_SLIC.A09) to W6702M.A09, W6702MB.A09.bin and W6702MB.A09 -Shutdown your system and boot from your USB drive -Type fa.bat and hit enter -follow the instruction on the screen, after the flashing is finished, the system will shutdown itself -restart your system and don't do anything, it will restart a couple of times before it will boot into Windows, don't worry. Everything at your own risk of course, I don't take any resposibility for bricked mobos. Crisis information should be available at bios-mods.com in case you mess up totally. Hope some of you guys test this as well and give some feedback. Again, a very big thanks to Ahmed Hossam from the bios-mods.com forums.
-
This is a modified version of the M17x R3 BIOS A10, it brings back the SATA behavior of A08 and earlier, while keeping the features of BIOS A10. A lot of users don't seem very happy with the changes Dell made to the SATA performance of BIOS A09 and up, thus I created this BIOS. Just keep in mind one thing: Dell probably didn't change the corresponding settings in the BIOS for no reason, so it's possible that certain drives may have issue with this BIOS, I don't know. According to a lot R3 users, A08 brings a clearly better SATA performance on a wide variety of drives. It's up to you to decide what you need and what you want to use. Now you have the choice. Download link for BIOS A10 with the 'SATA fix', and unlocked hidden menus: M17x R3 BIOS A10 - unlocked & 'SATA fix' Read the included READ ME for further information and instructions. Load the default settings in the BIOS setup after flashing. User at your own risk.


