Search the Community
Showing results for tags 'lenovo'.
-
What laptop is ideal for an egpu setup mostly for lighter games like rocket league and some bf4 but on medium setting 1080p. I have a GTX 660 TI reference card and a GDC express card variant. Please help me choose a laptop. Im thinking about the Lenovo W530 (love the looks but no mxm). The HP 8770W (I think it has a whitelist but has an ExpressCard and mxm 3 b.
-
 The goal here was to keep my workhorse laptop functional for school, and in the off chance I get free time, require only 5 minutes of setup for high end gaming and virtual reality. Though there were many hurdles to overcome due to issues caused by the manufacturer, I finally have a VR-Ready working solution. Thanks to Nando for DIY eGPU Setup 1.30 and his timely response to my ichip error. Hardware & Software Tools Lenovo Thinkpad Edge E550 (i7) Processor: Intel i7 5500U iGPU: Intel HD Graphics 5500 dGPU: AMD Radeon R7 M265 eGPU: ZOTAC GeForce GTX 1060 AMP! Edition Adapter: EXP GDC Beast V8.0 (NGFF M.2) PSU: EVGA 400w DIY eGPU Setup 1.30 Initial Setup: Begin by downloading the drivers for the GTX 1060, as you'll have to remove the WiFi card later and won't have access to internet. Then attach the GTX 1060 to the PCI port of the GDC Beast. Then attach the power supply connectors (6 pin connector to the top of the 1060, 20 pin and 4 pin connectors to the included connectors from the GDC Beast). Once this is completed, plug in the power supply and shut down the PC. Remove the WiFi card and attach the NGFF M.2 connector in its place. Plug the HDMI end of the connector into the GDC Beast and power on the PC. The graphics card should be recognized in the device manager as a basic display adapter and you should be able to install the drivers. After the drivers install you may have a working setup (as I did), however after rebooting you'll be confronted with a black screen and a code 12 error in device manager. This means that there are not enough resources to accommodate the device. A DSDT Override is needed to compensate. DSDT Override: Nando has a great guide for this process here, but it is important to note that you'll want the Windows 10 Drivers Kit instead of the link provided on that page. Using the Windows 8 Drivers Kit will result in compilation errors when compiling the asl file. Aside from that, follow the instructions and set TESTSIGNING on. Once you reboot, you should notice a large memory address in your device manager in resources-by-type. You now have a 36 bit PCI space that will accommodate the GTX 1060. After rebooting, you'll notice that you still get code 12 error. This is because of improper PCI allocation. Therefore, you'll need to hard allocate the eGPU into the 36 bit PCI space which can be done with Nando's DIY eGPU Setup 1.30. Issues Before PCI Compaction: However, before compaction there are several issues that need to be addressed. One well known issue is that Lenovo BIOS whitelists their WiFi cards, causing the BIOS to not acknowledge other devices attached in their place. This is usually overcome by hotswapping the WiFi card and the eGPU after booting into Setup 1.30, but there are issue to tackle before this. After mounting Setup 1.30, you may have this error when attempting to boot into menu-based setup. [ichip] Unknown intel chipset found. Update R:\core\intel.txt including version with your chipset info, run ichip clear to clear variables then run ichip to confirm your chipset is found. If this is the case you'll need to contact Nando for an updated intel.txt. You'll then replace your intel.txt found in R:\core\ with the new intel.txt. You then will be able to properly boot into the menu-based setup. Theoretically from here you should be able to hotswap the WiFi card and the eGPU and have Setup 1.30 recognize it, but after performing that process the eGPU is remains unrecognized. This means that the adapter is not correctly interfacing with the PC. Specifically the GDC Beast is set to only receive power from the PSU when signal is detected, which makes it unready when the CLKRUN signal should be received. We can overcome this issue by removing the top plate from the GDC Beast. You'll notice 2 small switches on the bottom left. One of them is used to set the PSU to be permanently on, while the other delays the receive of the CLKRUN and PERST# signals in order to avoid ACPI_BIOS_ERROR. Set the PSU switch to on and the CTD/PTD switch to 15. You should now be ready for hotswapping. Reboot into Setup 1.30 (menu-based setup) with the WiFi card attached. Hotswap the WiFi card and the eGPU and your eGPU should now be recognized. PCI Compaction: Since we now have the eGPU recognized by Setup 1.30, we can begin PCI compaction which will eliminate the code 12 error. First, disable the PCI port of the dGPU and any other PCI ports you don't need using iport>disable ports. We also want to set our eGPU's PCI port to Gen2 with iport>Gen2>(whatever port your eGPU is on). Then select PCI compaction and set the endpoint to 36 bit. Run PCI compaction with the scope being iGPU + eGPU and force the iGPU to 32 bit PCI space. Finally, chainload to Windows 10 and you should no longer have any errors. We now have a VR-Ready working solution. Results: Setup and benchmark images coming soon []
 -
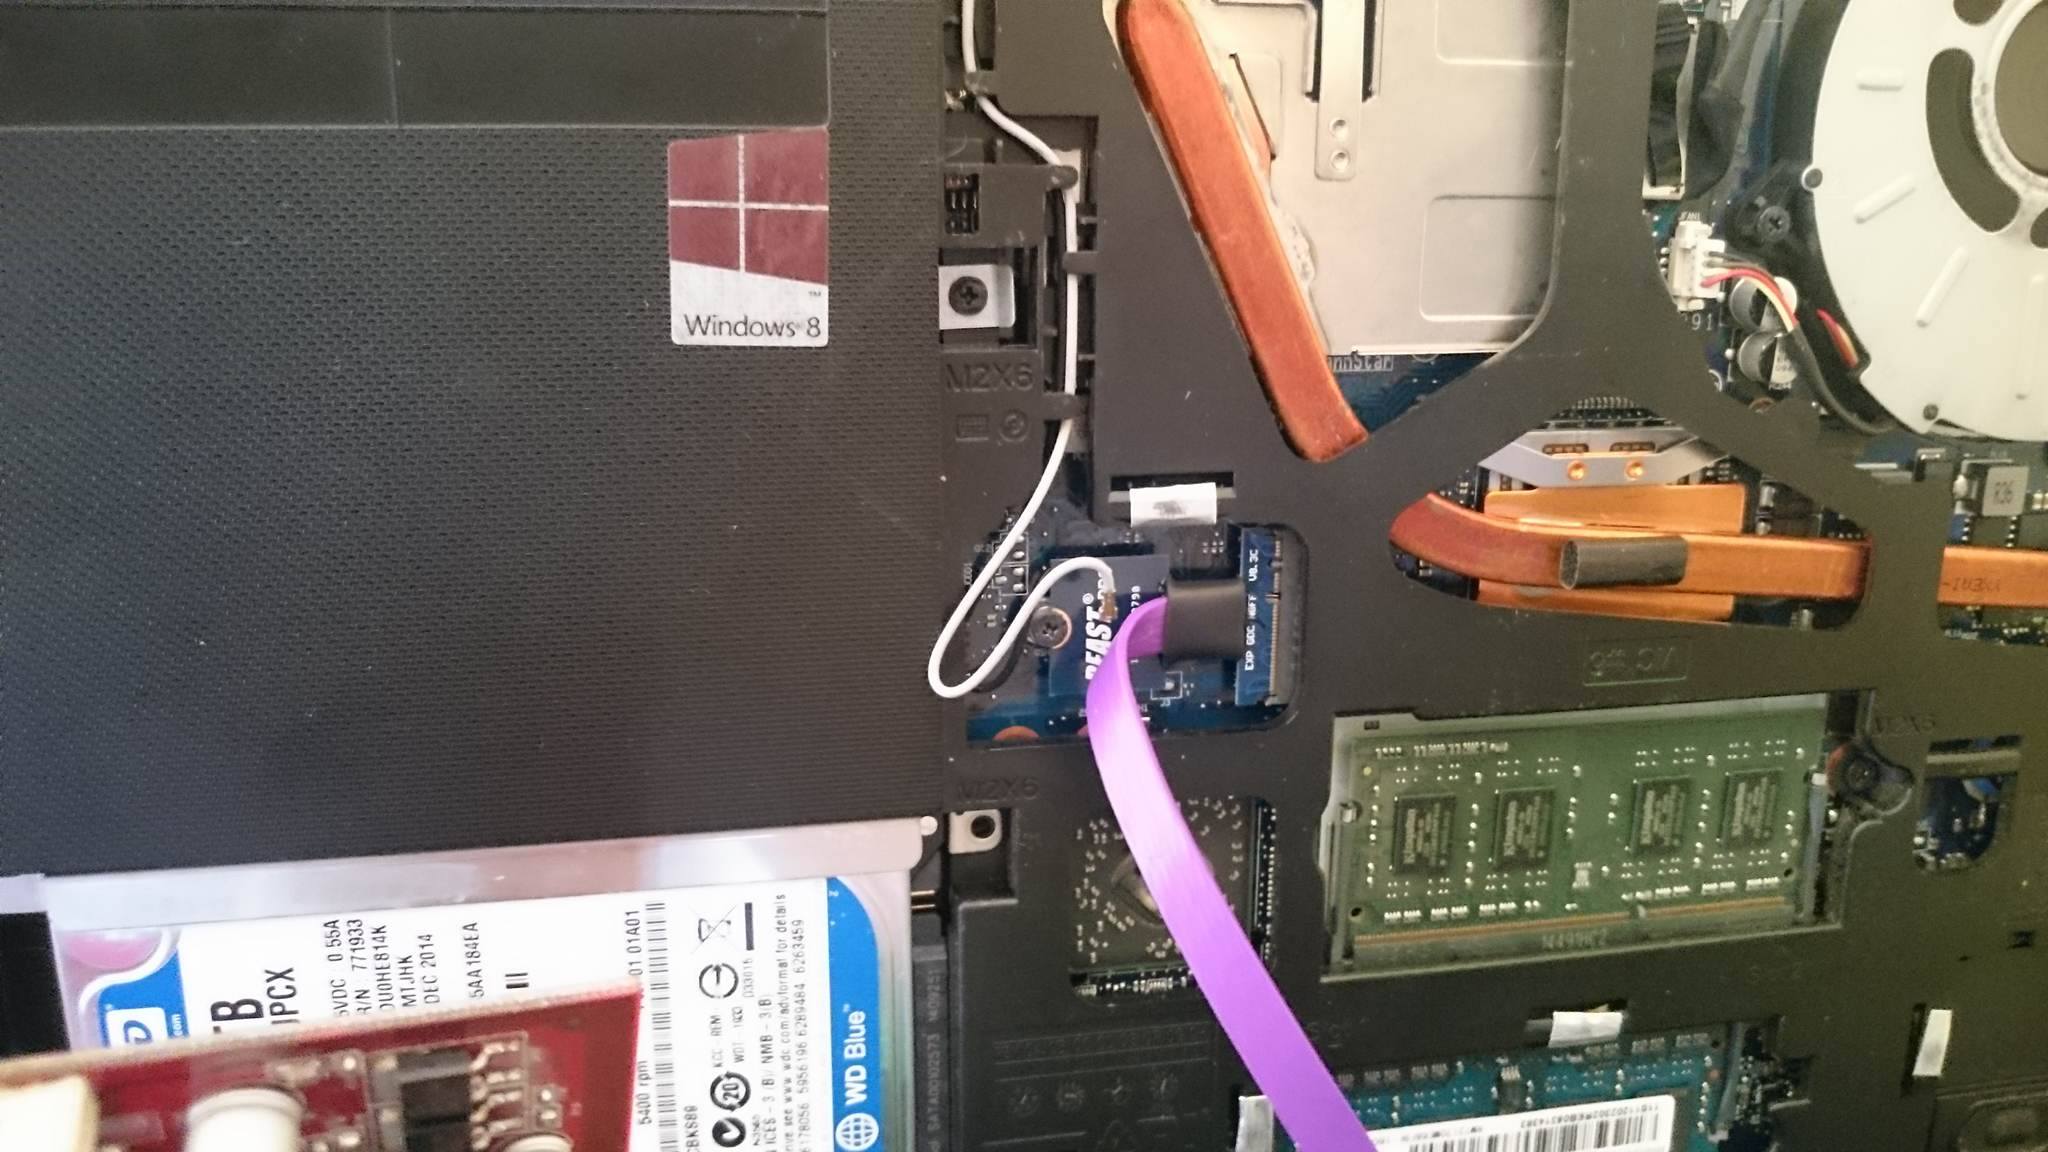
 Current Status: HELP NEEDED! mPCIe port actually micro PCIe, not sure if I can convert it or if this is a lost cause Materials: bPlus PE4C V3.0 Adapter (mPCIe connector version) MSI NVidia GTX 970 a PSU (this is still in the mail from a friend so I don't remember the model) USB Wireless Adapter (I bought this one but it's being terrible) (optional) mPCIe flexible extender cable (I use this to help keep the laptop mobile) Sections: Part 1: Open the laptop Part 2: Remove the WiFi card Part 3: Connect the extender (or the bPlus board if you're not using the extender) Part 4: Connect the graphics card and PSU Part 5: Software and integration Part 1: Opening the laptop Unplug your laptop and power it down. Place it upside-down in front of you so that the labels are upright. Starting from the top left, unscrew the screws around the outside of the case. Move to the three on the inside, saving the middle one for last. Note that the middle screw will not unscrew all the way. Just unscrew it until it's loose; you'll push it out from the other side in a moment. Insert a long, thin object such as an unbent paperclip into the indicated screw holes. This will pop the keyboard off the front of the laptop. Gently pull up the rest of the keyboard. The keyboard will be connected by two wires. You can choose to disconnect these, but leaving them attached is fine and less annoying. Lift the keyboard out of the way to find the middle hole with the screw that doesn't unscrew all the way. Using your long object, poke the screw out. At this point, the disk drive (or placeholder if you don't have one) will be loose, so if you're going to remove it (like I did), feel free to slide it out. Starting from the disk drive hole or a corner, pull the cover off the back of the laptop. You will hear it click as it goes. Part 2: Removing the WiFi card Now that the laptop is open, locate the mPCIe slot. Gently disconnect the two antenna wires by pulling them out at their heads. If you want to preserve the internal wireless card for later use, be very careful with this step; I accidentally crushed one of the wire terminals without even trying. Remove the screw which holds the card in place. Unfortunately, the people at Lenovo made this screw out of reconstituted sewage instead of metal, so chances are it will become 100% stripped the moment you touch it. [more to come eventually, including picture embedding] Help I need right now: Can I convert my cables or am I done for? (see reply below for image)
 -
I recently bought a "Lenovo Ideapad Y500". I like it a lot, but there is one big problem: the games doesn´t run properly.On notebookcheck.com "Max Payne 3" gets around 70 fps on medium. I get 8-15 fps on medium with some settings turned off."Red Faction: Armageddon" gets 8-19 fps.On notebookcheck.com "Metro 2033" gets around 80 fps on high. I get 20-30 fps on high with some settings turned off.All three games were tested in both DirectX 9 and 11. The fps i wrote about is from DirectX 9.Specifications:3. generation quad-core Intel Core i7 processor (3630QM)8 gb RAM (DDR3)Nvidia GT 750m (SLI) (GDDR5)1 terabyte capacityFull HD screen (1920x1080)Windows 10
-
 System Lenovo G40-70 (This may work with these other Lenovo laptops which share the platform: G40-30, G40-45, G40-70m, Z40-70, Z40-75, G40-80) CPU: Intel Core i7-4510U, 2.6 GHz iGPU: Intel HD Graphics 4400, 1024 Mb RAM: 8 Gb DDR3 OS: Windows 10 x64 Setup eGPU Board: Bplus PE4C v4.1 with M.2 Key A/E (http://www.mfactors.com/pe4c-v4-1-pci-express-16x-card-to-m-2-card-or-pcie-x4-connecter/ Model: PE4C-M2060A) Video Card: MSI Radeon R5450, 1024 Mb GDDR5 Power: Antec 430W External Monitor: Asus VE228 Tools Used DIY eGPU (https://www.techinferno.com/index.php?/files/file/87-diy-e-gpu-setup-130-by-Tech Inferno Fan/) HWiNFO64 (https://www.hwinfo.com/download.php) Phillips Screwdriver Dremel Heat Gun Sugru Packing Tape The Build To run DIY eGPU, Windows has to be installed in a non-UEFI boot mode. Here are my current BIOS settings: Once Windows was re-installed, I installed WiNFO64. Here's what the hardware looked like prior to installing the PE4C in place of the wireless card: Then I installed DIY eGPU by right-clicking on setup-disk-image.bat and running as Admin: Rebooting and selecting DIY eGPU Setup 1.30: Then "menu-based": There's the Atheros wireless card in the DIY eGPU hardware list: Shutting down I then removing the wireless card: I then used a Ryobi dremel clone to slice off a portion of the laptop's plastic case and chamfer the edge off of the CD drive connector. This was necessary to get the cable to fit into the PCIe slot and tuck the cable up so that the laptop is able to sit level on a desk. I also cut a notch into the removable cover on the bottom of the laptop: I used a heat gun to soften the hot glue inside of the heat shrink on the plug, so that I could slightly bend it to fit: (Note: That is a cat hair, not a manky man hair.) A blob of Sugru: And some masking tape keep the cable secure, while letting me remove it relatively easily: I plugged my MSI video card into the PE4C, kept the Delay and Settings switches at their stock positions, turned on the ATX power supply and booted the laptop into DIY eGPU. And there's the video card listed in the hardware where the wireless card used to be: Then i ran PCI Compaction: I was unable to return to the DIY eGPU menu: So I just rebooted into Windows and ran WiNFO64 to check that the external video card was detected: Then I installed the latest Radeon drivers, & connected up my second monitor. I now have dual display with the second monitor set as my Primary and the laptop's display below it as the Secondary. Quality-wise I've been able to run games that my laptop alone couldn't handle, such as the We Happy Few alpha. The low-end frame rate isn't great, but with some overclocking using MSI Afterburner it's doing pretty well. As the card is sitting out in the open it doesn't overheat. I'm not sure if this matters or not but I ran.. or at least tried to run.. three different benchmark apps: 3D Mark Demo (wouldn't run), MSI Kombuster 2 (also wouldn't run) and Heaven benchmark. Stock FPS: 14.0 Score: 352 Min FPS: 5.7 Max FPS: 25.3 Very Basic Overclock FPS: 13.8 Score: 347 Min FPS: 10.4 Max FPS: 24.6 Next steps might include a different power supply, so I can put the ATX I'm currently using back into the 3d printer, and perhaps a case for the PE4C & video card. Maybe someday a better video card. I hope this has been helpful for someone. Please ask me questions if you have any. Note: This is my second PE4C, as the first one I purchased would not work no matter what I tried. They eventually RMA'd it and I bought a second one which worked out of the box, first try. \o/
 -
Hi! I've been looking into hooking up an eGPU to my Lenovo z41-70 laptop, a build which I haven't been able to find a prior example of anywhere. The laptop has an mPCIe slot on the inside, but the wireless card is currently connected to it. My ultimate goal is to preserve as much mobility as possible, which means I need wireless functionality and I need to keep the case closed. So far, I already have my hands on an Nvidia GTX 970 and a matching PSU. I'm planning to get this BPlus mPCIe adapter and this USB wireless adapter (unless anyone has better recommendations from personal experience). My biggest question right now is will I be able to display the eGPU output on the internal screen? It's a really nice FHD screen, so I don't want to let it go to waste. I'm using Windows 10, and I will install the newest Nvidia drivers once the card is hooked up. If I need to use an external monitor, I don't think the project will be worthwhile. Does it seem possible? Also, is there a good solution to quickly switch between internal graphics and the eGPU? I'd like to be able to just unplug the mPCIe cable and get moving without pausing to restart the computer. Regarding keeping the case closed: I don't have an optical drive in my laptop, which means I have a big empty plastic placeholder that I could totally make my own mPCIe port inside of. The only issue with this is that I would need a ribbon extender for the mPCIe port which does not have a board to support a card on the end. Does such a thing exist? Where can I find it? Relevant Laptop Specs: OS: 64-bit Windows 10 Home Processor: Intel i5-5200U @2.20GHz RAM: 8GB CPU-integrated Graphics: Intel HD Graphics 5500 Internal Graphics Card: AMD Radeon R7 M360 All drivers kept as up-to-date as possible.
-
Hello. I have a Lenovo G40-70 that I'm trying to add an eGPU to, it has an Intel Core i7-4510U CPU, 8GB of RAM, and onboard Intel HD Graphics 4400. I bought a Bplus PE4C v4.1 with the M.2 A/E key, and a Sapphire Radeon R7 240. The power supply is an Antec ATX 430W. I started trying to get it running on Win 10 64bit, but as that was installed with UEFI I couldn't run DIY eGPU. I've since installed Win 8.1 Pro 64bit using "Legacy" mode. For testing I'm using HWiNFO64 to check the status of the system's PCI Express bus.. the tree for which looks like this: Bus - PCI Bus #0 - Intel Lynx Point-LP - PCI Express Root Port #3 - PCI Express x1 Bus #1 - RealTek Semiconductor etc. etc. - Intel Lynx Point-LP - PCI Express Root Port #4 - PCI Express x1 Bus #2 Bus #2 is where my laptop's Wifi was plugged in, and has been swapped out for the eGPU. At first I had no luck at all with getting the eGPU to show up. So I tried going through every combination of Delay and Settings configuration of the switches on the PE4C. I tried booting with the wifi installed, sleeping, swapping in the powered up eGPU and nothing. Tried booting with the eGPU powered up, booting with it powered off. Still nothing. Tried taping over line 22 on the PE4C's key. No change. I purchased the DIY eGPU app and have been trying to figure it out, but initially I wasn't able to get the eGPU to appear in DIY either. I'm not 100% certain what happened but during yet another boot into DIY, with the PE4C switches set to stock.. first position on each switch.. no special power up on the PE4C.. suddenly my eGPU was there! It had found it!! I have no idea what had changed, but it was working. I ran a few of the commands in DIY eGPU which only work on a found eGPU. Didn't really understand any of the output though. So I crossed my fingers and rebooted into Windows and found that it was still working! The video card showed up in HWiNFO, so I installed video drivers, rebooted, still working. I had video out put to both the external monitor and my laptop's screen.. dual monitors, not mirrors. Thinking the worst was over I began setting up Steam. A short time later my external monitor suddenly cut out, and then my laptop locked up. Reboot. The eGPU was still working.. but my internet connection was messed up for about 10 min, before finally coming back. The LAN hardware is in PCIe Bus #1 so maybe there was some kind of 'crosstalk' with the video card on PCIe Bus #2? About 15 min later, the output to the external monitor died and the laptop locked up again. I shut down, removed the PE4C's key from the PCIe slot and rebooted. The onboard GPU worked normally and no crashes. A while later I re-installed the PE4C's key and found that my system could no longer find the eGPU. I've been poking around this forum looking for possible solutions, and booting into DIY eGPU to try and make sense of it all. But I think it's time to reach out and see if anyone can suggest a course of action... I've tried to run "Compact All except..." in DIY with the default range, and it appears to run, but then I'm unable to return to the GUI due to "C: DOS area: sector not found" error. So I ran the command which logs the compact attempt and I'm attaching the C:\diag folder to this post. Please let me know if you have any suggestions or if there's any more info you'd like me to provide. I have photos of the handful of tests I ran in DIY when the video card was detected, and I can provide them if you think they might help. Thank you. diag.zip
-
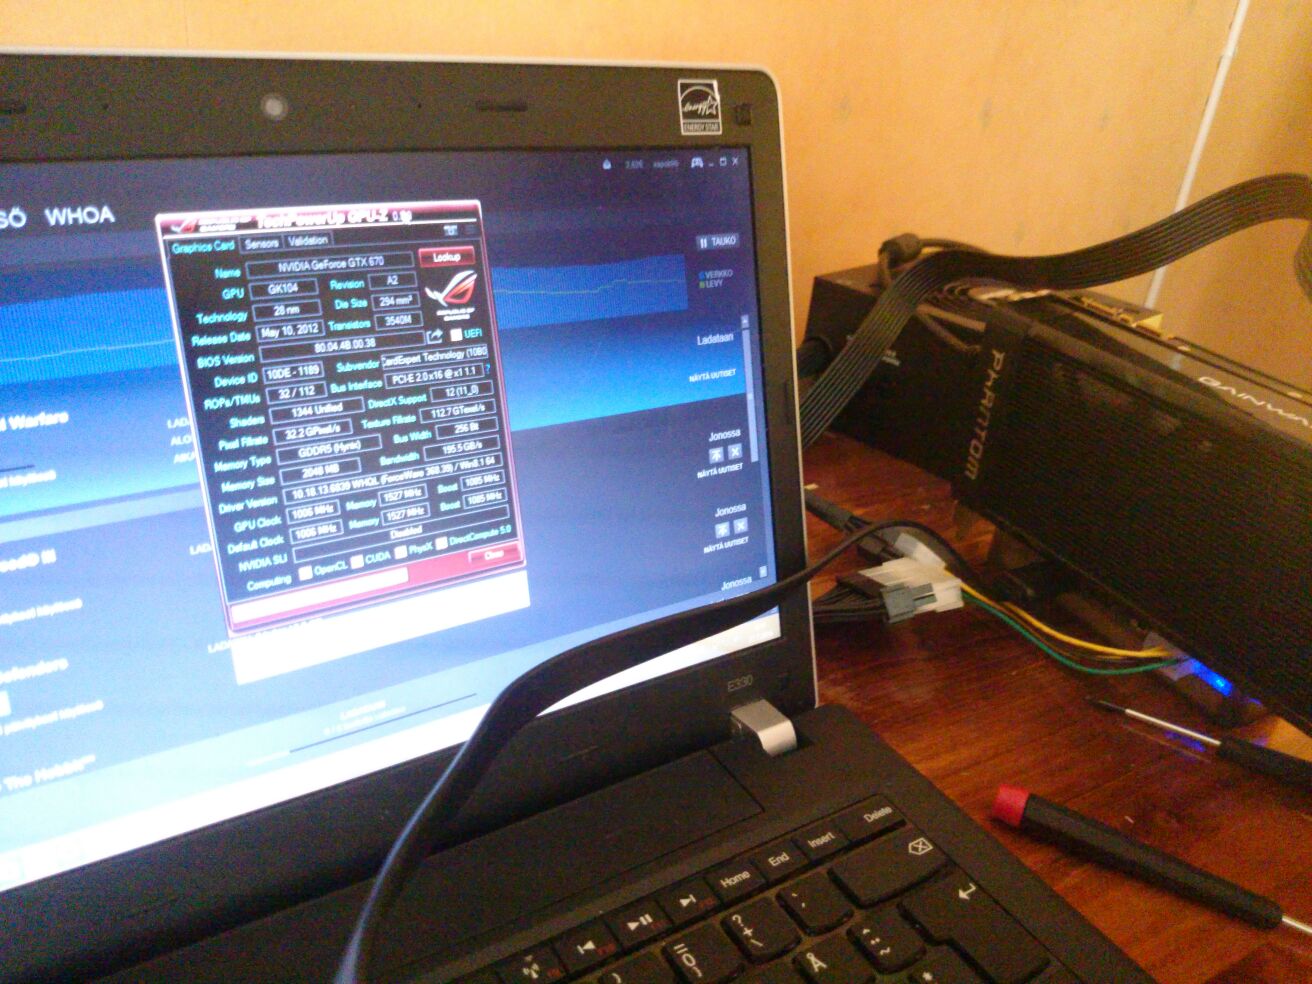
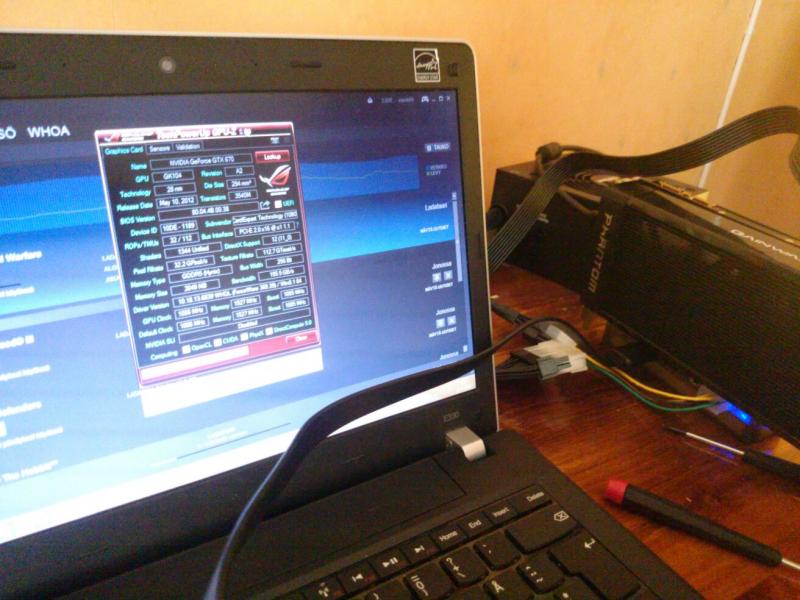
 Hello everyone! I finally got my eGPU setup working after many endless hours, and decided to write and implementation guide for users struggling with similar setups. Notebook Details 13" Lenovo Thinkpad Edge E330 i3-3120M 2.5Ghz HD4000 iGPU 8 GB RAM Windows 8.1 eGPU Gear EXP GDC Beast v8.0 eGPU adapter with mPCIe cable lead 450W Corsair CX450M PSU Gainward GTX 670 Phantom edition 2GB GDDR5 225W TDP Performance Results will include later Now for the build itself... Implementation Guide As Lenovo Thinkpad Edge's TOLUD is 3,5GB leading to Windows error 12, and Lenovo is well known for using whitelisting, the build might seem like a lost cause. However when there is a will, there will eventually be a way. 1.Error 12 !!! DO A BACKUP FIRST !!! To overcome the error 12 I followed the guide on this thread: Windows 8.1 and 10 users please note that you have to run the following command as and Admin user in command prompt bcdedit -set TESTSIGNING ON 2.Whitelisting Now we only have to overcome the whitelisting. The only way to overcome it elegantly is with a bios mod. However you are only able to install bios mod if you have bios version 1.09 or older as Lenovo Thinkpad Edge E330's bioses 1.12-> have EEPROM write protection thus installing a bios mod requires certain flashing device and an skilled user. As bios modding is a dangerous thing to do, and can lead into a seriously overpriced paperweight (your laptop!!), I myself didn't feel the urge to do it. I settled for hotswapping: Boot the laptop with whitelisted WIFI card attached > Boot into setup 1.30 menu > hit F5 > carefully remove the WIFI card and attach the eGPU and voila! Setup 1.30 should now detect your eGpu 3.Booting to windows After succesfully completing a DSDT override, and overcoming the whitelisting, now what is left to do is to boot into Setup 1.30 (using above hotswapping method or not if you have a bios mod) and run a pci compaction 36-bit on eGPU and then chainload to windows and start gaming (YEAHH!!!! THAT'S RIGHT BITHCES) #OPTIONAL# (4.Almost forgot) As Lenovo Thinkpad Edge E330 has an half-miniPCIe slot I removed a tiny piece of plastic to make the EXP GDC mPCIe adapter fit better #OPTIONAL# I myself got a huge gaming boost out of this and enjoyed doing it, however your mileage may vary... Thanks to: @Tech Inferno Fan for setup 1.30 and eGPU threads @angerthosenear for DSDT override guide
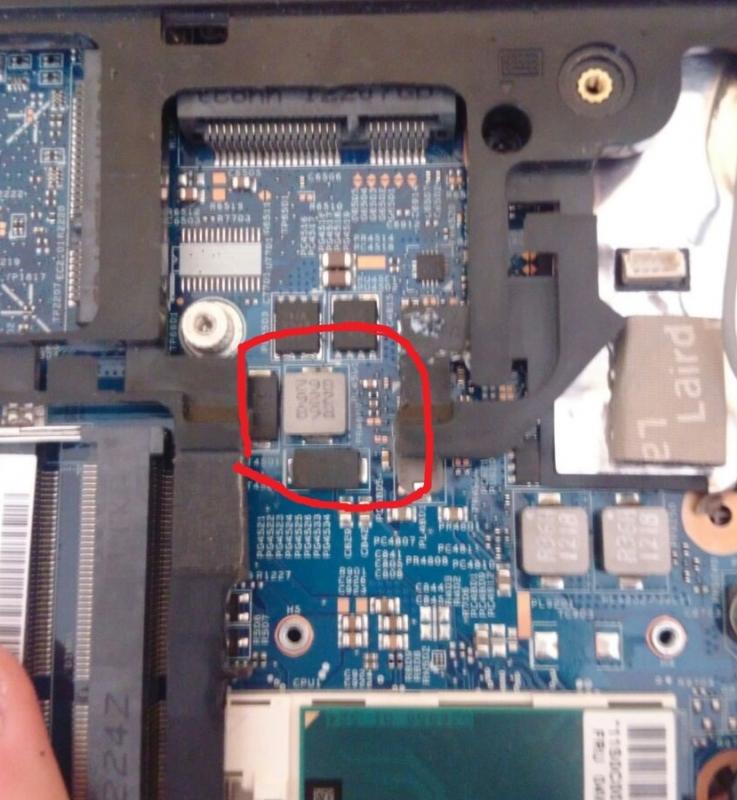
-
Because I was in need of free USB ports (especially for Bluetooth after Wifi card change) I started DIY work on adding internal USB hub. I wasn't able to found any free USB head on board so I decided to adopt USB-2.0 port on Audio jack board. This was successfull and my Y510p has now 3 more internal USB ports (fourth port is connected out to external USB - except power which is lead directly to allow power-off charging, of course). As usb hub I used mini octopuss hub type, the output cables pretty fitted to free room around HDD and under mPCI slot. On one cable is connected mini bluetooth 4.0 module, on second mini micro-SD reader (for fail-safe and system repair and recovery, including gparted live distro) and one cable is left free, ending just beside mPCI slot. I plan to use it eventually for usb wifi mini-dongle replacing PCI wifi card thus freeing mPCIe slot. The free slot will be then available for PCI riser with external graphics etc. ... If somebody is interested, I'm ready to upload complete and detailed photo story
-
Hello, I own a Lenovo Y510p with a GT755M SLI configuration (which almost always overheats/crashes for games that DO support them) and i plan to set up an eGPU for it. I've done a considerable amount of research on the topic but there are still doubts to ascertain before moving on. 1) Is it possible for the latest series of GPUs (GTX 1070, GTX 1080) from Nvidia to be used as an eGPU? Those who've already tried it used stuff like the Razer Core or it's other branded equivalent. What I'm looking for is the complete DIY version using the EXP GDC V8 connected to the mPCIE underneath the laptop (the one which the wifi card uses). I am aware of the Thunderbolt tests on Macs but I'm curious about it's performance on the mPCIE. And would it be compatible with the mPCIE adapter? Would it be too "new" for my laptop bought in 2014? 2) If it is possible, would it be worth it? Would the bottle-necking of the mPCIE be enough to diminish its worth? I wouldn't want to go for the GTX 970 or GTX 980 because my long term plan would be to use the GTX 1070 on a desktop set up once I settle down. (I'm a travelling student btw) Thanks in advance.
-
Hello! I have a Lenovo Y50 with a shitty Wifi-Card and i wanted to unlock the BIOS, so i can replace it with a better one! Now I saw there are Instructions for the Y500 but none for the Y50! Is there a possibility for me to unlock it on my own, or do I have to rely on other Users on this Forum, who know how to do it? Greatly appriciate any help regarding that matter :/. My BIOS is on V1.13 by the way.
-
Hey guys, what are some accepted wireless card that has 5G which is compatible with Lenovo Y500? Thanks!
-
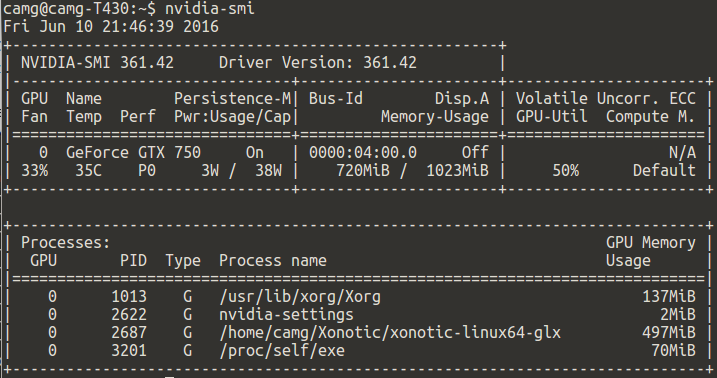
 NOTE: This post has been updated to reflect the latest state of this implementation... Hello mates, I am delighted to share a bit of my new successful implementation... After fighting my way thru previous EGPU implementations using several Linux distributions. From Ubuntu Mate 14 & 15 to Linux Mate and Centos 5 and 6. I only documented one of them. I had to share this experience, mostly because I am amazed by what the community behind Ubuntu Mate 16.04 has achieved. So bear with me. System Specs Lenovo T430 Intel Core i5-3320m at 2.6 Ghz 8 GB DDR3L 12800 16 GB DDR3L 12800 Intel HD 4000 EGPU: Zotac GeForce GTX 750 1GB EVGA GeForce GTX 950 SC+ 2GB KFA2 GeForce GTX 970 OC Silent "Infin8 Black Edition" 4GB EXP GDC v8.3 Beast Express Card Seasonic 350 watts 80+ bronze Display: Internal LCD 1600x900 Dell UltraSharp 2007FP - 20.1" LCD Monitor Procedure: I prepared the hardware as usual. Feeding power to the Beast adapter using the PSU. Plugging these into the laptop's ExpressCard slot. The installation of Ubuntu Mate 16.04 used is only a couple of weeks old and is loaded only with a full stack of Python and web tools I need. For the integrated graphic card, stock open source drivers are used. For the EGPU... I was ready to perform the usual steps, disable nouveau drivers, reboot switch to run level 3, install the cuda drivers, etc. But.. Following the advice read on a Ubuntu/Nvidia forum, and very sceptical, I installed the most recent proprietary drivers for my card. Reboot. Boom! I am done. Even functionality previously not available in Linux is now available... As you can see from the last screenshot the drivers now report what processes are being executed on the GPU, that was something reserved previously to high-end GPUs like Teslas. That screenshot also shows the evidence of the computation being performed in the GPU while the display is rendered in my laptop's LCD. This screenshot also shows how the proprietary driver can now display the GPU temperature as well as other useful data. For those of you into CUDA computing, I can report CUDA toolkit 7.5 is now available in the Ubuntu repository and also installs and performs without any issue. I went from zero to training TensorFlow models using the GPU in 30 minutes or so. Amazing! I could expand this post if anyone needs more info, but it was very easy. Cheers! After upgrading the GPU two times, my system is now capable of handling Doom fairly easy. Now some benchmark results. RAM eGPU PCIe gen 3d Mark 11 3dm11 Graphics 8 GB GTX 750 2 P3 996 4 095 16 GB GTX 750 2 P3 994 4 094 16 GB GTX 950 1 P5 214 7 076 16 GB GTX 950 2 P5 249 7 709 16 GB GTX 970 1 P7 575 11 202 16 GB GTA 970 2 P8 176 12 946 Now, the difference between Gen 1 and Gen 2 might not seem relevant from the results in the table. But playing Doom there is a difference of around 15 fps on average between both modes. This brief difference is even more noticeable during intense fights.
-
Is there any information for Latest Thinkpad P50 eGPU setup, System wont run When I connect Pe4l 2.1b with express card . Please give me Ideas....
-
Hi all, I have been trying to get an eGPU implementation working on my T450s. The only option I could find for it is through its NGFF slot, which I think is only 1x speed. I picked up the eGPU adapter from yoybuy: http://www.yoybuy.com/en/Show/40808703110. The graphics card I am testing with is the Zotac 750ti. When plugged into the T450s before boot, the laptop won't post and gives 2 beeps. It does let me chainload, however I can't seem to get the device to show up in the device manager or in Setup 1.30. It's plugged into the port that the wifi chip was in, so it should support more than just SATA right? Anyways, NGFF eGPU setups seem like uncharted waters, but if anyone has tried this form factor before, please let me know. Cheers, James
-
 3dMark11 Performance Preset Benchmark: http://www.3dmark.com/3dm11/11262792 Required items: 1.) Lenovo u310 (I have a Core i3 - Ivy Bridge, 8GB RAM) 2.) 65CN99WW unwhitelisted. 3.) eGPU (I used a EVGA GTX 750 Ti from another computer I had). 4.) EXP GDC mPCIe Edition adapter (got from eBay - banggood seller). 5.) ATX power supply (I used a 600W PSU from another computer I had). 6.) USB wireless. 7.) External monitor, keyboard, and mouse. Steps: 1.) Obtain and install a unwhitelisted BIOS. If you are unable to obtain a unwhitelist BIOS, I think it might be possible to bypass it with Tech Inferno Fan's Setup 1.x (may need confirmation as I haven't used it myself yet.) 2.) Shutdown computer and remove all USB devices, ethernet cables, power cables, card reader cards. 3.) Remove mPCIe wireless card and detach antennas. 4.) Attach EXP GDC external mPCIe cable to the former wireless slot and screw down. 5.) Attach HDMI end of the mPCIe cable adapter to the EXP GDC device. 6.) Attach graphics card to the EXP GDC device (I moved my laptop off the desk and onto the side shelf to make room on the desk for the monitor/keyboard/mouse). 7.) Using the power cable adapters that came with the EXP GDC device, I hooked in my ATX power supply's 20 pin and CPU 4 pin cables. Then hooked the other end (8 pin) into the EXP GDC device. My EVGA 750 Ti also required that I use an additional PCIe power cable (6 pin) in the top of the card. 8.) Then I attached my misc devices (HDMI monitor, USB keyboard/mouse/wireless adapter), and hooked in my PSU and powered it on (below is image of final product, also moved HDMI cable out of the way). 9.) Power on your computer and let it install the standard VGA drivers and then install your drivers (I didn't have to go in the BIOS for any graphics settings, which it doesn't have anyways, nor did I have to disable iGPU in Device Manager before the card was added). Extra Info: I found that most games will play on med settings with about 45 FPS with this particular card. BDO: Upscale on - Anti Aliasing on - SSAO off - med settings. Skyrim: Med-High settings. Fallout 4: Med settings. (EDIT 5/19/2016) > Images added.
 -
Hello guys, First of all, really appreciate this project and I want to thank to all of you guys sharing your experience and creating such a great community. if there's anybody that managed to do it successfuly on this Thinkpad model, please PM me so I can talk with him, and I promise at the end I will post a full guide for this type of Thinkpad (wasn't able to find more that 2 posts related to this type of Thinkpad, and at one nobody responded, the second one I cannot find it anymore). I decided to start my own eGPU project, on my Lenovo Thinkpad T420s. I have waited for the PE4C-EC060A V3.0 ( eGPU PCIe x16 interface for ExpressCard) to be released and decided to order one (since Thinkpad T420s has an Express Card port) but instead I ordered an PE4C version 3.0, PCIe x16 interface for mPICe; Length 60c and it has been shipped. I than opened my laptop and I've noticed I do have a 2nd mPICe slot, and here comes my first question: 1st question: do you guys recommend me in switching to the Express Card version, or the mPICe one behaves the same as the Express Card one? The only inconvenience is that it will be harder to plug it in and out, since I take my laptop to work at a daily bases. Looking at the requirements, I saw that it is possible to do it for this type of laptop by having a bios version of 1.3x. 2nd question: The bios version of 1.3x refers to the bios versioin developed by @Tech Inferno Fan, or just the market one? ( I currently have 1.31 installed). I than need to consider what GPU to order. The post that I found about GPU installed on a Thinkpad T420s, it was talking about an Geforce GTX 570 (from what I remember - this is the post that I cannot find anymore) . I was thinking about buying an GTX 750 Ti OC2 2GB, beeing a 3rd Generation that seems to work with the PE4C V3.0, but while reading the forums, most of the guys installed a 2nd Generetion GPU. 3rd question: Does anyone know if the PE4C v3.0 Gen3 is stable or it';s safer to go with older GPUs. That's it for know. Thanks and really appreciate the support. Regards, Strack
-
 Hey guys, does anyone have the spare time to mod my laptops BIOS so that I can remove the limit of the sliders in MSI Afterburner. So that I can go above a max of 135 on the core, have the voltage and power limit sliders unlocked etc. If it can be done for free, I would much appreciate it, and donate in the future when I get some money. If you can do the task, plz reply and I'll upload my BIOS backup to RGhost if that's the site you guys upload stuff to on this forum. Thanks in advance friends!
 -
Has anyone been able to get the exp gdc beast working on the lenovo z580? What about the ones with discreet graphics? Did you have to use setup 1.3 or was it working without it? Theres a thread here about the z580 but it dosen't answer my questions well. I have a lenovo z580 with discreet gt630m. Will the exp gdc beast setup work with mpcie on my laptop? Will I need setup 1.3 or not? Thanks.
-
 PROBLEM: Black screen of death on a Lenovo y580 (or probably most of the ideapad Y series since they all use similar bios software) after changing the setting for which video source gets priority (default is "SG"). SOLUTION: Rather than using the vast array of options that rarely work for anyone like heating up your video card by blocking the fan on a pillow for 20 minutes at a time until it "decides" to start working again - after much research I found the solution for setting the modified slv7 lenovo y580 bios back to its defaults in the event that you inadvertently disable your video. First, press power and immediately hold F2 until your laptop starts beeping, then release. If there is no sound hold it about 45 seconds. Second, press the following button sequence for 100 extra lives: left arrow (1x) down arrow (4x) enter (4x) At that point the system should automatically shut down and restart. If it does not, the settings may not have been changed correctly but go ahead and manually restart to find out. If you come back to a black screen again try the process over until you're certain that the cause is something other than your bios settings. This will save you hours upon hours researching CMOS bypass surgeries, blind usb jump drive bios flash procedures, and all those tedious and time consuming processes. I even started questioning whether my keyboard on my laptop worked at one point it got so screwy. I will add this, if you can use an external monitor and get a signal, do that. Use Fn+F4 to switch to an external signal and that will make your life much easier. Barring that, the above is the easiest solution I was able to track down. Best.. wissper [original issue] This has come up fairly often, and I've read every post I can find trying to fix it but with no positive results so far. I've got a lenovo y580, running a modified svl7 bios. I accidentally changed the video setting that was set to "SG" to some other setting, unsure what. Now I can't get a response from the laptop other than from the power button which simply lights up, but no other indications of life show any more. Early on there was a point at which I pressed some button combo and heard loud beeps, but that has not recurred. I've tried the typical blind default reset method (left, 4x down, 4x enter) which didn't help. I cannot access the computer remotely when it's been powered on which makes me believe that it is not moving past the bios to windows. (no ping response or net view access) I have been unsuccessful in getting an external display to work on the HDMI or VGA ports (though I am going to try VGA again to be sure). Most of the advice I've found says to unplug everything from the system (wifi adapter, HDD, SSD, Optical,etc.), insert a usb stick with various ROM/BIN files conforming to a particular name variant depending on your model, and to hold Fn+B continuously just after inserting power cord w/o battery installed and hit the power button. The 1 time I've tried this, I had copies of the bios w/ extentions .bi .bin .rom .fd with prefixes QIWY3207 or just QIWY3 (which was the suggestion from Andy's phoenix tool that was part of the instructions). If anyone sees a mistake I've made along the way, another method to try, or just knows the key pattern to reset the modified svl7 y580 bios to default I would really appreciate the help. I'm looking forward to buying another laptop about as much as choking down a bag of cement. Thanks! Wissper
- 7 replies
-
- 2
-

-
- black screen of death
- bios
- (and 3 more)
-
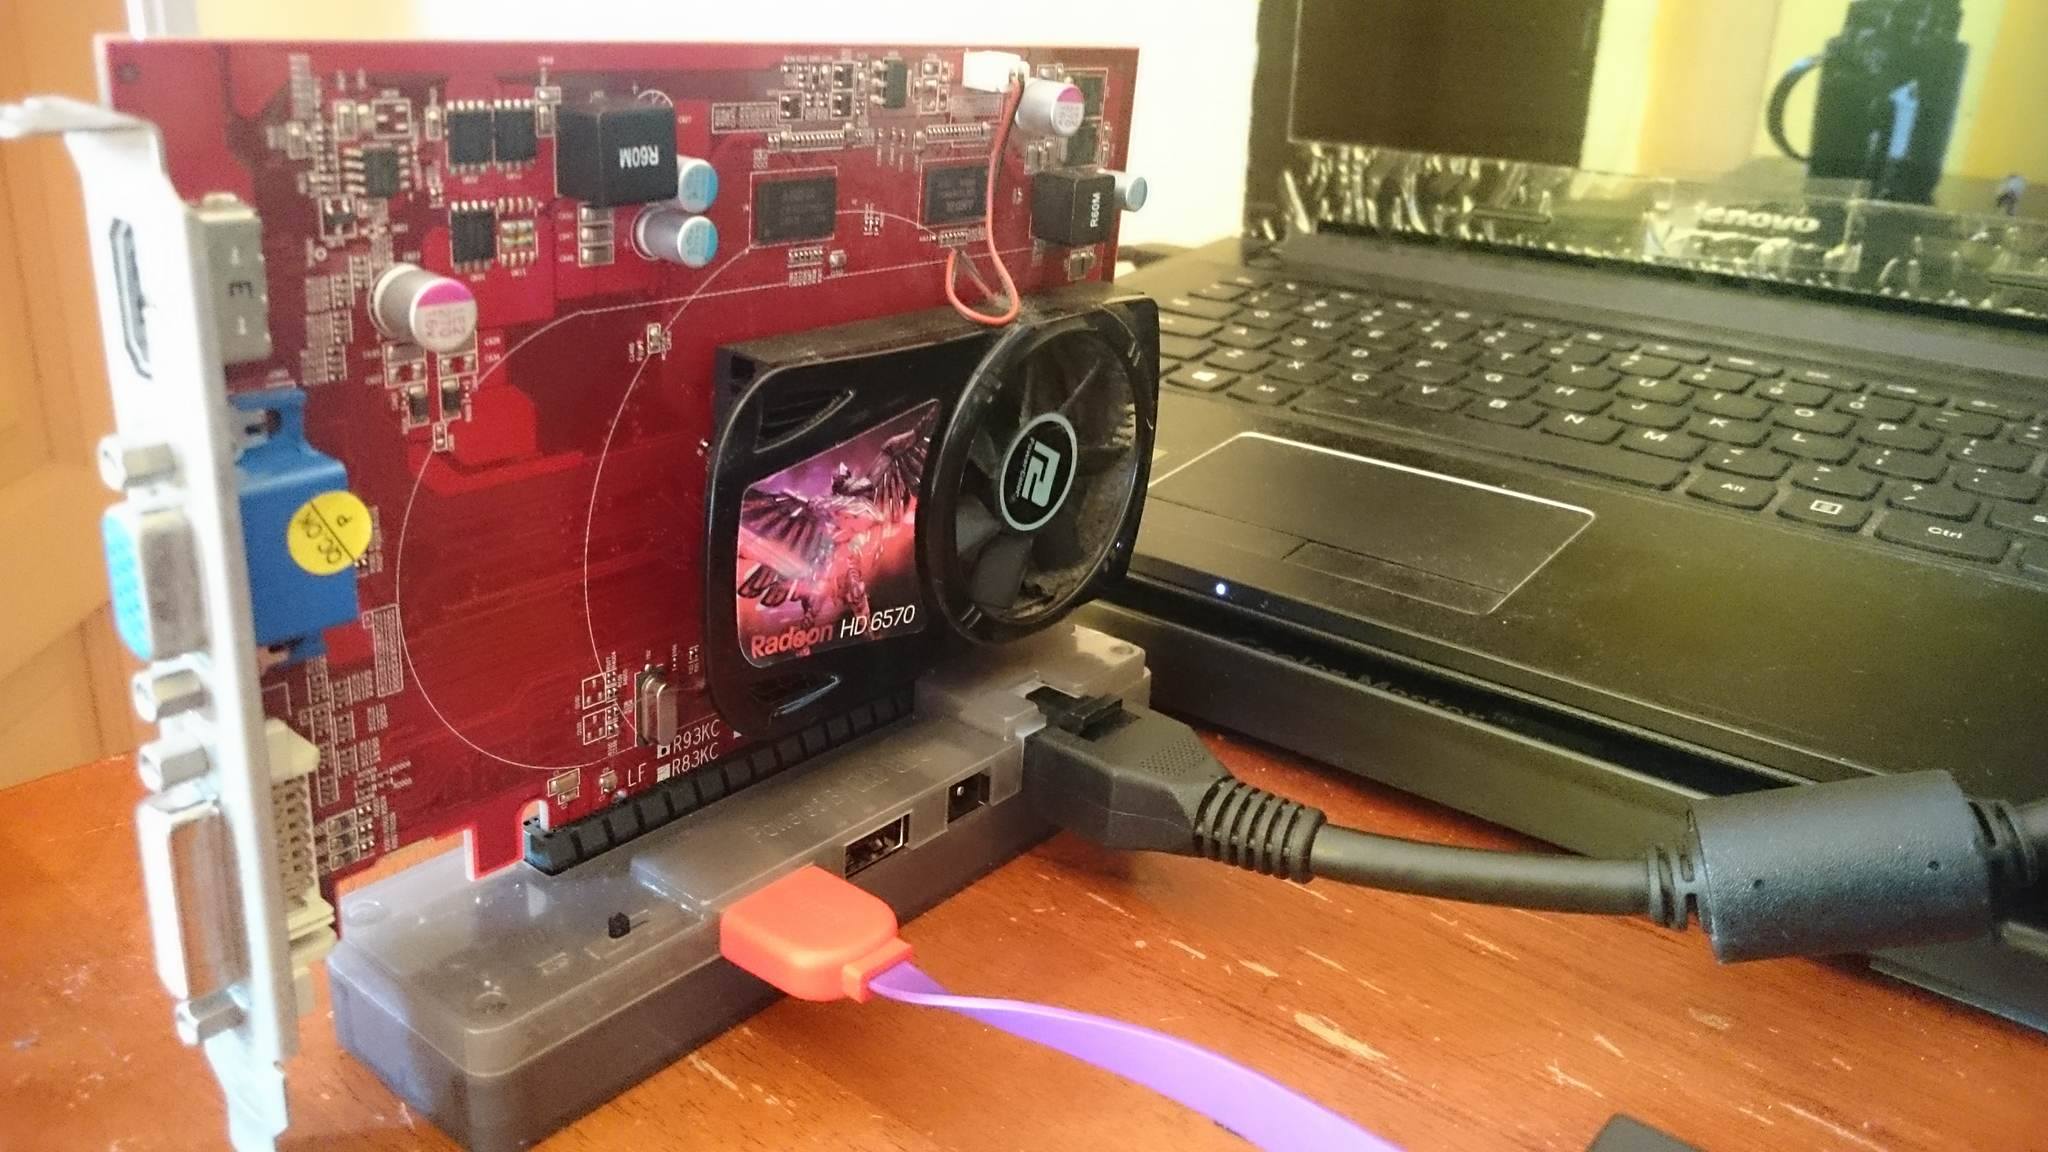
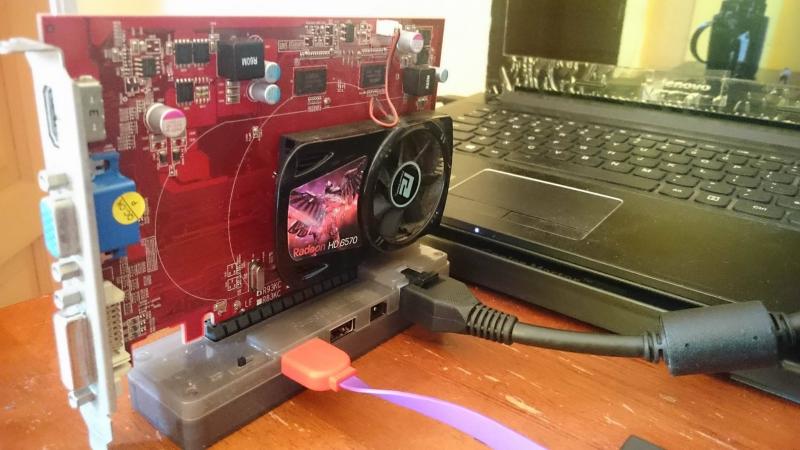
Laptop:Lenovo Z40-75 Prosessor: AMD A10-7300 RAM: 8GB Integrated GPU: AMD R6 M255DX (DUAL GPU) EGPU tool: EXP GDC v8.0 (NGFF version) EGPU: PowerColor HD 6570 Problem: EXP GDC v8.0 not working when plugged with NGFF to HDMI cable( without lightning ) with proper installation. But when I'm using mini PCIExpress to HDMI cable it work well on my ASUS laptop

-
Hi guys! So recently, I've been trying to make the BIOS Whitelist mod by svl7 work, because I really need to downvolt my GPU's but nVidia Inspector just won't let me. I've been able to follow the steps correctly until I reached the step where you were required to boot up the modded BIOS using a formatted USB. The problem was that the USB didn't show up in the BIOS and boot options, even though I formatted the USB correctly to FAT32. Also, I'm running Windows 10, if that helps. Anyone know why this is? If so, please help me. Thanks
-
I have designed an adapter for the ultrabay slot to plug desktop graphic cards into a Y510p. The BIOS starts with "Unauthorized Slave vga ...". Need help for a new BIOS without PCIe check on Ultrabay.
-
I just recently clean installed with Windows 10. I'm somewhat confused with the caching feature for my mSATA SSD. People on other forums have shared their frustration on getting the caching feature to work and have narrowed them down to Intel's Rapid Storage Technology's Acceleration feature, Lenovo RapidDrive, and ExpressCache. I scoured all over to find my particular instance but I was left more confused than when I started. I did learn that the acceleration feature no longer works since I do not have an acceleration tab anymore and that RapidDrive no longer seems to apply. I've yet to try ExpressCache. Anyone who has experience with this can lead me to the right direction?
-
Hello ive seen a few people asking about heat and i thought i would chime in and say a few ways to keep down the heat! there are a few ways you go about this with out opening the computer, for those who arent to sure about taking a screwdriver to their laptop it may help you. in saying that, if your fans are dirty then this will not help you at all. I TAKE NO RESPOSIBILITY TO ANY DAMAGE HARDWARE! ANY CHANGES YOU MAKE ARE AT YOUR OWN RISK! INCREASING THE FAN SPEED to control your fans use this http://www.hwinfo.com/download64.html this is a free program that alot of people use on various computers. it work on alienwares well but im yet to test ROG and MSI with it. its pretty simple to use install it and get to this page and click on the sensors button then on the next screen click the small fan icon at the bottom unless you want to manually adjust your fan between each time you play click customer auto and you can edit it from there UNDERCLOCKING download and install NV tools it can manage fan speeds too but its not always 100% in laptops http://www.nvidia.com/object/nvidia-system-tools-6.08-driver.html on the left hand side, under the performance tab, select device settings now just slide it back in small steps until you are comfortable with the temps. remember that if your computer blue screens it DOES NOT mean your computer has been damaged. it is simply a way for the computer to avoid damage. adjust the slider in intervals of about 15mhz to be safe and click apply each time. start on the core clock and finish on the memory. Every now and again it is good to check on your progress to see how far you need to go. (more on this later) MSI after burner is a good one too http://www.guru3d.com/files-details/msi-afterburner-beta-download.html again the fan control is a bit hit and miss with it but it can control your clock speed. ass per the program above keep going untill you hit a STABLE setting you want. TESTING here we will look at the new GPU temps after the tune. MSI Kombustor is a great way to test your heat. http://www.geeks3d.com/20150710/msi-kombustor-v3-5-2-64-bit-v2-6-0-32-bit-download-gpu-stress-test-benchmark/ click on stability and watch the temps. if you see any artefacts stop the test and increase the mhz by 15mhz each fur mark is the one that i use to test the heat of my alienware http://www.ozone3d.net/benchmarks/fur/ aim for about 70-75*C. hope this helps you a bit. PS avoid EVGA's tuning tool on alienware i have heard it can brick your LCD! CLEANING THE FANS Just for the sake of it ill give you a few tips on cleaning your laptops fans out. assuming you already know the basics of using a screwdriver to open a laptop ill cover a few things to help you. REMEMBER, IF YOU REMOVE THE HEATSINK YOU WILL NEED NEW THERMAL PASTE! compressed air is a great way to remove dust and id recommend having a can of it over a compressor. The reason being is that some compressors can fill with a bit of water and can spray it directly into the computer. you can spray the air into the vents and while it wont really "clean" it it may open enough room for air to pass out. i DO NOT recomend this however. after opening up the computer and removing the fan take a paint brush and clean the entire fan, get as much of the dust out as you physically can. you can use toothbrushes too if you dont have anything else. make sure you clean the grill behind the fan too as that is where the dust usually builds up. removing this dust and hair is the most important part of this clean up. now on to thermal paste. remove all the old thermal paste from the heat sink and the CPU with a dry cloth then, use isopropyl alcohol to clean the rest. some people seem to think that more is better but this is completely not true! if you put a large amount of thermal paste on the heatsink you will actuall have hotter temps. this is due to either: A ) the heatsink is not geting enough connectivity to the GPU as the layer of thermal paste is too thick B ) too much of it creates small pockets of air, these air pockets become super hot and that causes more heat on the GPU the correct amount is roughly the size of a pea even that is boarderline too much. Dont spread it around instead place your heat sink over it as even as possible and screw it down in a X pattern for an even spread. really hope this helps you and good luck!