Search the Community
Showing results for tags 'alienware'.
-

Version 1.0.0
361 downloads
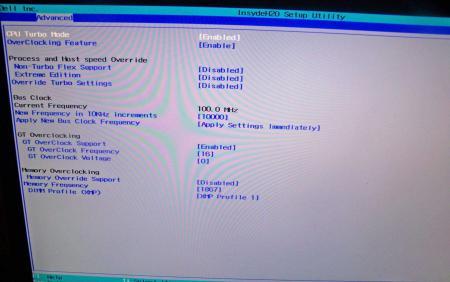
Alienware M17x R3 A12 unlocked BIOS with tweaks on SATA settings Files contained in this archive: AtpTimerInfo.dll Ding.wav FWUpdLcl.exe InsydeFlashx64.exe iscflashx64.dll iscflashx64.sys PAR00MEC.fd platform.ini READ ME.txt xerces-c_2_7.dll To learn more about how to use the files in this archive, please visit the thread below: Donation link In case you want to buy me a beer Thanks and cheers! -
Version 1.0.0
780 downloads
Files contained in this archive: FTP-DOS.zip prr2.zip M18x R2 - BIOS A03 'unlocked.zip M18x R2 - BIOS A08 'unlocked.zip M18x_R2_-_BIOS_A08_-_[unlocked]_-_[IRST 11.0.6.1702].zip M18x_R2_BIOS_A03_-_[unlocked] - [IRST 11.6.0.1702].zip M18x_R2_BIOS_A09_-_[unlocked].zip [FPT]-M18x_R2_BIOS_A09_-_[unlocked].zip [FPT]-M18x_R2_BIOS_A10_-_[unlocked]_V2.zip M18x_R2_-_BIOS_A08_-_[unlocked].zip M18x_R2_BIOS_A03_-_[unlocked].zip For information on how to use the files in this archive, see here: My donation link in case you want to buy me a beer -
 Do you plan to purchase a new gaming notebook in the next few months? If so, which brands are you considering and why? Additionally, with the release of Thunderbolt 3 and external enclosures like Razer Core coming to market, is this a contender for you vs a dedicated gaming notebook that is thicker and weighs more?
 -
Hello I have a gtx 660m. I Put it in my m15x with a 1.5mm coper shim. It fit good, also added paste. I have windows 10 and have tried every driver none are working. the eurocam driver I got off from their site for the 660m upgrade starts downloading and 2 minutes into the install, it fails, and an error pops up, "install failed" and that's it. please help :\ NOTE: The 660m is showing up as unknown in the device manager but I can still manage to get the hardware ids.. Also I believe my bois is a08 I downloaded a09 from dell and it just gave me a folder with some files in it no download setup THANKS!!
-
NVIDIA just sent word that they have created a new "GeForce GTX VR Ready" program where participating hardware partners will produce GeForce GTX equipped systems that will have the NVIDIA approved GeForce GTX VR Ready badge. NVIDIA is doing this in hopes of simplifying the buying process as many consumers aren't aware of the immense GPU power necessary to deliver a quality VR experience. According to NVIDIA, VR demands "seven times the graphics processing power of traditional 3D games and applications". Some of the partners that will be participating in this new program include Alienware, MAINGEAR and MSI with the full list of partners available here. The press release is as follows: View full article
-
Hi Guys, I've just upgraded my GPU card from a GTX 660M to 680M. Everything seems properly installed but somehow, my laptop runs a lot hotter compared when with GTX 660M. Idle temperature starts at 58C and when playing games can hit up to 89C. There is also a slight throttle from 771MHz to 754MHz but only for awhile. I've been scratching my head and searching everywhere in the forums for hours now and still cannot really tell what the cause is. I've used MX-4 thermal paste and new thermal pads. My only suspicion is either i've used the wrong thermal pads or thickness?
-
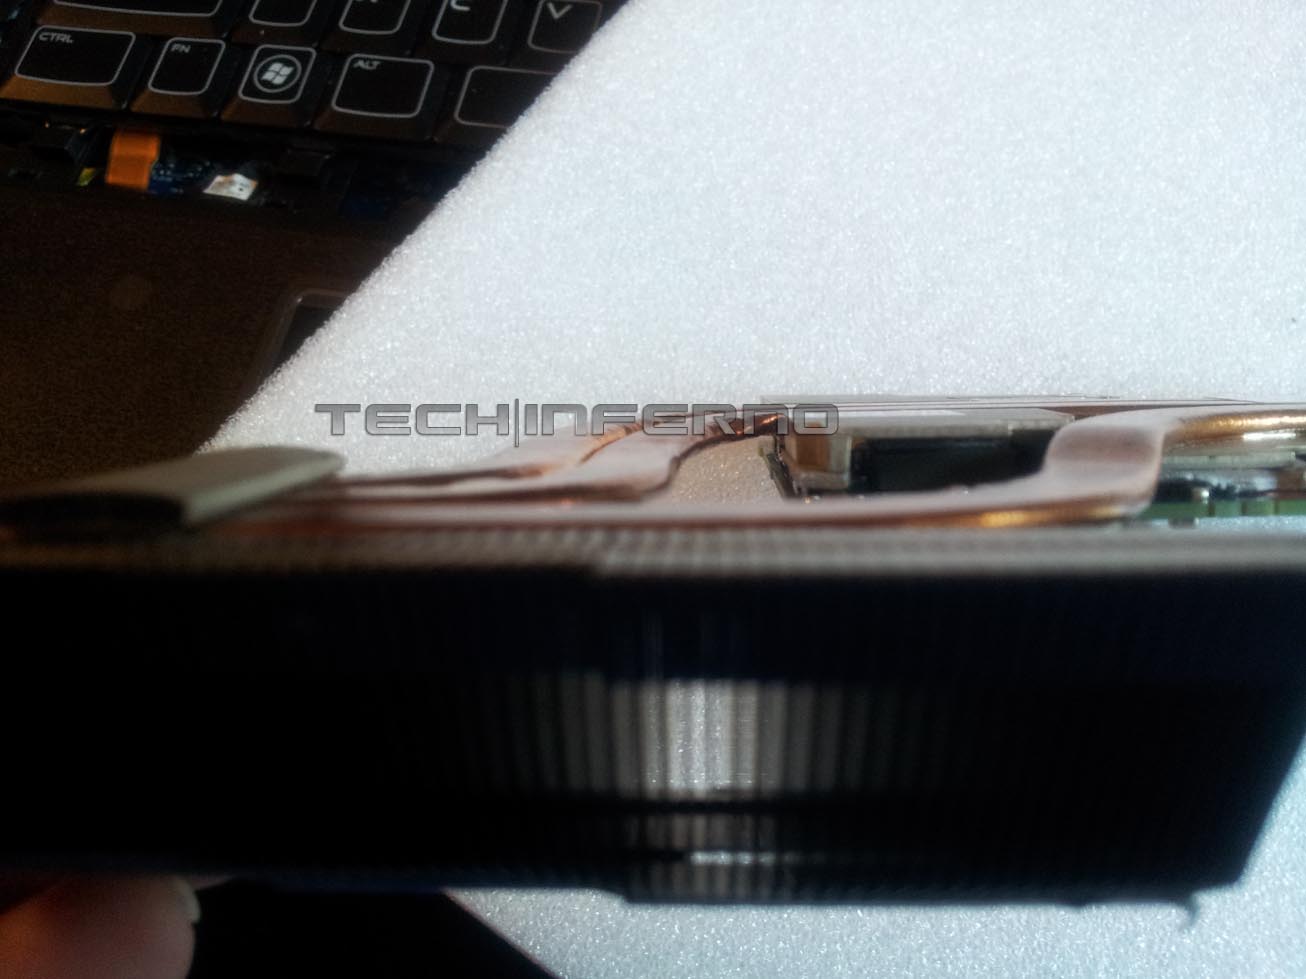
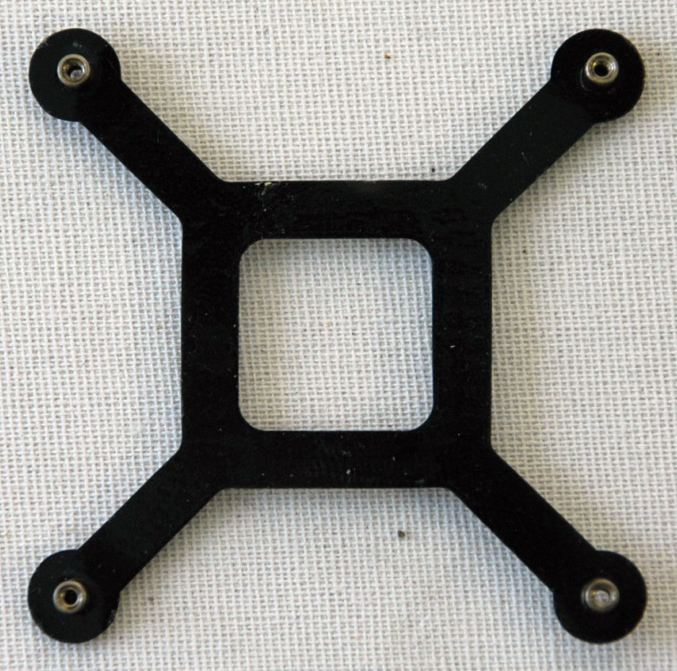
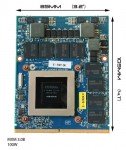
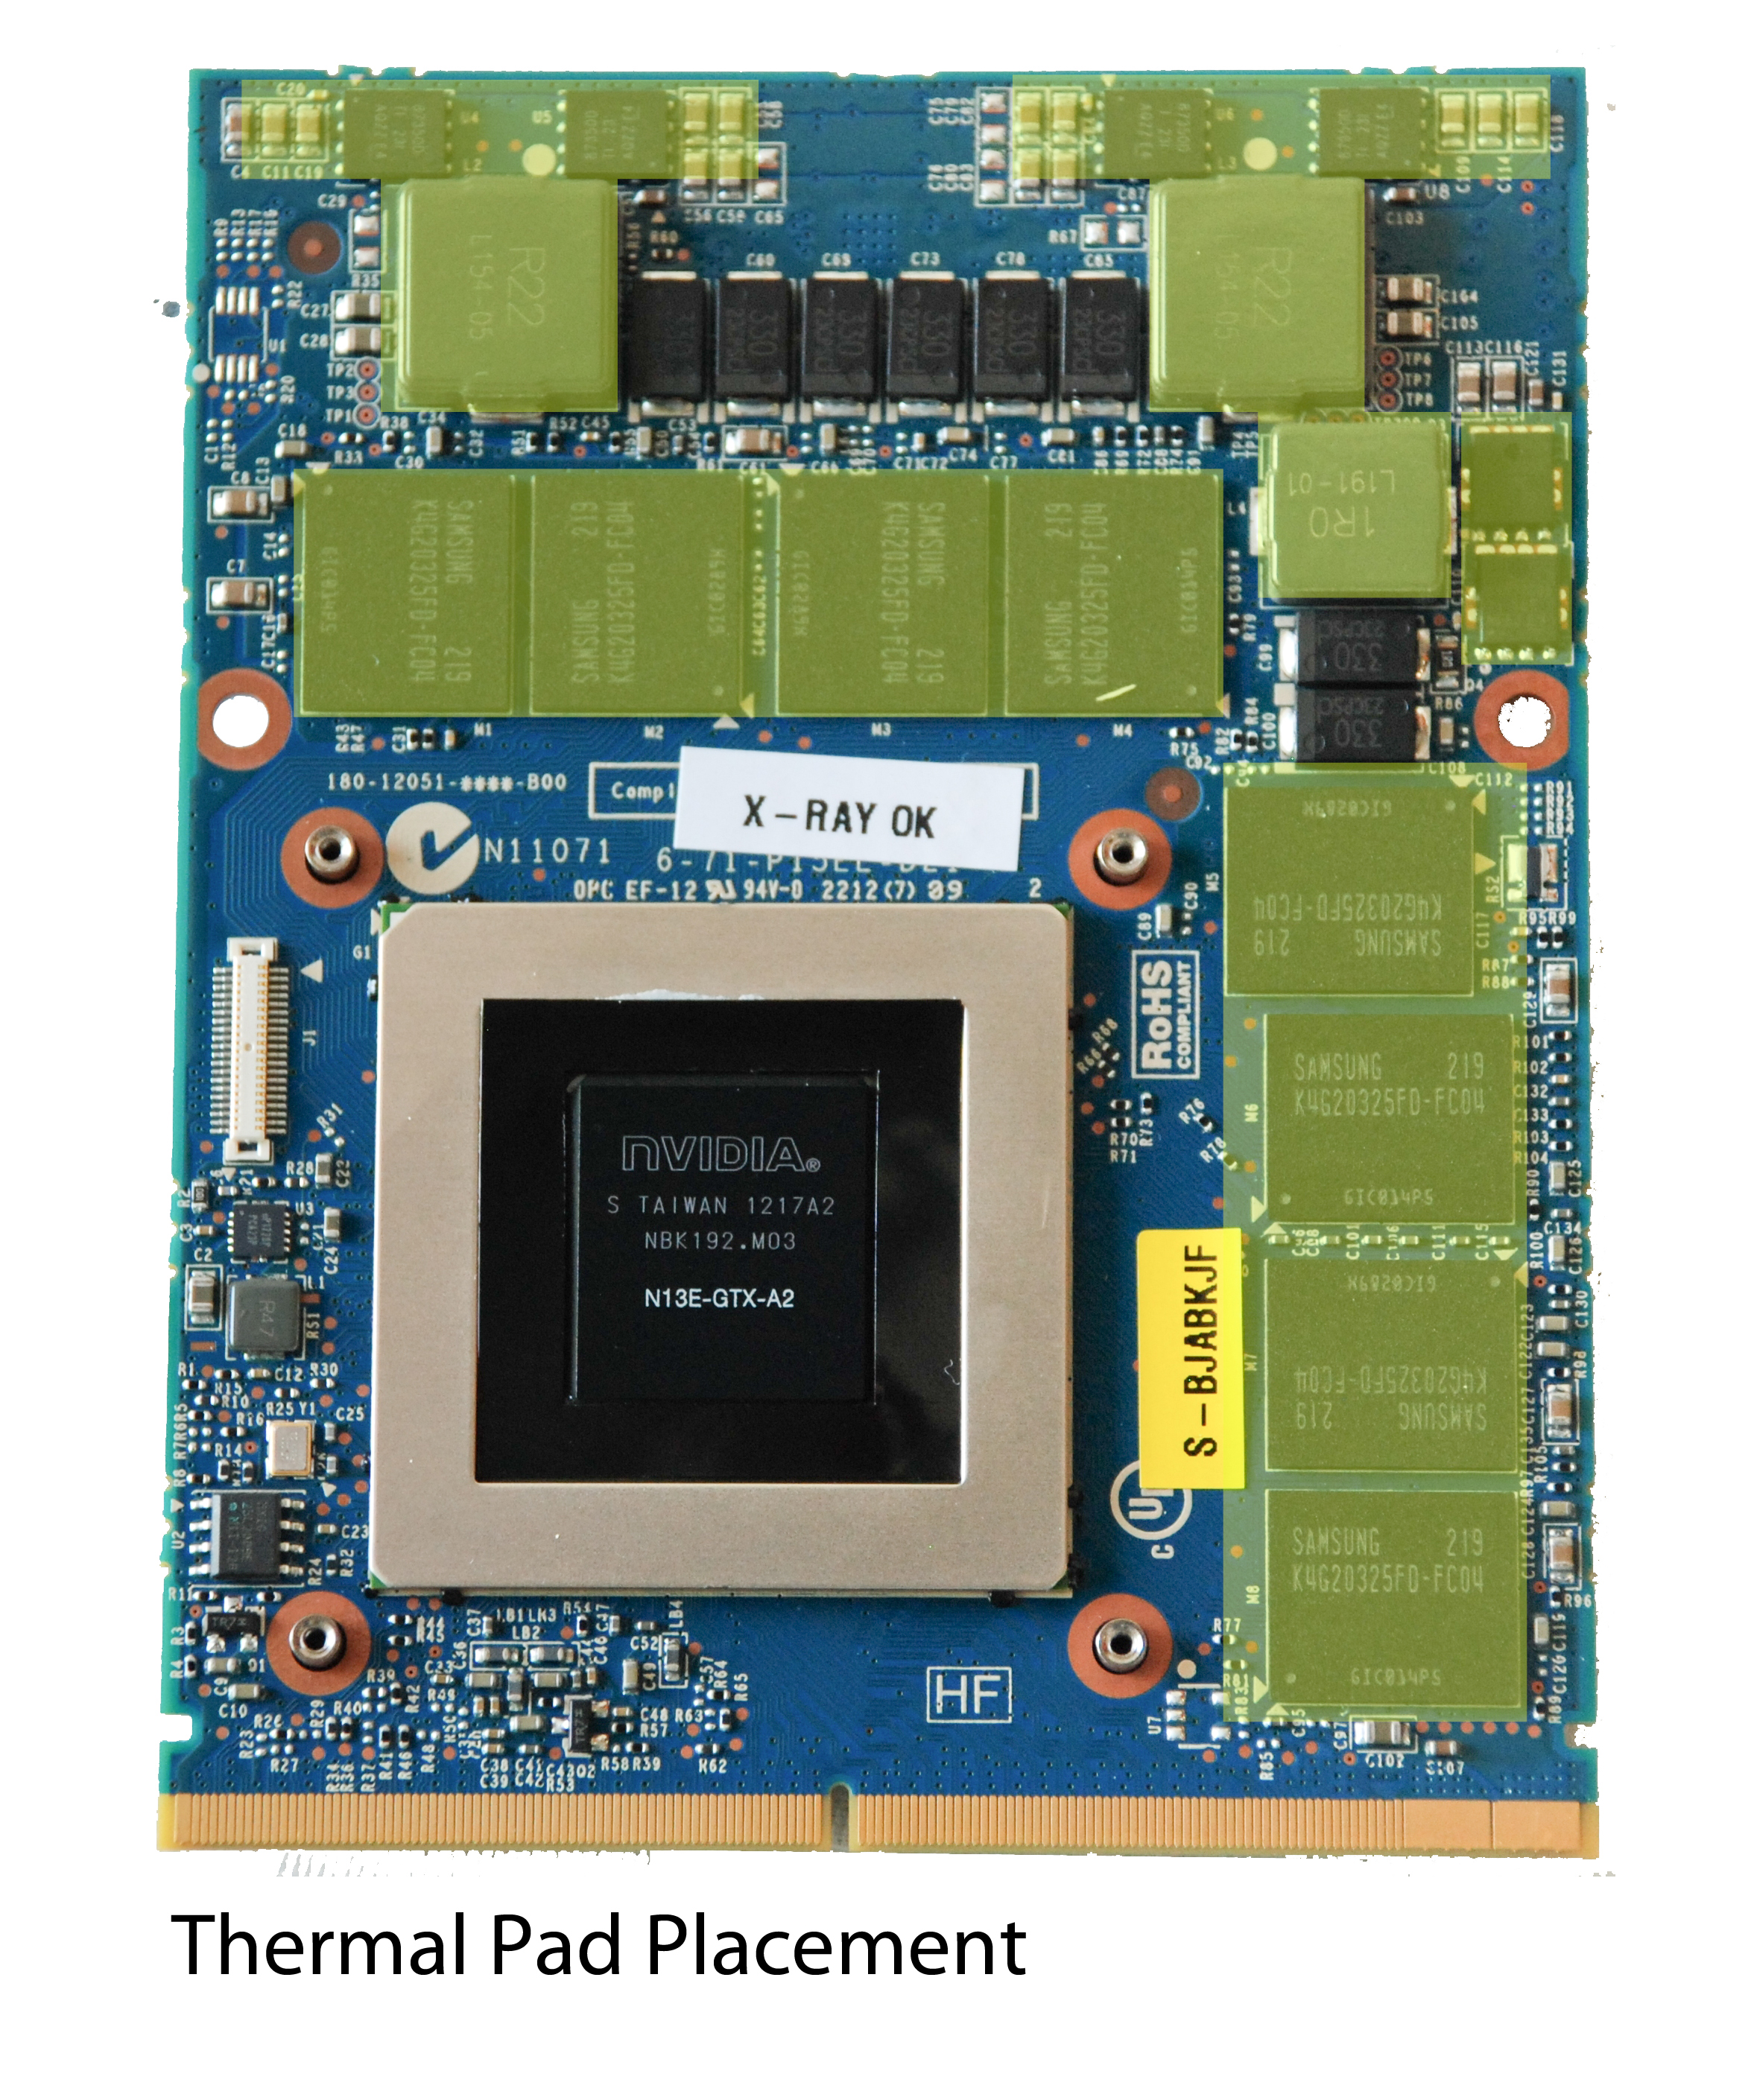
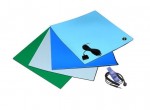
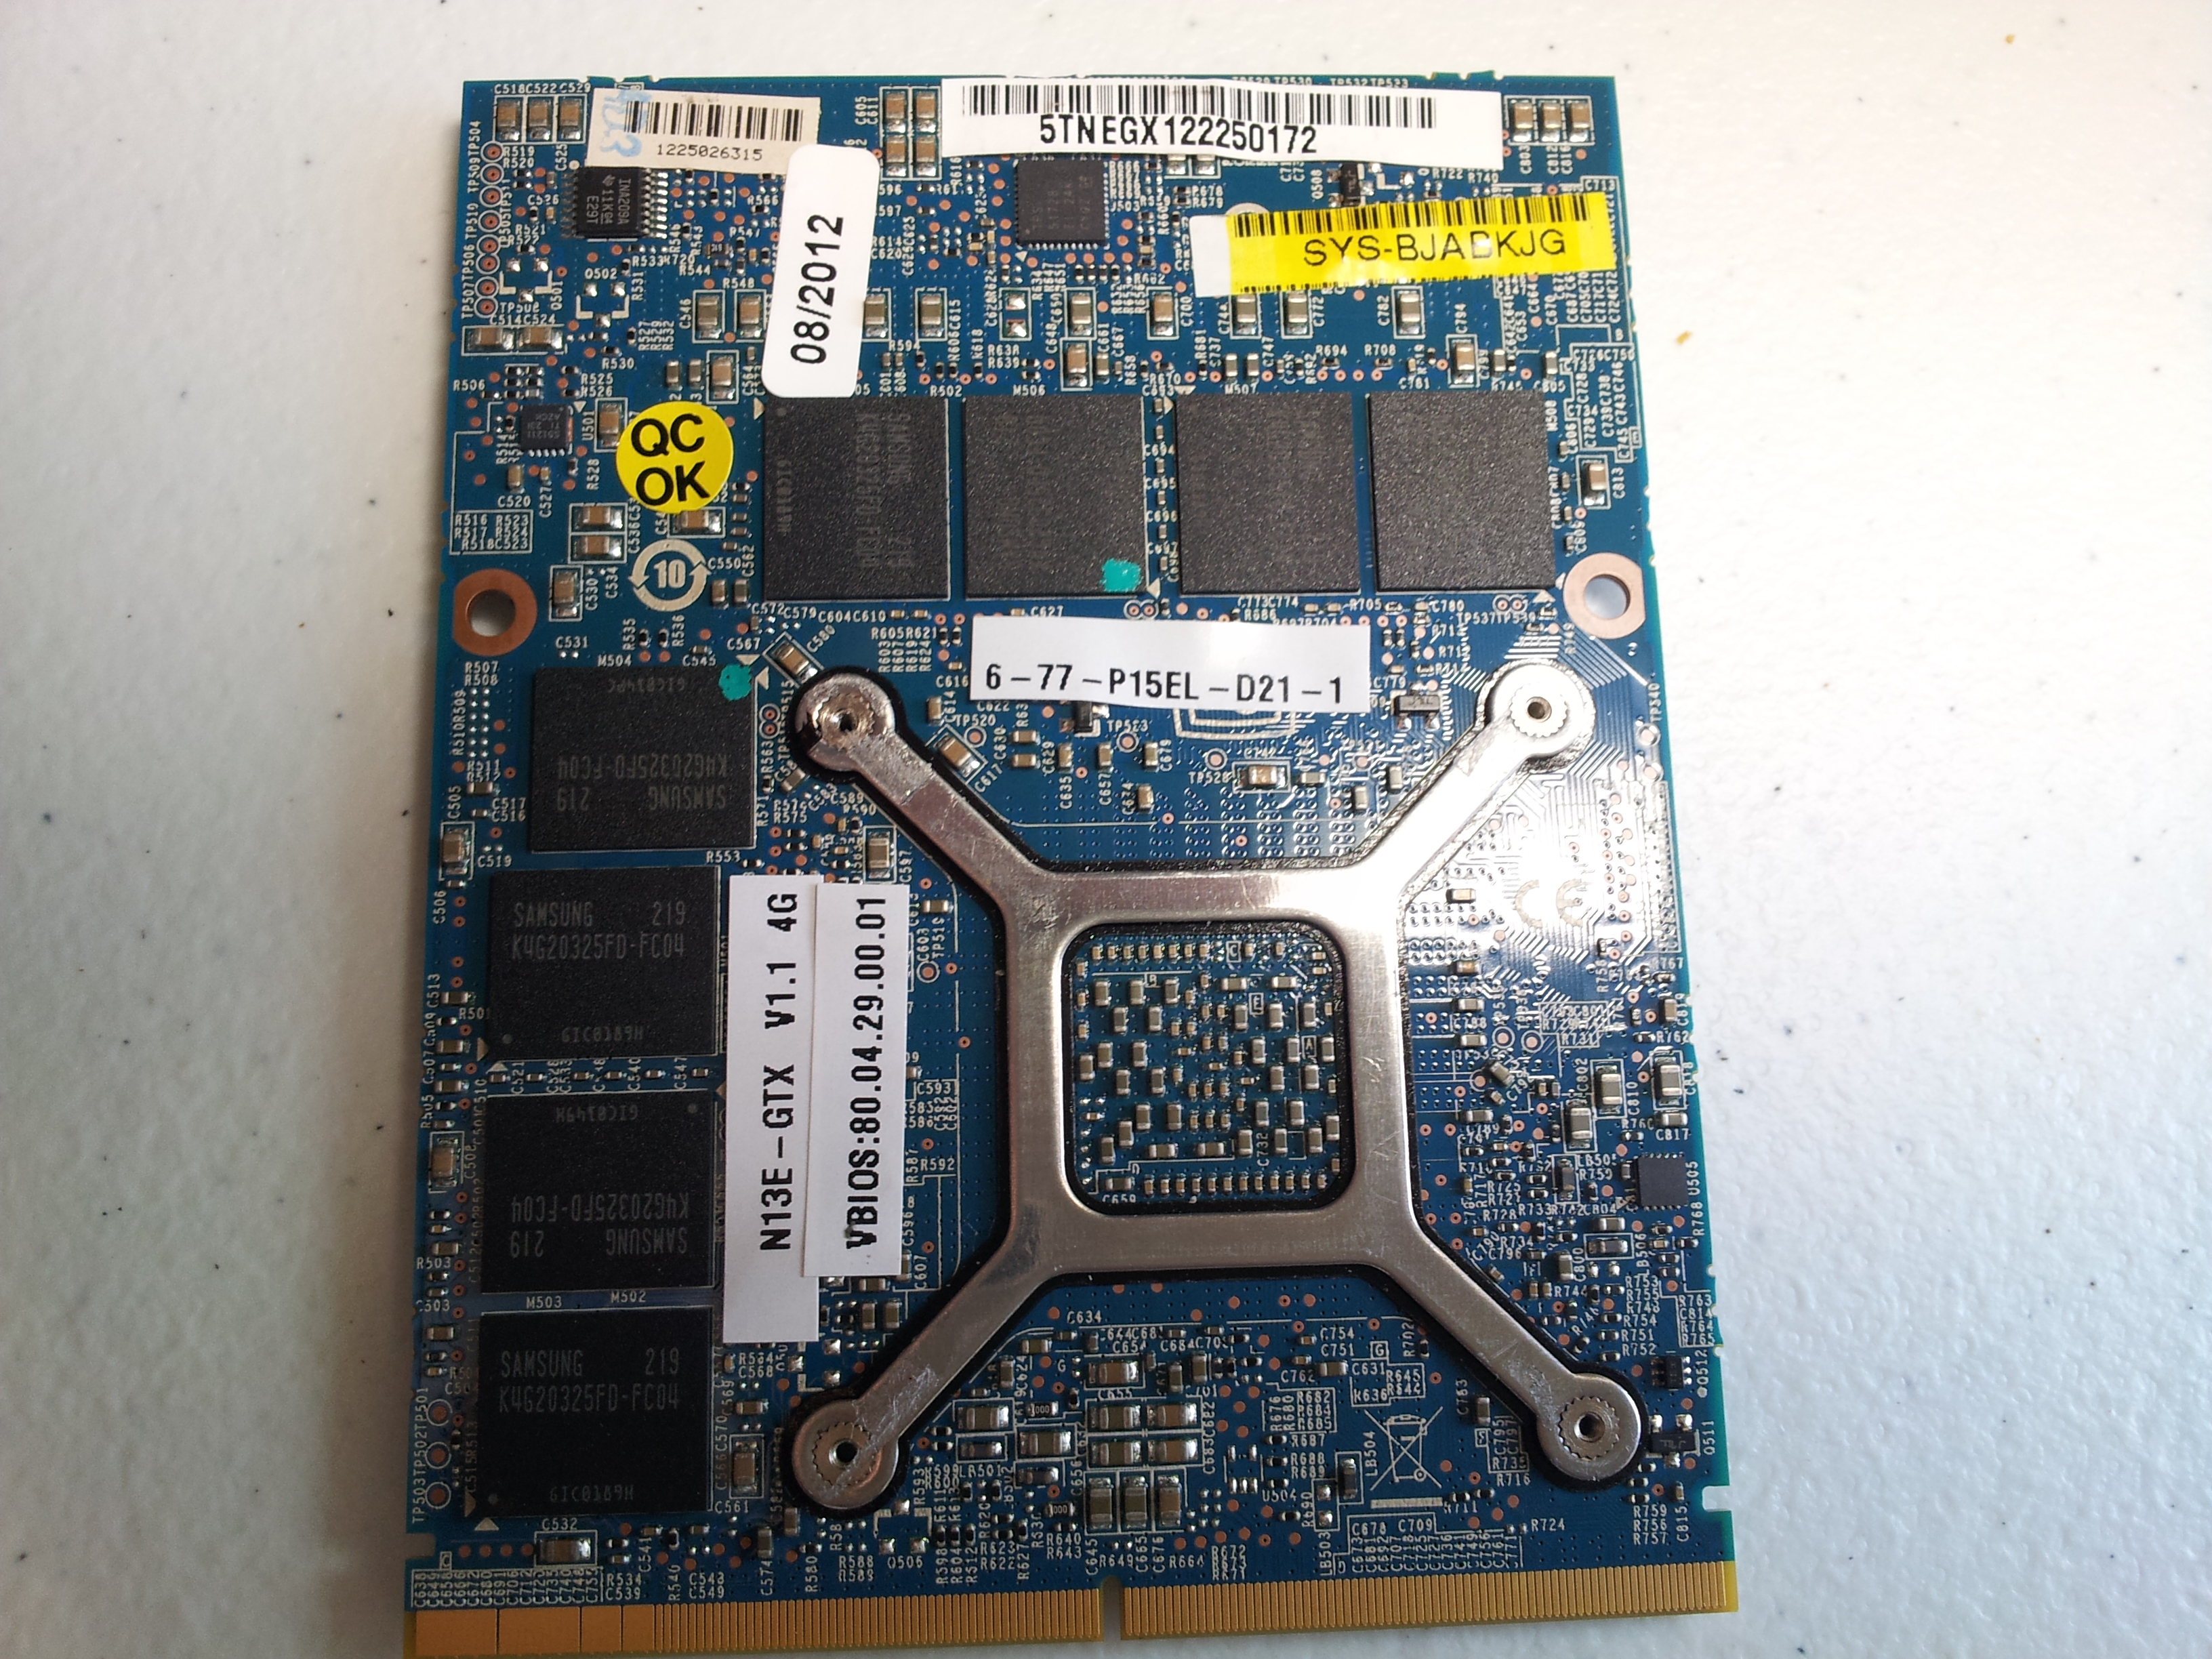
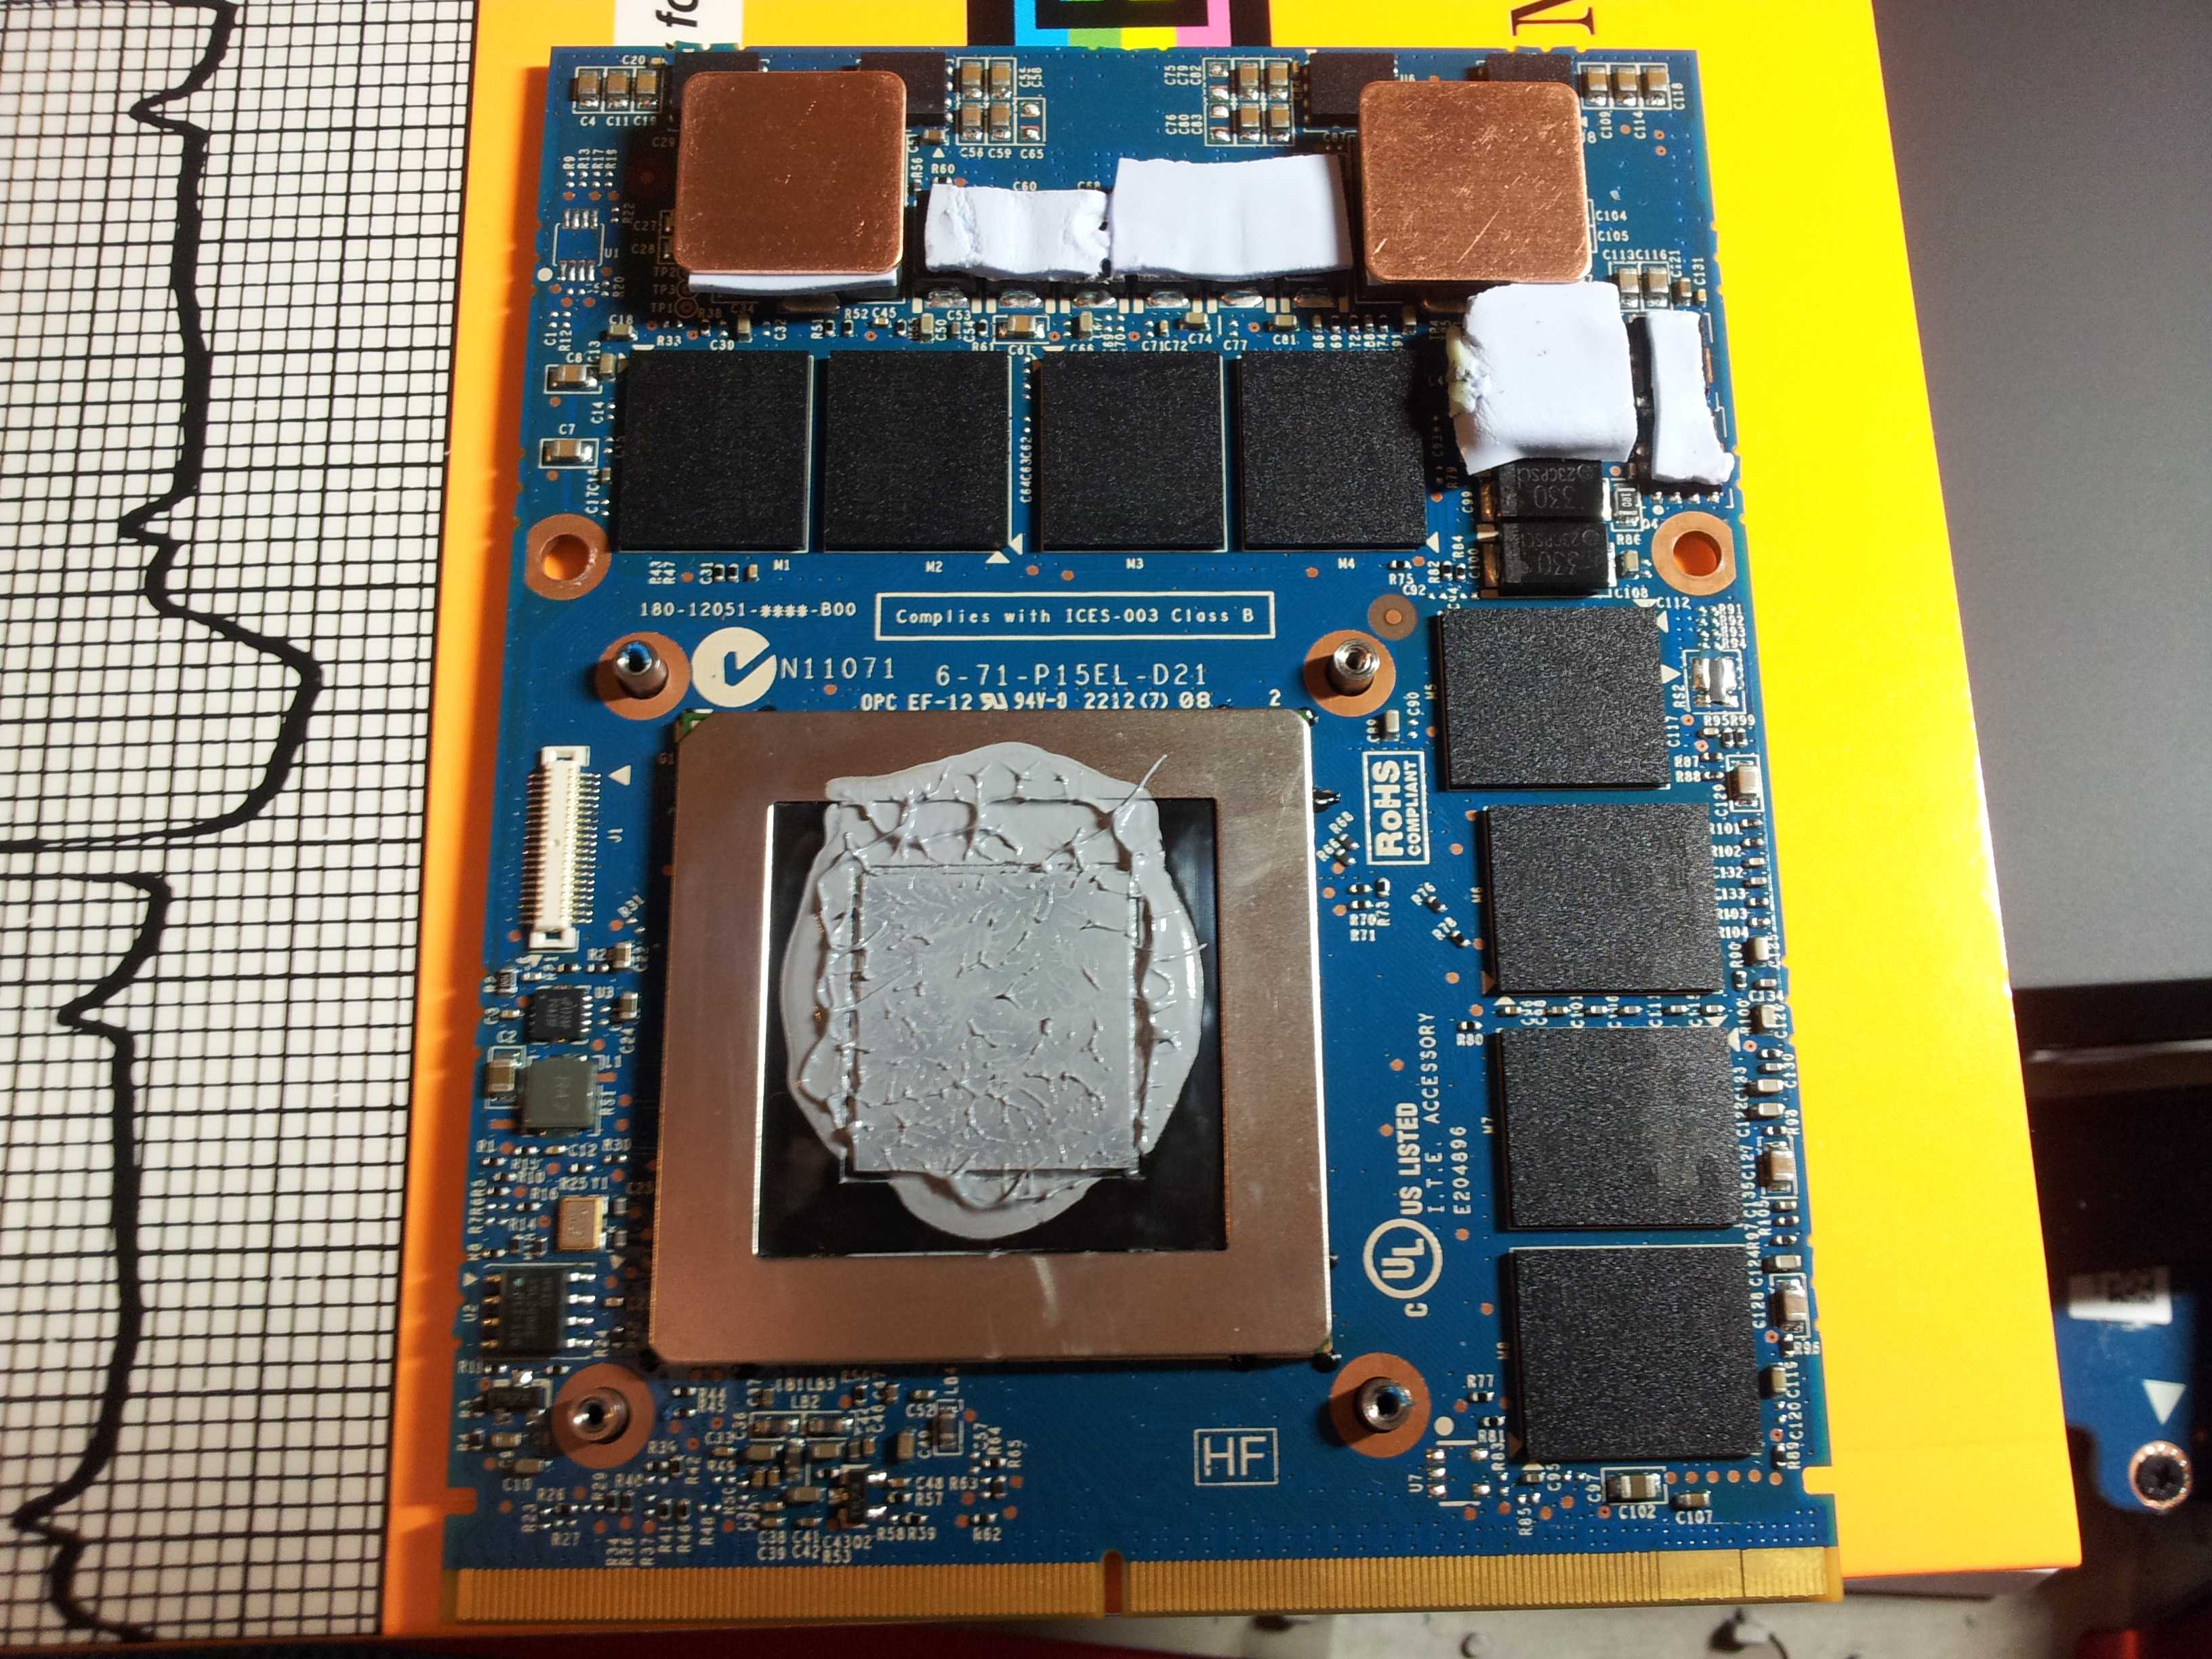
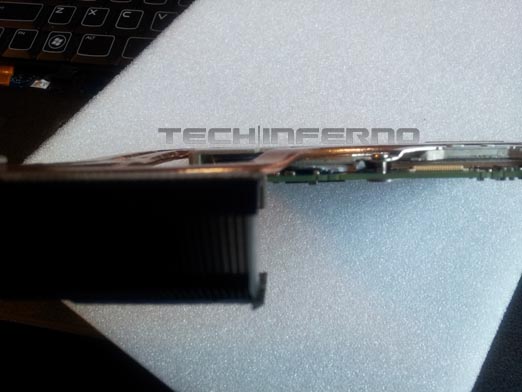
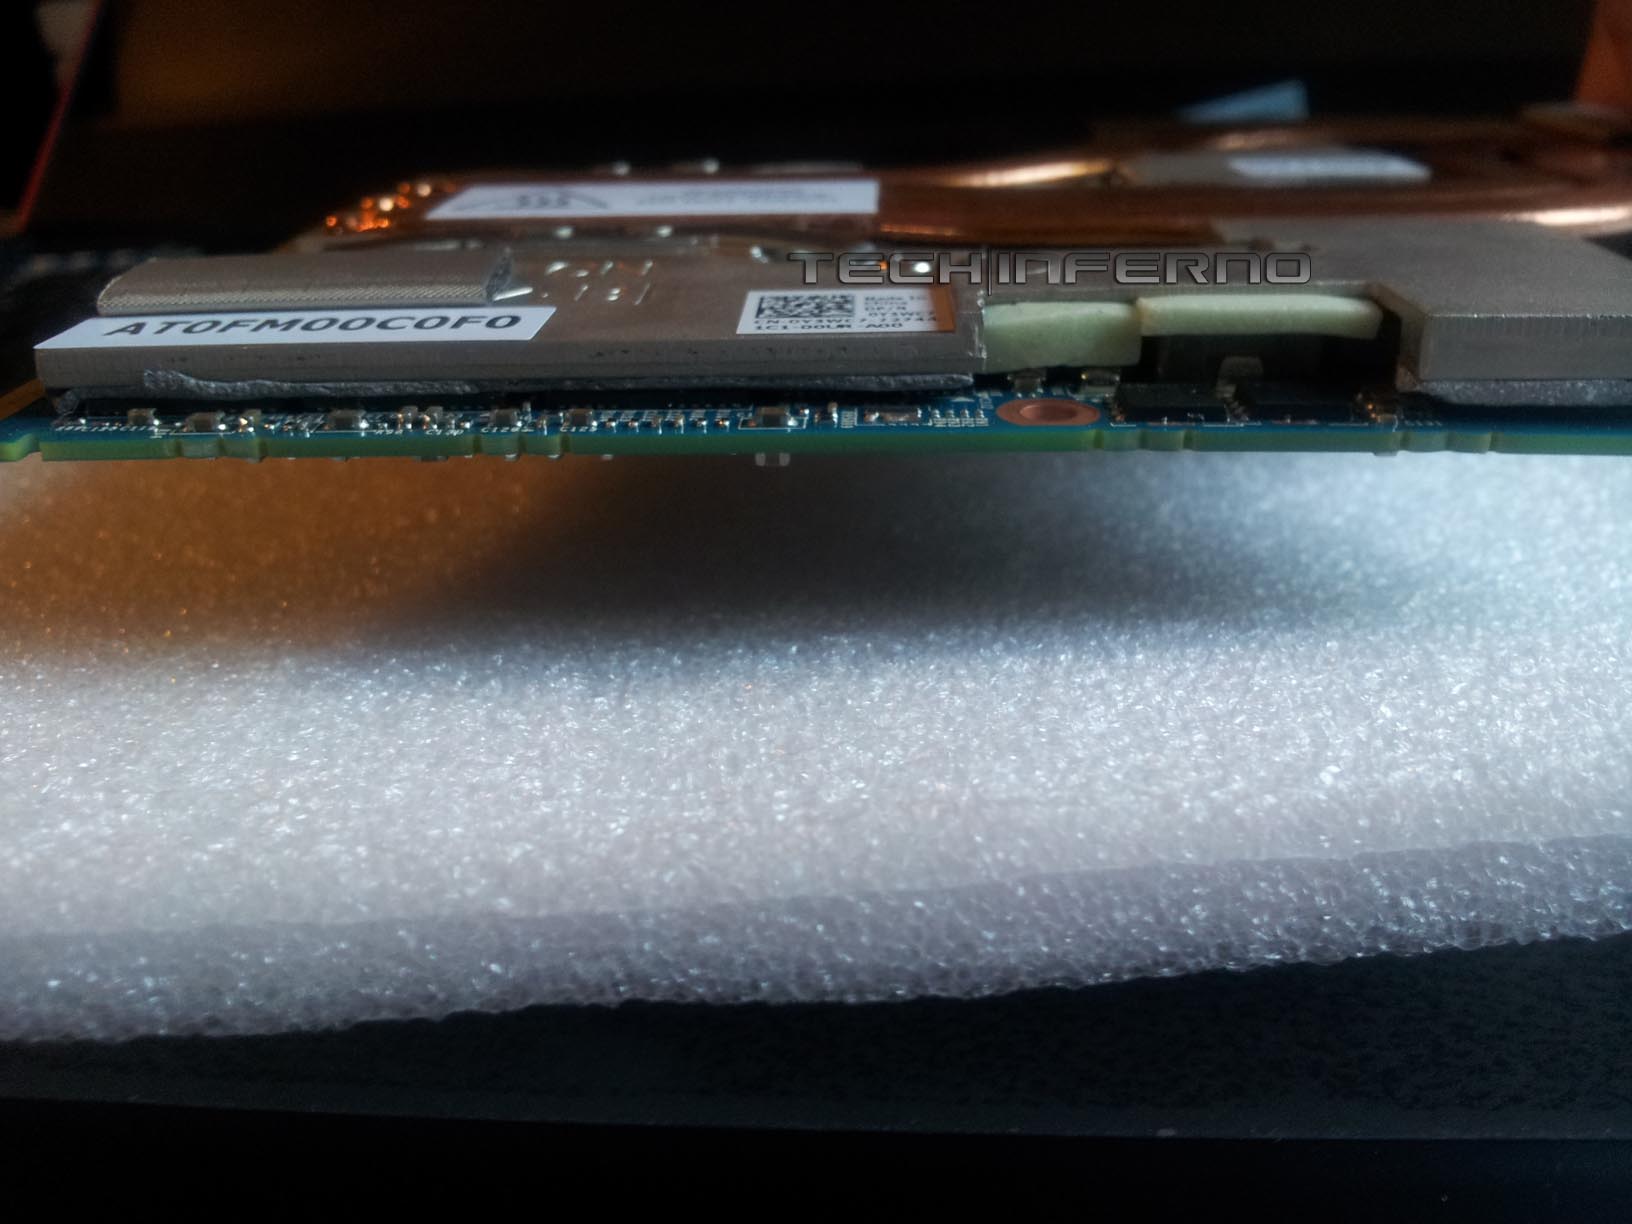
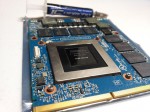
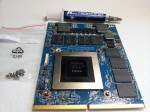
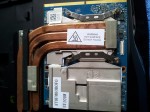
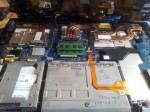
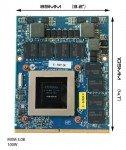
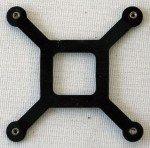
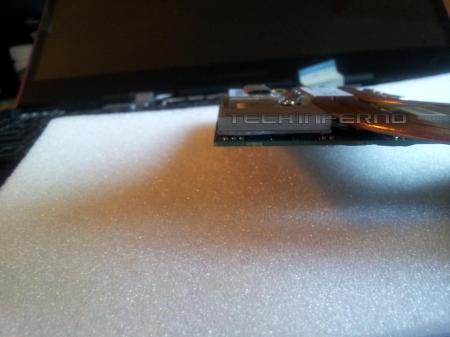
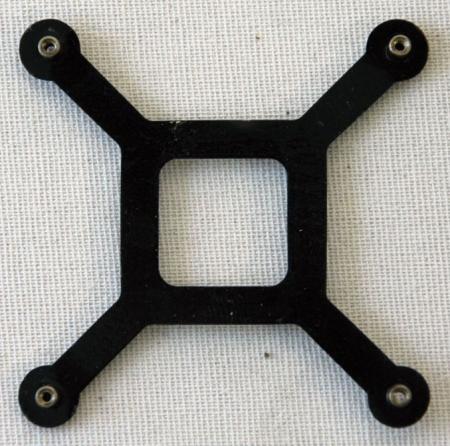
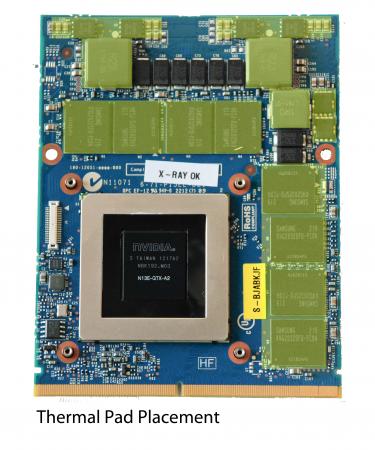
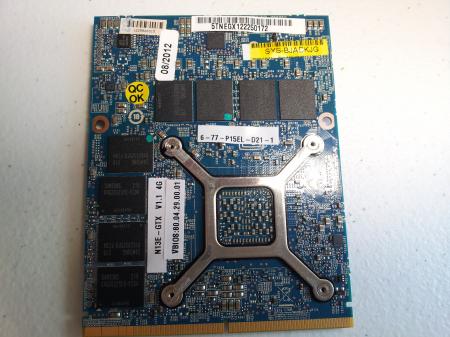
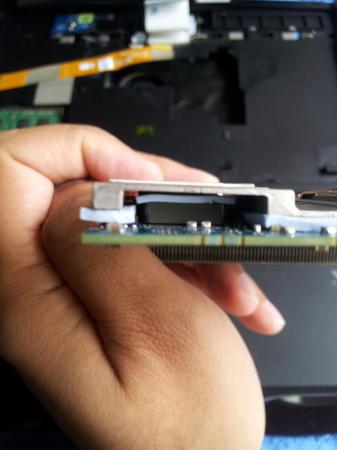
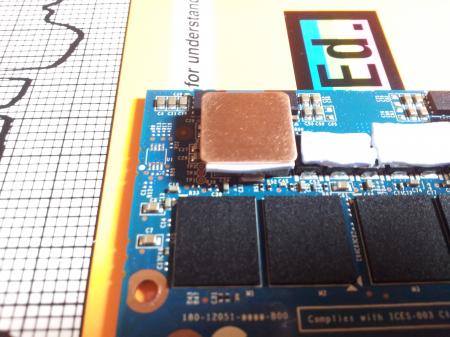
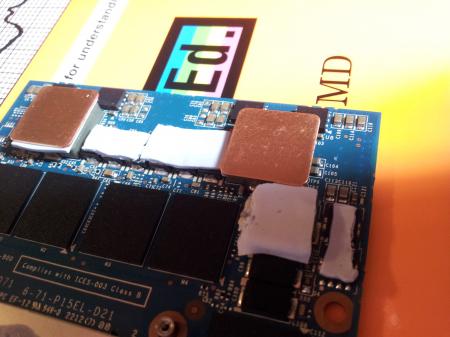
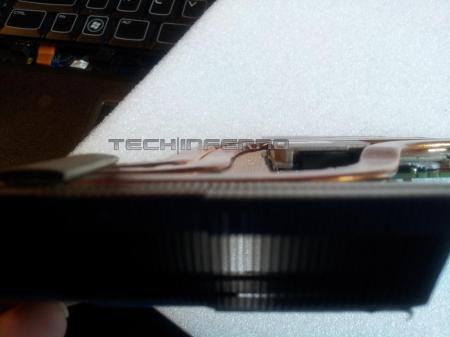
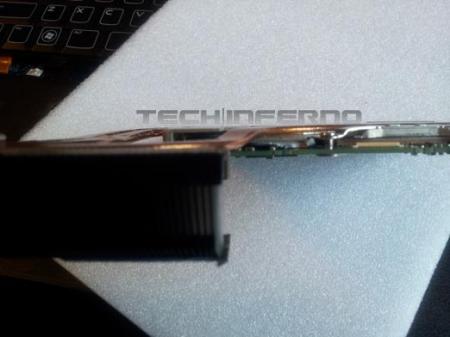
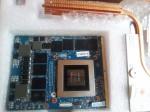
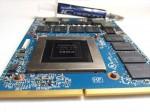
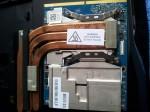
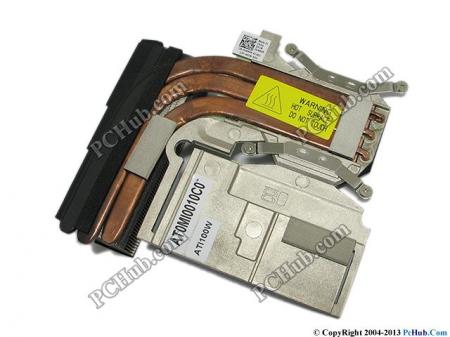
Officially, the upgrade path for the Alienware M18x-R1 ends with the nVidia GTX 580M but is that really going to stop the Tech|Inferno enthusiast from trying the latest and greatest? Absolutely not! So let’s get started. Parts & Tools Needed Quantity Part Needed (1) or (2) Clevo GTX 680M Kit from RJTech (1) X-Bracket (also included with 680M kit when purchased from RJTech) (1)Screws Screws (Also included with 680M kit from RJTech) (1)680M SLI cable SLI Cable (optional, can be found on eBay or directly from Dell) (1)IC Diamond ICD7 Diamond(recommended) or MX-4 Thermal Paste (1)Thermal pads Aftermarket Thermal Pads (1) ESD Mat + Strap (1) Precision Screwdriver Set (1) Techni-Tool Spudger Clevo GTX 680M Upgrade Kit When you purchase the Clevo GTX 680M Upgrade Kit from places like RJTech or MXM-Upgrade, they usually send a full kit that includes the X-bracket, screws, thermal paste, and Clevo heatsink. For the M18x-R1 or R2, the Clevo heatsink will be useless so you can elect to either resell it on eBay or just toss it in the garbage. A point of importance to keep in mind is that whether you opt to purchase the GTX 680M by itself or as a kit, be sure it comes with the x-bracket and Clevo screws (more information on this below). Typical price for an upgrade kit as of September 2012 is around $750-$850.00 USD. M18x Disassembly The Alienware M18x-R1 is a fairly sophisticated system that requires the user to have a familiarity with taking apart notebooks. Because some of the parts in the M18x are fragile, it is recommended you only attempt this if you feel you have sufficient experience. Refer to the Alienware M18x Service Manual to learn how to take apart the system. View Alienware’s Tear Down videos to see how its done. Installation Installation is pretty straightforward, be sure to use the ESD mat + strap when handling the M18x and GTX 680M so that no damage occurs to the sensitive electronics. Once the M18x has been opened up, remove the existing video cards. Ensure that you are using GTX 560M/580M video card heatsinks for full compatibility with the GTX 680M. You must use the screws (linked in the above table) designed for the Clevo GTX 680M X-Bracket since the Dell screws do not fit. Remove the retention washers from the 560M/580M heatsink in order to remove the original screws. Clean the previous thermal paste from the GPU using isopropyl alcohol and a cotton pad. Alternatively, coffee filter paper also works well. Place the thermal pads on the video card according to the picture below: One problem you may encounter while fitting new pads is that the heatsink does not make full contact with the inductors on the video card. To alleviate this, a thicker aftermarket thermal pad can be used or copper shims + ICD7 such as the photo below: Once the thermal pads and/or shim have been placed, do a test placement with the heatsink to ensure all the thermal pads make contact with the heatsink. An example of proper contact is illustrated in the photos below: After proper pad contact has been determined, place a thin line of thermal paste across the GPU, seat the heatsink and fasten it with the screws. Both the right and left heatsinks require different fitting of the pads so always check for proper contact before installation. Driver .inf Modification The Clevo GTX 680M may require the proper device id to be added to the nvcv.inf file found in the Display.Driver directory. Credit: jhmonroy Instructions Using Notepad, open nvcv.inf from the ‘Display.Driver’ directory (I suggest you copy a backup of file elsewhere) (Using the replace function) Replace all occurrences of DEV_11A0&SUBSYS_51051558 with DEV_11A0&SUBSYS_xxxx1028 (You can replace any GTX 680M Dev ID code you wish) Replace all occurrences of %NVIDIA_DEV.11A0.5105.1558% with %NVIDIA_DEV.11A0.xxxx.1028% <–Dell hardware ID. Replace all occurrences of NVIDIA_DEV.11A0.5105.1558 with NVIDIA_DEV.11A0.xxxx.1028 The latest beta drivers require more extensive modification that go beyond the scope of this article at this time. However, there are modified nVidia beta drivers available at LaptopVideo2Go that have the .inf files already modified for both the desktop and notebook and thus are a simple point and click installation–which is what we recommend. Update 9/13/12: You can grab the latest 306.23 modded drivers from our forum to use with the M18x-R1 and Clevo GTX 680M. Clevo GTX680M Gallery


-
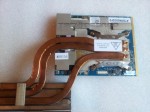
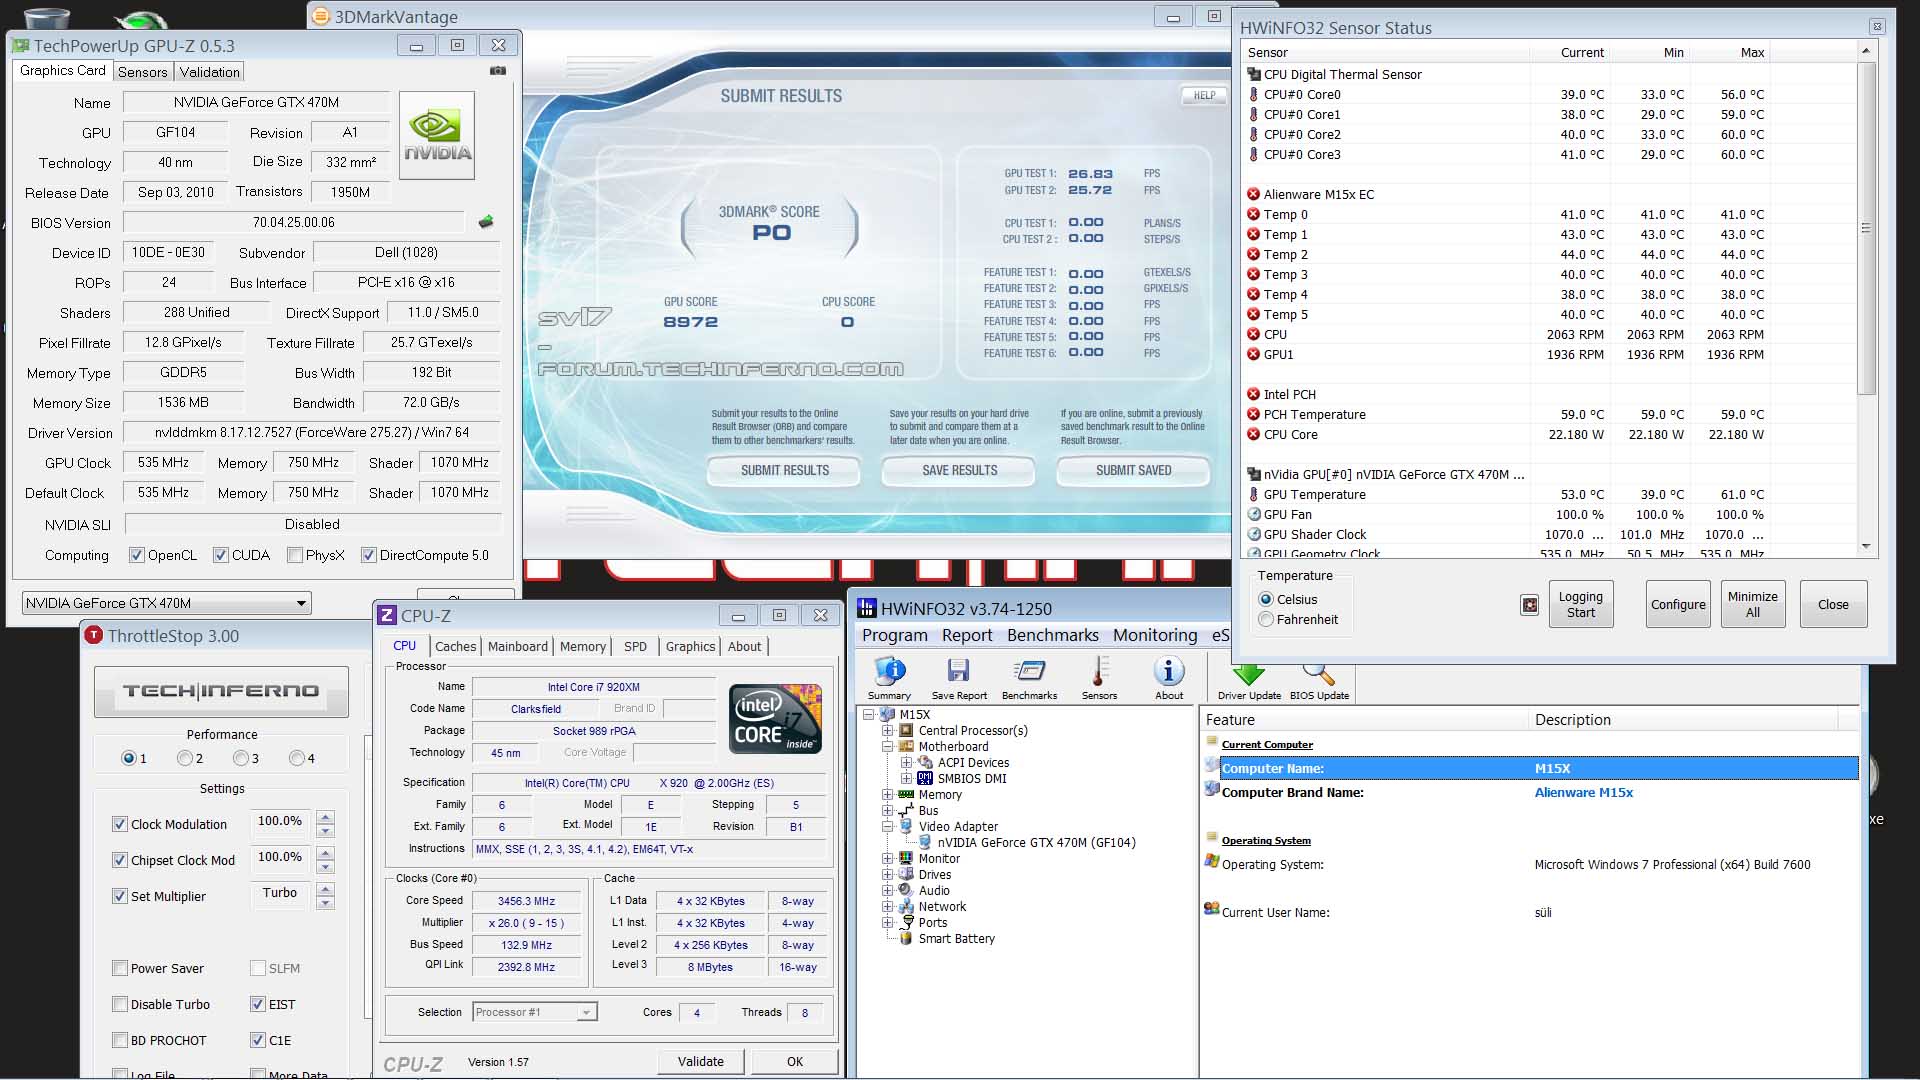
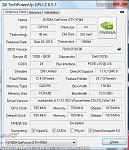
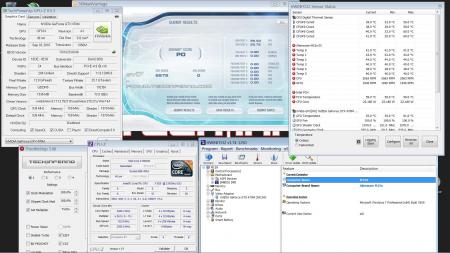
Guide – M15x with Nvidia GTX 470m IMPORTANT: The Nvidia 470m is not officially supported by Dell. Upgrading to this card may void your warranty. Some background to this mod: The first guy who tried to put a Nvidia 470m in an Alienware M15x was @iloveb00bs in December 2010, shortly after the card got released.Unfortunately it didn’t work as desired, the card worked, but only at 2d clocks. All attempts to bring it to 3d clocks failed, and the card wasn’t supported by Nibitor support at this time.Also @widezu69 didn’t get it to work a couple of weeks ago, so I didn’t think it would be possible. But in the process of trying to upgrade the Asus G73JW of a colleague I got my hands on a Nvidia GTX 470m and since we didn’t get it to work in the G73, I thought let’s try it again in the M15x. I had to mod the vbios to get it running at 3d clocks. I’m not that experienced with Nvidia cards, so that’s probably why it took me a couple of attempts to get it working. First I changed the 2d clocks and voltage (P3 in Nibitor) to 3d values. The result was that the card idled at 3d clocks, but as soon as I opened a 3d application it went downclocked itself to about 73MHz core and got to 2d voltage again… pretty annoying. After some more tests I realized that I had to change the lower 3d clocks and voltage (P7 in Nibitor). This did the trick. Apparently the card only checks P7 and P3 in the VBIOS, the actual 3d clock entries (P15) seem to have no effect at all. The fan control works perfectly. Haven’t tested DP/HDMI audio yet, but I’ll do this sometime soon. Things to do before exchanging the card: Download the drivers. I used the latest Nvidia beta driver (v275.27) and the modded .inf files from laptopvideo2go. As the card comes from Clevo I guess the Clevo (and resellers) driver will work as well. But I usually prefer the latest driver for performance and stability. Also get GPU-Z for monitoring your video card and verifying it. Make sure you have thermal paste, maybe some new thermal pads as well as something to clean the heatsink (e.g. isoproply alcohol) and some cloths around. I also highly recommend using a grounded ESD-mat and a wristband. Know what you’re doing. You need to partially disassemble your machine to get to the GPU. Prepare yourself thoroughly, check out my little GPU exchangement guide and if you need more information also the M15x service manual, as well as the official teardown video. It can be helpful to write down all the steps in advance when you’re doing this for the first time.In case there’s still something unclear about the disassembling procedure after checking out all the stuff I just mentioned, just ask. Exchanging the GPU is really pretty easy. Very important: Make all the necessary preparations to flash the modified vbios to the card in order to get it working at 3d clocks:You’ll need a DOS bootable USB drive with NVflash on it. If you have already such an USB drive you can skip the next step and simply copy the mod470m.rom file from the attached archive to your stick. If you first need to create such an USB drive follow these instructions: Creating a bootable DOS USB drive (by @Brian ) Step 1: Download all the following files as they will be needed throughout this guide.1. Download the HP USB Key Utility: HP USB Disk Storage Format Tool – v2.1.8 Download – EXTREME Overclocking2. Download the Windows 98 system files: Windows 98 System Files Download – EXTREME Overclocking Step 2: Creating a Bootable USB Drive to Flash to GPU1. Install the HP USB Key Utility2. Launch the HP USB Key Utility and do the following: - Insert your USB thumb drive. - Select File system as “FAT32″ - Select Format Option as “Create a DOS bootable Disk…” - Checkmark the box that says, “Quick Format” - Locate the directory you extracted the Win98 files. - Format the USB key using the the Win98 files. The upgrading procedure: Uninstall your GPU drivers. Make a power drain (Turn off your M15x, remove the power cord and the battery. Then press and hold down the power button (Alienhead) for about 10-20 sec. Remove your GPU - Here’s a little guide with pics in case you need some help. Clean your heatsink, if necessary replace the thermal pads with new ones. Make sure the 470m has a retention bracket on the back of the GPU. If not take the one from your old GPU and put it there. Properly insert your GPU, make sure that it sits properly and that the die is clean. Apply the thermal paste, and attach the heatsink. Then (after reassembling your system), boot, install the drivers and reboot. Make sure the fans are running (otherwise you probably forgot to plug in the fan). Open GPU-Z and verify your card and the clocks. Default 3D clocks are 535/750/1070 MHz (core/memory/shader), you can see them in the “Graphics card” tab of GPU-Z. Make sure PowerPlay is enabled in the Catalyst Control Center. Also make sure Stealth Mode is deactivated. Check your temperatures. Idle temps should be 40-50°C, depending on your ambient temp of course. While gaming or doing something similar GPU-intense the system will run significantly hotter, 60-70°C, maybe a bit higher. >>>Now you need to flash the modded vbios to your GTX 470m in order to get your card working at 3d speeds<<< WARNING: Flashing the vbios of your GPU always involves some risk and can brick your card in case something goes wrong. Make sure you know the exact procedure before doing this. I do not take any responsibility for damaged cards, systems or whatever. -Plug in your properly prepared USB drive -Make sure your system is plugged in (AC adapter and to be safe battery as well) -Reboot -When you see the Alienhead press [F12] to get to the boot menu, choose “Boot from USB” A command prompt will appear. First of all, make a backup of your original 470m vbios! Use the following command: Code: nvflash -b orig470m.rom Before flashing, test whether the file isn’t corrupted (errors while copying it to the stick or similar): Code: nvflash -v mod470m.rom The image size must be 64000 bytes and the CRC32 3C8FA599 Now flash the modded vbios: Code: nvflash -5 -6 mod470m.rom Press enter. A couple of warnings will appear, follow the instructions on the screen to confirm the flash procedure. Remember, some Keyboard layouts have the [Z] key at the place where the US layout has the [Y] key. So in case you have such a keyboard you’ll need to press [z] instead of [y], otherwise the flashing procedure will get cancelled. Then press [Ctrl][Alt]+[Del] to reboot your system, unplug the USB stick. You can use GPU-Z to verify the flash of the vbios. It should look like this afterwards: Here some first benchmarks, both at stock clocks, PhysX off and the rest in the Nvidia control panel on standard settings, CPU at 3.2GHz. I haven’t seen other 470m benchmarks of other systems, but 9k stock vantage seems reasonable. The card is probably pretty overclockable, but I haven’t tested this yet. I have yet to find overclocking tool with which I can set the core clock manually, so far I only managed to change the memory and shader clock with Nvidia Inspector. Otherwise I’ll have to modify the vbios in order to overclock it (which isn’t the best solution as I can’t really push the card with this method) However, it seems the card can be overvolted, haven’t tested it yet but Nibitor allows me to change the voltage to 0.99V (instead of 0.94V). The only issue so far is that the card runs either at 3d clocks or at 2d clocks. Nothing between this.


-
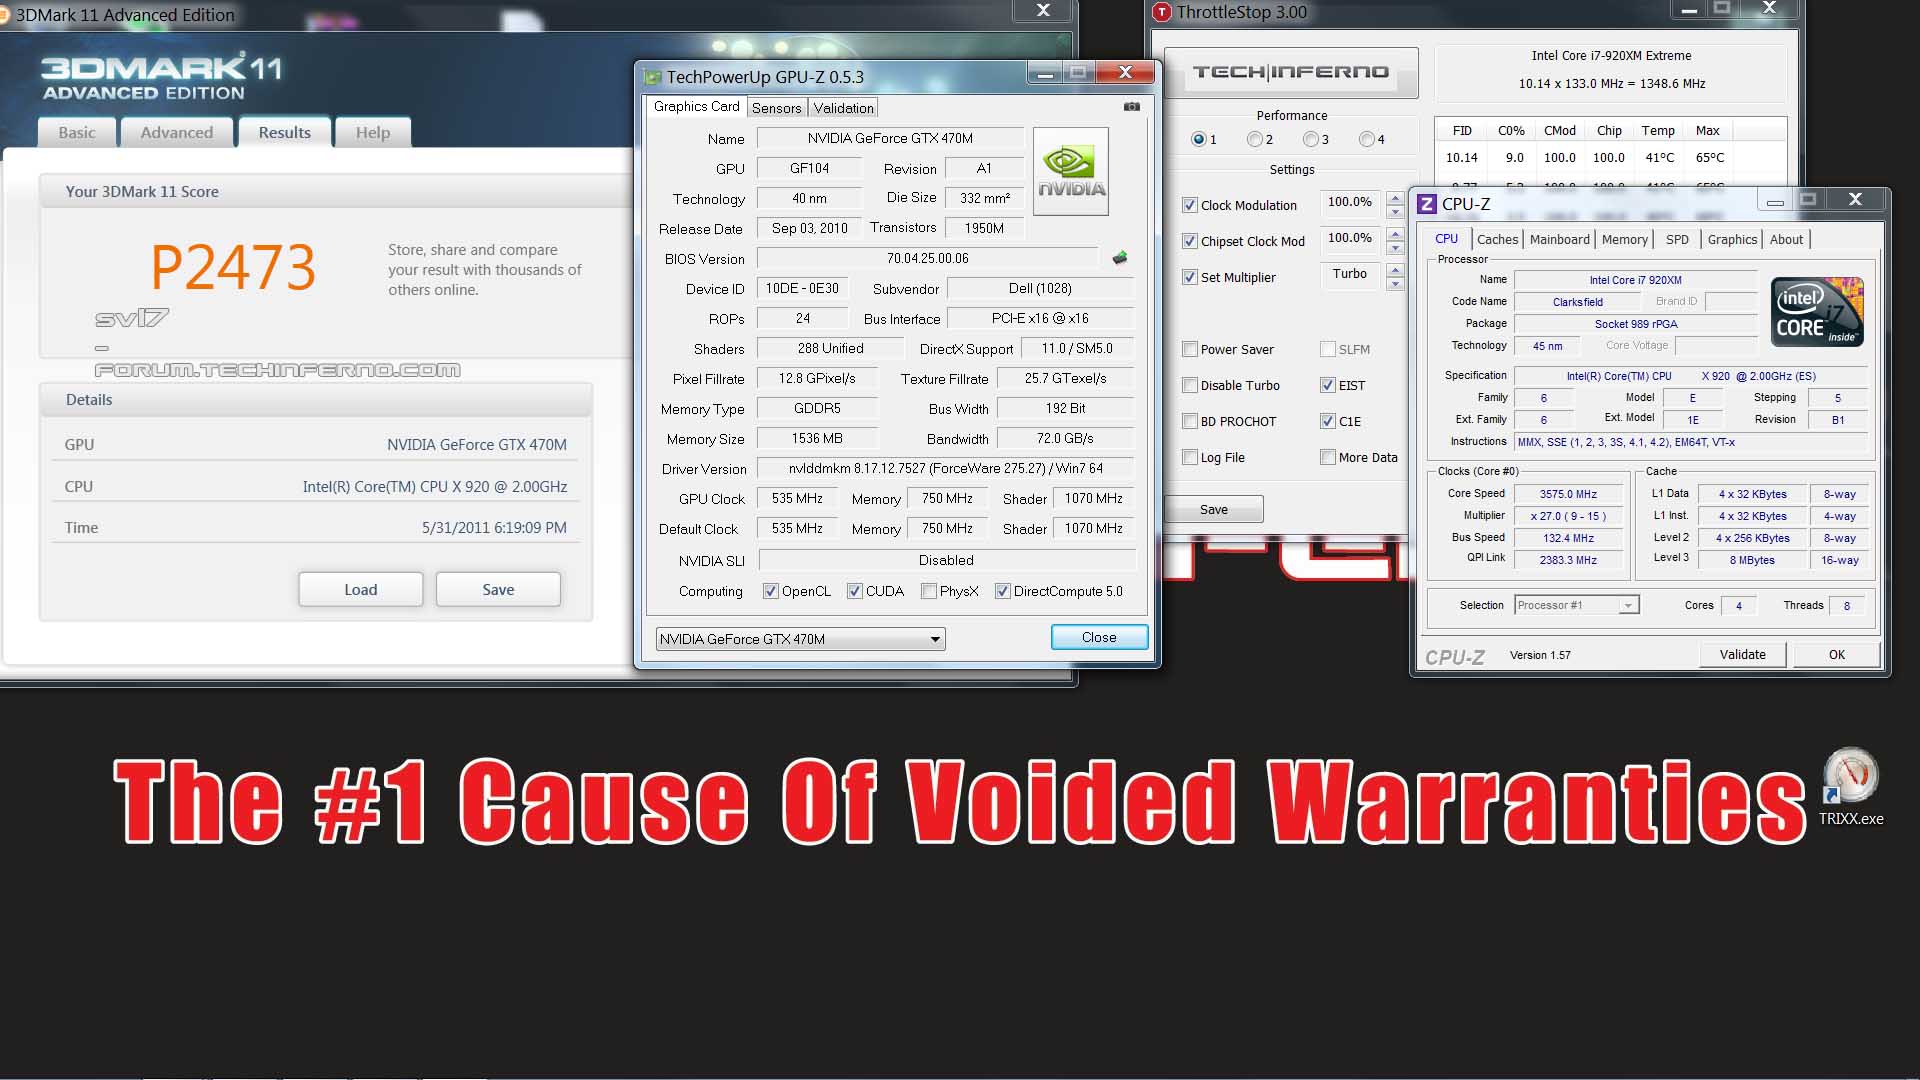
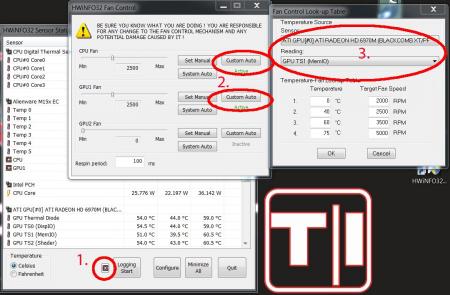
IMPORTANT: The 6970m is not officially supported by Dell. Upgrading to this card may void your warranty. The 6970m is a powerful card, it will draw more power and produce more heat. This card can significantly improve the performance of your system, however, the long-term effects of running this card in a M15x are currently unknown, but it works great so far. Cards that are known to work: The card Dell uses in the M17x R3: This has only been tested for a short while so far, but it seems to work perfectly fine. Credits go to Rogue-OP and iloveb00bs, the first guys who tried to put a 6970m in a M15x. -DP/HDMI works, confirmed by Strigae, fan control works It seems you need to install the M17x R3 drivers first before you can get the official AMD drivers. I guess installing for example the modded 11.4 will work as well. Dell Part nr. is: V9XKH.Good luck when ordering one from Dell, depending on where you live and what kind of rep you get on the phone they might not want to sell you the card as it isn’t officially available for your system. Call again in this case, or if you know someone with a M17x R3 let him order the card for you. 6970m from MXM-upgrade.com: Works great, but no fan control. The fans are constantly at a high speed, but not completely at full full speed. For now you’ll need to manually control the fans with HWinfo32. -DP/HDMI works. Sound through HDMI works when you install the Dell 6970m vbios and the M17x R3 HDMI audio driver. Here are the instructions for this. Card can now be ordered for the M15x from mxm-upgrade. Clevo (and resellers) 6970m: The card from Clevo and resellers (Eurocom etc.) works as well, but make sure you get a version of the card which has holes for the back plate! Some of these cards have the screw holes for mounting the heatsink soldered on which makes it impossible to use the Dell backplate, and since Clevo uses slightly smaller screws than Dell you can’t simply put your heatsink on such a card. Contact your dealer in advance to make sure you get a card which doesn’t have the screw holes soldered to the PCB, otherwise you’ll have to remove it (which is difficult) or use some smaller screws on the heatsink. For all these cards the heatsink of the M15x fits perfectly. No modification needed. Cards from other vendors / manufacturers may work as well. If you got a different 6970m running in your M15x let me know and I’ll upgrade the list. Things to do before swapping the cards: Download the drivers. This modded 11.5 should work, click on “MobilityMod Windows 7/Vista” in the linked thread. Also get GPU-Z for monitoring your video card and verifying it, Trixx, for under- and overclocking and in case you haven’t got a Dell card also HWinfo32 (I recommend getting it anyway since it is a great system monitoring tool) Make sure you have thermal paste, maybe some new thermal pads as well as something to clean the heatsink (e.g. isoproply alcohol) and some cloths around. I also highly recommend using a grounded ESD-mat and a wristband. Know what you’re doing. You need to partially disassemble your machine to get to the GPU. Prepare yourself thoroughly, check out my little guide. In case you need more information, there’s also the M15x service manual, as well as the teardown video. It can be helpful to write down all the steps in advance when you’re doing this for the first time. The upgrading procedure: Uninstall your GPU drivers. Make a power drain (Turn off your M15x, remove the power cord and the battery. Then press and hold down the power button (Alienhead) for about 10-20 sec. Remove your GPU. Clean your heatsink, if necessary replace the thermal pads with new ones. Make sure the 6970m has a retention bracket on the back of the GPU. If not take the one from your old GPU and put it there. Also make sure you read the section about the “retention bracket problem”. Properly insert your GPU, make sure that it sits properly. Apply the thermal paste, and attach the heatsink. Then (after reassembling your system), boot, install the drivers and reboot. Make sure the fans are running. Open GPU-Z and verify your card and the clocks. It should look more or less like this. Default 3D clocks are 680/900MHz (core/memory) and 150/100MHz when idling. Make sure PowerPlay is enabled in the Catalyst Control Center. Also make sure Stealth Mode is deactivated. Check your temperatures. Idle temps should be 40-50°C, but this also depends on your ambient temperature . While gaming or doing something similar GPU-intense the system will run significantly hotter, 70-80°C, maybe a bit higher. Note: By lifting the back of your system a bit (for example with a book) you can improve the airflow in the system. This can really help lowering the temps. The back plate problem: The retention bracket of the 6970m has a different size than the regular M15x cards (260m, 5850m etc.)When your card doesn’t come with this x-plate you need to take the one you have on your old GPU, but this one won’t fit properly. Nevertheless it works, even if it covers some resistors on the back of the card. Make sure you’re not shorting anything. Usually the back plate has an insulating black plastic pad on it, this will work. However, if your x-plate doesn’t have this pad on it, you must cover it with some thin, insulating tape. Here you can see the problem, in the first picture I marked the are which gets covered by the backplate and in the second picture the highlighted area shows where the plate should be. The space beneath the card becomes pretty tight, but it works. My advice is contacting your dealer before buying the card and asking whether he can provide the correct x-plate. (In case he tells you that you should use the one from your old card tell him it has a different size.) Power consumption: The power draw of the card is probably about 75-100W. I run this card together with an i7 920xm in my M15x and it works fine. Nevertheless you need to be careful, as the PSU of the M15x is only rated 150W. When doing some 3dM11 runs with both GPU and CPU overclocked I measured about 160-170W current draw from my system during the combined test. You really need to be careful when running this card, especially when you have an extreme processor (920/940xm). Pushing both GPU and CPU can (and will) bring the PSU to its limits (and above). Some numbers about the power draw when playing games, everything on stocks: Black Ops Zombies (everything on max): ~ 130-140W Portal 2 (everything on max): ~110-125W Medal of Honor (everything on max) ~140-150W Crysis 2 (set to “Hardcore) ~ 140-150W The device I use for measuring the power draw has an accuracy of about ± 10W. Fan control: In case you have a card which makes your fans running at a high speed all the time you will need to use HWinfo32 to automatically (or if you prefer, manually) control the fan speed. It’s possible to create a fan control look-up table and let HWinfo32 automatically control the fan speed by temperature. 1. Click on the fan symbol2. Click on “Custom Auto” 3. Choose the temperature sensor diode which you want to use as reference.4. Set the desired speeds/temperatures according to your needs. Do this for both GPU and CPU, ignore GPU2 fan. I recommend using the hottest GPU diode (usually MemIO).A big thanks to Mumak, the developer of this fantastic tool. Here you can find the official Alienware fan control thread in case you find a bug or need to know more. Warning: Adjusting the fan speed can be dangerous!! Always keep an eye on your temps and never forget to adjust the values before doing something CPU or GPU intense (in case you control them manually) Possible problems and solutions: Unable to install drivers. Solution: Try a different driver. Also contact your vendor, maybe he knows a specific one that works. Idle clocks are 250/900 instead of 100/150. Solution: Check your display settings and make sure only your internal notebook monitor is selected. 250/900 are the idle clocks when you’re connected to an external monitor (or when your display settings are got messed up, probably driver related) The GPU temps are crazy high! Solution: Repaste. You probably did a bad job with the thermal paste. Also make sure your system is dust-free and that the heatsink sits properly and is making contact (also check the pads where the memory modules touch the heatsink). While idling the GPU clocks change from 2d to 3d clocks and back all couple of seconds. Solution: This behaviour can be caused by the M17x r3 6970m driver (A00). Get the latest AMD driver and you should be fine. If you have this problem with a different driver try another driver version.
-
Helping a friend restore his pre-dell alienware M17x-R1 that one : The note got two ATI 3870 cards. The master card went bye bye, it still boots with it but with tons of artefacts. I need a way to dump the master vbios and write it to the slave card so that we can use the slave as master. What tools do i need to do that ?
-
Intro The Alienware Graphics Amplifier- Probably the best implementation of an eGPU enclosure that has ever existed, and at about $130 "like new" on eBay, it's a bargain compared to other PCIe enclosures like the Akitio Thunder 2 and Sonnet Echo Express, especially when you consider it comes with a 460-watt PSU (and two 6-pin PCIe connectors that can separate to two 4-pin connectors). Fantastic. Obviously, though, it uses a proprietary Alienware PCIe port, making is just about useless to people like us who, if we had Alienware computers, probably wouldn't need an eGPU in the first place. I was curious how the Alienware GA did its magic, I figured it couldn't be all that different from how the Akitio Thunder 2 and others like it do their Thunderbolt-to-PCIe thing. So I scoured the Internet for some high-res pics of the inside of the GA, and finally found some. Similar, indeed, it has inside it a simple PCB with two PCIe slots: 1 PCIe x8 (which is backwards!) for the proprietary port and 4 USB 3.0 ports, and 1 PCIe x16 slot for a full-length, full-height, double-width GPU. I finally got the GA in the mail today, so I could look at the circuits up-close and see just how proprietary that x8 card with the proprietary port is. From what I can tell, not very. The circuits (sorry if this isn't the official term, but the lines you can see on the board running from component to component) from the proprietary port run mostly to the PCIe x8 slot, where they then go over to the PCIe x16 slot. Both slots, by the way, receive power directly from the ATX connector from the PSU, so in the case of the x16 slot, you have some circuits running to the ATX connector and the rest going straight to the x8 slot. My thinking is that the purposes of the x8 card are to, aside from doing a pass-through of the PCIe connection to an Alienware laptop, control the power state of the GA (turn it on and off) and of course control the USB 3.0 hub (that's what most of the ICs on the board appear to be for). I'm assuming that if the detection method for the proprietary connector is anything, anything of substance, it is something we will have to work around when we take that proprietary x8 card out. Fortunately, it may be possible to simply tape down the power supply's reset button which, if one holds it down, causes the GA to essentially power on- the fan in the PSU spins, as does the fan in the front of the GA. The Alienware logo on the front, however, does not turn on, so I'm thinking that's controlled by the x8 card as well. The Plan So I mentioned earlier that I will be replacing that proprietary x8 card, and you may guess with a Thunderbolt to PCIe x4 card. There's another thread here on "https://jatsby.com/echo/eGPU/Thunderbolt%202%20AIC.pdf"]ASRock Thunder II Manual
-
Hey I am new here. I have had an Alienware M17x R4 for a while and I keep deciding to upgrade it instead of buying a new laptop. Mostly because it would be prohibitively expensive to buy a new one with comparable performance, expecially the more I upgrade it. I am quite inept when it comes to a lot of the tech stuff on this website, so bear that in mind if I make myself sound like an idiot. Currently running; OS: Windows 10-64bit Pro CPU: Intel Core i7-3840QM CPU @ 2.80GHz, 2801 Mhz 4 Core GPU: NVIDIA GeForce GTX 980M, 8GB VRAM -353.17 Modified Driver, in PEG mode with A11 unlocked BIOS RAM: 32GB of some Samsung RAM, not sure exactly what kind Wireless Adapter: Intel Dual Band Wireless-AC 7620 Storage: Two 1TB HDDs in Raid0, and one 64GB SSD (that I believe is mSATA and used to be a cache) So what could I upgrade with what I currently have? The main thing I have thought is possibly replacing the 64GB SSD with a Samsung 850 EVO mSATA 1TB SSD. Transfer my OS to the new SSD and just use the 2TB Raid for mass storage. Would that work? What other upgrades could I do? Thanks.
-
T|I and the author are no longer associated. For support kindly contact the author directly
-
So i put a 7970m in my laptop because the 675m that was in it was broken but my laptop doesn't recognise it in the bios. My bios revision is A11 Any ideas?
-
Does anyone have? I'm currently experiencing problems with this card. Pulled from AW system, couldn't display screen on MSI system. Flashed older VBIOS using Clevo system, forgot to save the original VBIOS. Installed in MSI system, installed Windows right away, worked for like 10 minutes and fans started spinning hard. Didn't want to kill the card so I forced shut down. Shows Code 43 error on MSI and AW system. Just wanna rule out every possible option to determine what the problem is. :/
-
Hello, I have a little problem with my laptop (M17r4): once out of ten times I am able to boot normaly. Otherwise I get a repetitive one bip from the speakers and it doesn't boot. After some talk with Dell people, it could come from a corrupted bios. All the internal Dell diagnostics are OK (RAM, CPU,...). So I tried to flasn a new Bios ( am currently in A09). From Windows, the update program will execute very quickly and when it reboots, I get a "insyde H20-secure flash error : invalid firmware image". Then the system is reseted... If I try the update from a USB stick, I boot on the stick, run the official bios update and I get a " Test." And then nothing... I tried with official A09, 10, 11, 12 and even 08. Same behavior... I run Windows 7, legacy boot. If someone has any idea on how to fix that, your help would be appreciated. 😀 Thanks.
-
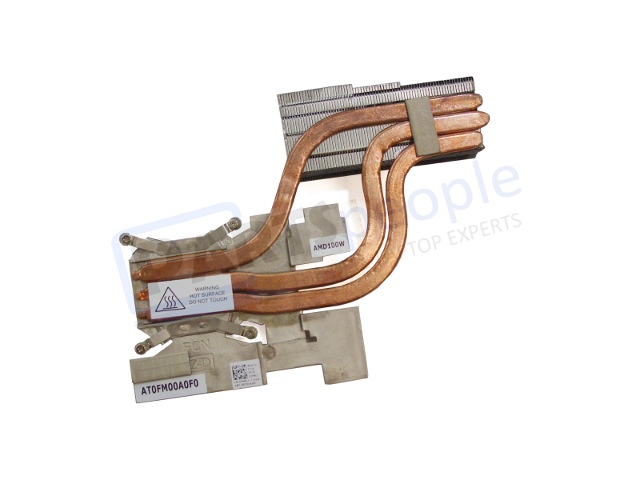
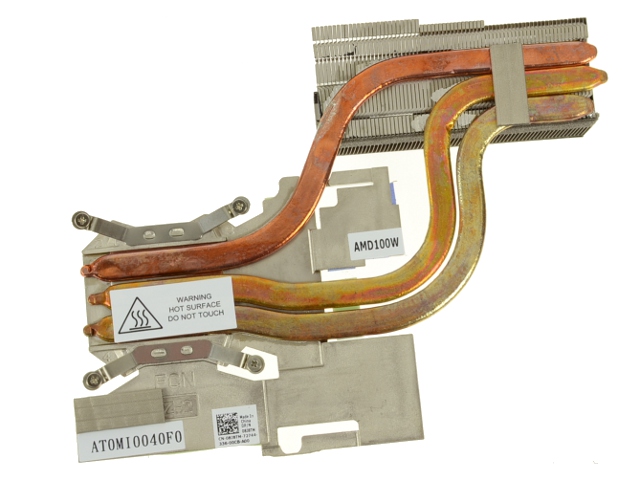
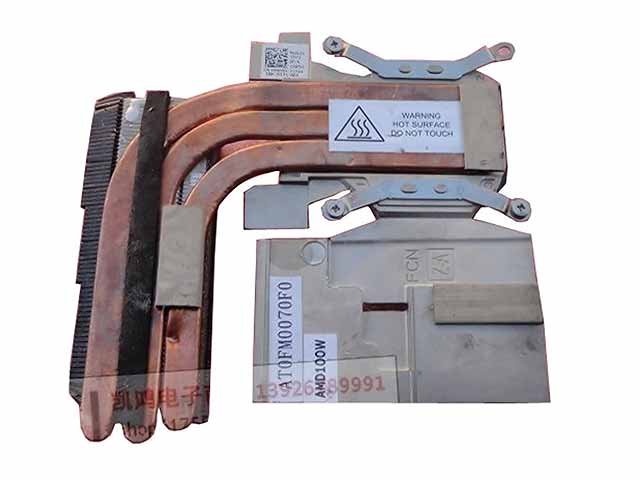
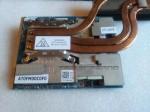
Hello everybody! Will heat sinks from Alienware M18x R2 physically fit in Alienware M18x R1? I have 2 x AMD 6970M. I have read that heat sinks from R2 are better. I do not know which parts will be the best. Right Side Video Card Heatsink For R1: DP/N: 29NC1 029NC1 AT16L0010F0, AT0FM00A0C0 For R2: DP/N: 8J8TM, 08J8TM, AT0MI0040C LEFT Side Video Card Heatsink For R1: DP/N: 0Y8T9Y, AT0FM0070F0 For R2: DP/N: V4NXK, 0V4NXK, AT0MI0010C0 Taking this opportunity, which is better to add to M18x R1: two graphics cards AMD AMD 6970M or one 7970M? Could anyone help me?


-
I've heard a lot of bad things about Alienware and keep hearing Origin is the best. I don't care about the design. Even if it looks like an 80s computer, as long as I can run my Skyrim, BF4, and GTA V on the max settings even after dropping it on concrete or leaving it on and charged for days at a time. I want power and quality. What do you think?
-
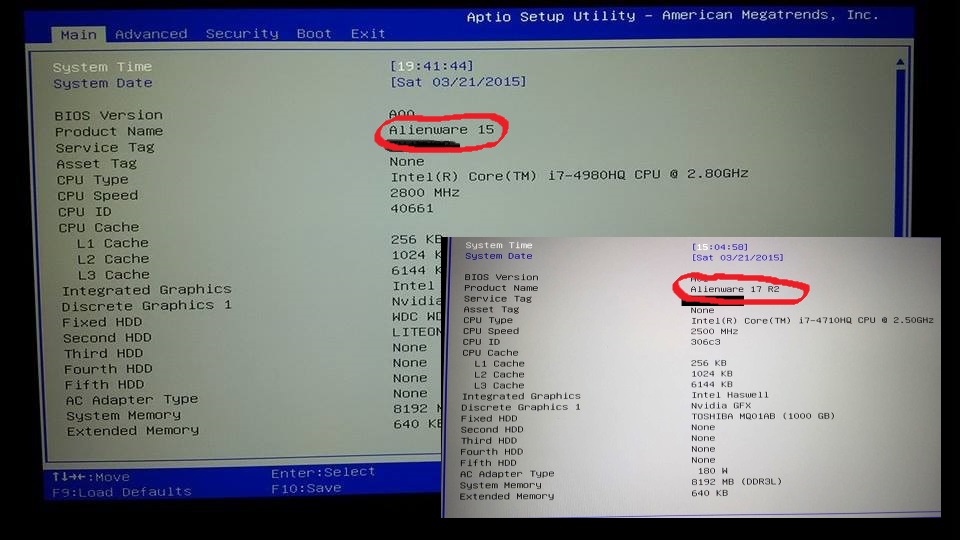
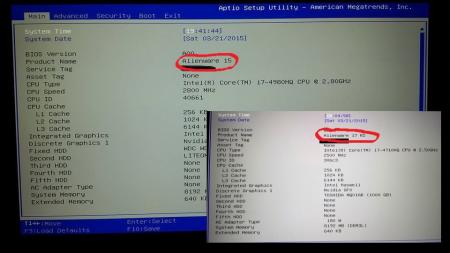
Hello everyone, I received technical intervention on my Alienware 17 R2 some days ago, the Dell technician replaced my defective frontal speakers and also motherboard, when rebooting the system he entered again my Service Tag on the BIOS but I think he did something wrong and now the BIOS shows Alienware 15 instead of Alienware 17 R2 as Product Name, I know there are different ways to edit these parameters, I'm asking you guys help or a software / tool to fix this error. TL;DR: I need to edit the Product Name on BIOS to change it from Alienware 15 to Alienware 17 R2. I'm attaching a picture. Thanks in advance for your help
-
Can the new Alienware 13" be fitted with a GTX 980M and 4980HQ?
-
Hi All, First of all I wanted to thank all the contributors on this forum who have helped many-a-people like me in upgrading their gear and solving the issues which arise along the way. Kudos to all of you! I have been lurking around this forum and sub forum for about a month now trying to understand how GPU upgrades work on alienware m17X laptops and how will I go about doing this on my own laptop. The purpose of this post is to share what steps I am going to undertake once I begin upgrading my GPU and also post a comprehensive guide for beginners like me (or noobs if you wish ) as I feel there is some good information here in multiple threads on this subforum but it can sometimes be hard for beginners to grasp all the information in the various threads. Firstly I would like to share my m17x R4's specs: Processor : Intel Core i7 3820QM (8MB Cache, up to 3.7GHz w/ Turbo Boost 2.0) Display : 17.3" 120Hz w/ 3D Bundle WideFHD (1920 x 1080) WLED LCD Memory : 16384MB (2x8GB) 1600MHz DDR3 Dual Channel Power Supply : Alienware 240W AC Adapter Graphics : 2GB GDDR5 NVIDIA GeForce GTX 675M Sound Card : Creative Sound Blaster Recon3Di with THX TruStudio Pro Software Operating System : English Genuine Windows 7 SP1 Home Premium (64 BIT) I have decided to upgrade my GPU from GTX 675m to GTX 880m. I have ordered the card from Upgardemonkey (ebay) and should be with me by Tuesday (10.03.2015). I do understand I would loose my 3-D functionality when I upgrade the card, but that is not a big drawback to me as imho it more of a gimmick anyways. UPDATE: I have now successfully installed the card. Please see the below post for steps on how to do the same.
-
I managed to get myself an M18x R1 with at least one dead GPU, thankfully I happen to have an AMD 7970m lying around. Sadly, after getting mid-way into disassembly, I discover the torx screws are heavily stripped, and some of the ribbon cables have no plastic clips, and are using improvised methods to be held in. Where can I purchase the clips, and how do I install them?
-
Hello there, just wanna ask for some advice because i have no idea wha to do... 1 year ago i bought m17xr5 laptop (2013 model) with sound was everything without problem. But 3 days ago i installed last drivers from Dell support page and after this i lost my bass in songs, games etc... Have no idea what happened, because i tried install again back my old drivers - same problem. From old WIN x64 US ultimate tried install W8.1 Pro - still same problem (checked with windows default drivers, checked with last driver for 8.1). So i looked at some pages and found this: ePSA http://en.community.dell.com/support-forums/laptop/f/3517/p/19351382/19768710#19768710 So i tried this through epsa, everything was ok, but when i tried check that choice "perform quick audio check" so i did not hear any beep sound. The weird is in windows i can normal listen music, play games or watch movies, but i still without bass. Is subwoofer btw in this model of laptop or not? 'cause i downloaded owner's manual and i found just how to remove speakers but no subwoofer. In settings for sound i've got normal Realtek High Definition Audio - configuration - stereo, because if i try 5.1 settings i can hear just left and right speaker but subwoofer no. I've got the latest driver from Dell Support pages, i checked settings in Windows drivers, Dolby, and Realtek. Still same. Yesterday i listened some music through YouTube on Lenovo laptop of my friend, she's got Dolby Home Theatre V4 btw (on W7 i had this too, in 8.1 is Dolby Home Plus - problem was on W7 and on 8.1 too) and that sound was soo natural. Not flat without life if u know what i mean. I can hear perfect voices but that drums are so flat... (cannot better explain, i tried check equalizer in Windows Media Player and Dolby - it's still same) http://jpeg.cz/images/2014/09/13/cwIkg.jpg http://jpeg.cz/images/2014/09/13/aj8AL.jpg http://jpeg.cz/images/2014/09/13/fKSHu.jpg http://jpeg.cz/images/2014/09/13/5VYqW.jpg http://jpeg.cz/images/2014/09/13/WIxfh.jpg Sorry just for links, i wanted insert here some thumbnails, but dunno how And btw nothing from this doesn't explain, why i don't hear in ePSA that beep sounds P.S. And something new, when i listen some music and pause it, after play again that sound is like without some equalizer, completely without life. So i don't know.... I guess so i've got problems with drivers, but in this case, i am confused, why through ePSA i can't hear that beep sounds
-
 Hey Guys, Having trouble with my 7970m, it hard freezes pc at any overvoltage. Is this a PSU issue? Its in my Alienware m17r4. I was trying to run 1.075v at 980/1380. It froze, so I took it back to the stable OC of 925/1300. Still froze. Took it back to stock clocks and guess what. It froze! On stock clocks! This only happens when I disable the integrated graphics. (I assume enduro prevents the card from hitting max power use/performance/whatever) On stable clocks, dedicated card only, stock volts i get 50 fps in I:SS. With enduro on, at 1000/1400/1.075v i get about the same fps. With enduro on at stable clocks and stock volts i only get about 34fps... so obviously enduro is throttling me somewhere. I just don't get why it crashes on voltage, shouldn't this not be possible at stock clocks?? Do I have a dodgy alienware? Thanks guys, Scott.
 -
 A13 unlocked - watch dogs good fps only with 720p low details - i7 gt650m 2gb I was wondering if it's end of my laptop? Is that max I am going to get out of this laptop? I have only bought it 18 months ago still got 18 months of credit left to pay back. I wont be able to play any new games? Should I buy Play Station 4? I was always against console but I see the point now. Please share opinions