Search the Community
Showing results for tags 'akitio'.
-
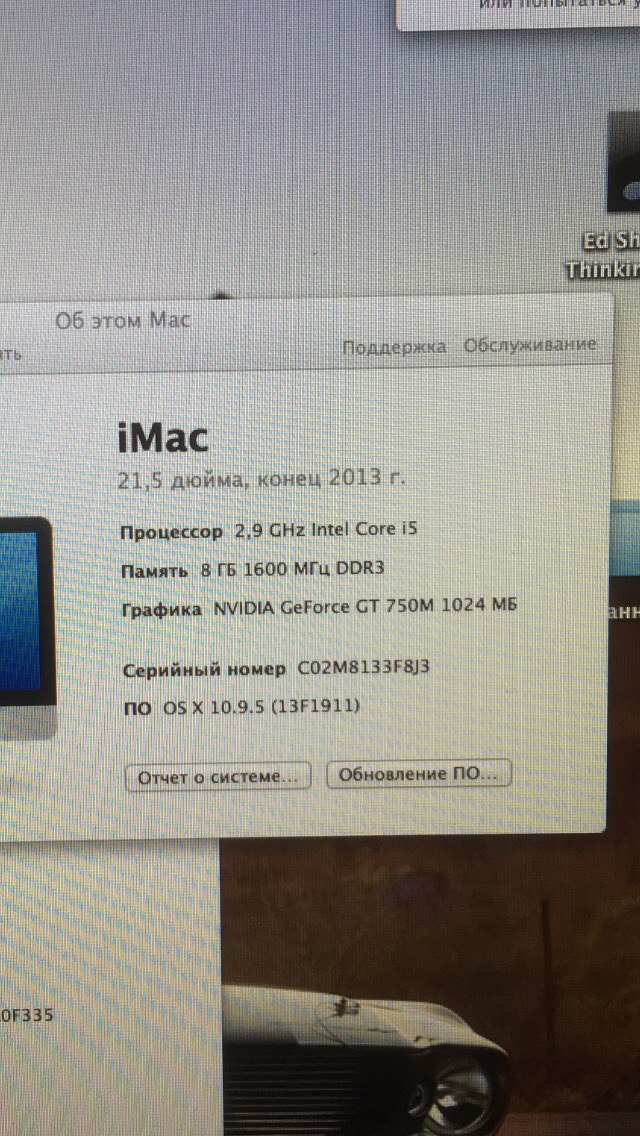
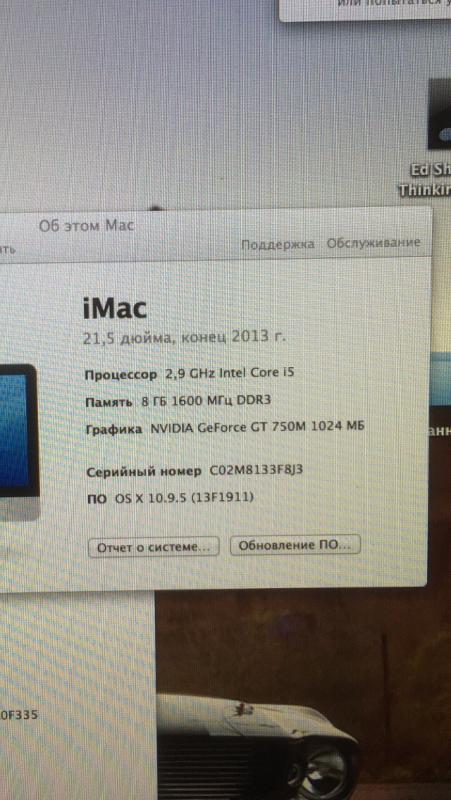
Hello! My name is Arman! I from Armenia, and sorry for my English! I have iMac Late 2013 with Intel core i5, 8Gb, NVIDIA GeForce GT 750M 1024 Mb. I have Boot Camp installation on my iMac (now i have 7 Windows, but i can update it to 10 or 8 Windows) I discover that there is an Akitio 2, wich can use with iMac 2013 for productivity increase. I want to use akitio 2 with GTX 1050 ti 4Gb, but i dont know how it is intalling on iMac? Who can write for me the process of installation ALL equipment (akitio 2 + GTX 1050 ti + imac)? What i must to do? I talking about from the very beginning to the very end. PLEASE everyone, help me. You are my last chance !!!!
-
 Hi guys, im selling a modified akitio thunder 2 enclosure with an nvidia zotac 960 ddr5 2gb. I also include the power supply unit, you wont have to do any aditional manipulation. http://www.ebay.es/itm/322614048182?ssPageName=STRK:MESELX:IT&_trksid=p3984.m1555.l2649
 -
Hi guys. I have had my egpu setup and running fine for the past year or so on my mbp (mid 2012) which has a hdd drive. I now want to improve the gaming performance, so I've bought an ssd. I manage to get through all the steps in eGPU Setup 1.2 but when i go through the bootloader, it says at the very end "No bootable device -- insert boot disk and press any key". I'm guessing it is to do with my ssd being in the optical drive bay location (i assume this is hd1) and the original hdd (hd0) being disconnected, so windows can't see it when in bootloader. I think I need to edit the config file for the chainloader, so the bootloader reads the ssd but what exactly do i need to change? I tried changing the map section (line 55): map --harddrives=1 if "%DRV%"=="C" map (%FIRSTHDD%) (hd0) Changing the (hd0) to (hd1) put the bootloader in a loop!? So I am not sure what to try next... Any help is greatly appreciated! Thanks
-
 EDIT: SOLUTION on my 4th post. Hi all, I just wanted to know if anyone found a fix for the cpu idle bug without hibernating. First of all, I made my setup in 2015 and I just used an external monitor since at the time making it work with optimus having a dgpu was unknown. Recently I read that disabling the dgpu was an option so I quickly got "up to date" reading the new stuff, but I might have missed something. Keeping that in mind: I have a MBPr Late 2013 (GT750M dgpu) with an Akitio Thunder Box, with a dell power supply (which I always thought it might not be enough because I had to limit the power with Afterburner to 80% so it wouldn't shut down when playing a few hours) and an Nvidia GTX970 (KFA 4GB). Since I was using a Win 7 on Bootcamp/BIOS I decided to start from scratch: got a Win 10 EFI installed, got reFind so I could activate the visibility of the Iris igpu, and although it seems to be much more buggy, got to run the system with the egpu. Then disabled the dgpu on the device manager, used the switch-gpu bat file as admin to get the igpu as main, so far so good. Shut down, Boot. I get to the point where I basically have the egpu working and I tried running Tomb Raider's benchmark (what I had at hand) and it was going smoothly (which wouldn't be like that with the iris or dgpu). Also, looking at msi afterburner my egpu was at 100%. The ONLY thing that I can't by any means get to work is to not have the CPU idle crazy load. I get around 25-30% of CPU load and if I try to hibernate the system it... well it goes to hell, haha. The MBP seems to hibernate (sleep/shutdown black, fans out) but the egpu is still on with the fans (doesn't really hibernate), and from there its impossible to make it run. Pressing any button, alt, power, whatever, it tries to wake up/power on for a moment, but it simply can't finish, just black screen with the fans turning on. The only way to shut it down is to hold the power button. And after that it basically locks there and becomes even difficult to boot again, I actually have to press alt, go back to osx, reinstall refind - since it no longer appears with it trying to wake up from hibernation- run windows efi and quickly press shift+f8 to run in safe mode and then boot correctly (and again with the cpu load). I have to say that even when working, my macbook pro doesn't consistently boot with the egpu via thunderbolt2, with any combination (wait to plug the cable, have it powered on, off, preboot, when starting windows, etc.) it just seems to randomly work. It used to work a bit better before refind, though, but never consistently (don't know if that has changed in the past years). So... any ideas of how to get that cpu load off? Or to make hibernation work? Oh, as a note, I read that when you disable the dgpu and use the switchgpu script you can control the screen brightness again, but I just have it locked to the max. The control osd appears and moves but it doesn't actually change. I don't care about it but I thought it might give a hint of something not done properly? Many thanks to whoever can give me any ideas!!! EDIT: Reduced part of the cpu idle from known w10 small stuff but the main bug is still there, about 15%)
 -
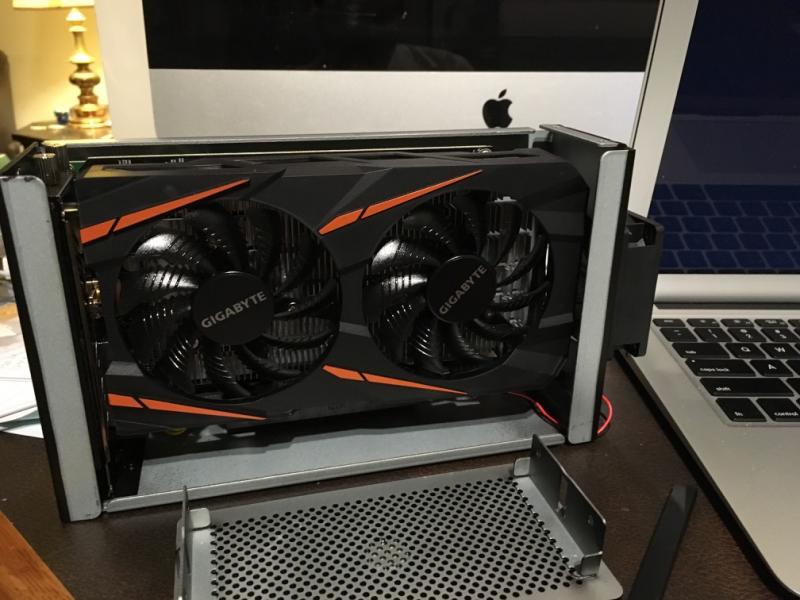
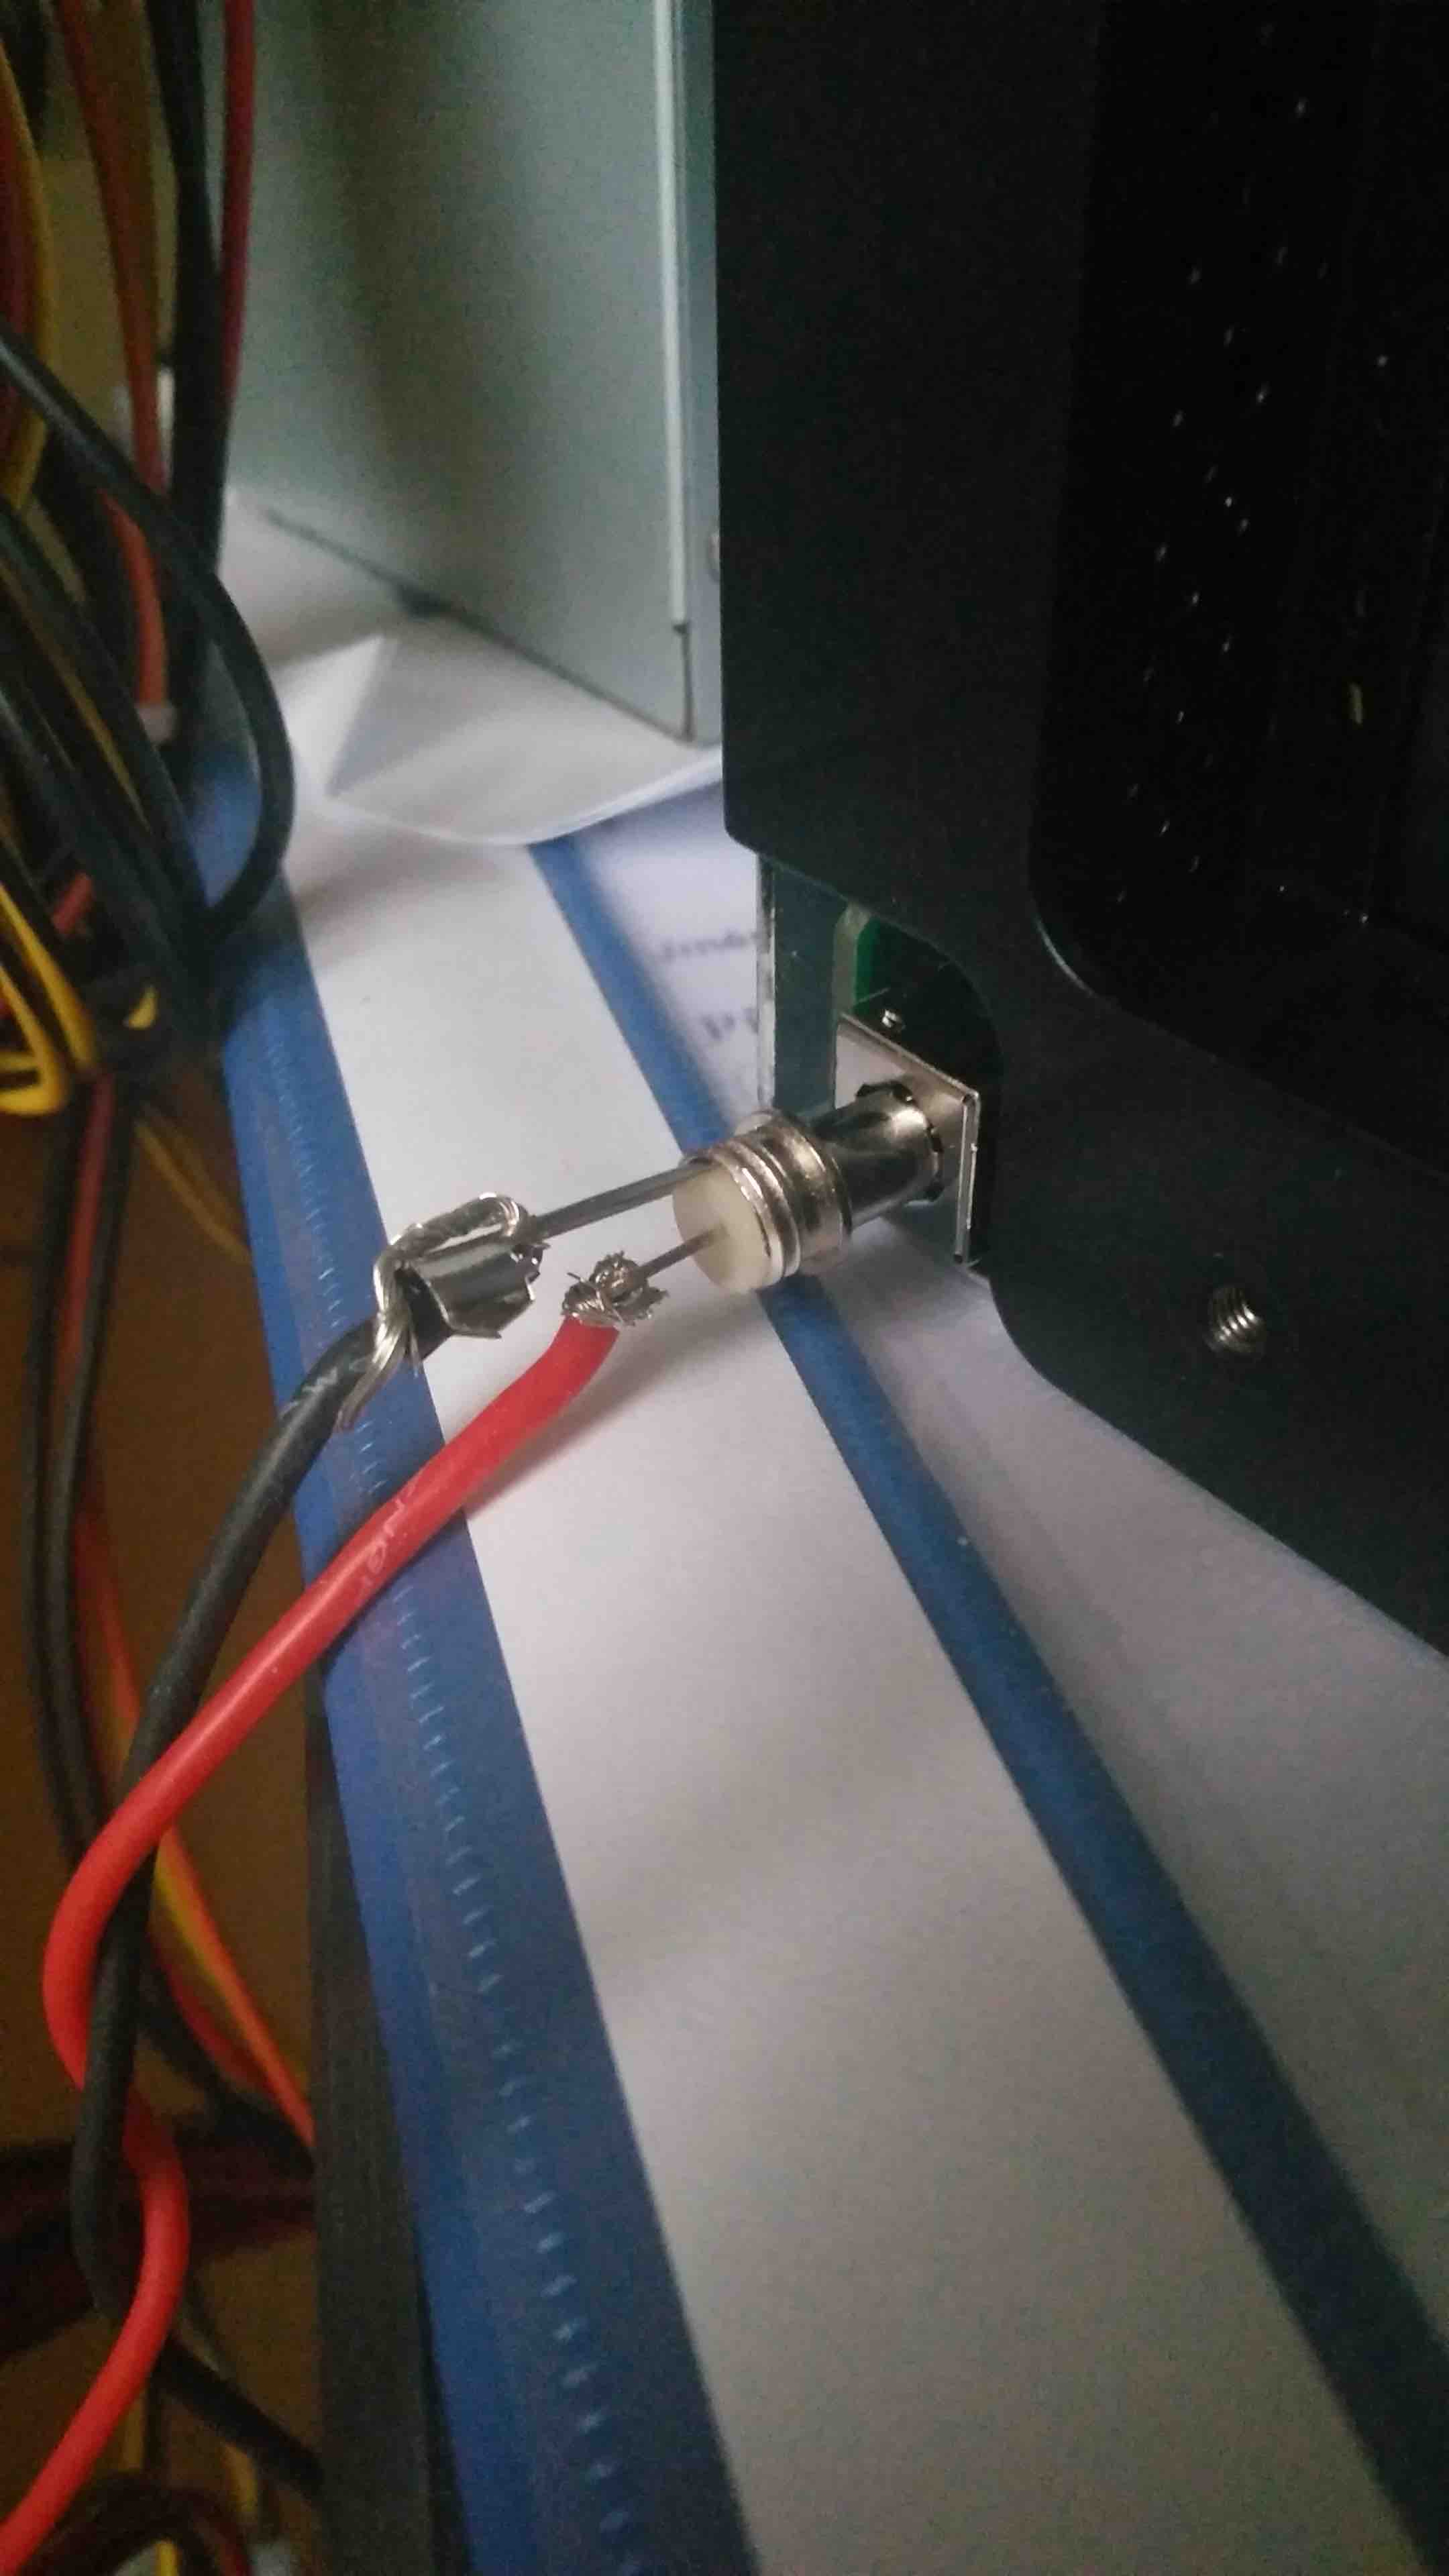
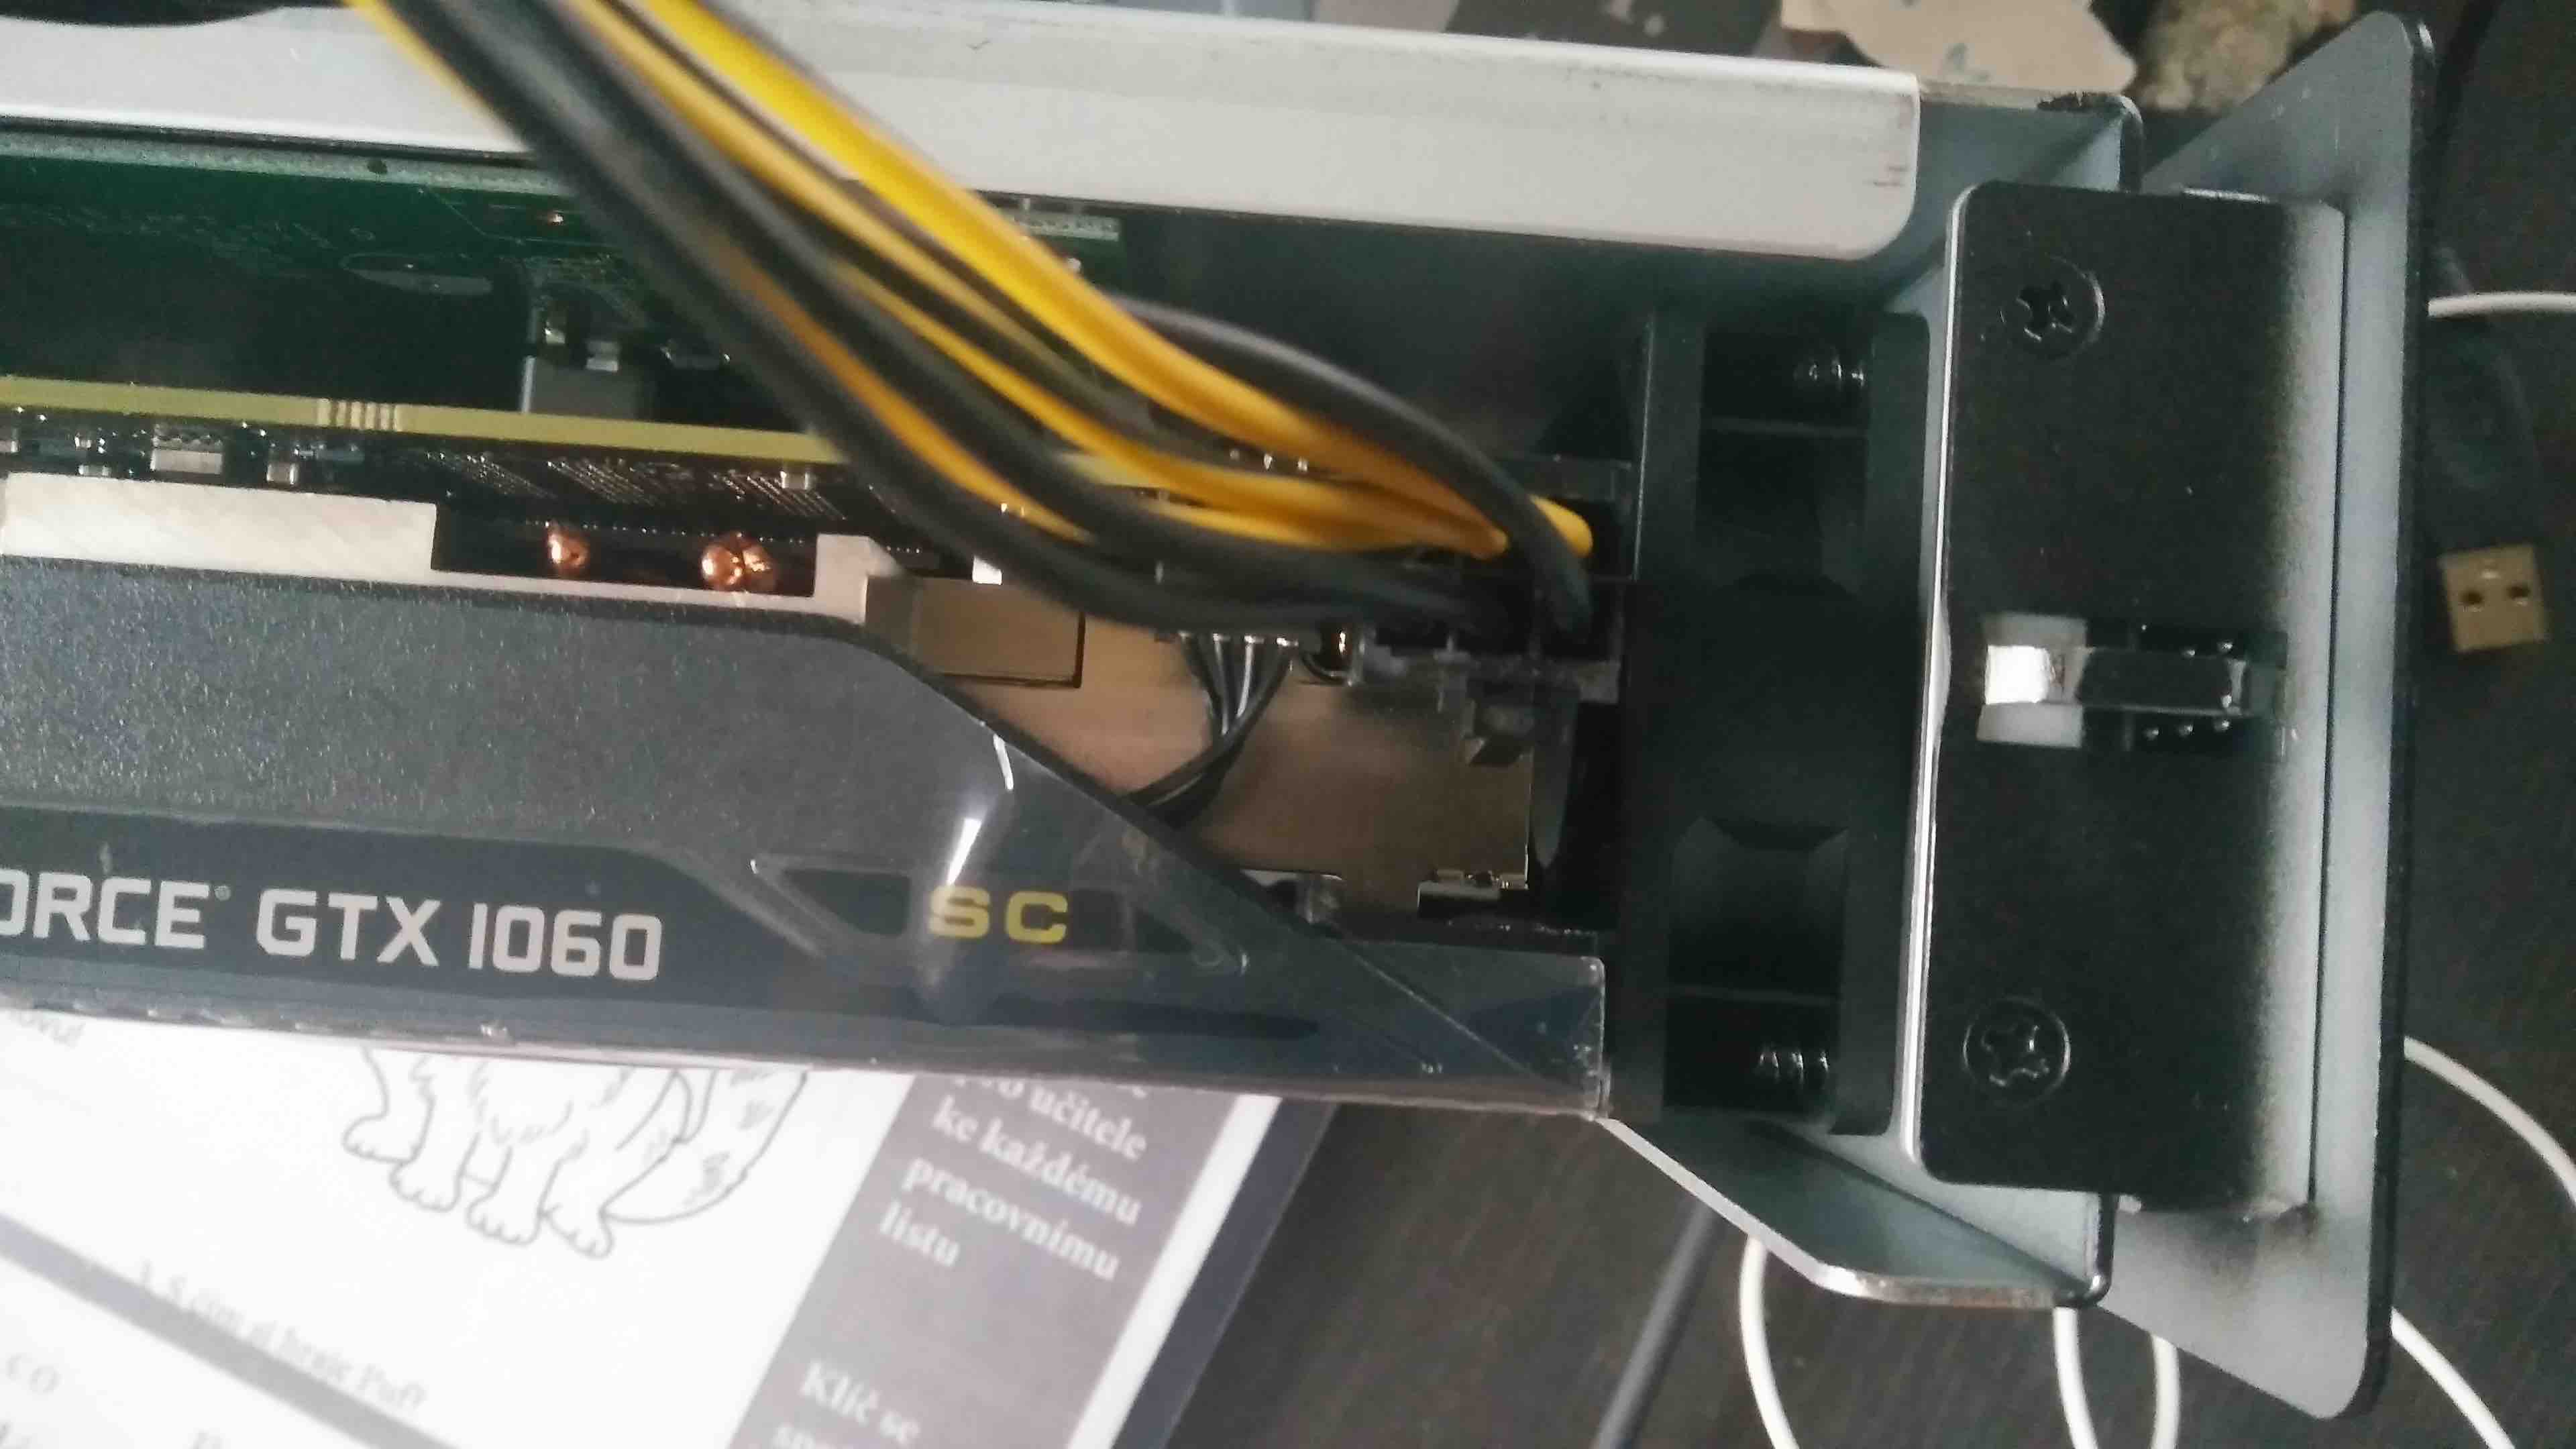
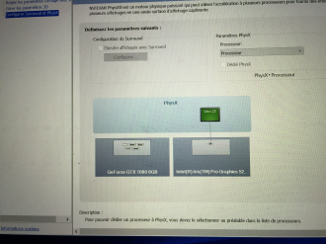
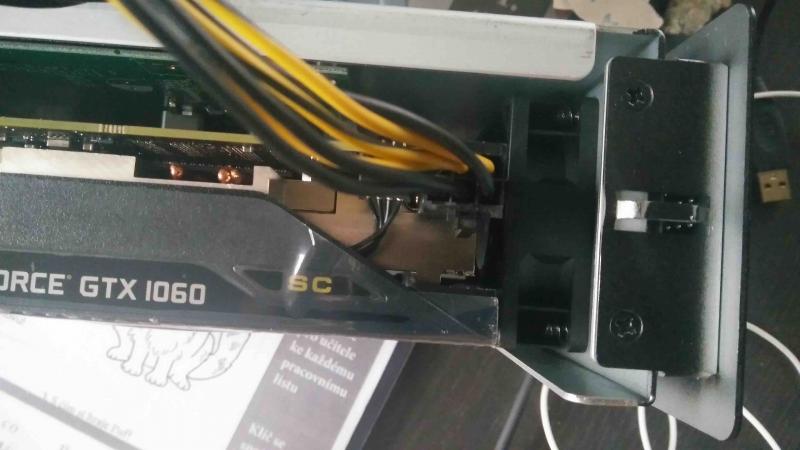
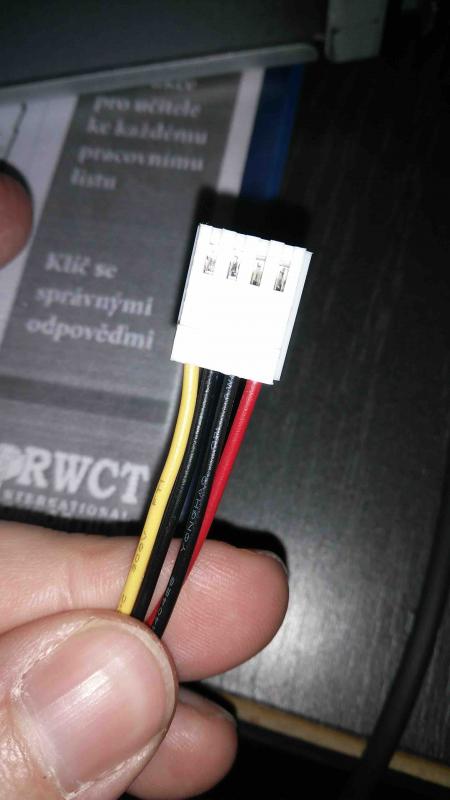
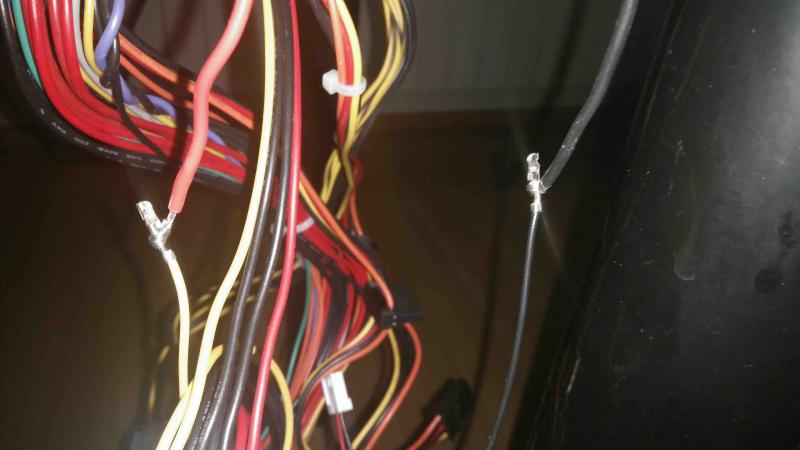
 Hey guys, Let me introduce you my eGPU setup, realized on a 2013 15" retina Macbook Pro, model equipped with a dedicated GT 750M. I am using an Akitio Thunder2 PCIe enclosure and a EVGA Geforce GTX 1060 SC 6Gb. I wanted to use both internal and external display on my Mac. I was looking for information during weeks before buying it and wasn’t really sure if it would work as I wanted to. Many people are convinced that using the internal screen is impossible or way more complicated if the Mac has a dedicated GPU. I spend a whole week formatting and testing, using UEFI, BIOS, considering going back to Windows 7 (not for long)… I finally used Windows 10 UEFI, the programs rEFInd and GPU-switch and nothing else ! No need for an HDMI headless ghost or any program to spoof the number of screens. I made a video to show you the whole installation process, I hope that it will help: My GF did the voice acting as I wasn't convinced by my own If you prefer a text-based tutorial, here are the different steps: 1) Installation of Windows 10 in UEFI mode On the 2013 retina Macbook Pro, the SSD is a PCIe model. This seems related to the UEFI mode used by default when using the Boot camp assistant. If you don’t want to use it or are using another model of Macbook, you can follow this excellent tutorial to force the UEFI mode: http://fgimian.github.io/blog/2016/03/12/installing-windows-10-on-a-mac-without-bootcamp/ You just need to create a conventional partition and convert your table partition from “hybrid” to “protective”. By doing this, Windows will see a GPT disk instead of MBR. You just need to boot your USB drive on EFI mode. Once Windows is properly installed with the correct Macbook drivers (another reason to prefer the boot camp assistant), you need to go back to Mac OS. 2) Installing rEFInd rEFInd is a boot manager tool, like rEFIt or GRUB. Its first advantage is the ability to choose the OS without the need to press a key at startup. And the real reason why we are using it is to spoof the computer to allow Windows seeing the entire installed hardware. You can install refind from this link: http://www.rodsbooks.com/refind/ Then you need to activate this spoof ability by opening a terminal and typing these two commands: sudo mkdir /Volumes/efi sudo mount -t msdos /dev/disk0s1 /Volumes/efi Now, you can see your EFI partition in your Finder. Go to EFI/EFI/refind and open the file refind.conf with textedit. Search for the “spoof OS version” and remove the comment symbol # Reboot your computer and choose Windows on the rEFInd screen. Open your device manager, you’ll see your iGPU (intel iris pro graphics 5200) and dGPU (Geforce GT 750M) 3) gpu-switch GPU-switch can be downloaded from there: https://github.com/0xbb/gpu-switch Download the windows version, available in the description (direct link : https://github.com/0xbb/gpu-switch/releases/download/v0/gpu-switch-windows.zip ) Install Microsoft C++ redistributable (not sure which version do the trick, I’ve installed each version in x64 and x86 just to be sure) open the file integrated.bat with administrator rights, you should see the word “success” 4) GPU driver installation Not sure if this step is necessary but I’ve removed the dGPU driver before installing nVidia GeForce experience. The program DDU (Display Driver Uninstaller) is perfect for that. You can download it using this link: http://www.guru3d.com/files-details/display-driver-uninstaller-download.html Choose to uninstall and shutdown the computer, as you will install a new hardware indeed When your computer is off, plug the power supply to your eGPU, press the computer power button, wait for the chime and the rEFInd screen to appear, then plug your eGPU to the Macbook and launch Windows. If rEFInd is stucked, hold the power button until the computer is off. You should now see three graphics cards in the device manager, two of them not recognized at this point. Install nVidia GeForce experience and the latest nVidia driver. The GPU list will be updated at the end of the installation process. Re-launch GPU-switch and reboot. You don’t need to unplug the eGPU when rebooting. Now, your eGPU should have an error code 12, with unsufficient resources available. Just right clic on the dGPU (GT 750M) and disable it. Re-launch gpu-switch just to be sure (integrated.bat) and reboot. Just a last step and you’ll good to go Right click on the nVidia icon in your systray and open the configuration panel. Go to PhysX and set it to automatic instead of processor, like on this picture: That’s it, you can now launch your games on the internal screen or using an external monitor To switch between both, just plug the display on the eGPU and use the shortcut Win + P (Cmd + P on a Mac keyboard) to toggle between both screens. You can also duplicate them, it works, but don’t expect any kind of good performances doing this Now, the most important part, to avoid screwing your configuration: every time you go back to Mac OS, Windows will switch to the dedicated GPU (maybe also when turning off the computer, I’m not sure). For this reason, always re-enable the GT 750M before turning off the computer! Otherwise, you’ll get a black screen at Windows startup. Just follow this procedure when you want to use your eGPU: - Use gpu-switch to set the integrated GPU as primary - Disable the dGPU from the device manager - Turn off your computer or reboot - When you see the reEFInd screen, plug your eGPU and launch Windows - Play you favorite video game or launch your intensive GPU application (there are two schools) - Re-enable your dGPU from the device manager - Turn off your computer - Unplug your eGPU Now, some advices based on my little experience: If your end up with a black screen, you can restore Windows to a previous restauration point or remove the display driver. If you really can’t boot windows, using Parallels Desktop, you can boot your Windows partition from a virtual machine, then remove the display driver. At first, I was experiencing a game crash and the GPU fan running at max speed, when launching any sort of game. This issue was caused by the power supply connection, using an Xbox 360 S adapter with too thin wires These wires caused a voltage drop when consuming the 100W needed when playing a game (against 15W on Windows) About the electrical connections, here are a few pictures I’ve added a connector on the free PCB footprint to avoid soldering wires on the board. The cables are 0,75mm2 section and fits perfectly the original jack hole. About the PCIe power connector at the top of the graphic card, I had to cut it with a Dremel to fit the enclosure. You can find specific (and pretty expensive) cables on Ebay if you don’t want to modify one. For the ventilation, a colleague helped me cutting holes in front of the fan. I’m not sure to keep this solution, as some games make it very noisy. Let me know if this tutorial or the video did help you. Don't hesitate to ask for support if you want to do the same setup. Some websites are pretty discouraging about the concept of eGPU, the whole process is not pretty user-friendly but I'm happy to see that there is an active community growing each year !
-
Hi, my name is Kåre. I help users on this site find power solutions for the Akitio Thunderbox and I currently see that you may want to your into the case, if you just had the correct power supply cable that would allow for it to be seated inside the case. KAREONKABLES.COM

-
 (Having trouble uploading images here, I'll try again later) Hi all, I'm green as here, but been closely following peoples implementations for eGPU and MBP. After finding some inspiration from P-Mac here, I decided to build one. I knocked this all out for around $600 AUD. Being from Australia, it was hard to come by a Thunder2 box. So I bit the bullet and bought one from the US as cheap as I could find it. Picked up a second hand MSI Gaming GTX960, the twin frozr fan edition, also overclocked edition, cost me $200. Grabbed a Corsair VS550 PSU too for $80. I'm pretty handy with electronics and good with a soldering iron so I thought, no worries mate. Anyway, after waiting 3 weeks for the Akitio to arrive, it finally showed up and I knocked this all out in about 1.5 hours. Opening up the Akitio I unboxed the package, and opened it up. These things are TINY, I thought. I knew I'd have to open the case up to make the GPU fit, but jesus, the GPU dwarfs this thing. I removed the fan from the Akitio and set it aside, probably never to be used again. A lot of people have just bent the back plate of the Akitio away, then gaff taped it up, etc. I didn't like that idea, so I took to it with a dremel and cutting wheel with the box facing DOWN, as grinding sparks and PCB's tend to disagree with each other. I cut a decent line into the steel, then bent it away with some pliers, then fatigue snapped the cut line. Inserting the GPU Pretty straightforward. Removed the 2 retainer screws for the PCI cards, pushed the card firmly into place. I re-inserted the two screws and nipped them up with a screwdriver. Easy peasy. Wiring up the CPU PSU Now, I've seen all sorts of dodgy behaviour like jumping PSU's on with paperclips. That's live power, flapping around sensitive electronic components. I didn't like that idea. I also didn't like the idea of chopping up the PSU cables in case I ever want to re-purpose the PSU. So, I bought a molex to something connector (I can't remember the name) and chopped the red and black wires off at the molex plug end, chopped the yellow and black at the something end. Got some automotive twin core 3mm wire and a barrel plug I bought from JayCar and soldered the red to the centre post and the black to the outer post. Heat shrink over the exposed solder connections and electrical tape inside the barrel plug to ensure that it didn't short out, BAM, one 12V barrel plug to power the Akitio. Plugged the PCI-E connector into the GPU, simple. To "hot-wire" the PSU, I used a jumper wire and two electrical bulkhead crimp terminals. They're a little big to fit in the ATX connector of the PSU, but I squished them up with pliers and they fit in there snug, no exposed metal to short out on the case, or anywhere else, with the added bonus of the entire setup being plug and play. Plugging in and recognising I used the instructions here (see below) to get OSX to recognise and install the drivers. Followed the instructions, no problems. Had to go and disable system protection out of the recovery partition, but that's no biggie. I re-started, flicked the switch on the PSU with the eGPU plugged in, took a little while to get through the load screen, but away it went. I ran a benchmark on Cinebench, got 77fps which was an improvement over the 59fps I would get out of the GT750m. Teething issues Being new as hell to all of this, I'm still working out how to tweak settings etc. I opened up WoW, being an avid player, and expected to be dazzled. I copped a heaping load of disappointment when my recommended settings went to 1 from 4, and the game ran like a wet turd. However, after some playing around, trying a different monitor, enabling automation of the eGPU in the script, I'm getting a solid 40-60fps at high, not ultra, settings at 1080p. I'm having often problems booting out of sleep, the computer crashes and won't turn back on without a hard reset, no boot chime or anything. Sometimes switching off the PSU to kill the eGPU is needed to get into the OSX loading screen, then flicking it on once it's loading is needed. Sometimes it works fine. This seems to be common but I'll keep looking for fixes for waking up from sleep. Even with NoSleep enabled and not closing the lid, eventually it'll go dark and won't wake up. However sustained use and gaming doesn't kill the computer, so I don't think it's an overheating issue. Also keeping a close eye on temps everywhere and setting the fans to max when gaming, as I always do as these things overheat like crazy during gaming. To be done At the moment the Akitio is sitting open on the desk and the PSU next to it with wires fucking everywhere. It's messy and cluttered and I hate it. I've got access to tools and equipment some probably don't, so I'm going to build a custom case for both the PSU and the Akitio, and put some nice big fans on it to keep it all nice and cool under high load, hopefully preventing the GPU from needing to use it's active cooling at all, thus letting it work without strain. Any tips or advice would be great! Updates Managed to pick up a GTX 970 locally for the same price as I paid for the 960. Same card build, MSI Twin Frozr fans etc, slotted right in with no changes needed. Getting 57 fps on furmark within OSX, 82 fps out of cinebench, which is a slight improvement over the 960. I've upped the settings in WoW and it's running between 50-60 fps no worries. I also installed windows to try and get some benchmarks done, however furmarking is crashing the whole show and requiring a hard reset. I can get furmark to run in OSX though through some command lines found from the guys at geek3d.com. Windows has way more trouble posting the eGPU from startup, and has A LOT of trouble rebooting/shutting down. Really re-enforcing my love for OSX but I would like to play some higher end titles that simply aren't available on OSX in the future. Got Unigine to finally install (had a lot of issues downloading the entire file for some reason) and ran that on the 970. Didn't get to test it on the 960.
- 1 reply
-
- 1
-

-
- egpu
- macbook pro
- (and 2 more)
-
 I have one, with dedicated graphics card (AMD R9 M370X) want to know whether it would work because of the possible incompatibility of the thunderbolt controller (TI86/87) of the Node
 -
 First and foremost: this is a HASSLE-FREE BUILD. You will not find creative schematics, acrobatic soldering, custom BIOSes or anything like that: this is pure "just works eGPU" with Win10 bootcamp and an external display (so, no OSX support and no internal monitor either) Let's begin! Hardware: - Macbook Pro Retina Mid 2014 with nVidia GT750M - Akitio Thunder2 - MSI GTX 1070 Armor 8G OC - Dell DA-2 12V (ended up not using it) - Old Corsair 540W Modular PSU Setup: None. Absolutely no software setup. I had my previously working Win10 bootcamp machine installed, and it was a regular, apple-certified, Win10 installation done via bootcamp assistant, so no UEFI workaround or custom BIOS. The works Got my Akitio, unbox and open. Just 2 screws and voila. Removed the back plate (4 little screws) I unplugged both the fan and the led cable and removed the glued support for the cable, you can still see the glue Removing the fan was just a matter of removing 4 screws, the LED light took just a bit of force and it popped out of the socket. Here's all the things from the Akitio you will not use. As you can see from the hardware list, I decided to go with a full sized GTX card, and not just a full-sized one, a pretty big one at that. The MSI GTX1070 Armor OC does not have any LEDs or fancy things, just 2 big (and quiet) fans and that's that. So, of course, I had to bend the Akitio to make room for the card. I went with the "jeweller's screwdriver" technique. Fast and easy: just put a little flat screwdriver near the soldering at the bottom of the enclosure and work your way in lightly with a hammer. Took me 1 minute and the little solderings popped open. Now it was just a matter of applying a bit of brute force and bend the enclosure open. Not pretty, I know... but I'm not looking for pretty. Besides, the card is so long it covers the bent enclosure and then some! I gotta say, I was getting pretty impatient at this point. I put the card in, adjusted the two screws to set it in place and checked the spacing between the card and the bent enclosure. Everything was in order. Not pretty, again, but in order. At this point, I encountered a little snafu in my plan. I had bought the famous Dell DA-2 to power my GPU.. turns out this monster of a card has an 8 pin power slot, not a 6 pin one. Huh. Now what? Remember, this was supposed to be a hassle-free installation, no soldering or complicated workarounds. I remembered I had an oldish PSU from my desktop era sitting in a closed, took it out, plugged it in and got a nice 8-pin cable to power my GPU. (of course I had to use the paperclip-trick to power the PSU, but it's so basic, I'm not counting that as a hassle). To power the Akitio, since this a... let's say it again, everyone... hassle free build, I didn't want to use any custom made barrels or anything, so I used the original PSU, plugged it in and that's it. It was time to power it all up and see what the future brings. Thunderbolt cable connected, external monitor plugged in with a displayport cable, everything powered up... turn on MBP: nothing. Black screen. Huh. Powered down, tried to plug the thunderbold cable in AFTER the boot. Got a "hey I found something" sound from Windows, but nothing else. Reboot. Now the MBP started in Bootcamp, and Device Manager said there was a "Microsoft Basic Display Adapter". Bingo! Downloaded latest nVidia drivers, gave it a go: oh, damn! I have 2 video cards! Rebooted again The external monitor came to life, so I closed the lid on my MacBook (I'm using it in clamshell mode, I have no need for another screen) and there it was. With this solution, you don't even need to go and disable the "internal" 750M, Didn't have the time to make a 3D Mark benchmark, yet... but these were the settings of my WoW client yesterday and @2560x1440 with all ultra settings I had 67fps. Not too shabby Future implementations: - power the Akitio via the barrel to remove an external PSU - organize cables and spaces - switch PSU: this one has a terrible case of "coil whining", it looks like I'm skinning a cat... - IF I ever have any spare time, try and put everything inside a box: I'm thinking of one of those ikea metal boxes... Thank you all for your help and... comments appreciated! (everything but: "it's ugly!". That one I know )
 -
 No issue up to now, everything is stable, easy and cheap setup. However, Nvidia Optimus isn't working with latest Nvidia drivers. Hardware: - Mac mini Late 2012 (MD387LL/A) / Macbook Pro Retina Late 2013 (ME293LL/A) - Akitio Thunder2 - Zotac GTX1050Ti - Samsung T3 Portable SSD - 250GB (for Windows To Go) - DC 12V/12.5A from Aliexpress Setup: - Install Windows 10 as Windows To Go with Rufus; - Install Bootcamp; - Reboot to Windows with Akitio connected and install latest Nvidia Driver; System Start: - Connect External SSD with Windows To Go to your Mac; - Power up and hold down ALT keyboard; - Connect Akitio and wait 2-4 minutes; - Choose Windows from boot menu; sorry guys, I can't attach files here, every times it gives me an error. I uploaded images and benchmarks to my google drive here
 -
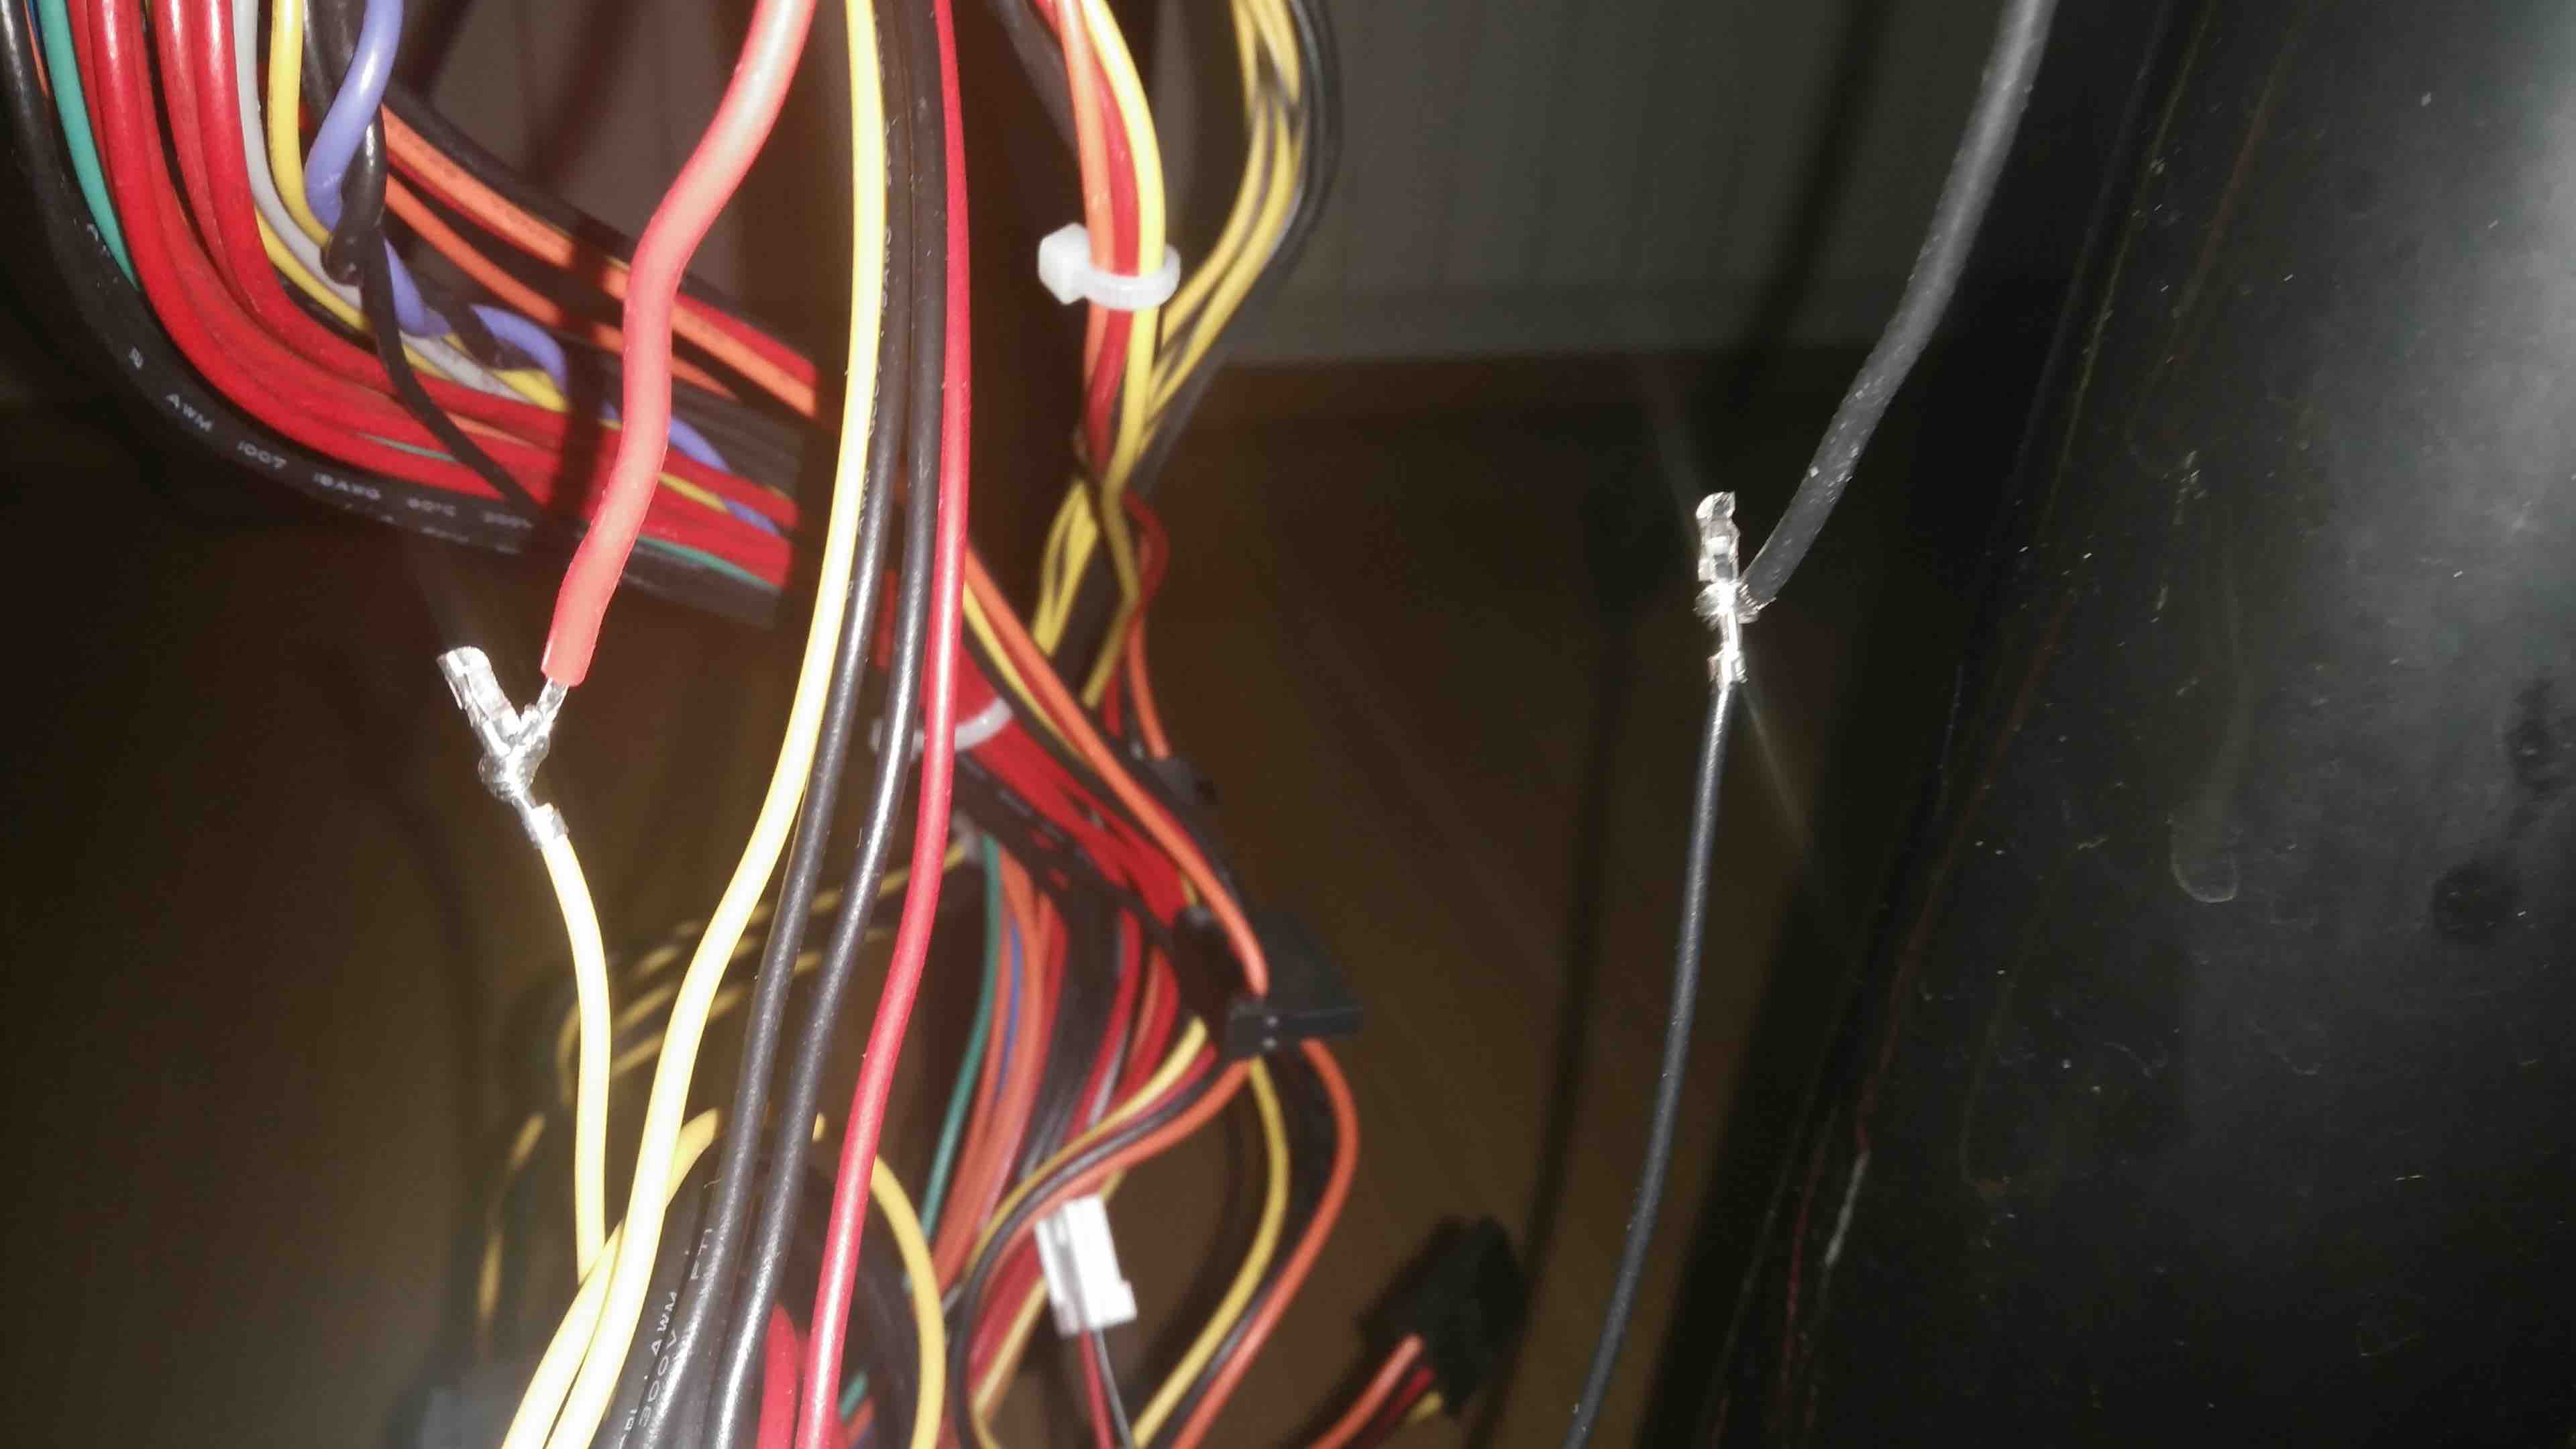
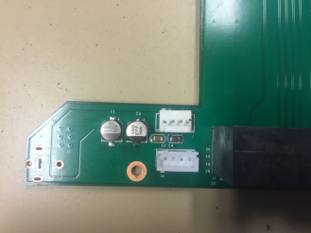
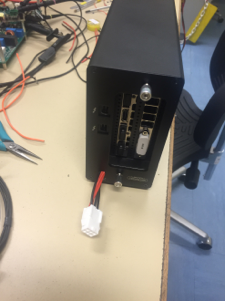
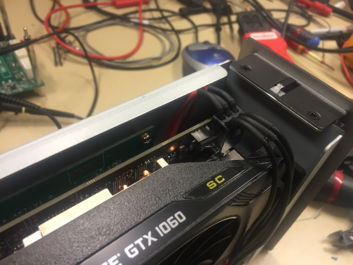
 Hi, as of Christmas time i tried my setup 550W PC PSU but will switch for this one once finish testing (220W Switching PSU) Barrel plug EVGA GTX 1060 6GB SC card (fits without bending the box), using 3GB OC version as well with no problems 2015 13" Macbook Pro (model MacBookPro12,1) Akitio Thunder 2 box So far using the internal screen (projector Epson EH-TW5100 for testing purposes) Ext. monitor Dell 27" S2716DG Samsung T1 500GB Win10 (v.1511) Installed WIN 10 to USB drive first using https://bleeptobleep.blogspot.cz/2013/02/mac-install-windows-7-or-8-on-external.html Had a problem to update to newest version of WIN10 over the windows update(some uEFI hw issues), but it went smoothly once i run this WIN 10 disk as a virtual over VirtualBoxVM http://www.sysprobs.com/mac-os-x-host-boot-virtual-machine-from-usb-in-virtualbox For powering the box i just removed one connector from PSU(pics bellow) and used RED-yellow/Black cable without soldering to connect the barrel plug For the GPU i used the 6pin connector from PSU To install: - Power on the Box - Boot to WIN 10 - Hot plug the Thundebolt cable and check the Device manager for new card something like "Basic Display Adapter" - Then install the Geforce driver (in my case the version 376.33) as administrator. Even 378.49 works fine - Then follow the instruction and reboot (don't unplug the cables). Rebooting without ext.monitor plugged in. - It should boot again in WIN10 (select win 10 during the boot). It requires a bit patience here during spinning wheel. I made a ham&eggs meanwhile (approx. 10-15minutes). I don't have to select the system after chime because my system starts automaticly when USB with Win10 is plugged in EGPU is working until the next reboot of Win10 in that case i need to reinstall the drivers (but it's worth those 8 minutes ) - Remove the old drivers by DDU tool (Display driver uninstaller) http://www.guru3d.com/files-details/display-driver-uninstaller-download.html - Install the driver again as described above and it should work again Remarks: I was running fine even on build 1607 of Win10 but after some microsoft update it stopped working. So i reverted back to build 1511 again (see below what i have installed from Microsoft) I found out that i don't really need to reinstall the drivers again. Just doing this: - turn off the Mac, - plug in the th2 - then turn the Mac on and just after chime turn on the egpu (It will not boot with the win for first time, but the win it self boots) - Then i just restart the win and not touching the th2 cable. And that's it. eGPU is up and running. (there is spinning wheel but all it takes is 2-3minutes) PPS: Don't let the windows to go to screensaver or powersaver mode. It will disconnect the eGPU Work in progress Its a snug fit This cable i used to power box (yellow and black wire) Work in progress
-
hi guys! I need help with my egpu. My gtx 970 with the akitio 2 works fine on my mac mini on os x 10.10.1. mow I tried it on my Macbook pro mid 2012 15" with the same os and it doesn't work. The gpu isn' recognized, System information I get NVIDIA Chip Model instead gtx 970. The drivers are the same as on my mac mini.
-
 Hi, a week ago i decided to build an eGpu Setup for my Macbook Pro. I installed Windows 10 (excidentley deleted OS X :/) and pluged the Zotac GTX 970 via Akitio Thunderbox into my Macbook(only Supports Thunderbolt 1). The device Manager detected the eGpu and i installed the latest Driver. Now the problem, when im triyng to play for example Company of Heroes the eGPU is obviously not in action. The Company of Heroes Benchmark says something about 1-4 fps. Im very confused because when im running this Benchmark with disabled Intel hd 4000 the GTX970 works well:http://www.geeks3d.com/gputest/. please help me, its so frustrating to see the egpu running in this Benchmark and dont see it in games.
 -
Hey guys, I am pretty new here. This is my first post (I posted a similar thing on Reddit). I have been a long time lurker and am keen to get your guys' input on what I have to offer. So I found the Akitio Node for sale from this UK company: http://www.equip-u.com/shop/index.php?main_page=product_info&cPath=45_896&products_id=20752 Seems like a legit site from what I can tell etc. And it's even linked on the Akitio official website 'Where to Buy' page for Europe (https://www.akitio.com/where-to-buy/akitio-sites). But there's nothing on their site about being in stock etc. Now I've been lurking for a while and it looks like none of the Thunderbolt 3 eGPU boxes(apart from the Razer Core) are actually available at all in Europe yet. Am I missing anything? TL;DR version: Is it worth ordering from these guys on the chance that they actually have it in stock?
-
 Published on Dec 6, 2016 I have seen a lot of people online lately asking questions and wondering if it is possible to have an external graphics setup via thunderbolt for an HP Spectre (Product name:HP Spectre Notebook Product number: W2K28UA#ABA). In general, i want to show an eGPU setup via any thunderbolt 3 connection. In this video i will show how to successfully setup and run an eGPU with 3 main components. Keep in mind that if you are going to use the Akitio PCIe thunderbolt 3 expansion box like i did, you WILL NOT be able to fit full length graphics cards, they must be half length and up to full height double width. Akitio Thunderbolt 3 PCIe expansion box: (around $260) --- https://www.amazon.com/gp/product/B01... EVGA NVIDIA GeForce GTX 950 Graphics Card: (actually around $200 - i said $300 in the video so thats a plus) --- https://www.amazon.com/EVGA-GeForce-C... Power Supply EVGA 430 w: (around $25) --- https://www.amazon.com/EVGA-WHITE-War... Also, here is a link below to download the Geforce Experience for driver installation and updates. --- http://www.geforce.com/geforce-experi... Grand total, just shy of around 500 bucks give or take shipping costs. A bit steep considering that the majority is spent on the expansion box however, it is good to have the freedom to expand upon mobile hardware. Its also important to note that when i clocked the stock GPU it barely ran on the same program. it scored a mere 2400 as compared to the eGPU setup which scored over 9000, equating to roughly a 450% increase in raw graphics capability. If you have any questions please ask away.
 -
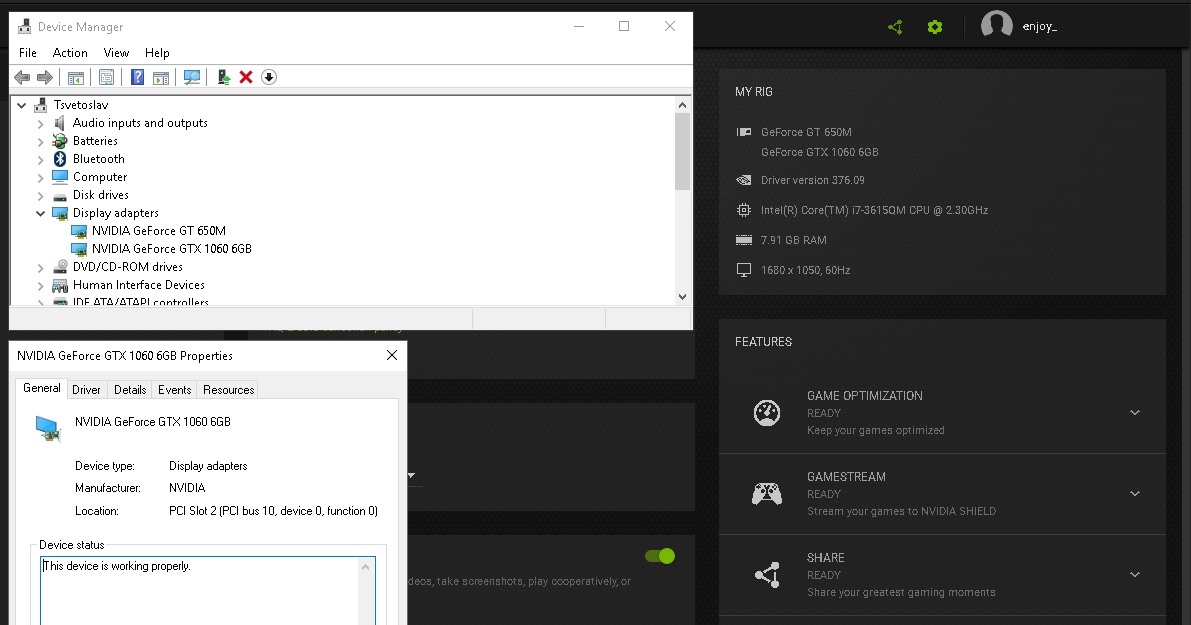
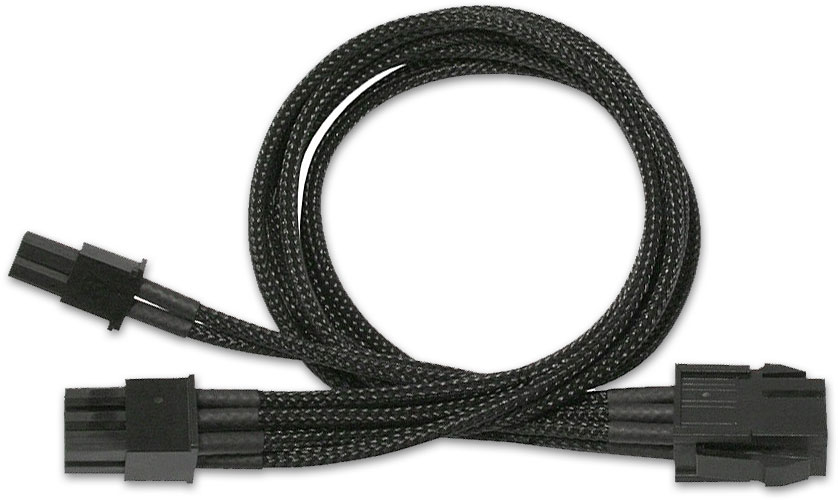
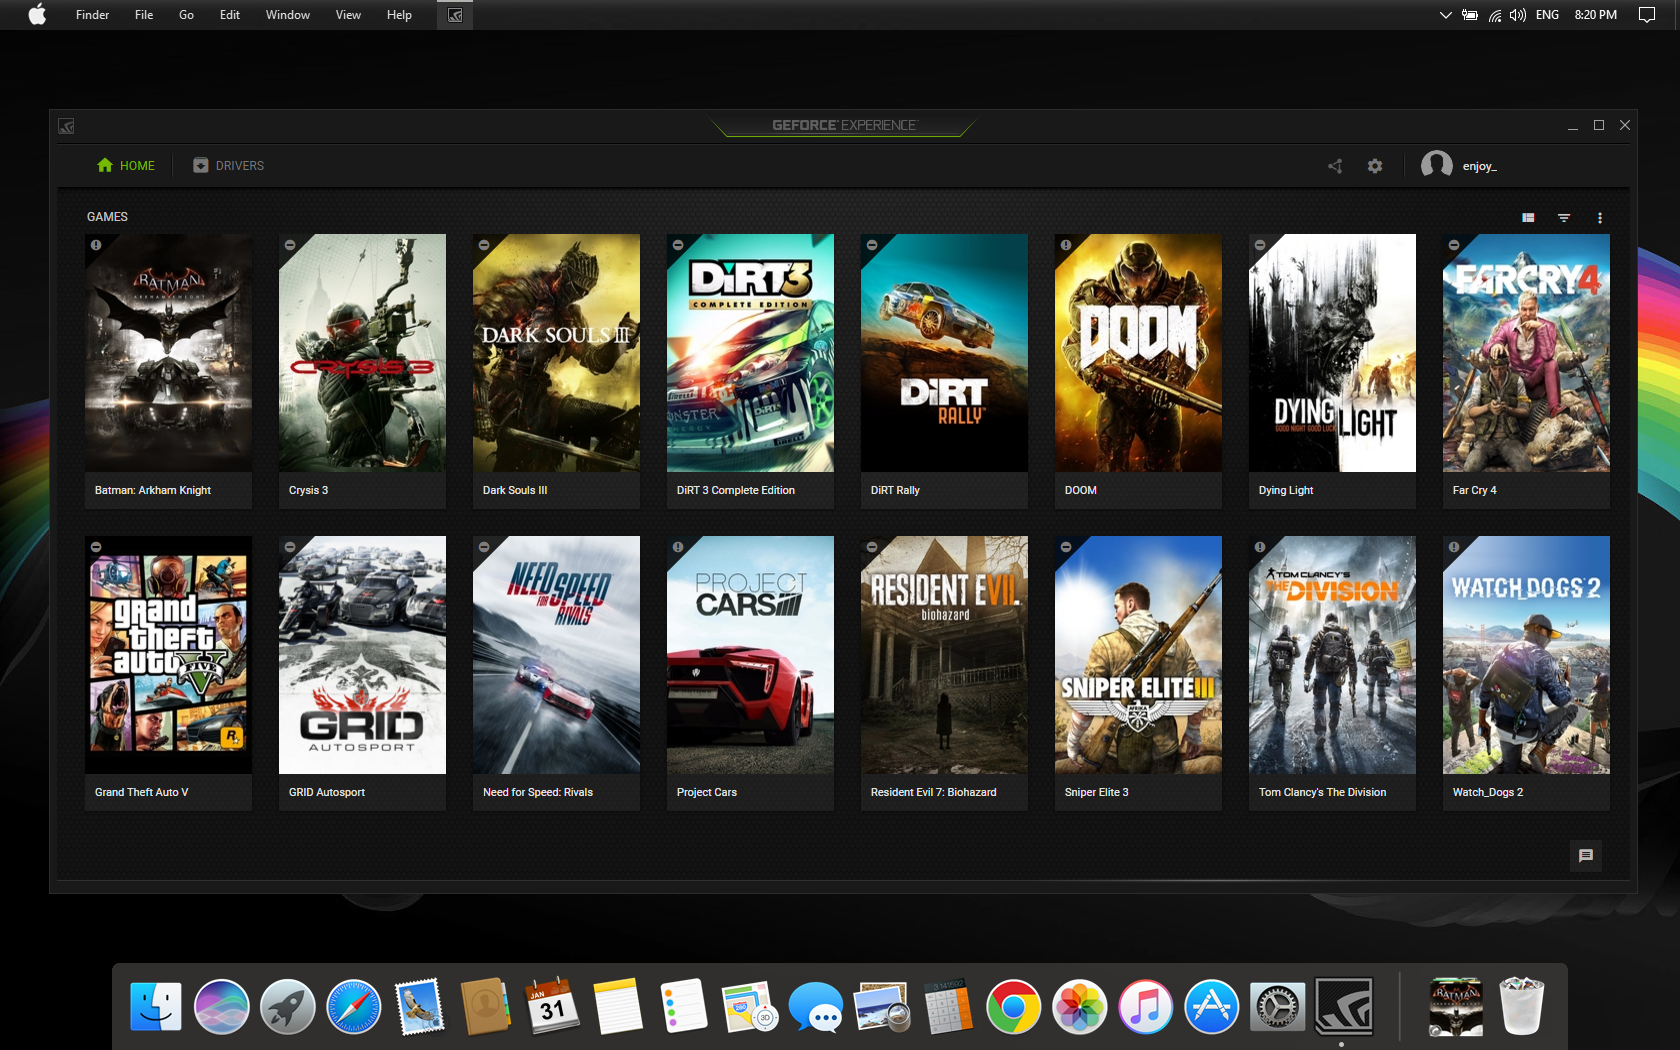
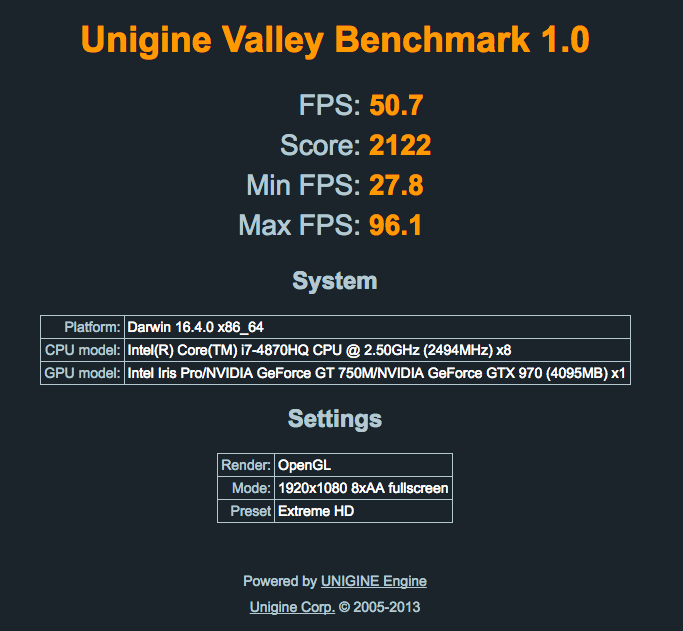
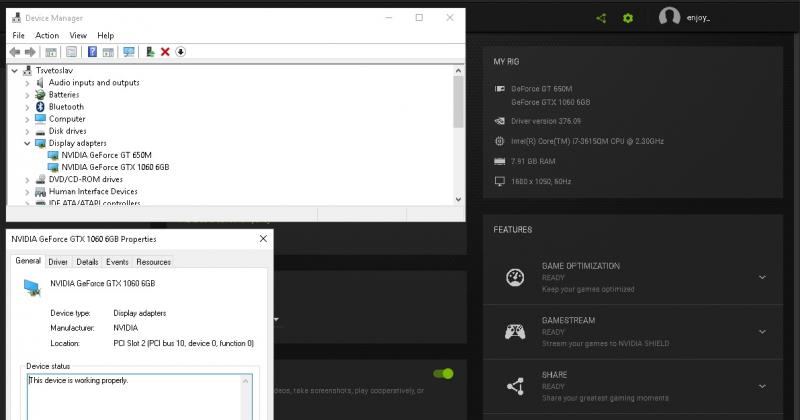
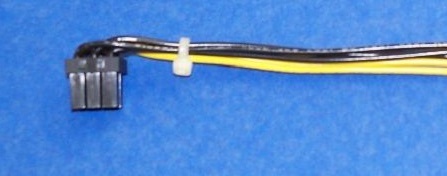
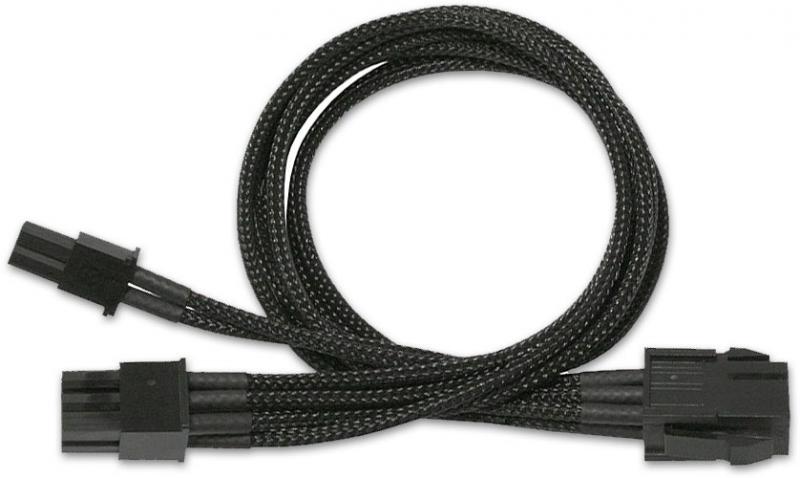
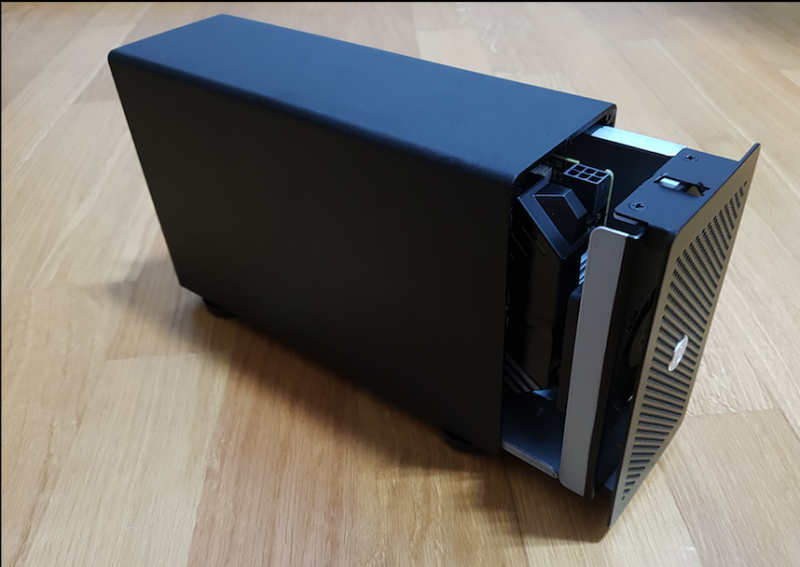
 Firstly I just want to thank everyone in this community. I read a lot of info before i start my project! Now i have more then 5 times better laptop just for 633 EUR! Windows 10 64 Bit (BIOS) / Bootcamp MacBook Pro (Retina, Mid 2012) 2.3 GHz Intel Core i7 "Ivy Bridge" (I7-3615QM) (Turbo Boost up to 3.3GHz) with 6MB shared L3 cache 8 GB 1600 MHz DDR3 NVIDIA GeForce GT 650M 1024 MB Intel HD Graphics 4000 1536 MB Nvidia Driver: 372.70 I dont like the new retina MacBook Pro 2016 and choose to spend my money for the Akitio eGPU setup with: I. PARTS: 1. Akitio Thunderbolt2 PCIe Expansion Box 290 EUR 2. 2 x Startech.com 6 inch PCI Express Power Splitter Cable 20 EUR 3. EVGA GeForce GTX 1060 Super Clocked (1607 /1835) GAMING 6GB 275 EUR 4. Dell 220W DA-2 35 EUR 5. DC Barrel 5.5mm x 2.5mm 1 EUR 6. HDMI to VGA adapter from Bulgaria 12 EUR - to play on the retina internal screen TOTAL: 633 EUR II. DELL 220W DA-2 SETUP: I have Windows 10 64 bit (BIOS) via Bootcamp on my SSD and eGPU-Setup-1.20 ready. III. Uninstall GT650M Drivers from Device Manager and Download and install 327.70 NVIDIA Drivers - http://www.nvidia.com/download/driverResults.aspx/107012/en-us IV. ERROR 12 FIX Unzip eGPU Setup 1.2 to c:\eGPU run setup-disk-image (as admin user) Restart and load eGPU Setup 1.2 and select 2 with your keyboard Then: V. Install again 327.70 NVIDIA Driver when you with the two GPU's in Windows VI. DONE VII. GAMES - I can play all games i have with 60FPS with High/Ultra setings FULL HD 1920x1080 - Before that i can play only on lowest settings with my GT 650M 1GB with 1280x800 VI. UPDATE NVIDIA DRIVER via GEFORCE EXPERIENCE TO LATEST DRIVERS - 378.66 VII. DONE I can play all games - FULL HD / 60 FPS (all to MAX + AA) on External Display I can play all games - 1680x1050 / 30-40 FPS (all to MAX + AA) on my Internal Reitna Display I also made a custom Windows 10 theme aka macOS Gaming 10.10.10 VIII. PLAY ON INTERNAL RETINA MONITOR @LukeHero MOD: So the main limitations with this model of Macbook is the fact that you need an external display. So @LukeHero got around this limitation with this little device and three resistors: It's a HDMI to VGA adapter. All you need to do is put 3x 100ohm resistors inside the VGA port to create a fake external display. You can see where the resistors need to go with this image: So the deal with this is, any program started on the 'external screen' (being powered by the eGPU) will use the eGPU. So what you'll want to do is set the fake display as your main display. Then anything started on that display will be running from the eGPU. Now there is a little limitation here; only games that run in windowed mode will work (which is most). You'll want to start the game on the fake screen in windowed mode and then drag it over to your internal display. So how do you grab from a display you can't see? Well, I found this free program called Dual Monitor Tools (it's free right here: Dual Monitor Tools - Home ) and what you can do in this program is set a keyboard shortcut to move the selected window over to the other display. So you click on the game in the task bar, and hit the shortcut you assigned and it'll pop over to the internal screen, but because it was launched on the fake screen, it'll be powered by the eGPU. Simple as that, there's no performance hit either as you're just dragging the game to the other screen. A good tip is to have the internal display set as default first, launch the game, go to options and set the game to windowed mode now, then quit and relaunch after you've changed the fake screen as your primary. Otherwise you might not be able to switch it with the shortcut while it's in full screen. HOW TO CLOSE THE AKITIO CASE: HOW TO START THE SETUP (when i want to play games): 1. choose eGPU Setup 1.2 from boot menu and select 1 with your keyboard 2. choose again Windows 10 from boot menu 3. Start the game i want 4. Press the combination for Dual Monitor Tools to show the game on my internal display (i use Borderless Gaming so i run my games fullscreen on my retina display) 5. Done - my old rMBP 2012 can run all new games - 30-60FPS (1680x1050) on Very High/Ultra settings on my retina display Borderless like Fullscreen! BENCHMARKS: Unigine Heaven 4.0 Benchmark Score EXTERNAL DISPLAY 1920x1080: Unigine Heaven 4.0 Benchmark Score INTERNAL RETINA DISPLAY 1680x1050: 6584 in Fire Strike (V1.1) - External (fake display) - the basic test (for example only 1522 with dGPU - GT 650M) Graphics score 7 210 Graphics test 1 32.47 FPS Graphics test 2 30.30 FP FOR EXAMPLE: This user have 8556 in Fire Strike (V1.1) ( http://www.3dmark.com/fs/9689714 ) with the closer CPU to mine so there is 20% performance loss because of TB1 but I still can play all games Very High or Ultra FULL HD! 1680 x 1050 - External (fake display) - just change the resolution i don't touch any settings Graphics score 9 089 Graphics test 1 46.98 FPS Graphics test 2 34.11 FPS 1680 x 1050 - Internal Retina Display (Borderless) - just change the resolution i don't touch any settings Graphics score 7 852 - the score is enough to play all games VERY HIGH/ULTRA with 1680 x 1050 on the Internal Retina Display (Borderless) Graphics test 1 33.96 FPS Graphics test 2 34.32 FPS 1680 x 1050 - Internal Retina Display (Windowed) - just change the resolution i don't touch any settings Graphics score 8 377 Graphics test 1 37.83 FPS Graphics test 2 35.12 FPS AKITIO TB2 CASE MOD - by enjoy

-

Mac Pro 2013+Akitio Thunder2+Titan X+El Capitan
imcalledandy posted a topic in Apple eGPU discussion
Hello fellow eGPU enthusiasts. This is my first post after weeks of reading and studying different threads. I have as the title suggests, a 2013 Mac Pro and I'm trying to get a TITAN X working in my Akitio Thunder2 setup. I have tried pretty much everything I believe and I'm sure it's something really silly and simple I've overlooked. Here's where I'm up to: Erased SSD Fresh install of El Capitan + all security updates installed. Disabled SIP Downloaded and ran @goalque's script (thanks for automating the process) TITAN X is recognised and the script runs fine. Reboot I get to the Apple boot screen with the progress bar - it goes a third of the way and then stops. Machine hangs. Have to press and hold the power button to shut down. This suggests a kernel panic to me. I disconnect the eGPU and turn on - OS X boots as expected. eGPU is powered by a Be Quiet 650W Power Zone PSU using a Phobya ATX-bridging plug. I am using a twin molex to barrel plug (non-solder method) to power the Thunder2. I would appreciate any help and if you need further information from me, just let me know. I'd love to get this thing up and running! Cheers, Andy -
I have hooked up my graphics card via akitio thunderbolt chassis . I have installed all the drivers necessary and still do not any image from HDMI out on card. The computer read my graphics card in that sections of system report before but now does not say it. I have downloaded CUDA and installed script for drivers and no image. Can anyone please help ?
-
Hi. I have build 4 egpus stations based on Akitio and 980ti. After eGPU Script i can work with two of them on Sierra. But when I plug 4 of them (no matter if i use two thunderbolt cables(2x2) or one (1x4)) my imac 5k won't boot and it's stuck not even making a startup sound. The same thing with three. Only two gpu's setup works perfect. Can anyone have any idea what can be wrong and how to fix this? Thank You P.S. I have also tried the bootcamp and windows 10 sees all 4 of them but only one is active and renders in octane bench. I have the same problem with booting as in macos, so i have to do it by hot plugging thunderbolt cable.
-
Its just an aesthetics thing, but I would really love to run my Akitio semi-closed; its just so much neater. Why semi-closed, you ask? I'm thinking of sliding it up to the point where the 6pin connector sits into my GTX1060 mini–which perfectly fits into the akitio box, except for the 6pin power cable. But of course theres the issue of hot temperatures. To those with experience with the akitio, do you think it is alright to leave my akitio closed with around 5cm(~2in) of open gap? picture attached to show you what i mean. Its much cleaner, isnt it? (pardon the small image, I'm limited as i just registered here) Did anyone run any temperature tests and care to share your insights? Thanks a bunch
-
Hi, I was wondering if anyone has run into the same problem I am having. A fully functional eGPU setup on my NUC has started displaying the following issue following a failed Win10 update that caused the system to hang (it wasn't a driver update): 1) The system boots up perfectly without the eGPU and the TV gets a signal from the HDMI. 2) If the Akitio is connected, then the BIOS/POST appears on the HDMI output of the NUC, but the second windows loads, then both HDMI outputs (NUC's iGPU and the GTX750Ti) go black and the system hangs. 3) If the Akitio is connected to a running system, the GTX750Ti is detected in the device manager and appears as functional (no code 10/12/43), but then windows begins to stutter and locks up hard after 20-30 seconds. The display output from the NUC itself freezes, while the display output from the GTX750Ti is black. I have tried to salvage the system by reverting to a restore point, but that did not help. I reinstalled windows, but the new installation displays the same issue. I am somewhat perplexed, because this came out of the blue and screwed up my HTPC without any clear cause. I am wondering if using Setup 1.30 would help here somehow (perhaps by actively disabling the iGPU)? I am willing to wire the 25$ to Tech Inferno Fan for it (I did not need it before). Has anyone else run into Thunderbolt eGPU black-screens of this sort? Thanks! -Y.
-
 Hello all, I am new to this forum so I apologize in advance if this question is in the wrong place or has already answered elsewhere. I am thinking about setting up my 13 inch mid 2012 non-retina MacBook Pro with an eGPU. I considering an EVGA GeForce GTX 1060, similar to this one: http://www.newegg.com/Product/Product.aspx?Item=N82E16814487267 I am also considering an AKiTiO Thunder2 PCIe box since it is not too expensive: http://a.co/7TsdwNH I know I will need an power supply of some sort as well but am not sure what I want to get yet since I am new to all of this (any suggestions are welcome). So, my main question is, with the GTX 1060 fit in the Thunder2 box without modification? I also request that if anyone knows of a cheaper thunderbolt 2 box out there please let me know. I would like to set up this GPU as cost effectively as possible. Thank you in advance for your help!
 -
 Easy Budget eGPU for OSX My objective for this build was to make a plug-and-play eGPU that was cheaper than a console and suitable for casual 1080p eSport gaming. Sadly, this wasn't quite plug and play and with a total project cost of ~$350 after extended store warrantees and rebates the 'cheaper than a console' objective is only true if you include console accessories or look at the release pricing. Still, I have a working eGPU that can play Paladins on at least medium settings at 1080p that didn't require any power supply modifications. Hardware > AKiTiO Thunder2 > This 5.5mm x 2.5mm 108W DC adaptor (anything 90-120W should work) > A Gigabyte RX 460 Windforce 2GB Tools > Philips screw driver > Wire Cutters Software > MacOS 10.12.2 > Terminal Known Issues > An external display is required for acceleration, but if the display is connected before the GPU is recognized the macOS will crash during startup. > If FileVault is on then system startup will occur after log in, which prevents one from using the external display to log in. > If FileVault is on then the computer may crash if the display goes to sleep. Hardware Installation My 7.5" GPU was within a half-inch of being a simple drop-in. Making it fit required removing the enclosure fan, which I then screwed back into the same orientation the the other side of the ventilation cutout. That required some physical effort since the fan holes on that side were not pre-threaded for the screws, but it wasn't much harder than driving a screw into wood. (I skipped the 4th inside corner screw since the board was in the way). The wire cutter was used to carefully snip the zip-tie holding the fan/LED wire bundle. I would have skipped reinstalling the fan except I couldn't get the fan connector to disconnect and didn't want to cut any actual wires. The power adaptor was a simple swap in. No wiring modifications required. The plug sticks out a little but otherwise it just plugged right in. Kext Mods > Step 0: Have a backup. > Step 1: Disable SIP. > Step 2: Use an editor, PlistBuddy, or a script to add IOPCITunnelCompatible to the AMDRadeonX4100 and AMD9500Controller kexts. The former is required for the RX 460 to be recognized in the AKiTiO enclosure, the latter to enable acceleration. AMDSupport.kext might also need to be updated. >> I used a combination of modified scripts and vi while learning my way around the kexts, but copy/pasting PlistBuddy commands is the simplest explanation. (Exact sequence not verified. I'll confirm when 10.12.2 comes out of beta and I have to remod the kexts) sudo /usr/libexec/PlistBuddy -c "Add :IOKitPersonalities:AMDBaffinGraphicsAccelerator:IOPCITunnelCompatible bool true" /System/Library/Extensions/AMDRadeonX4100.kext/Contents/Info.plist 2>/dev/null sudo /usr/libexec/PlistBuddy -c "Add :IOKitPersonalities:Controller:IOPCITunnelCompatible bool true" /System/Library/Extensions/AMD9500Controller.kext/Contents/Info.plist 2>/dev/null sudo /usr/libexec/PlistBuddy -c "Add :IOKitPersonalities:ATI\ Support:IOPCITunnelCompatible bool true" /System/Library/Extensions/AMDSupport.kext/Contents/Info.plist 2>/dev/null sudo touch /System/Library/Extensions >> Alternatively modify one of @goalque's scripts. This script can be used as-is if your hard drive is named "Macintosh HD" and the famous automate-eGPU script can be used with the RX460 if all AMDRadeonX4000 references are replaced with AMDRadeonX4100. (But note that the renaming will break the script for eGPUs use with older x4000 Radeon cards) > Step 3: Restart with the eGPU (but not the external display) plugged in. > Step 4: Plug in the external display and set the external display as primary by going to [System Preferences]->Displays->Arrangement, deselecting mirroring, and dragging the white bar from the internal display outline to the external. And now, Heaven Benchmarks for Internal_HD_6000, Internal_RX460, External_RX460 Alternative GPU choices: The GTX-750 ti (not the SC) and Mini-GTX-950 where the other two cards that caught my eye when looking for <75W options. However I decided I wanted something newer than the 750 and the 950 mini was too pricy for my budget. No promises that either would actually work, but they might be worth looking into if anyone had a strong preference for Nvidea on OSX mixed with a strong aversion to power supply splitters or wiring converters.
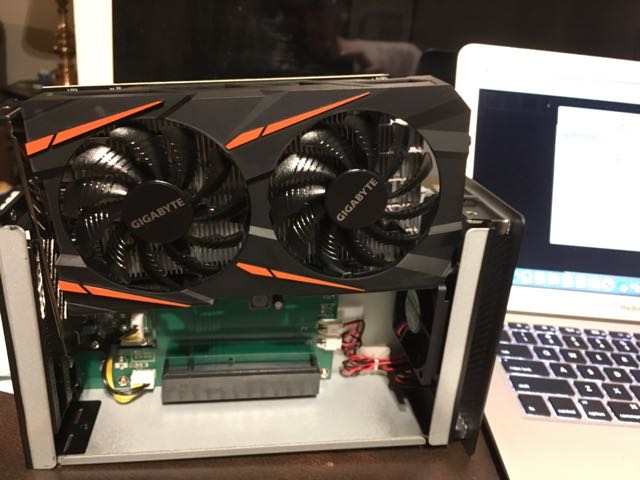
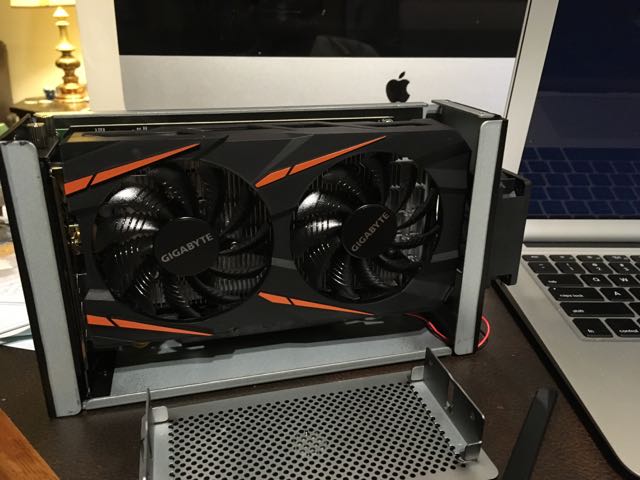
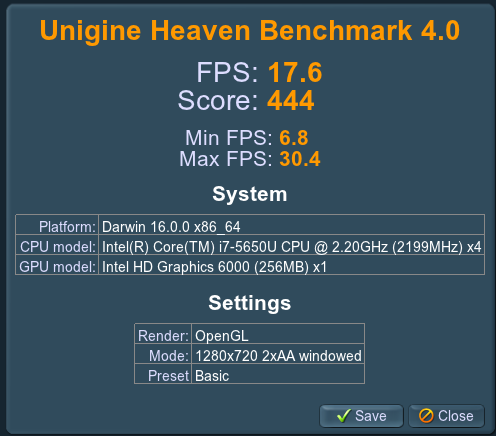
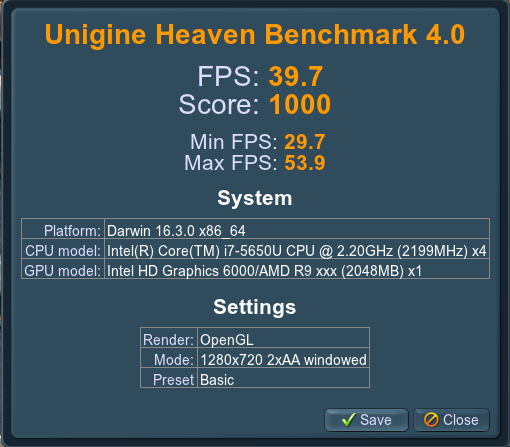
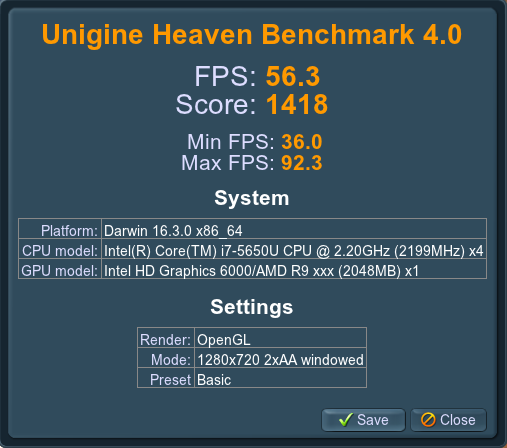
-
 Hello guys, I am just a newbie who likes the concept of eGPU. The guide here https://www.techinferno.com/index.php?/forums/topic/7947-the-basic-egpu-hardware-guide-for-macs/ really helped me a lot about eGPU fundamentals and how to do it properly. After reading it and other guides, I was able to set up my own with the new Akitio Thunder3 PCIe box. Here are the details: System: Transformer 3 Pro CPU Intel Core i5 6200U 8GB RAM 256GB SSD The card I use is ZOTAC GTX 1060 6GB Mini. I chose this because it fits nicely into the box and I am not really a serious gamer My method to provide enough power is to use a PSU with paper clip trick and I cut the wires from CPU connector 2x4pin to connect to a barrel plug To avoid soldering, i bought a barrel plug with screws. However, this one doesn't fit into Akitio's socket, so I had to buy a barrel adapter to make it work. See the pictures below [gallery800x600] [photo=https://q1ofrg-sn3302.files.1drv.com/y3mlcEuBpMLNo68Pi6byS3YdaVc17QH2xfCzhG9TrMKIP7XZrbCj6mDhU2QfG9fhEju32JQweG795lbYeaPMu7ezll3_UAW8xUYD7rUh3POHMKRsacGkmHcEDVCDMvUIdPwCSJ4bFQCeUc-yzsgVhr8MxL0EwW8fpN1p_7LoGyxJYM/WIN_20161115_08_57_09_Pro.jpg?psid=1][/photo] [photo=https://bfvomq-sn3302.files.1drv.com/y3prHzGjlBvu7uPqi_9bh_YoXG4HYjJSOANM5sFE0KUWty2ioaGjRUsdpYlPNc8EO_nbK-lMuMw3HfCx1kKZmr5tonRHL2iPH3txMWh81hJaSHIEDQgX0l1Om5e2QSxLpE_9maECsn6DGz7XODk77mp2m-A5PwAZzUQ0MJDeNa29TA/IMG_20161110_082830.jpg?psid=1][/photo] [/gallery] Afterwards, driver installation is flawless. The box will power the card only when thunderbolt cable is connected to my tablet. I can reconnect at any time (hot plug) and system is able to recognize the card almost instantly. For benchmarking purpose, I used the existing game Batman Arkham Origins that my tablet struggles to play. Details are as follows: All other graphics settings are at highest values 1920x1080, internal display: 50FPS 1920x1080, external display: 55FPS 1920x1440, internal display: 45FPS 2560x1440, external display: 40-45FPS (cannot remember the exact value) To compare thunderbolt performance with the desktop one, I plugged the card into my friend's desktop computer (Intel Core i7 6700K, 16GB RAM). Under 1920x1080, the difference is huge with the card being able to perform at 80FPS To my suprise, there is not much difference between internal and external display (5FPS) at 1920x1080. I don't know if the game itselt factor into this, as I don't have other AAA games to test That's what I have tried so far. Thanks for reading
 -
The hardware is working. I replaced the default power supply with a 108W 12V 9A unit and had to relocate the Akitio Fan so the Windforce cooling fan on my Gigabyte RX 460 2GB GPU would fit, but everything is connected and fans spin when my 2015 i7 MacBook Air powers on. However it was not plug and play as I had wistfully hopped, and the automate-eGPU script didn't work either to my active disappointment. For anyone familiar with the script this was the output: ---------------------------------------------------------------------------------- sudo ./automate-eGPU.sh -skipdriver Password: *** automate-eGPU.sh v0.9.9 - (c) 2016 by Goalque *** ------------------------------------------------------- Detected eGPU Baffin [Radeon RX 460] Current OS X 10.12 16A323 Previous OS X [not found] Latest installed Nvidia web driver [not found] Checking IOPCITunnelCompatible keys... Missing IOPCITunnelCompatible keys. Controller not found. ------------------------------------------------------------------------------------ Does anyone have any ideas? Has anyone successfully used any particular RX460 model with Sierra on a MacBook Air?