PlannedObsolescence
-
Posts
25 -
Joined
-
Last visited
Content Type
Profiles
Forums
Downloads
Everything posted by PlannedObsolescence
-
In the zip file from the link that Makinachan just posted, there is a folder called "Crisis," and inside of that folder is a readme and a bin file called "QIWY3.bin". Here is what the readme says: I don't see any recovery names appearing for a stock Y580 version 8.01 bios when I use the Phoenix tool to try and find one, but according to this information the recovery name to recover a Y580 version 8.01 bios should be "QIW3.bin." I made this thread a while back which you might help: The recovery process for recovering a Y580 bios should be the same as the one for the Y500, but I'm unsure as to whether or not it would work with a Y580 version 8.01 bios.
-
From the looks of things, it looks like there should have been an additional Mini PCIE card edge slot attached to the Y500 motherboard for a Mini PCIE TV Tuner. There is even a driver for a TV Tuner for the Y500 on the Lenovo website: http://support.lenovo.com/us/en/downloads/ds032571 I found an alternative card edge to the original card edge that is attached to the Y500 motherboards: https://www.digikey.com/product-detail/en/jae-electronics/MM60-52B1-E1-R650/670-2275-2-ND/2071034 This particular card edge being sold at DigiKey has a different height from the one on the LinkConn website. The card edge on DigiKey is 5.9mm in height, while the one on LinkConn is 6.75mm in height. I believe all the other specifications are the same. It was the closest available match I could find. We would have to solder the card edge to the motherboard somehow. Then, we would need a nut for screwing in a Phillips screw and a rubber stand (or whatever you call it) to keep a full length Mini-PCIE card in place while it is connected to the card edge. Then we should have a working, extra Mini-PCIE slot on the Y500 motherboard for Mini-PCIE cards. I suspect if the card edge was to be soldered correctly in the particular area that I have shown in the pictures along with the nut and the rubber stand, and if we were to place any of the following Mini-PCIE TV Tuners into the extra Mini-PCIE slot and install the TV Tuner driver from the Lenovo website, we would have a fully working TV Tuner on the Lenovo Ideapad Y500: 16 TV Tuner Module, DMB-T, Geniatech, MM7000DMBT TV TUNER 11011329 * 16 TV Tuner Module, DMB-T, Yuan, MC163 TV TUNER HYBRID MINICAR 11011447 * 16 TV Tuner Module, DVB-T, Avermedia, AM H339 DVBT Hybrid TV Turner MiniCard 101500048 * 16 TV Tuner Module, ATSC, Avermedia, AM H339 ATSC Hybrid TV Turner MiniCard 101500047 * 16 TV Tuner Module, DVB-T/ATSC, Yuan, MC907 TV TUNER HYBRID MINICAR 11013387 *
-
Flashing a Y500 with a Y580 bios? Possible?
PlannedObsolescence replied to PlannedObsolescence's topic in Lenovo
I recently found out that the recovery name for a Lenovo IdeaPad y580 bios is the same as the one for the Lenovo IdeaPad Y500. It is "QIWY3.bin". However, there is no recovery name for the Y580 version 8.00 or 8.01 bios given when you use the Phoenix tool. So in theory, even if you were to brick a Y500 trying to flash a Y580 version 2 bios on it, you might be able to recover from it using the appropriate Y500 "QIWY3.bin" bios. I don't think the recovery would work if you used a version 8.00 or 8.01 Lenovo IdeaPad Y580 bios though, because it seems there is no way to do a bios recovery using those bios versions. I'm not trying to convince anyone to try this, but this is what I have discovered using the Phoenix tool and I'm letting you all know. -
I don't have a Lenovo z510, but I decided to download a bios for it from the Lenovo website and used the Phoenix tool to find a bios recovery name for the z510 bios. I'm pretty sure the bios name you would have to use for a recovery is "Zx10X64.fd". I had a similar problem on my Y500, and I did this: I can't imagine that a bios recovery for a Lenovo z510 would be that much different. Perhaps the actual steps for a bios recovery on a z510 are little different, but maybe they aren't. But I'm pretty sure the right file name to use, if you have the appropriate bios, is "Zx10X64.fd".
-
The Recovery . . . Read all the below (twice) before starting! 1) Use a USB thumb drive (preferably with a working activity LED, see note 9 below) and format it as FAT or FAT32 2) Copy only the “QIWY3.bin” file to the drive – nothing else 3) Remove the battery from your Y500/Y400 4) Remove the external power cable 5) Insert the thumb drive in the USB port next to the HDMI connector 6) Hold down the “Fn” and “R” at the same time (do not release until step 9) ‡ 7) Insert the external power (still holding the “Fn” and “R” buttons down) 8) Briefly press the power button 9) The laptop will try to start and will read the thumb drive, here is where the USB thumb drive activity LED comes in handy, when you see drive activity release the “Fn” and “R” buttons 10) CRITICAL, DO NOT TOUCH ANYTHING ON THE LAPTOP OR REMOVE POWER!! At this point the fan will run at full speed, LED’s may or may not blink – the magic is happening here – you bricked BIOS is being re-written with the crisis BIOS (QIWY3.bin) file! 11) The laptop will power off briefly when done, and then restart. 12) With luck, you’ll now be able to access the BIOS screen via pressing F2 during boot up Other helpful tools/sources: Phoenix Tool – this tool is handy to help identify the recovery BIOS file needed. When ran using the BIOS “BIN” file, the tool will yield “QIWY3.bi?” confirming that the “ QIWY3.bin” file is to be used for the crisis recovery. Find the working “Fn + R” key combination, several other posts on the web will point to the “Fn + B” combination; however, the the “Fn + B” combination didn’t work for my laptop (it may for yours), be ready to try all 12 combinations! Credit: http://blog.jimsjump.com/2016/02/07/lenovo-y510p-v305-bios-bricked-crisis-recovery-solved/ <-- The above method is the same as the method that was used to do a bios recovery for the Y510p / Y410p described. You just have to use a different recovery name ("Yx01.bin"). This method may work on other Lenovo IdeaPads with the same/similar type Insyde Bios as long as you use the correct recovery name. UPDATE: The recovery name for a Lenovo IdeaPad Y580 version 2.06 bios is also “QIWY3.bin”. I checked it with the Phoenix tool. However, I noticed that Y580 bios versions 8.00 and 8.01 don't give you any recovery names when you use the Phoenix tool.
-
LENOVO Y500 BIOS UNLOCK AND WHITELIST REMOVAL
PlannedObsolescence replied to LaRtInG's topic in General Notebook Discussions
I downloaded some files from here as well after I was permitted to do so, but there seems to be a limit of 5 files per month. I thought my original wait time was 24 hours from the time of downloading my first 5 files, but I could be wrong. -
LENOVO Y500 BIOS UNLOCK AND WHITELIST REMOVAL
PlannedObsolescence replied to LaRtInG's topic in General Notebook Discussions
You don't need to mod the bios to take advantage of the Intel Turbo Boost feature of the CPU on the IdeaPad Y500. All you need to do is get Throttlestop, set the multipliers to a suitable level below 34 that won't raise the core temperatures above 105 degrees Celsius, and uncheck the box for "BD PROCHOT". Also, I will also mention something went wrong with the multipliers when I first used Throttlestop, and it tried to overclock my CPU to 6.0 ghz by mistake once. I'm not sure about using speeds beyond 3.4 ghz if you are seeking to do that because I've never tried it. There are some posts I saw in Y500 unlocked bios thread about raising TDP, etc, and stuff like that: I actually didn't get my Y500 bios mod files from here. I got them from a link someone uploaded to some website: http://thaisarn.net/clipsingle/Pk4oMcEs4MM I did a successful bios recovery on my laptop using an LED flash drive formatted to FAT32. I used the backup I made prior to flashing the modded bios using the file name "QIWY3.BIN" and the same bios recovery method that was used to do a bios recovery for the Y510P that is described here: http://blog.jimsjump.com/2016/02/07/lenovo-y510p-v305-bios-bricked-crisis-recovery-solved/ This bios recovery method wasn't well-documented, and wasn't easy to find on the net. It was also for a Y510p, but it also works on the Y500 and Y400 if you use the right recovery name. This should save you a lot of trouble. -
Are you sure? Is this true? Has this person tried using a device that uses a Mini PCIE connection like a TV tuner or a full size Intel Wifi WiMax bluetooth card? Generally, mSata ssds don't work on Mini-PCIE.
-
Flashing a Y500 with a Y580 bios? Possible?
PlannedObsolescence replied to PlannedObsolescence's topic in Lenovo
I found out that the recovery name for the Lenovo IdeaPad Y500 "QIWY3.bin" seems to correspond with a name that is used on a Lenovo IdeaPad Y480 motherboard. I just did a successful Y500 bios recovery from a USB flash drive. I don't know if you would be able to do a bios recovery for a Y500 if you flashed it with a Y580 bios though, or whether using a Y580 bios on a Y500 would damage the Y500's motherboard. I think that the recovery name for the Y580 is "QIWY.bin", and perhaps the recovery would work (in the event of a bricked Y500 as a result of flashing a y580 bios) if you renamed the "QIWY3.bin" file to "QIWY.bin", but I'm not sure. -
My laptop was running on Insyde Bios version 2.02, and I did not upgrade it to version 2.04 before running SVL7's procedure. I just did a successful bios recovery on my laptop using an LED flash drive formatted to FAT32. I used the backup I made prior to flashing the modded bios using the file name "QIWY3.BIN" and the same bios recovery method that was used to do a bios recovery for the Y510P that is described here: http://blog.jimsjump.com/2016/02/07/lenovo-y510p-v305-bios-bricked-crisis-recovery-solved/ This bios recovery method wasn't well-documented, and wasn't easy to find on the net. It was also for a Y510p, but it also works on the Y500 and Y400 if you use the right recovery name.
-
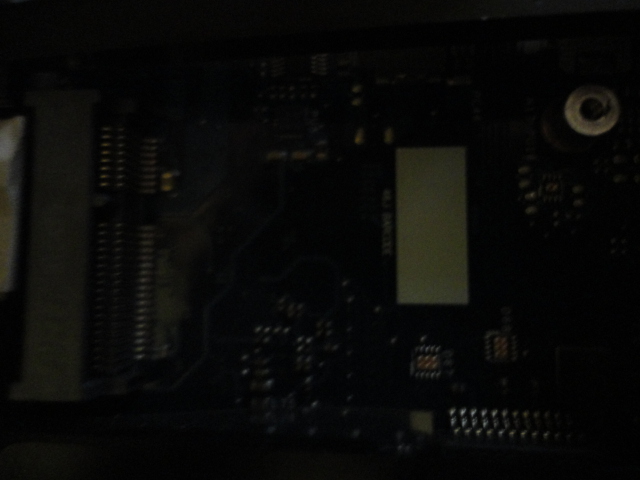
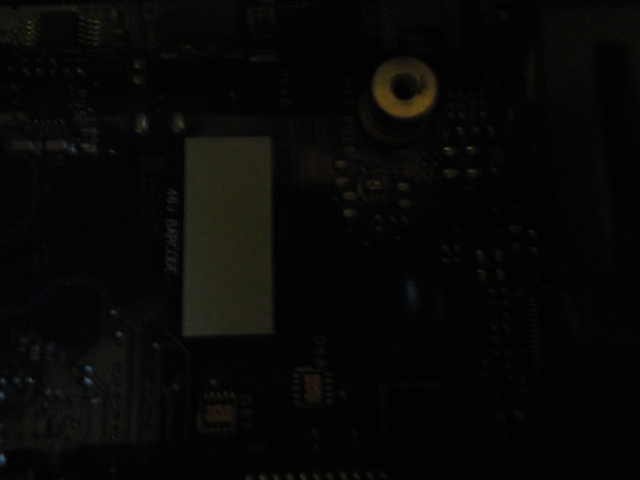
Well, thank you for this post. So you are saying that this RaspberryPi method of flashing a bios will work for a Y500 motherboard with a bricked bios without actually replacing the bios chips on the motherboard? I believe the bios chips are located somewhere not too far from the CMOS battery. They are marked on the motherboard as "U5" and "U9", one of them being for the embedded controller. Apparently, the IdeaPad Y500 has a 256 KB CMOS Ram chip, but I'm not sure what it does though. The only thing desoldering and resoldering the CMOS battery seemed to do was reset the bios real time clock to Sat Jan 1st 00:00:00 2011. There is also a much bigger chip with the "Lenovo" logo on it around near where the CMOS battery is located, but I don't know what it does either. Maybe it is flash memory. I didn't have to use the RaspberryPi method as I managed to do a successful bios recovery from a USB flash drive. I used the file name "QIWY3.BIN" and the same bios recovery method that was used to do a bios recovery for the Y510P that is described here: http://blog.jimsjump.com/2016/02/07/lenovo-y510p-v305-bios-bricked-crisis-recovery-solved/ . The USB flash drive I used had an LED, was much bigger than 2GB, and was formatted as FAT32.
-
Sorry it took me so long. So the CMOS battery on my laptop was desoldered and resoldered back in, but it didn't seem to solve the problem with the bios. However, I tried recovering the bios from a USB flash drive using the backup I made prior to flashing the modded bios using the file name "QIWY3.BIN" and the same bios recovery method that was used to do a bios recovery for the Y510P that is described here: http://blog.jimsjump.com/2016/02/07/lenovo-y510p-v305-bios-bricked-crisis-recovery-solved/ The bios recovery was successful for my Lenovo IdeaPad Y500. It even restored the original Insyde bios version 2.02 (the modded bios updated it to version 2.04) and the original "80.07.95.00.17" vbios for the first GDDR5 750M GPU that is part of the laptop's motherboard.
-
So I took a look at the motherboard of my Y500 laptop, and I discovered something very interesting: There seems to be an area on the Y500 motherboard where an extra Mini PCIE x1 could have been, and it looks like this might be true of other IdeaPad motherboards as well. I identified the card edge that was on my laptop's motherboard, and the company than made it. I tried to contact the company, but my messages didn't seem to go through. This is what I tried to ask them: So the question is: Could you install another Mini PCIE x1 to this laptop and use another Mini PCIe device with it (i.e. an mSata hard drive, another Wi-Fi card, etc.) ?
-
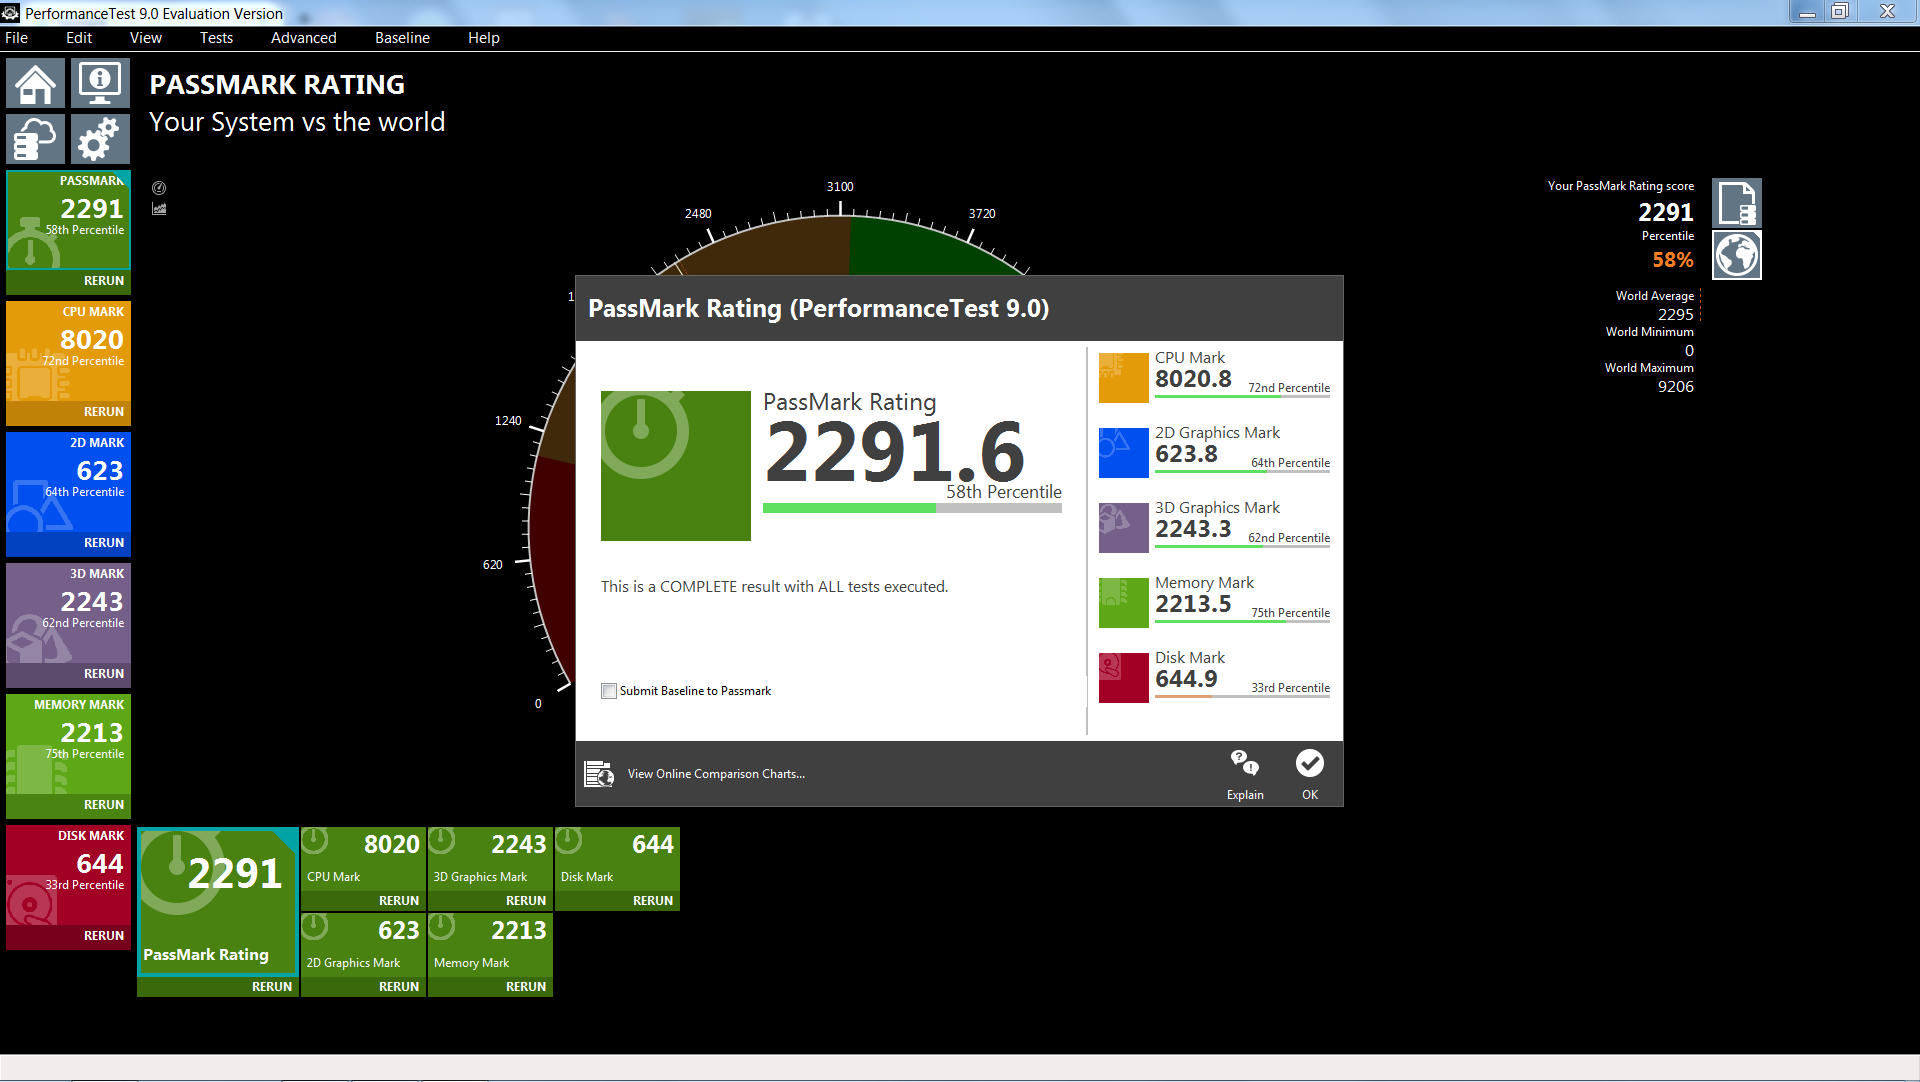
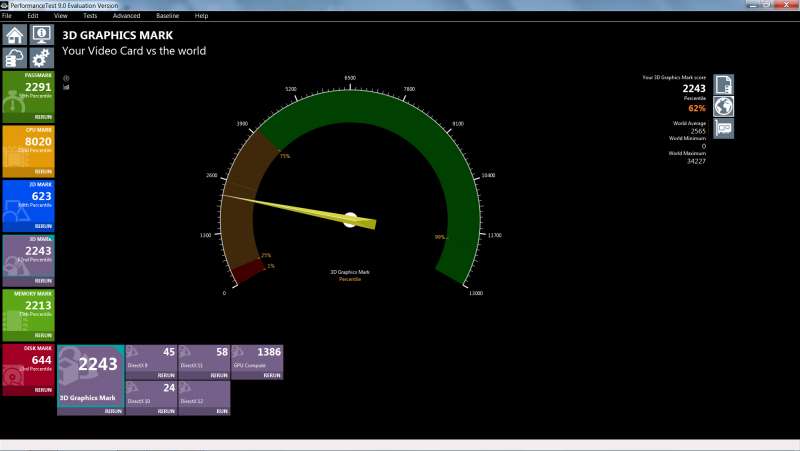
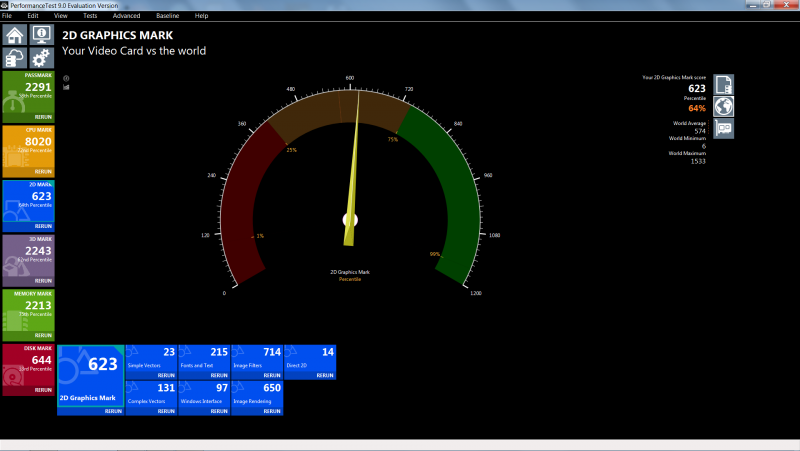
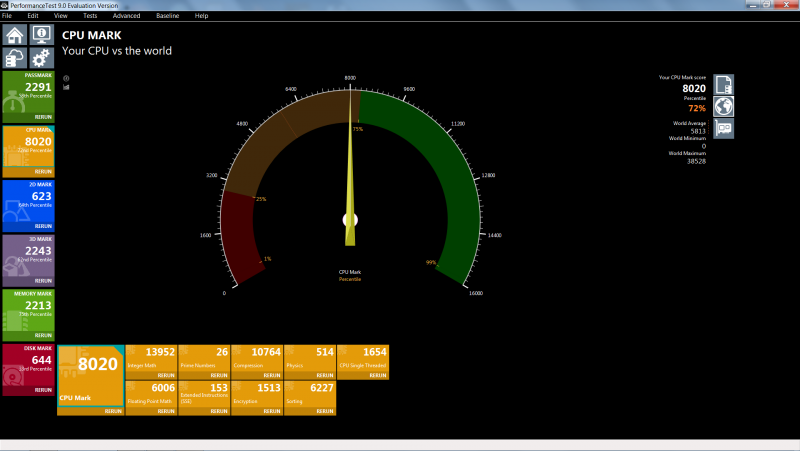
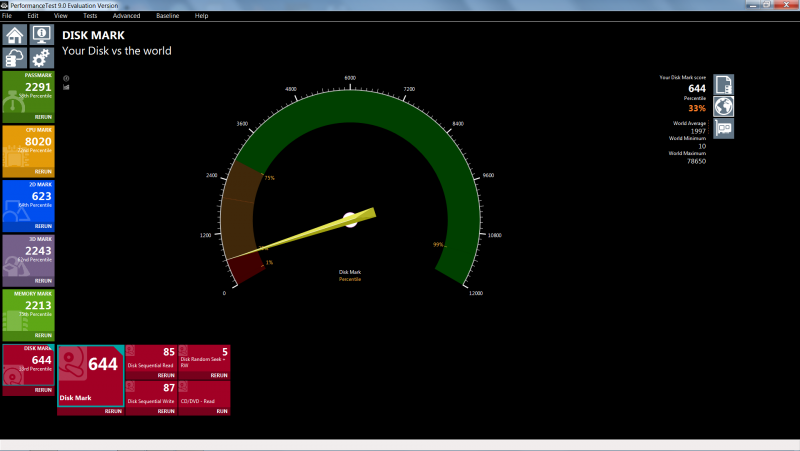
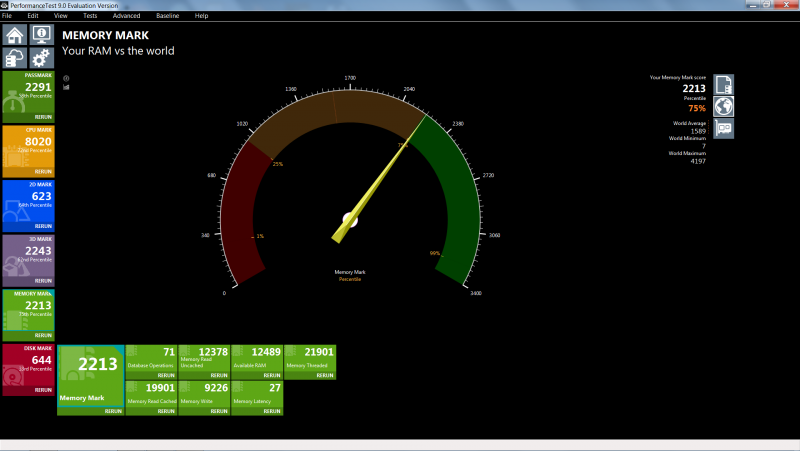
I did a Futuremark benchmark weeks before I did the bios mod, and I also did some Passmark performance tests a week after that. The Futuremark benchmark was done on December 30th, 2016: http://www.3dmark.com/3dm/17053334 I was using an outdated version of Futuremark because I don't think a proper scientific assessment can be made if you change too many variables at once (graphics card drivers, CPU clocks, etc.). I did another Futuremark benchmark after I did the bios mod, but I didn't save the link to it. I noticed that the core clock says it is 1058 MHZ in the December 30th benchmark, but I never saw that speed in GPU-Z (I saw 967 MHZ boost clock speed) while using the 80.07.95.00.17 vbios in Windows for the first 750M GPU, hence that is why I thought I got a 100 MHZ overclock when the new 80.07.9d.00.11 vbios replaced it. I guess the GPU clocks change depending on what you are doing. I found this in another thread: Here are the Passmark benchmark screenshots I saved from January 7th: I think the 3D Graphics Mark is twice as high as the 750M you will see on PassMark's website because I was doing the test in SLI. I never submitted my results to Passmark. I'm posting this because I'm trying to rule out whether something was going physically wrong with the laptop before I starting making changes to the bios, etc. If something was physically wrong with it, I think I should have noticed it in the results I was getting or while I was actually using the laptop.


-
Here are the Dynamic Platform Thermal Framework (DPTF) and the Smart Connect software and drivers I used before the laptop was bricked: http://www.filedropper.com/y500smartconnectanddptf I believe these are the links to the original files as well: https://downloadcenter.intel.com/download/23109/Intel-Smart-Connect-Technology http://support1.lenovo.com.cn/lenovo/wsi/Modules/DriverDetail.aspx?ID=35350 http://driverdl.lenovo.com.cn/lenovo/DriverFilesUploadFloder/35350/SmartConnect.exe https://support.lenovo.com/us/en/olddownloads/ds037476
-
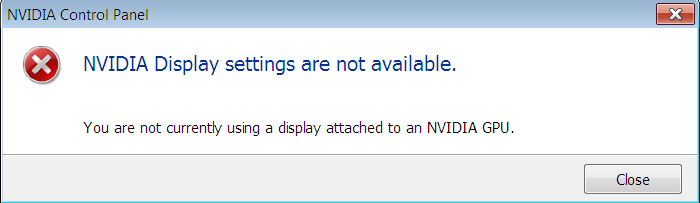
Here is my log of the second GPU vbios backup that I did with NVFlash before the laptop got bricked: NVIDIA Firmware Update Utility (Version 5.218) Simplified Version For OEM Only Select display adapter: <0> GeForce GT 750M (10DE,0FE4,17AA,3802) H:--:NRM S:00,B:01,PCI,D:00,F:00 <1> GeForce GT 750M (10DE,0FE4,17AA,3802) H:--:NRM S:00,B:02,PCI,D:00,F:00 Select a number (ESC to quit): 1 Adapter: GeForce GT 750M (10DE,0FE4,17AA,3802) H:--:NRM S:00,B:02,PCI,D:00, F:00 The display may go *BLANK* on and off for up to 10 seconds during access to the EEPROM depending on your display adapter and output device. Identifying EEPROM... EEPROM ID (C2,2012) : MX MX25L2005 2.7-3.6V 2048Kx1S, page Reading adapter firmware image... IFR Data Size : 0 bytes Image Size : 95744 bytes Version : 80.07.95.00.1A ~CRC32 : D316B74A Image Hash : 21141F9F460E61CEE435CEABBB8671A4 Subsystem ID : 17AA-3802 Hierarchy ID : Normal Board Chip SKU : 750-0 Project : 2044-0100 CDP : N/A Build Date : 01/17/13 Modification Date : 02/01/13 UEFI Support : No UEFI Version : N/A UEFI Variant Id : N/A ( Unknown ) UEFI Signer(s) : Unsigned Saving of image completed. That vbios is around 94K and is different from the one on the Lenovo website. Here is the a picture of the NVIDIA Control Panel error I got after trying to get a vbios backup of the first 750M GDDR5 GPU attached to the laptop's motherboard: I never tried backing up the first 750M GPU vbios with a modified version of NVFLASH from Tech Inferno. Here is picture of some files from the dump of my laptop's bios: I read some tutorial online somewhere and dumped the bios using the Phoenix tool sometime ago, but I couldn't find the vbios. Perhaps one of these files listed above is the vbios for the first 750M GPU? I used my own laptop's original bios when I used the SVL7 Bios Fixer tool, so if the vbios isn't in the Phoenix dump of my laptop's bios, then how come a different vbios was flashed when I flashed my SVL7 modded bios to the laptop?
-
Does anyone here believe flashing a certain Lenovo IdeaPad Y500 with a Lenovo IdeaPad Y580 would be successful and result in a functional PC? Here are the specifications for the particular Lenovo IdeaPad Y500 I'm talking about: Intel® Core™ i7-3630QM NVIDIA® GeForce® GTX 750M GDDR5 Version 16GB Ram 15.6" HD 1920x180 Display JBL speakers with Dolby Home Theater v4 sound enhancement Key Specs and Drivers Y500: http://www.lenovo.com/shop/emea/content/pdf/IdeaPad/YSeries/en/ideapad-y500-datasheet.pdf http://support.lenovo.com/us/en/products/laptops-and-netbooks/ideapad-y-series-laptops/ideapad-y500-notebook?c=1&beta=false A bios taken from this particular Y580 with these specifications: Intel® Core™ i7-3630QM NVIDIA® GeForce® GTX 660M 16GB Ram 15.6" HD 1920x180 Display JBL speakers with Dolby Home Theater v4 sound enhancement Key Specs and Drivers Y500: http://www.lenovo.com/shop/emea/content/pdf/notebooks/ideapad/y-series/y580/en/Y580_DS_EN.pdf http://support.lenovo.com/us/en/products/laptops-and-netbooks/ideapad-y-series-laptops/ideapad-y580?beta=false "The IdeaPad Y Series laptops released by Lenovo in mid-2012 were the Y480 and Y580. Lenovo followed them up towards the end of the year with the Y400 and the Y500 which had almost similar specifications. The main difference is that the Y400 and Y500 have an ultrabay slot which can be swapped for another hard drive, another fan or another GPU which will work in SLI with the already integrated one to increase performance drastically." https://en.wikipedia.org/wiki/IdeaPad_Y_Series I'm not sure what would happen to the functionality of the Y500 ultrabay, but there doesn't seem to be any specific settings for it listed in the default Y500 bios or the modded one for that matter. Now, I know that the Y580 came with a 660M and the Y500 I'm talking about has a 750M GDDR5. However, based on the specifications of the two graphics, I have very good reason to believe that the 750M GDDR5 is an overclocked 660M: https://www.game-debate.com/gpu/index.php?gid=688&gid2=1715&compare=Nvidia GeForce GTX 660M-vs-Nvidia GeForce GT 750M 2GB GDDR5 They also have the same number of transistors (1,270 Million). Examining the vbios of a 750M GDDR5 and the vbios of a 660M, it would seem like you could replace the vbios a 750M GDDR5 with a 660M one without compatibility issues and simply modify the core speeds and boost clocks to the original ones for a 750M GDDR5: https://www.techpowerup.com/gpuz/details/3yyyu https://www.techpowerup.com/gpuz/details/c5c8y The device ID for a Lenovo 660M is 10DE - 0FD4, while the device ID for a Lenovo 750M GDDR5 is 10DE - 0FE4, so it looks like one letter was changed. Further, a stock vbios 80.07.95.00.17 for a 750M GDDR5 appears as modified in NVIDIA Inspector according to a post in this thread: So why would you try to flash a Y580 bios with a Y500 anyway? Well, you cannot use the Intel HD Graphics 4000 on the Y500, but you can on the Y580, which is odd because as you can see you could have a Y500 and a Y580 with the exact same CPU. There is an option on the Y580 bios called "UMA Graphics" under "Graphic Device" in addition to the "Switchable Graphic" option which will disable the discrete GPU and only enable the Intel HD Graphics 4000. "UMA generally stands for unified memory architecture. It indirectly refers to the fact that integrated graphics card uses the system RAM because it does not have any of its own integrated RAM. Therefore, whenever you come across the term UMA that is an indication of some sort of integrated graphics." The Y500 bios doesn't have this "UMA Graphic" option in the bios, nor does it have the "Graphic Device" option or the "Switchable Graphic" function by default. I don't see any reason why the exact same CPU on the Y500 cannot use its own system RAM to produce integrated Intel HD 4000 graphics just like the Y580, unless they physically altered the Intel i7 3630QM CPU somehow on the Y500. Its possible that the Y500 cannot use integrated Intel HD 4000 graphics because of a bios restriction and or because they restricted the ability to use UMA graphics via the bios. This might also increase battery life on the Y500 laptop, or maybe even you the ability to use NVIDIA Optimus since the HD 4000 graphics would be installed and enabled. Another reason you might want to flash a 660M vbios on a 750M GDDR5 GPU is because perhaps the 660M has better driver support. Finally, the Y500 bios is very restricted and terrible overall (not like the Y580 bios is any better, but it would seem like it would be an improvement if it gave you the ability to use the CPU's integrated graphics capabilities). I haven't tried flashing a Y580 bios on a Y500 myself, but I guess if I could remove the CMOS battery to reset the Y500 bios to its original settings (which I'm having trouble doing since the CMOS battery is unnecessarily soldered to the motherboard as decided upon by the manufacturer of the laptop), it might be worth a shot.
-
To add, I'm also doubtful that 5 minutes of installing, using, and uninstalling the Lenovo Smart Connect program would cause a short circuit in the motherboard, or that disabling the hyper-threading of the CPU would completely kill it. The GPU wasn't overclocked for very long, so I'm also doubtful that GPU would die in a day or so from being overclocked. I played a game for like less than 5 minutes and did a Futuremark benchmark in SLI to see if there were any differences, but that was pretty much it. The GPUs had ASIC qualities in the range of 73 to 75 percent from what I remember.
-
I still haven't tried removing/desoldering the CMOS battery from my laptop and resoldering it to the motherboard to try and do a bios reset. My problem is similar to what is described by some other posters: If I manage to reset the bios by desoldering the CMOS battery and resoldering back to the motherboard and it works, I will let you know. I think this happened to my laptop because I disabled the PCI reset delay. I messed around with some other settings that deal with video configuration like Primary Display (iGFX, PCI, PEG, SG, etc.) and Always Enable PEG, but I would still manage to get the Lenovo boot logo and be able to access the bios nonetheless. Some Video settings in the bios would revert back to the original when I changed them. It was only until I decided to disable the "PCI reset delay" did the laptop decide to become unbootable and not show anything on the display. I can get power from the USB ports, but I can't boot anything from them, and I'm wondering if the disabled "HS Port Switch 2" under "XHCI" in the "USB Configuration" of the "Advanced" section has anything to do with it. I have tried pressing the Novo button on the laptop, but nothing has ever happened when I have tried this.
-
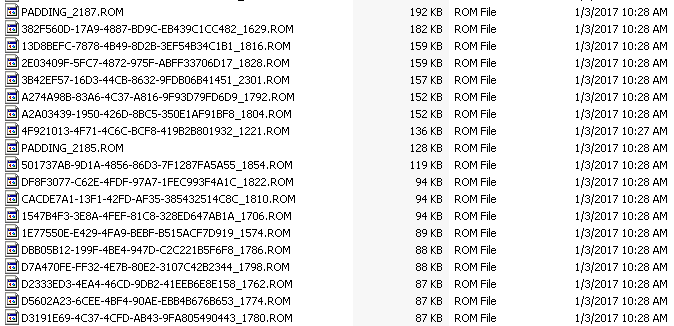
Someone posted in the Lenovo Y400 / Y500 - unlocked BIOS / wlan whitelist mod thread links to an older 2.02 Bios mod and a modified 80.07.95.00.17 vbios. If I had known about the older 2.02 bios mod, maybe I would have tried this instead. However, the links to the attachments appear to be dead, and the files were also removed from Svl7's Y500 unlocked bios guide. "Hey Svl7, I tried this Lenovo_Y500_BIOS_v2.02_Mod - rev01.zip and the GPU 0 (main GPU) still have the +135MHz OC limit, as shown in EVGA Precision. The Y500 - Y400 - SLI 750m - 80.07.95.00.17 - OC.zip works fine for GPU 1 (secondary SLI GPU). What is weird is that before this GPU0 would go up to 1102MHz, but after flashing I believe it went up to 1189MHz in game. On the other hand, after flashing GPU1 would go above 1200MHz easily. After checking with Nvidia Inspector, both GPU 0 and GPU 1 has the same BIOS (80.07.95.00.17), which says MODIFIED beside it. I have tried re-flashing and GPU0 still wouldn't go above 1189MHz, meanwhile GPU1 went up to 1254MHz stable." That user said that the second vbios for the secondary SLI GPU was the same as the first vbios for the main GPU (the 80.07.95.00.17 version) , but in my experience the second vbios for the secondary SLI GPU was different from the one that was used for the main GPU. The secondary SLI GPU vbios version ended in "1A". I have a backup of the unmodified, stock "1A" version. I believe I did use the Phoenix tool once to try and get the main GPU vbios extracted from it, but I had some trouble identifying it. If I can take a look through those files again, I'll look for some files that are around 159 KB in size. I'm not sure whether or not flashing a different vbios caused the issue I'm having with my laptop.
-
Someone took some pictures of their modded Lenovo IdeaPad Y500 bios and posted them to Svl7's Y500 unlocked bios guide a few years ago: You can compare those to the pictures I posted of my own, and as you can see that my pictures are of the original modded bios configuration before I made changes to it.
-
Prior to changing settings after installing the bios mod for my Lenovo IdeaPad Y500, I decided to take some pictures of the original settings. I didn't take any photos of the Power section of the bios, but the only setting that I changed there had to do with the Hyper-Threading for the CPU. I can't upload the images directly to this thread because they exceed the limit of 1 MB, but I uploaded them to PostImage, and here is the link to the gallery: https://postimg.org/gallery/jiuaqrq6/
-
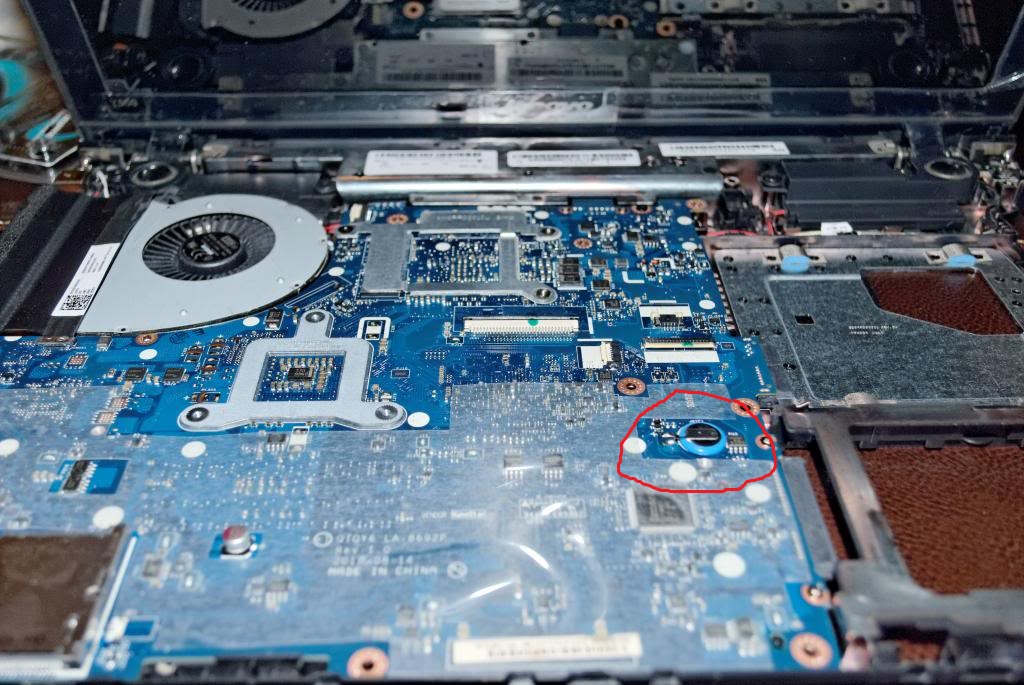
Here is a visual representation of the CMOS Battery in question that may be soldered to the motherboard. I believe the CMOS Battery for the Lenovo IdeaPad Y500 should be located in the area circled in red: This isn't an actual picture of my own Lenovo IdeaPad Y500's motherboard. The original photo was from the Y500 disassembled (pictures) thread: I have yet to try fully disassembling out again to try and remove the CMOS battery for 10 minutes out of the fear of physically damaging the laptop. I have tried booting from a USB drive and the draining the battery bios reset method, but I have had no success so far.

-
I recently tried this Lenovo IdeaPad Y500 bios mod by svl7. I was originally running official Insyde Bios v2.02 and the stock vbios for the first graphic card GDDR5 750M. I was reluctant to try this bios mod initially because I could not backup the vbios for the first 750m graphic card, but I finally decided it to try it because I was convinced that I needed access to other hidden bios options to accomplish what I was trying to do. I wasn't modding my bios so I could change the GPU clocks of my 750M graphic cards, and I did try to back up the vbios for each 750M first. If I tried to back up the vbios with GPU-Z, it would give me an error message saying bios reading is not supported, cause my computer screen to change colors, or freeze my computer completely. If I tried it to back up the vbios with NVFLASH, it would change my display resolution, disable my GPU, return an error message, and cause NVIDIA control panel to return a message which says a NVIDIA GPU must be attached to the display, etc. I could only backup the vbios for the second GPU. I followed the instructions on the guide posted on the TechInferno forums correctly and everything. I backed up my bios, modified it using the tool, and then I flashed the modded bios. The bios mod was successful, and I now had access to other hidden bios options. However, I noticed that the vbios version for the first 750M GDDR5 graphic card was now different as I had feared, and it was also clocked at 1059 mhz, almost 100 MHZ higher than it was before the mod (it was at originally at 967 MHZ). The original vbios version 80.07.95.00.17 was changed to version 80.07.9d.00.11. Here are some other GPU-Z validations for reference: vbios 80.07.95.00.17: https://www.techpowerup.com/gpuz/details/e7hcb https://www.techpowerup.com/gpuz/details/3yyyu vbios 80.07.9d.00.11: https://www.techpowerup.com/gpuz/details/4z7pe The GPU clock was higher (1059 mhz) for me with the 80.07.9d.00.11 version. I did a Futuremark benchmark in SLI, but I got the same/similar results as before. But the computer seemed to running fine with the SL7 bios mod, despite the change to the vbios for the first graphic card. I tried enabling and disabling various features and options in the bios, but none of them seemed to get what I wanted working. If the PC was stuck at the Lenovo logo after changing an option, or something else wasn't working right in Windows after making a change in the bios, I just undid the changes I had made previously in the bios. One thing I noticed after I installed the bios mod was a command prompt which opened up and installed some WiDi certificate while I was running Windows 10. I decided to press escape a few times while the Lenovo logo was displayed, and I noticed that it took me to some Grub4Dos boot menu, with gave me a list of options of booting Windows with or without SLIC, etc. I was never able to do this until I installed the modded bios v2.04, and I'm pretty sure I never actually installed Grub4Dos myself. I tried experimenting with various bios settings in the video configuration which was accessible in the advanced section of the boot menu, but changing these options didn't suffice. So, I decided to enable the Intel Smart Connect Technology and the Intel Dynamic Platform and Thermal Framework (DPTF) in the bios. A bunch of unknown devices showed up in Device Manager when I booted Windows, so I went ahead and installed the Lenovo Smart Connect software which was for a different Lenovo Laptop as well as the Intel Dynamic Platform and Thermal Framework drivers that were for a Lenovo Yoga. Both installations worked and installed drivers for the unknown devices. I took of some options for the CPU which stood out to me. I saw that the "Bi-Directional PROCHOT#" in the thermal configuration of the advanced section of the bios, was enabled, but I didn't disable it. If this is enabled, it kinda makes the Intel Turbo Boost feature useless because the CPU Turbo Boost clock to 3.4 ghz etc. will only last a couple of minutes and maybe longer if you are lucky since the CPU cores will reach temperature maximums by that time. If Intel Turbo Boost is enabled at the same time, the Bi-Directional PROCHOT setting can also cause CPU-demaning games to freeze and lag. But the BDPROCHOT setting in the bios isn't something that you cannot disable in Windows using an external overclocking program if you want the the extra benefit of the Intel Turbo Boost, so it wan't really necessary to disable it in the bios. I did see that there was an option to disable the hyper-threading for the CPU somewhere in the power section of the modded bios, so I gave it a spin. I once wanted to reduce extra CPU threads without actually disabling physical cores of the CPU by disabling hyper-threading, and I could not do this until I installed the modded bios. I was interested in the ACPI Table/ Features Control in the advanced section of the bios as well, and I enabled the TC0 Watchdog Support which was originally disabled. It changed some configuration in Windows and required a reboot of the operating system. Changing this setting in the bios didn't seem to cause any problems. I enabled Serial Port A in the Peripheral Configuration of the advanced section of the bios, and I'm not sure what this did. I also disabled some PCI clockrun setting as well. I believe it was the turn off unused PCIE/PCI clocks in extended ICC in the advanced section of the bios. Finally, I decided to change a setting in the PCI Express Graphic in the Video Configuration which was part of the advanced section. The setting was called "PCI Reset Delay". I changed the setting from "100 ms" to disabled. Now I cannot even access the bios of the laptop. The laptop powers on, but all I get is a black screen. I cannot get a video output using an external screen. I wanted to do a factory reset of the bios somehow, but I'm not sure how I can accomplish this. I tried calling Lenovo technical support, and they told me to try a remove the CMOS battery. I'm aware of the location of the CMOS battery on the motherboard, but it does not seem to be removable and might actually be soldered to the motherboard. The Y500 also seems hard to disassemble, and I was watching a video on how to disassemble it from this website: https://www.how-fixit.com/laptop-repairguideslenovo-laptop/lenovo-y500-y510p I tried to take the laptop apart, but I was having great difficulty doing this. I couldn't fully take it apart to expose the CMOS battery. I'm also afraid of breaking the connectors which connect the CMOS battery to the motherboard. I already broke a plastic piece of the second GPU because I had trouble removing it from the Ultrabay port of the laptop. I'm trying the bios reset by using the discharge laptop battery method that someone used on their Z400 laptop, but I'm not sure if it will work on my laptop or not. If anybody knows of a way I can fix this problem so I can use my laptop again and can explain it to me, I would be very thankful. I hope that a replacement of the entire motherboard is not necessary just to fix a bios or CMOS battery issue.