


MC-Sammer
-
Posts
29 -
Joined
-
Last visited
-
Days Won
1
Content Type
Profiles
Forums
Downloads
Posts posted by MC-Sammer
-
-
9 minutes ago, Khenglish said:
Yeah the HDD/SSD drive caddy would be good to have and I see you listed it. Mainly I want the optical drive bezel. The P150EM bezel does not match at all.
The bracket for the single screw to hold the drive in would be helpful as well, although I could make that out of copper flashing.
And hell, my optical drive is getting flaky, so the whole optical drive would be nice if you're willing to part with it, especially if it can read blu-ray.
idk if you want to relist the caddy with the other parts included or just make another listing, so I've held off buying it for now.
I don't have anything else I can put the drive in, and finding a ODD external caddy is a pain, so here ya go!
https://www.ebay.com/itm/272956363346
I also posted the screen if you're interested. 95% color gamut and it calibrated pretty nicely
")
-
-
3 hours ago, Khenglish said:
If you put them up on ebay I will 100% buy them if they're cheap enough.
Also this is the link to TI's page if you want to use that:
https://www.techinferno.com/index.php?/classifieds/category/2-notebooks-and-components/
When you say OD caddy are you talking about the housing of the optical drive itself, or that little HDD/SSD drive caddy for housing a drive above/behind the OD?
-
Well the drive I have is a blu-ray writer, would you be interested in buying the full drive?
-
6 hours ago, Khenglish said:
Do you still have the battery and optical drive caddy? I picked up a P157SM-A frame and have everything but those. The battery doesn't need to work. I just need the shell. As for the optical drive all I really need is the bezel, but the fully caddy would be nice to secure the SSD.
I do have the battery, and you're in luck because it holds about a 3 minute charge lol
And yup I have the OD caddy; the GPU + Heatsink + Screws are the only parts I've sold so far.
-
I could've sworn there was a selling section on TI, but I can't seem to find it.
Anyway, I'm parting out my old P157SM since I've upgraded to a P750DM2-G.
I've already sold the GPU, but the rest of the parts (minus the CPU and bottom case cover) are in decent shape and I was wondering if folks would either be interested in buying any parts (much cheaper than getting them from rjtech) and/or had recommendations on where to post them.
I've already posted them on eBay without much fanfare (links below) but if anyone has any tips I would be very grateful!
https://www.ebay.com/itm/Laptop-Keyboard-and-speaker-cover-For-Clevo-P157SM/272870402908
https://www.ebay.com/itm/Killer-Wireless-N-1103-NIC-Clevo/272870395346
https://www.ebay.com/itm/New-Clevo-P157SM-P157SM-A-P170EM-GPU-fan/272870382942
Thanks everyone!
-
@Prema this might be of interest to you
-
Oh my, Kabylake uCode is added to the bios from the repo!
-
I was looking for new drivers for my p750dm2-g and stumbled across this.. [PM me for the link]
I thought I'd share.
-
I recently bough a p750dm2-G to replace my P157SM; it has a fried CPU, and I suspect that the Prema VBIOS were a bit too much for the power supply because it would crash on me when I was gaming.
I did do some mods on the case in an effort to improve cooling which can be found at https://www.techinferno.com/index.php?/forums/topic/9694-hardware-mod-p157sm-cooling-overhaul/#comment-144375
I did find a site that would sell replacement bottom covers if the mods I made to mine are unappealing.
PM me if interested
-
And now it appears that I've fried some portion of the integrated GPU

I'm able to get windows loading correctly with a generic driver from M$, but I had to use gpedit to block the driver from reinstalling itself.
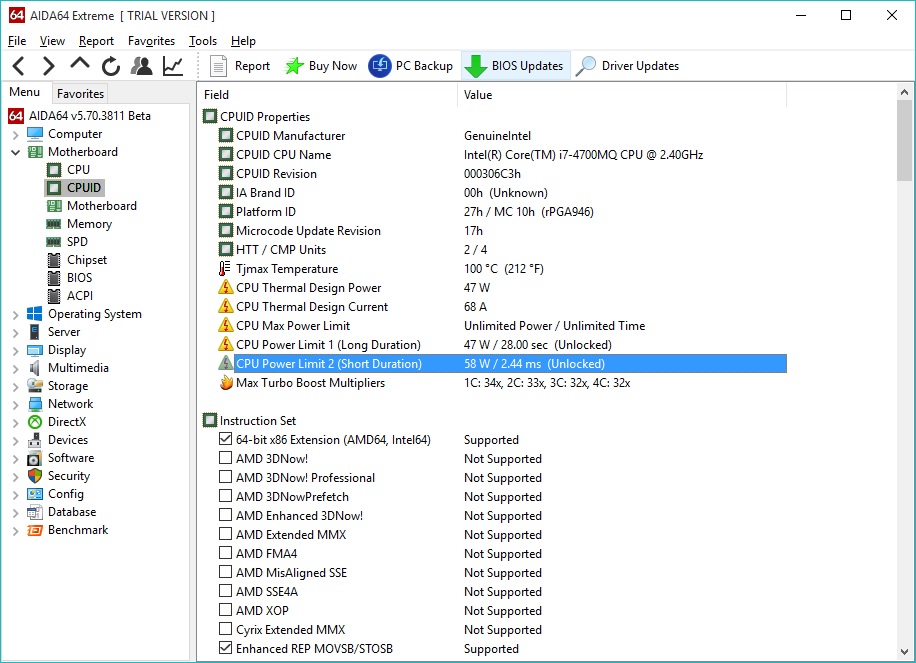
And now to debate if I should fork up the dough for a new 4700MQ, or if I should invest in a new system; decisions, decisions...
-
@senso Yup, both the CPU and GPU.
-
Howdy all,
So I've been having some issues with my P157SM overheating while gaming (particularly with fallout 4). It seems to me that the fans aren't kicking on early enough to keep the system cool, though I know from logging at least the CPU and GPU are within reasonable limits. It's sort of strange that I can't seem to pinpoint one particular thing that is overheating, My current guesses are either the caps/resistors above the CPU (covered by the little copper edge of the CPU plate) or some of the thermal pads on the GPU plate aren't lined up correctly. It's also possible that the EC firmware from @Prema isn't kicking in quite early enough, but that'd be surprising for him to not have already addressed this at some point.
The only time I've been able to re-create it outside of Fallout is one time I was running both the CPU and the fuzzy donut GPU burner from MSI Kombuster. I haven't been able to get it to over heat just running one or the other.
I'll have to re-examine the pads one of these upcoming weekends, though it'd be a shame to screw up the good paste job I did on the GPU this last time lol
PS: I sent some financial love Prema's way, because he really deserves it!
-
20 hours ago, tmash said:
Would be nice to see temps with CPU OC, I need more fins for increased "virtual" cooling capacity
Yeah I'm thinking that too, though I won't have a 'before' to compare against
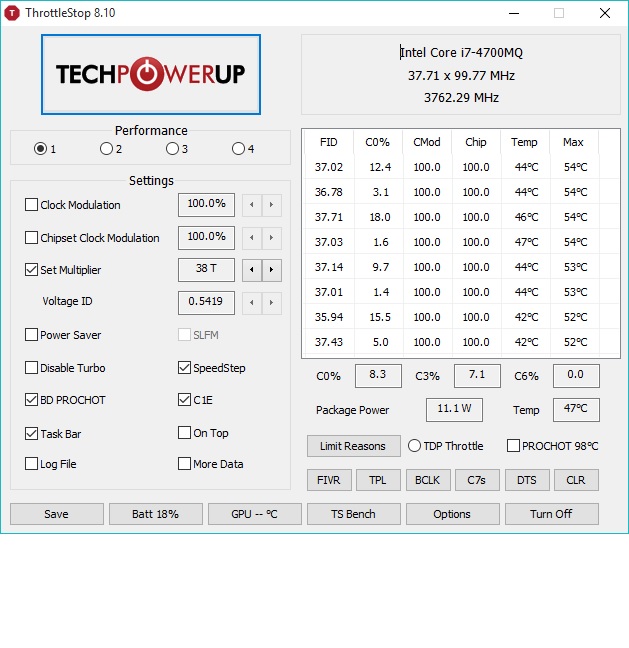
I'm back up to uC 17 and I installed XTU and throttlestop is all unhappy and won't hold the multiplier settings

But I'm gonna be working on the GPU side of things this weekend, so maybe I'll play around some more with uC and try getting rid of XTU and see if that helps
-
 1
1
-
-
Over the last month or so, I've been planning on overhauling my (slightly dated) P157SM to give it better cooling, and possibly higher performance.
There were a number of sources I used for inspiration, and I'll attempt to document all of them later on, but first, pictures!
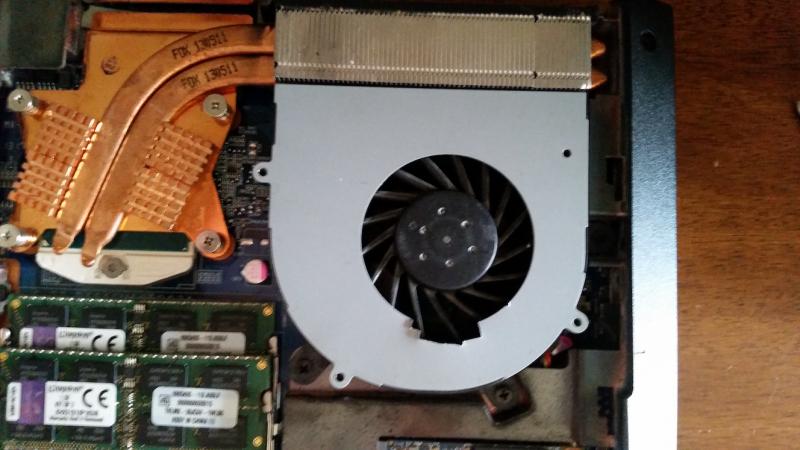
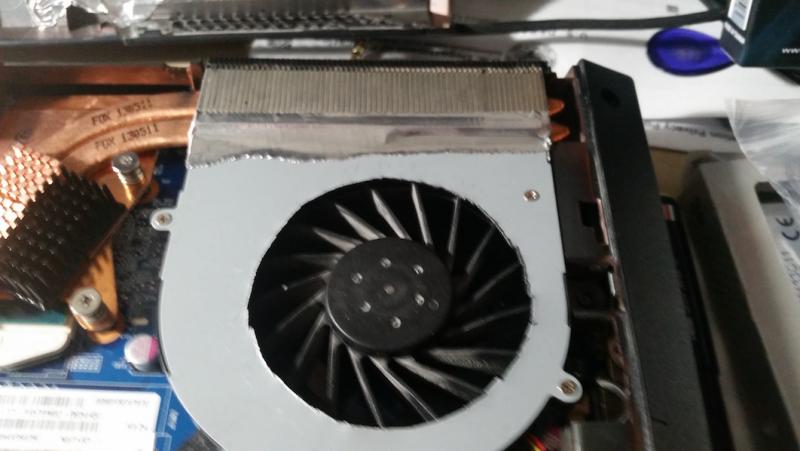
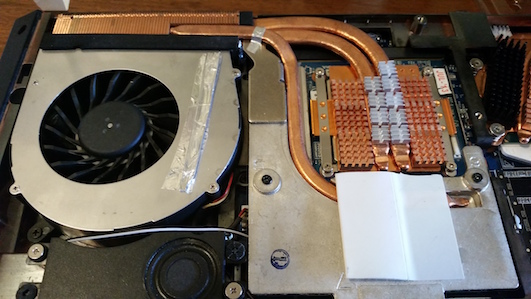
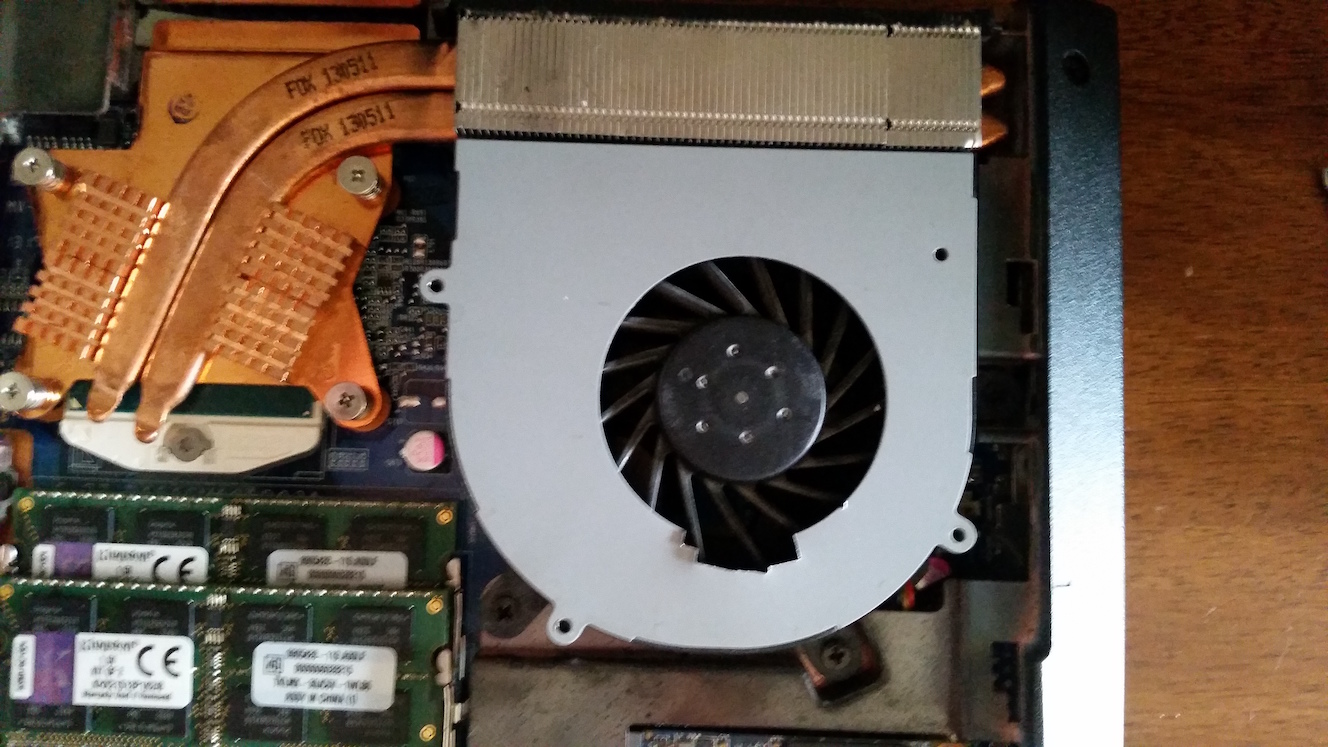
This is the first modification I made. I increased the opening of the CPU fan to allow more air to go into the fan. As I recall, it helped with idle temperatures but I don't remember by how much.
This picture shows how much I increased the opening by, I didn't do just that bit and stop

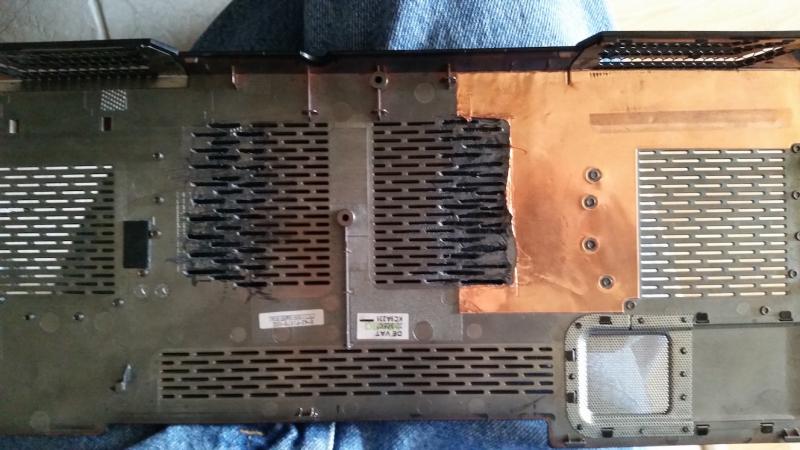
Next up, I increased the width of the intakes directly over the GPU and CPU to reduce ambient heat buildup in those areas.
I ultimately decided that increasing the width was not the best route to go (and it was quite ugly) so I decided to simply remove the vents
I used some diamond mesh to cover those areas, but I don't have any pictures of that at the moment.

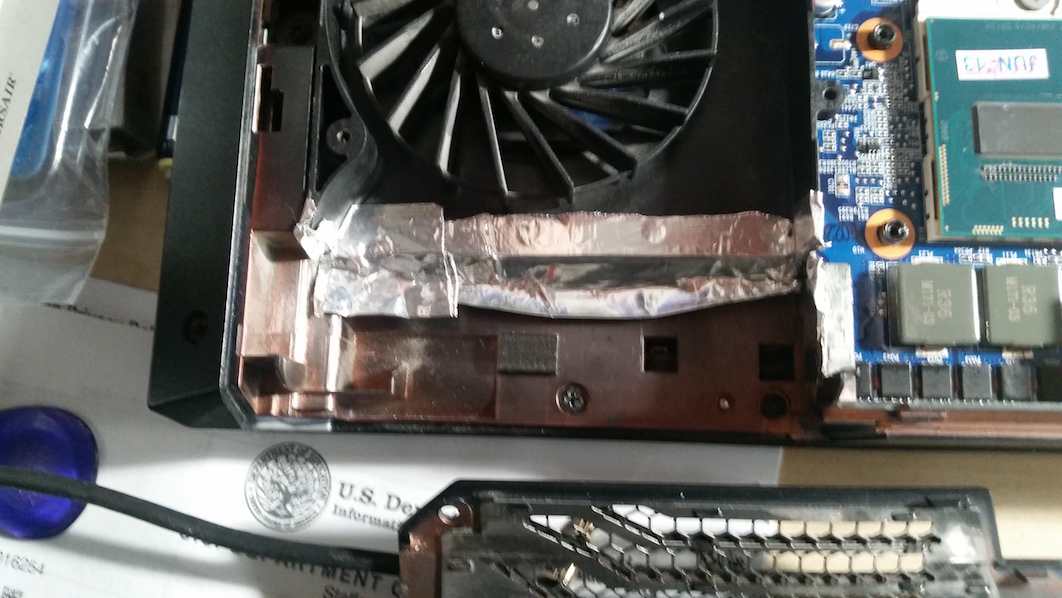
Next I used some HVAC tape to direct the air flow from the CPU fan into the heatsink and not out the tiny gaps in the area.

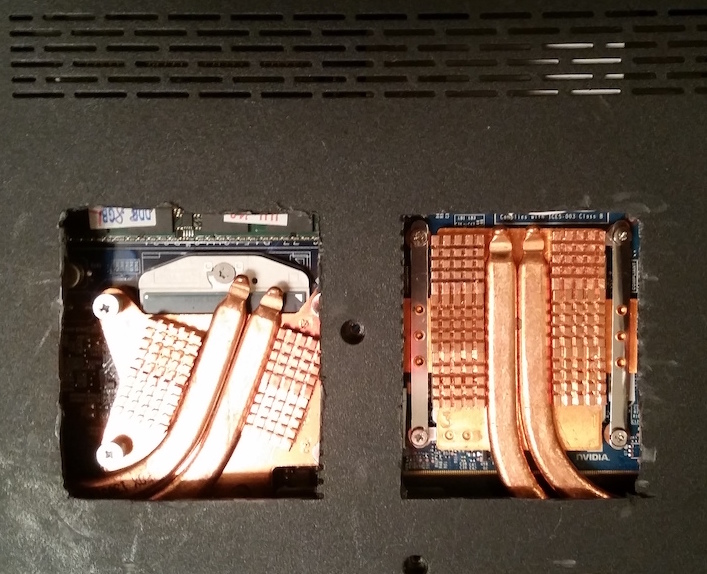
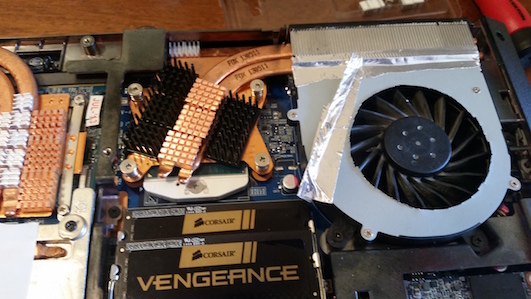
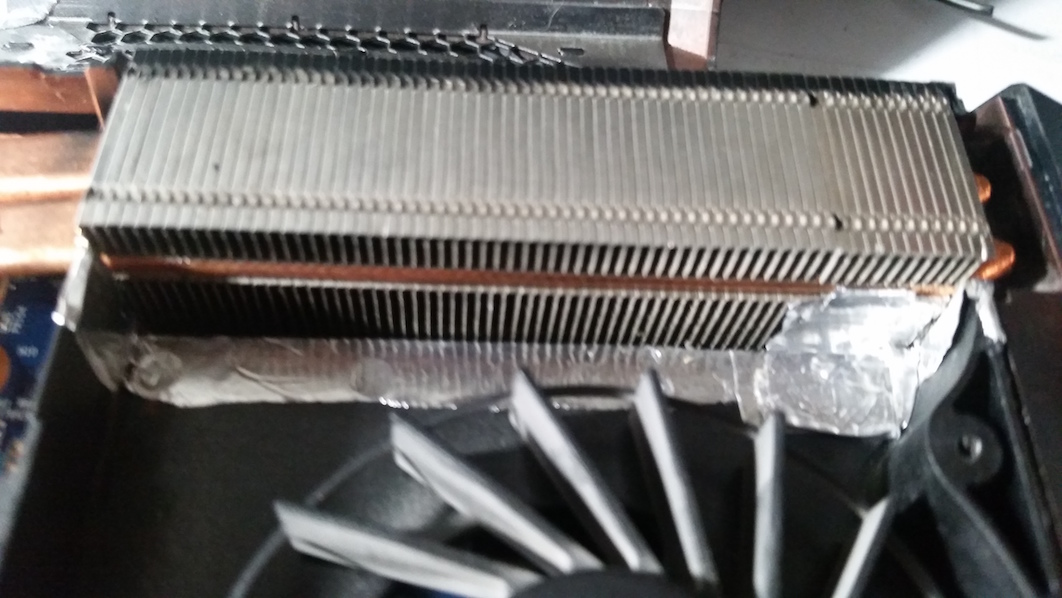
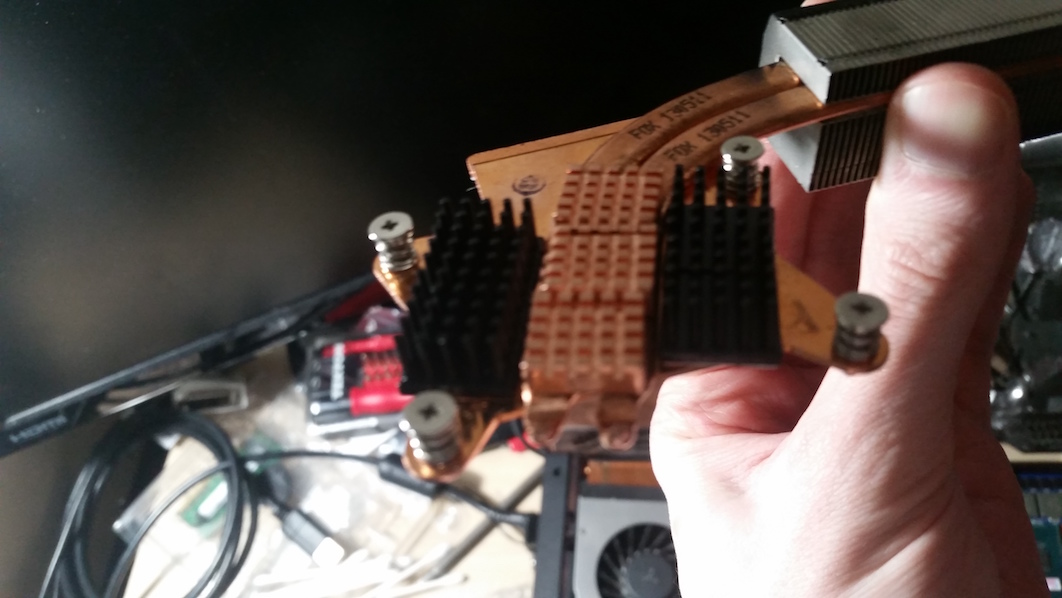
Then I swapped out the heatsinks (originally I ordered this from XoticPC and went with their copper cooling upgrade (I was young(er)) for some bigger ones.
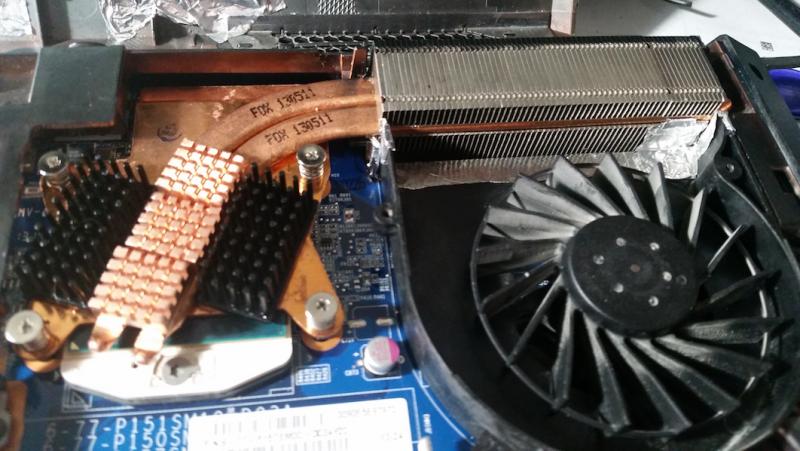
Everything is all nice and snug
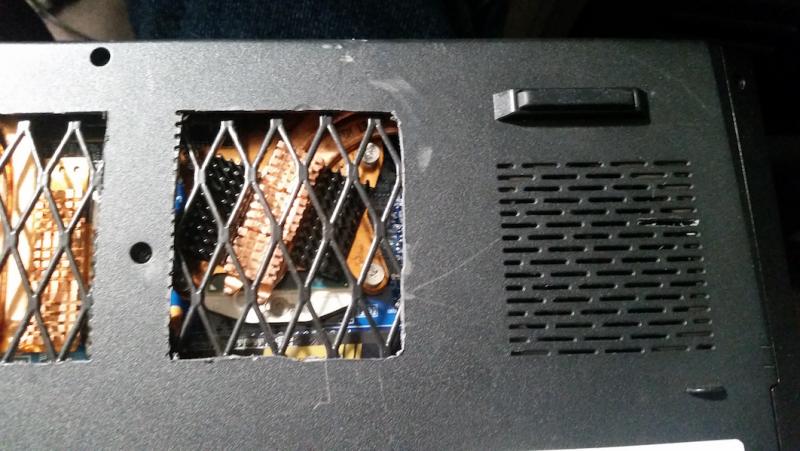
And finally with the lid back on.
With the changes made between cutting the vents, and the last picture, I was able to drop load CPU temps ~5C which I thought was pretty nice.
My goal is to also get rid of the vent over the fan, but I haven't found time to do it. I'm also planning on lapping the GPU heatsink, which will, again, take time.
I'll post more updates as I make them (and post the benchmarks I've already done).
Update:
GPU Work:
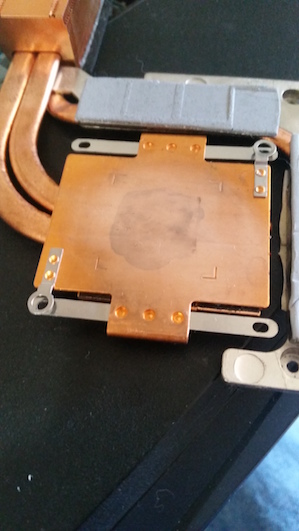
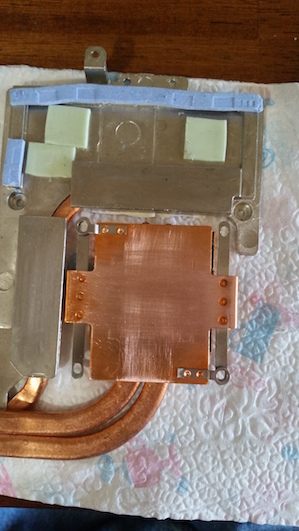
So I have a 780M at the moment (I'm planning on going to a 980M, though I may just wait for the Pascal GPU's to come out) and I decided to lap the heatsink, since I'm planning on overclocking it.
Fresh of the block
400 Grit (10 minutes)
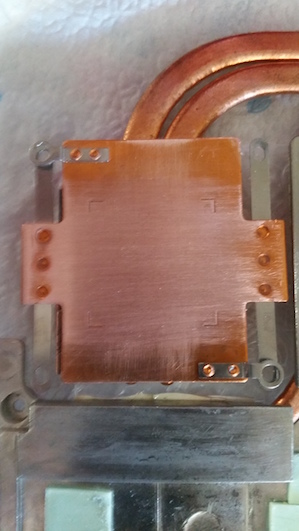
600 Grit (10 minutes)
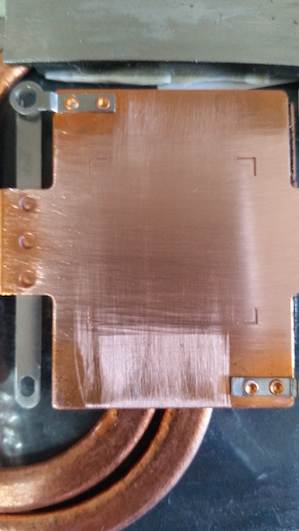
800 Grit (10 minutes)
1000 grit (7 Minutes)
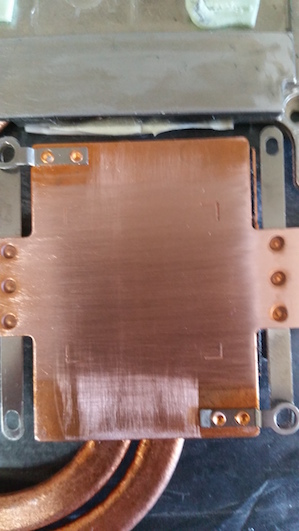
1200 Grit (7 Minutes)
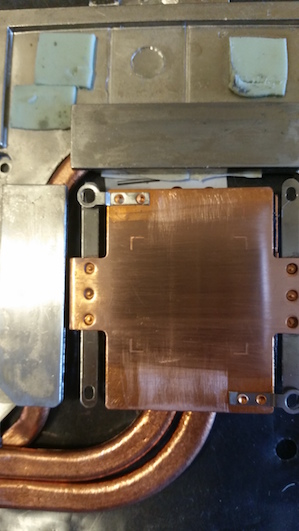
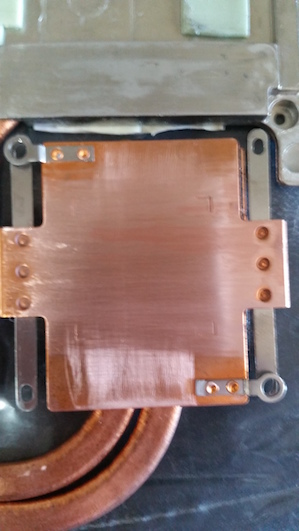
1500 grit (about 25 minutes for this stage)
And I thought it looked pretty smooth. One of my references mentioned cutting off the little tabs on the block, since they're mostly there for adding additional pressure (since the plate is usually warped) and I wanted to just lap the area directly over the GPU die (plus I don't really have a good place for grinding copper with my rotary tool).
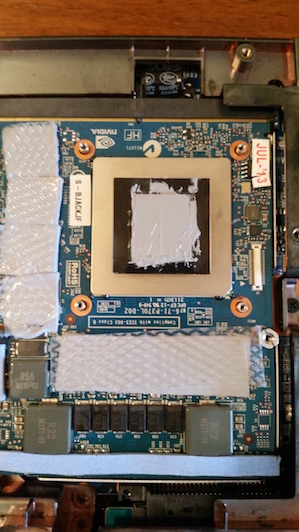
For the paste I used http://www.coolermaster.com/cooling/thermal-compound/mastergel-maker/ which I went with based on the favorable review posted at http://www.play3r.net/reviews/cooling/cooler-master-master-gel-maker-nano-thermal-paste-performance/ and the pads are Fujipoly high end (didn't think I'd need to go ultra).
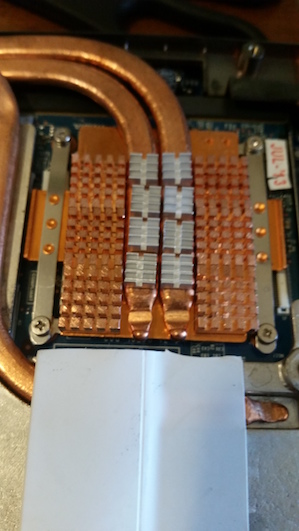
I also added some little sinks on to the heatpipes, though they might be suspect (more on that in the results below).

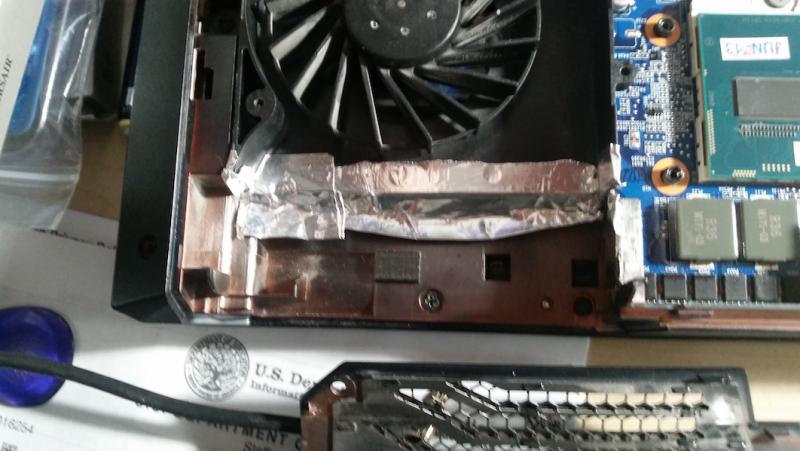
And I sealed up a gap in the fan to direct more airflow through the larger fins.
I also used from more HVAC tape to try to prevent ambient air from being drawn in to the fans, but this too might be suspect (it might be needed to draw it away, since where else is the heat from all those fins supposed to go?)
And the results are... interesting...
pre upgrade
SpoilerLakes of Titan x32
Preset 1080
5033 points, 83 Fps
70C maxPlasma (1M-particle)
Preset 1080
5090 points, 84Fps
59CPhysX 3 Fluids (GPU)
Preset: 1080
2249 Points 37 Fps
63C MaxStress test: GPU core burner V2 (furry donut)
Preset: 1080
after 400 seconds
86Cpost upgrade
SpoilerLakes of Titan x32
Preset 1080
5057 points, 84 Fps
64C maxPlasma (1M-particle)
Preset 1080
4852 points, 84Fps
57CPhysX 3 Fluids (GPU)
Preset: 1080
2158Points 35 Fps
64C MaxStress test: GPU core burner V2 (furry donut)
Preset: 1080
after 300 seconds
85CSo the initial benchmark had a 5C drop in temperature, but the following results aren't as promising.
In fact, the stress test results appears to be higher (I'm speculating that it'd be over 86C by 400 seconds).
I'm thinking that either the added heatsinks on the heatpipes are dispersing the heat before it can get to the fins, my lapping job wasn't so great, or I added too much TIM. I may try the washer trick from the p150 cooling threat mentioned below, but I'm spent on energy for this weekend.
June 3rd update
I finally got back around to working on my clevo some more and after a third re-pasting my temps are down (taking into account that today is hotter than when I first tested)
SpoilerStock
780M, 850MHz core, 2500MHz ramLakes of Titan x32
Preset 1080
5033 points, 83 Fps
73C maxPlasma (1M-particle)
Preset 1080
5020 points, 83Fps
58CPhysX 3 Fluids (GPU)
Preset: 1080
2180 Points 36 Fps
65C MaxStress test: GPU core burner V2 (furry donut)
Preset: 1080
after 400 seconds
82CI suspect that my older paste jobs were either too thick, or I bent the heatpipe and kinda threw the plate out of alignment.
Inspiration:
Modding my clevo in general:
http://null-bin.blogspot.com/2015/04/extensive-clevo-p150sm-cooling-and.html
Sealing up the gaps in the fins:
Additional cooling ideas:
-
2
-
-
I flashed in DOS and the uC is no longer detected, though I'm not able to bump up the multiplier in throttlestop; I think it's because I have the ICC watchdog installed. I'm gonna try removing that some time soon and give it another try.
I'm also in the process of doing some cooling mods to my Laptop, and I have a bunch of mini sinks, sandpaper, thermal pads, etc, on order so I'm gonna have a busy weekend
My plan is to document it, along with temp differences, in another thread.
I also got 2 sets of CMSX8GX3M2B2133C11, which I'm hoping works well (and at 1.35V) because my current config is less than optimal.
-
1 hour ago, tmash said:
Done:
EDIT: oops, thought you quoted me, sorry...
But why would you want to do it when stock (clean) bios has the update anyway? Would be useless without posting how to remove mc from bios first XD
Yeah it's just like why update the uC at all if the OS overwrites it lol
-
@Prema while we're on the subject (slightly) how to you feel about Microcode? I know you have version 17 in your p15xsm bios, but the mcupdate_GenuineIntel.dll automatically puts in a newer version (I think mine was deploying something like a1). Would you put instructions on removing that file on your main blog, or would that be a legal hubbub too?
-
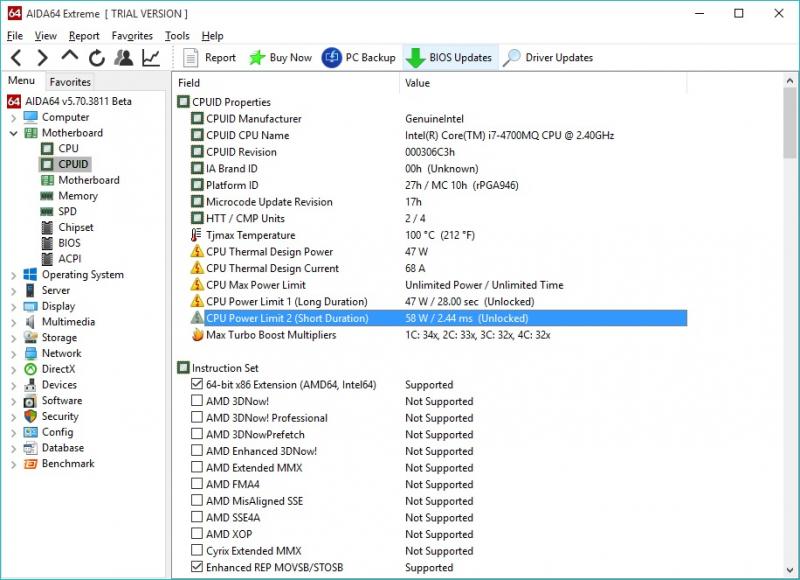
Flashing with afuwingui (64 bit) initially didn't take (the first microcode revision was gone, according to MMTool, but there was another one present), but I came across https://downloadmirror.intel.com/11979/eng/Release_Notes_P09.10.TXT and discovered that microcode isn't stored in the main block
Quote============================================================================= KNOWN ISSUES/WORKAROUNDS ============================================================================= - When running the Flash Utilities (AFUDOS, AFUWIN etc ) do not use the following options /pn - for flashing NVRAM Block /k - for flashing all Non-Critical Blocks only /c - for flashing all Non-Critical Blocks along with main BIOS image /k0 - for flashing the Non-Critical Block 0 only /c0 - for flashing the Non-Critical Block 0 along with main BIOS image Since the above options try to flash protected areas NVRAM or Non-Critical Block 0 the verification fails. Always use the following command to flash a bios C:\afudos /iXXXX.ROM /pb /c1 /c2 /n /i - Input .ROM file /pb - Flash Boot Block /c1 - Flash Non-Critical Block 1 (OEM Logo & User Binaries) along with Main BIOS Image /c2 - Flash Non-Critical Block 2 (CPU MicroCode) along with Main BIOS Image /n - don't check ROM IDAnd I know, I should be using a USB to flashing, but when I'm in DOS my SO gets all paranoid lol
I'll report back on findings, if I have any.
EDIT: Flashing the non-critical block didn't get rid of the Microcode either... hmmm...
-
1 minute ago, tmash said:
It would be really nice to try this on other Haswell CPUs, results would be interesting, guess 4900mq can go 4.8ghz stable due to having high quality ASIC compared to 4700mq, 200+mV to reach 4.6 should be less with better cpus
Agreed, though now you've sent me down a rabbit hole of trying to find newer Intel iGPU GOP drivers and trying out different SATA driver Option ROMs

-
@tmash I was doing some more digging and found that (according to them anyway) the 07 Microcode update is the last to support overclocking
http://www.win-raid.com/t154f16-Tool-Guide-News-quot-UEFI-BIOS-Updater-quot-UBU.html
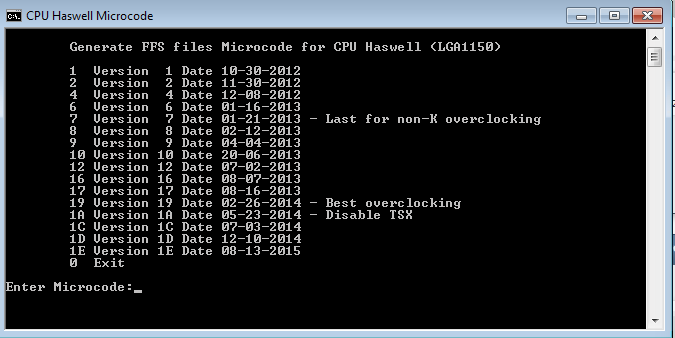
Perhaps something to investigate? I'd imagine all of the Microcode for haswell is universal (as an architecture), but I'm just getting into BIOS editing, so I'm just guessing
And who knows, maybe one of those microcode updates was actually important!
Maybe this is something that could be rolled into your mods?
-
Found another typo
22 hours ago, tmash said:15) Open AMI Aptio MMTool > Load Image > your modified rom > CPU Patch Tab and verify there is no 06C2 in CPU ID
That should be 06C3, since that's the microcode we're removing :)
-
1
-
-
In
Quote9)Adjust the cursor on the beginning of the highlight text/microcode (00) right click>Select Block>Length>5000 or whatever in your case
the block you have highlighted in your selection starts with a "01" not "00". Was this a typo, or do you start the selection at "00"?
Either way, after deletion it leaves a "01" there, I just was hoping for some clarification
-
1
-
-
Oh I'm definitely gonna have to try this!
Thanks!


Looking to part out a P157SM
in Clevo
Posted
I lowered it to $45 ($50 with shipping).