


svl7
-
Posts
4643 -
Joined
-
Last visited
-
Days Won
789
Content Type
Profiles
Forums
Downloads
Posts posted by svl7
-
-
IMPORTANT: The 6970m is not officially supported by Dell. Upgrading to this card may void your warranty. The 6970m is a powerful card, it will draw more power and produce more heat. This card can significantly improve the performance of your system, however, the long-term effects of running this card in a M15x are currently unknown, but it works great so far.
Cards that are known to work:
- The card Dell uses in the M17x R3: This has only been tested for a short while so far, but it seems to work perfectly fine. Credits go to Rogue-OP and iloveb00bs, the first guys who tried to put a 6970m in a M15x.
-DP/HDMI works, confirmed by Strigae, fan control works
It seems you need to install the M17x R3 drivers first before you can get the official AMD drivers. I guess installing for example the modded 11.4 will work as well.
Dell Part nr. is: V9XKH.Good luck when ordering one from Dell, depending on where you live and what kind of rep you get on the phone they might not want to sell you the card as it isn’t officially available for your system. Call again in this case, or if you know someone with a M17x R3 let him order the card for you.- 6970m from MXM-upgrade.com: Works great, but no fan control. The fans are constantly at a high speed, but not completely at full full speed. For now you’ll need to manually control the fans with HWinfo32.
-DP/HDMI works. Sound through HDMI works when you install the Dell 6970m vbios and the M17x R3 HDMI audio driver. Here are the instructions for this. Card can now be ordered for the M15x from mxm-upgrade.
- Clevo (and resellers) 6970m: The card from Clevo and resellers (Eurocom etc.) works as well, but make sure you get a version of the card which has holes for the back plate! Some of these cards have the screw holes for mounting the heatsink soldered on which makes it impossible to use the Dell backplate, and since Clevo uses slightly smaller screws than Dell you can’t simply put your heatsink on such a card. Contact your dealer in advance to make sure you get a card which doesn’t have the screw holes soldered to the PCB, otherwise you’ll have to remove it (which is difficult) or use some smaller screws on the heatsink.
For all these cards the heatsink of the M15x fits perfectly. No modification needed.
Cards from other vendors / manufacturers may work as well. If you got a different 6970m running in your M15x let me know and I’ll upgrade the list.
Things to do before swapping the cards:
- Download the drivers. This modded 11.5 should work, click on “MobilityMod Windows 7/Vista” in the linked thread.
- Also get GPU-Z for monitoring your video card and verifying it, Trixx, for under- and overclocking and in case you haven’t got a Dell card also HWinfo32 (I recommend getting it anyway since it is a great system monitoring tool)
- Make sure you have thermal paste, maybe some new thermal pads as well as something to clean the heatsink (e.g. isoproply alcohol) and some cloths around. I also highly recommend using a grounded ESD-mat and a wristband.
- Know what you’re doing. You need to partially disassemble your machine to get to the GPU. Prepare yourself thoroughly, check out my little guide. In case you need more information, there’s also the M15x service manual, as well as the teardown video. It can be helpful to write down all the steps in advance when you’re doing this for the first time.
The upgrading procedure:
-
Uninstall your GPU drivers.
Make a power drain (Turn off your M15x, remove the power cord and the battery. Then press and hold down the power button (Alienhead) for about 10-20 sec.
Remove your GPU.
Clean your heatsink, if necessary replace the thermal pads with new ones.
Make sure the 6970m has a retention bracket on the back of the GPU. If not take the one from your old GPU and put it there. Also make sure you read the section about the “retention bracket problem”.
Properly insert your GPU, make sure that it sits properly. Apply the thermal paste, and attach the heatsink.
Then (after reassembling your system), boot, install the drivers and reboot. Make sure the fans are running. Open GPU-Z and verify your card and the clocks. It should look more or less like this. Default 3D clocks are 680/900MHz (core/memory) and 150/100MHz when idling. Make sure PowerPlay is enabled in the Catalyst Control Center. Also make sure Stealth Mode is deactivated.
Check your temperatures. Idle temps should be 40-50°C, but this also depends on your ambient temperature . While gaming or doing something similar GPU-intense the system will run significantly hotter, 70-80°C, maybe a bit higher.Note: By lifting the back of your system a bit (for example with a book) you can improve the airflow in the system. This can really help lowering the temps.
The back plate problem:
The retention bracket of the 6970m has a different size than the regular M15x cards (260m, 5850m etc.)When your card doesn’t come with this x-plate you need to take the one you have on your old GPU, but this one won’t fit properly. Nevertheless it works, even if it covers some resistors on the back of the card. Make sure you’re not shorting anything. Usually the back plate has an insulating black plastic pad on it, this will work. However, if your x-plate doesn’t have this pad on it, you must cover it with some thin, insulating tape.
Here you can see the problem, in the first picture I marked the are which gets covered by the backplate and in the second picture the highlighted area shows where the plate should be.
The space beneath the card becomes pretty tight, but it works. My advice is contacting your dealer before buying the card and asking whether he can provide the correct x-plate. (In case he tells you that you should use the one from your old card tell him it has a different size.)
Power consumption:
The power draw of the card is probably about 75-100W. I run this card together with an i7 920xm in my M15x and it works fine. Nevertheless you need to be careful, as the PSU of the M15x is only rated 150W. When doing some 3dM11 runs with both GPU and CPU overclocked I measured about 160-170W current draw from my system during the combined test. You really need to be careful when running this card, especially when you have an extreme processor (920/940xm). Pushing both GPU and CPU can (and will) bring the PSU to its limits (and above).Some numbers about the power draw when playing games, everything on stocks:
Black Ops Zombies (everything on max): ~ 130-140W
Portal 2 (everything on max): ~110-125W
Medal of Honor (everything on max) ~140-150W
Crysis 2 (set to “Hardcore) ~ 140-150WThe device I use for measuring the power draw has an accuracy of about ± 10W.
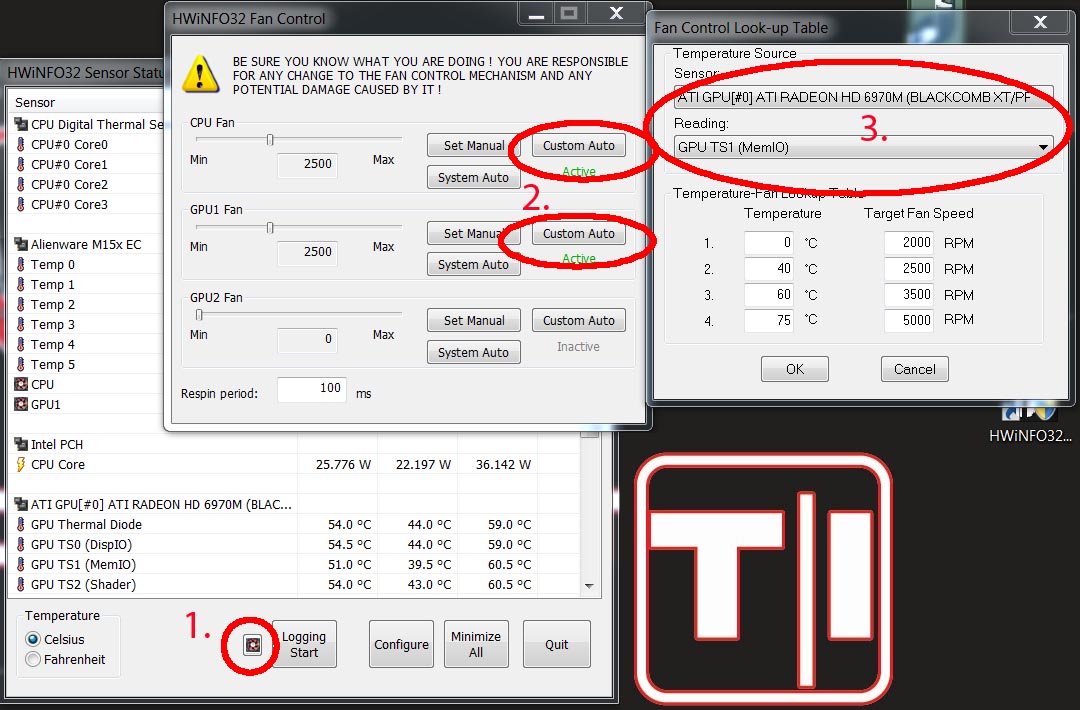
Fan control: In case you have a card which makes your fans running at a high speed all the time you will need to use HWinfo32 to automatically (or if you prefer, manually) control the fan speed.
It’s possible to create a fan control look-up table and let HWinfo32 automatically control the fan speed by temperature.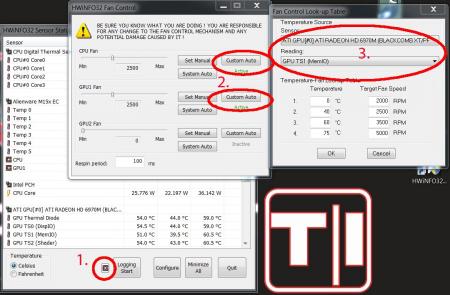
1. Click on the fan symbol2. Click on “Custom Auto” 3. Choose the temperature sensor diode which you want to use as reference.4. Set the desired speeds/temperatures according to your needs.
Do this for both GPU and CPU, ignore GPU2 fan. I recommend using the hottest GPU diode (usually MemIO).A big thanks to Mumak, the developer of this fantastic tool. Here you can find the official Alienware fan control thread in case you find a bug or need to know more.Warning: Adjusting the fan speed can be dangerous!! Always keep an eye on your temps and never forget to adjust the values before doing something CPU or GPU intense (in case you control them manually)
Possible problems and solutions:
Unable to install drivers. Solution: Try a different driver. Also contact your vendor, maybe he knows a specific one that works. Idle clocks are 250/900 instead of 100/150. Solution: Check your display settings and make sure only your internal notebook monitor is selected. 250/900 are the idle clocks when you’re connected to an external monitor (or when your display settings are got messed up, probably driver related) The GPU temps are crazy high! Solution: Repaste. You probably did a bad job with the thermal paste. Also make sure your system is dust-free and that the heatsink sits properly and is making contact (also check the pads where the memory modules touch the heatsink). While idling the GPU clocks change from 2d to 3d clocks and back all couple of seconds. Solution: This behaviour can be caused by the M17x r3 6970m driver (A00). Get the latest AMD driver and you should be fine. If you have this problem with a different driver try another driver version. -
There are several reasons for flashing the VBIOS of a mobile GPU, for example if a newer version is available, or if you modify it for higher clocks or voltage, or maybe undervolt it for less heat… It’s a common procedure when trying to optimize your system according to your needs.
However, flashing always involves a certain risk of rendering your card useless, “bricking” it, especially when experimenting with modded VBIOS versions. That’s also how I managed to brick my 6970m in my Alienware M15x. I tried to flash it with a modded version of a VBIOS which (apparently) wasn’t suited for my card.
Sometimes it’s possible to do a so called “blind flash” to recover the card (flashing it without having any picture on the screen), however since my system didn’t even POST after flashing the experimental VBIOS I didn’t have this option.
Fortunately a card isn’t dead after flashing a VBIOS which isn’t suited for it or after a bad flash, even if the system can’t boot anymore. The problem is only caused by the firmware of the card (VBIOS) and not by hardware faults.
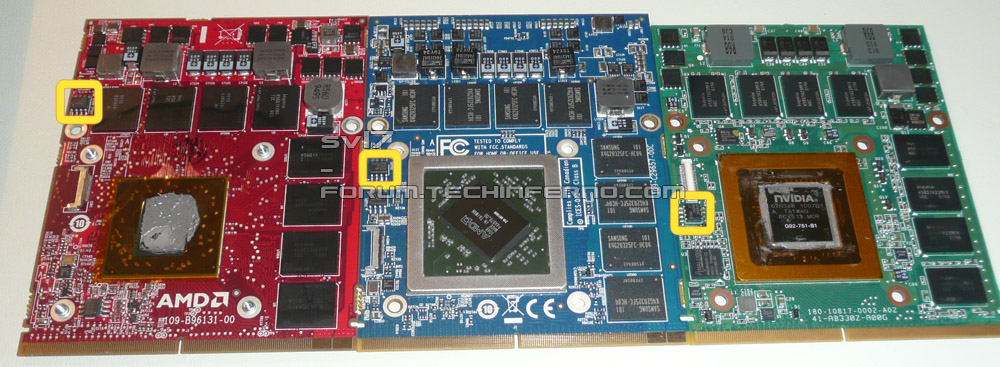
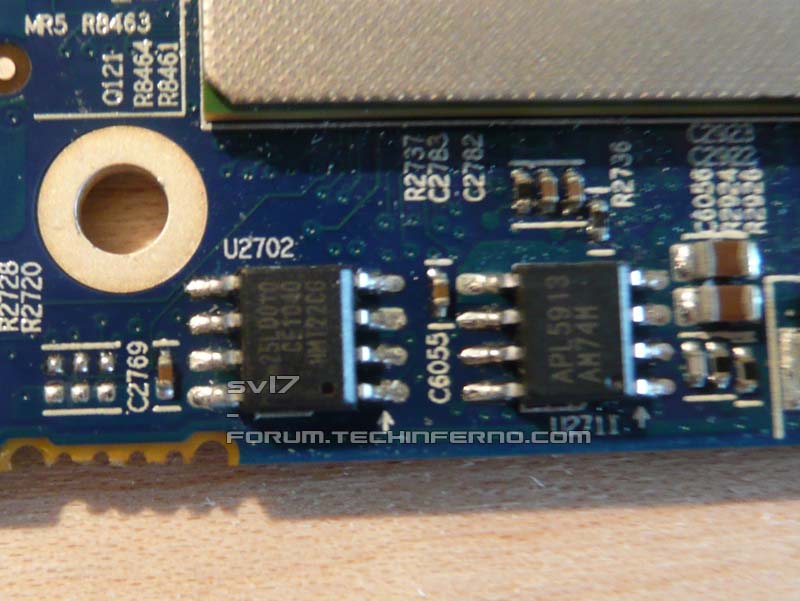
This means to get the card working again, it simply needs to be reprogrammed with the proper VBIOS. There are professional services which are capable of doing this for a little fee, but I decided to see whether I can fix the card myself.The VBIOS is stored somewhere on the card in a flash memory chip. It should be a serial flash memory chip with 8 pins. Here’s the location of this chip, for the Nvidia GTX 260m, AMD 6970m and ATI 5850m (from left to right)
The memory chips are “single operating voltage serial flash memory” which use anSPI – bus.
There’s no cheap programmer available which officially supports the chip which stores the VBIOS of the 6970m, but a couple of affordable programmers that can handle very similar chips (same SPI modes, memory organization, size, etc.). After comparing some datasheets of different flash memory chips and discussing it on the forum, I came to the conclusion that it should work with a cheap programmer, even though the specific IC wasn’t supported by it.
Before and after desoldering the eeprom chip. (after image lost)
Desoldering the chip is the most difficult part. You don’t want to accidentally remove one of those tiny SMD parts or kill something with too much heat. Also the card, and especially these little ICs, are ESD-sensitive, this means an ESD mat and wristband are highly recommendable for this job.
I desoldered the flash chip with my hot air station, that’s much more comfortable than using a soldering iron (which of course is an option as well). Since most companies have to use lead-free solder, removing the chip needs more heat than for all the usual DIY soldering (which is mostly done with solder containing lead, at least in my case. It’s easier to handle in my opinion).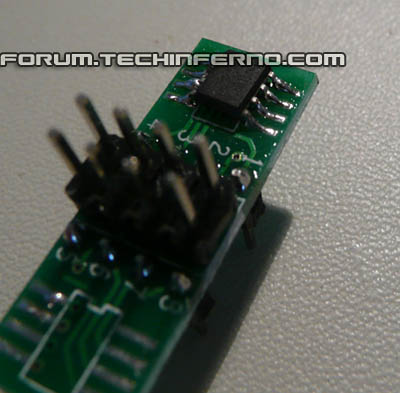
As it’s a surface mounted device, it needs to be in a socket in order to be programmed, it can’t be put in the ZIF socket of the programmer. I don’t have an SOIC socket for this size, but the programmer came with an improvised PCB – socket for 8 pin SOIC chips. This means turning on the soldering iron and solder the chip to the “socket” (see the picture on the left side).
Then I programmed the chip, it wasn’t recognized by the programmer, but choosing a chip from the list which was technically identical (same block size, interface, etc.) allowed me to erase the flash memory and write and verify the original VBIOS data.
After doing the whole soldering procedure in reverse order I was finally able to boot the system again with the card.
Tech|Inferno member AssimilatorX also suggests to reflash the VBIOS again per DOS and ATIflash, just to make sure that there’s definitely no error in the stored VBIOS.So operation “GPU reviving” was successful. This should work for most mobile GPUs I guess, since all cards I’ve seen so far use similar flash memory chips. Though it can still depend on the programmer.
What’s needed is a steady hand, proper soldering equipment, ESD-protection and a programmer.
Here’s a pic of my soldering workplace: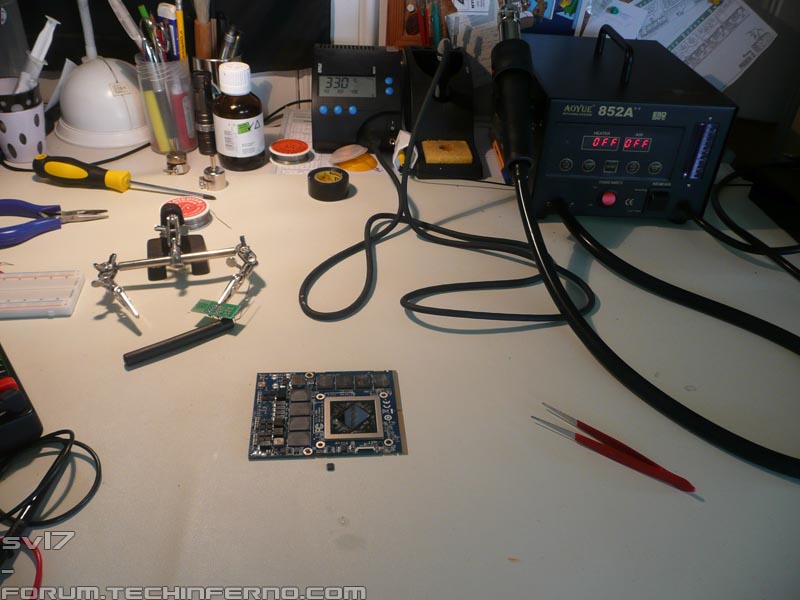
-
Two new modified BIOS for M14x R1 users. Both based on A08, but with the same SATA performance as in A05.
This allows GF106 users which are still on A05 to benefit from the fixes included in A08 while keeping the SATA performance of A05 and it allows GF116 users to get the benefits of A05 SATA behavior.
It's actually the result of trying to bring GF116 support to A05 in order to change the SATA behavior (as requested by he_yincheng), since this didn't work as planned I tried it the other way around - bringing the SATA performance of A05 to A08, which succeeded. Thanks @he_yincheng for testing! Check here to see some screenshots he posted to verify that it is working as intended.
There are two versions of this mod available, one is the standard A08 with only the SATA tweak and the other is the unlocked version of it.
In the M14x R1 voltage mod thread you can also find both versions with an increased GPU voltage, GF106 and GF116 supported.
As always with such mods, use at your own risk, I don't take any responsibility for possible issues.
You are responsible for the changes you make on your system.
Feedback is welcome!
Donate link - feel free to buy me a beer if you like this mod")
-
 12
12
-
-
Basically you use the older driver...??
-
First of all - I don't think an online petition will change anything, at all. I'm absolutely convinced Nvidia gave this some thorough thoughts in advance.
As always, the "official" statement is very Nvidia-like. It's deceptive, twists the through and most likely is even an utter lie (for some parts).
"GeForce notebooks were not designed to support overclocking."
That statement is wrong in so many ways. E.g. Asus even provides software OC support for its G-series notebooks. MSI (until very recently) stated overclocking headroom as one of the features of their high-end mobile devices. Nvidia having the guts to say that all notebooks that have a green GPU inside aren't "designed" for overclocking is a pathetic effort to blame OEMs in general and distract from the fact that it indeed works incredibly well on many higher-end systems.
Of course there are many systems with on-board solutions that do not have the thermal headroom for higher clocks, more volts, etc., however that's not *all* systems and certainly not the ones that actually got overclocked. Due to the driver throttling as soon as the temp gets critical you can't even overclock a system with insufficient thermal headroom and get decent results.
The only systems that get overclocked by a lot of users are those which are very well capable of running the hardware a certain amount above stock clocks. And it works well. Maybe too well in the eyes of Nvidia, see post by @Brian.
Let's talk about pushing hardware to the limits and potentially endangering the hardware or shortening its life... well the GPUs can handle the additional load with no problem whatsoever. Same silicon is used on desktop cards which run on distinctly higher clocks as well as voltage. "Overclocking is by no means a trivial feature, and depends on thoughtful design of thermal, electrical and other considerations". Yeah, well, the GPU can handle increased current etc. very well, we don't even have to discuss this. Naturally mobile systems are limited by the power supply circuits and so on, but that only means that you can't even reach the max overclock before you run into issues, so even less harm done.
Assuming the average power users is not a bencher (and I think that assumption is reasonable), an overclock aims to maximize performance while maintaining stability, all within a thermal frame that allows the GPU to run without thermal throttling. If we assume this to the be regular aim of someone who overclocks his notebook, all the issues that Nvidia points out are invalid. Cause the GPU itself is very well capable of handling additional load, and you can't push a mobile system so far that you'd get to limits where you're above speeds, power draw levels etc. that you see in desktop parts, cause by this time (assuming the power supply circuits could hold up, which they don't) you would have run into heat issues a long time ago, resulting in a throttling GPU.
That's why this point is completely invalid as well.
I don't say you can't damage your GPU with overclocking. Most people actually that manage do damage their systems with overclocking don't damage the GPU itself, but the vram (e.g. those certain users that seem to have a fetish for high memory overclock to compensate for their lack benching skills...). Yet I don't think this point is that important at all. There are easier ways to damage a system, and people always manage to do it. So far I haven't killed a single GPU with overclocking, and I seriously abused some of them.
"There was a bug introduced into our drivers which enabled some systems to overclock"
It's not like I can proof it, but this really, really stinks. If this hasn't LIE written all over it then I don't know what a lie is. And Nvidias current track record certainly isn't helping their credibility *cough* 3.5GB *cough*. At least ALL mobile Nvidia parts ever since Fermi, heck even the G92 generation, definitely allowed to be overclocked. Every single Nvidia MXM part had the ability to overclock. Same goes for the GM104 Maxwell series as well as GM204.
I can't say for sure why Nvidia decided to kill overclocking for mobile parts, but some strong points have been raised in this thread already. First of all it certainly has to do with money. Not enough competition helps, you can do whatever you want basically. (Move you ass AMD and release some new MXM shit...!!).
Recently the Nvidia rebadges have been basically worthless thanks to certain vbios mods
 . Did you ever notice that +135MHz limit on Kepler mobile (yeah, desktop parts don't have this...). That's definitely related with making rebadged cards with higher clocks more of an option.
 Disabling overclocking makes the point a lot more clear. You want more speed? Buy a new card. It's the same one, but it runs faster. A bit. Cause we want you to sell another one in a couple of months.
Yeah, fuck you guys.
Which brings me to an important point (which unfortunately won't be followed by most users):
Don't buy Nvidia if you don't approve of what they're doing. That would be the only way to actually change anything. I know it won't happen, people will still go and buy, upgrade... and Nvidia will never change. It needs to hurt them before they consider changing anything. That's also why we need AMD around. See G-Sync, the whole GK110 fraud with Titan, then 780 and then 780Ti. Not to mention the 970...
Nvidia is clever enough to increase the pain level in small steps, +135Mhz limit... right, we got a workaround for that, all fine. No more vbios flashing... right, we got rid of that as well, all fine. No more overclocking by software... whoopsie. We might find a workaround. Or we flash the vbios. But what's NEXT? No more working drivers with unsigned vbios? Well, that'd be my bet.
That's the way hardware seems to take these days.
For most guys it didn't start to become noticeable until secure flash was introduced. All in the name of security. Certainly not because a manufacturer doesn't want you to use a modified firmware that allows for much refined control of your hardware, nooo... it's about security. To keep away those nasty firmware rootkits that everyone suffers from, because they're so easy to code and work on any mobo with ease. (Hint for the thick ones: look up 'sarcasm').
Secure flash... making it virtually impossible to flash unsigned firmware by means of using software. Who profits? Microsoft. Big style. No more Windows activating per bios mod. Locking out Linux distros. All in the name of security. Cause that works so damn well. By the way, same reason nvidia is locking down on vbios flashing. No more overclocking, but also locking out nouveau, the open source nvidia driver that is mainly based on tons of reversing of the nvidia blob. All in the name of security.
What's next? Intel boot guard. No, wait, that's already here. Good bye Coreboot.
Ah right, Intel PFAT... good bye bios mods in general. And ME mods.
Locked out hardware can be exciting, if there's a lock. Cause I can still afford lock picking tools and teach me some skills. It's actually a challenge, it's fun. However, if there isn't a lock but instead a bloody atomic shelter that's been concreted over... the fun ends.
The heck, if it was just for money making... I'd even pay $100 for an overclocking warranty.
The only OEM that ever went with this is Intel. And it was distinctly cheaper.
-
14
-
-
Eurocom does not have their own bios, vbios ec or whatever versions. They're just a clevo reseller, and a rather nasty one if you ask me.
I'm not familiar with your system, the EC may be related to the keyboard backlight, but the bios could be just as well. I noticed that in many Asus systems it is easy to kill keyboard backlight when flashing a modified bios the wrong way. Can be restored though.
Do you have a dump of your original bios?
-
First of all check whether those cables are seated properly.
-
I'd like to get Prema's and svl7's take on this and what this means down the road.
Let me quote Linus:

-
9
-
-
Alienware 17.
-
I have still a bunch of hardware here that waits to get benched... I wonder when I'll take time for that.
-
That won't work. I'll prepare something when I'm back home. Got some days off and spending them in the mountains.
-
3
-
-
Yeah, then a bios mod might help you. Though I don't remember the exact specs of the 4700mq, but I thought the max multi was 38, not sure though.
-
Is XTU working on your machine?
-
Any Nvidia driver with 980m support, but you'll need to modify the .inf file.
Check this thread from @J95.
-
Depends, what system are you talking about?
-
I have contacted HIDevolution where I got the card from.
The tech support replied saying that changing my 120hz/3d panel with a 60hz one will fix the issue... How reliable is this piece of information? should I get a 60hz screen panel and change my glossy 120hz/3D panel?
I added the 675m VBIOS to the mentioned thread: http://forum.techinferno.com/alienware/2658-%5Bm14x-r2%5D-%5Bm17x-r4%5D-%5Bm18x-r2%5D-uefi-fast-boot-secure-boot-gpu-issues-%2Asolved%2A.html
Maybe I should make a bios with the necessary settings saved as default values, then a bios reset won't mess up things...
-
3
-
-
-
First-ever AW17 3D & M17x R3/R4 3D boot using IGP...

Problem is it works only under true UEFI, vbios flashing... @svl7
If you look carefully you'll see another..........
[ATTACH=CONFIG]13755[/ATTACH]
[ATTACH=CONFIG]13735[/ATTACH]
So, finally got some time. Just got my AW17 back together and running. I can do that as well:

But how is that going to help? The active display is still the discrete graphics and not the Intel HD. How is this useful? I must be missing something.
-
1
-
-
Only a 720qm svl7? What happened to the 920xm es?
Sold it a while ago. Still got a 940xm ES laying here that I wasn't able to sell so far. But I din't have time to really push it together with the 900m series, would have to apply a volt mod first.
-
Which BIOS version do you use? And do you know which vbios version is on your card?
What's the screen you got in your AW17? I assume it's a 60Hz LVDS monitor since you were able to use Win7. Did you try pure UEFI mode?
PS: Gonna put the 970m in my AW17 now.
-
1
-
-
That was only the GPU tests, look at the GPU score.
-
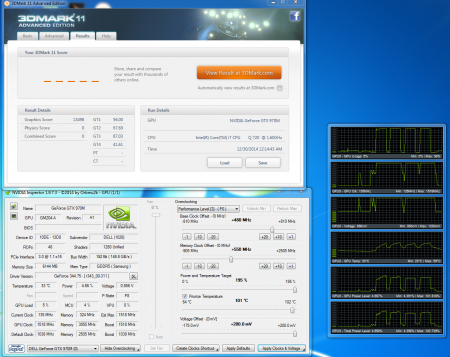
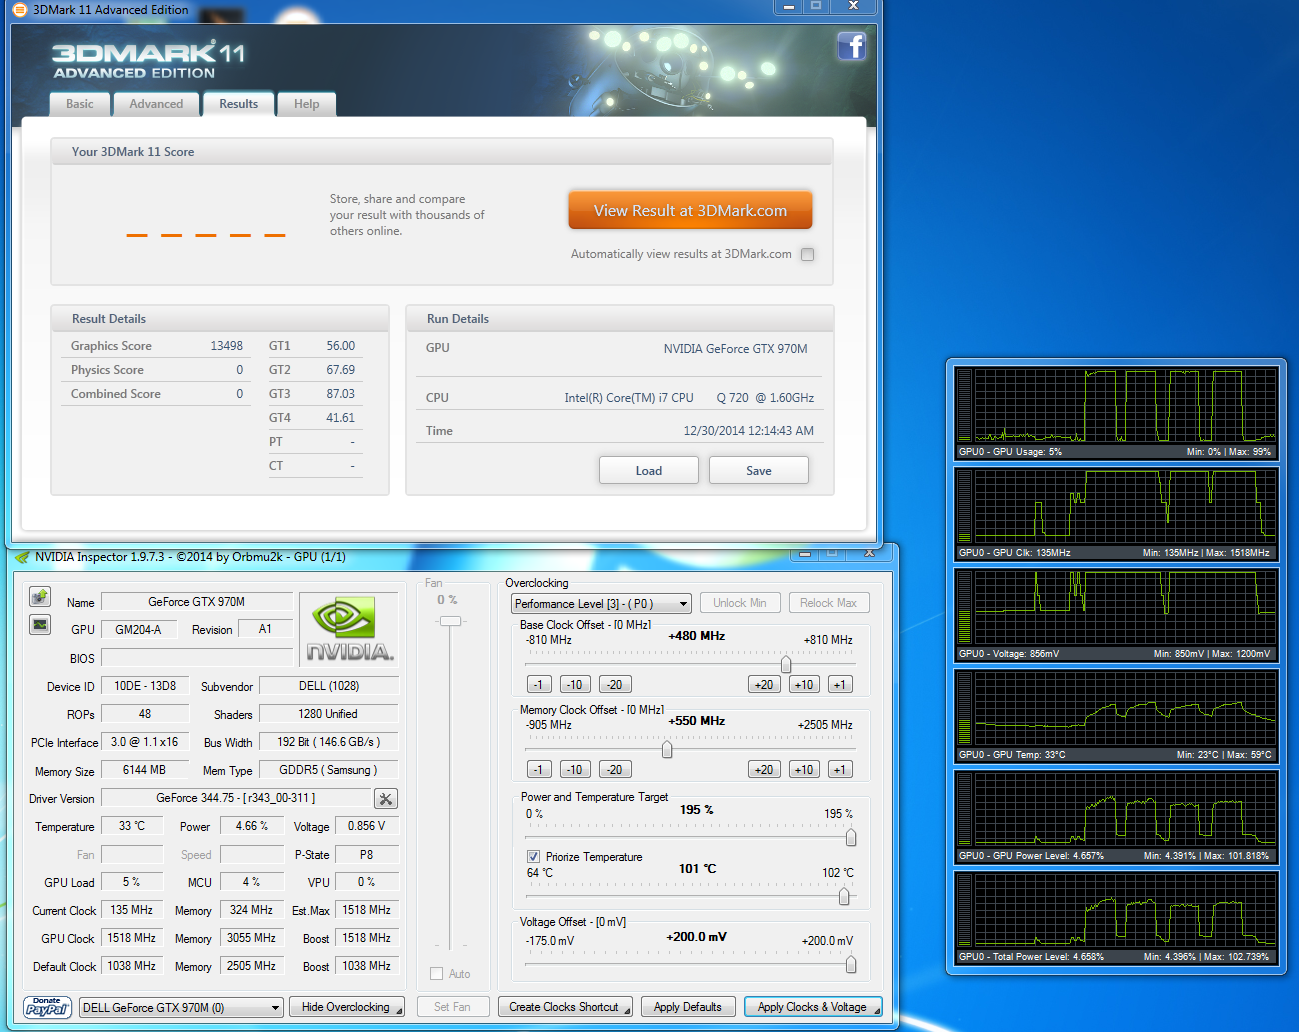
My highscore so far. (M15x & 970m):
-
1
-
-
OK so Here's a screenshot - this is running the new vbios with voltage and power target increased. I'm getting a lower score than before in 3DMark FireStrike - with stock I managed well over 9000. If I try to increase the core or memory 3D Mark just crashes... what am I doing wrong???
[ATTACH=CONFIG]13535[/ATTACH]
No. I'm using the 230W PSU that came with the laptop - MSI GT72 Dominator Pro.Can you overclock with the stock vbios?
I would like to flash the overclock bios as wel but it gives me a problem. First i have to boot in pure dos mode because i have a m15x but when i want to back up the vbios than it say's adapter not reconised. Latest nvflash and bios version 09. I know i am a noob but i always worked with AMD never nVidiaYou don't flash from DOS, you flash from Windows. Seems I have to provide clearer instructions. People don't seem to be used to running command line programs.
i am wondering i dont have optimus or a second GPU so how Can i close the GTX in device manager? this means i dont have a card working right?No, it just means that the installed driver will be disabled and a generic driver gets loaded instead.
Prema and/or SVL7, do you think a copy of the 4gb 980m vbios from Dell would go a long way to helping AW users with this throttling problems (educated guess) ?I've heard the vbios might come as part of an overall system bios, which then needs to be isolated.
What are your thoughts?
The new 980m vbios will lack the MXM interface, therefore won't be able to configure itself according to the specs of the system in which the card gets used, which makes it unlikely to work properly. Not impossible, just less likely. The memory part is another story. See below.
Forgive ignorance on such a question, is any kind of modding of the 4gb VBIOS to make it play ball with the 8gb cards doable ?Changing 4 to 8 GB is sometimes possible, but depending on the memory configurations stored in the vbios not necessarily easy or even realistic.
-
2
-
-
Let me see the dump you have.
-
1
-
Adding nVidia 470M GTX to Alienware M15x
in Legacy Articles
Posted
Guide – M15x with Nvidia GTX 470m
IMPORTANT: The Nvidia 470m is not officially supported by Dell. Upgrading to this card may void your warranty.
")
Some background to this mod: The first guy who tried to put a Nvidia 470m in an Alienware M15x was @iloveb00bs in December 2010, shortly after the card got released.Unfortunately it didn’t work as desired, the card worked, but only at 2d clocks. All attempts to bring it to 3d clocks failed, and the card wasn’t supported by Nibitor support at this time.Also @widezu69 didn’t get it to work a couple of weeks ago, so I didn’t think it would be possible. But in the process of trying to upgrade the Asus G73JW of a colleague I got my hands on a Nvidia GTX 470m and since we didn’t get it to work in the G73, I thought let’s try it again in the M15x.
I had to mod the vbios to get it running at 3d clocks. I’m not that experienced with Nvidia cards, so that’s probably why it took me a couple of attempts to get it working.
First I changed the 2d clocks and voltage (P3 in Nibitor) to 3d values. The result was that the card idled at 3d clocks, but as soon as I opened a 3d application it went downclocked itself to about 73MHz core and got to 2d voltage again… pretty annoying.
After some more tests I realized that I had to change the lower 3d clocks and voltage (P7 in Nibitor). This did the trick. Apparently the card only checks P7 and P3 in the VBIOS, the actual 3d clock entries (P15) seem to have no effect at all.
The fan control works perfectly. Haven’t tested DP/HDMI audio yet, but I’ll do this sometime soon.
Things to do before exchanging the card:
clean the heatsink (e.g. isoproply alcohol) and some cloths around. I also highly recommend using a grounded ESD-mat and a wristband.
- Insert your USB thumb drive.
- Select File system as “FAT32″
- Select Format Option as “Create a DOS bootable Disk…”
- Checkmark the box that says, “Quick Format”
- Locate the directory you extracted the Win98 files.
- Format the USB key using the the Win98 files.
The upgrading procedure:
Then (after reassembling your system), boot, install the drivers and reboot. Make sure the fans are running (otherwise you probably forgot to plug in the fan). Open GPU-Z and verify your card and the clocks.
Default 3D clocks are 535/750/1070 MHz (core/memory/shader), you can see them in the “Graphics card” tab of GPU-Z.
Make sure PowerPlay is enabled in the Catalyst Control Center. Also make sure Stealth Mode is deactivated.
Check your temperatures. Idle temps should be 40-50°C, depending on your ambient temp of course. While gaming or doing something similar GPU-intense the system will run significantly hotter, 60-70°C, maybe a bit higher.
-Plug in your properly prepared USB drive
-Make sure your system is plugged in (AC adapter and to be safe battery as well)
-Reboot
-When you see the Alienhead press [F12] to get to the boot menu, choose “Boot from USB”
A command prompt will appear.
First of all, make a backup of your original 470m vbios! Use the following command:
nvflash -b orig470m.romBefore flashing, test whether the file isn’t corrupted (errors while copying it to the stick or similar):
nvflash -v mod470m.romThe image size must be 64000 bytes and the CRC32 3C8FA599
Now flash the modded vbios:
nvflash -5 -6 mod470m.romPress enter. A couple of warnings will appear, follow the instructions on the screen to confirm the flash procedure.
Remember, some Keyboard layouts have the [Z] key at the place where the US layout has the [Y] key. So in case you have such a keyboard you’ll need to press [z] instead of [y], otherwise the flashing procedure will get cancelled.
Then press [Ctrl][Alt]+[Del] to reboot your system, unplug the USB stick. You can use GPU-Z to verify the flash of the vbios. It should look like this afterwards:
Here some first benchmarks, both at stock clocks, PhysX off and the rest in the Nvidia control panel on standard settings, CPU at 3.2GHz.
I haven’t seen other 470m benchmarks of other systems, but 9k stock vantage seems reasonable.
The card is probably pretty overclockable, but I haven’t tested this yet. I have yet to find overclocking tool with which I can set the core clock manually, so far I only managed to change the memory and shader clock with Nvidia Inspector. Otherwise I’ll have to modify the vbios in order to overclock it (which isn’t the best solution as I can’t really push the card with this method) However, it seems the card can be overvolted, haven’t tested it yet but Nibitor allows me to change the voltage to 0.99V (instead of 0.94V).
The only issue so far is that the card runs either at 3d clocks or at 2d clocks. Nothing between this.