drunkenninja
-
Posts
12 -
Joined
-
Last visited
drunkenninja's Achievements
Settling In (2/7)
27
Reputation
-
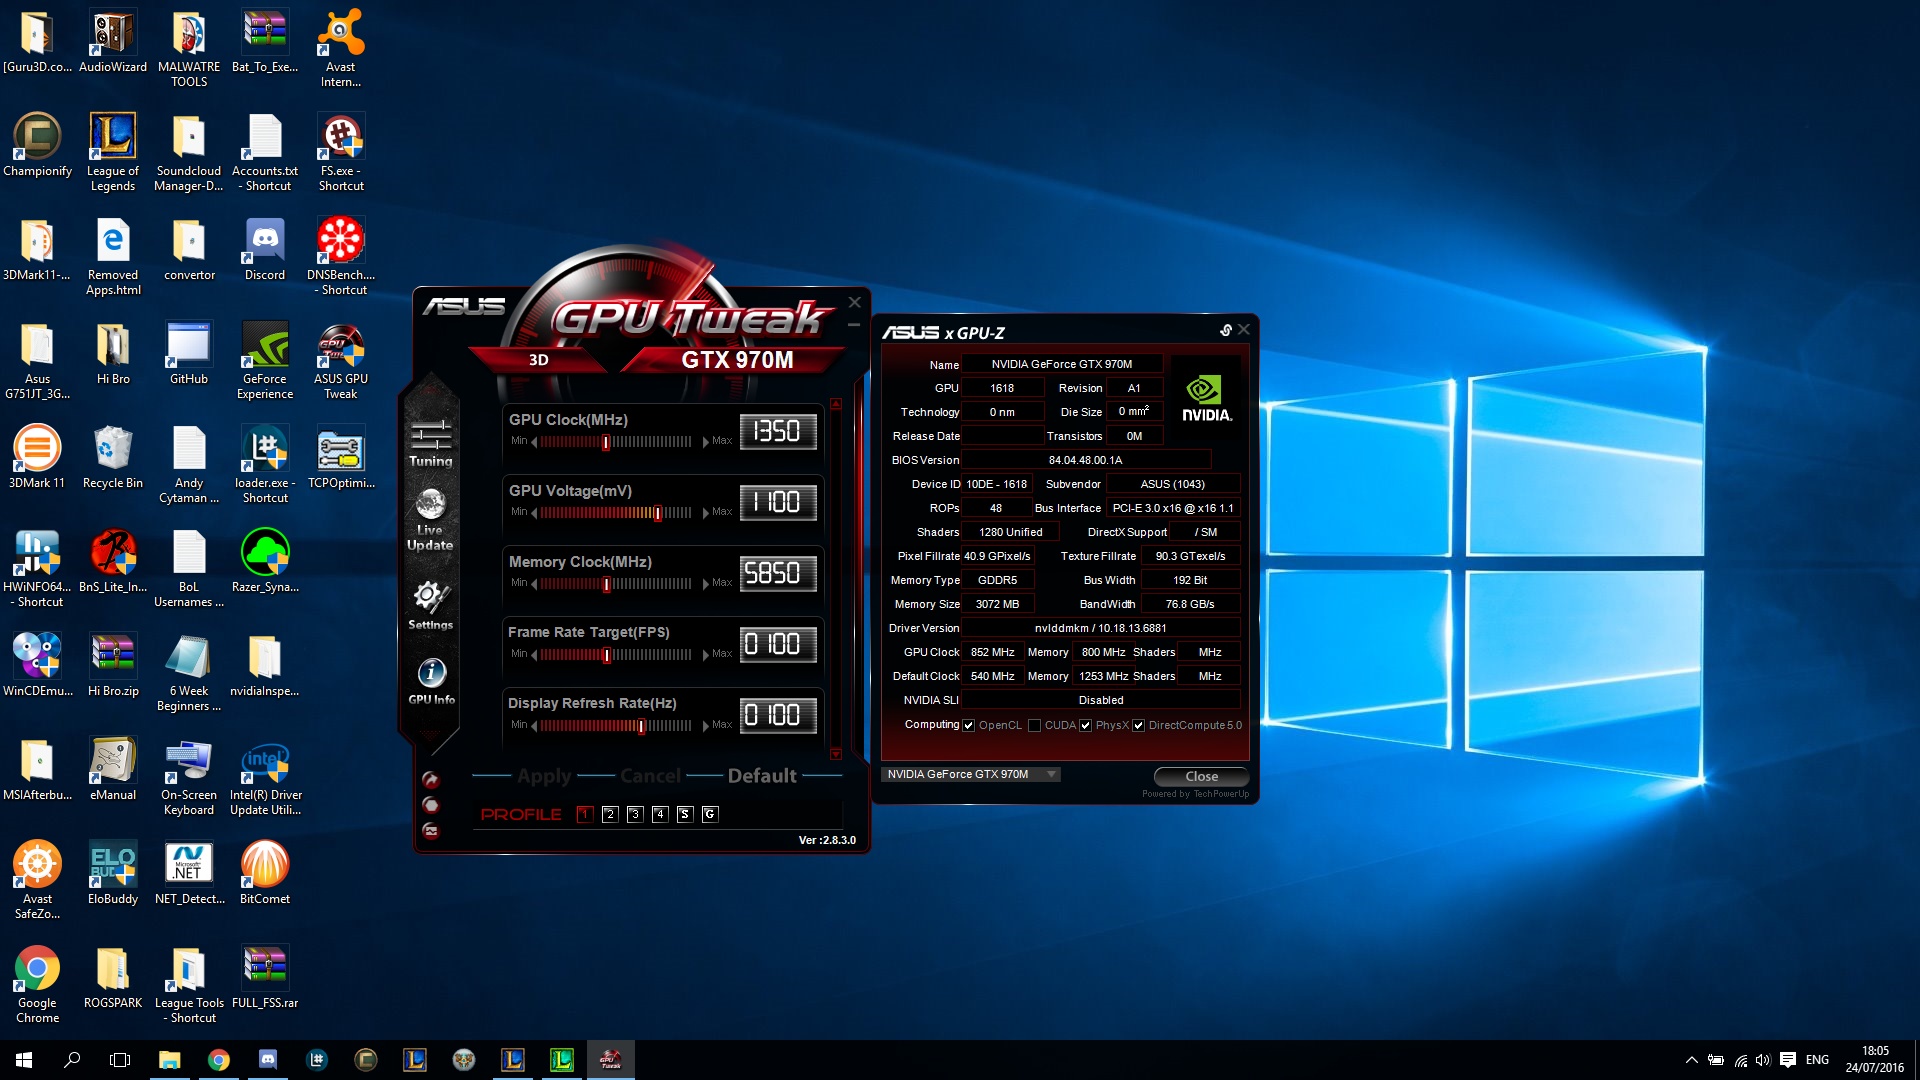
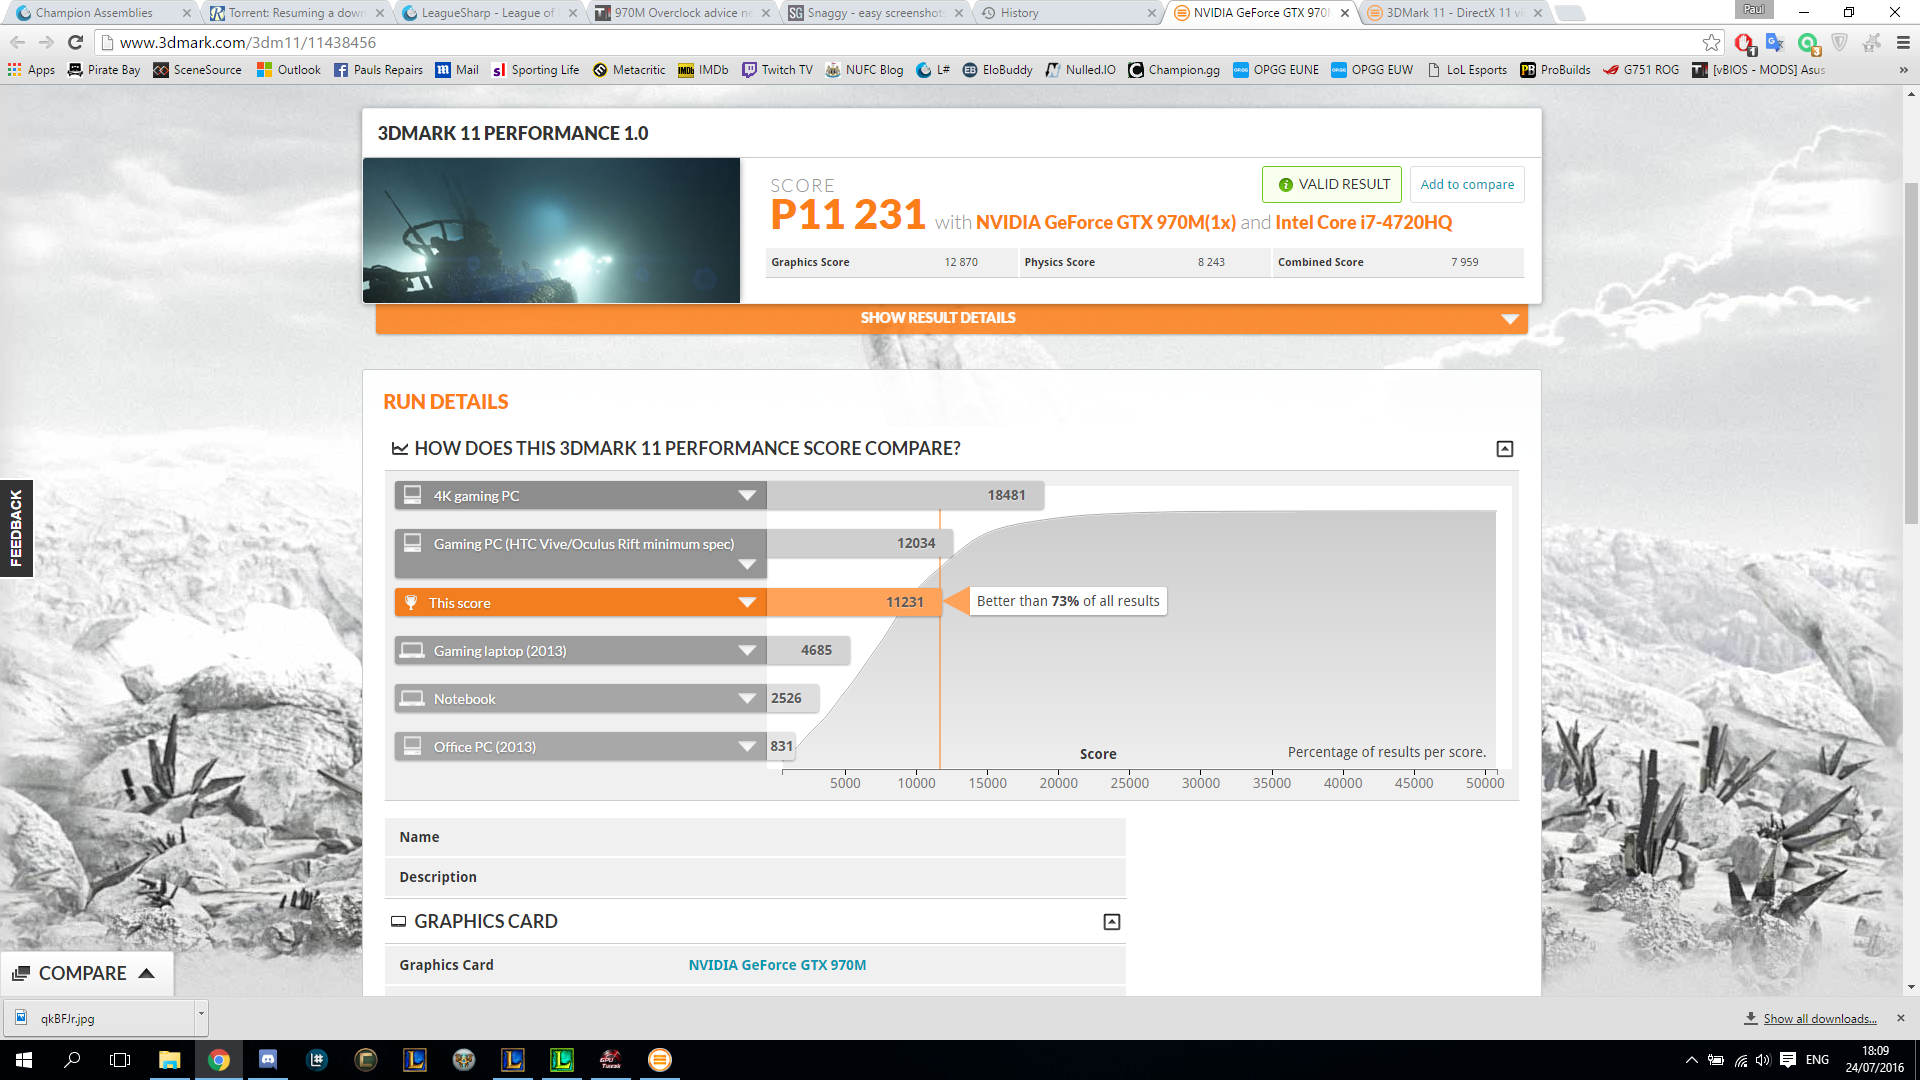
Guess you guys are busy so I did a bit of solo research and thought I would post my final settings here in case anyone else was looking for something similar. If I go above these settings the GPU glitches out and thats not recommended, these pretty much push the chip as hard as possible using 1.1v and the heat output is minimal, so no worries there. Considering the 980M weighs in at a GPU Score of 11840 this overclock pretty much upgrades your 970M to a 980M, quite astonishing. Anyway hope this post helps some of you guys.

-
I'm currently running the "G751JT_3GB_GTX970M-G_OC_PM" VBIOS by prema and would like some tips. Whats the most convenient way to run a profile from start-up? I'd like some Stable settings to overclock the GPU? Thanks for the help.
-
I have pretty much tried them all, only the top 10% of pastes are worth the effort, if you can't get one of those you may as well use the $1 stuff off ebay. I to this day use MX-2 exclusively, I found it easy to apply and thermally very responsive when applied correctly, for the price you pay you get a kiss ass thermal conductivity. I think there are only 2 other compounds that of a measurable higher standard than MX-2 and both are pretty expensive.
-
[HARDWARE MOD] 980M to Desktop 980 core upgrade
drunkenninja replied to Khenglish's topic in Custom Build Worklog
You can use a universal Stencil, just cover the holes you don't need with some tape OR you could go commando and do it manually, I have gone commando quite a few times when i had to get jobs done but its really tedious, your eyes go mad you have to look away every 5 minutes to adjust focus... -
[HARDWARE MOD] 980M to Desktop 980 core upgrade
drunkenninja replied to Khenglish's topic in Custom Build Worklog
Great Job, this wasn't an easy task, you can feel proud... You will likely get bitten by the bug now and start hunting for chips to swap -
Thank you, really appreciate that, I posted one quick guide to trace repairs, (not sure it's the right section though) I still need to get used to the sections. Honestly if you need any advise just PM me, I'm happy to help.
-
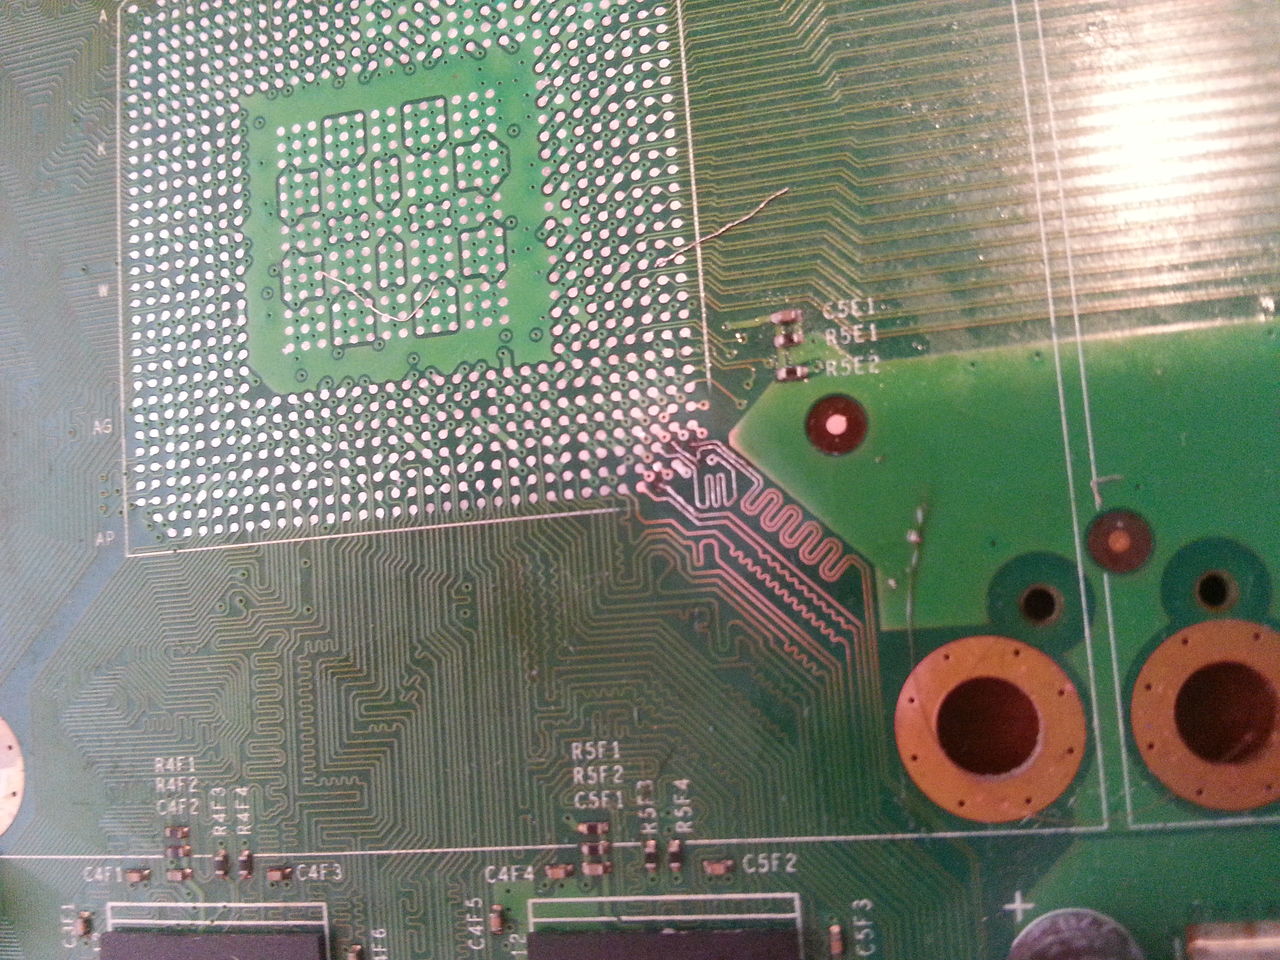
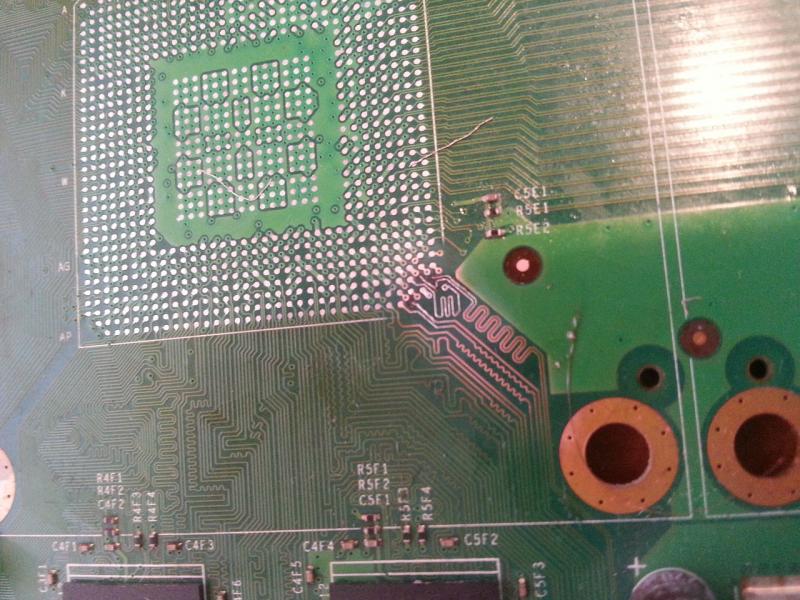
This is one of the guides I created some years ago I would like to share, hope it helps some of you guys out interested in rework/motherboard repair. (I have updated it quite a bit) I got frustrated the a couple of weeks ago during a clean-up and managed to lift a pad off the board, I threw it in the "bored pile" cause I was determined to correct my error one day. I found later looking at the GPU that one corner's solder balls were intact, and the lift must have weakened the pads under the solid solder balls, I was heartened "sort of" that my cleanup method wasn't to blame. A total of 3 pads were lifted after cleaning the board fully, all in the same region. Ok, onto the repair, here are some items your gonna need, most you will likely have already: IMPORTANT This is just my technique to do this repair, and it works great for me, I'm not saying it's the best method, this is not an easy repair and definitely not for a novice, as a minimum I would say you need some standard trace repair experience either using bridged solder or preferably using low gauge kynar wire. I have tried to make it as easy as possible though and it's definitely worth a try if your in a bind. The traces from the GPU are incredibly close together, this is why we are using braid/wick copper wire and a high powered magnifying glass Ok so lets move on. So the first thing you want to do is get your braid and dissect it a little, the easiest way i found was to pull each side and it it will begin to unravel. what we want are those single strands of the braid, once you have some you want to put some flux paste on them and tin with your unleaded solder. Now you want to clean up your board with IPA or thinner, I pretty much use standard thinner for everything these days but each to their own. once it's all clean you will want to expose the copper traces, of the points you want to solder from, you will do this with your fibreglass pen, exacto knife or razor. (see below). SEE IMAGE LIFTED PAD 001 Clean the board up again. You now want to tin your traces, with unleaded solder, the easiest way to do this is run your wick and some flux over the trace, you will find that a thin layer of solder will be attracted to the traces, just what we need. Now get your insat and rub it over the tinned traces with a brush, wait a few minutes for it to get sticky, now you really need that magnifying glass, position the tinned wire on the trace with some tweezers, it should stick nicely cause of the INSAT, you want the wire going right into the pad area, it should reach one side of the pad fully to the opposite side of the pad (but no more). Again using your magnifying glass gently tap along the wire at 1 second intervals from one end to the other (depending how long your trace needs to be, any size is fine actually), feel free to use a pair of tweezers to support the wire also and keep in mind that it might only take one tap to flow the wire to the trace, don't hold the iron on the trace cause you could sever it. Finally test the continuity of the new points with a DMM, use the two furthest points of the exposed trace to confirm you did a good job. Gently clean up the area, use Thinner then IPA or just IPA this time. SEE IMAGE LIFTED PAD 002 I actually redid the point closest to the bottom of the site as I was not happy that the wire did not fully cover the pad - forgot to photograph though Use a toothpick and some solder mask to tidy up the exposed parts of the board. The reason we used unleaded solder is cause you will put a leaded GPU back on the board, the unleaded solder will stand firm at 190C meaning the solder ball will flow straight onto the trace wire you just created. A word of caution, although your joints should be relatively solid, be aware not to mess around too much with the seating of the GPU before reflowing to the board, remember that the unleaded solder balls will automatically shift the GPU to its correct position in reflow state if your not exact. I am not a big fan of the wire glues in the market, I tried them in the past on damaged pads I found they didn't hold upto the temps, plus I'm always wary of using glues on PCB's to form circuits. Maybe there are better ones now? I also heard of copper tape being used (the scaletrix type but again I would be worried about how adhesive would react at 190C but I'm happy with using unleaded solder as I know it will form as good a connection as you will get and be solid at leaded reflow temps. Another option to consider, and you can incorporate this into the above guide if you like is to place a small amount of solder in the pad and then heat with a a hot air wand, it should naturally be attracted to the small trace repair you did, but these are all just ideas, you can play with. Apologies for the pics, getting pcs of those tiny points is tough, if you open them and zoom in, you can see the points relatively clearly though...

- 1 reply
-
- 1
-

-
I havn't been on BGA Mods for over a year probably, I knew the old owner from years back and when he sold the business I lost interest (just coincidence really). I have no idea what shit those guy are talking over there now, when I was a mod there I banned anyone that was rude or derogatory towards anyone interested in this field, I had zero tolerance because there used to be another website (cvxgameconsolerepair I think it was) where they flamed the new members constantly, a pointless exercise to inflate the ego's of the senior members. Not very different to most forums in that respect, but this place seems cool so I wanna hang around for a while and offer any help I can. If you link me in PM to your BGA Mods post I will log in for the first time in years and give you my support, everything I learnt in this field I either learnt from others or was done by my own practical tests, by the end I pretty much knew everything there was to know and was sharing that information with others. I might grab some of my guides from over there and see if I can get them posted over here.
-
Chill man, I'm not here to judge, and your right, you work with what you have to hand and hope for the best. I started out as a hobbyist like most people in that particular field and only bought equipment when the profits made it viable, it looks like you have done a really great job with the tools available to you. Glad you read up on some stuff. Any rework station is better than none; certainly for motherboard work to isolate the heat and not hit reflow temps on every BGA on the board especially the tiny RAM chips, all the same, if I'm not wanted here I can go straight through the same door I came in from. Why you so Salty? Again though looks like you did a good job with the tools to hand, pads looked intact and flush to the board, Reball looked fine also, it has a decent/good chance of success.
-
I just noticed my username is spelt wrong xD. Do you think you I could abuse you admin privileges and ask you to change it to drunkenninja. Thanks so much, msg me anytime, I'll keep an eye out for posts I might be able to help on...
-
[HARDWARE MOD] 980M to Desktop 980 core upgrade
drunkenninja replied to Khenglish's topic in Custom Build Worklog
Wow this is pretty impressive, congratulations, would never expect to find something like this here, but Brian pointed me in this direction after my introduction. I have done a lot of this kind of work in the past, reballed what feels like thousands of chips but is probably more like hundreds, I'm rubbish with v-bios software and matching the components but I am very good at reballing and reseating chips. Anyone into this stuff might know me from over at BGA Mods, I used to mod there for a long time. That chipped die reminds me of the old PS3 GPU's and how careful you had to be removing the IHS cause those machines got so hot 90% of them needed reballing, that heat caked the paste onto the die and 4 RAM chips like superglue. If you guys have any specific questions feel free to post them and PM me, I may not have all the answers but it would be a pleasure to help out here. I have done most things. Actually exchanging different version GPU's and PROCESSORS was of interest for me a while back but I never had the software knowledge you guys have so is very interesting. I'm pretty old skool so don't use an IR unit but instead a self modded T-8280 griddle and a Aoyue 968 Wand. One thing I will say is try to avoid ovens and such, this is really delicate work and at relow temps I always nudge the chip with a chopstick just to confirm reflow state, with an oven you can't do that, even though tou could in theory confirm the reflow temps with a couple, TC monitors (always use one either side of the chip).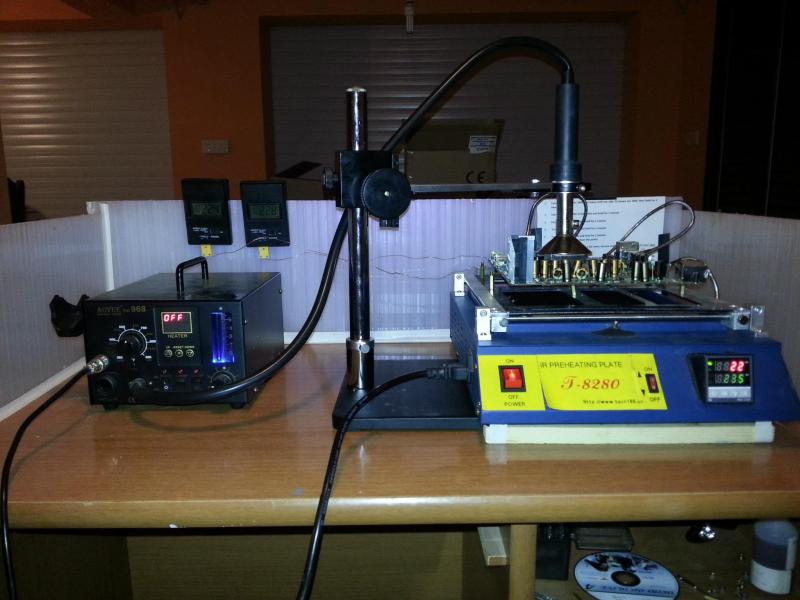
-
More than happy to help out, I have a lot of tricks I used to do when repairing board traces and reseating BGA tips. I'm still the 2nd highest poster over at BGA Mods on 1,636 posts, wrote quite a few guides there as well before stepping down as a Mod to try new things. Thanks for the warm welcome by the way!!!!
-
Acer is basically the Sister Company of Pakard Bell with the Parent Company being Gateway... I rate all machines very highly. Repaired tons of laptops 100+ and as far as build quality goes (Motherboards) they are never left wanting and have adequate airflow to the GPU and CPU, they should last many years even the cheaper models. You of course see the external difference between the manufacturers in the finishing, keyboard quality, touchpads and screens, but inside they are rock solid.
-
Been registered here a while it seems but never had the chance to check the place out fully until today... This place is pretty cool, I was deep into the Reflow and Reball scene of all BGA chips until around 6 months ago when I got bored of it, I know quite a bit o the subject and have helped may people start-up and repair boards over the years on other forums. The software side has always intrigued me as a failed student of programming, if you guys have any questions about reballs or reflows hit me up.
-
Outlook Express 6 is empty
drunkenninja replied to AngusLawrie's topic in General Software Discussion
Outlook holds all of your date in PST files, if there was a problem (i.e. the computer crashed at some point) Outlook backs up the PST file. Depending on what operating system your on you need to locate the file and check the date it was last modified, while there also see if a backup was created and the date this file was modified also. You can then create a new account with either of these files to see if you can somehow recover the lost data.\\ You might find this link helpful: https://www.howto-outlook.com/howto/backupandrestore.htm Best of luck!!!