beezow
-
Posts
45 -
Joined
-
Last visited
Content Type
Profiles
Forums
Downloads
Everything posted by beezow
-
Hi Klem thanks so much for volunteering your time to provide this awesome service. Like everybody else, I want every unlockable menu (advanced, vbios, overclock etc) unlocked and the whitelist removed. Here's my link: https://www.sendspace.com/file/3h3vh5 Also I've been out of this for a few years, if you could give detailed instructions for how to flash my bios (including any custom tools needed to bypass security checks for example) that'd be very highly appreciated. Thank you so much!!!
-
Well since we all love conspiracy theories, how this one for a change? So Asus is behind this? Thoughts? Basically guy started talking about how nVidia is locking down the drivers due to a spontaneous wave of THOUSANDS of RMAs, and when I pressed him for a credible source that's all I got. It's from a certain overclocking place.
-
The heatsink didn't look bent to me, at least not visibly so. In my case it really was because the 780M itself was bent rather than the heatsink. The heatspreader doesn't do anything for thermals (well maybe it helps the vRAM on the underside to cool a bit), I use it mainly for structural support as I don't want my 780M to become increasingly bent over time and eventually snap.
-
I dunno, but bottom line is it's about the same. Although I may start to see a difference when playing a more demanding game like Far Cry 3. EDIT: So it seems I was right about having to push the cards harder to see a difference. After gaming Far Cry 3 for 3 hours, peak temp dropped 3C while average temp dropped 2C. And this was with ambient temp of 27C no less. The bigger issue is that ever since I did these mods, my slave GPU now runs 5-7C hotter than my master when gaming.(before the master used to run about 2C hotter) Absolute temps are down for both master and slave 780Ms, but the slave did not experience as big of a drop. I think the main issue is that the heatpipes are just too long, and short of using Liquid Ultra I see no other way to improve this, considering I already lapped the slave heatsink.
-
Well Meaker gave an explanation as to why the 8970M could actually have caused core temps to go UP. Basically the fins closest to the fan are connected to the VRM heatpipe, so adding those extra fins there means the air going over the fins connected to the core heatpipes (which is behind the VRM heatpipe/fins) is going to be hotter than without those fins. So maintaining temps is already sort of an improvement lol. Fan speed shouldn't be an issue, the fans ramp up once the GPU hits 42C, and don't go into turbo until the temp is in the high 80s.
-
The 8970M is virtually identical in dimensions to the 880M heatsink, so all that I needed to do was swap the pads over and I was good to go. Unigine Valley was run for 10 min using Extreme HD Preset, Watch Dogs was played for 30 minutes on Ultra + SMAA, and Far Cry 3 was played using Ultra Preset + HBAO + 2x MSAA, and played for 3 hours. Ignoring Far Cry 3, there's not much of a difference (well if you want to call 0.3°C an improvement...), but once we crank up the stress dial, the 8970M heatsink slowly (but surely) edges past the 880M heatsink. Btw, the VRM pads for the 8970M are 4mm thick I wonder if that's the cause of the AMD cards dying prematurely -- bad heat dissipation from the VRMs. I mean if you're going to use a 4mm pad, might as well just not bother at all.
-
It actually is a hardware flag as this nasty flag survives reinstallations and reformats. You can find all the details in this NBR post. (wall of text warning)
-
Just to be safe I'll take some measurements with my caliper and see if any of the thickness/heights/depths changes between the 880M/8970M heatsink. If yes I'll have to get new pads. The relatively flat plate was for the slave GPU, never bothered lapping the master heatsink since temps were already ok. Sad thing is, even with the lapped heatsink, the slave still runs a good 4-5C hotter when playing more demanding games like Far Cry 3 and Crysis 3, because of those stupidly long heatpipes.
-
Wow thanks for the tip about the 8970M heatsink, I'll order one from RJTech right away. Looking at the 8970M, I'm guessing the only thing I'd have to do is switch the 780M pads over right? No need for any hard modding on the plate or anything. And why does Clevo do stupid boneheaded crap like this anyway? Is it that hard to just have one single design that works for every card? 8970M master is one-piece, 780M is 2 piece core+vRAM, but 880M goes back to one-piece yet missing that row of fins. WTF?! Looking at the 8970M heatsink and the 880M heatsink, it looks like Clevo basically ripped the design -- even the stickers are in the same place -- except they made the 880M heatsink worse for no good reason at all. Yeah the temperature drop from lapping wasn't as dramatic as I'd hoped, but it's probably because the plate was relatively flat to begin with. I actually could not see the stress marks where the heatpipes bonded at all. As for CPU heatsink, this is why I'm not lapping it: Yeah the top 2 corners could use some work, but honestly it's good enough. When used with Liquid Ultra, I can play Far Cry 3 for hours on end (longest was a continuous 4 hour session) without my 4900MQ going a hair over 78C. As a gamer who isn't into benching, that's enough for me.
-
Well I'm temperature obsessed, so if a mod can reduce temps by even 1C, I'll do it as long as it doesn't involve anything risky or expensive. Plus half the fun is the modding process itself. I can honestly say I feel much more confident with my hands after doing these mods.
-
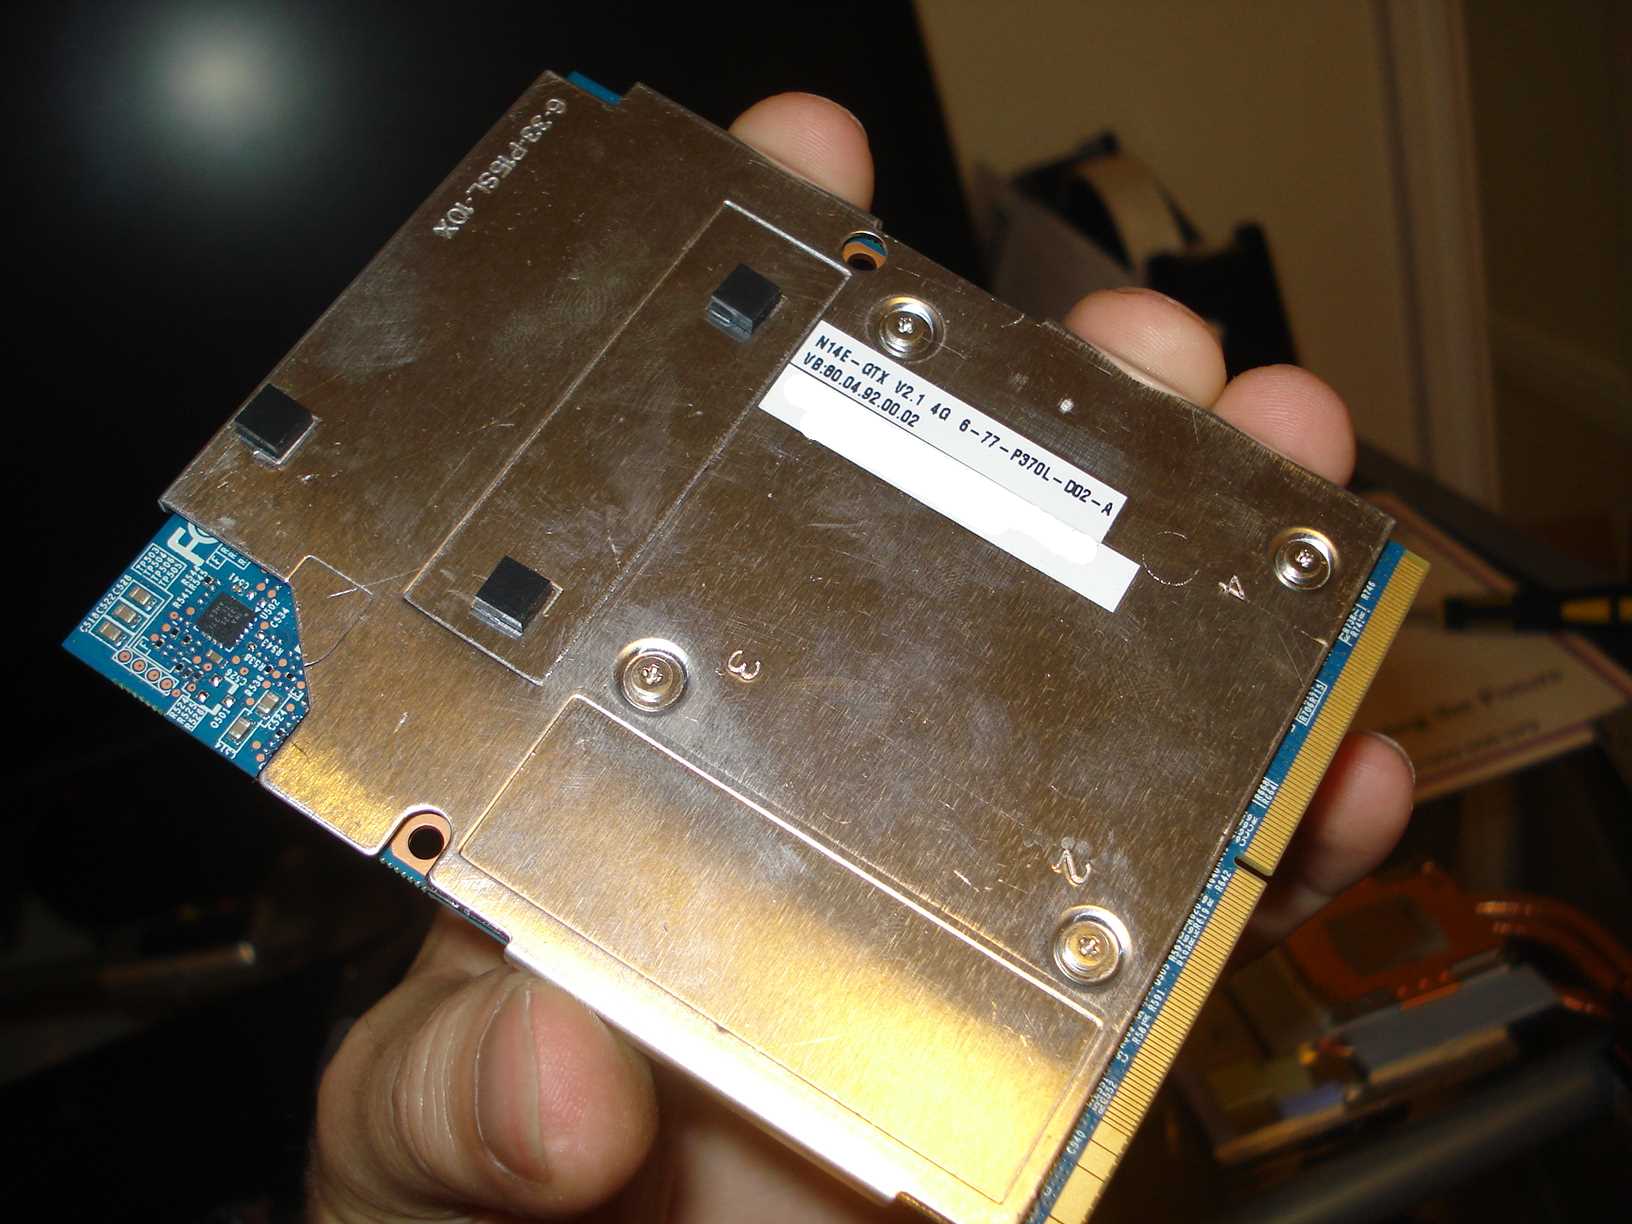
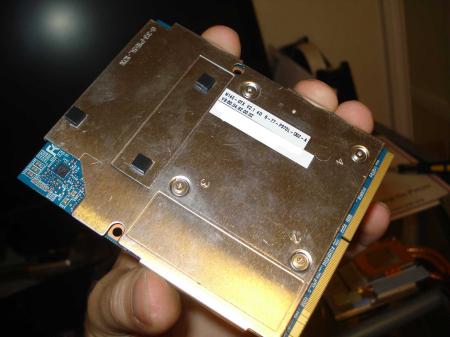
I was originally going to put this one in my modding thread, but decided it might be better to have this in its own separate thread. I present to you: the tale of a warped 780M. This mod, while having a cooling aspect to it, goes far beyond that. I need to go into some detail on this one as this flaw can potentially cause the master GPU to die prematurely. We all know the 780M has vRAM chips on the back, and having a heat spreader would be optimal for dissipating heat. Well this is what a Clevo 780M with a heat spreader looks like: (photo courtesy of Calibre41) And this is what the 780M in my P370SM looks like: Alright then, so it seems I'm missing a heat spreader here. After some sleuthing, I was able to conclusively determine that all P1xxSM laptops have this heat spreader (part# 6-33-P15SL-101), the P570WM has the heat spreader built into the mobo, but for some reason the P370/375SM laptops got left out. Is this an engineering oversight, or did Clevo intentionally leave this out for some reason? Well let's start by looking at the mobo after the master 780M has been removed: Keep this square outline in mind, I will come back to the significance of this later. So as it turns out, the stock heat spreader from the P1xxSM machines can NOT simply be dropped in without some Dremel modding, have a look at these pictures: A closer look at that protrusion: So it would appear that Clevo didn't include a heat spreader simply because they were too lazy to modify one to fit the P370SM. Which means they couldn't be bothered with less than 5 minutes of Dremel work to make the initial design. But is that really the case? There's just no way I could take a usable picture with the heat spreader resting on the mobo, but take my word for it that I've verified at least 5 times that the support foam on the heat spreader fits squarely (pun intended) into that square outline on the mobo. At this point if I had to guess, Clevo perhaps in an earlier revision of the design had intended to include a heat spreader for the P370SM, but for whatever reason scraped this idea at some later stage, and the end result is what you see here. Now this wouldn't have been an issue if not for a much more serious problem that I discovered -- unbalanced mechanical load on the master 780M, causing the card to deform. Seriously have a look at the pictures below: There is a noticeable downward deformity on the top right corner of the 780M. (top right if you view the card top down with the pins facing downward) Another view along the top edge of the card: The top left is less affected, but a small gap still exists: This deformation is particularly nasty, as it widens the gap between the VRM chips and the thermal pads on the heatsink, to the point that the VRMs were barely contacting the thermal pad. (and I actually think the VRMs on the more deformed side weren't contacting the thermal pad at all) No wonder contact between the VRMs and the heatsink was poor. Doesn't help that the VRMs do the heavy lifting and run even hotter than the core. You can probably appreciate how freaked out I was when I found out about this, but thankfully I was able to fix this with some 2.5mm pads. If you need convincing that my master 780M warped due to an unbalanced load, have a look at this: This truly a dangerous design flaw, and one that really pissed me off. All the other ones are just gripes that I can live with, but this one really had the potential to kill my card had I not caught it. To Clevo's credit, the 880Ms in the P377SM-A (P375SM refresh) now do come with a heat spreader. So it seems that Clevo is aware of this issue and has taken steps to rectify it, so that's encouraging. Btw, don't bother getting the heat spreader to fit the slave 780M in the P370SM, there's just not enough "depth" to accommodate the extra thickness of the heat spreader, yet this was no issue on the master 780M. So I think it's clear that Clevo did intend for at least the master 780M to have a heat spreader (if only just for load balancing purposes).
-
Overview This thread is essentially a compilation of the various mods I performed on my P370SM to improve its cooling capabilities over the period of several months. Most of these mods have been documented in detail, but the actual posts/threads are scattered all over the forums, with some even in the Alienware section. I am now piecing everything together into one central thread, both for my own benefit, as well as other P370SM owners. Most of these mods should work equally well for the P370EM, P375SM, and P37xSM-A. However, I am confident that a few of these mods will be universally applicable to other laptops (Clevo or otherwise) that suffer from the same issues. The initial impetus behind all this modding was the increased temperatures due to the summer heat. As there is no AC in my room, the ambient temperature is typically at least 24°C (75°F), and on hot days it rises to an uncomfortable 29°C (84°F). My initial goal was rather unambitious, as I simply wanted my P370SM to never exceed 80°C on any of the components during summer gaming. But as I kept modding and temperatures kept dropping, eventually it became an obsession to see just how low I could push the temperatures. I am still not quite finished with modding at this point, so this post may be updated from time to time as I complete and validate any new mods. Before I begin, I must acknowledge a few key people that motivated or helped me along the way to keep all this modding going. They were the brains behind a lot of these mods, and I was simply the technician. -deadsmiley for discovering the TechInferno mod, as well as his own mod that helped me get the ball rolling, and for providing very helpful tips and pictures when it came to lapping the heatsink -sl44n3sh at TechInferno for various mods - Gerik at a certain overclocking site for the awesome Notepal U3 fan mod The P370SM: A Brief Introduction The P370SM is the second iteration of Clevo's mobile SLI laptops (the first being P370EM). Compared to the P370EM, the P370SM made several major changes to the cooling system, among them the omission of the third heatpipe from the CPU heatsink that shared the slave GPU fan, beefier 6mm heatpipes for the master GPU (instead of 4mm in the P370EM), and a one-piece construction for the slave GPU heatsink that now sat flush with the fan and had no issues with air leakage due to unnecessary voids. While these improvements are welcomed, I feel that Clevo made a number of questionable design decisions, and the end result is that the cooling is still not as good as what it should be. Thus the task is placed upon the end user to rectify some of these issues and unleash the full potential of the P370SM. For reference these are the main specs of my P370SM: -4900MQ -780M SLI -2x8GB 2133MHz ram -1TB 840 Evo boot + 500GB 840 Evo data -Running Prema's BIOS mod v2 for the P370SM Everything was run bone stock (clockspeed, vBIOS) for all testing. Liquid Ultra was used on the CPU, while MX-4 was used on both GPUs. With that out of the way, let the modding begin... The Mods: Part I External Cooler Mod For some reason TechInferno doesn't allow me to state where the original mod came from, but if you google "Gerik U3 mod" the second result takes you to the source thread. Basically, he combines 3x 120mm Rosewell RFX-120 case fans with a Notepal U3 cooler. Since Gerik has an excellent guide up, I won't repeat myself here. I will just say that the fan controller has some QC issues, and mine had a dead DC jack on arrival, which made me think the whole thing was DOA for a while. However I was able to get it to work using an AC to Molex adapter that was meant for HDDs, and plugging into the Molex end of the fan controller. It looks a bit cumbersome as a result (as you'll see shortly), but on the plus side I gain the ability to switch the fans on and off at will. You see what I mean by cumbersome? Granted it doesn't look too bad in this picture because I hid all the fan wires LOL, but believe me when I say it's a handful (literally). The green light is the on/off switch from the AC adapter, which I really appreciate, as I would otherwise have no means of manually controlling the fans aside from unplugging the controller. The wires for the 3 120mm fans can be neatly routed through the back of the U3, and don't get in the way at all. This is probably the easiest mod of them all, and for such a small amount of effort, I recorded a 5°C drop on the master GPU and 2°C drop on the slave GPU. Not bad at all. GPU Cooling Mods Exhibit 1: Sealing unnecessary voids I'm really not sure what it is with Clevo and voids, but here you go. The fix is to simply tape off the offending area of the fan with some foil tape. It takes literally less than 1 minute, and the result is a 1-2°C drop in temps when gaming. Exhibit 2: An improved heatsink When I was going through HTWingNut's review of the P377SM-A, I noticed that the 880M heatsink for the master GPU in the P377SM-A seems to have slightly improved compared to the 780M heatsink: it is now a one-piece construction instead of separate core+vRAM heatsinks, so one doesn't have to worry about misalignment between the two parts obstructing airflow and, perhaps more importantly, fin area seems to have increased (thanks Meaker!). As a bonus, the 880M heatsink includes a bit more foam padding on the fins to block off the atrocious void I mentioned in exhibit 1. So does the 880M heatsink actually offer any improvement over the 780M heatsink? Yep it sure does. The following records the temperature taken at 1 minute intervals while running MSI Kombustor 3.0: I was very happy to find that the 880M heatsink did indeed perform better than the 780M heatsink; not only was peak temperature reduced by 2°C, it also took longer to reach the peak temperature. Exhibit 3: Opening up restrictive vents Have you ever taken a moment to stare at the fan grilles on the bottom cover? I certainly have, and I've always wondered just how much the fans are being starved of air by these tiny vents. This is what the vents on the P370SM look like; for comparison this is what the bottom of the Alienware 18 looks like. See the difference? The baffling part is that Clevo clearly realizes the importance of non-restrictive vents, because the P570WM has some pretty awesome vents. So why the vents on the P370SM are the way they are I don't know. The fix is easy enough if you know what you're doing: take a Dremel to the bottom cover and cut some holes. And here's a bunch of close up shots: Master GPU CPU Slave GPU Master GPU CPU You may have noticed the CPU opening is slightly smaller and does not encumber the entire circumference of the fan. That's because there are some support structures (the black "fins" at each of the four corners) that get in the way, and I did not feel like cutting those out. Slave GPU By simply allowing the fans more air, I saw a 3-4°C drop in temps on both the master and slave GPU. Exhibit 4: De-warping aka lapping the heatsink I will admit to being completely ignorant to this issue until Khenglish at TechInferno pointed this out: Now you know why the temps suck despite the strong fans. But as you will see towards the end of this long post, when all (or most) of the issues are rectified, the cooling system finally starts to tap into its full potential. The fix for warped heatsink is both easy and hard: it involves lapping the heatsinks, or sanding down the uneven parts until you achieve an almost perfectly flat surface that has a mirror-like finish. The fix is very simple conceptually, but the execution can be rather difficult on a laptop heatsink. I started with the slave GPU heatsink as the contact plate had no "tabs" on 2 corners unlike the master GPU heatsink (see exhibit 2 for pictures), so the contact plate was completely flat, and easier to work on. The materials I used: I skipped both the 400 and 600 grit as I didn't want to take too much material off. The metal block to the far right is a 1-2-3 machinist block, which provided the flat surface I needed to sand down the heatsink. So what I did was use the 3" side of the 1-2-3 block and cut a piece of sandpaper that was just slightly larger than the area of the contact plate on the heatsink. For the actual lapping I pretty much just followed the guide from OverclockersClub that I linked to above. Every 3 complete rotations I washed off the copper shavings on the sandpaper, and reapplied dish soap to the heatsink. I went 800, 1000, 1500, and finally 2000 grit. I had 2500 grit sandpaper but quite frankly I was just too tired at the end and decided to call it a day. The entire lapping process took about 2 hours, and both my hands and wrists started giving out towards the end. You will need a lot of patience if you want to do it right, so make sure you're in the right frame of mind when doing this. This is NOT something you want to rush, as I can tell you from personal experience that I almost trashed my heatsink because I was rushing the first time through. Also, the actual process is very messy as copper containing water/foam will get everywhere, so either do this outside or near a sink, and make sure you wear nitrile gloves. The end result does look quite stunning though: (note that this is actually a second lap; the first one was botched because I rushed so again DO NOT RUSH THE PROCESS) From left to right: before lapping, 800 grit, 1000 grit, 1500 grit, 2000 grit For 2 hours of my trouble, I shaved 3°C off the slave GPU while gaming. The rather modest drop is because my plate wasn't all that warped to begin with, as I know deadsmiley who had a rather warped plate experienced a drop of over 10°C. For the vast majority of you this may not be worth your trouble, but to a temperature obsessed enthusiast like me every °C counts, so I'm happy with the result. Summary of Results for Part I They say a picture is worth a thousand words. If you don't feel like reading this gigantic wall of text (which I totally understand), then hopefully this single image will be enough to convince you that these mods really do work. Below I have recorded the temperatures, both the absolute peak as well as the average after 30 minutes of playing Watch Dogs on Ultra with 2x SMAA. ***I should emphasize that the 880M heatsink was used for all these tests, so "no mod" should really be "880M heatsink only*** With all mods incorporated, both the master and slave 780M experienced a 7-8°C drop in both the peak and average temperature. This may not sound very impressive given all the mods, but check out the actual values. You're not reading them wrong, even a demanding game like Watch Dogs barely pushes my 780Ms past 70°C, with the average temperature just around the 66°C mark for both. This is absolutely remarkable, and just goes to show how much power the cooling system can deliver when the design flaws are rectified by the end user. - - - Updated - - - The Mods: Part II PCH Cooling Mod In case you didn't know, the PCH chip is located under the keyboard in the P37xSM models. (see pics below) As you can see, the PCH just quietly hides under the keyboard, with no access to air or ventilation of any sort. Because of this and the high summer heat, my PCH would idle at 62°C, and could go up to 83°C when gaming. Since the keyboard backplate is one big piece of aluminum, I figured why not bridge the gap between the PCH and the keyboard and use the keyboard as one gigantic heatsink. So I used my caliper to measure the gap between the PCH die and the keyboard backplate, and it came in around 4.2mm. I figured 2x2.5mm thermal pads would do the job nicely: (here I actually just used the stock square 2.5mm pads that go on the inductors from a spare 780M heatsink, they fit very nicely and the size was perfect) Look at the nice impression the die makes in the stacked pads: I didn't expect too much from this mod, since I'm stacking 2 thick, stock Clevo thermal pads, and the pressure isn't that high. But even with this rudimentary mod, the idle temp dropped by 7-8°C, and the temp maxed out at 73°C after an hour of playing Watch Dogs, representing a 10°C drop in load temps. The keyboard did not feel any noticeably warmer, probably because the heat is concentrated between the "\" and "enter" keys. However I will say I don't know what the long term consequences for the keyboard would be, so do this at your own risk. CPU Cooling Mod Remember the triple pipe CPU heatsink of the P370EM I mentioned earlier? Well turns out this fits in the P370SM just fine, and gives the CPU healthy temperature drop because of the extra cooling from the slave GPU fan. The problem is that all the extra heat from the CPU is 100% off-loaded to the slave GPU, which is completely unacceptable in gaming situations. I'm not going into any details here because this isn't really a worthwhile mod unless you're into hardcore CPU benching. In any case I wrote about my findings here, so all the details are there for you to see.
-
[HARDWARE MOD] Clevo P150/P170 cooling system (solutions here)
beezow replied to beefsticks's topic in Clevo
Khenglish, I can't thank you enough for pointing out this glaring defect, as I would've never caught it otherwise. And you are 100% correct that the cooling system is extremely heavy duty, yet the temperatures are nowhere near optimal because of some questionable design decisions on Clevo's part. However, after patching up most of these issue (I've compiled a thread over at NBR), the cooling system truly stands out above the rest. Just look at these temperatures below: These are the temps I recorded after playing Watch Dogs on Ultra for 30 minutes. Both 780Ms barely push past 70°C, and the average temp is a breezy 66°C. Now if only Clevo would fix these issues themselves so that all users could benefit from the heavy duty cooling. -
Hate to toot my own horn, but I did a writeup on some pretty extensive modding of the P370SM over at NBR. I could definitel copypasta the thread here, but that seems excessive.
-
If you have the means, I strongly recommend getting an 880M heatsink for your 680M. As I mentioned in that thread the X-brackets on the GPU are the same across 3 generations, so I have no doubt the 880M heatsink will fit your 680M just fine. You should see at least a 5C reduction in temps just due to the beefier heatpipes (6mm vs 4mm).
-
[HARDWARE MOD] Clevo P150/P170 cooling system (solutions here)
beezow replied to beefsticks's topic in Clevo
Is this a problem unique to the P1xx series? I don't think the radiator extends below the mobo in my P370SM, but then again I'm not entirely sure I understood what you meant either. -
Honestly the difference between all non-metal TIMs will be 2-3 C at best, so it's definitely not worth the extra premium. If you want an all-round general purpose hassle-free paste I recommend the MX-4. However, if you're after the absolute lowest temps possible, then there is simply no substitute for Liquid Ultra. I too was skeptical when I saw the disappointing results from desktop CPUs, but having tried it myself, I can say with 100% confidence that Liquid Ultra is THE single best TIM for laptops bar NONE. Nothing on the market right now even comes close to what Liquid Ulra can do. Sure it won't drop your idle temps by a whole lot, but under load is where it really shines. Previously while playing Crysis 2, my 4900MQ would routinely run up to about 75 C. Now with Liquid Ultra, it never goes a hair above 63 C. And this paste is a MUST HAVE if you're serious about benching. With MX-4, no matter what I did, when benching XTU at 4.2 GHz my 4900MQ would run right up to 95 C and throttle like mad. After repasting with Liquid Ultra, it can manage to pull through XTU without throttling once, and topping out at 93 C. To say Liquid Ultra is amazing is an understatement, it is a godsend to gamers and benchers alike.
-
^under the keyboard. As soon as you lift out the keyboard you'll see it.
-
Yeah that's exactly what happens when I clock my ram too high (tried running 2600 at 1.35v, terribad idea; however 2400 was attainable ). Although for me the BIOS resets itself automatically after 3 failed boot attempts, so didn't have to go through the hassle of doing it manually.
-
Dang those are some ridiculous scores Mr. Fox, congrats! Could you share your secret or point me in the right direction? That PCMark score is delicious, and those CrystalDiskMark numbers are just unreal.
-
I came across this thread yesterday while looking for something completely different. What got me curious was this particular picture: This is what appears to be a heat spreader backplate for the 780M. I always wondered if Clevo had a solution for cooling the vRAM chips on the back of the card, and it seems they do. Now the question I have is will this fit in the P3xxSM models? Meaker confirmed that the P570WM has it integrated, so the P1xxSM series have it, the P570WM has it, but the P3xxSM series don't. Really seems like a design oversight to me, unless Clevo just "conveniently" forgot to include one with the P3xxSM series. I always wondered how Clevo just decided to let the backside vRAM chips roast, I guess they didn't, just that the P3xxSM units were somehow glanced over...
-
Since I'm running a P370SM, it's through the dGPU as all SLI capable laptops have the iGPU cutoff from the hardware front (unless it has a MUX).
-
^by that, do you mean disconnect the LVDS connector from the mobo so the laptop's LCD no longer works? I guess I could give it a whirl sometime.
-
Finally took the plunge and bought a an Asus VG248QE. Loving it so far for the 144Hz, colors are a bit meh especially coming from a 90% gamut screen. One issue I've noticed though is that the LCD does not receive any signal (or at least it says "DisplayPort No Signal" before the Win7 login screen (currently connected via Thunderbolt/mini-DP to DP cable). The entire POST + boot sequence can only be seen on the laptop screen, but not on the external. Did a bit of digging around and apparently this is an inherent feature of the Thunderbolt/mini-DP connection (what???). Anybody have any ideas? I mean the external works fine once the laptop has finished booting, and the signal starts at the Win7 login screen. But it's kinda annoying that I can't tweak any BIOS settings unless I'm on the laptop itself.
-
I asked Mythlogic about this a while ago and the response was if the mobo doesn't have en eDP connector then it's a no-go, regardless of whether the LVDS connector matches or not. Have you thought about using your P370SM as a "true" desktop replacement? Once everything I ordered gets here, I plan on hooking it to an external 144 Hz LCD via the Thunderbolt port (mini-DP to DP cable), attaching some speakers, and adding an external keyboard so it will truly live up to its name.