MrHaPPyPiLLs
-
Posts
16 -
Joined
-
Last visited
MrHaPPyPiLLs's Achievements
Settling In (2/7)
18
Reputation
-
Hmmm. Seems unlikely to be overheating in that case although most card manufacturers supply monitoring software that you could run alongside the benchmarking to double check? Personally, if I were troubleshooting, I would try some different methods to get the power to the card. @Tech Inferno Fan has posted somewhere (sorry cant find it right now) a link to a board that takes the 75W from a spare PCIe connector and outputs to a 6-pin molex. One of those and a cable to convert a single 6-pin to 8-pin would probably be the simplest way to supply the power that your card needs. The second (and I would suggest is the neatest solution somewhere between DIY modding while making sure that you aren't invalidating the warranty on the enclosure) would be to assemble a cable that splits off the 16 pin power from the PSU to the riser board and provides 1 x 6pin and 1 x 8pin connector for your card. It's slightly tough to explain what I mean but have a look at the cable mod by @kryzaach here to see the 16pin cable that comes from the PSU and powers the whole system through the riser board. The third option would be to follow exactly the steps in that build and assemble your own cables that connect directly to the PSU - the only issue there is the possibility of running into trouble if you wanted to repair under warranty.
-
Interesting. Sounds suspiciously like an overheating issue? Not to say that it's not power related but the high fan speed on reboot would support this theory. Is your card a rear exhausting model? I specifically selected a card that draws air from the rear of the cooler and pushes it out of the back of the enclosure to avoid heat building up. The fans that I've used are 25mm thick so I've mounted them on the outside of the enclosure, the airflow from these Noctuas is ~2x that of the stock fans but they are significantly quieter.
-
Ok, finally managed to put aside a couple of hours to get some more benchmarking done and reply to peeps... Good news story that, assuming its not been mis-quoted somehow, that might be one of the first (if not the first) times that an existing enclosure product has been mentioned in combination with a GPU! Regards the 6pin power cable inside the IIID (and the same in the Echo Express Pro 1st gen box). Each cable is rated up to 300V with a thermal threshold of 90C for the insulation, conservatively working on 1mm braided cross section, it should be good for 10A as I suggested previously. Assuming each of the 3 pairs carries 75W @ 12V, that's ~6.25A per cable so within sensible tolerance. Excellent mod work by @kryzaach you've linked earlier. The one bit that I couldn't find was the reason behind the mod? From working through the design, all 300W from the PSU is already delivered up to the riser board so I'm not sure why it was necessary to bypass it? Unfortunately the only 780Ti that I have access to is a Titan Black and thats hooked up to a watercooled system so I cant test this specifically. From the basic theory above, it should work as the max TDP of that card is 250W. Since there is a quick cable mod already in existence that allows it to work regardless, I would say what've you got to lose? Bang on with costs: as I mentioned right at the top of my original post, this really is a money no object type of setup (although arguably, since I hadn't seen the SLI 780Ti build before, its actually makes this a complete bargain!). I have now run back-to-back benchmarks for about 2 and a half hours (3 x 3d Mark 06, 3 x 3d Mark 11 and 3 x 3d Mark 13). Not a single issue at all - I'm kind of suprised by this but note that I have replaced the crappy fans with Noctua ones so that will likely have help with the airflow. Damnit, now I have to fight the urge to get a second enclosure to do an SLI build! Seriously though, that is a pretty damn fine build so I'm very happy to run second fiddle to that monster... I've posted links to the lowest score each of three benchmarks (not much variation between each run as youd expect but it was worth a long burn on the hardware to test the stability which was rock solid).
-
Hi Nando, Firstly I guess it's important to note that a 6pin PCIe connection is not, per say, limited to providing 75W power: the cabling is likely able to realistically provide 8-10A down each of the 3 12V channels so straight away, you can see a theoretical 360W. At that point, you are limited by the current control system in the PSU. In all honesty the ideas you've suggested are very nifty workarounds and, because I've not actually had to do any additional modding of this enclosure to get it working (unlike my previous build using the first incarnation of the Echo Express Pro which needed a load of work to get it working stably), I've not had to get anywhere near it with the ammeter to actually confirm the exact reason this works. Looking at the circuit boards, there is very little difference from the first gen. Echo Express to this one. Importantly, there does not appear to be anything that would separate the 12V supply separately across each of the 3 PCI segments and the single PCIe power connector. Theoretically, this should mean that all 300W are available to a single slot and that power connector. I am definitely not suggesting this will happen (I'm not convinced from my knowledge of Sonnet's design - which tends to the lazy side - that it wouldn't burn out bus riser board), but only that it's potentially possible. The part I used, as you surmised, was a simple 6 pin Molex y-splitter in this case made by Startech who use better quality cabling and proper molex connectors rather than cheap knock-offs. You can get them off Amazon (http://www.amazon.co.uk/Startech-com-Express-Power-Splitter-Cable/dp/B004NNTVT6/ref=sr_1_1?ie=UTF8&qid=1411999753&sr=8-1&keywords=startech+6+pin+splitter) so very easy to find. I'll do my best to squeeze out some more benchmarks for you if it would be helpful - its the least I can do after all the help I got from here last year. One other fun thing I did while waiting for the IIID to arrive was to fit the GTX980 into my 1st Generation Echo Express Pro. Very interestingly, it loaded into windows and was actually capable of running if I underclocked it so that the max power draw didn't exceed 158W. If I have some time, Ill post a benchmark to compare as, looking at a lower budget build, you'd save several hundred $ using the older tech. Not so interesting story behind that - having spent an inordinate amount of time working with their 1st Gen Echo Express Pro and getting a bit of conversation going with one of their designers (who still refuses to acknowledge the compatibility of their products as external GPU systems, read into that what you will...), they were pretty happy for me to have one to continue working with their systems.
-
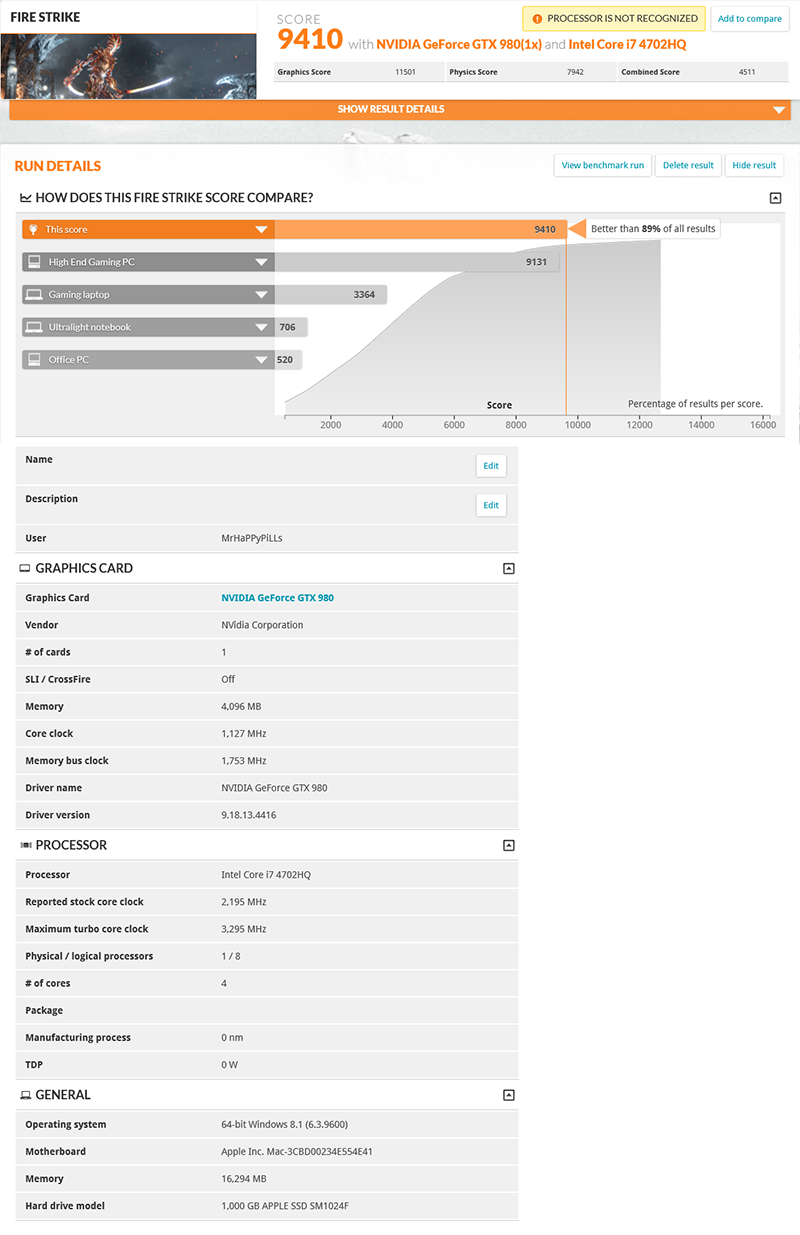
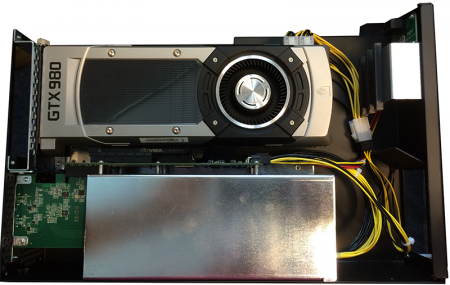
Having been happily running a late 2011 MacBook Pro with GTX 660Ti for the last 18 months, and waiting patiently for the Maxwell architecture NVidia cards to be released, I've splashed some cash (and managed to sweet talk Sonnet into providing an engineering sample of their new Echo Express IIID Thunderbolt II enclosure) to do a pretty sizable upgrade. For those who are more concerned with the hugely useful nature of eGPU's rather than working to a budget, what briefly follows is an illustration of just how simple and powerful this concept has now got (read: No faffing about with EFI bootloaders and injecting code to manually manage PCIe allocation during the startup)! Components: 15” rMBP – Base Model MGXA2B/A (16GB DDR3 1600MHz Ram, 256GB SSD – thanks to eBay: upgraded to 1TB version, Intel Core i7-4770HQ CPU, no discreet GPU). Sonnet Echo Express IIID – Thunderbolt 2 enclosure, 1 PCIe 2.0 x16 physical (x8 Electrical Ports) + 1 x8 port + 1 x4 port. 300W power supply. Zotac GTX 980 GPU – Maxwell architecture, reported max TDP 165W! So installation-wise – I just installed Windows 8.1 pro as I would on any normal PC. This is the first MBP that I’ve worked with where it all just worked (although I suspect that is partly due to improvements in Win8.1). No blue screens, no reboots, just plug and play. I then used DiskPart to shrink the windows partition, created a new one and installed OSX. Only slight hiccup was that OSX Disk Utility couldn’t format the partition to HFS – quick install of Paragon Partition manager solved that one. No picure but I swapped out the 80mm fans that Sonnet supplied with the enclosure (anyone who has ever used a Sonnet enclosure will I’m sure agree that they use the cheapest fans known to man!) for a pair of Noctua NF-R8 redux-1200. Simple swap of the connectors to 2pin and mounted them on the outside of the enclosure to avoid them touching the GPU. Quick picture of the enclosure – no external PSU required, all power is provided by the internal PSU using a y-splitter to provide 2 x 6pin connectors. Benchmarked using the Firestrike test in Futuremark – seems to be a slight issue with the CPU reporting, assuming because of the newish rMBP build not being fully supported by the software? EDIT: Added full benchmark links to each of the 3d Mark tests: 3d Mark 06: http://www.3dmark.com/3dm06/17663590 3d Mark 11: http://www.3dmark.com/3dm11/8783566 3d Mark 13: http://www.3dmark.com/3dm/4230159

-
Yep, I saw the Geekbench uploads yesterday afternoon - excellent news in my opinion (although Im sure others will disagree). If this does come true and they retain the upgradability that is missing from the rMBPs, I will be ditching my early 2011 15" MBP for one of these...
-
eGPU on Thunderbolt? Easy? Worth it? [2012 15" rMBP]
MrHaPPyPiLLs replied to nop's topic in Apple eGPU discussion
Hiya, In my opinion, given that I didn't have any sort of budget cap for this project, it was very worth it! It was definitely not easy though and its taken me something like three months of work to get my systems running of which about 2.99 months was spent reading and understanding how PCI memory is allocated by the EFI or the BIOS before they hand off to the Operating System. I do intend on doing a write up on both the setups but again, after spending such a monumental effort on it, I kind of just want to enjoy using it for a while before throwing myself into that (I did take detailed notes though so it should be possible to do a dummy's guide style thing) For the system that you are looking at, these are the things that I would start off considering (I can't guarantee the accuracy of the information below, its what I managed to piece together and read from other people's experiences but it fits with the tweaks that I made to get it working): The 15" rMBP has two on-board graphics processor's which physically connect to the PCI controller in exactly the way that you don't want them to. the Mac EFI pushes the dGPU (NVidia 650M) into the primary VGA space and allocates its PCI memory first. It then initialises and allocates the memory of the other devices on the PCI buses and finally it then initialises the iGPU (HD4000). I believe the reason for this is the way that OS X handles the switchable graphics due to its App architecture. The problem is that Windows cannot correctly handle this switchable graphics system so when it comes to installing Windows 8 (or Win 7 for that matter) in EFI mode, it will quite happily utilise the HD4000 graphics driver, but cannot switch the internal display connection to the iGPU. If you want to read more about this issue, have a browse at Shelltoe's post - he has done a huge amount of investigatory work with this. I would add that the early 2013 rMBP that I have does not have any issue loading the driver for the iGPU but it does have exactly the same problem of shunting its output to the internal screen. The upshot of this is that you have four basic problems. 1) When you try and install Windows in EFI mode, you will get an annoyingly huge number of blue-screens. Just follow the install guide by Shelltoe and let it reboot itself. It will eventually battle through to full install and boot and from then on, you wont have this problem. I will stress that you have to be patient with this, on one install routine I had about an hour of constant blue-screens before it finally went through (on another one I didnt get a single one though so you might get lucky!). 2) Windows will always boot with the dGPU (650M) running and it cannot be disabled if you want to be able to use the laptop's internal display (by disabling, I mean disconnecting from the PCI controller as opposed to disabling the driver in Windows). 3) Windows can struggle to interpret the correct PCI Allocations from the EFI when you boot up with the eGPU connected. 4) You wont be able to get the internal sound card to run under Windows. To overcome the first just takes patience. The second again cannot really be overcome, you can however manage the situation by not installing an NVidia driver for the 650M. This will ensure that Windows just uses its basic VGA driver. Downside to this is that I couldn't use the thunderbolt port to connect to an external displayport screen. Upside is that the battery drain will be much more manageable. The third depends on whether you use an ATI or an NVidia graphics card in your eGPU. An ATI card requires that its PCI config memory space is 256MB contiguous whereas an NVidia card is able to run with its mem space split over three contiguous and smaller blocks totaling that same 256 MB so Windows is much more capable of arranging the PCI mem space automatically during the hand off from EFI. Basically speaking, if you get an NVidia card and you get Windows to install in EFI mode on your rMBP and, if its an early 2013 model like mine then you wont even need to perform the extra step that Shelltoe found to get it to run, it will absolutely just Plug and Play. If you get an ATI card, you will need to do a huge amount of work to manually allocate each and every one of the PCI devices in the EFI before it hands over to Windows. If this sort of thing sounds like fun then go for ATI, otherwise stick with NVidia (I've tested with a 660Ti) - I was mainly doing this partly as a technical challenge and a proof of concept so it was worth my time and effort - might not be the same for you. To do either of these using Windows installed in emulated BIOS mode is an absolute bastard! Unfortunately DIY eGPU setup 1.2 cannot negotiate the hideously complex PCI bridge structure that Apple built in the rMBP and so can't automatically allocate the PCI mem space using compaction (even if you set 36bit memory space and try and push any of the GPU's into it). This means that you need to do a huge amount of work to manually allocate each and every one of the PCI devices, it was like the ATI system above. I would not recommend that you even attempt this unless you are willing to put the effort in and really understand how PCI devices work... The good news is that it really makes no odds what sort of thunderbolt system you decide on - at the level they operate at, they are all just PCI bridges to the EFI and Operating System. I ended up being really happy with my Sonnet Echo Express Pro because it supports both daisy chaining of Thunderbolt Devices so I could add a Belkin Thunderbolt Dock into my system for extra USB 3 ports, external Sound Card and a second Gigabit Ethernet Port and also has two PCI-E bus connectors so I was able to add a large capacity PCI connected SSD into my enclosure for extra storage when I'm booted in OS-X (dead handy for the rMBP because of its upgrade restrictions. Running these extra peripherals in EFI mode is again plug and play but in BIOS mode requires each of these devices to be manually allocated as well. -
Could a Mod please close this thread - problem solved
-
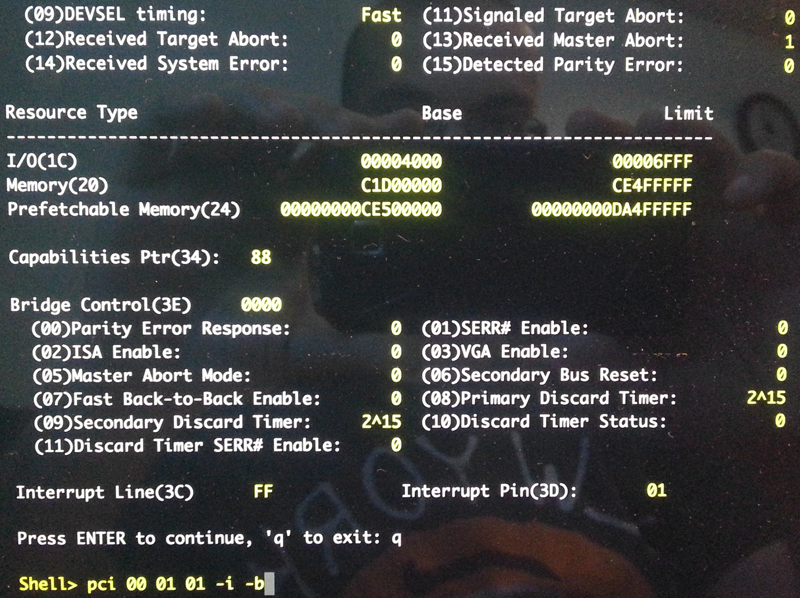
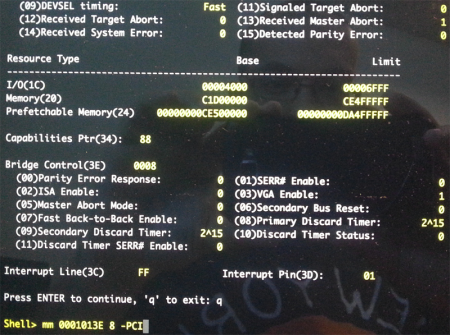
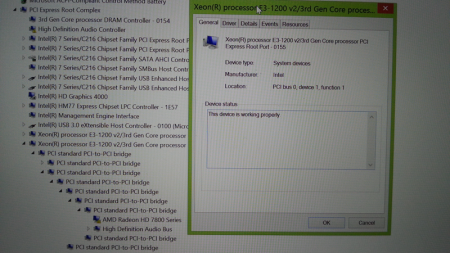
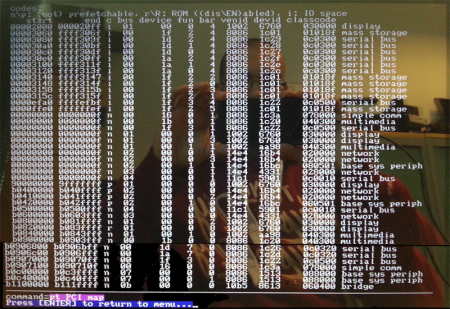
Hi all,I am really hoping that someone with an understanding of PCI Memory allocation will be able to help me finally get my eGPU setup running. Spec: Early 2011 15" MBP (core i7 2635QM @ 2.00GHz, 16GB Ram, Crucial 512GB SSD). iGPU - Intel HD3000. dGPU - AMD 6490M. eGPU AMD HD 7850 -> PCI Extender with break-out cabling for ATX power and PCI Powergood -> Sonnet Echo Express Pro (total overkill but I'd hoped for an easy install in the enclosure) -> Macbook Pro Thunderbolt port.I've made four seperate attempts to get this system to boot in EFI mode by doing the following:Windows 8 DVD EFI Boot = Fails to write boot code Windows 8 USB EFI Boot = Fails to write boot code Windows 8 EFI install on second laptop then transfer SSD to Macbook = Fails with well documented IRQ Not Equal error, even after disconnecting the Facetime Camera and removing the igdkm64.sys driver. Windows 8 USB EFI Boot using restore system image from working 15" Retina Macbook Pro = Fails with well documented IRQ Not Equal error same deal as above.At this point, I am pretty sure that EFI boot on this particular model is not going to work. I am aware that others have managed this but unfortunately, being an Apple product, there is likely a slight difference between their hardware architectures and mine that is causing this to fail.So I am relegated to working on a MBR booting Windows 8 system. I have DIY eGPU Setup 1.2 from Nando installed. I have previously tried on the same system with Windows 7 loaded, a DSDT override to create 36bit memory space but cannot get setup 1.2 PCI compaction to put this into use, the reason, I am told, being that this setup has got a large number of PCI bridges between the thunderbolt controller and the VGA card...I also tried to just disable every single device except the eGPU vga device and its bridges on all PCI buses based on posts saying that Windows might be able to set the memory space up itself by doing this. Unfortunately again this didnt work for me and I still had error 12 - not enough resources.I am now desperately in need to help to manually setup the pci.bat file so that I can set the contiguous memory block for the eGPU card.The Device locations are as follows: Device Name PCI Bus Device Function Xeon E3-1200 PCI Express Root Port 00 01 1 PCI Bridge 05 00 0 PCI Bridge 06 04 0 PCI Bridge 09 00 0 PCI Bridge 0a 03 0 PCI Bridge 0b 00 0 PCI Bridge 0c 02 0 AMD Radeon HD 7850 0e 00 0 I've used the Windows Device Manager to get this info because I really struggled to understand the PCI bus relationship using the text dump output from the PCI Dump tool in Setup 1.2. I've linked it (
-
rMBP 15" + Sonnet Echo Express Pro = No Joy
MrHaPPyPiLLs replied to MrHaPPyPiLLs's topic in Apple eGPU discussion
Ok, it now works - Once I'd spent about three weeks understanding and tabling the PCI configuration space that the whole system needed, I was able to manually set these in the EFI shell and then automate the whole thing. You can achieve the same effect in BIOS boot using Setup 1.x and a manually created pci.bat (as I was forced to do on the early 2011 15" MBP that I have also got it running on). One thing to be very aware of between the 15" and 13" rMBP and MBPs is that the MAC EFI forces the discrete graphics to be the primary graphics so installing Windows in EFI mode cases a huge number of IRQ NOT EQUAL blue screens. With patience and reboots, it is possible to get it installed - it wont blue screen once you've got it running. -
rMBP 15" + Sonnet Echo Express Pro = No Joy
MrHaPPyPiLLs replied to MrHaPPyPiLLs's topic in Apple eGPU discussion
Hi Mate, thanks for the reply. Your DSDT Override instructions were spot on! I managed to get the Large Memory block but unfortunately I haven't then managed to get the PCI compaction working using Setup 1.2. I've had a PM from Nando advising manually creating the pci.bat as done by @kloper (here) rather than letting Setup 1.2 do this automatically so that will be my next step. Fingers crossed -
rMBP 15" + Sonnet Echo Express Pro = No Joy
MrHaPPyPiLLs replied to MrHaPPyPiLLs's topic in Apple eGPU discussion
Right, got the bits installed into a nice enclosure so now to get it working...
-
rMBP 15" + Sonnet Echo Express Pro = No Joy
MrHaPPyPiLLs replied to MrHaPPyPiLLs's topic in Apple eGPU discussion
Ok, update time again... Tried the simplest option first... Used Win8 USB recovery tools and restored EFI image that I'd made previously - well worth noting that this worked perfectly, exactly the same as when run on PC: select the repair option, then advanced, then restore system image from USB disk. So I didnt have any issues booting into Win8 so I tried to disable the HD4000 but strangely this caused corruption and I couldn't get back into Win8, even in safe mode). So I re-imaged again and then renamed (rather than deleted just in case) the igdkmd64.sys driver file per Shelltoe's instructions, a few reboots and cold boots just to ensure stability and then hooked up the eGPU. Unfortunately this left the same problem, Windows starts to boot up to the rotating circle of dots but then just sits there spinning away. Now onto the better news. Following the wiring guide created by @MystPhysX (here) I have created and tested a wiring loom, very straight forward to make using cheap bits bought from eBay (when I get this working and do a guide, Ill detail further). When using this to power the GPU directly from an ATX PSU, I can EFI boot into Windows, get the drivers installed and am now just stuck with the last hurdle which is error12. Now I've got to this stage, I've just tidied the whole thing up, using epoxy resin to secure the wires into the wiring blocks and seal off all of the open ended wires etc. and have ordered a nice sff ITX case (Fractal Design Node 304 if anyone's interested + I can use the case switch to control the ATX power on pin ) to install all of the pieces into ready to get this finally running. Next week, once everything is installed into its new enclosure, Ill be playing with a few options to complete the project, these are the ones I've come up with so far... 1) Disable various devices on the PCI-E buses and see if this clears enough resources. 2) Go back to the MBR booting Windows8 machine with DIY eGPU setup and try the compaction method to free up the necessary resources. 3) Cry, since my bit of searching around the forum doesn't seem to reveal anyone else struggling with error 12 on an EFI booting rMBP (then I'll grovel for help!) -
rMBP 15" + Sonnet Echo Express Pro = No Joy
MrHaPPyPiLLs replied to MrHaPPyPiLLs's topic in Apple eGPU discussion
Just wanted to say big thanks to both of you for taking the time to assist... I'm actually going to try both suggested routes; @Tech Inferno Fan, I have just ordered a PCI e extender, a nice low profile atx case to put all the bits in and some spare connectors/cables. This is going to take a few days to arrive so in the meantime I am going to go back to the EFI setup as recommended by @Shelltoe. I actually have a couple of different MacBooks now so will keep one with MBR boot and one with EFI boot so I can test with both setups. If I manage to get the EFI setup working, I will try and put together a guide for anyone following in my footsteps -
rMBP 15" + Sonnet Echo Express Pro = No Joy
MrHaPPyPiLLs replied to MrHaPPyPiLLs's topic in Apple eGPU discussion
Ok, update time... So I've now tried a different tack: 1) Install OS X then run bootcamp assistant and use it to install Windows 8 Pro 64bit in BIOS mode (hybrid partition style). 2) Bought a copy of DIY eGPU Setup 1.2 from Nando and installed it. This gets me no further unfortunately as, when I power up the rMBP with the Sonnet Echo Express connected with one of the three GPUs I've got for testing installed, it wont even get past the Grey Screen. If I disconnect the enclosure and boot, then I can get into the eGPU setup menus. If I get into the eGPU setup menu and then connect the enclosure, no amount of fiddling with settings that I can get my head round will get the setup system to detect it. I think the problem I have is that (unless I'm being blind here) no one has used the Sonnet Echo Express Pro combined with an MBP yet so there aren't any guides out there for exactly how to go about getting this to work. If there is any chance that someone with some experience with these setups could provide even a quick pointer, Id be very grateful. Thanks in advance (hopefully)...