Leaderboard


Popular Content
Showing content with the highest reputation on 02/12/19 in all areas
-
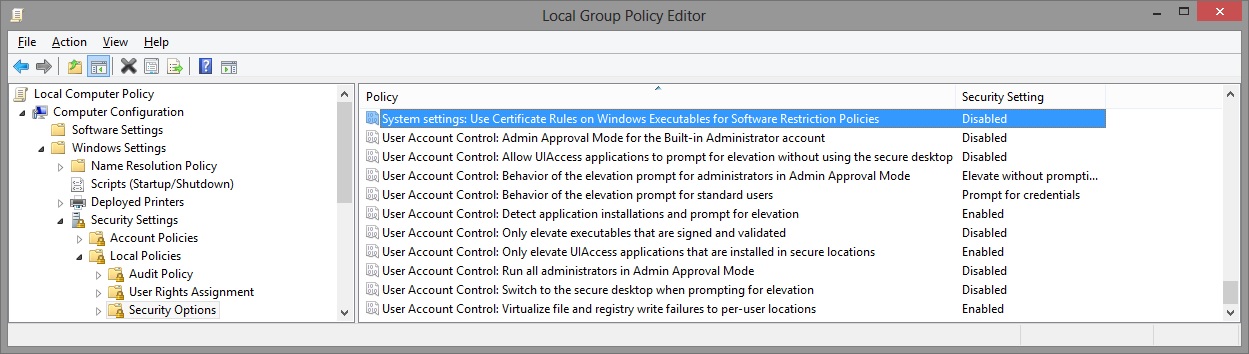
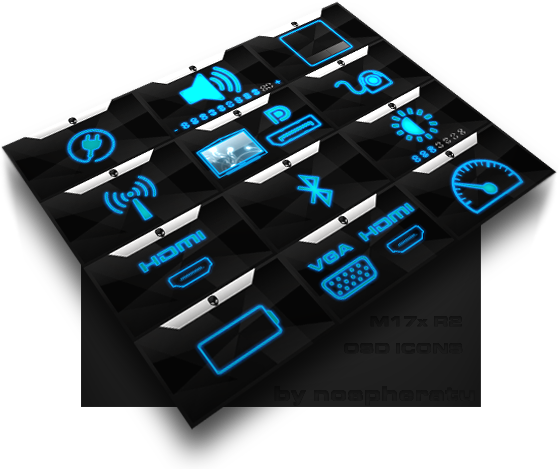
I've recreated the OSD Icons for the R1/R2/R3/R4 and R5 aka 17 as the standard ones are a bit dated. It should also work with the M15x though as my old M15x had the same setup for the OSD app. Regarding the R3 OSD, it seems its the same install for the M18x as well so it should work for you M18x owners too. I've also added the AW 17 OSD to the list. This exe is also compatible with the 14 and 18 as Dell uses the same OSD for all the new machines. There's also a set for you Area-51 m17 R1 owners. I've tried to give it a simular feel to the Invader Icon pack by Alienware. Hope you guys like it Install Instructions for R1 1. You need to end the OSD process in Task Manager since it may be using some of these icon files. Ctrl+Shift+Esc then find the OSD process and end it. 2. Backup your current icons if you want to revert to the originals (You can also uninstall and re-install the OSD application if you want to go back to the original icons) 3. Extract the attached "M17X R1-R2 & M15X.zip" contents to C:\Program Files (x86)\OSD\picture\. Overwrite if prompted. 4. Restart the OSD application. It is located in C:\Program Files (x86)\OSD\Launch.exe 5. Done! Install Instructions for R2 /M15x 1. You need to end the OSD.exe process in Task Manager since it may be using some of these icon files. Ctrl+Shift+Esc then find "OSD.exe" and end the process. 2. Backup your current icons if you want to revert to the originals (You can also uninstall and re-install the OSD application if you want to go back to the original icons) 3. Extract the attached "M17X R1-R2 & M15X.zip" contents to C:\Program Files (x86)\OSD\ICONs\. Overwrite if prompted. 4. Restart the OSD application. It is located in C:\Program Files (x86)\OSD\Launch_OSD.exe 5. Done! Install instructions for R3 / R4 / M18x 1. You need to end the OSD process in Task Manager since it may be using some of these icon files. Ctrl+Shift+Esc then find the AlienwareOn-ScreenDisplay.exe process and end it. 2. Backup the existing AlienwareOn-ScreenDisplay.exe by renaming it to "AlienwareOn-ScreenDisplay.exe.BAK" for example. Its in C:\Program Files (x86)\Alienware On-Screen Display\ 3. Extract the AlienwareOn-ScreenDisplay.exe from the appropriately named file depending on your OS and model to the C:\Program Files (x86)\Alienware On-Screen Display\ folder. 4. Restart the OSD application by double-clicking the file. 5. Done! Install instructions for 14 / 17 / 18 ** 1. You need to end the OSD process in Task Manager since it may be using some of these icon files. Ctrl+Shift+Esc then find the AlienwareOn-ScreenDisplay.exe process and end it. 2. Backup the existing AlienwareOn-ScreenDisplay.exe by renaming it to "AlienwareOn-ScreenDisplay.exe.BAK" for example. Its in C:\Program Files (x86)\Alienware On-Screen Display\ 3. Extract the AlienwareOn-ScreenDisplay.exe from the "AW 14-17-18 (Windows 8).zip" file to the C:\Program Files (x86)\Alienware On-Screen Display\ folder. 4. Restart the OSD application by double-clicking the file. 5. Done! The Area-51 m17-R1 install should be similar to the steps for the other laptop revisions above. They all basically follow the same process anyway, apart from filenames/paths. @robby_hd was kind enough to make a red version of these icons for the M17x R3 / M18x R1 which can be downloaded from his post here. **There seems to be a security issue with Windows 8/8.1 at this point in time since it doesn't allow modified exe's. I will update this post with a solution once it has been found. Also a few Alienware owners are having an issue with the unmodified OSD and Windows 8. Only the default Windows 8 OSD displays and not the Alienware version. Try the solution posted by Dell here and then attempt installing the mod. The below screenprint is a workaround by editing the security policies to allow the unsigned exe to run in Windows 8. If you are not aware of what these settings do and the repercussions of changing them, please do not attempt it. - Open the Group Policy Editor by typing "gpedit.msc" in the search or run text box. - Duplicate the settings below. Area-51 m17-R1.zip M17X R1-R2 & M15X.zip M17X R3-R4 & M18X R1-R2 (Windows 7).zip M17x R4 & M18X R2 (Windows 8).zip AW 14-17-18 (Windows 8).zip M17X R4 & M18X R2 (Windows 8.1).zip

 1 point
 -
[revised by svl7, 01/22/12] Here are some unlocked versions of the M18x BIOS, this means all the hidden BIOS menus are now available. This allows you to further tweak and overclock your machine, but some settings are very advanced and not meant to be touched by the average user, so use it with care and common sense. Unfortunately quite some of the links which were previously posted here are now invalid due to what happened with megaupload. I will try to recollect all the files and get fresh links, so I can provide the complete collection. Here's what's available for now: [unlocked] M18x BIOS A03 [unlocked] M18x BIOS A04 both modified and provided by Ahmed from BIOS-Mods, a big thanks to his amazing work! Consider buying him a drink for all the effort! [unlocked] M18x BIOS A05 modified by @svl7 After flashing, go to the BIOS menu and load the default settings to prevent possible issues. As always with such mods, you are responsible for what you do to your system, use at your own risk. M18x - A05 unlocked.zip1 point
-
Hey Everyone, Well, I was FINALLY able to MOD a fully UNLOCKED A05 Bios for the m18x R1. I created several BIOS's that have the following Intel Raid OpRom v10.5, 11.2, 11.6, 12.9, 13.5. I'm told that 12.9.0 is the BEST version to use with our m18xR1. Also, these ROMS are modded to give TRIM on a RAID0 system! I've tested it and can confirm it does work! I also have an intel ME Firmware upgrade that you can do, as well, but I only sugest people that know what they are doing use it. Only because, for some reason, if you flash the ME firmware, then the Bios, there is a problem and you can brick your ME Firmware. (You'd need a new motherboard). It locks your firmware. Anyway, if you flash the bios that you want, and not even deal with upgrading the ME, then you're fine. But, if you do the ME firmware upgrade like I did, if you flash and bios's, you will need to downgrade the FW, before any BIOS flashing... (I THINK). In any case, you may just want to stick with the BIOS upgrade, as this will give you TRIM in RAID0 support (confirmed with trimtool). If interested, please let me know! Thanks, Swick1 point
-
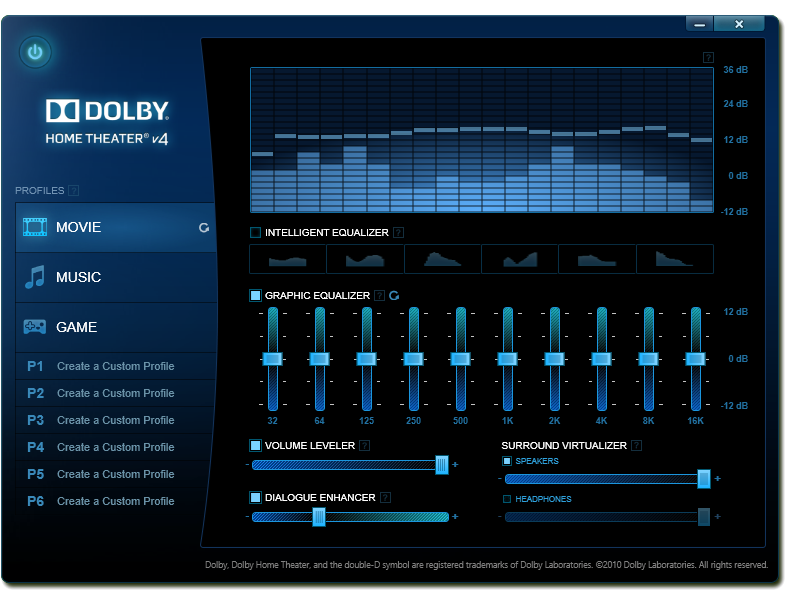
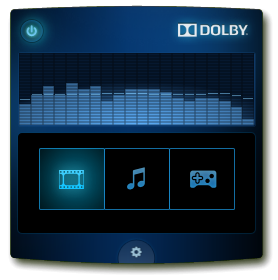
Dolby Home Theater v4 - M17x R2 and IDT High Definition Audio So I decided I needed a headset with a mic and I'm a sucker for matching peripherals so I set my sights on the TactX headset (Rebranded SteelSeries 5HV2). There's some pretty appalling reviews of it online but I have to try them out for myself. One of the "problem" areas is an apparent lack of bass since its tuned for FPS gaming. In preparation I figured I should get some sound enhancement software. I've been using the Dolby Home Theater v4 application on my HTPC with a Xonar DX soundcard and its very effective particularly with movies and it's volume leveler feature. All processing effects can be switched off for music by just switching profiles using a handy system tray utility so its very convenient to use. You can read more about it on Dolby's official page. System Tray Utility I'm not sure if many users are still soldiering on with the M17x R2 but heres a fix if you wanted the use the Dolby Home Theater v4 application. Support for the IDT High Definition controller used in this machine is non-existant. The only driver I could use was the one's directly from Dell (apart from this Dolby Driver) so I hope this is of some help to fellow M17x R2 users who are looking for more customisable sound. I've replicated my steps a few times and I'm fairly certain should work without isue on an Alienware M17x R2 with Windows 8.1 as that's what I'm using. You could give it a try if you have an onboard IDT HD Audio card as well. Fixing the INF for use with an IDT High Definition Audio sound card 1. Uninstall all audio applications/drivers and reboot. Windows should install the default "High Definition Audio" driver. 2. Download the installation files from here. Extract the rar. 3. Extract the "Dolby PCEE Drivers.msi" installation file using msiexec and the command line. eg... msiexec /a "C:\Dolby PCEE Drivers.msi" /qb TARGETDIR="C:\Extracted Dolby PCEE Drivers" 4. Using the above extraction path as reference, go to C:\Extracted Dolby PCEE Drivers\Dolby PCEE Drivers\Drivers64\Release. You should see a file called PCEE4-DHT.INF 5. Open the file and find and replace all occurances of HDAUDIOFUNC_01&VEN_11D1 with HDAUDIOFUNC_01&VEN_111D. Save and close. 5.1 Optional depending on whether you're running Windows 8.1. Reboot with Driver signing off. ie. Hold down Shift when clicking Restart. Select Troubleshoot->Advanced Options->Startup Settings. Click Restart. Once the machine reboots press F7 at the Startup Settings screen to Disable driver signature enforcement. 6. Go back to the extracted Dolby PCEE Drivers folder and run "Dolby PCEE Drivers.msi". Select the "DHT(release)" driver. You should be prompted on whether to install the driver or not, select Install. Your drivers should now be installed. If you're using another machine (not an M17xR2) with IDT HD Audio and can hear a marked difference in sound when you go to your Playback Device's properties and switch between the Dolby profiles on the Dolby tab you can go ahead and install the "Dolby Home Theater v4.msi" application. If you do not have the Dolby Tab under your speaker playback device and have the Enhancements Tab instead read on. At this point if I plugged in a pair of Headphones into the 2nd or 3rd audio jacks, the Headphones properties under Playback Devices contained the Dolby Tab and the Dolby effects were working with the headphone playback devices. Enabling the Dolby Tab and effects on the Speaker Playback Device 1. Open regedit and go to HKEY_LOCAL_MACHINE\SOFTWARE\Microsoft\Windows\CurrentVersion\MMDevices\Audio\Render. There should be multiple entries here. Expand the entries and look for the ones with both "FxProperties" and "Properties" keys. To identify the Speakers playback device one of the "Properties" key values will have a string value called "{a45c254e-df1c-4efd-8020-67d146a850e0},2" with a data value of "Speakers". We're interested in the "FxProperties" key above this "Properties" key. 2. Under this "FxProperties" key, delete all values apart from (Default). 3. Copy and paste the below to Notepad making sure to change ****** to the name of the parent key of that particular "FxProperties" key. eg. Mines was called {36018a56-954a-437d-8bdb-0b6bbf830dbc}. The name will vary as it changes with every driver install. Windows Registry Editor Version 5.00 [HKEY_LOCAL_MACHINE\SOFTWARE\Microsoft\Windows\CurrentVersion\MMDevices\Audio\Render\*********************\FxProperties] "{b725f130-47ef-101a-a5f1-02608c9eebac},10"="Dolby PCEE4" "{d04e05a6-594b-4fb6-a80d-01af5eed7d1d},3"="{C53E5AAF-5F6F-41c2-9F63-ADEBBC9B6B64}" "{d04e05a6-594b-4fb6-a80d-01af5eed7d1d},0"="{00000000-0000-0000-0000-000000000000}" "{d04e05a6-594b-4fb6-a80d-01af5eed7d1d},1"="{BC8E3B67-3306-4eef-B230-6798E9A67F0B}" "{1da5d803-d492-4edd-8c23-e0c0ffee7f0e},5"=dword:00000000 3. Run this reg file and select yes when prompted on whether you want to add this information to the registry. If you have a look at the same "FxProperties" key again you will notice the above values have been added. 4. Reboot the machine. 5. You should now have Dolby effects working on your speaker device. Install the "Dolby Home Theater v4.msi" and you're done! Notes: The effects are only really worth while if you're using headphones, the M17x R2's speakers aren't that good. So this exercise is a bit pointless really. I'm not a fan of processed sound but what really annoyed me was that the effects only worked when the Headphones were plugged in. Hopefully some of you guys enjoy it. Credits: I'd like to thank @fr33jack from guru3d forums for providing the install files on his post here and @epguy19 also from guru3D for pointing out the flaw in the drivers INF for the IDT device ID on his post here. I'd also like to thank @erp-ster7n from the laptopvideo2go forums for the insight into the enhancement tab mods with his post here. DISCLAIMER: Perform this modification at your own risk. I take no responsibility for any damage caused by technical error, user inexperience or stupidity.
 1 point