Leaderboard


Popular Content
Showing content with the highest reputation on 11/20/17 in all areas
-
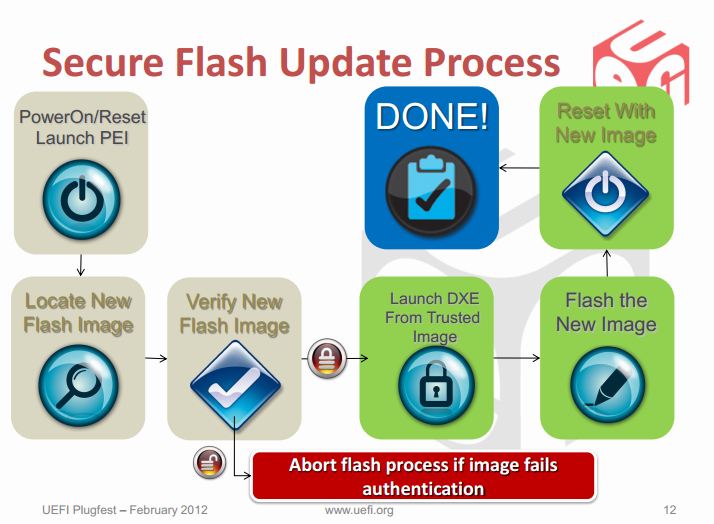
********** * This is only for systems with Intel chipsets. * * It still won't work for all of them, but for some it does. * This article is meant as an explanation for interested / advanced users. Since some of the more recent bios mods require the tool described below in order to allow flashing, I decided to share some information about it. Also I really don't like how users get locked out of their own hardware, this is a way to circumvent a couple of the more recent restrictions of certain systems. I hope this will be useful to some of you. If you know other ways to get around the current firmware updating restrictions (per software), please let me know. The problem: With the appearance of Windows 8 and Microsoft's requirement for OEMs to support 'secure boot' in order to get the Win8 certificate for their machines, a lot of the most recent systems (notebooks and desktops) use now firmware which is digitally signed. Since secure boot looses its purpose if firmware updates aren't verified and protected as well, the latest UEFI implementations come with a secure firmware upgrading procedure which makes sure that only properly signed and unmodified images can be flashed. This updating protections is active even if you don't enable secure boot. These two pictures explain the idea behind secure firmware updating very clearly: On the second picture you can see that the system verifies the firmware image even before it loads the drivers required for the flash. For bios modders or people who want to use modified firmware, the consequences of this are severe. It simply isn't possible anymore to flash digitally signed bios which have been modified, there's no way around the signature, at least not with the usual tools. The solution (at least for some systems): The only way to get around those new restrictions is to directly program the firmware flash memory and therefore leave out the verifying of the image. In Intel systems the flash chip is directly wired to the PCH, and it can be accessed by an Intel utility called Flash Programming Tool. It's a very powerful application which supports the most common flash memory chips. The requirement for it to work on a system are the following: - BIOS region of the flash memory must have write permissions - The OEM or BIOS vendor omitted to set an additional flash lock. - You can't flash an encapsulated firmware image, only the pure bios region. You will have access to the BIOS region for obvious reasons, but the second point can only be figured out by trying to flash a BIOS. If the tool comes up with an 'Error 28', download the attached 'prr' utility, as well as the DOS version of the flash tool. Put both on an USB drive which can boot DOS, boot from it and execute the prr.exe, if it manages to remove the protection on your system it will tell you 'ready to flash', in this case go ahead and directly flash with fpt, without rebooting before doing so. If prr can't remove the protection you're most likely out of luck, even though might be ways for certain systems, but the chances are pretty small. In order to flash a BIOS you will need to remove the capsule from the firmware image provided by your system manufacturer. You only want to update the bios. Then flash it by using this command: fptw64 -f FILE -bios (FILE stands for the image you want to flash) ***WARNING*** This tool is only for very advanced users. If you mess up it will override your BIOS without a warning or waiting for you to confirm. This means you can easily brick your system beyond any chance of recovery. You most likely don't need this tool. My BIOS mods which require this application for flashing will always come with a .bat file which will do the flashing for you. Again, for 99.9% of the users there's no need to mess with this. This version of the tool works only for 7 series chipsets. *InBeforeOmgMyYystemWontBootAnymore* The tool provided here by svl7 (prr2.exe and former prr.exe) may not be hosted anywhere outside of Tech|Inferno without the previous approval of the author. FPT_DOS.zip Fptw64.zip prr2.zip

 1 point
 -
Hey guys, This is a thread for sharing what you have learned about configuring a graphics card using Gerald's Y510p Ultrabay Graphics Adapter. It was created to make it easier for new users to find the information they need to successfully configure and use the adapter on their computer. I consulted Gerald before creating this thread. Please feel free to post information, insights and tips below. The Y510P Graphics Adapter What is it? The Y510P Graphics Adapter is a card which will allow you to use a full-length PCIe desktop graphics card with a Lenovo Y410p or Y510p laptop. It plugs into the device's Ultrabay. This is the swappable device bay which is, for instance, used for the second NVIDIA card in Y510P SLI configurations. Please be aware that the Y510P Graphics Adapter is currently only compatible with the Y410p and Y510p. It is not compatible, then, with the Y500 and other Lenovo or IBM laptops that feature an Ultrabay. The Y510P Graphics Adapter was developed by Gerald, a member of this forum. What it needs to run - hardware In addition to the Y410p/Y510p laptop itself, the Y510P Graphics Adapter requires a separate power supply unit (known also as a PSU) to provide the graphics card with electricity. An actual PCIe graphics card is, of course, also required. If you are going to use the power supply unit to power the Graphics Adapter and the graphics card plugged into it only, a 450-watt unit will likely suffice, at least for current graphics cards. While graphics cards manufacturers may advise you to obtain a more powerful PSU, this is because the PSU would normally also be used to power other components, such as the hard drive and CPU. Note that the Radeon RX Vega 64 and R9 Fury X are exceptions to this rule, as they have been shown to draw close to 500 watts of power when they are under a lot of strain. Please note that without further modifications only AMD graphics cards will work, due to checks that are carried out by the computer on startup. High_Voltage has made two mods which should allow you to use an NVDIA card with the Graphics Adapter: a BIOS mod and a hardware mod: * Thread on the BIOS mod: https://www.techinferno.com/index.php?/forums/topic/12014-lenovo-y410py510p-bios-mod-to-enable-nvidia-egpu-support/ * Post on the hardware mod: https://www.techinferno.com/index.php?/forums/topic/9686-y510p-ultrabay-graphics-card/&do=findComment&comment=163854 Please be aware that flashing your BIOS is potentially dangerous, even if the BIOS you are installing is an official version. To minimise the risks, always back up your data first and make sure that your laptop is fully charged and connected to the electrical grid before you start the flashing process. What it needs to run - software Three versions of the Y510P Graphics Adapter exist: * Version 1: this is the experimental version which Gerald originally posted about. * Version 2: this is the version that Gerald sold in 2016 and part of 2017. It requires BIOS version 2.07 and Windows 10 to function. Earlier BIOS versions may also work. * Version 3: this is the version Gerald is selling at the moment of writing. Thanks to a discovery first posted to the forums by user David 'Soap' Washington, it should work with any BIOS version, as long as one uses an AMD graphics card rather than an NVIDIA one. It may also work Windows 7, 8 and 8.1, in addition to Windows 10. I am currently using this version of the adapter with Windows 10, using BIOS version 3.08. Videos on installing and using the Y510P Graphics Adapter Note that these videos only illustrate the installation process and performance with AMD cards. * Installing the adapter: - By Tesla: a general introduction on Version 2 of the adapter and how to install it: https://www.youtube.com/watch?v=KL7muHXsAmI - By ManyStrongWords/Go'Vic Gaming: a video on installing Version 2 of the adapter: https://www.youtube.com/watch?v=4pviqwFRDn4 * Gameplay/performance: - By Tesla: using an AMD RX 470 with the adapter: https://www.youtube.com/watch?v=SqdDeZ0UCgc - By me: using an AMD Vega 56 with the adapter: https://www.youtube.com/watch?v=PVbsib8eHRg&t=25s Other useful videos * Removing the Y510P Ultrabay, by Someone7089: https://www.youtube.com/watch?v=tYcVlaMV0Ig Example of a configuration using the adapter My own configuration consists of the following: * Lenovo Y510P with an Intel Core i7-4700MQ CPU, 16 GB RAM and an Intel SSD hard drive; * iiyama G-Master GB2888UHSU 4K monitor; * Gerald's Ultrabay Graphics Adapter, version 3; * AMD RX Vega 56 graphics card; * Corsair 450W PSU; * OS: Windows 10 Creators' Update. Below is an overview of the steps I had to take to get this configuration to run well on an existing Windows 10 Creators Update install. Note that when I installed a fresh copy of the Fall Creators Update, Windows automatically recognised my hardware, monitor included, and I did not have to disable the other graphics adapters. I do find I sometimes have to reinstall the graphics drivers, as updates in AMD' s driver package sometimes result in The Witcher 3 crashing when a cutscene is played. ***** In order to get my configuration to run well on an existing Windows 10 Creators Update install, I had to do the following: * Run the monitor at its native resolution. * Install the appropriate driver for the monitor, instead of the generic one provided by Microsoft. * Disable both the NVIDIA GeForce GT 755M and the Intel HD Graphics 4600 display adapters in the device manager. Note 1: removing the drivers for your Intel and NVIDIA display adapters is unnecessary. It is also likely to be futile as, ultimately, Windows may reinstall the driver even if you disable automatic driver updates. Note 2: an HDMI connection with your monitor should work just fine without you disabling the Intel HD Graphics 4600. A Displayport connection, however, will probably only work as intended if you do disable the Intel display adapter. If you do not do this, Windows will completely duplicate the video output displayed on the internal monitor on the external monitor, including the internal monitor's resolution. Note that this is not the ordinary 'duplicate screens' feature as there is no way to disable it until the Intal graphics adapter is disabled. A Displayport connection is generally preferable since most Freesync-capable monitors do not support Freesync over HDMI. Also, AMD cards usually do not output colour depths over 8bpc over HDMI connections. Note 3: should you find that the backlighting of the internal monitor remains on even though only the external monitor is active, all you have to do is press the FN and F2 keys at the same time. This will switch off the internal monitor.1 point