Leaderboard


Popular Content
Showing content with the highest reputation on 03/14/17 in all areas
-
Version 1.0.0
114 downloads
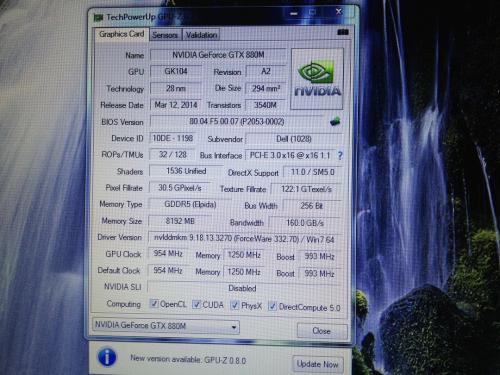
Klem's_vbios_DELL_GTX880M_80.04.F5.00.07_UNLOCKED.rar For 8Gb card. 1. Unlocked Nvidia core limit +135 MHz. 2. Unlocked core voltage adjustments. 3. Unlocked Power Limit. 4. Unlocked Power adjustment by software (for example with Nvidia Inspector). 5. Increased Power Limit and Power Target. 6. Enabled some additional tweaks. If you liked my mod, you can buy me some beer: https://www.buymeacoffee.com/timqsh1 point -
Consider this before purchase Tech Inferno Fan>> I recommend a slightly pricier BPlus PE4C V3.0 over any EXP GDC product as it has no Gen2 expresscard signalling issues when tested on my Dell E6440. The EXP GDC V6 does glitch occasionally with a "NVidia driver has stopped responding" with the manufacturer unwilling to supply an updated Beast product for review. I'm therefore assuming the problem isn't corrected in the newer version. 11-Nov >> Note: Beast product not integrated into purchasing guide below as yet. Comparison: EXP GDC Beast versus V7 (Ares) versus V6 -> Beast is the best!! The "BEAST" edition being the newest unit being that integrates all the desirable features of V6 (excellent connector positions, USB connector) with the best of the V7 (150W DC jack, x2 link support) and adding a new honeycomb acylic enclosure option as well as a new secondary boot delay (CTD - presumably CLKRUN). You'll note that Cloud is offering a Paypal purchase option in his aliexpress (English) store. These being the links of interest: Ê×Ò³-ÊýÂ빤³¡-ÌÔ±¦Íø (Chinese customers or Yoybuy taobao agents) hero cloud's store - Small Orders Online Store, Hot Selling set game card,mini iphone memory card,card reader writer software and more on Aliexpress.com (English/ROW customers) Comparison: EXP GDC V7 (Ares) versus V6 V7 has a 150W rated round DC socket, has a new NGFF.M2 (x2 2.0) adapter option and new enclosure options. V6 has better positioned power connectors AND has the USB port, though USB port has been reported as being flakey. No rating on the round DC socket suggests it's good for 75W slot power. Both use the same (BIG) 8pin jack for the DA-2 220W Dell AC adapter so will have no problems with either V6 or V7. V6 is better for standalone EC/mPCIe use with the 220W Dell DA-2 without an enclosure as gives a tidier cabling layout. The 220W DA-2 can power up to a GTX760/670/680/970/980. A 229W GTX770 could be accomodated if prepared to undervolt/underclock with MSI Afterburner software to get full load stability. V7 would be better if wanting to use say a smaller 150W AC adapter (GTX750Ti/660/970), use a NGFF.M2 PCIe slot, or want the new enclosure option. Why US$83-shipped 0W PE4C V2.1 is better than a US$50-shipped 0W EXP GDC V6? | Why US$134-shipped 220W PE4C V2.1 is better than a US$99-shipped 220W EXP GDC V6? Picture comparison: Download >> PE4CvsEXP + Tech Inferno Fan has found clean Gen2 signalling of the PE4C V2.1, whereas EXP GDC V6 has unreliable glitches + Has a PM4N socketted mPCIe option + BPlus have a history of delivering quality products to the DIY eGPU community. + Easier to purchase with quicker delivery + Has H1PA option -> can connect to a desktop PC to extend the slot + Has a x2 link option, though this is primary for users with 1st gen i-core or older systems. Intel locking down 2nd Gen i-core or newer systems to prevent that. + Has locking x16 slot + Support two delay switch (PCIe Reset Delay and CLKRUN) to avoid registration problems when booting + 0W BPlus offering includes the special PCIe power cable that the EXP GDC V6 0W package does not Why EXP GDC V6/V7s better than PE4C V2.1? + 0W US$50 offering is far more affordable. Their a user sources their own ATX PSU to drive the adapter. + import tax free for some EU countries + Dell DA-2 native input cable -> Customer can buy the PSU locally in their own country -> corrected in PE4C 2.1. It too has a native DA-8 8-pin input. + Rubber protected (re-enforced) mPCIe/EC cable + Very good shape of adapter + V7 has a x2 2.0 NGFF.M2 PCIe connector option + V7 has very stylish enclosure options Disadvantages: - V6 had some quality issues: USB port power, faulty mPCIe/EC cables, PCI Reset Delay faulty on some samples - logistics/delivery/purchase is more complex via Taobao agents like yoybuy - No x2 link option where can combine EC+mPCIe or mPCIe+mPCIe (Series-5 1st gen i-core or older chipsets) -No nasty surprises like crazy import taxes, unlike similar products! IMPORTANT: When buying from Taobao agents such as Yoybuy, ask the agent for the original Taobao order number! This is needed when contacting Cloud if the item is damaged/faulty NEWS "Say Hello" to EXP GDC V7.0: M.2 / NGFF support! Link to yoybuy Metal enclosure for the EXP GDC V7.0 or ask for V6.0 Link to yoybuy now accepting , Packages EXP GDC BEAST w/o power supply: US$50-$53 (incl. shipping and ATX-cable): banggood Store - IMPORTANT: The 6-pin PCI-e power cable is nowincluded! - IMPORTANT: The ATX power cable is included EXP GDC BEAST w/o power supply: US$68 (64 + $2 + $2) (incl. shipping): Aliexpress Store - IMPORTANT: Don't forget to add the 6-pin PCI-e power cable EXP GDC BEAST & V7 NGFF complete package (including 220W power supply and PCI-e cable): US$99 (incl. shipping): Yoybuy Store - IMPORTANT: (Optional) Don't forget to add the ATX power cable (if you intend to use GPU's higher rated than 220W) - IMPORTANT: When asked for extimated weight, use 2000g (2Kg) - IMPORTANT: 195W GTX680 would be the highest rated card to use with this 220W AC adapter. 229W GTX770 requires undervolting. - INFO: Sonek's post for images of complete package content. Accessories 6P-pin PCI-e power cable EU Coolermaster: 6-pin to 6+2pin, modular flat cable US Coolermaster: 6-pin to 6+2pin, modular flat cable US eBay: 6-pin to dual 6-pin, modular cable ATX power cable: Yoybuy Store Acrylic enclosure EXP GDC V6.0: Yoybuy Store | enclosure images by bichael and shared by Tech Inferno Fan Metal enclosure EXP GDC V7.0 (or ask for V6.0): Yoybuy Store WARNING: Some users had tried hooking up a regular PCIe 4-pin cable straight to the EXP GDC (8-pin/DA-2 power socket), this is very dangerous and will cause fire and harm/destroy your EXP GDC, GPU or System!!! The DA-2 interface has reverse polarity compared to PCIe power interface which means you will be shorting 12V -> GND & GND -> 12V. Use the ATX power cable: Yoybuy Store Video Review Donations for video? Recommend to not donate to the author of the video as he suggests. Instead donate to any of the members who have been pivotal in delivering eGPU content: Tech Inferno Fan, kizwan, angerthosenear, jacobsson to name a few. Metal enclosure for the new EXP GDC V7.0.
 1 point
 -
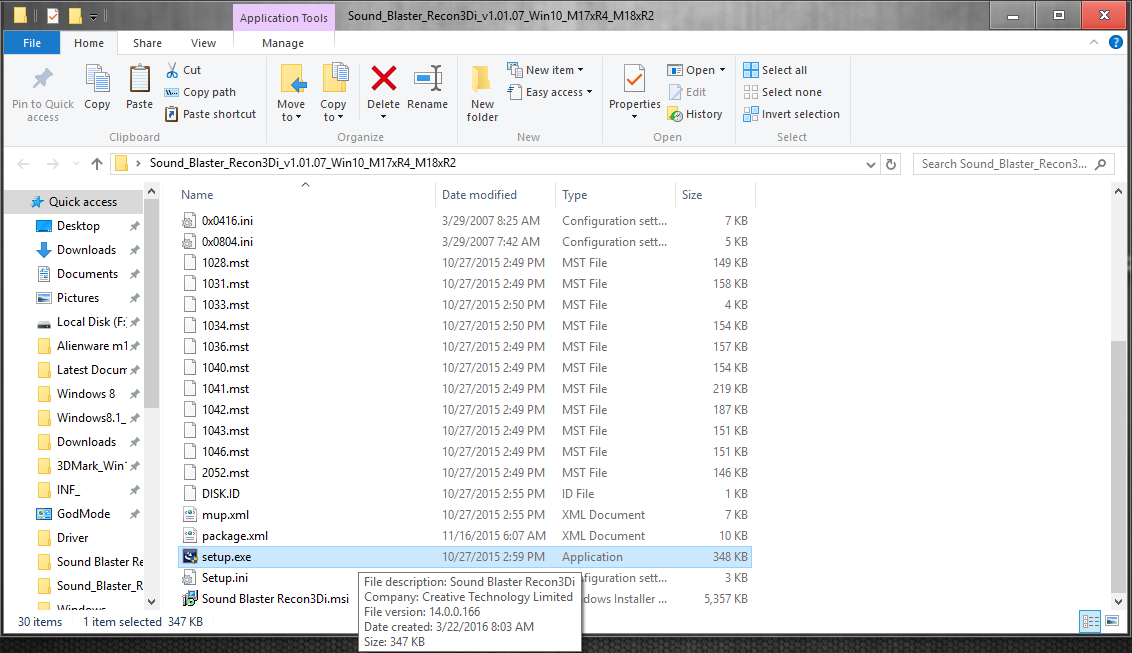
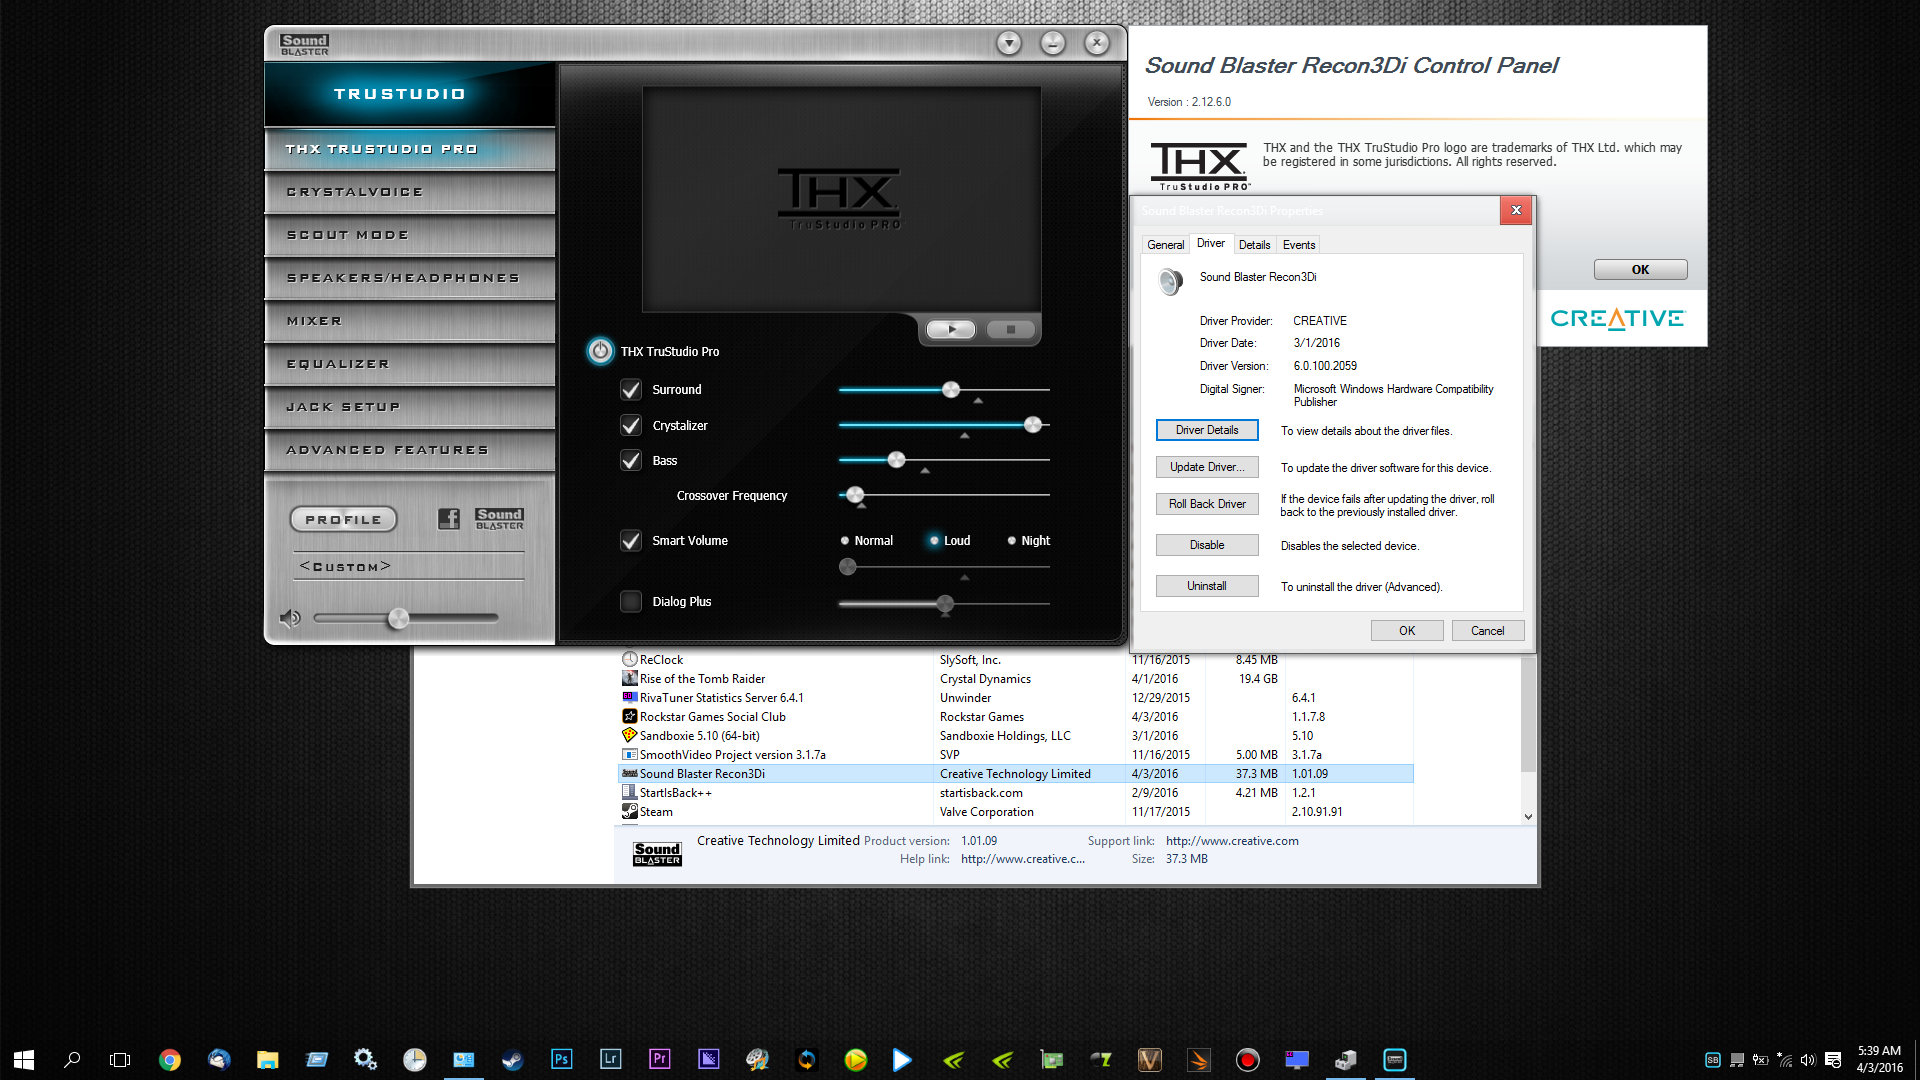
Creative SB Recon3Di full package, for both M17xR4 & M18xR2 - Win10, Win8.1 & Win7. Improved sound quality, latest CPL, Dell EQ + Audio Drivers...incl bloatware [Optional]. Clean Install option: Device manager -> uninstall Creative audio drivers (check delete driver and software) . Programs and Features -> uninstall Recon3Di -> reboot. Delete -> C:\Program Files (x86)\Creative -> C:\Program Files (x86)\InstallShield Installation Information (Hidden folder)\{9C6429B2-8FE9-4B40-8A83-171BCA4FA288} (SpkEQSC3DDell) -> C:\Users\Public\Creative Delete -> C:\Program Files (x86)\Creative -> C:\Program Files (x86)\InstallShield Installation Information (Hidden folder)\{9C6429B2-8FE9-4B40-8A83-171BCA4FA288} (SpkEQSC3DDell) -> C:\Users\Public\Creative Delete -> C:\Program Files (x86)\Creative -> C:\Program Files (x86)\InstallShield Installation Information (Hidden folder)\{9C6429B2-8FE9-4B40-8A83-171BCA4FA288} (SpkEQSC3DDell) -> C:\Users\Public\Creative regedit (registry editor) delete: HKEY_CURRENT_USER\Software\Creative Tech HKEY_LOCAL_MACHINE\SOFTWARE\Creative Tech HKEY_LOCAL_MACHINE\SOFTWARE\Wow6432Node\Creative Tech Extract w/ 7-zip -> run setup.exe -> Custom install option -> select both SB control panel & drivers (uncheck Extras) -> reboot. Update: Windows 10/8.1: Sound_Blaster_Recon3Di_v1.01.09_Win10_8.1_M17xR4_M18xR2.7z Windows 7: Sound_Blaster_Recon3Di_Win7_M17xR4_M18xR2.7z

 1 point
 -
Step 1: Go to your MSI Afterburner Profiles folder (C:\Program Files (x86)\MSI Afterburner\Profiles) Step 2: Right-click the file named "VEN_10DE&DEV..." and go > Properties > Security Step 3: Select "Edit" and then click on "Users (username\Users)" and with the permission boxes below, check "Allow" for the first box - Full control. Click OK and OK again (this allows the file to be saved after editing it). Step 4: Now you can open the file named "VEN_10DE&DEV..." in WordPad and replace everything you see with this: [Startup] Format=2 CoreVoltageBoost= PowerLimit= ThermalLimit= ThermalPrioritize= CoreClkBoost= MemClkBoost= [Settings] VDDC_Generic_Detection=1 Step 5: Save the file and restart MSI Afterburner Step 6: Go into MSI Afterburner settings and check the boxes under General > "Unlock voltage control" and "Unlock voltage monitoring" then click OK and restart Afterburner. Final: GPU voltage control is unlocked and can be used now up to +100mV as well as monitoring GPU voltage in the OSD.1 point
-
HP 2570p ScrollLock and Pause\Break to Home\End keys remap Hello, guys! I owned HP2560p laptop before, and now I am owner of 2570p. Everything is excellent, instead of strange location of Home\End keys (on 2560p they was on Left Arrow \ Right Arrow). So, I wrote small program to change functionality of FN + Left\Right arrow keys. Program also have native functionality of ScrollLock and Pause\Break keys -- just quick click them twice. List of functional hotkeys: Scrolllock = Home Ctrl+Scrolllock = Ctrl+Home Shift+Scrolllock = Shift+Home Ctrl+Shift+Scrolllock = Ctrl+Shift+Home Scrolllock DoublePress = Scrolllock Pause = End Ctrl+Pause = Ctrl+End Shift+Pause = Shift+End Ctrl+Shift+Pause = Ctrl+Shift+End Pause DoublePress = Pause You can download exe or compile it via ahk manually: Scrolllock and pause To HomeEnd.zip You need to set it to autorun. 2 moderator: Please, add link to this post to subject header, it will be usefull for users.1 point
-
What you are thinking of attempting is no different from the following: Just because a physical connection appears to be RJ-45 doesn't mean it actually carries ethernet. Likewise, just because a physical connection is HDMI doesn't mean the signal is.1 point