Leaderboard


Popular Content
Showing content with the highest reputation on 02/09/17 in all areas
-
Hello, friend! (Mr. Robot reference) This is a guide to setting up an eGPU with the new 2015 15" Macbook Pro Retina with the AMD Radeon R9 M370x. A few people stated that it was impossible to use an eGPU with the new 2015 Macbook's but, I got it to work after a lot of researching.After chatting with 2 different Apple engineers at a Genius Bar, I was told that no changes were made to the new 2015 line of Macbook's that would effect the application of a eGPU build, and that it's highly possible to do so. With this in mind I decided to continue with my project and was able to install a GTX 970 with my Mac. The hardware remains the same, meaning there's nothing extra you should buy, that you would not have bought if you were building an eGPU for any other Macbook. The software, from what I can see is where it gets tricky but I'll get to that later. First off I purchased these: Power Supply - Used to power parts. Graphics Card/GPU - The thing that's going to play Star Wars Battlefront on ULTRA at 60FPS Akitio Case - Used to make GPU thunderbolt Compatible. (You're connecting your thunderbolt cable to this, as GPU's don't have thunderbolt ports). Barrel Plug - Used to attach Dell DA-2 Power supply to Akitio Case and GPU. Precision Screwdriver - Used to bend the Akitio case to fit the above GPU. GAMEPLAY VIDEOS FOR THOSE CURIOUS HOW IT RUNS: Batman Arkham Knight: https://www.youtube.com/watch?v=NJ_N9a-1UKc Super HD Drawing of what the Connections look like You set up the Hardware like you would any eGPU build. First things first, if you're using a graphics card that doesn't fit in the Akitio case, like mine, you're going to have to bend the right side of the Akitio case. This is what the Precision Screwdriver is for. This isn't just a simple apply some pressure and bend though, in my opinion this was the hardest part of the whole project. Follow this guide in order to bend and open the right side of the Akitio case: CLICK HERE. My only advice for this part is don't hit the hammer too hard when breaking the weld. You don't want to accidentally damage your PCIe in the Akitio. After you've bent the case, do the following: 1. Connect Graphics Card to Akitio Case. 2. Connect the BARREL PLUG to the DELL-DA 2 POWER SUPPLY. (It will look like it doesn't fit but it does, don't worry. And do not connect the other end of the power supply to the wall yet) 3. Connect the PCIe plugs on the Barrel plug to your graphics card. 4. Connect the cylindrical plug on your Barrel to the Akitio. 5. You have now powered the GPU and the Akitio case. 6. Your hardware is ready. Software guide: (Requirements: Windows 8.1) At first I thought that the software would be just like any other Apple e-GPU project. Meaning, connect eGPU, install drivers etc. However, the new 2015 line of MBPr's that have dedicated GPU's (dGPU), use AMD rather than nVidia. What this means is that you can no longer use nVidia's Optimus technology in order to connect the eGPU to the new Macbooks with dedicated GPU's. What Optimus does is if it detects that there are 2 nVidia cards connected to the device (the one in the Macbook and the eGPU), it switches to the one with the most power, which would be the eGPU, automatically disabling the default dGPU for you. This allows someone with a 2014 Macbook that has a dedicated GPU, to use the internal LCD screen (the Macbook screen). This is not the case with the new MBPr's with AMD dGPU's. So now, we have to figure out a way to disable the default AMD dGPU and enable the Intel iGPU. The problem is that device manager doesn't show the Intel iGPU by default, as that's the way Bootcamp is optimized. It is explained in more detail in the thread below. If you have one of the new 2015 MBPr's with a dGPU and you were to go into device manager on Windows, you would only see the AMD dGPU. You wouldn't see the Intel iGPU. In order to solve this issue I looked at THIS thread. This thread basically solved the whole problem, thanks to users @ah- for providing the file that makes it so device manager shows Intel's iGPU (Intel Iris Pro 5200). The instructions for device manager to show your iGPU are as follows: (Huge thanks to @juniordiscart , wouldn't be able to do this without him) 1. Install reFIND via Windows. 2. Reboot your computer, you should now see a new boot screen. You will see this every time you boot up from now on. Boot back into Windows. 3. Download THIS file and place it on your desktop. 4. Open up Command Prompt, run as administrator. 5. (Thanks to @juniordiscart for the clear and concise instruction) Enter the following commands: mountvol S: /S This will mount the EFI partition in Windows and assign it the drive letter S. You won't be able to see it appear in "My Computer" however, it remains hidden. S: cd EFI dir Check the output after these commands. If you see a directory for refind, then you have refind installed and you can proceed with the next set of commands. Otherwise, make sure you follow the installation instructions for rEFInd for Windows onthis link: The rEFInd Boot Manager: Installing rEFInd xcopy /E C:\Users\YOURUSERNAME\Desktop\apple_set_os.efi S:\EFI\custom\ This last one copies the efi file to the custom folder of the EFI partition. Make sure you get all of the "\" right and that your path to your apple_set_os.efi file is correct. It should ask you to create any custom directory if you don't have one already. 6. Now that you've done the hard part, when you reboot you should be brought to the reFIND boot screen and there should be a new option called something like "apple_set_os.efi". Open this up. 7. It should flash the screen quickly and bring you back to the reFIND boot screen. (If it opens up and stays on the screen for more then a minute, shut off your computer and try again) 8. Boot to Windows. 9. Check device manager. Your Intel iGPU should now show up. Congrats you've done the hard part! Now install your Intel Drivers ( https://downloadcenter.intel.com/ ) BUT WAIT------ While installing your Inteldrivers your screen will flash black and most likely freeze up. Let it sit like that for a couple of minutes or so and shut down your computer by holding the power button till it turns off. Turn it back on. One thing you have to keep in mind is that everytime you restart your computer you have to open up the apple_set_os.efi file in refind before launching Windows, otherwise your Intel GPU will not show. However, once we get the GTX 970 set up, we will not have to do this again. Ok now the fun part 1. Now we finally get to plug in our power supply, and start up our graphics card! 2. So just plug in your power supply, and your Akitio should have a green light on the left side indicating it's on. MAKE SURE YOU HAVEN'T PLUGGED IN YOUR THUNDERBOLT YET! Make sure you have the nVidia driver already downloaded and on your desktop . 3. Turn on your Mac, and reFIND should open up. Run the apple_set_efi, NOW you can plug in the thunderbolt to your GPU and to your computer, and boot into Windows. 4. Right click on the Windows button on the bottom left and open up device manager. You should have 3 things listed under display adapter. (R9 M370X, Iris 5200 Graphics, Something else) 5. Now disable the R9 M370X, your computer will switch to the Iris Pro. 6. Install thee nVidia driver. 7. Reboot, however now YOU DO NOT HAVE TO RUN the apple_set efi. Just launch straight into Windows. Go to Device manager. You should now see your graphics card and your Dedicated graphics card. 8. Plug in a separate monitor via the HDMI plug on your GRAPHICS CARD not your computer. And VOILA! This guide is still being updated with pics and fixes/recommendations for clarification. Any troubles please leave in the comments. Things to know: - Whenever you're not using you're eGPU, meaning when you want to unplug it and take your Macbook into another room to lay on the bed and watch Netflix, go into Device Manager, re-enable the Radeon R9 M370X, turn off your Macbook, unplug the eGPU, and reboot your Macbook. It should now go back to using the default dedicated GPU and it should work like normal. - When you want to plug your eGPU back in, disable the R9 M370X, turn off your Macbook. Plug in the eGPU. Turn on your macbook and boot into Windows. And now you're back to your eGPU set up. - Do NOT unplug the eGPU whilst using it. - I'm currently waiting on a better monitor and keyboard to come in so I can upload some game play footage. So far, everything runs as smooth as butter. In 2-3 days I'll upload links to Arkham Knight, Bioshock Infinite, Watch Dogs etc footage. Pictures1 point
-
This is for you. MSI870MOD.rom1 point
-
I guess I will throw a few of my thoughts here: I've checked the exact moment when the eGPU stops working, when installing the new drivers and found, that after updating the main driver sys file, the GPU stops responding and gives the error 43. I have logged the error code, which Windows has saved in the event viewer: Fault bucket 0x193_DxgkrnlLiveDump:804_dxgkrnl!DxgCreateLiveDumpWithWdLogs, type 0 Event Name: LiveKernelEvent Response: Not available Cab Id: e3262c67-efa7-4bca-94b0-413a2616c961 Problem signature: P1: 193 P2: 804 P3: ffffffffc000009a P4: 1 P5: 0 P6: 10_0_14393 P7: 0_0 P8: 256_1 P9: P10: Attached files: \\?\C:\windows\LiveKernelReports\WATCHDOG\WATCHDOG-20161222-2337.dmp \\?\C:\Users\Justas\AppData\Local\Temp\WER-1651703-0.sysdata.xml \\?\C:\ProgramData\Microsoft\Windows\WER\Temp\WER478E.tmp.WERInternalMetadata.xml \\?\C:\Windows\Temp\WER5E91.tmp.csv \\?\C:\Windows\Temp\WER5EC1.tmp.txt These files may be available here: C:\ProgramData\Microsoft\Windows\WER\ReportArchive\Kernel_193_12354c92ffc4695adc470a5b64044c08a8454ca_00000000_cab_29516046 Analysis symbol: Rechecking for solution: 0 Report Id: e5ee621d-c88e-11e6-af17-78dd08a5323d Report Status: 0 Hashed bucket: I have checked the nvidia driver sys file for Hotplug option changes and concluded, that no changes have been made (checked is sort of a loose term, given how limited I was in actually seeing what was in the main sys file). Either way, during the weekend I will try to gradually change all of Nvidias current driver files with the ones, which actually work for most, and see if there is a way to narrow down if there is something else at play here. Did anyone check the registry files? I was kinda thinking, could we save a backup of the whole PC registry while the working drivers are intalled, then use this backup to overwrite the whole registry with the non-working drivers installed? Maybe this way, it could be possible to find out if a registry change has some effect1 point
-
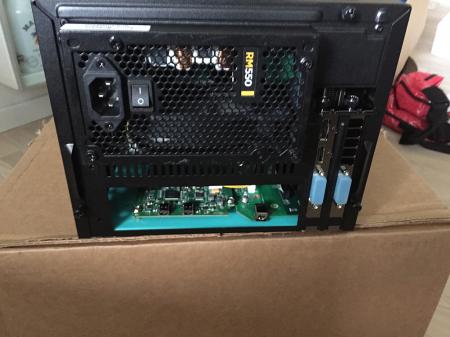
tre87's eGPU implementation | 2014 15" Macbook Pro GT750M + GTX970@16Gbps-TB2 (AKiTiO Thunder2) + Win8.1 Last update on November 16th 2014! My setup is as follows:Laptop: Macbook Pro 15 Retina (Mid 2014) /w dGPU (nVidia GT 750M)GFX: Asus GTX 970 Strix 4GBeGPU: AKiTiO Thunder2 PCI-E BoxPSU: Corsair RM550PCI-E: 16x Powered RiserCase: Cooler Master Elite 130Thunderbolt cable: Apple Thunderbolt Cable (2.0 Meters)Extra: Plastic board for mounting, superglue, black wire, cable strips and a standard on/off powerswitch. (Also had a fan silencer from a Noctua fan I used on the front mounted case fan to reduce its noise to nothing. It's not required for this build, but like like to have NO noise :))Images More images can posted if someone requests it :)[ATTACH=CONFIG]13147[/ATTACH] Front: Large image[ATTACH=CONFIG]13149[/ATTACH] Side (Case shield off) -> Yes, some screws are missing. Was taken while i was testing the riser placements :) ScreenshotFirestrike:GTX 970 (+ GT 750M PhysX)Validation:GPU-ZBuild Hardware:1. Remove the CM Elite 130 case shield and unscrew the 92mm side fan and it's mount!2. Remove the front of the case and drill out the rivets and unscrew the 2 screws to completely remove the optical drive mount.3. Open up the AKiTiO box and take out the curcuitboard.4. Place the AKiTiO board on the plastic board aligning the TB ports and power to point towards the back (where a motherboard would have been) and measure out where to drill and make holes for the motherboard risers5. Then place the plastic board on the bottom of the case and mark out the holes for mounting.6. Drill all the holes -> Small holes for the AKiTiO board so that you can super glue the motherboard risers (comes with the case | image for the layout). Place the other wire in the above or underneath black wire (Ground).11. Remove the case front and pull both wires thrue the bottom right USB port and put the case front back on.12. Insert both wires, one in each end of the on/off switch and mount it like you see in the Front image above.13. Install the powered riser in the AKiTiO board and the other end to the GPU.14. Mount the GPU in the case. (I used a cable strip from the GPU fanshield to the case to tighten the card in the opposite end of the case mount. Otherwise it won't be stable!)15. Install the 6+2-pin PSU cable for GPU and the 12V Molex PSU cable for the powered riser. Remember to connect the front mounted case fan as well with a molex connector! I also used a silencer (one of those that comes with a Noctua fan to slience the fan to no noise at all).16. Use some cable strips and sort out any loose cables to make room for the front fan to make some airflow.17.Put the case shield back on and let the fun begin.Note: You won't need the AKiTiO power adapter. Everything will be powered by the PSU.Prerequisites:1. Install Windows 8.1 (UEFI) on your MacBook2. Have the newest nVidia drivers downloadedSoftware (+Power up):1. Connect the Thunderbolt2 cable from the AKiTiO board to your MacBook.2. Power on the eGPU via your on/off switch. (Note: If you have a Corsair RM series PSU and/or the ASUS/MSI GTX 970/980 the fans wont spin on power on. They will start spinning once the PSU/eGPU is under load)3. Power on your MacBook.4. It sometimes helps to halt the bootup by holding down the option key and give it a few seconds before booting Windows. (Thunderbolt devices apperantly needs some initialization time)5. Once you reach the Windows logon screen the MacBook display should flicker and turn off while your external monitor(s) will come on (Might take a few seconds since it is actually installing the GPU drivers). If that happens everything is good! :) If you have the iGPU version of the MacBook you will properly use the MacBook screen as Optimus will be engaged immediatly.6. Login and start your nVidia driver installation. Choose the custom option in the installer and tick the Clean installation before installing.7. Once the GPU driver installtion is complete -> Reboot and your eGPU is ready to go! Enjoy! :DExtra Made a post about this setup at the danish hardware forum HardwareOnline.dk (Danish) -> My alias on there is ZazzY:Post (In english using Google translate)My thoughts so far... At the time of writing this I've had this setup up and running for 14 days. I've been using it everyday for both professional work and gaming! I'm a .NET developer and I use my MacBook for designing, developing, browsing and lots of gaming with my friends. And the gaming part is really an outstanding experience with this eGPU setup.So far the last 14 days has been a blast! The setup is TOTALLY stabile. I haven't had one crash or anything! All games run smooth and the whole thing ran over an entire weekend of none stop gaming, I didn't even restart during an almost 48 hour period of pure gaming! :) Let me just say that this setup goes beyond my expectations and that I can see myself using this setup for LOOOONG time!More experiences and thoughts will come once I've have a lot more experience! All I can say is, don't wait for this - do it, DO IT NOW! :Banane10:--->Please comment or ask any questions you may have... I'll answer as soon as possible. More will be added to this post as my time with this setup increases! :)

 1 point
 -
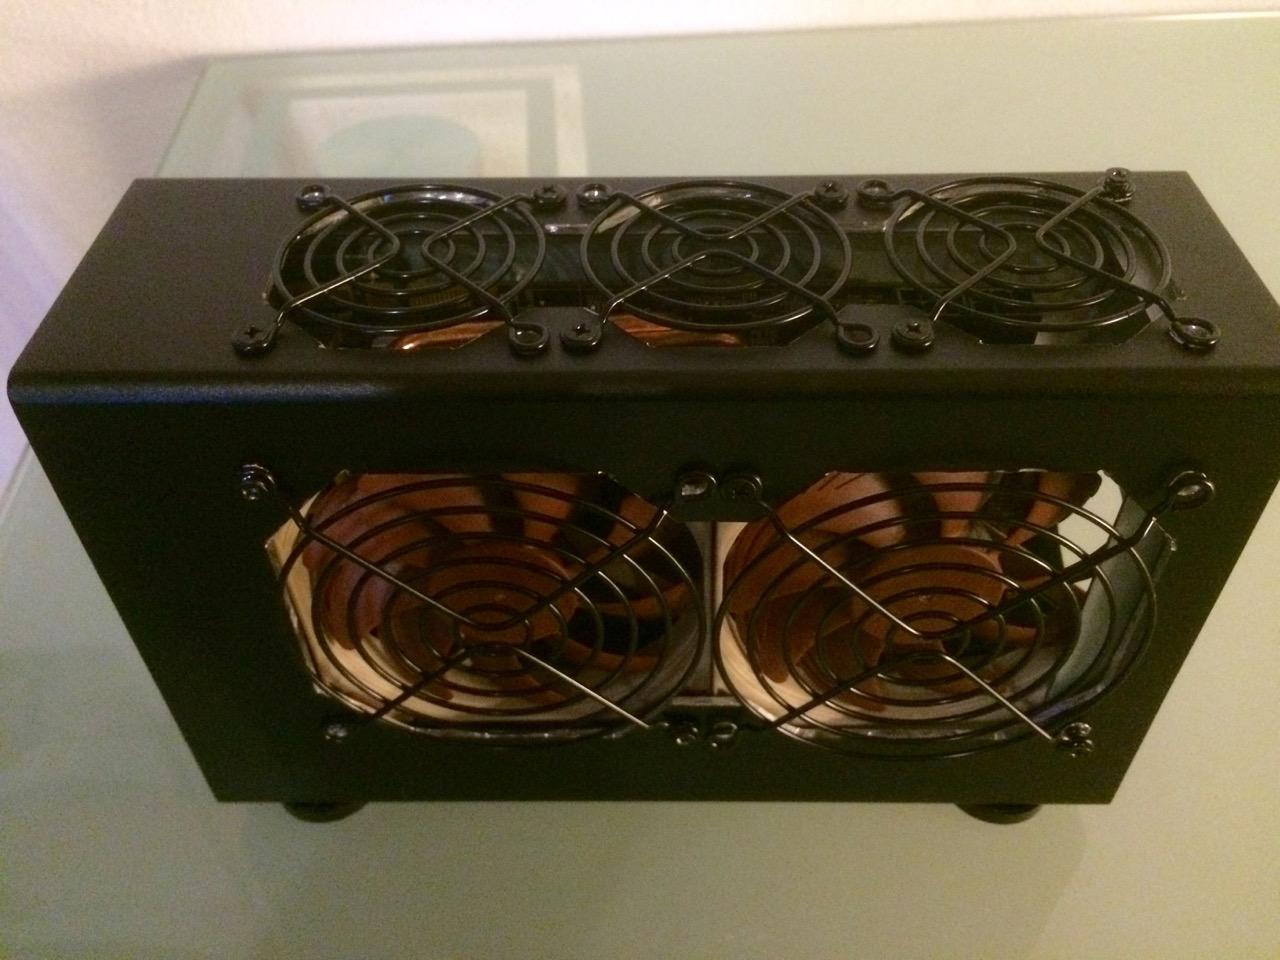
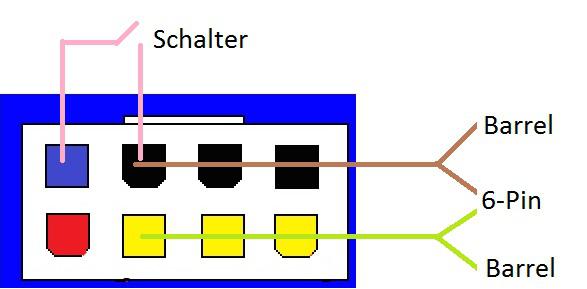
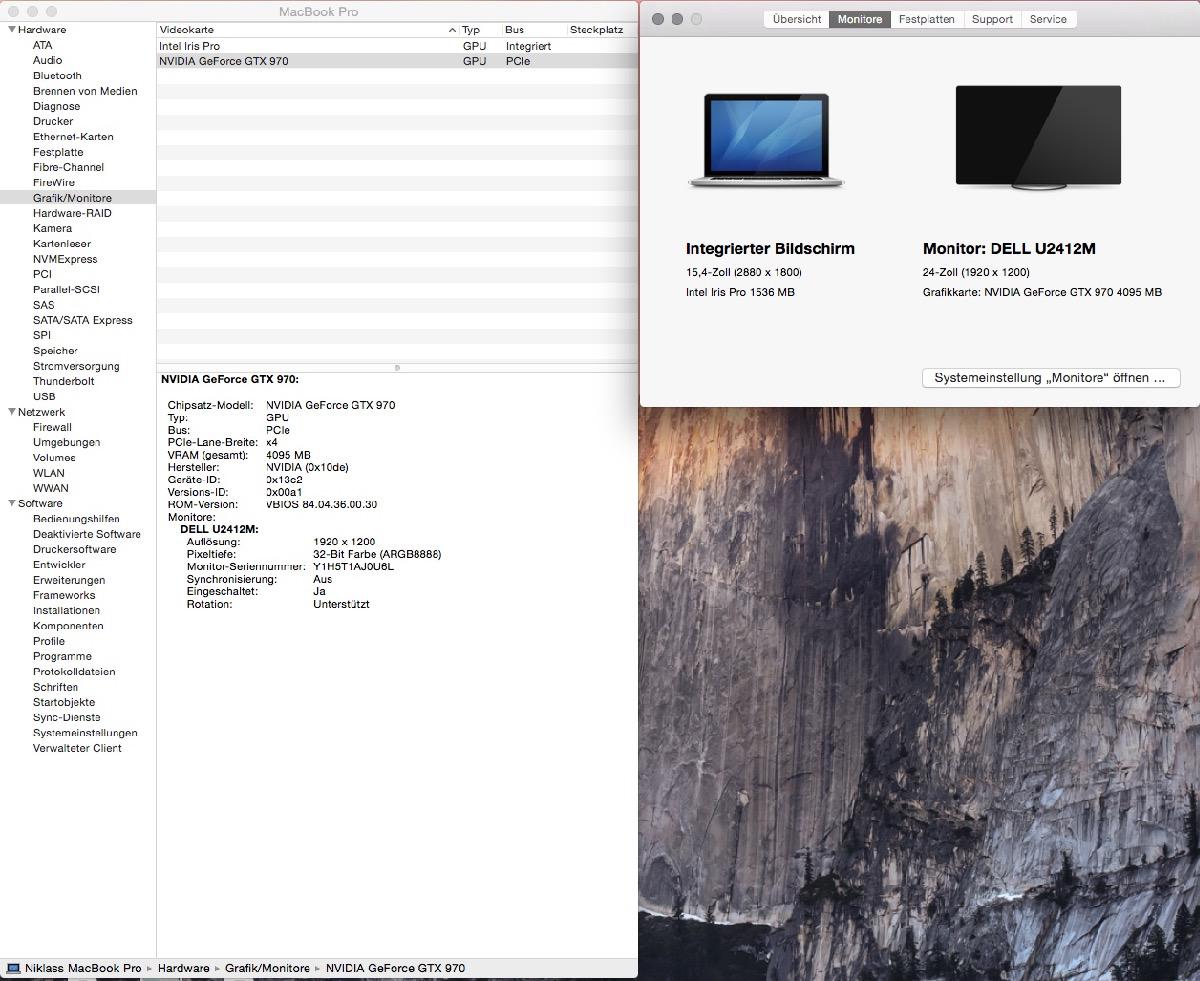
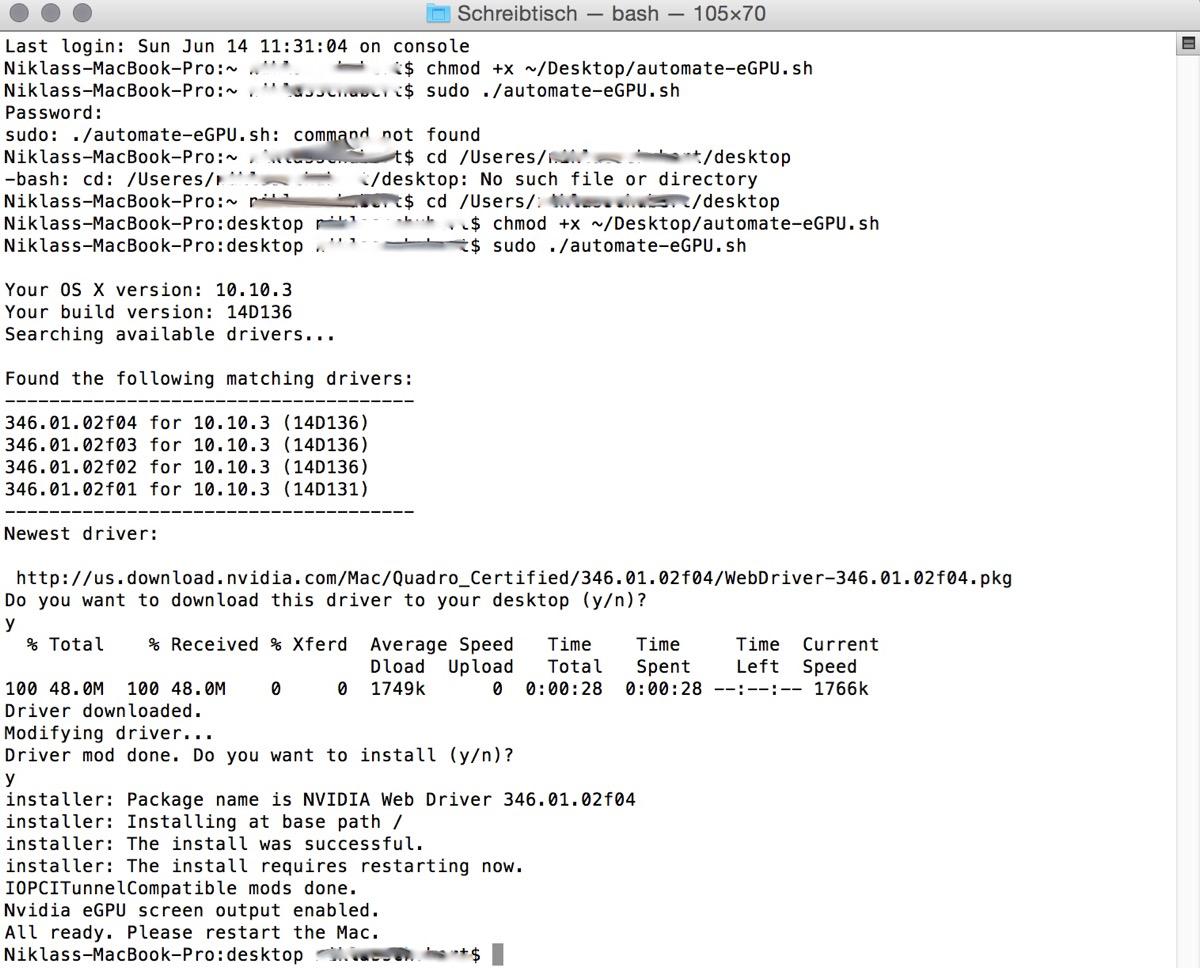
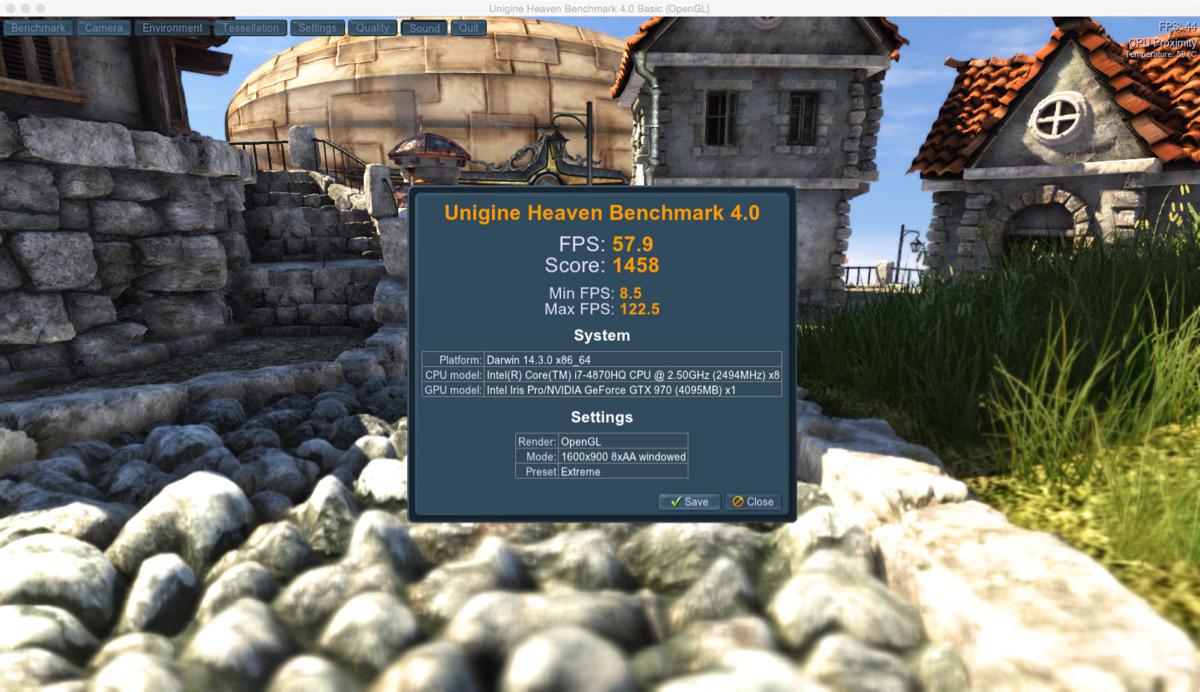
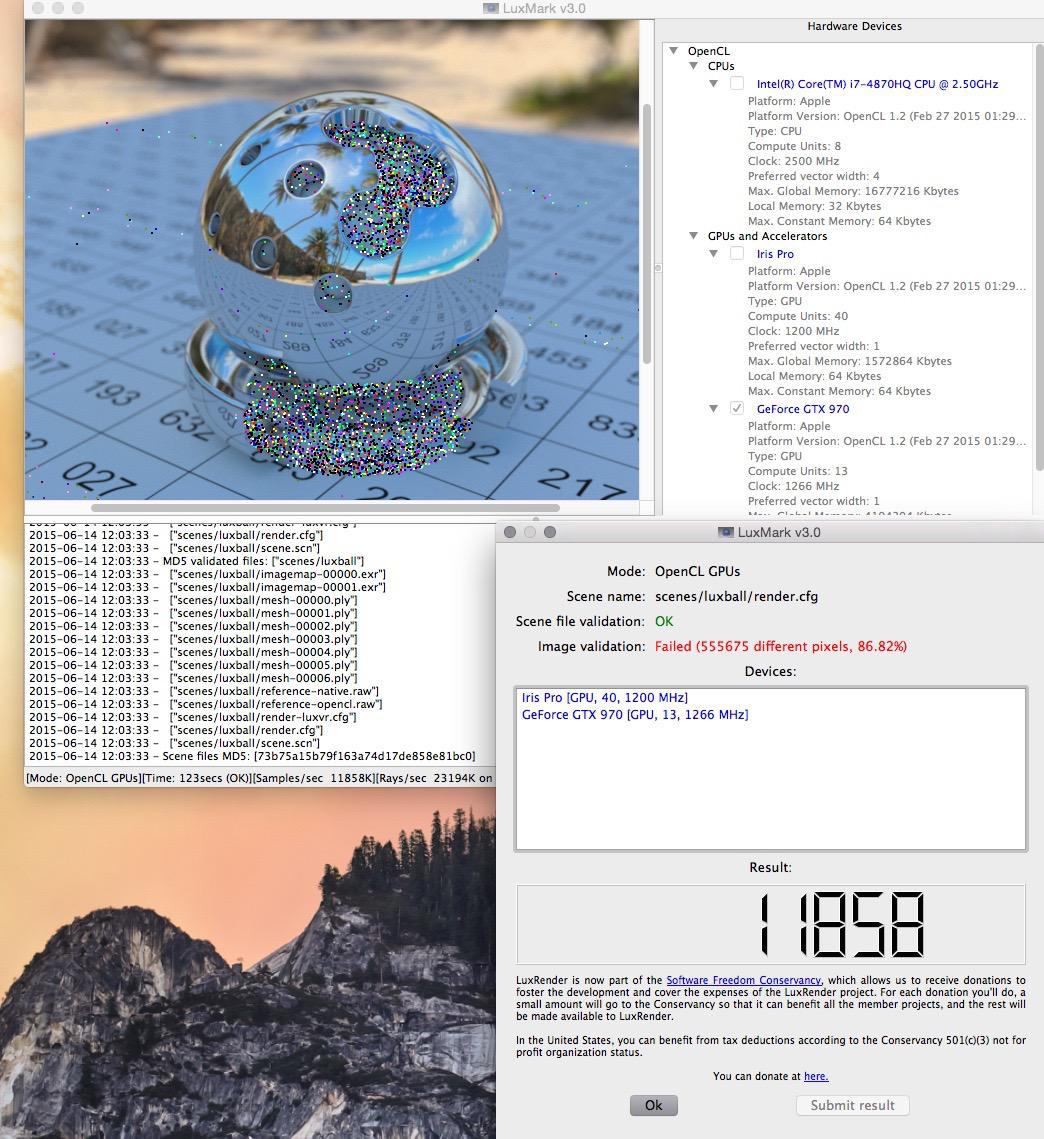
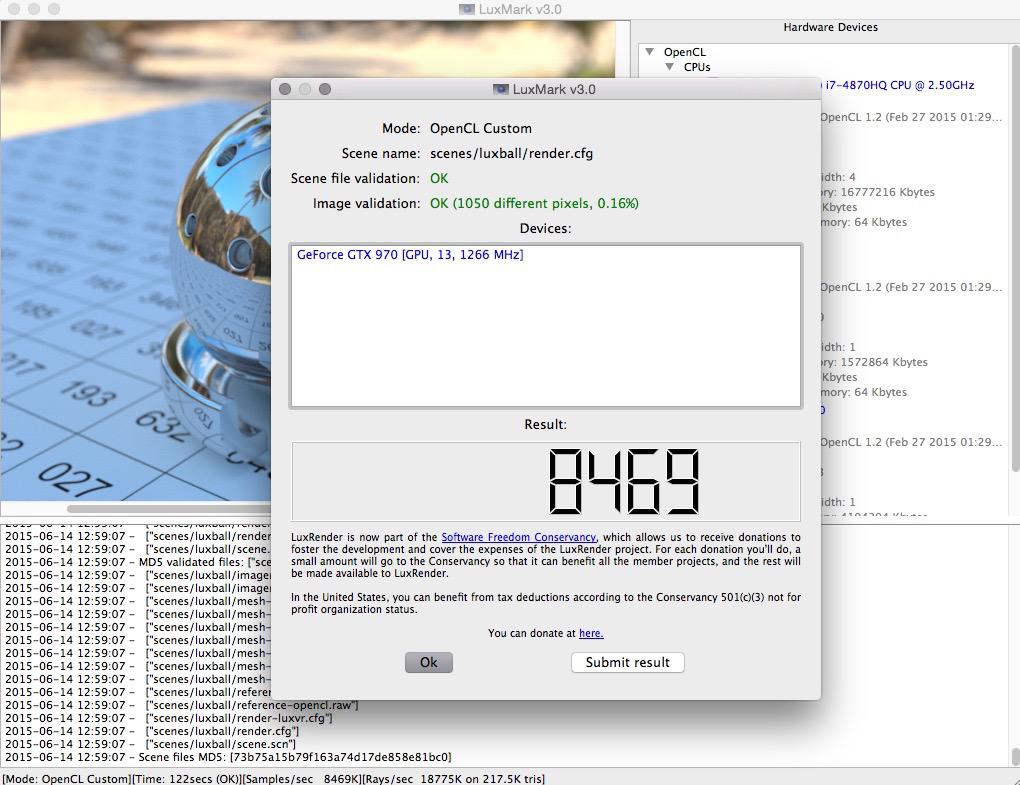
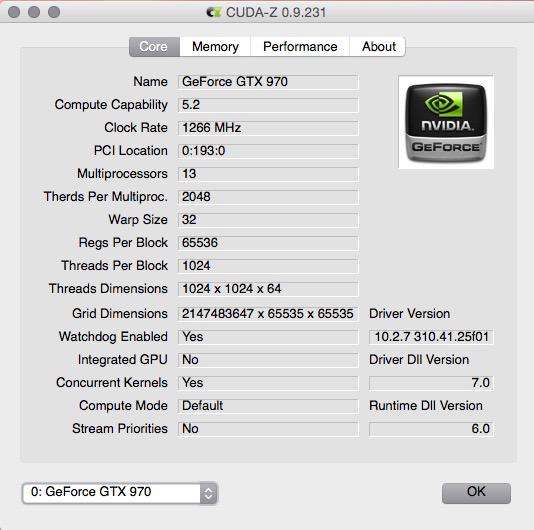
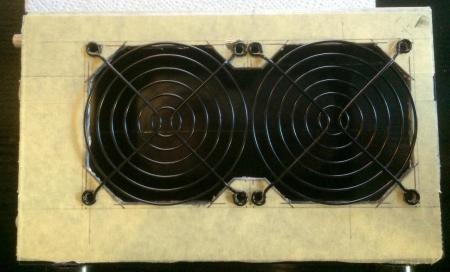
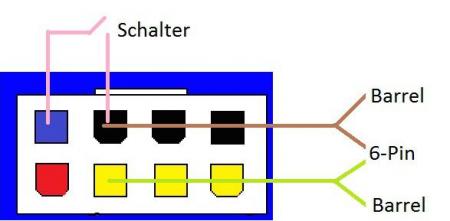
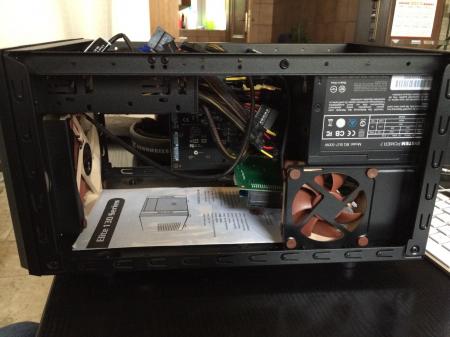
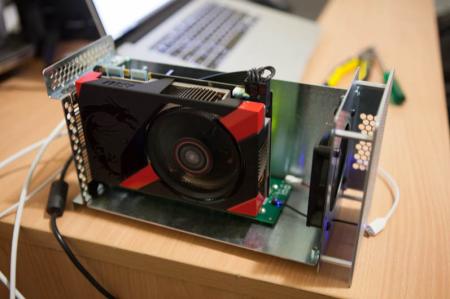
This is going to be a more hardware based guide, because I will switch from my large eGPU setup with an ITX case to an "all in the AKiTiO case" setup. A significant difference in size as shown in the spoiler: The software setup is going to "reuse" my current instalation of Windows 8.1 from this guide: http://forum.techinferno.com/implementation-guides-apple/8571-2014-15-macbook-pro-iris-gtx970%4016gbps-tb2-akitio-thunder2-win8-1-%5Bdschijn%5D.html Other builds I made 3 builds until now: 2013 13" Macbook Pro + GTX970@16Gbps-TB2 (AKiTiO Thunder2) + Win8.1/OSX10.10 [Dschijn] 2014 15" Macbook Pro Iris + GTX970@16Gbps-TB2 (AKiTiO Thunder2) + Win8.1 [Dschijn] 2014 15" Macbook Pro Iris + GTX970@16Gbps-TB2 (AKiTiO Thunder2) + Win8.1 [Dschijn#2] GPU To achieve that I will switch my GPU from a EVGA GTX 970 FTW+ to a much smaller Galax GeForce GTX 970 Gamer OC (Galax is known as a different brand in Germany: KFA2). That GPU is so short it can directly fit into the AKiTiO case without any modifications. Cooling For better cooling I will remove the stock fans and replace them with two 92x14mm Noctua PWM fans. I ordered a Mini 4-Pin GPU (Female) to Mini 4-Pin GPU (Male) y-cable to connect both fans directly to the GPU (fingers crossed that the PWM signal is good will give me a low Idle fan speed). Case modifications I will make two big openings two improve the cooling. 2x92mm cuts on the left side of the case, right in front of the new fans. This cut will be covered with 2x92mm black fan grills. 3x60mm cuts on the top for a good and easy exhaust of the hot air. This will be covered with 3x60mm black fan grills. Power Supply I will use parts of an old Dell OPTIPLEX GX620, that I got really cheap from eBay. That parts are the 220W Dell DA-2 PSU and the male plug that the PSU can connect to. That plug was directly attached to the mainboard of the Optiplex and will give me the opportunity for a small plug on the AKiTiO case. The AKiTiO itself will get power from a barrel plug. I am not really comfortable to solder wires directly to the AKiTiO PCB, so I will try the barrel plug first. Currently my idea of routing the cable for the barrel plug is to route it through the GPUs ventilation slots on it's IO shield. Overclocking (or maybe underclocking) If stability is good with the stock seetings and the cooling will keep the GPU cool, I will consider a bit OC. If the stability isn't good because of the PSU and the cooling can't handle the heat without a lot of noise, I consider underclocking the GPU based on this guide: https://translate.google.de/translate?sl=de&tl=en&js=y&prev=_t&hl=de&ie=UTF-8&u=http%3A%2F%2Fwww.tomshardware.de%2Fhtpc-gtx970-modding-cool-quiet%2Ctestberichte-241708.html&edit-text= Progress (x) ordering all the parts (x) remove the stock GPU fan (x) attach the new fans to the GPU (x) tape the case and draw cutting and drilling positions (x) solder the cables: 6-Pin PCIe (x) solder the cables: barrel plug (x) solder the cables: power switch (x) cut the ventilation holes: top side (x) cut the ventilation holes: left side (x) drill the holes for the fan grills (x) cut the case for the fan (92mm in front is beeing partially blocked be the case structure) (x) cut the case 3x for the DA-2 power plug (x) glue the power plug into the case with two-component adhesive (x) cut the case for a power switch (currently planning to place it in the front, because there is no other good option yet) I changed my mind and will keep the switch inside the case. Not happy with any other solution yet. Pictures (Schalter = switch) Windows 8.1 installation Since I already had Windows 8.1 running with my previous eGPU, it was just plag and play. Old guide: http://forum.techinferno.com/implementation-guides-apple/8571-2014-15-macbook-pro-iris-gtx970%4016gbps-tb2-akitio-thunder2-win8-1-%5Bdschijn%5D.html OSX 10.10.3 installation (update 14th June 2015) Thanks to goalque! He wrote an awesome script to enable display output in OSX on eGPUs: http://forum.techinferno.com/mac-os-x-discussion/10289-script-enabling-nvidia-egpu-screen-output-os-x.html#post136780 I just followed the instructions and have the eGPU running now in OSX as well: For Cuda support I also installed the latest Cuda driver: http://www.nvidia.de/object/mac-driver-archive-de.html Tested stability Soldering is done! Created a bundle of wires in which - all 12V wires are connected to all 3x12V DA-2 ports - all ground wires are connected to all 3xground DA-2 ports Setup is working flawless and booted right into windows (windows had to install the new GPU though...). First benchmark "3d Mark FireStrike" with stock GPU settings (new fans at 100%): NVIDIA GeForce GTX 970 video card benchmark result - Intel Core i7-4870HQ Processor,Apple Inc. Mac-3CBD00234E554E41 Windows Benchmarks (110% Power target, +100MHz clock speed, +75MHz memory speed, external display): 3dMark - FireStrike (Score: 9012, Graphics Score: 11027): NVIDIA GeForce GTX 970 video card benchmark result - Intel Core i7-4870HQ Processor,Apple Inc. Mac-3CBD00234E554E41 3dMark - 11 (Score: 11988, Graphics Score: 14150): NVIDIA GeForce GTX 970 video card benchmark result - Intel Core i7-4870HQ Processor,Apple Inc. Mac-3CBD00234E554E41 Unigine Heaven (Preset: Extreme): Score: 1624 Unigine Valley (Preset: Extreme HD): Score: 2266 Unfortunately the GPU can't keep the Boost clock speed of 1480MHz with the fans at 9V, because it is running into the 80°C temperature target. High load clock speeds are between 1430-1460MHz. OSX Benchmarks Unigine Valley: https://unigine.com/products/valley/ Unigine Heaven: https://unigine.com/products/heaven/ Cinebench: http://www.maxon.net/products/cinebench/overview.html Luxmark: http://www.luxmark.info/ Mac&i OpenCL Benchmark: http://www.heise.de/mac-and-i/downloads/65/1/1/8/0/8/7/8/Mac___i_OpenCL_Benchmark.app.zip GFX Bench: https://gfxbench.com/result.jsp Octane Render: http://home.otoy.com/render/octane-render/demo/ Videos (all captured on an external display, only Firestrike running on the internal display): 3dMark Firestrike via Optimus on the internal display (changed the music, you like it): The Witcher 3: Diablo III in 4k resolution (downsampling to 1980x1200) - FPS counter in the bottom right corner: Battlefield 4 - FPS counter in the upper right corner: Far Cry 4 - FPS counter in the upper left corner: GTA V- FPS counter in the upper left corner: Running 8 displays on one Thunderbolt connection with two daisy chained eGPUs: Heroes of the Storm:


 1 point
 -
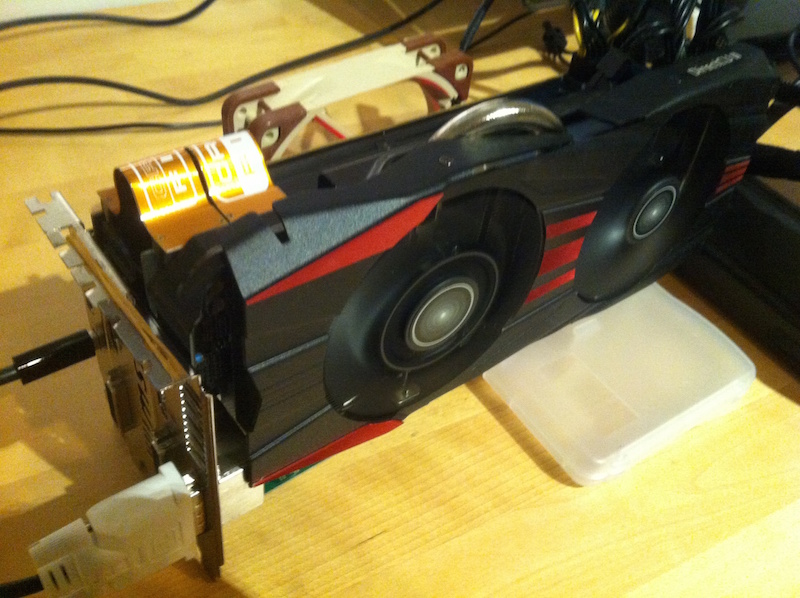
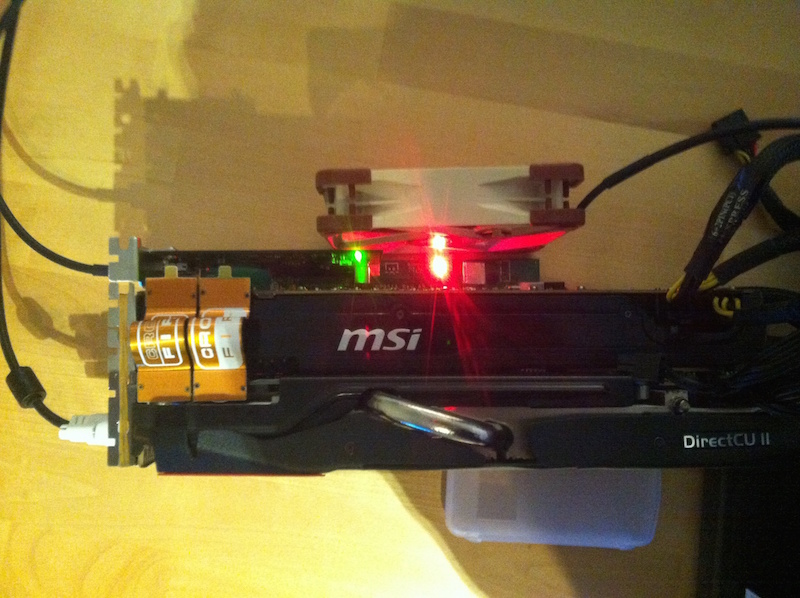
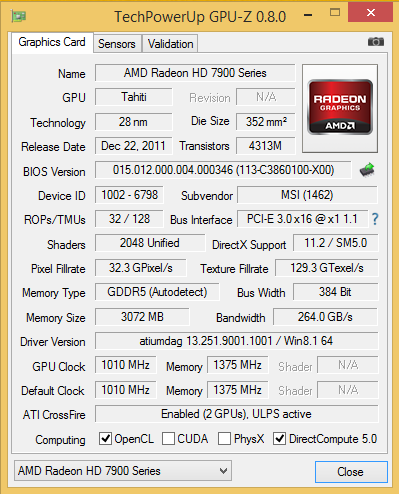
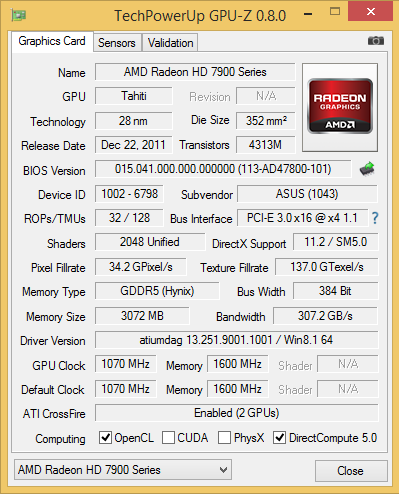
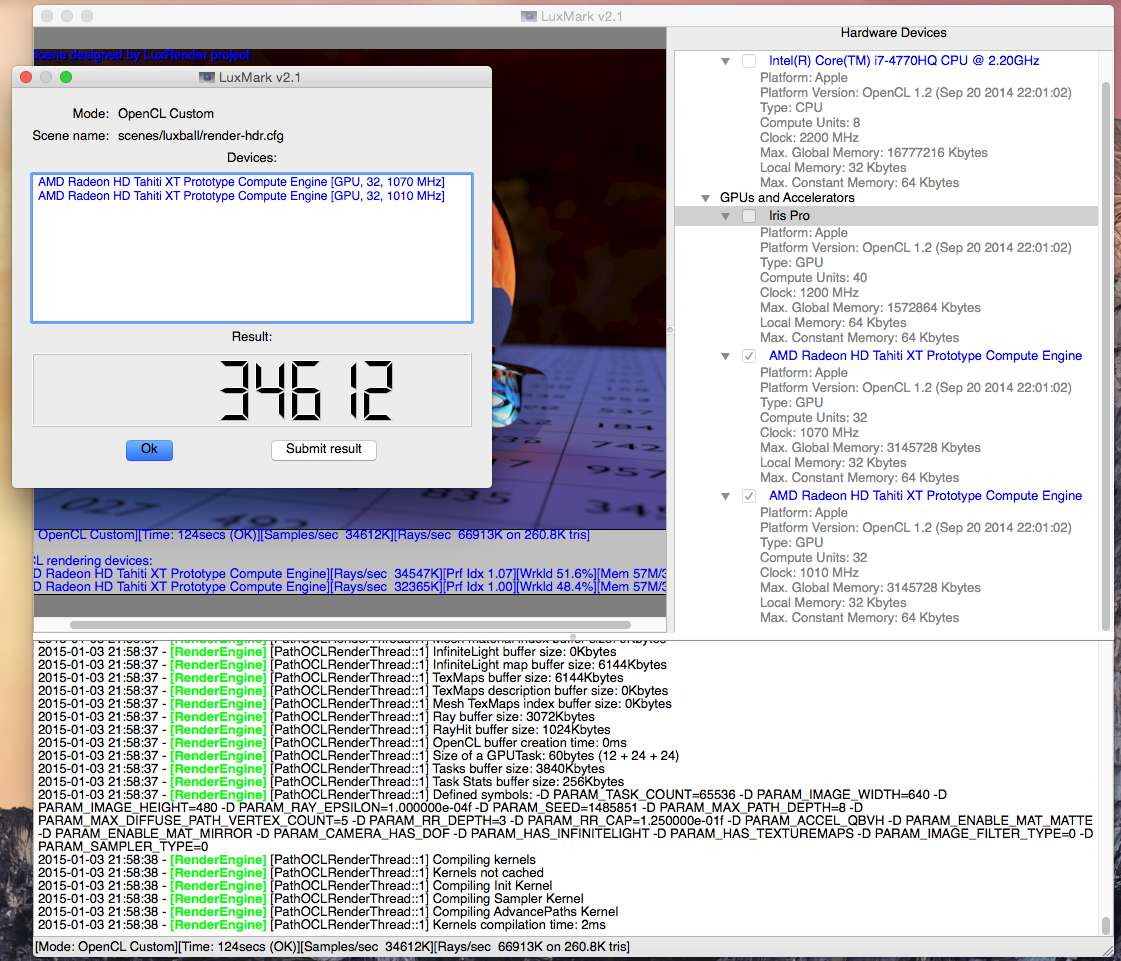
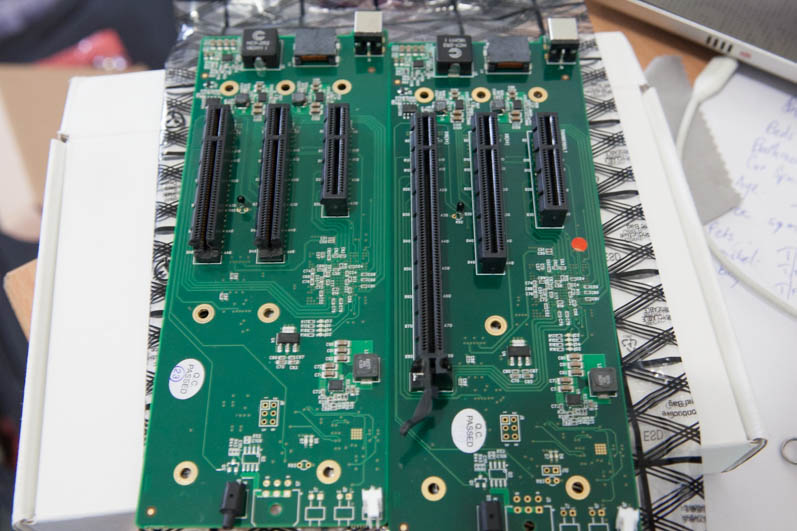
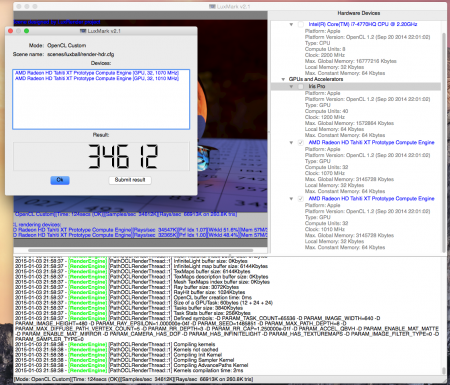
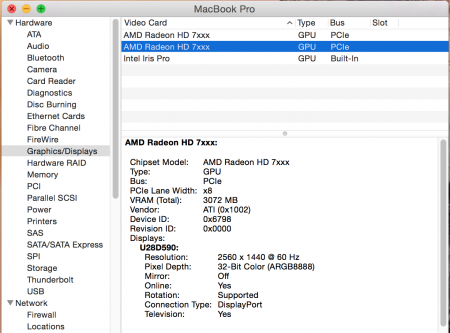
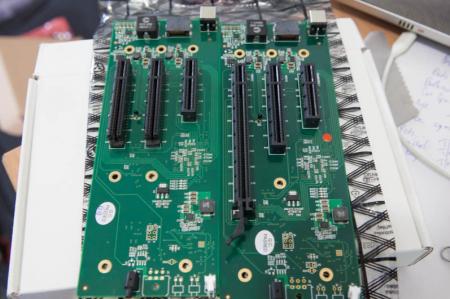
I didn’t found any TB2 implementation utilising AMD card. Maybe because of the simple reason; Nvidia cards consume less power, are more quiet and generally faster in desktop computers, but what benefits AMD could give eGPU TB2 users? I wanted to find out and took a step further with the Netstor NA211TB as I saw a couple of used cards on the shelf of local computer store: - MSI Radeon HD7970 3GB GDDR5 OC (1010Mhz) - Asus Radeon R9 280X DirectCU II TOP 3GB GDDR5 (1070Mhz) 434€ for both of the cards. Other components: - Apple MacBook Pro 15” Retina Iris Pro, 2.2GHz Intel Core i7 (Mid 2014) - Samsung 28” UHD LED Monitor (U28D590D) - Display Port cable - Thunderbolt cable - ATX PSU, 450W-1000W depending on how many eGPUs you are going to run (up to 3 eGPUs is possible) Will it Crossfire? R9 280X & HD 7970 Scaling Tested I attached the cards in x8 and x4 slots of the NA211TB PCIe board, and very soon realised that I made the first ever Crossfire Thunderbolt eGPU implementation. @squinks, you inspired me to go this point as you succeeded with two Sonnet SEL enclosures and SLI. By choosing AMD, it turned out to be much easier project. It worked out of the box: take the PCIe board off, use a powerful enough ATX PSU and do the cable modification as described here, then just plug in the cards install latest drivers from AMD. Apple Boot Camp Software Graphics Drivers (release date 12/16/2014) External monitor works always and both GPUs will be detected, no need for manual delay methods. Does the internal screen work? Yes, if you follow Evo*’s instructions here. No Optimus of course, but AMD provides something similar because the apps in the retina screen are accelerated as shown in the video. You can move windows normally between the screens. It seems that you have to plug in display cable after logged in Windows if you are outputting signal via 280X (SLOT1), otherwise the Intel Iris Pro shows error code. Mini DP - DP with the HD 7970 (SLOT3) should detect an external UHD monitor automatically. On OS X screen detection is completely plug-and-play. One more thing, and for me the most important - on OS X both the cards enabled the external monitor via eGPU and accelerated OpenGL apps. This wasn’t possible with Nvidia cards. It works with the default AMD kexts that Apple provides, you don’t need additional web drivers. Just a couple of IOPCITunnelCompatible true modifications. https://github.com/goalque/automate-eGPU http://forum.techinferno.com/mac-os-...output-18.html The procedure below is not up to date. Use automate-eGPU.sh script for both AMD and Nvidia cards 3DMark11: 17463 (graphics) 3DMark Fire Strike: 12244 (graphics) Unigine Valley Benchmark 1.0: Windows 8 (build 9200) 64bit/Direct3D11/1920x1080 8xAA fullscreen/Extreme HD: 2998 (FPS: 71.7, Min FPS: 25.9, Max FPS: 145.5) Clpeak (R9 280X): Clpeak (HD 7970): Clpeak (Iris Pro): https://github.com/krrishnarraj/clpeak More photos:


 1 point
 -
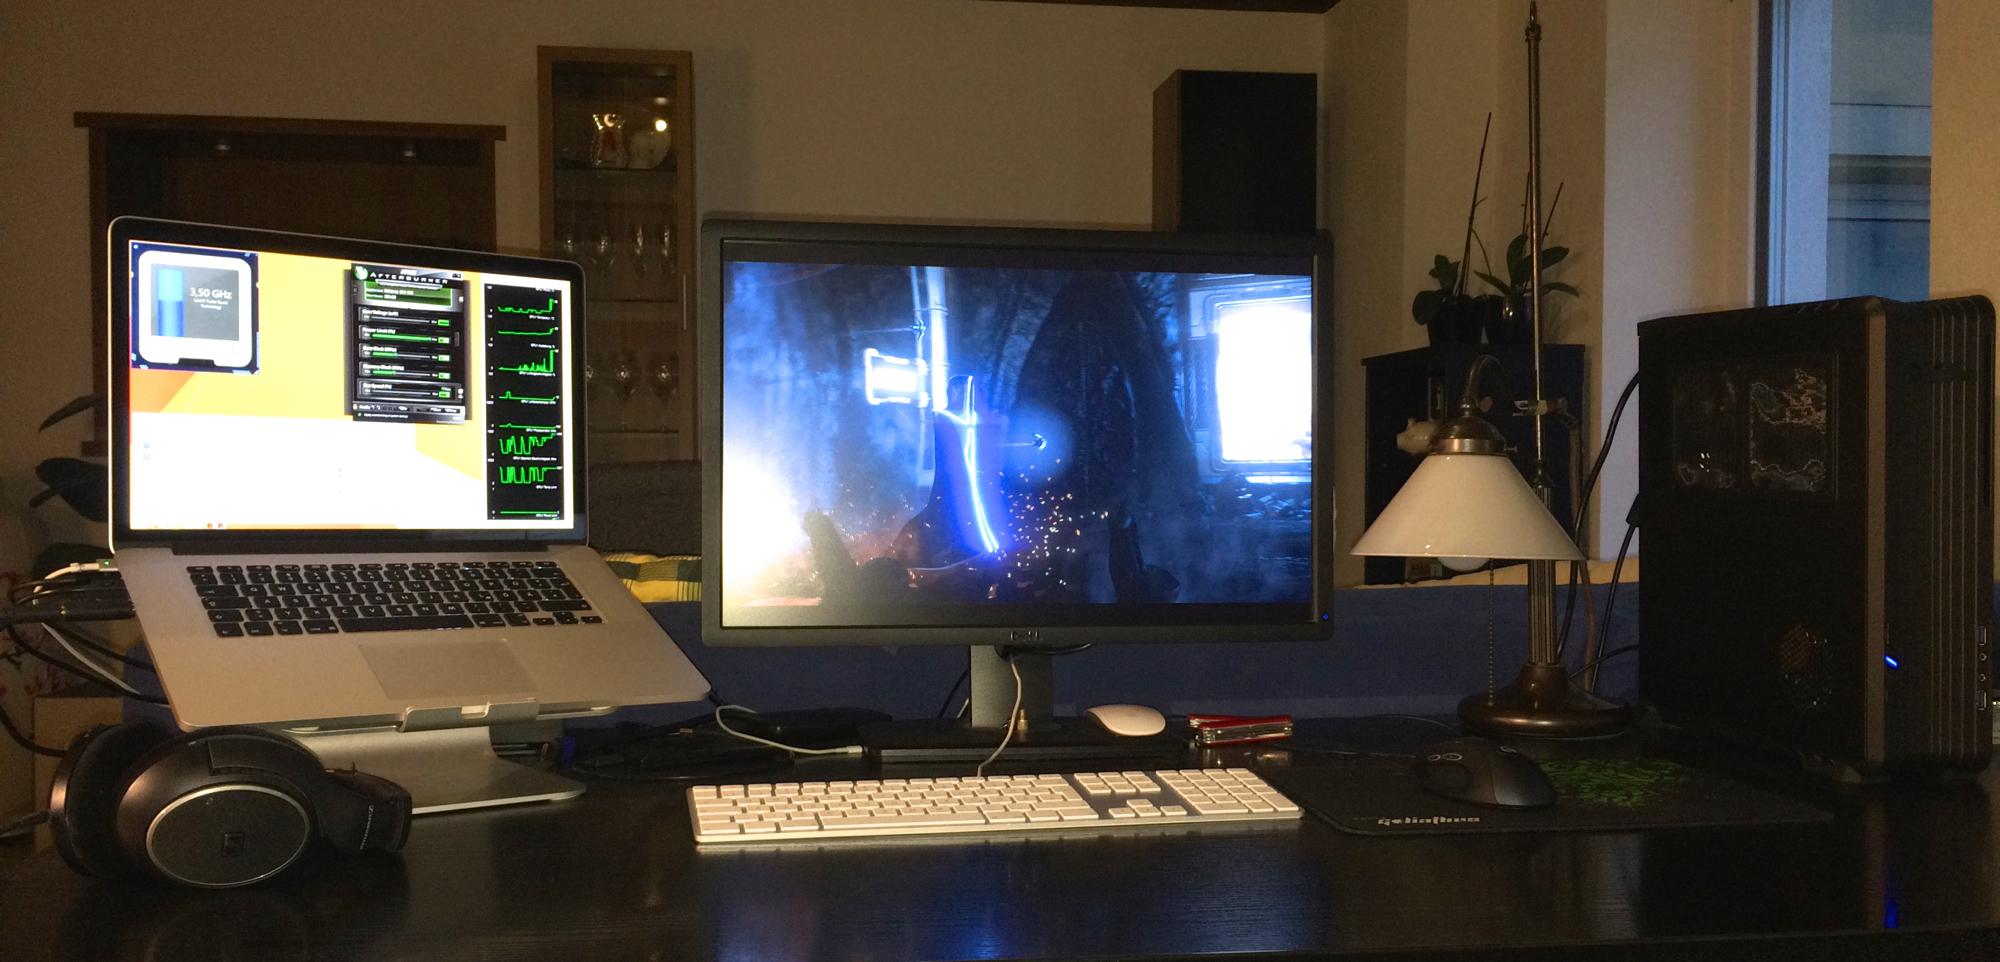
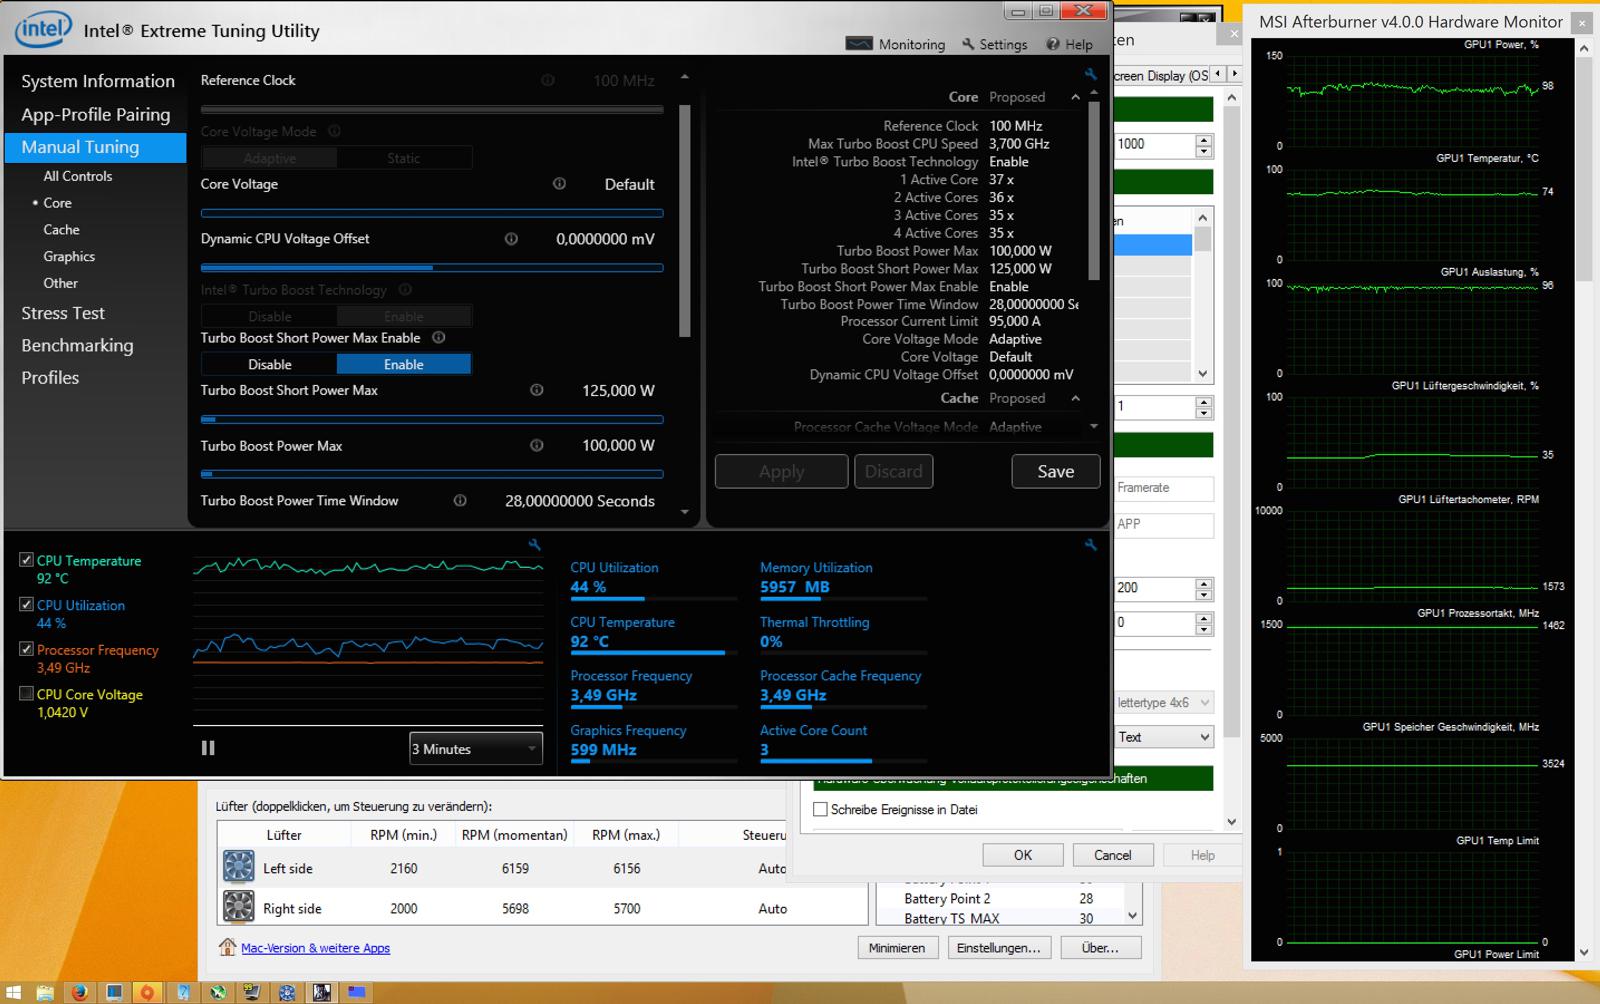
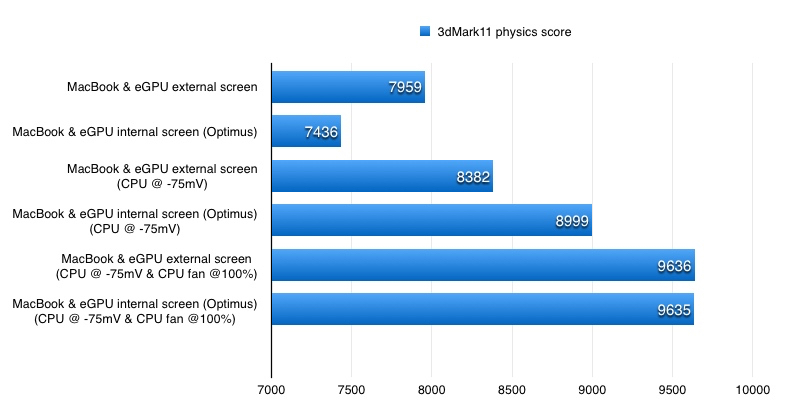
This guide is based on Evo*s guide. Made my optimus setup much more flawless. Other builds I made 3 builds until now: 2013 13" Macbook Pro + GTX970@16Gbps-TB2 (AKiTiO Thunder2) + Win8.1/OSX10.10 [Dschijn] 2014 15" Macbook Pro Iris + GTX970@16Gbps-TB2 (AKiTiO Thunder2) + Win8.1 [Dschijn] 2014 15" Macbook Pro Iris + GTX970@16Gbps-TB2 (AKiTiO Thunder2) + Win8.1 [Dschijn#2] PICTURES CONFIGURATION (Hardware) Apple MacBook Pro 15" Retina / i7-4870HQ 2.5Ghz / 512GB / 16GB (mid 2014), with Iris Pro graphics only AKiTiO Thunder2 PCIe Box Chieftec SFX-500GD-C Bitspower 24 PIN ATX PSU adapter to start the PSU EVGA GTX 970 FTW (Update 5th Feb. 2015: Switched to the new EVGA GTX 970 FTW+) PCIe 16x riser with powered molex - Please be aware that powered risers are not recommended to use. We strongly advice you to use a barrel plug instead: http://forum.techinferno.com/enclosures-adapters/8317-%5Bguide%5D-making-molex-barrel-adapter.html Apple 2m Thunderbolt Cable Silverstone RVZ01 Raven Why did I choose this case? I wasn't so pleased with the Cooler Master Elite 130. The footprint is too big and the GPU is struggeling to get fresh air (especially with a non Nvidia layout cooler). The Raven RVZ01 has the same footprint as the Sonnet III-D and is just a bit taller. It is still cheaper and offers better cooling options. I used a SFX-L PSU, which is the bigger brother of the regular SFX PSUs. It is using a 120mm fan to provide better cooling with less noise. Two slim 120mm fans (set to 7V) are pushing fresh air directly onto the GTX 970 (currently using 3 Noctua NF-F12 industrial PWM fans @ 7V. Will try to control them with the PWM signal of the GPU later). The more elegant case is the Silverstone ML07 Milo. It has the same footprint and functions but a more classic appearance. SOFTWARE INSTALLING Install Windows 8.1 64 bit from a USB stick by using ISO file. This is a standard Boot Camp installation. After installing Windows, download and install all Windows updates. Update Boot Camp drivers (Boot Camp Support Software 5.1.5640) and shut down Do the hardware preparing part 1-8 Install latest Nvidia driver Shut down MacBook Pro and continue from the hardware preparing step 8 Apply following steps to get Optimus internal LCD mode working: http://forum.techinferno.com/implementation-guides/8558-%5Bguide%5D-macbook-enabling-optimus-internal-lcd-mode.html#post110757 . Without this Optimus would only sometimes work. HARDWARE PREPARING Open AKiTiO's box by a normal screwdriver, take out the PCIe board, attach the riser and the GPU to its x16 slot Attach PSU's PCIe power cable to the GPU and do the "paperclip trick" or apply the adapter Attach the Molex power plug to the riser Attach DVI/HDMI cable to the eGPU Place something under the eGPU so that it will be steady Do not attach AKiTiO's 60W power plug to the DC jack of the PCIe board Connect TB cable Turn on MacBook Pro first Hold your "Alt" Key Power up AKiTiO/eGPU by switching on the PSU If your first boot with the eGPU fails, boot without the eGPU into Windows and power up the eGPU (and plug it into the MB) when you are in Windows. SOFTWARE Tools MSI Afterburner (overclocking and monitoring GPU): http://event.msi.com/vga/afterburner/download.htm Intel XTU (undervolting and monitoring CPU): https://downloadcenter.intel.com/Detail_Desc.aspx?DwnldID=24075〈=eng Macs Fan Control: http://www.crystalidea.com/macs-fan-control BENCHMARKS 3dMark Firestrike Please note, the computer benchmarks have been done with my first card (MSI GTX 970 4G gaming). With my 15" MBPr I used a EVGA GTX 970 FTW (power limit 110%, Core Clock +100MHz, Memory Clock +50MHz) eGPU Firestrike results with external screen NVIDIA GeForce GTX 970 video card benchmark result - Intel Core i7,Apple Inc. Mac-3CBD00234E554E41 eGPU Firestrike results with internal screen (Optimus, without external screen) NVIDIA GeForce GTX 970 video card benchmark result - Intel Core i7,Apple Inc. Mac-3CBD00234E554E41 3dMark 11 (All test done with: EVGA GTX 970 FTW, 110% power target, +70MHz GPU, +20MHz memory clock speed): 0mV external NVIDIA GeForce GTX 970 video card benchmark result - Intel Core i7-4870HQ Processor,Apple Inc. Mac-3CBD00234E554E41 0mV internal NVIDIA GeForce GTX 970 video card benchmark result - Intel Core i7-4870HQ Processor,Apple Inc. Mac-3CBD00234E554E41 -75mV external: NVIDIA GeForce GTX 970 video card benchmark result - Intel Core i7-4870HQ Processor,Apple Inc. Mac-3CBD00234E554E41 -75mV internal: NVIDIA GeForce GTX 970 video card benchmark result - Intel Core i7-4870HQ Processor,Apple Inc. Mac-3CBD00234E554E41 -75mV external (CPU fans @ 100%): NVIDIA GeForce GTX 970 video card benchmark result - Intel Core i7-4870HQ Processor,Apple Inc. Mac-3CBD00234E554E41 -75mV internal (CPU fans @ 100%): NVIDIA GeForce GTX 970 video card benchmark result - Intel Core i7-4870HQ Processor,Apple Inc. Mac-3CBD00234E554E41 POWER CONSUMPTION For power consumtion results, please take a look in my first guide: [GUIDE] 2013 13" Macbook Pro + GTX970@16Gbps-TB2 (AKiTiO Thunder2) + Win8.1/OSX10.10 VIDEOS Diablo III in 4k resolution (downsampling to 1980x1200) - FPS counter in the bottom right corner: Battlefield 4 - FPS counter in the upper right corner: Far Cry 4 - FPS counter in the upper left corner: The Witcher 3: GTA V: CPU TWEAKING By stressing the mobile CPU, it will reduce it's speed to adjust Intels CPU limitations. The CPU lowers it speed if: - a critical temperature is reached (sth between 95-100°C) - the max TDP (Thermal Design Power) is reached By lowering the CPUs voltage the CPU can more easily boost into higher frequencies / not too low throttle frequencies / hold it's boost frequency. With Intels XTU tool you can lower the "Dynamic CPU Voltage Offset" slider under "Manual Tuning - Core" to the left. Values around -100mV should be possible. After applying, test the stability of this new settings with Prime95 Small FFTs. With -100mV offset and without the offset) and fans set to 100% I get a higher 3dmark firestrike physics score (9751) because the thermal throtteling doesn't kick in and the CPU can constantly boost. I tested the settings in Geekbench (32bit) and Cinebench. Imo Cinebench is better, because the benchmark takes more time and the throtteling has a bigger impact as the quick Geekbench (or 3d Mark) where the thermal capacity of the cooler has a much bigger influence. Geekbench scores: 0mV 3187 - 11302 -50mV 3194 - 11916 -100mV 3180 - 12199 Cinebench scores: 0mV 1st 570cb -50mV 1st 584cb -100mV 1st 591cb 2nd 620cb 3rd 616 0mV fans 100% 1st 583 2nd 587 -100mV fans 100% 1st 642 2nd 638 3rd 643 As you can see, the lower voltage increases the results because the CPU can boost into higher states under full load and throttles less (hard). By setting the fans to 100% the slow increase of the fanspeed in the benchmark (stock) is excluded! In Battlefield 4 the CPU load is quite demanding and the CPU fan is working at full speed to prevent the CPU from throttling. With a very stable CPU voltage reduction of -75mV the fan speed is in a much lower area and much less annoying!


 1 point
 -
Hi everyone. New to Tech Inferno. You can call me Stu. Nando asked me to post my setup and results which I'm happy to do. I'm going to keep this as simple as possible since this eGPU project has been just that, simple and awesome. In my eyes, this is where the eGPU game ends. Thunderbolt 2 (and TB3 coming soon), full-size chassis, fastest single GPU on the market, running at desktop speeds. I suppose the only caveat is cost but considering I only need to upgrade my GPU from this point on, it’s worth it. I live an hour away from Sonnet's headquarters in California and decided I had waited long enough to complete my eGPU experiment. The results surpassed expectations. Feel free to scroll down for specific benchmark and game results. Key Points Completely plug and play. Standard Bootcamp 5.1 install (*see below), connect everything up, boot Windows, install drivers, you’re done. eGPU vs Desktop performance: 85-90% Gaming: Max out virtually any game. 60FPS+ (with a few exceptions. e.g. Black Flag has weird PhysX that kills performance so I turn it off) Discrete 750M graphics = No Optimus/Internal display support. MBP w/Iris only = Optimus support but not fully plug and play (**see below) Simulated Optimus FPS loss: 5-20% (window drag method) eGPU Setup Cost (Not including MacBook): $1500 to $2000 depending on GPU purchase *It appears only 2013 MBPs w/newer PCIe flash storage defaults to UEFI/GPT-based windows installation with Bootcamp 5.1 .. 2012 rMBP (and possibly other macs/notebooks) will not format to GPT and therefore no plug and play **Conclusive Results for 2013 13" MacBook Pro - Optimus - Thunderbolt 2 - Plug and Play Configuration 2013 Macbook Pro 15” w/GT 750M [email protected] 16GB-DDR3L 512GB SSD US$2599 Sonnet Thunderbolt 2 III-D Chassis (US$979) EVGA Nvidia Geforce GTX 780 Ti Superclocked 3GB (US$720) Corsair RM450 (Silent) Power Supply (US$100) for 8-pin cable only (Jumped the 12V rail with small piece of metal. Google it) Standard Bootcamp 5.1 (UEFI) Installation Windows 8.1 w/latest Nvidia drivers MSI Afterburner with custom fan curve, gpu temp/fan speed match (e.g. 68 degrees/68% fan speed) — Performance and Benchmark Results — Maximum Overclock Scores: FireStrike Graphics: 11227 link *Surpasses Titan and 780 Ti graphics score (without overclock) by 1000+ points comparison [Note: This is only one sample] 3DMark11 Score: 12781 link 3DMark11 Graphics: 13996 link 3DMark-Vantage Graphics: 46629 link 3DMark06 Score: 29254 link Unigine Valley Extreme HD: 70FPS / 2924 Unigine Heaven 4.0 Extreme: 67FPS / 1683 BioShock Infinite Benchmark (UltraDX11): 126FPS Overall eGPU vs Desktop performance Fire Strike comparison (Desktop 780 Ti vs eGPU 780 Ti SC) Reference: link Graphics Score Desktop: 11096 eGPU: 10410 Ratio: 93% (take into account reference doesn't mention overclock) Unigine Valley comparison (Desktop vs eGPU) Reference: link Desktop FPS/Score: 73.1/3057 eGPU FPS/Score: 60.2/2520 Ratio: 82% (take into account desktop CPU which offsets results somewhat) Bioshock Infinite Reference: link Ratio: 80-93% (calculated at multiple frame stops) Another Unigine Valley Comparison Reference: link Ratio: 91% (no overclock mentioned) Overall eGPU Perfomance vs Desktop Performance: 80-95% (Games and Benchmarks consistently show this) Internal Display FPS Loss (window drag method) Overall internal display FPS loss: 5-20% Unigine Heaven: 16% 53FPS vs 63FPS Borderlands 2: 5-10% CUDA-Z Bandwidth Host to Device: 1258 MiB/s Device to Host: 1366 MiB/s Device to Device: 136 GiB/s Reference Host to Device TB1 10Gbps: 781MiB/s link TB1 8Gbps (x2 2.0): 697MiB/s link Unigine Heaven (Basic 720p) 107 FPS Score: 2716 Unigine Heaven (Extreme 1080p 4XAA) 62.7 FPS Score: 1580 Unigine Heaven (Extreme 1080p 8XAA) 54.2 FPS Score: 1364 Unigine Valley (Basic 720p) 80FPS Score: 3343 Unigine Valley (Extreme 1080p 2XAA) 78.6 FPS Score: 3290 Unigine Valley (Extreme HD 8XAA) 60.2 FPS Score: 2520 3DMark11 Score: 11269 link Graphics: 12576 Physics: 8395 3DMark (2013) Fire Strike Score: 8807 Graphics: 10410 Physics 8102 Cloud Gate Score: 18795 Graphics Score: 57882 Physics Score: 5588 Call of Duty: Ghosts Max settings 1080p 2x AA: 60FPS+ Tomb Raider Ultimate (Tess. hair off) 1080p: 60-100FPS Crysis 1 Very High (Maxed) 2xAA 1080p: 60-90FPS (Fly-through Benchmark) Crysis 3 Very High (Maxed) SMAA 1080p: 40-60FPS Nvidia Demo - A New Dawn: 31FPS BioShock Infinite Official Benchmark - 1080p UltraDX11: All scenes average: 108FPS What about SLI? SLI Success! 2x 780Ti + 2x Sonnet SEL on MacBook Pro @32Gbps TB2 (2x 16Gbps) External discussion about this post: AnandTech: Running An Nvidia GTX 780Ti over Thunderbolt 2 TechReport: Thunderbolt box mates MacBook Pro with GeForce GTX 780 Ti MacRumors: 2013 15" Macbook Pro + GTX780Ti@16Gbps Thunderbolt2 eGPU implementation YouTube: MacBook Pro running an NVIDIA GTX 780 Ti over Thunderbolt 2 PC Perspective: NVIDIA GTX 780 Ti on Thunderbolt 2 by DIYers Linustechtips: Running an NVIDIA GTX 780 Ti Over Thunderbolt 21 point
-
I previously posted this thread with a similar setup but with a GTX 780: http://forum.techinferno.com/diy-e-gpu-projects/8357-egpu-octane-render.html System 2014 MBP Retina w/ GT750M, i7-4960HQ 2.6Ghz, 16GB RAM, 2xTB2-16Gbps ports Thunderbolt Monitor plugged in the second TB2 OS X 10.10 Octane Render 2.1 Cinema 4D plugin eGPU parts NVidia Titan Z 12GB dual-GPU 2.5-slot card 10.5" long card http://forum.techinferno.com/enclosures-adapters/7205-us%24200-akitio-thunder2-pcie-box-16gbps-tb2.html#post98210 barrel-to-molex adapter as per http://forum.techinferno.com/enclosures-adapters/8317-%5Bguide%5D-making-molex-barrel-adapter.html RM750 PSU Details The AKiTiO top shell was removed and vice grips used to bend the case at two places to accomodate the video card. The fan on top is the stock fan that comes in the Akitio. I just fitted it to the top to blow air down onto the backplate of the card. I ran the power wire behind the Akitio board to keep out of the way. The little cables that stick out from the Akitio board do rub the Aluminum backplate of the Titan Z. I placed a small piece of gaffer's tape in that spot on the backplate for extra caution but I don't think it's really much of a concern. Doesn't hurt that the fan is blowing onto it at that very spot. Since I'm doing 3D rendering and I won't be able to add cards to this setup, I thought I should just return my GTX 780 while I can and get the dual action of the Titan Z, if I could get it running. It wasn't a piece of cake, but it looks like everything is running smooth now. Initially, I was running Mavericks. I literally just pulled the 780 out and put the Titan Z in and it booted right up with the driver. But, I experienced some crashes when booting Cinema 4D Octane Render or in Cinema 4D Octane Render. Since there were some recent driver updates from Nvidia, I figured that might be a good next step but I needed Yosemite. The update was not very smooth but I got her going now. It really takes some finessing and following directions in the below below closely, but also with a knowledge of why. It seems an extra restart during the process can throw things off. After the update, I was still sometimes getting a boot to a black screen after the Apple logo. The computer would be running and the card would be on but the screen was black. This is when I tried out the powered riser I had laying around and rigged up a Molex>Barrel plug. After that, things seemed to smooth out. I grabbed a little case from a computer thrift store by my house (Free Geek – Computer/Technology Reuse, Education, Recycling & Sales) to put everything in but the riser wouldn't allow the card to sit nicely in there. Chatting with the guys in there (knowledgable bitcoin miners) they convinced me that just using the Molex>Barrel Plug from my 750 watt PSU alone would solve any power issues in the Akitio and card slot because that should be drawing at least 100 watts from the PSU to the Akitio. I gave it a shot and so far so good. I'm not using a powered riser, only using the Molex>Barrel plug to power the Akitio. The bitcoin miners said powered risers are usually used to prevent too much power draw from blowing out a motherboard and that because I'm not going into a motherboard with it, I don't need to worry about that. They said putting more watts into the Akitio with the Molex>Barrel plug should solve the issue, if it's a power issue. I still don't know if it was or not for sure. At this point things are running nicely. When I upgraded to the Titan Z in Mavericks, I saw about a 40% increase in Render speed. After updating to Yosemite, it seems I have gained bout 10% exta render speed and now my Thunderbolt monitor is no longer finicky - I can just leave it plugged in all the time. If anyone has insight as to why my card shows as 2 separate cards, only 1 of them titled 'Titan Z' in System Report, I am curious if this is expected. Of course, this is a dual card, but in Octane Render, it only loads as 1 card so I'm hoping my speed loss isn't because of only 1/2 of the Titan Z is being used. References used for assistance updating to Yosemite http://forum.techinferno.com/implementation-guides/8059-%5Bguide%5D-2013-15-macbook-pro-gt750m-gtx780ti%4016gbps-tb2-sonnet-ee-iii-d-osx10-10-a.html External GPU - V²C - ViDock :: Topic: macBook -> viDock -> 970GTX -> Oculus Rift (1/1) A Thunderbolt GPU on a Mac : How-to | Le journal du lapin1 point
-
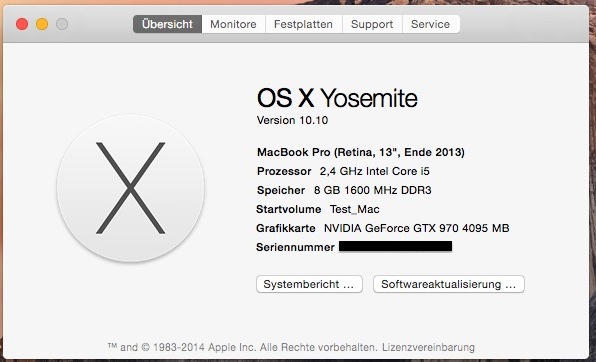
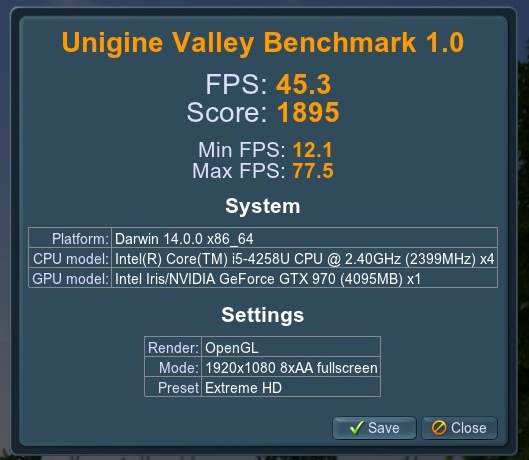
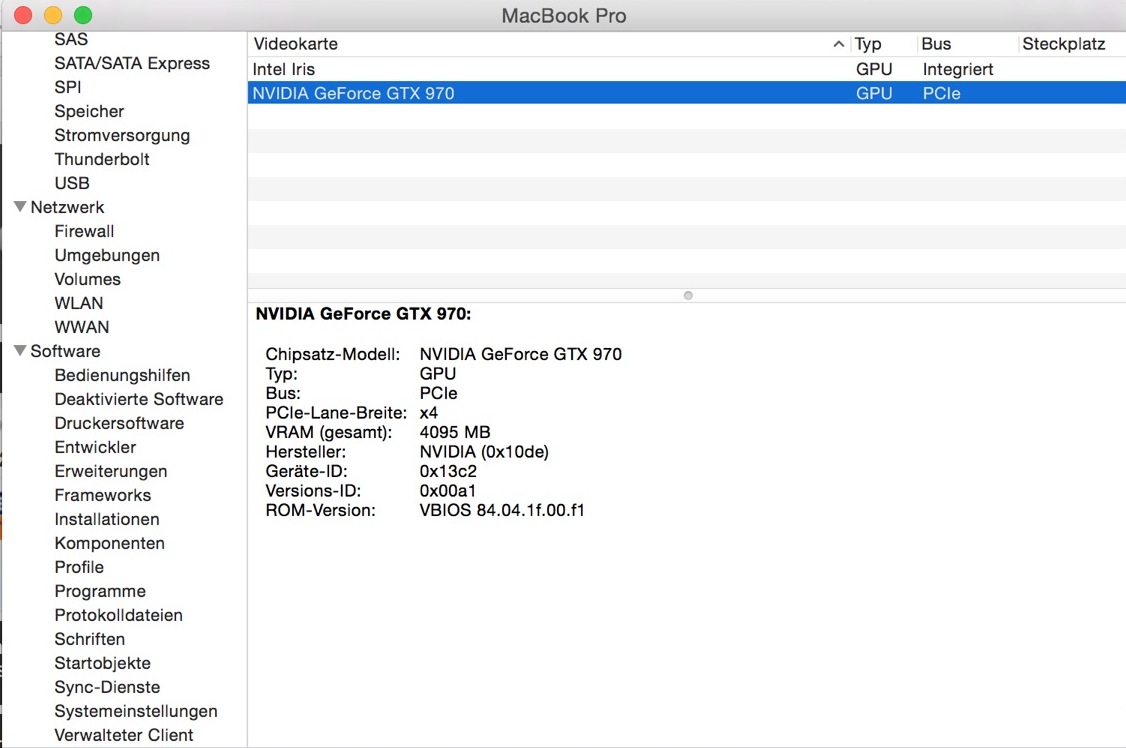
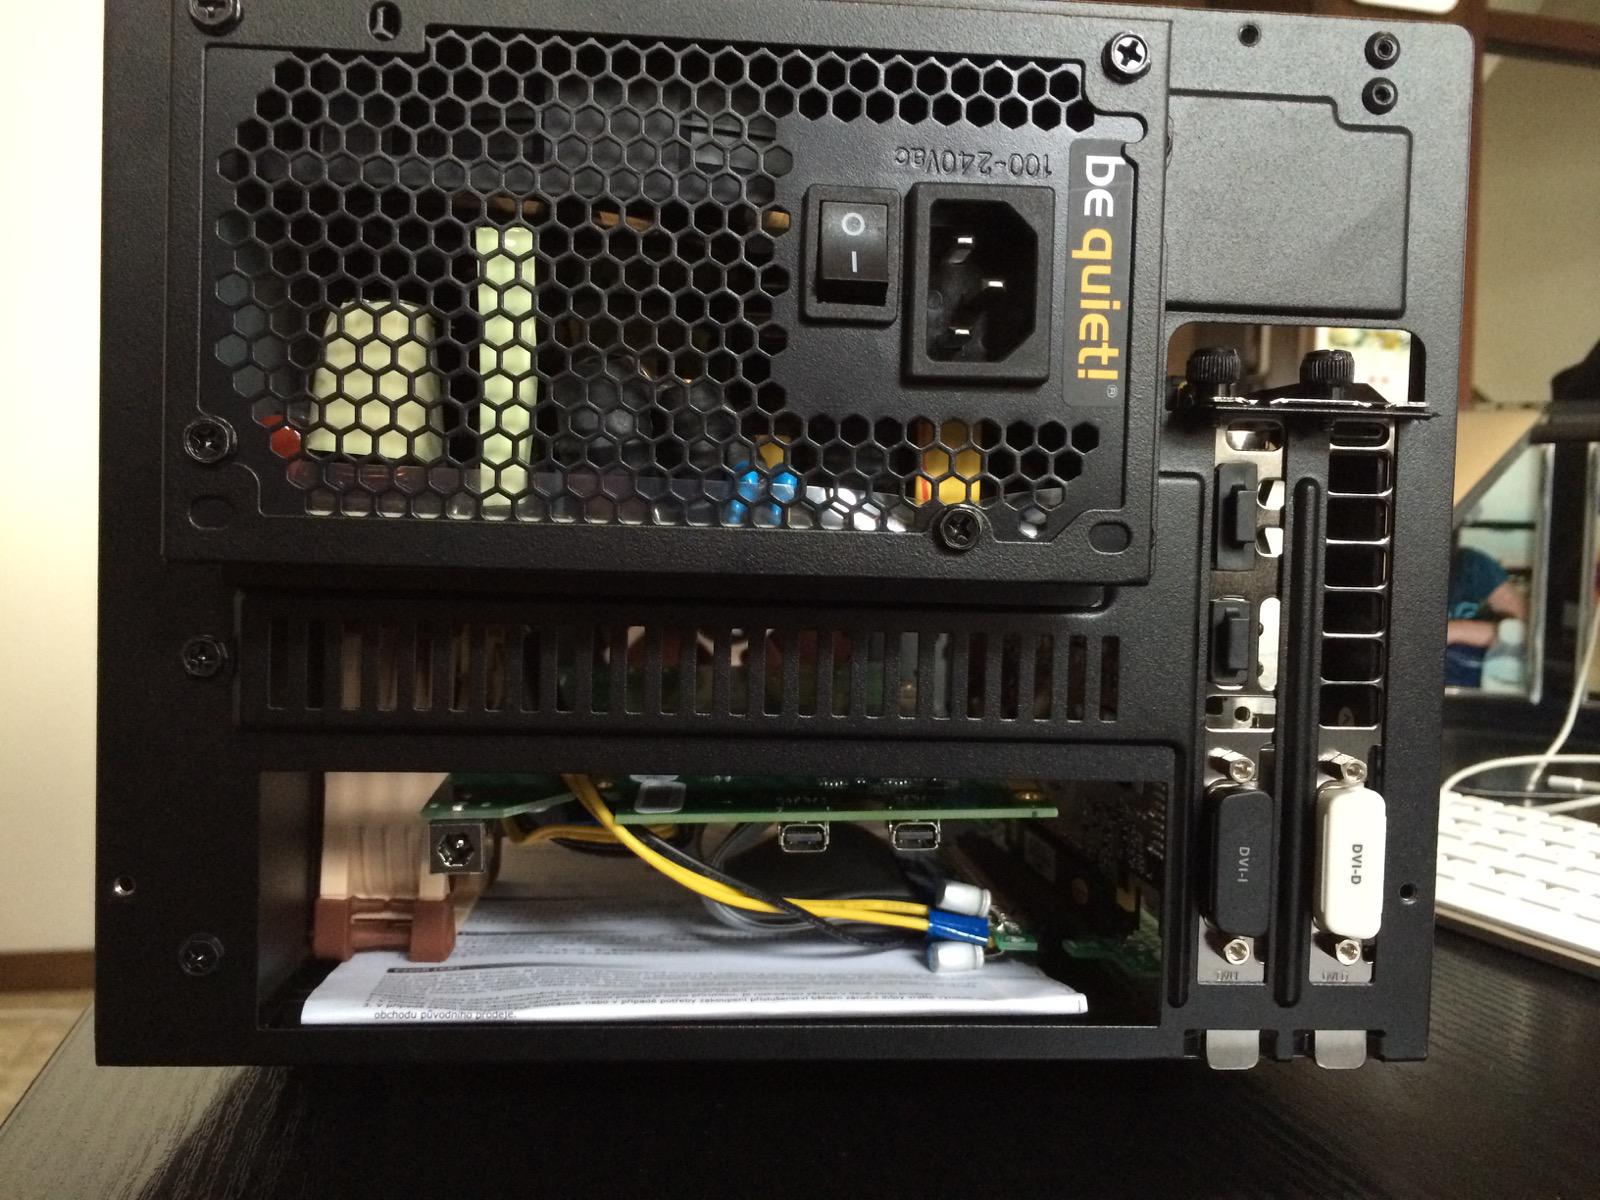
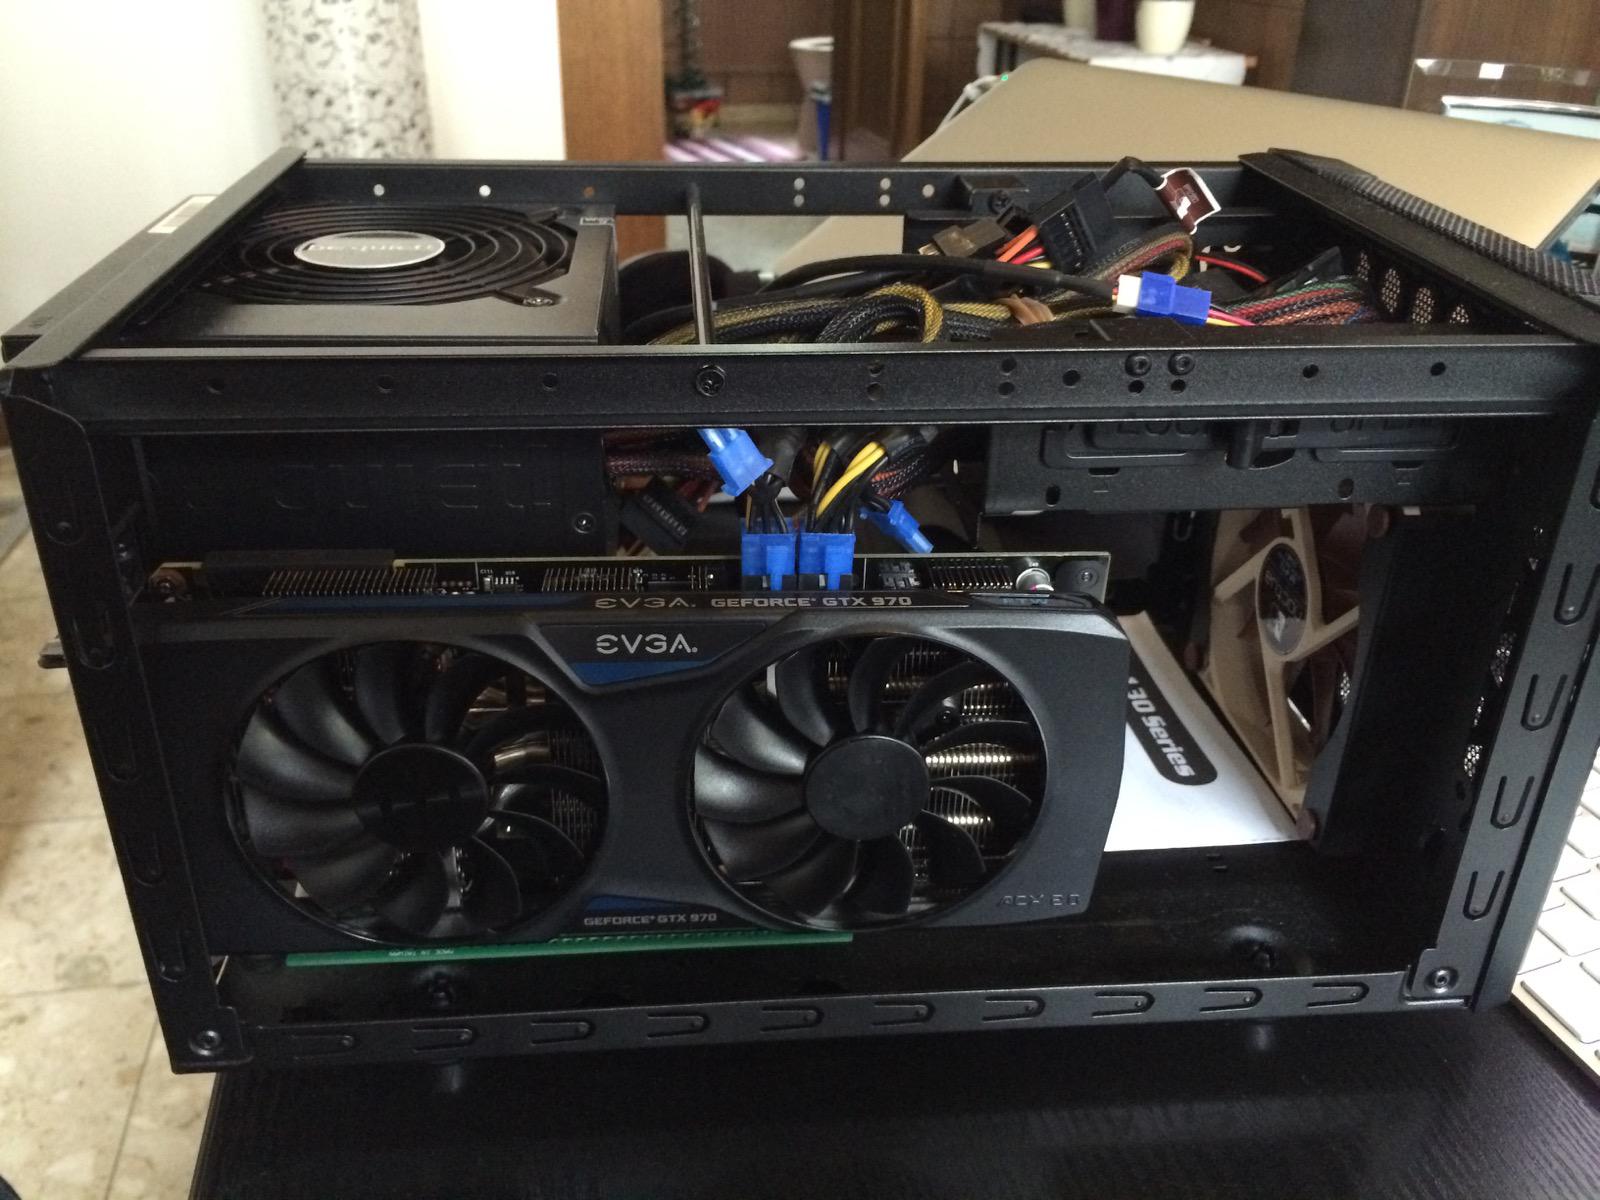
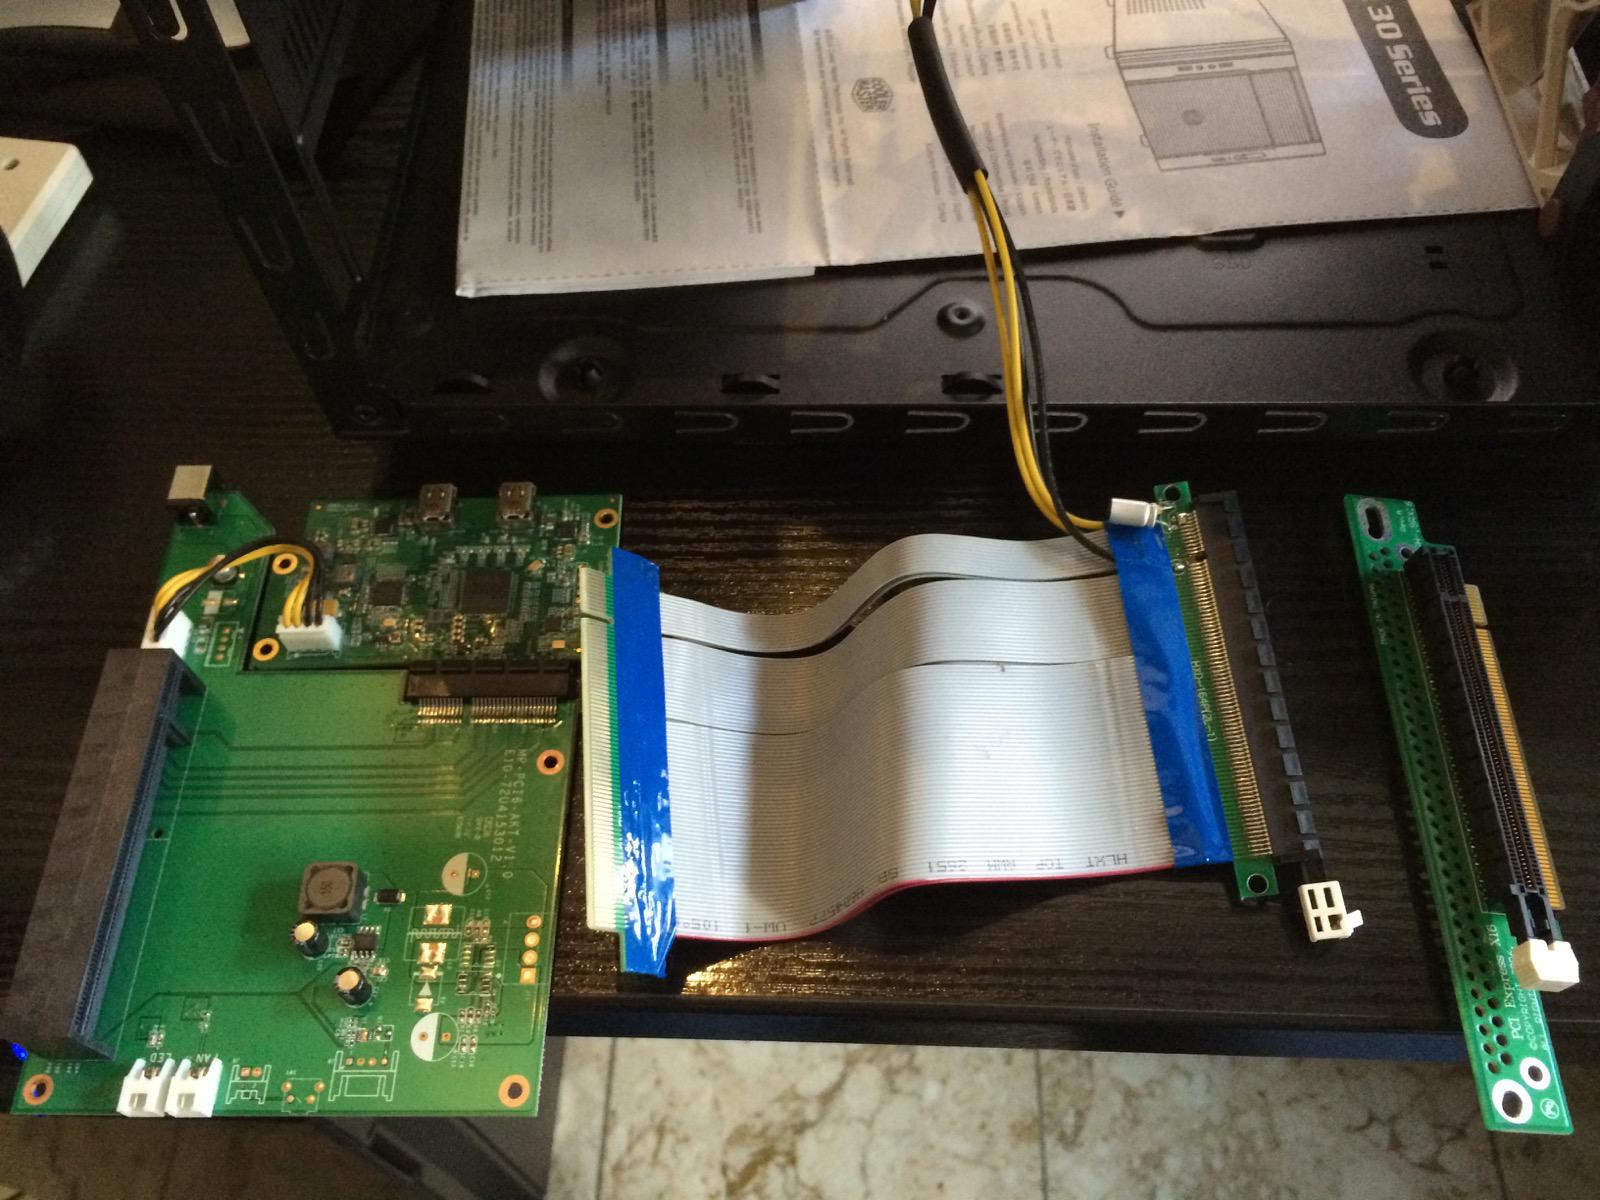
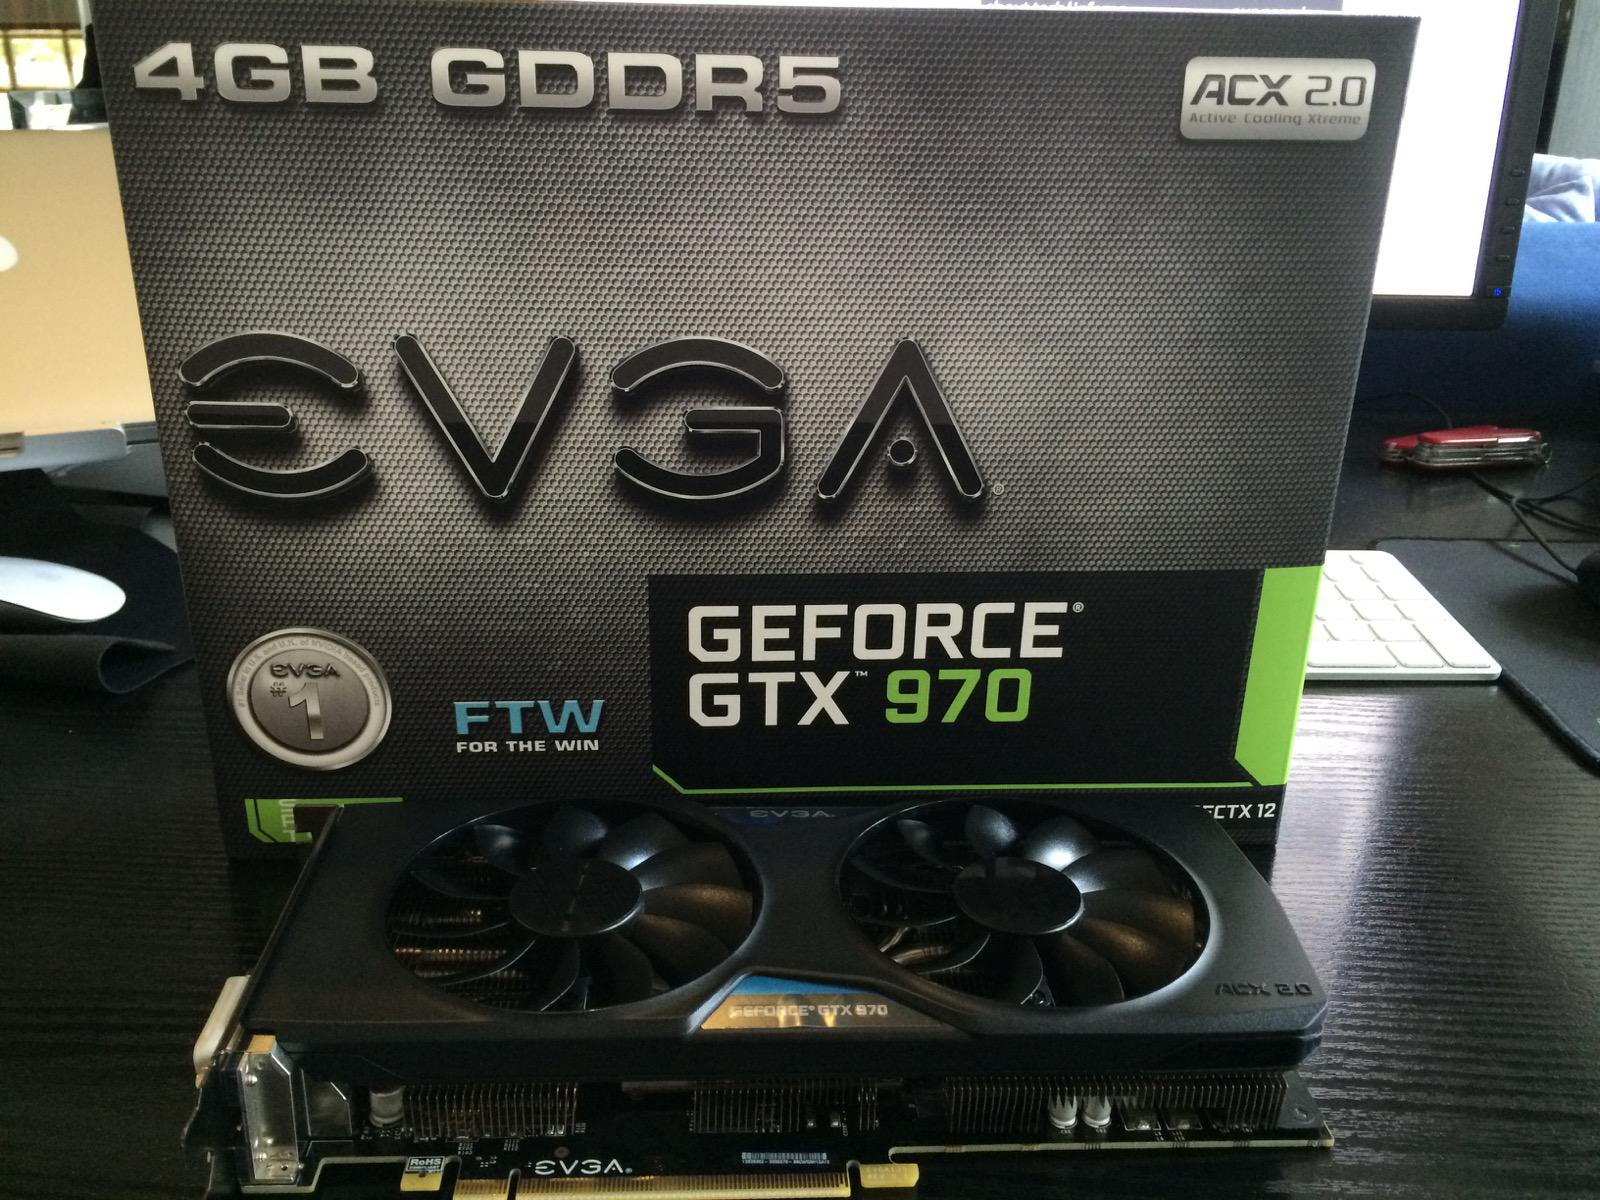
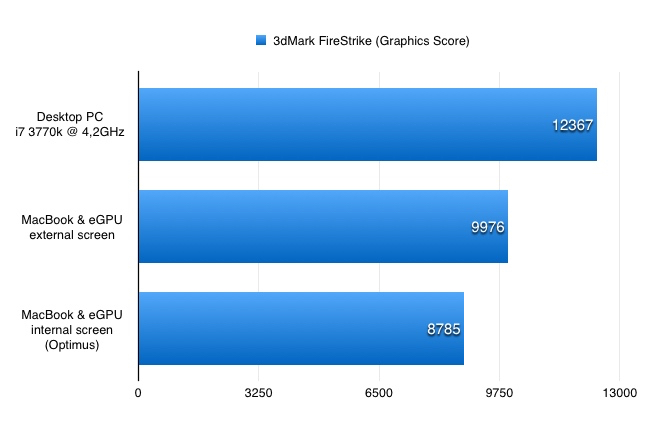
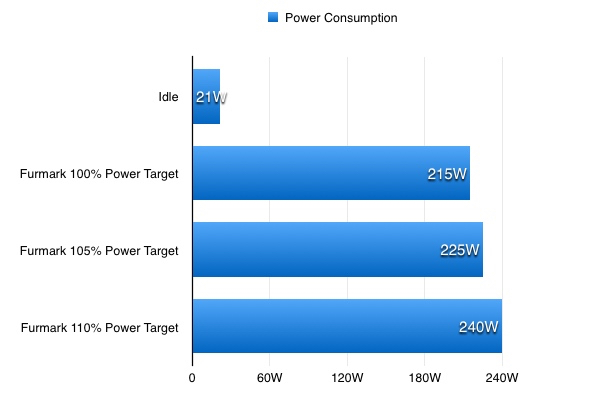
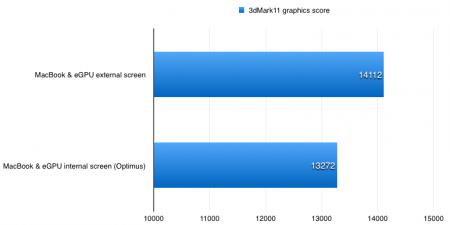
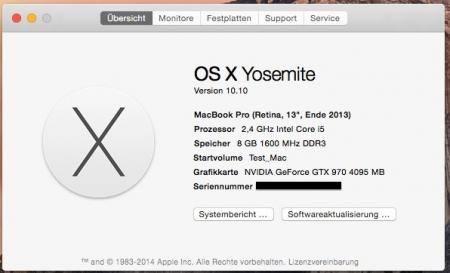
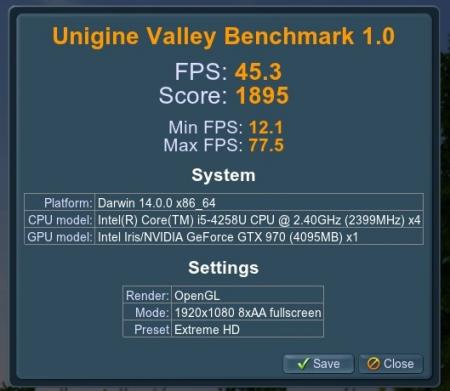
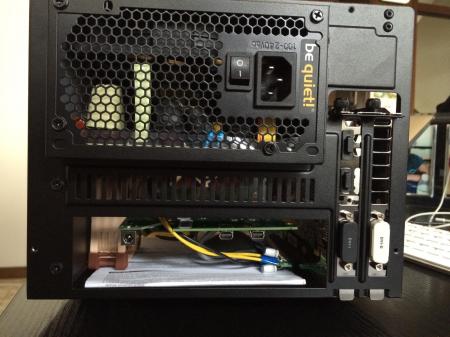
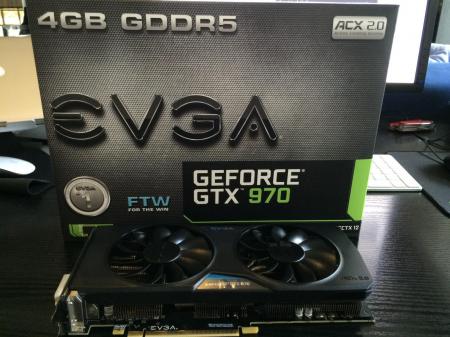
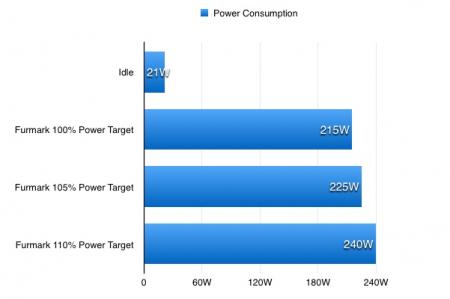
This guide is based on http://forum.techinferno.com/implementation-guides/7580-%5Bguide%5D-2014-15-macbook-pro-iris-gtx780%4016gbps-tb2-akitio-thunder2-win8-1-a.html#post103029. Many thanks to the awesome people of this forum and especially Tech Inferno Fan and goalque. Other builds I made 3 builds until now: 2013 13" Macbook Pro + GTX970@16Gbps-TB2 (AKiTiO Thunder2) + Win8.1/OSX10.10 [Dschijn] 2014 15" Macbook Pro Iris + GTX970@16Gbps-TB2 (AKiTiO Thunder2) + Win8.1 [Dschijn] 2014 15" Macbook Pro Iris + GTX970@16Gbps-TB2 (AKiTiO Thunder2) + Win8.1 [Dschijn#2] CONFIGURATION Apple MacBook Pro 13" Retina / 256GB / 8GB (Late 2013), with Iris graphics AKiTiO Thunder2 PCIe Box bequiet! System Power 7, 500W Bitspower 24 PIN ATX PSU adapter to start the PSU MSI GTX 970 Gaming 4G PCIe 16x riser with powered molex- Please be aware that powered risers are not recommended to use. We strongly advice you to use a barrel plug instead: http://forum.techinferno.com/enclosures-adapters/8317-%5Bguide%5D-making-molex-barrel-adapter.html a 90° PCB riser Apple 2m Thunderbolt Cable Cooler Master Elite 130 SOFTWARE INSTALLING Install Windows 8.1 64 bit from a USB stick by using ISO file. This is a standard Boot Camp installation. After installing Windows, download and install all Windows updates. Update Boot Camp drivers (Boot Camp Support Software 5.1.5640) and shut down Do the hardware preparing part 1-8 Install Nvidia driver 340.52 (Drivers | GeForce) Shut down MacBook Pro and continue from the hardware preparing step 8 Apply following steps to get Optimus internal LCD mode working: http://forum.techinferno.com/diy-e-gpu-projects/8106-%5Bwip%5D-2013-15-macbook-pro-iris-gtx970%4016gbps-tb2-akitio-thunder2-win8-1-osx10.html#post110489. Without this Optimus would only sometimes work as detailed in the spoiler. OS: Windows 8.1 (64bit) Reinstalled windows as described above. Installed the lastest Nvidia Driver (v344.16) and the latest Intel Graphics Driver (v15.36.7.64.3960)! Optimus is working by: 100% if external screen is main display Optimus fails by: 100% (after a reboot) if internal screen is setup as primary display and external screen as extended display. The following situations are (not) working: - booting with external display, internal and external display are working - external screen as main screen - window mode "Ungine Valley" can be dragged between both screens, always powered by the GTX 970 - booting without external display, internal display is working - Optimus is working - hot plug (plug and play) of the external display works on the fly in windows - unplugging the external display works, internal display still works and windows is not crashing - internal screen as main screen works, but fails after a reboot! - external display as 2nd display works - reboot without external display -> internal display is switched off (Optimus fails!) - plugging in the external display while internal display is black works, external screen is now main screen, internal screen is still off (Optimus fails!) - changing setting to extend the display to both screens doesn't work, internal screen is still off (Optimus fails!) - shut down, unplugging TB, plgging in TB, booting, internal screen is still off (Optimus fails!), previously setup extended display is off - device manager: Intel Iris is not found (turned off?) - setting up to extend the screen between both displays (external is main display)! - the previous step is compulsory! Without it, the next step will have NO effect - reinstalling Intel Graphics Driver works, reboot is showing internal display again - internal screen as main screen - reboot without external display -> internal display is switched off (Optimus fails!) - device manager: Intel Iris is not found (turned off again!) HARDWARE PREPARING Open AKiTiO's box by a normal screwdriver, take out the PCIe board, attach the riser and the GPU to its x16 slot Attach PSU's power cable (blue) to the GPU and do the "paperclip trick" as shown in picture 1. Attach DVI/HDMI cable to the GPU (if using a back bracket, I wasn't able to fit DVI-cable because the plastic part was too wide) and use any external monitor you like (4K would be nice to test with this setup) Place something under the GPU so that it will be steady (a removed front panel is perfect for this) Attach AKiTiO's 60W power plug to the DC jack of the PCIe board Connect TB cable Power up AKiTiO's box (green light should appear) and the PSU at the same time (I use a power strip with a switch on the floor) Turn on MacBook Pro (blue light should appear). If it is booting to OSX partition, change startup disk to Boot Camp partition from the OSX preferences. BENCHMARKS Optimus results (internal vs. external display): 3dMark_FireStrike (Graphics Score): 8785 vs. 9976 (88% performance of external display) 3dMark_11(Graphics Score): 12981 vs. 13773 (95% performance of external display) Valley_ExtremeHD(Score): 1922 vs. 2104 (91% performance of external display) Results (eGPU external display vs. Hackintosh): 3dMark_FireStrike (Graphics Score): 9976 vs. 12367 (81% performance of Hackintosh) Valley_ExtremeHD(Score): 2104 vs. 2274 (92,5% performance of Hackintosh) Results (eGPU internal display vs. Hackintosh): 3dMark_FireStrike (Graphics Score): 8785 vs. 12367 (71% performance of Hackintosh) Valley_ExtremeHD(Score): 1922 vs. 2274 (84,5% performance of Hackintosh) POWER CONSUMPTION Combination of GPU, ATX PSU, AKiTiO [without PSU], molex powered riser: Idle ~ 21W Valley ~ 150-160W (max. 180W) 3dMark11 ~ 200W (max 215W) 3dMark13_Sky ~ 195-200W (crashes after entering the cave) 3dMark13_Fire ~ 170-200W (max. 210W) Furmark ~ 215W (max. 220W [100% power target]) Furmark ~ 225W (max. 230W [105% power target]) Furmark ~ 240W (max. 240W [110% power target]) Combination of GPU, ATX PSU, without riser [AKiTiO PSU in use!], measured on the ATX PSU: Idle ~ 12,5W Furmark ~ 150W (max. 155W [100% power target]) Furmark ~ 158W (max. 160W [105% power target]) Furmark ~ 165W (max. 167W [110% power target]) Without riser [AKiTiO PSU in use!], measured on the AKiTiO PSU: Idle ~ 10W Furmark ~ 70W [100% power target] Furmark ~ 74-75W [105% power target] Furmark ~ 78-80W [110% power target] imho a powered riser is almost compulsory. The AKiTiO PSU specifications are output 12V, 5A = 60W. Furmark, which is of course no real world scenario, is exceeding the PSUs specifications. Might work for temporary peaks in games (real world scenario). PROBLEMS - GTX 970 is making a "coil noise", which is appearing in all 3d load situations (low and high FPS). This card will be exchanged by the webshop I bought it from. - Pictures, web links to benchmarks and anything else has to wait until (earliest) Monday, because I will send the card back and not at home until monday. UPDATE Was able to install the GTX 970 in OSX 10.10 Yosemite, following @Mark guide: http://forum.techinferno.com/implementation-guides/8059-%5Bguide%5D-2013-15-macbook-pro-gt750m-gtx780ti%4016gbps-tb2-sonnet-ee-iii-d-osx10-10-a.html BUT after changing to the OSX Default Graphics Driver, the eGPU setup is spoiled again… Can't fix it with reinstalling the WebDriver, kext editing, fixing and shutdown+boot. eGPU isn't recognized anymore PICTURES Note: MSI GTX970 with coil whine was replaced by EVGA FTW GTX970


 1 point
 -
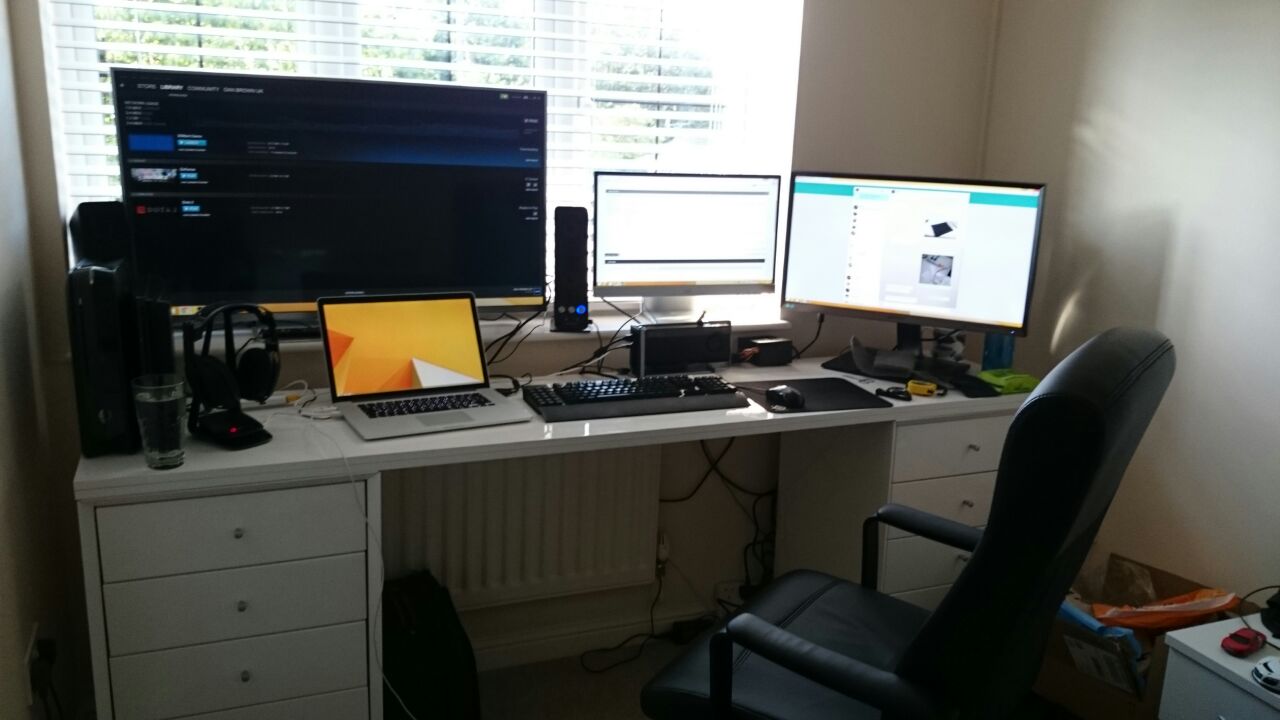
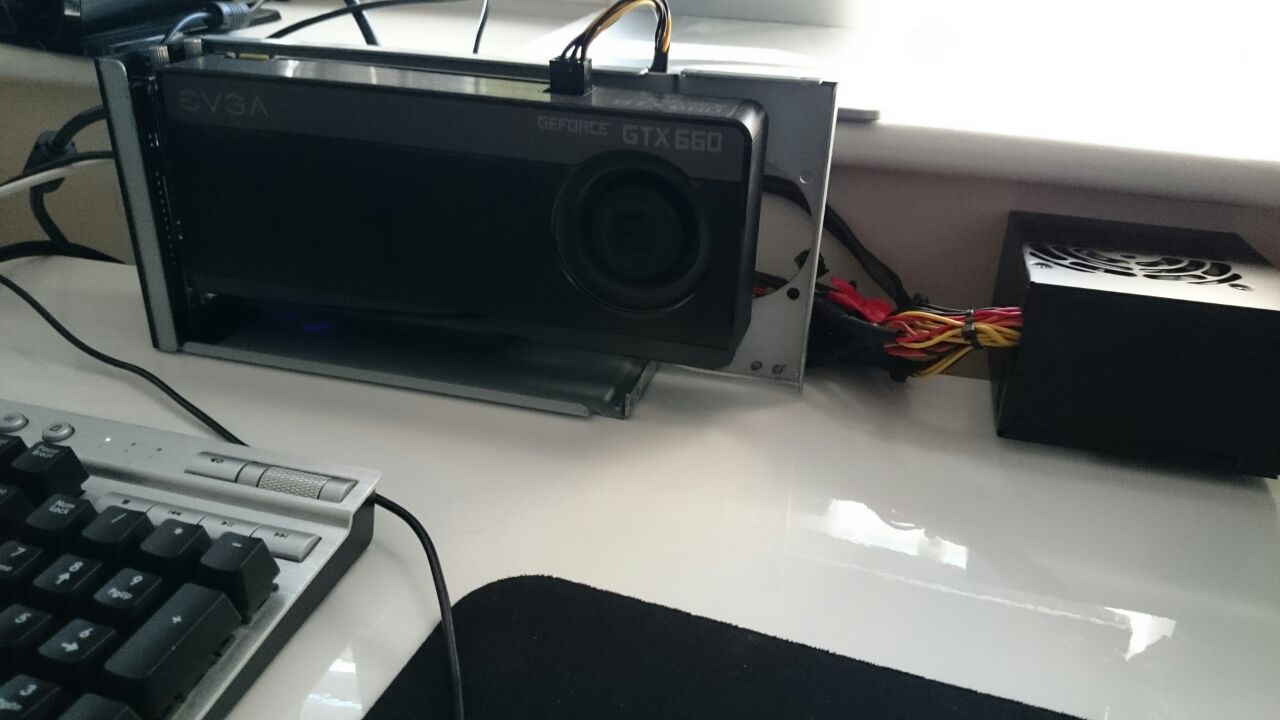
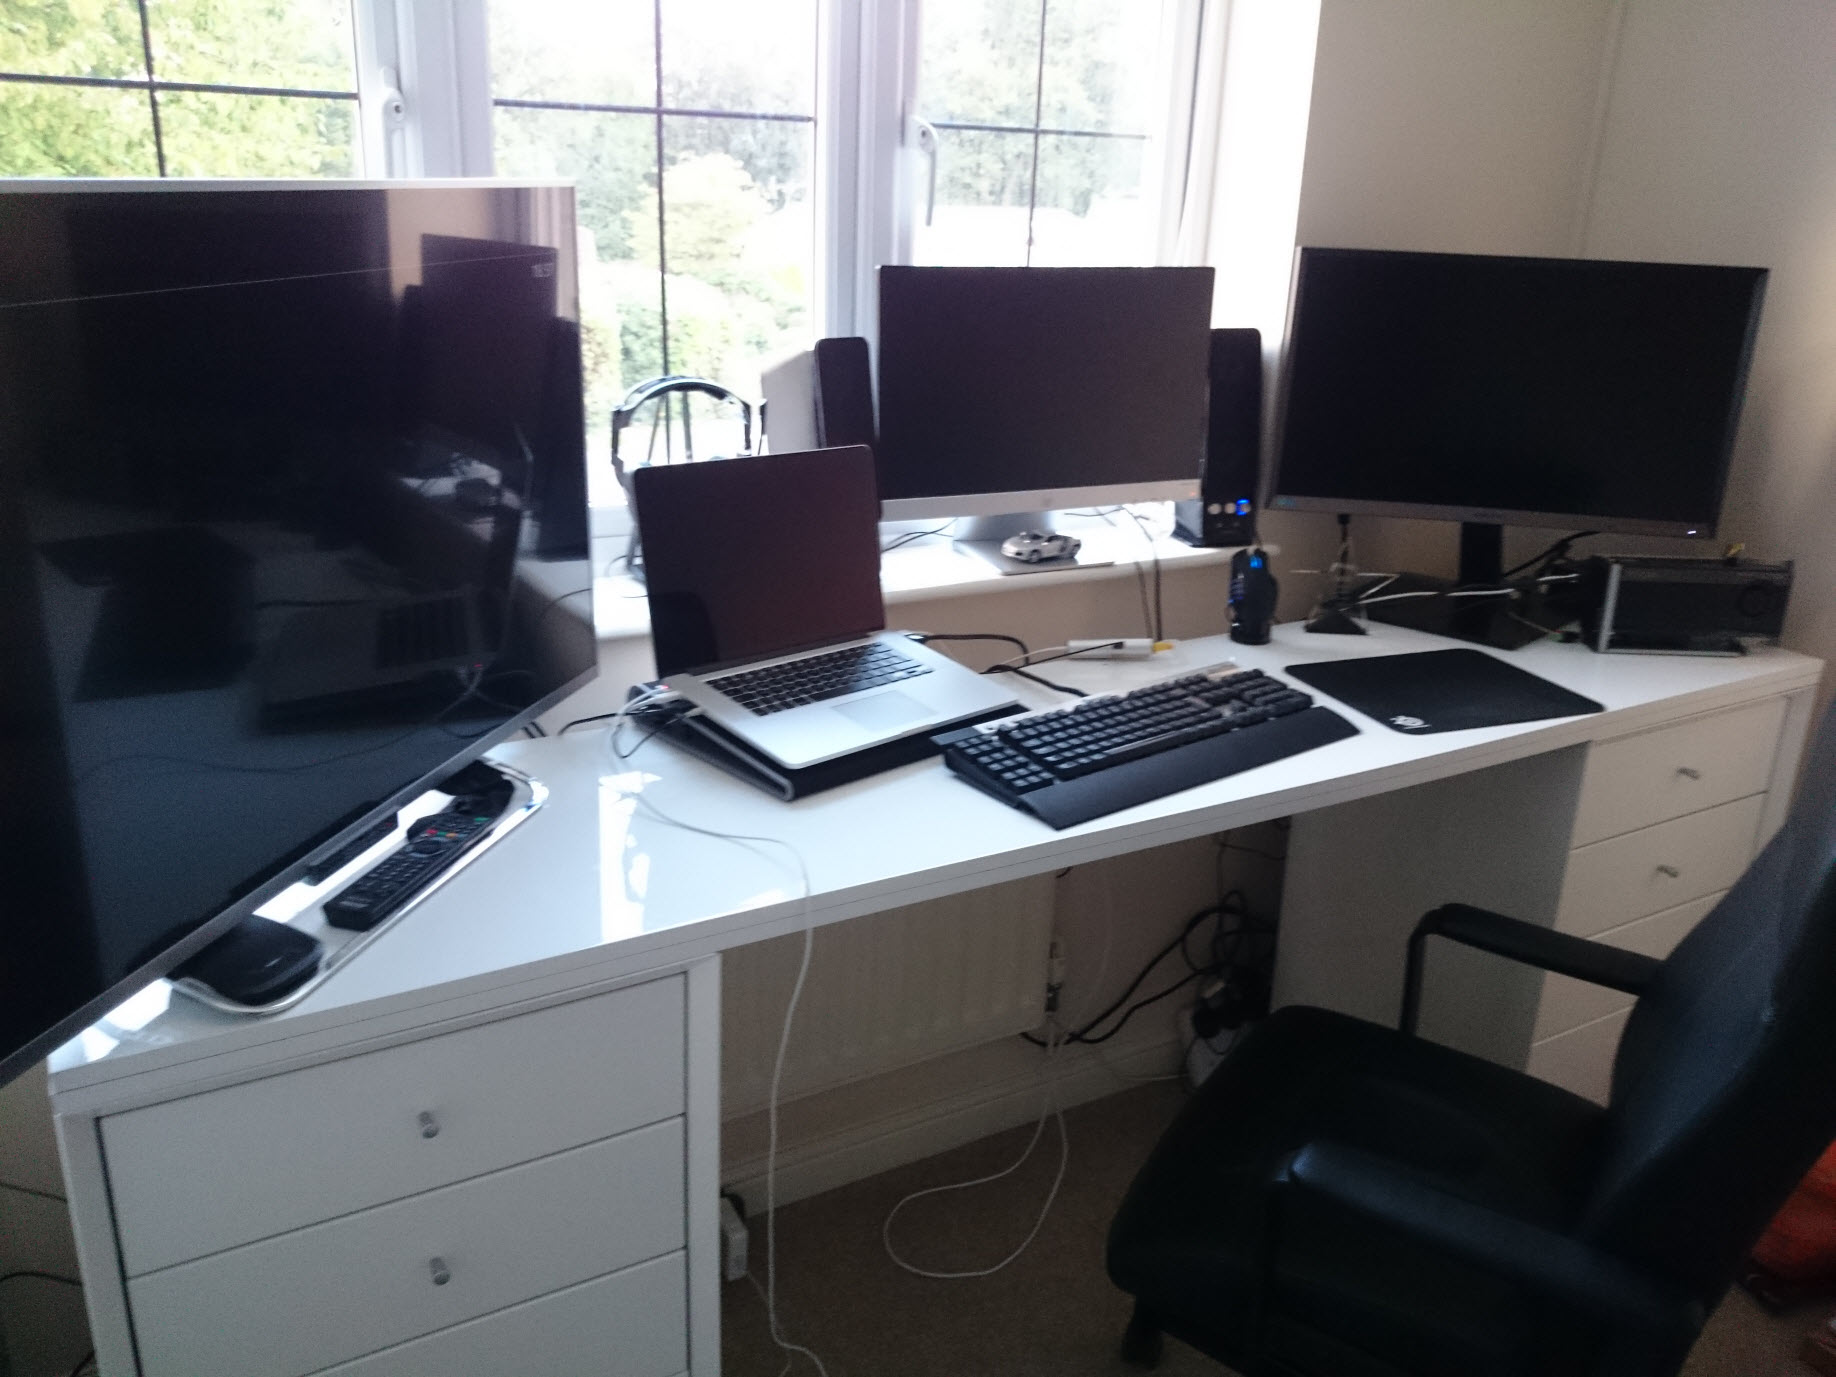
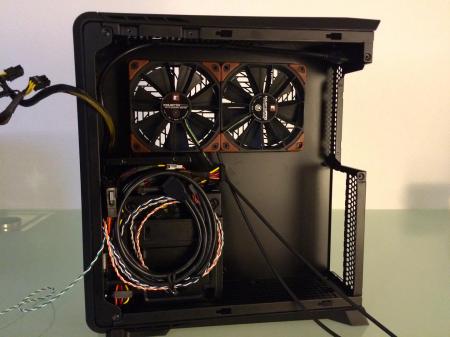
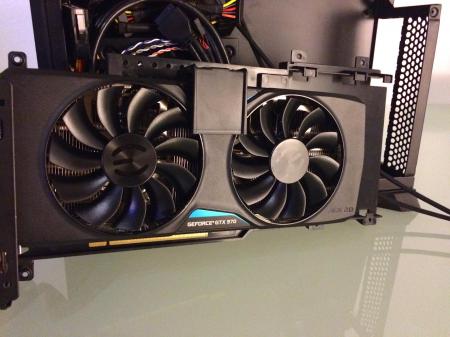
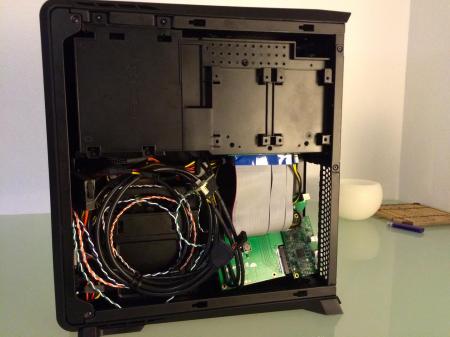
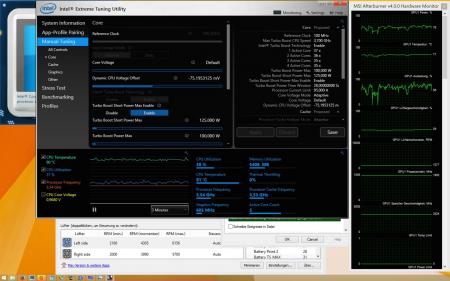
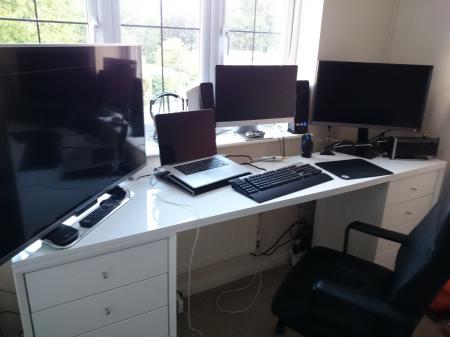
Hi all, You may have seen my other thread where I got an eGPU working on my 2011 Macbook pro. Based on this success, I decided to take the plunge and do a full desktop replacement, replacing my own-build Alienware x51 desktop for a 2015 15" Macbook Pro with AMD discrete GPU. Spec of desktop & new MBP Item/Machine Alienware x51 2015 Macbook Pro 15" CPU i5 3570k i7 4780HQ RAM 16GB 16GB Storage 128 SSD/750GB HDD 512GB m.2 SSD GPU GTX 660 AMD R9 M370X + GTX 660 My previous build had me using my eGPU from a (poorly) made aluminium case for portability so that I could take the build on a flight to Sweden for the Dreamhack Summer 2015 festival. For this build, I knew I was unlikely to get nVidia Optimus running, so this eGPU would be primarily desk-bound. As a result, I opened my AKiTiO case to enhance cooling and provide a more secure implementation. Benchmarks to follow (I will update my previous thread also!) Ran benchmarks using free version of 3DMark, settings may be incorrect as I have not paid to change the default res, I wonder if anybody could confirm if I need to buy it or not? Win 8.1 eGPU 660 External Monitor 3DMark13 Fire Strike 1.1 - 4211 Sky Diver 1.0 - 12855 Cloud Gate 1.1 - 25386 Ice Storm 1.2 - 173245 Win 10 eGPU 660 External Monitor 3DMark13 Fire Strike 1.1 - 4215 AMD Radeon R9 M370X video card benchmark result - Intel Core i7-4870HQ Processor,Apple Inc. Mac-06F11F11946D27C5 I'll be upgrading the machine to Windows 10 tomorrow evening and will re-run benchmarks for comparison. I also plan to purchase either a 970,980 or 980ti in the near future and benchmarks for the card I choose to purchase will be added. Re-worked desk & purchased a laptop-cooler:


 1 point
 -
Hi guys, Following on from @squinks' work: http://forum.techinferno.com/implementation-guides/6689-%5Bguide%5D-2013-15-macbook-pro-gt750m-gtx780ti%4016gbps-tb2-sonnet-ee-iii-d-win8-1-a.html#post91182 I have finally got my Sonnet Echo Express SE II working with the MSI Nvidia GTX760 and my late-2013 Macbook Pro 15" which I custom ordered to have only the Intel Iris 5200 GPU. It is also a quad-core with 16GB ram and 512GB SSD. I am powering the card using a Corsair RM650 because that is what was easily available, fully modular (so I only need the PCIe power cable) and has a power switch easily accessible. I am running Windows 8.1 which I have installed UEFI using this guide. Originally when I received the Sonnet I found out that the PCI slots were only 8x length and so you could not insert the graphics card which is 16x length. Because I am a bit of an idiot and couldn't find a google answer easily enough I tried to hack off the end of the slot with a utility knife. Unfortunately it seems that when I did that I put too much pressure on the PCB and broke it. I received the new board yesterday and you can see in the photo below that it looks like in the later revision (right) they changed the left slot from an 8x to a 16x so you don't have to hack up the slot like I (failed) to do. It is a shame that they didn't extend both of the slots as there would be more airflow if the middle slot was 16x too as the edge of the enclosure would be further apart. Also, the power cables only just fit and are under some pressure when the case is on, I haven't been able to find many 90 degree 'low-profile' PCIe power cables but that would solve this problem. In terms of operation it is a bit of a pain. If the Sonnet and the graphics card are powered when you turn on the machine then Apple's BIOS disables the Intel GPU. This will work perfectly with an external screen but if you have used one of these MacBooks you will know how incredibly good the MacBook's screen is. To get Optimus (or to install drivers) my turnon sequence is: 1. Turn on machine with only the Sonnet plugged in (PSU off). It annoyingly doesn't have a power switch but will turn on when the Thunderbolt cable is plugged in and MacBook is powered on. Hold down the alt/option key so you can select Windows. 2. As soon as the Apple startup chime is heard turn on the PSU (and therefore the graphics card). 3. Quickly start up Windows. I suspect something is happening with the Sonnet's power settings that if you delay then the GPU is not detected. Weird. 4. You should be able to tell the GPU has started as Windows does some strange stuttering on startup only (e.g. typing in password is strangely laggy) but this is completely gone after logging in. I haven't got that many benchmarks but you can see it is running correctly over Thunderbolt 2.0: CUDA-Z Performance Information ----------------------- Memory Copy Host Pinned to Device: 1262.49 MiB/s Host Pageable to Device: 1128.11 MiB/s Device to Host Pinned: 1352.1 MiB/s Device to Host Pageable: 1206.5 MiB/s Device to Device: 64.3746 GiB/s If you do the maths then Host to Device (1262)+Device to Host (1352) then we are getting pretty good speeds: 2614 (Megabyte / s) = 20.421875 Gigabit / s Also, you can see this is much higher than the Thunderbolt 1 Thundertek CUDA-Z score (for Device to Host only) of 790MiB/s vs 1352.1 MiB/s (171%). Now if only we had some other manufacturers interested they could quickly address these BIOS/EFI level issues and we could have true plug-and-play eGPUS!
 1 point