Leaderboard


Popular Content
Showing content with the highest reputation on 02/04/16 in all areas
-
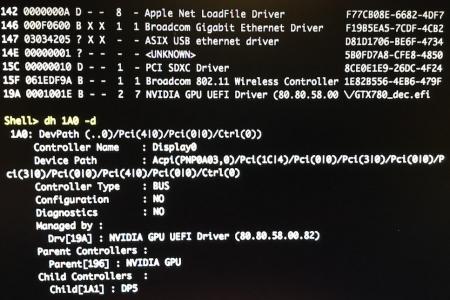
A few days ago, when I was researching in greater depth the EFI, I found out something amazing. I had an Asus R9 270X plugged, reporting a valid GOP (AMD GOP X64 Release Rev.1.54) by the “drivers” EFI Shell command and by the “dh” command, which displays all the protocols that are associated with that device handle. So, I unplugged the TB cable, swapped for an Asus HD 7870 (non-UEFI card) which doesn’t report about the GOP by itself, replugged the TB cable, typed “dh -p graphicsoutput” and the shell printed TxtOut, GraphicsOutput, EdidDiscovered and EdidActive protocols for the HD 7870. All the display interfaces worked (HDMI, DP, DVI). They can be seen under the device tree as “DFP2_HDMI” for example. The same trick worked for my another non-UEFI AMD card as well. Intel’s UEFI Specification 2.0 says “A PCI Device Driver should not be designed to care where it is stored. It can reside in a PCI Option ROM, the system's motherboard ROM, a hard drive, a CD-ROM drive, etc. All PCI Device Drivers are compiled and linked to generate a PE/COFF image.” Sounds logical. When the driver image is loaded, it stays permanent in the memory, even if the eGPU is swapped. I also looked at a couple of Nvidia’s UEFI images. Nvidia’s UEFI section in the ROM file complies with the Intel’s recommended PCI device driver layout (has 0x0EF1 value at offset 0x04). Took out the PE/COFF part from the correct offset, decompressed it with efidecompress command successfully, and then tried load command, but the EFI Shell said “incompatible version”. I said earlier that my Nvidia cards didn’t seem to support GOP. I meant that my test app didn’t find any frame buffer. I was thinking that if I could load the Nvidia GOP driver as well, but for some reason it wasn’t compatible. No new Nvidia drivers appeared in the list of loaded EFI drivers and that explains why my EFI test app didn’t find the GOP for my Nvidia card. AMD UEFI worked out of the box. I didn’t give up. Thought maybe a Kepler card UEFI GOP would work, so did the same extract procedure for the GTX 780 ROM. Plugged in my USB stick, typed “load GTX780_dec.efi” and… Success. These tests confirm what Intel says - the UEFI driver doesn’t have to be in the GPU ROM. As we know, the eGPU boot screen is not important with TB Macs since it’s always visible through the iGPU/dGPU. However, I’m rethinking about EFI version of the automate-eGPU.sh since I found a way to bypass SIP via dmpstore in EFI environment. That would be a huge amount of work. At least, my EFI test app written in C will be available on GitHub.
 2 points
 -
Welcome to the 2560P Owner's Lounge! A place to liase with other owners and share useful tips/tricks/mods to get the most satisfying user experience from this exceptional ultraportable notebook. Release date: 9 May 2011 Reviews/Comparisons: laptopmag, NBR, pcworld. HP 2560P vs Lenovo X220 (butwhyme) HP 2560P vs Lenovo X220 vs other ultraportables/ultrabooks (spoiler below - Tech Inferno Fan) HP 2560P vs 2530P (butwhyme) HP 2560P vs 2540P vs 2530P vs 2510P (spoiler below - Tech Inferno Fan) Customized 2560P systems (ordered by approx additional expense spent) Owner Storage Other Mods 2.5" sata bay sata optical bay/2.5" caddy External Tech Inferno Fan ssd: 128GB MDS Bullet Proof hdd: 500GB/newmodeus - DC_optimized, GTX560Ti DIY eGPU SimoxTav ssd: ??? hdd: 250GB/ebay - i7-2630QM, GTX560Ti DIY eGPU, 8GB RAM vnwhite ssd: 256MB Crucial C300 hdd: 750GB/ebay - DC_optimized, i7-2820QM, 6300AGN, 8GB 1866MHz RAM RED - highest performance setup | GREEN - lowest power consumption drive setup (2.5" SSD see here). OS, drivers and disassembly Drivers, Manuals, Maintenance And Service Guide, Media Services Library with disassembly videos.Popular HP Notebook Software Collection : one-stop location for the latest versions of popular HP notebook sw.Win7 OEM sources : the additional HP installation contents added to a Win7 CD.HP/Compaq Desktop Wallpapers : A compilation of stock wallpapers from the HP and Compaq notebook rangeHP DMIFIT 118 Utility: change DMI details, eg: model number, serial, password. Used to tattoo your system in case you replace the systemboard. Usually done by a HP technican.StorageSecond hotswappable 9.5mm 2.5" HDD/SSD via optical drive bay. 2560P examples: ebay (SimoxTav) or newmodeus. e-sata/usb cable or enclosure, useful for external e-sata storage. Eg: convert optical drive to be external unitExpansionUSB 3.0: add a US$15-delivered USB 3.0 expresscard.DIY eGPU: to attach a desktop videocard via expressport. Provides HDMI/DVI and accelerated graphics. WWAN/WIFI card whitelist: the WWAN/WIFI cards the 2560P bios will bootup with.Ivy Bridge CPU retrofit for 2560P?: proposed method to get ME 8.x firmware onto a 2560P for Ivy Bridge CPU support.TweaksFlashing F.01 bios to a 2560P : to regain 1866Mhz RAM support removed in subsequent versions. Includes details on other hacks.F.28 or newer BIOS removes RAM frequency limit. Can use 1866Mhz RAM at full speed.HPFancontrol: set custom (quieter) fan profile confimed to work on a 2560P by pejxPerformance: running 1600, 1866 or 2133Mhz DDR3 RAM in a 2560p : gain up to 54%/10% single-channel/dual-channel HD3000 performance.DC_optimized: optimize the system to maximize battery life, idling at 4.7-5.2W!! Done with more sophistication by vnwhite &.Enabling third-button mouse click scrolling with touchstykDual-channel RAM: increases WEI RAM and video (1x4GB vs 2x4GB)How to enable Upgrade Bay Hard Drive boot: so can hit F9 at bios screen then boot off an optical bay caddy HDD or SSD.Disconnect upgrade bay caddy diagnostic pin: allows the system to fully shutdown rather than hang with a black screen.MiscRetrofitting webcam to non-webcam models : in case you have a non-webcam model.Backlit keyboard mod: HP Folio 13 backlit keyboard retrofit??EliteBook NightLight mod: increase the brightness/spread of the nightlight by removing the diffuser.Obtaining an expresscard blank: if lost or damaged yours. Replacement comes with an optical drive weight saver. FAQ about optical drive space saver: can it's faceplate be used on other ODDs or a caddy? Answer: no/maybe. Schematic - Inventec_Styx_MV.pdf (aka HP Elitebook 2560P). The block diagram summary is below:1 point
-
Version 1.0.0
2089 downloads
Files contained in this download: Asus 770m (G750JX) - 80.06.54.00.13 'OC edition' rev02.zip Clevo 670mx - 3GB - 80.04.58.00.03 - 'OC edition'_rev02.zip Clevo 675mx (4GB) - 80.04.58.00.05_'OCedition'_rev00.zip Clevo 680m - 80.04.29.00.01 'OCedition' revised_01.zip Clevo 680m - 80.04.33.00.10 'OCedition' revised_01.zip Clevo 680m - 80.04.33.00.10_'OCedition'_revised_01 - OV 1000v.zip Clevo 680m - 80.04.33.00.10_'OCedition'_revised_01 - OV 1025v.zip Clevo 680m - 80.04.33.00.10_'OCedition'_revised_01 - OV 1050v.zip Clevo 680m - 80.04.67.00.01 'OCedition' revised_01.zip Dell 680m - 80.04.5B.00.02_'OCedition'_revised_00.zip Dell 680m - 80.04.33.00.32__'OCedition'_revised_00 - OV 1000v.zip Dell 680m - 80.04.33.00.32__'OCedition'_revised_00 - OV 1025v.zip Dell 680m - 80.04.33.00.32__'OCedition'_revised_00 - OV 1050v.zip Dell 680m - 80.04.33.00.32__'OCedition'_revised_00.zip Dell 765m - 80.06.61.00.01 - 'OC edition' (AW 17) - v00.zip Dell 765m - 80.06.64.00.01 'OC edition' (AW 14).zip Dell K4000m - 80.04.33.00.34_'OC edition'.zip Dell K5000m - 80.04.33.00.05 'OCedition' rev00.zip HP K3000m - 80.04.33.00.2E - 'OC edition'.zip MSI 670mx (1.5GB) - 80.04.5B.00.A5 'OCedition' rev00.zip MSI 675mx (2GB) - 80.04.58.00.14_'OCedition'_rev00.zip MSI 675mx (4GB) - 80.04.58.00.0E_'OCedition'_rev00.zip MSI 680m - 80.04.33.00.24_'OCedition'_revised_02 - OV 1000v.zip MSI 680m - 80.04.33.00.24_'OCedition'_revised_02 - OV 1025v.zip MSI 680m - 80.04.33.00.24_'OCedition'_revised_02 - OV 1050v.zip MSI 680m - 80.04.33.00.24_'OCedition'_revised_02.zip MSI 770m - 80.06.54.00.11 'OC edition' - rev02.zip Nvidia 770m - 80.06.51.00.0F 'OC edition' - rev02.zip Nvidia GTX 780m - 'OC edition' - rev02.zip Nvidia GTX 860m (Kepler) - 'OC edition' - rev00.zip Nvidia GTX 870m - 'OC edition' - rev00.zip Nvidia GTX 880m - 'OC edition' - rev00.zip Nvidia K3000m - 80.04.3A.00.07_'OCedition'_rev00.zip Instructions on how to use these files:1 point -
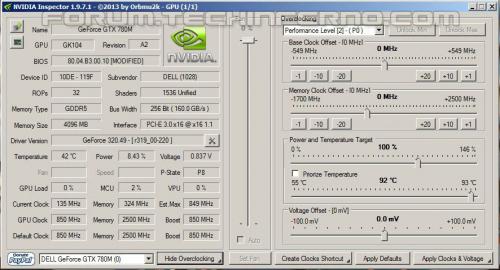
I want to share this experience with all. finally I am using eGPU with my Lenovo Y580. performance is amazing and I also tested 3D Mark fire strike and GPU score is 11280. Notebook 15" Lenovo Y580 HD4000 iGPU + GTX660M dGPU i7-3630QM @ 2.4Ghz CPU 8GB RAM 120GB Evo 850 SSD Windows 8.1 64-bit eGPU hardware EXP GDC Beast mPCIe Gigabyte GTX970 G1 Gaming Corsair CXM500M External LCD Benchmark 3dmark-FS.gpu=11280 Full Setup tutorial Enable using internal LCD for windows 10 Videos: benchmark between old dGPU and new eGPU1 point
-
One month ago, i've started my first eGPU project. I was looking for a solution to improve my render times. I've searched the web for possible solutions and i found this site. After two days reading a lot of articles in this forum, i've made my decision. So i started a new thread "eGPU with IMac 21" 4k (late 2015)" in the section "Apple eGPU discussion" and wrote down my questions. Within a few hours, I've got all the answers i needed (many thanks to @Dschijn! Without his recommendations, gain experiences and hints, i never would be able to build my egpu). When i finished my first part of my egpu project, Tech Inferno Fan asked me to post an implementation guide. So here is my implementation guide: Because i want to speed up my render times, i needed an GPU with a lot of CUDA cores. So i decided to built up my eGPU with a high performance GTX 980 TI. My Hardware: iMac (Retina 4K, 21.5", Late 2015) 3.3 GHz Intel Core i7 1TB Fusion Frive HDD 16GB 1867 MHz DDR3 RAM The components, I bought: Akitio Thunderbolt2 PCIe Expansion Box MP-TB-PCIE ( https://www.format.de/Products/5961/index.php?gclid=CPDWsYn2hsUCFUblwgodMa0AVA) ASUS STRIX GTX 980 Ti (http://www.hiq24.de/shop//GeForce-STRIX-GTX980TI-DC3-6GD5-GAMING,-Grafikkarte/170245/100/i.html?) PSU: Thermaltake Smart SE 630W (http://www.hiq24.de/shop/Hardware/Komponenten/Netzteile/ab-500-Watt/Smart-SE-630W,-PC-Netzteil/81758/9512/i.html?) 24-Pin ATX adapter (https://www.caseking.de/bitspower-24-pin-atx-ueberbrueckungsstecker-zuad-083.html) DC cable (http://www.reichelt.de/DC-AKS-7525/3/index.html?&ACTION=3&LA=446&ARTICLE=150126&artnr=DC+AKS+7525&SEARCH=niedervoltstecker+2.5mm) MOLEX adapter (http://www.reichelt.de/DELOCK-82315/3/index.html?&ACTION=3&LA=446&ARTICLE=143815&artnr=DELOCK+82315&SEARCH=6-pin+pcie+kabel) Within a few days, i have got everything, i need. I've opened the AKiTiO. I bend the back part of the case a bit because the GTX980TI is to long. I put the GPU into the PCIe slot I connected the two 6+2 power cables from the PSU to the GPU With the DC cable and the MOLEX adapter, i've built up a power connector for the AKiTiO (as described here in the forum) I prepared the ATX adapter for the paper clip trick After this steps, i connected everything together and so i've got my eGPU in the "ghetto-mod" version I connected the TB2 cable (included within the AKiTiO) and switched on power at the PSU Then i've turned on my iMac (now the blue LED at the AKiTiO lights) For the driver installation, i've downloaded the script: https://www.techinferno.com/index.php?/forums/topic/7989-script-automating-the-installation-of-egpu-on-os-x-inc-display-output/ I've followed the instructions in the thread. This script is doing the installation automatically (thanks to goalque for this amazing work) After the first try, I've got the message "nvram: Error getting variable - 'csr-active-config': (iokit/common) data was not found" To solve this, the SIP has to be switched off (csrutil disable) when using MAC OS X El Capitan (here is a link http://www.macworld.com/article/2986118/security/how-to-modify-system-integrity-protection-in-el-capitan.html) Then i boot up my system and installed the latest CUDA driver package from NVIDEA I started my 3D program and the external GPU was recognized directly. I did a few test render,, the performance was great :-) Then i connected an external monitor to the eGPU via a HDMI cable and after i made the external monitor to my primary monitor (https://support.apple.com/en-us/HT202351) everything works fine. Conclusion: The whole project has lasted one week. The system runs very stable and the fans are very quiet. Many thanks to this forum! The next steps will be: finding a suitable case for my PSU, AKiTiO and GTX upgrading to OS X 10.11.3 and the latest NVIDEA driver installing Windows 10 (via BootCamp) and make the eGPU running under Windows Update: I have just updated to MAC OS X 10.11.3 and NVIDEA Web Driver 346.03.05f01 (incl. CUDA Driver Version: 7.5.25). Everything works fine. Update: A few days ago, I also installed Windows 10 /with Bootcamp). I followed the instructions (and the power up sequence) by ZapCord and everything works fine. The eGPU will be recognized and i am able to do fast renders. On the external display, the eGPU works brilliant, only OPTIMUS will not work.
 1 point
 -
the described procedure is exactly what i do every time, i start Windows. I will try the EFI method at the Weekend But the Performance on the external Screen is amazing. So i am happy right now with the results i've got so far :-) Thanks so far.1 point
-
I modified a slim PC case, to house a HDD, VGA,and a ATX PSU. Its the same size as the e6430 with the Dell PR03X dock, which sits on the top of it. The PSU powers the lappy through the dock, besides every component inside, and is switched on/off automaticly whenthe machine is docked/undocked. Works flawless with the little script, which disconnects the GPU as a device when i undock :). It's almost ready for the paint job, just missing the cutout for the 92mm fan on the top, which is blowing the air direcly to the intake on the laptops bottom. The interior air-chambers turned out really good, also has a front USB, working power button, and audio in/out. Will post some pics when its finished1 point
-
I got intel AC72601 point
-
@timohour The nvs5200 has a 64-bit GDDR5 interface. All cards with a GF117 core have 64-bit DDR3 interfaces. Memory setup will be completely wrong if we try to copy/paste the whole vbios. It's possible that the E6530 BIOS does not allow for pci-e downscaling. It needs to run x8 with the pad missing. I put a damaged 7970m that could only do x8 into a P150HM once and it did not run, and another undamaged 7970m worked fine. Meanwhile the P150EM did downscale the damaged card to x8 and worked fine. I could check if a sliver of the pci-e trace is left and try to get a ball on it, or maybe expose what's left of the trace and get a wire on. This is not something I will try for a while though as this will take a lot of time to do, and we're talking about a 96 shader fermi core here. Also TY for the schematic info. UPDATE: So Prema is confident that the core cannot work with the GF108 vbios. I'm going to try a GF117 vbios and hope enough axillary stuff matches to at least get something out of it. It's possible the vbios will have a GDDR5 section in case GDDR5 is detected. Even if not the the should still be detected even with no functional memory.1 point
-
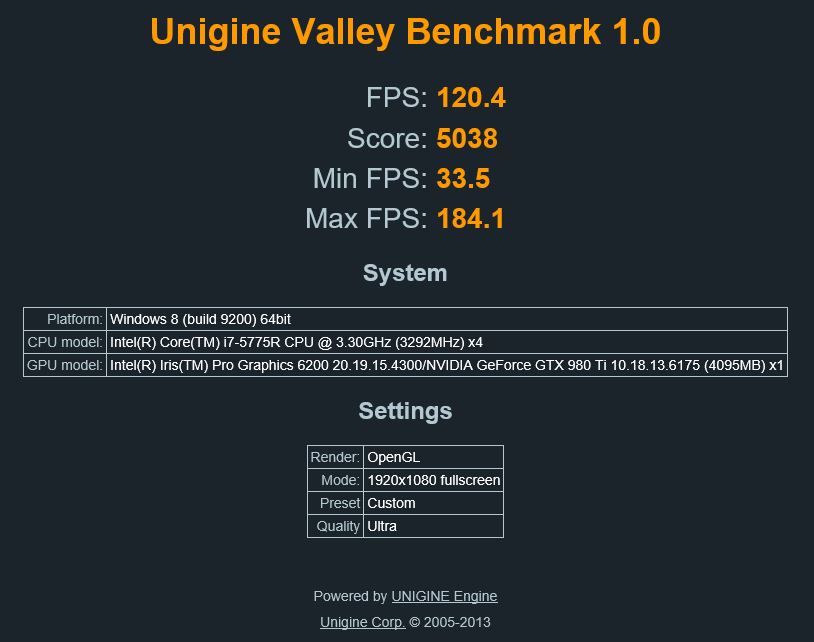
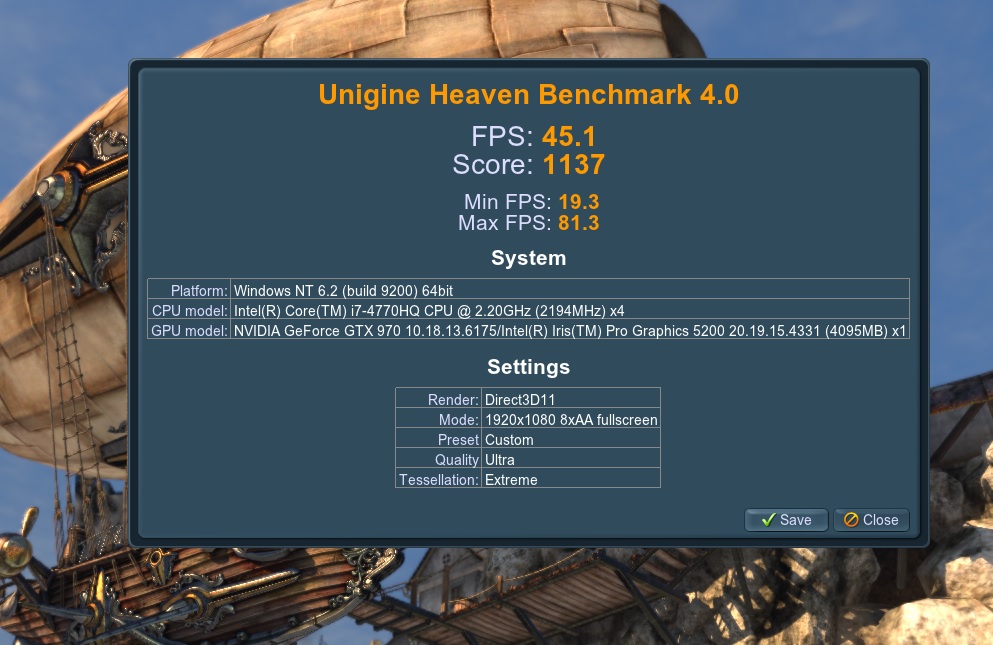
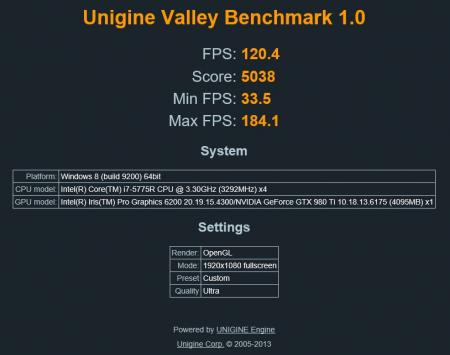
@stemoac Greetings! It is very much possible to run both displays with nvidia. However, the internal display will not show the egpu as its display adapter. -That is due to the fact that the internal display is connected to the integrated graphics no matter what; however, the brunt-work is still handled by the egpu. You can see this in the spoiler below. -Notice that the score is a little bit less than the one I posted above in my original post as it is run on the internal monitor. -That is due to the inefficiency of having to route all traffic through the integrated graphics no matter what for the internal display. I hope this clears it up! EDIT: grammar errors

 1 point
 -
@stemoac Can you first test making the external display (connected to the eGPU) your main display and run a test/benchmark? Secondly try with the eGPU without the external display and try a test/benchmark on the internal display.1 point
-
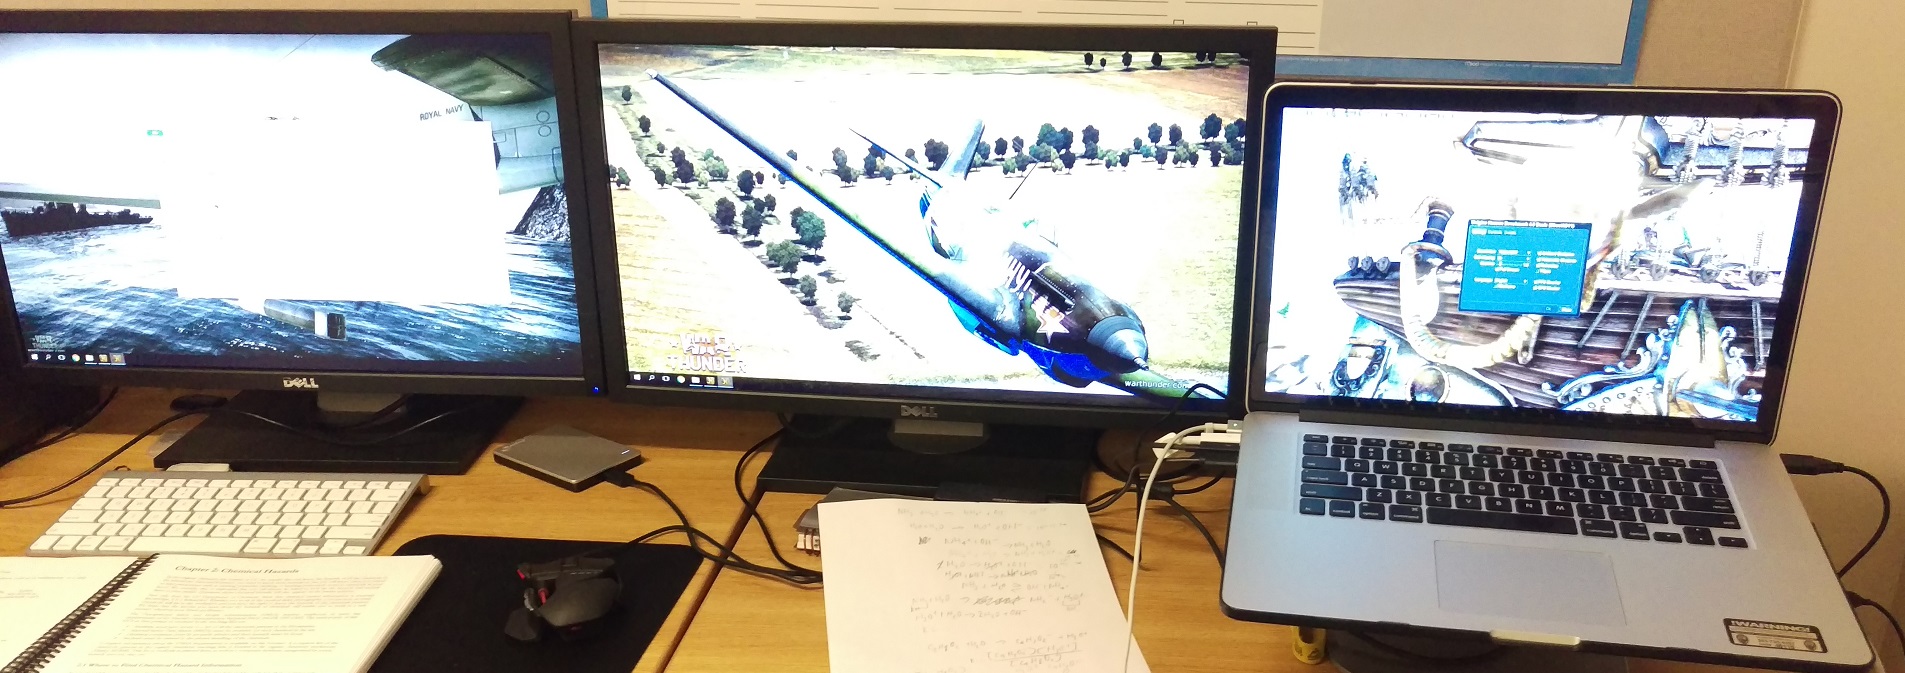
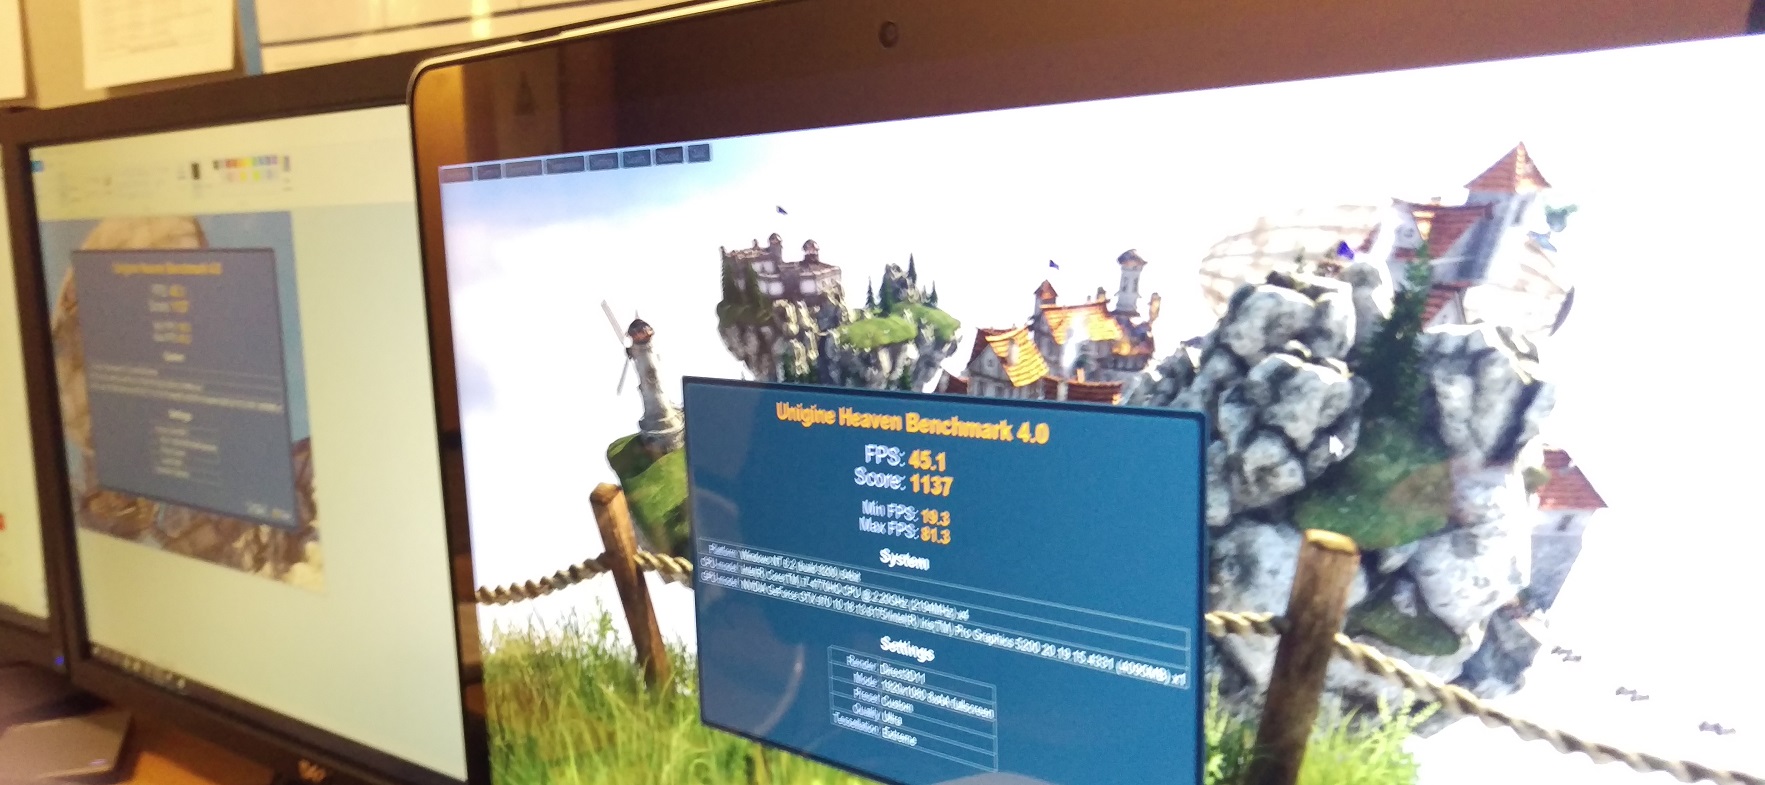
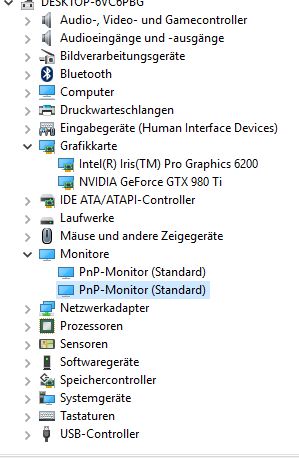
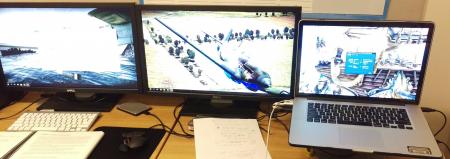
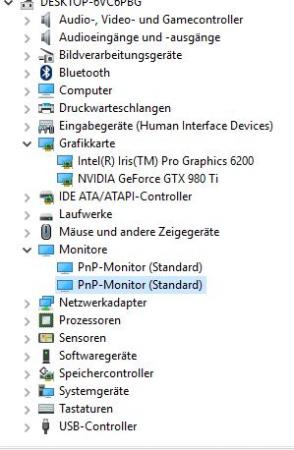
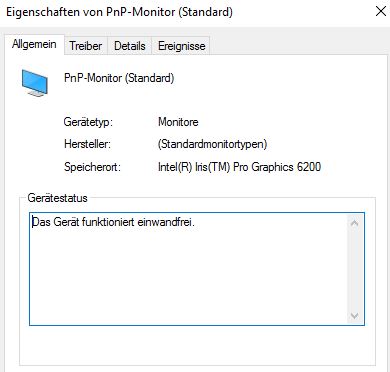
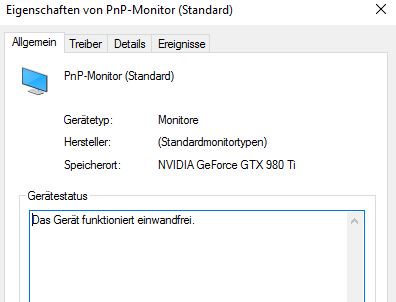
Hello ZapCord, today i followed your guide and installed Windows 10 on my iMac with BootCamp on a 1TB Fusiondrive. The installation and the described boot sequence works fine (from 10 tries the system comes up 9 times without any problems). Is this correct that the internal monitor still uses the internal graphics card and only the external monitor will be powered by the 980 TI? I have tried both: cloning the display (both monitors showing the same) and extended display. If i look into the preferences, there is still the intel graphics card (see screenshots). Is it possible, that both displays running with the nvideaß Greetings Stemoac
 1 point
 -
I would love to see this functional for my P770DM-G. And for it to work in every game would be beyond awesome. I hope wonders can be worked here.1 point
-
Seems like a clear cut driver issue. Ask @J95if he can assist you with a driver mod.1 point