Leaderboard


Popular Content
Showing content with the highest reputation on 07/28/15 in Posts
-
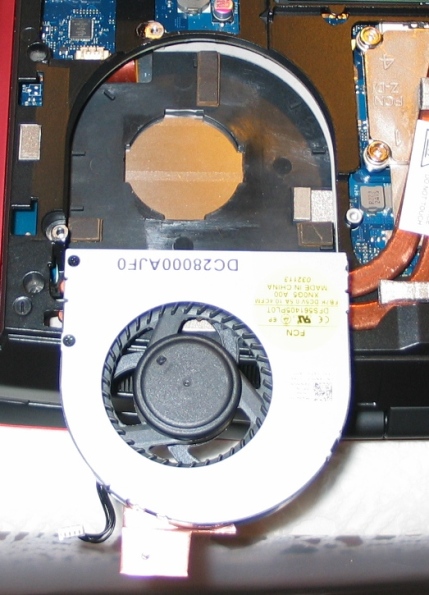
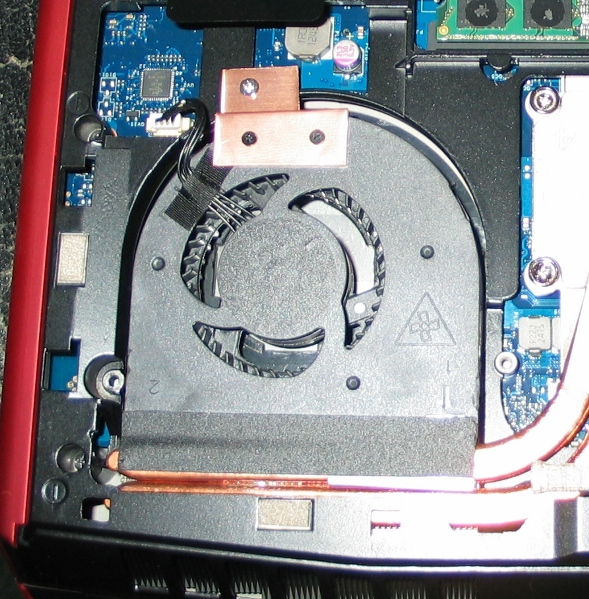
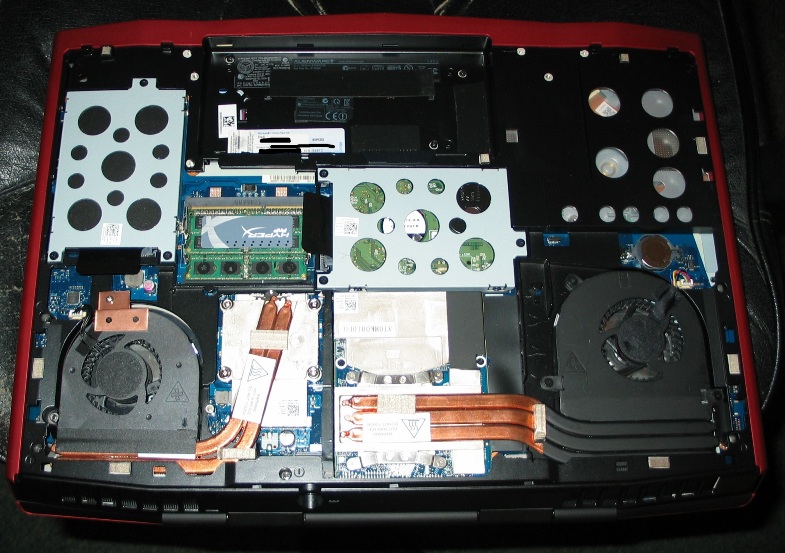
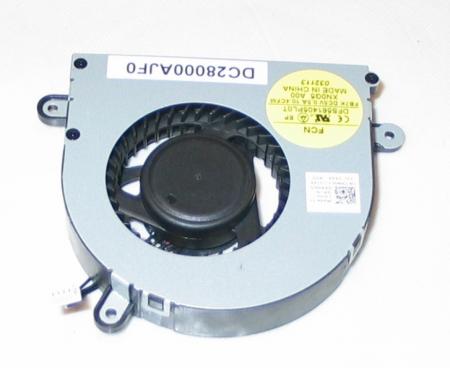
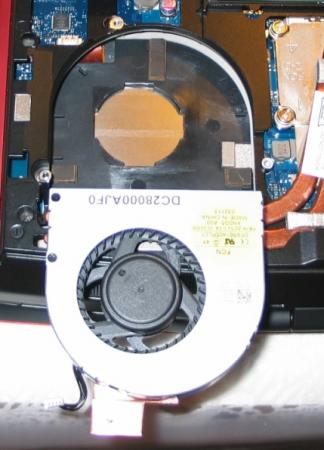
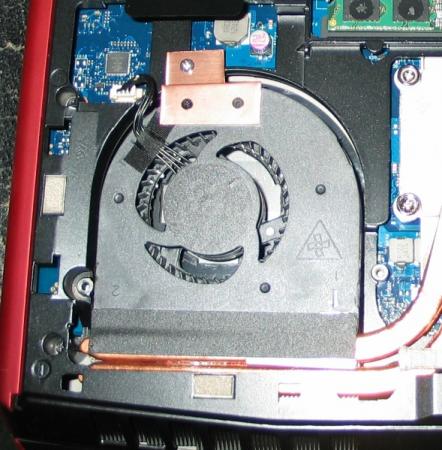
CPU Fan Upgrade Procedure for M17x R3/R4 (2.0CFM->10.4CFM!)<o:p></o:p> My original CPU fan was adequate (not great but adequate) fora 3740qm CPU @ 3.7GHz but when I upgraded to a 3920xm CPU and overclocked to4.1GHz x 4 cores, I needed more cooling - a lot more. Running a 60-second CPU stress test on all four cores in Intel XTU, with a 65watt CPU TDP programmed, and a core voltage of 1.351v, the difference is asfollows: · With original fan, system runs @ 4.1GHz for ~28 seconds before dropping to3.5-3.7GHz because of heat. On longerstress tests, it DOES NOT recover from this reduced speed state becausecooling is not adequate. Core Max: 92-95Celsius. · With this fan mod, system runs @ 4.1GHz for ~55 seconds before dropping to 3.7GHzbecause of heat. On longer stress tests,it DOES recover from this reducedspeed state and spikes of ~4GHz are seen for the remaining duration of thetest. Core Max: 92 Celsius every time. <o:p> </o:p> So here are the stepswith some pictures: 1. Procure an M14x R2 fan. It MUST be an R2 fan!! The fan blade design is clearly different so usemy picture as a reference. There are many eBay sellers, for example, selling the R1 fan as an "M14x series fan," implying that bothrevisions use the same fan - which is not true. The R1's fan has a 2CFM sticker rating while the R2's has 10.4! The markings to search for are: XN0G5 and/or DC28000AJF0. I got mine here: http://www.aliexpress.com/store/product/Cooling-Fan-for-Dell-Alienware-M14x-XN0G5/207462_647373968.html Note: Do not just swap the M14x's fan blade into your existing M17x fanshroud. I tried that first and it doesnot increase airflow. You need the newblade AND the new shroud for this to be effective. 2. Remove your original CPU fan. There are three screws that hold it in. Also disconnect its power jack from themotherboard. While you have access, youmight want to blast that exposed exhaust port with some compressed air to makesure everything is clean. 3. Notice the three mounting brackets that protrudefrom the sides of the fan shroud in the picture from Step 1. You'll need to cut them off so the shroudwill fit. I used a Dremel with agrinding wheel. There's also one smallblack screw in the corner with the yellow sticker. You'll need to remove it and grind down thatprotrusion as well. Save that screw forlater btw. 4. Make spacers/pads to hold the new fan up. The factory pieces will not line up so you'llwant something under the fan for clearance and to allow air intake from theunderside. I used small pieces of arubber material called Dynamat but padded mirror tape would work, as would manylayers of electrical tape placed on top of each other. It doesn't matter what you use - as long asit won't melt - and you'll want it to have a small footprint so it doesn'tblock airflow. I made my pads abouttwice the height of the factory material. Higher pads will allow for greater clearance and more air intake - justbe sure the fan still lines up with the heatsink and the case closes over it. This picture shows the three pads I made, and the fan shroud with its originalmounts ground off. 5. Create a mounting bracket to secure the fanshroud at the point farthest from the exhaust port. You could optionally fabricate mounts to lineup to all three screw threads on the case, but with my sturdy rubber pads andthe tape that will be included on the exhaust side if you buy your fan new, Iwas fine with only one new mount. Note: Leavethat tape covered until the end of Step 7. I used a thin piece of copper but any metal is fine. Bend the metal so it lines up to both the topof the fan shroud and the point above the screw thread on the case. Mark how it sits on the fan shroud and drill twotiny holes (1/16" bit) through the shroud-side of the mount. Now place the mount on the shroud using yourmarkings and VERY CAREFULLY drill further so that you have holes going throughthe plastic as well. Do not push hardand do not hit the fan blade within! Drill a slightly larger hole on the case-side of your mount where itwill line up with the screw thread. Thescrew you saved from Step #3 can be used for one of the shroud-side holes andwill not hit the fan blade within. Ifyou can come up with another similar screw, use it for the second hole. If not, you can take one of the other twofrom the shroud assembly if you want. It's also held together with clips so it won't fall apart. One of the three screws that held in youroriginal fan shroud can be used for the other (case side) of the mount. 6. Thoroughly blow off your new shroud inside andout with compressed air to remove any stray plastic scraps from the machiningprocess. 7. Fit everything up, making sure the fan sitsflush on all the pads you've made. Makesure it lines up with the heatsink and isn't too high or too low into thecase. Adjust pads as necessary. Once you're satisfied, screw in your mount tohold the fan in place. Now lift up thetape on the exhaust side (which should still be covered) and remove thecovering. Carefully fold the sticky partdown onto the copper heatsink pipes to secure that side of the assembly. 8. Plug in the fan's power jack. Again, ignore the connector being a differentcolor. It fits and it works withoutmodification or programming. 9. Close your unit up and enjoy!! So there it is! Let me know how this works out for you guys if you try it - and what you think about the procedure itself. Suggestions/questions are always welcome! * I obviously assume no liability if you break anything doing this. Informational purposes only, etc, etc, * This procedure replaces the M17x's original CPU fan (and fanshroud) with that of the M14x R2, and yields a greatly increased fanoutput. Both fans use the samemotherboard connector (ignore the color difference of the jack) so all that'sneeded here is to procure an M14x R2 fan, modify the mounting system a bit soit fits, and connect it up - and it works like a charm!
 1 point
 -
Anyone here play Rust experimental? My clan and I recently setup a dedicated box for a modded Rust experimental server and are looking for some active players. Server is called KGB Gaming and some of the features include: Teleport system using /tpr and /home for up to 4 homes. Trade: Use /trr to initiate trade with a person anywhere on the map for a safe and fun trading experience. Instant Craft: Why wait to craft an item? It sucks and it's boring so we have 0 craft time. Stacks: Increased stack counts for almost every item so you can manage your inventory more efficiently. Kits: Use the /kit command to see a list. We have daily, bp, starter and an autokit. Donor kits to be added. No Decay: With the exception of twigs, no other foundation type decays. 3x Smelting: Don't you hate waiting on your furnace to smelt something? So do we so smelting is 3x. Gather: 5x gather on all resources and 10x gather for high quality metal ore. SIL: Want to paste a photo of some hot model on your sign? Using /sil <url> you now can! Limit 1024 kb. Better Loot: Refined loot tables. Limit ladders: Ladders can be placed on rocks but not on buildings with an auth cabinet. Private messaging: Simply type /pm <username> to speak privately with someone on the server. Clans: This server fully supports the creation of clans. Type /clan to see how. Friendly fire: If you're in a clan with someone, friendly fire is automatically disabled and can be toggled. Death Messages: When someone is killed by someone or something, there's a server wide broadcast. Vote Day: If you hate playing in the dark, simply vote for day time and if it passes (69%) then it becomes day. Anti Cheat: Besides having active admins keeping a watchful eye, we have anti-cheat software to help keep logs on these guys. Live map: We support the Rusti:IO live map extension. You can view our map here: Rust:IO Airdrops: Every 30 mins with coordinates given. Coordinates: Wish to track down an airdrop's x/y/z coordinates but don't know yours? Type /loc to see them! BTW, if anyone from T|I does show up, just let me know and I can toss you a few extras to get started.1 point
-
Just an update. I got my P2415Q monitor today, and my assumptions were right this time. I got 4k60 SST from both the 2013 15" and the 2014 13", and I did nothing more than run @goalque's script. I am now going to return the 13" and wait for the next 13" with TB3 Meanwhile, anyone want a spare 4k monitor?1 point
-
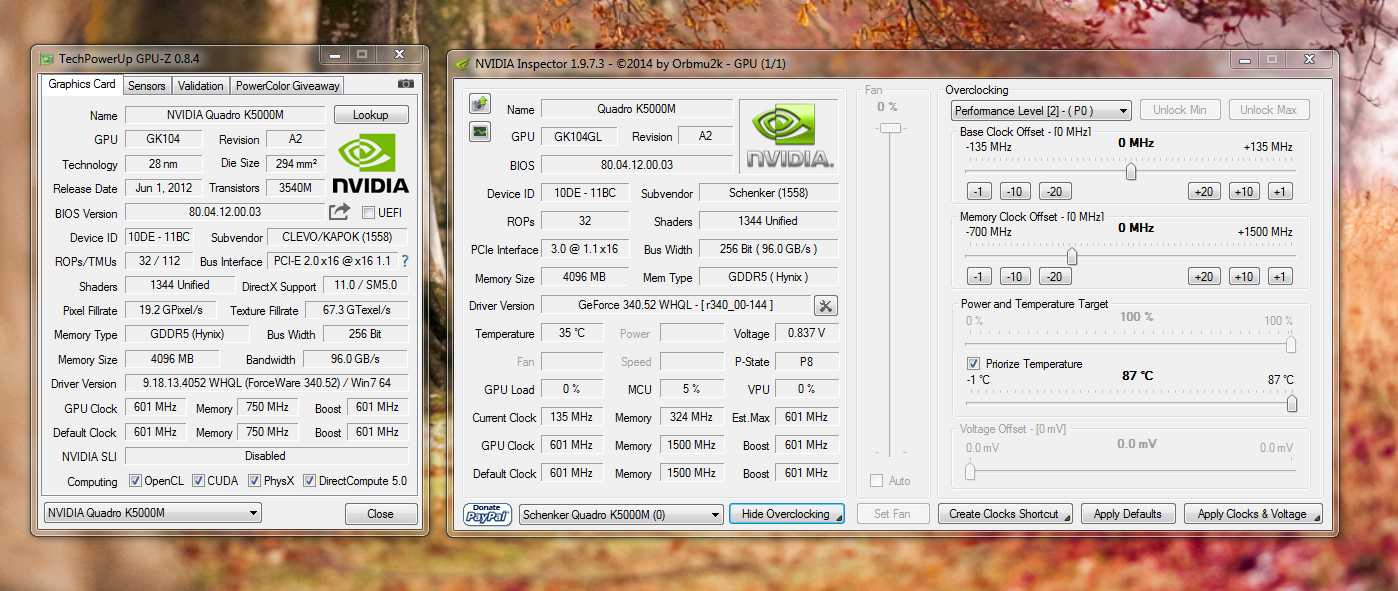
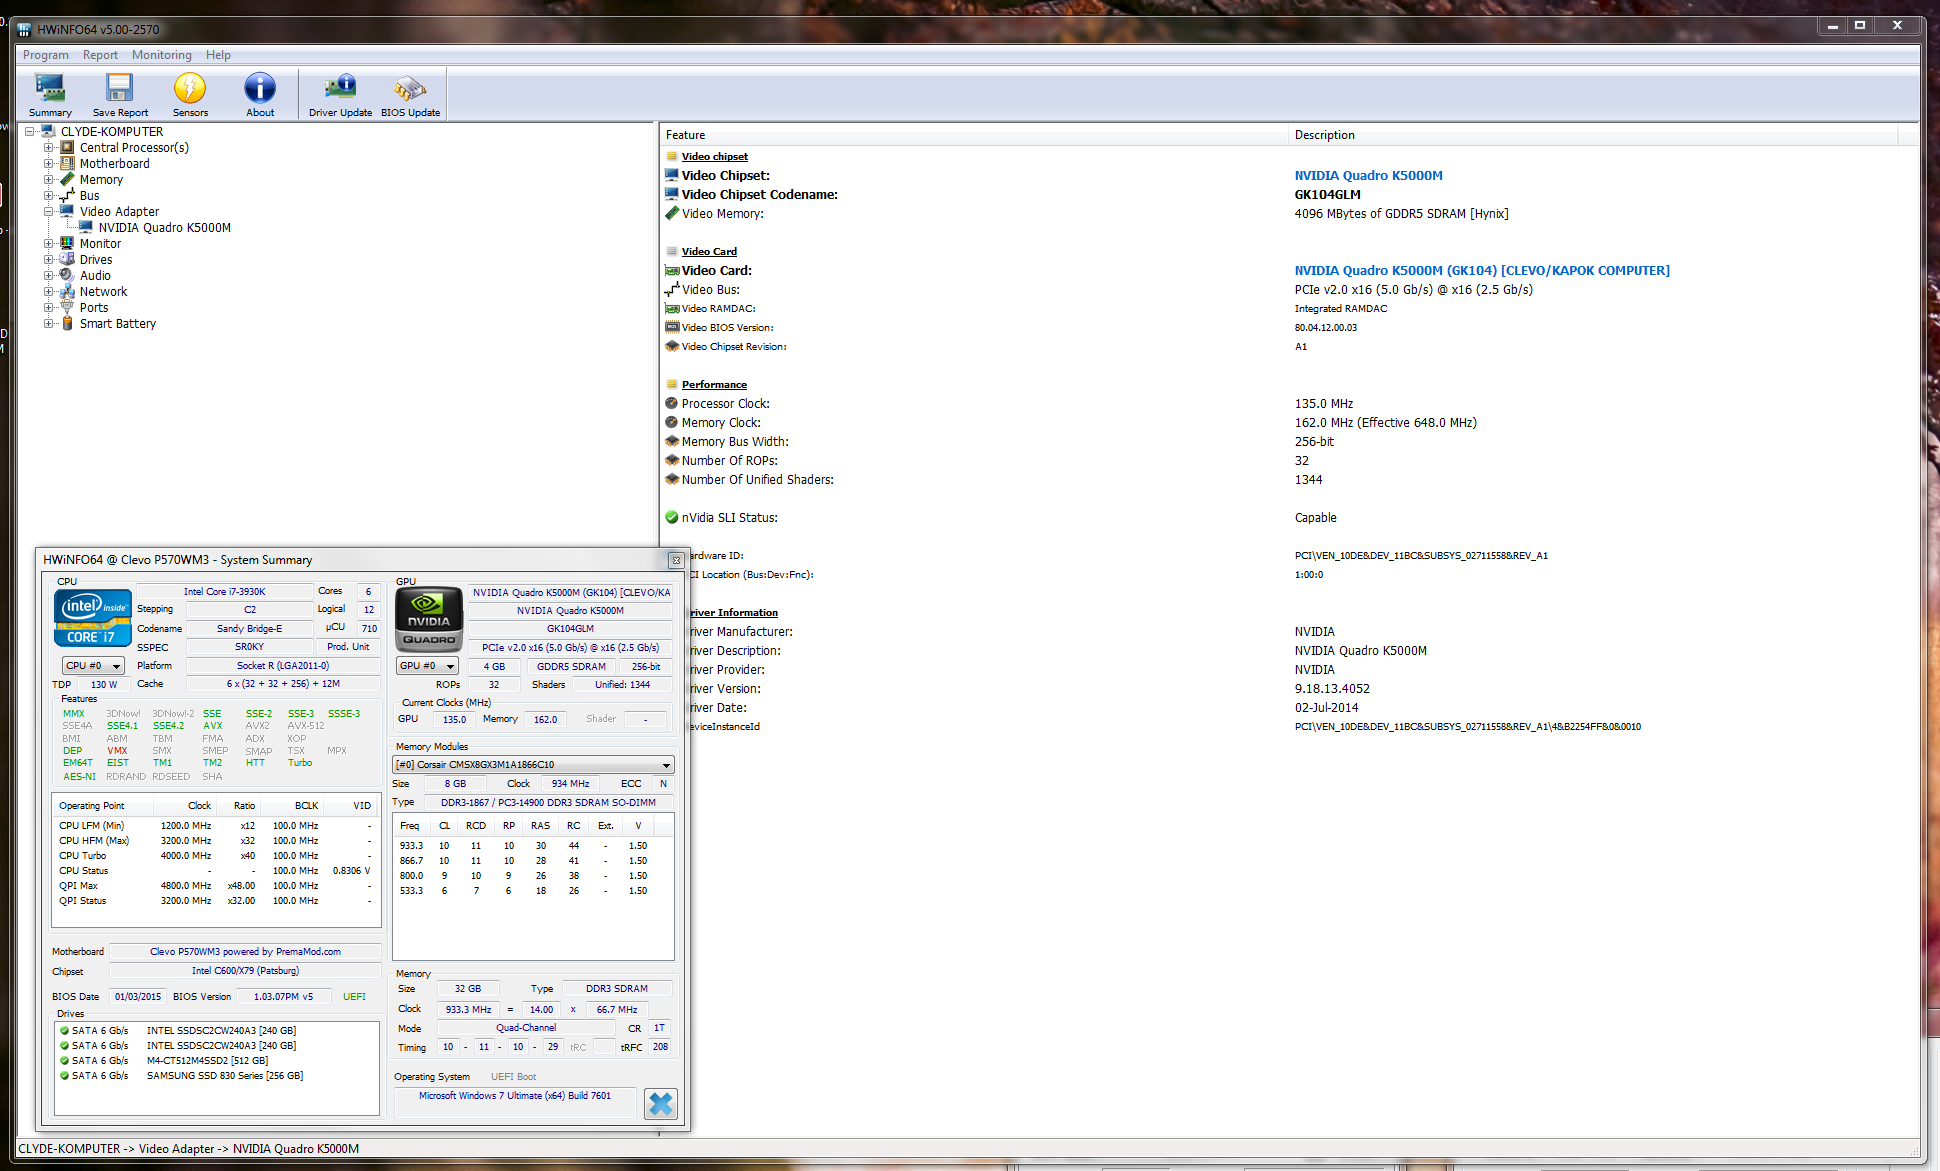
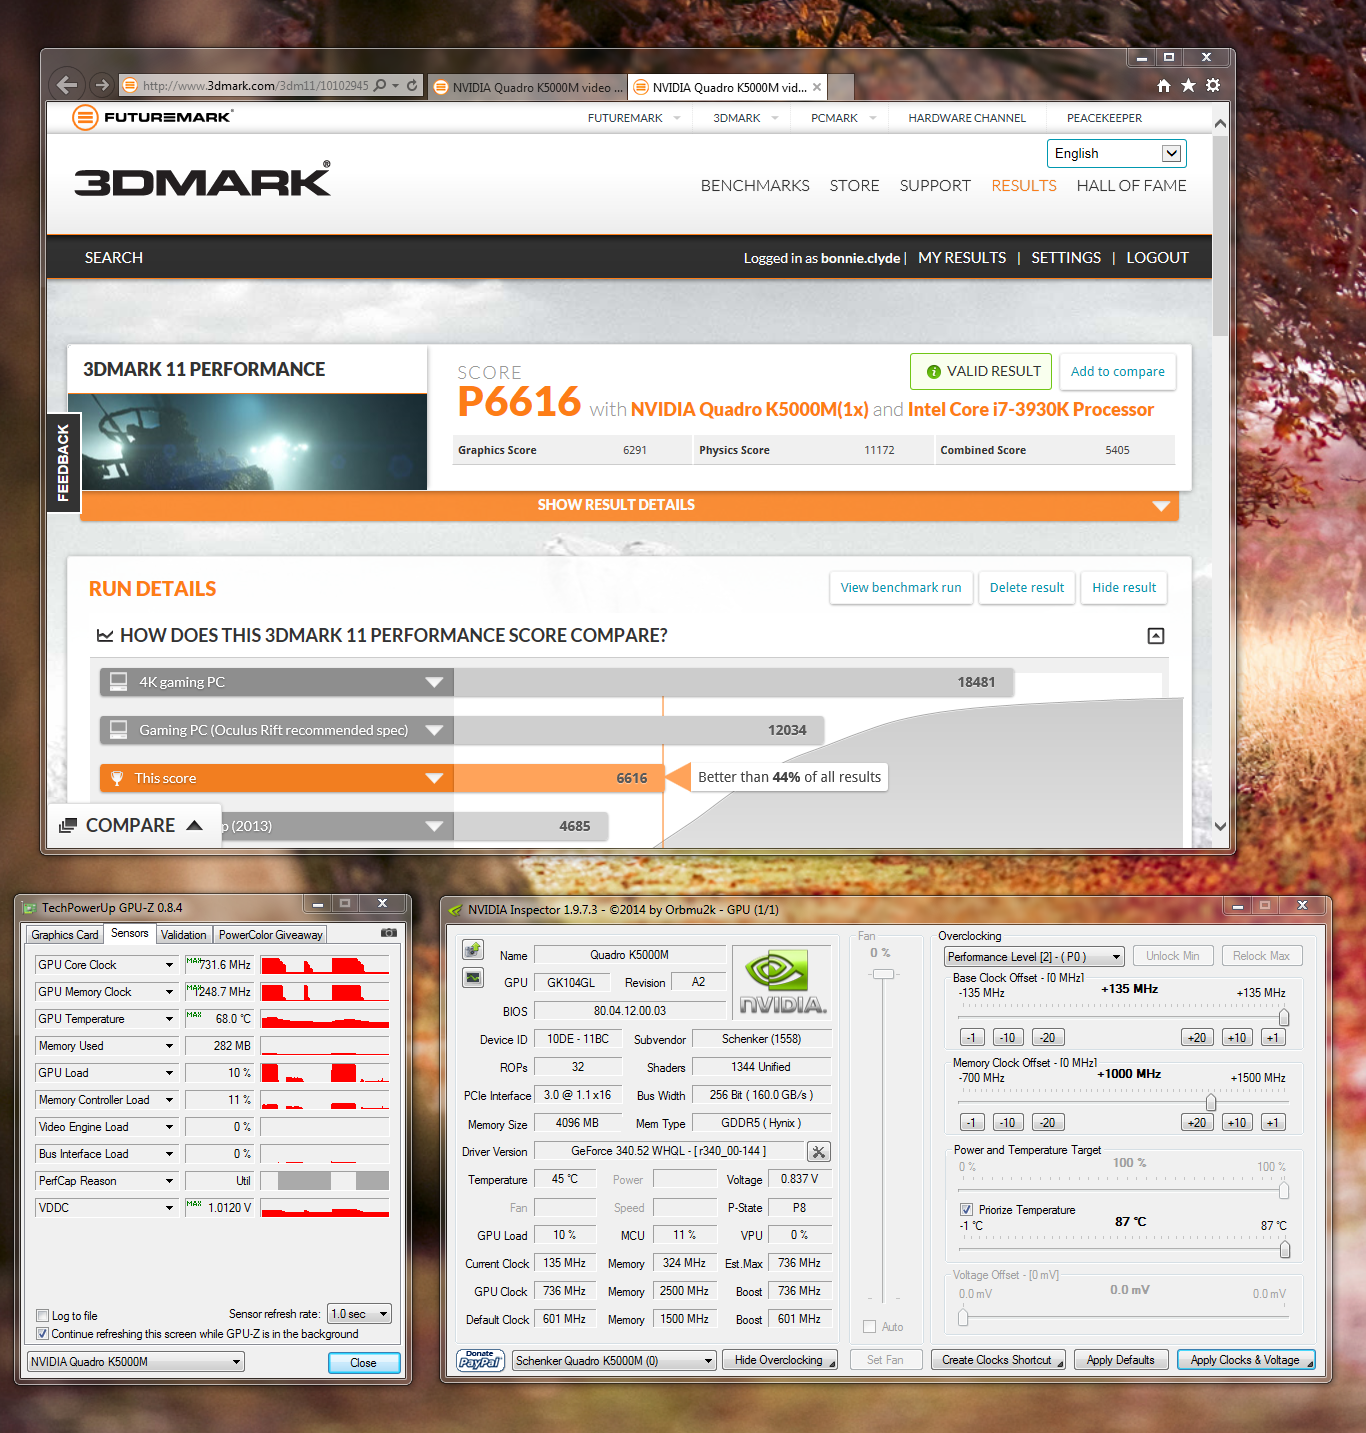
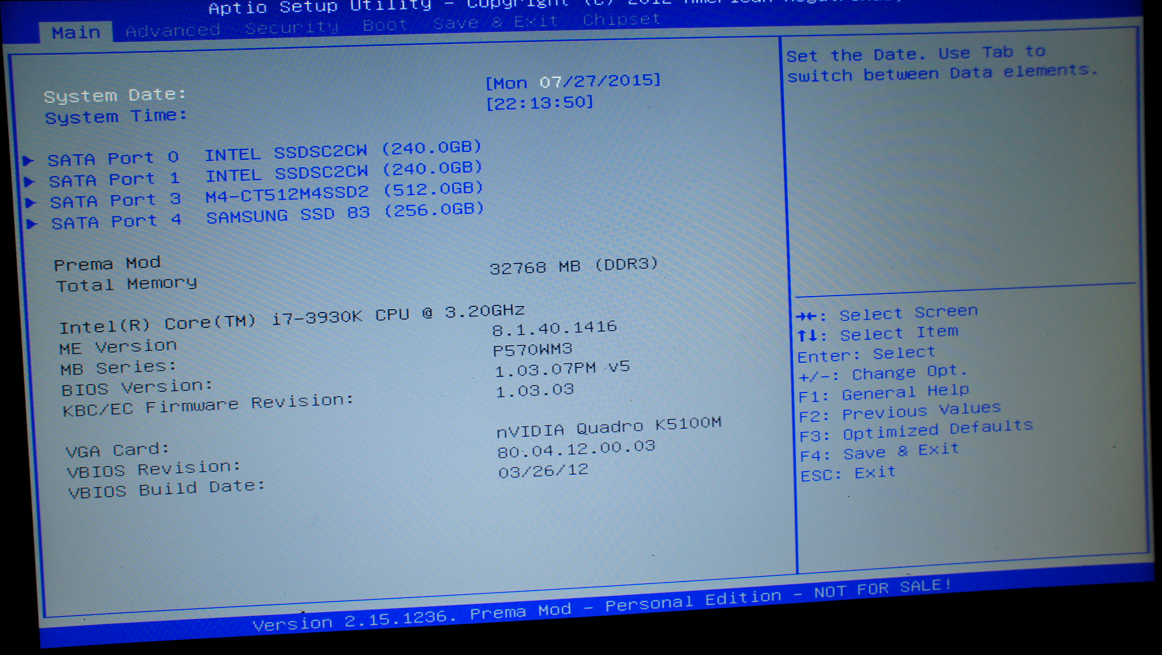
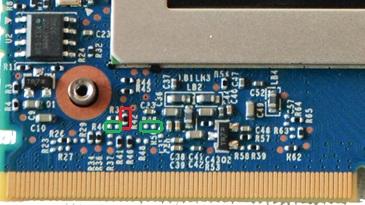
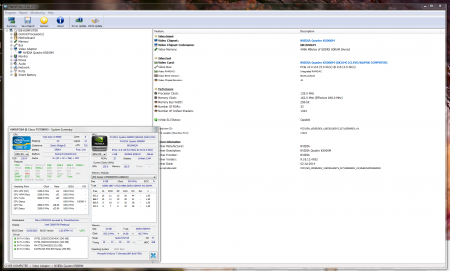
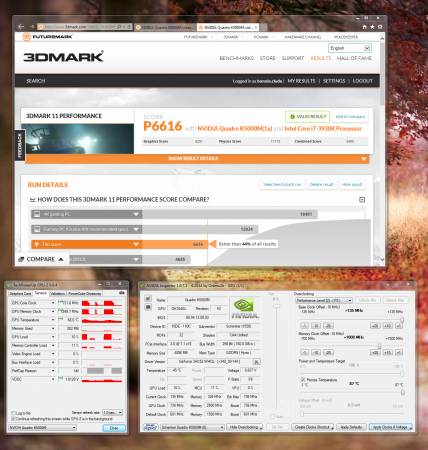
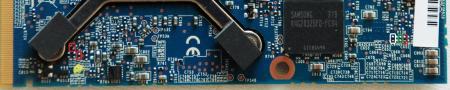
Recently I got hold of GTX680M, which I was able to convert in K5000M. In front: 1. You need to unsolder the 5K (R42) resistor marked in red. 2. You need to solder the 25K (R40) resistor and 0K jumper (R49) in places marked in green. In back: 1. You need to unsolder two 100K resistors marked in red (on the left) and 35K (on the right). 2. You need to solder 35K resistor in places marked in green. Resistor marked in white (on the right) is a GDDR5 manufacturer ID resistor where 45K is Samsung and 35K is Hynix assigned. 3DMark11 stock + 135/1000MHz Only BIOS has some problem yet with the proper card recognition. Have fun.


 1 point
 -
Please look on ceg-hardcorecustom site and productivity quadro link. Gesendet von meinem SM-G920F mit Tapatalk1 point
-
- for recording gameplay the best tool is to use ShadowPlay of the GeForce Experience tool you installed with your driver. - how hot is your card getting with the closed case? Better keep is open or try to improve cooling! - Please don't video tape vertically >_<1 point
-
I would personally recommend looking at the clevo laptops. They have alot of customization options, especially if you get one from somewhere like rjtech.com. Lenovo Laptops I can say from experience are pretty good. However all lenovo laptops I have ever used have had a locked bios. This may or may not be relevant to you. As for the hp's sorry I don't have any experience with them so have no comment.1 point