Leaderboard


Popular Content
Showing content with the highest reputation on 07/05/15 in all areas
-
I imagined that people would like a vbios similar to the one I released for the Titan, so here you go. As I don't have 780 myself I'll need your feedback in order to adjust the mod in case something doesn't work as it should. Thanks for the people who tested it so far, all seems to work fine. Features of the "OC edition": Boost 2.0 disabled - the card runs at the clocks you set it to . Voltage is adjustable up to 1.2125V . Default power target = 350W (so there should be no more need to adjust it manually per software, EVGA classified vbios is set higher) . Fan speed adjustable up to 100% . Clocks are stock, card idles normally at 2d voltage 'rev03' adds undervolting capabilities . To clarify some things - as boost is disabled clocks and voltage will be fixed in 3d mode. In all other performance profiles the card will behave just as the with the stock vbios. The main differences to the stock vbios is that there is no throttling. NOTE: If your 780m came with a 80.10.3A.00.xx or newer vbios from the factory, then please don't use an older version. People have reported issues when using an older vbios on 780s that came with 3A or newer. The reason for this might be a slight revision on the board or GPU. It won't harm if you flash an older vbios on such a card, but it can cause crashes and unstable behavior. ************* Download links 'OC edition': Nvidia_GTX_780_(EVGA)_80.10.3A.00.82_-_'OC_edition_v03'.zip EVGA 780 - SC ACX - 80.10.3A.00.81 - 'OC edition v03' (new fan profile).zip Nvidia_GTX_780_-_80.10.36.00.01_-_'OC_edition_v00'.zip 80.80.30.00.01_-_GTX_780Ti_'OC_edition'_v04.zip ************* MD5 sums for the paranoid guys: EVGA 780 Classified - 80.10.3A.0x.80 - 'OC edition v03'.zip EVGA 780 - SC ACX - 80.10.3A.00.81 - 'OC edition v03' (new fan profile).zip1 point
-
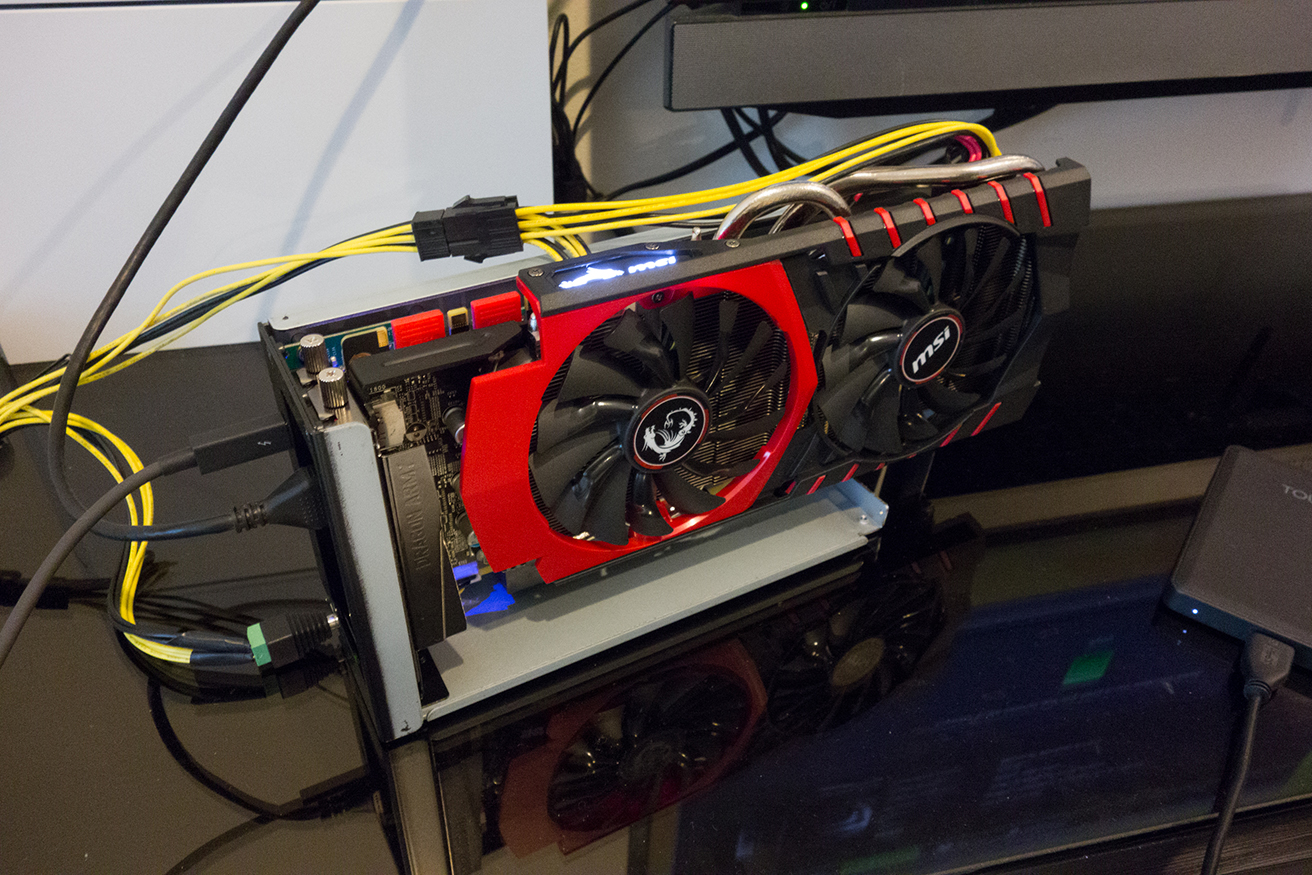
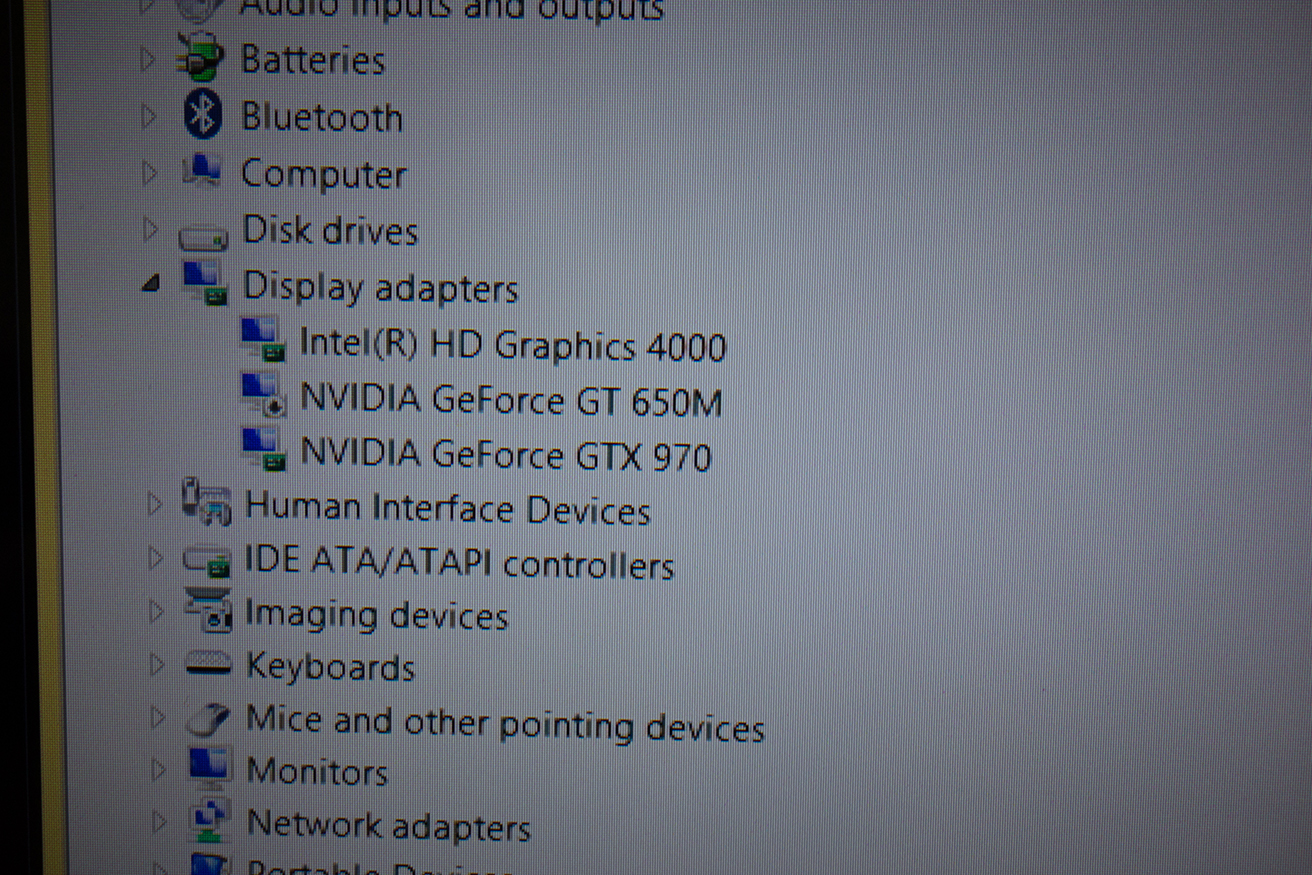
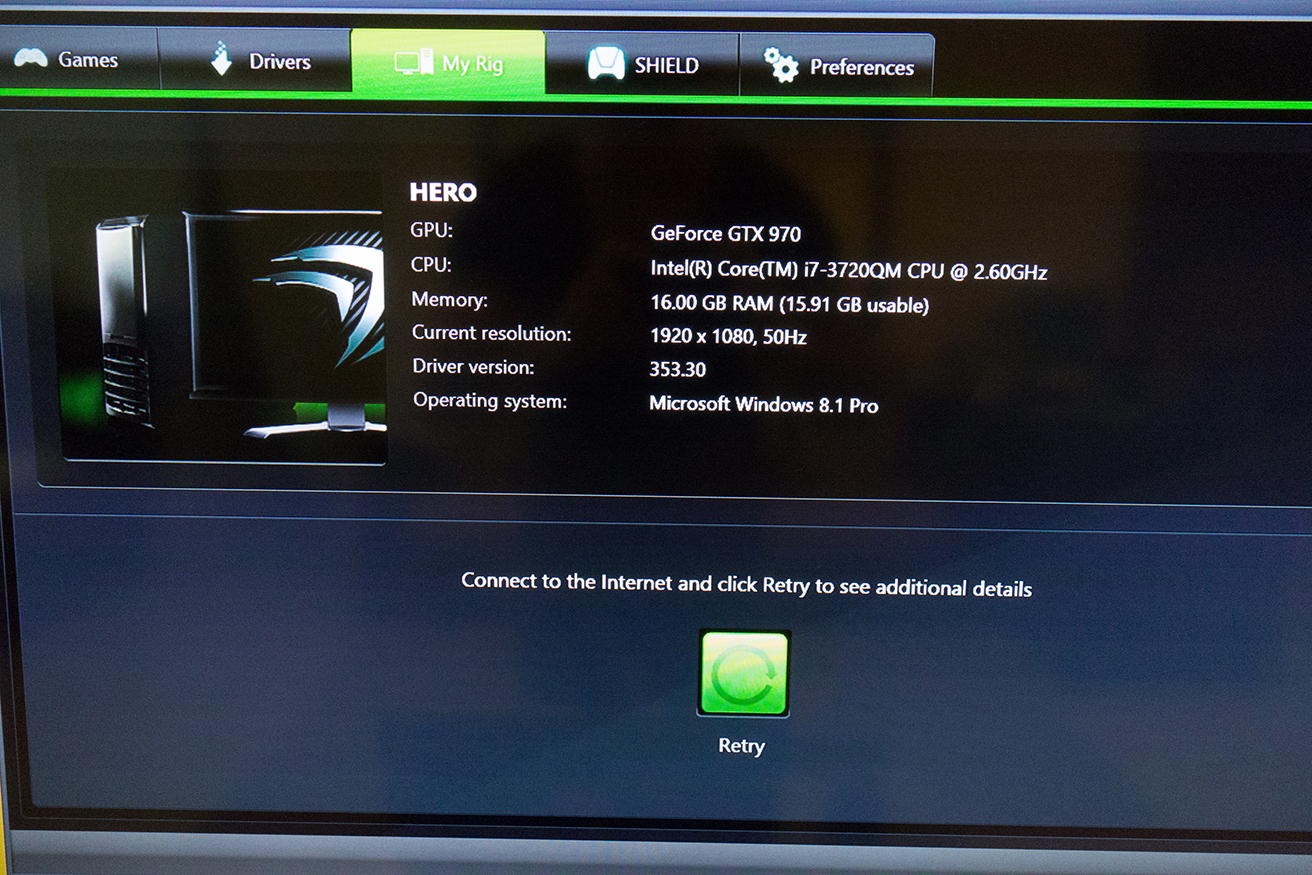
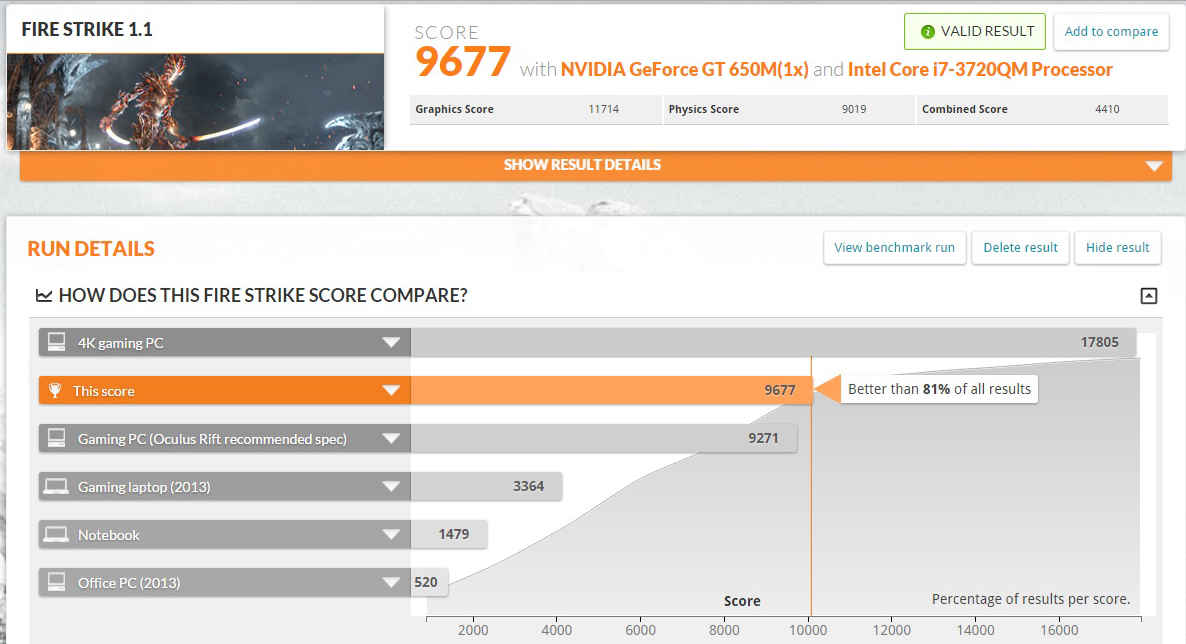
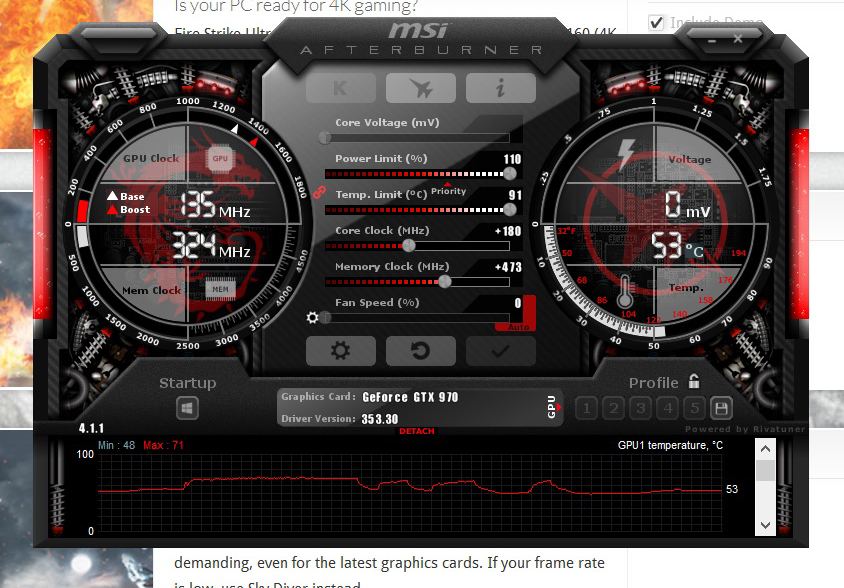
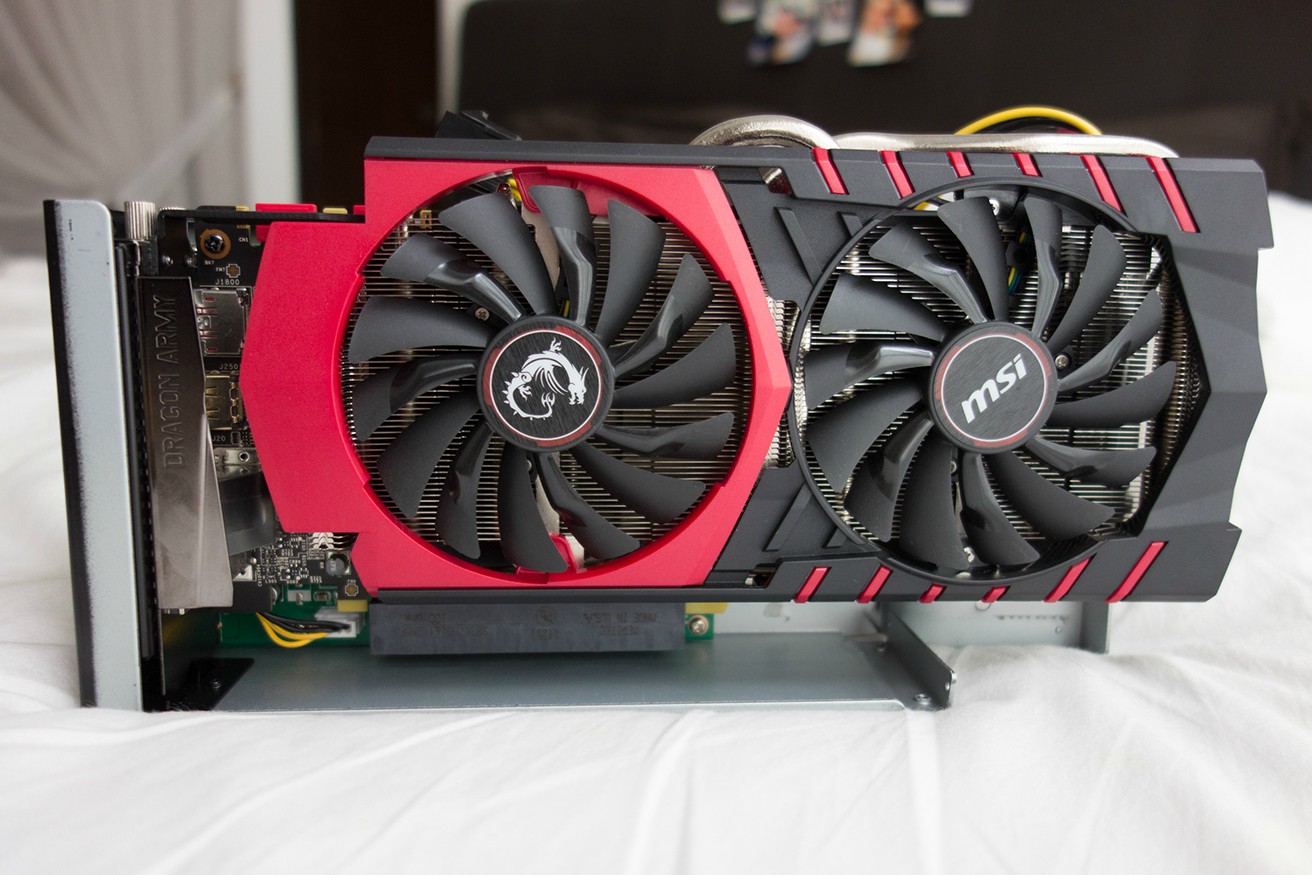
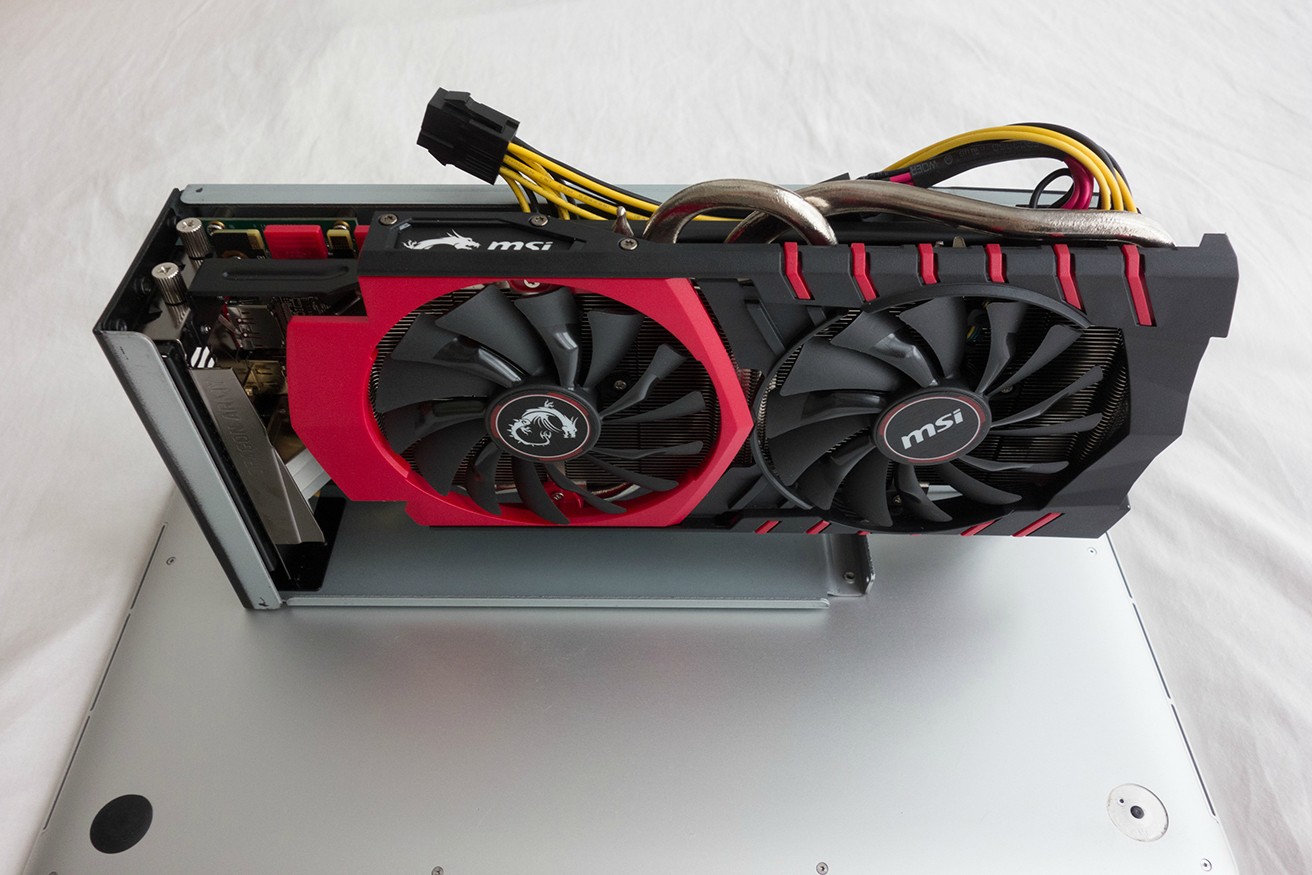
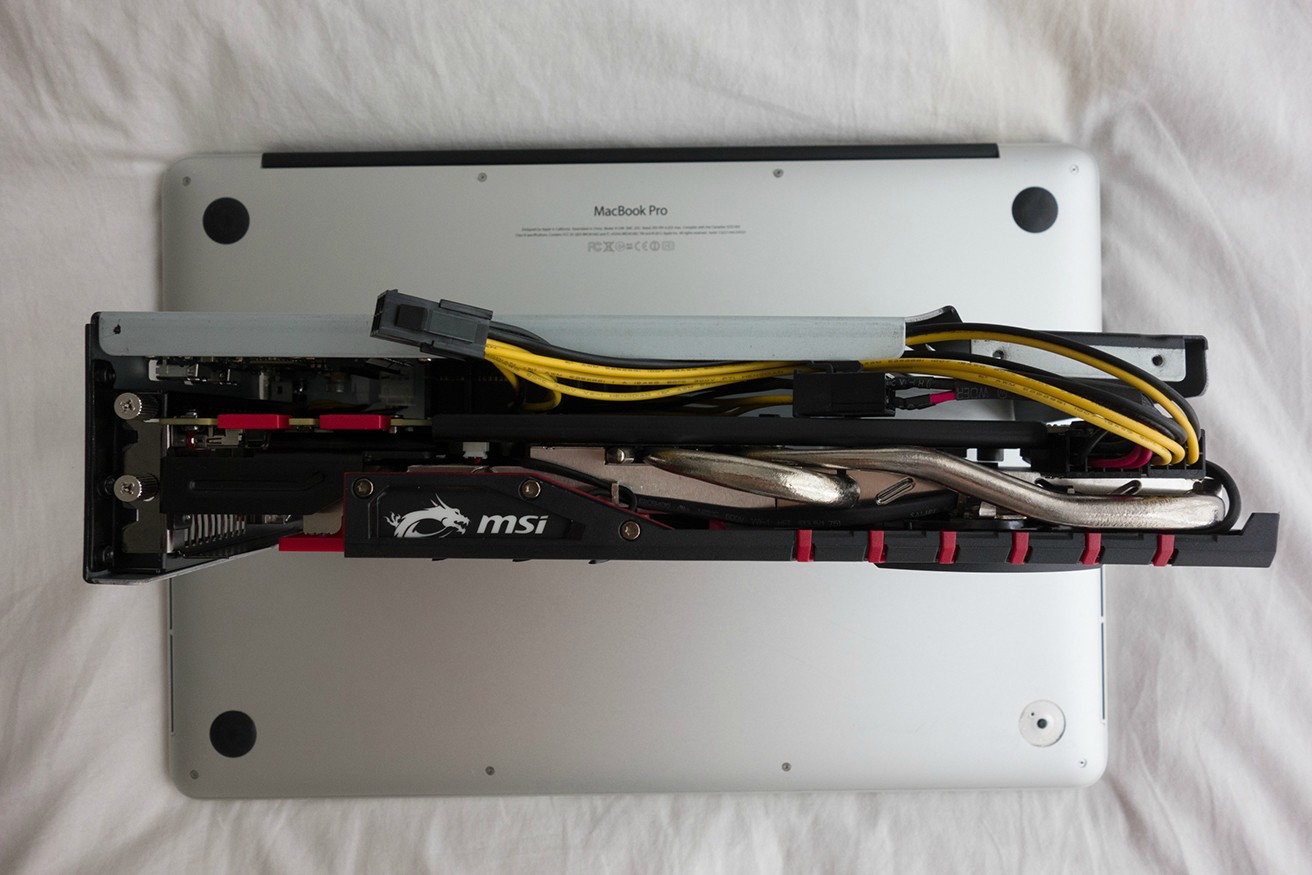
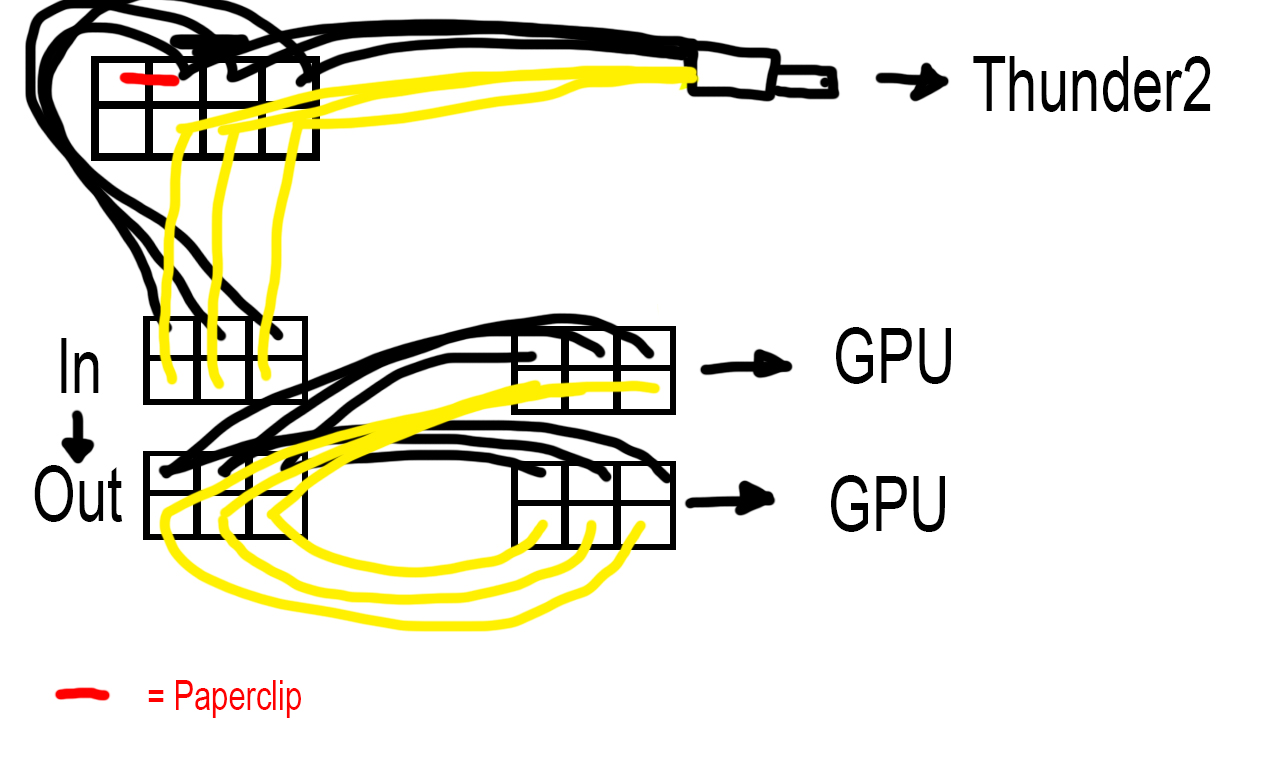
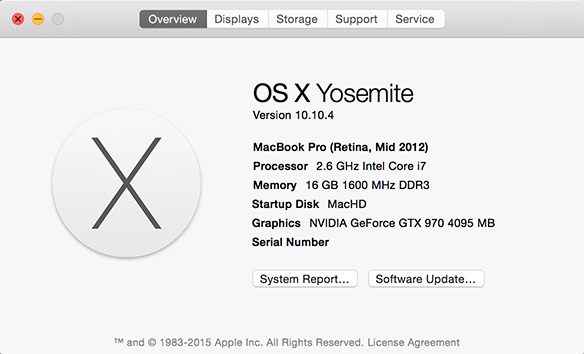
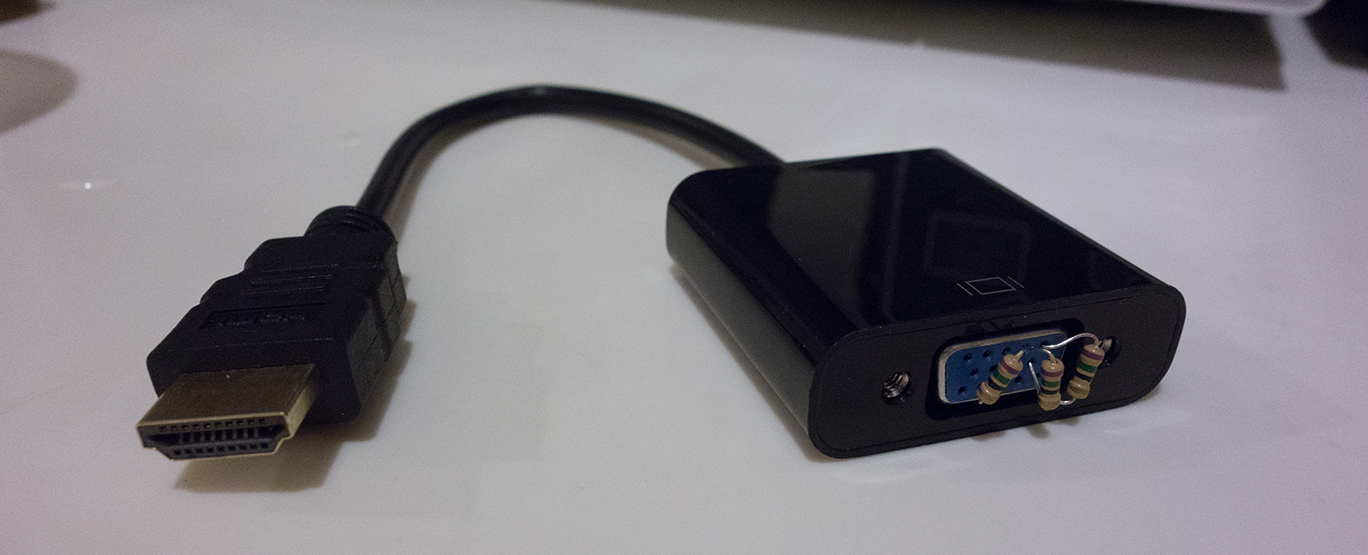
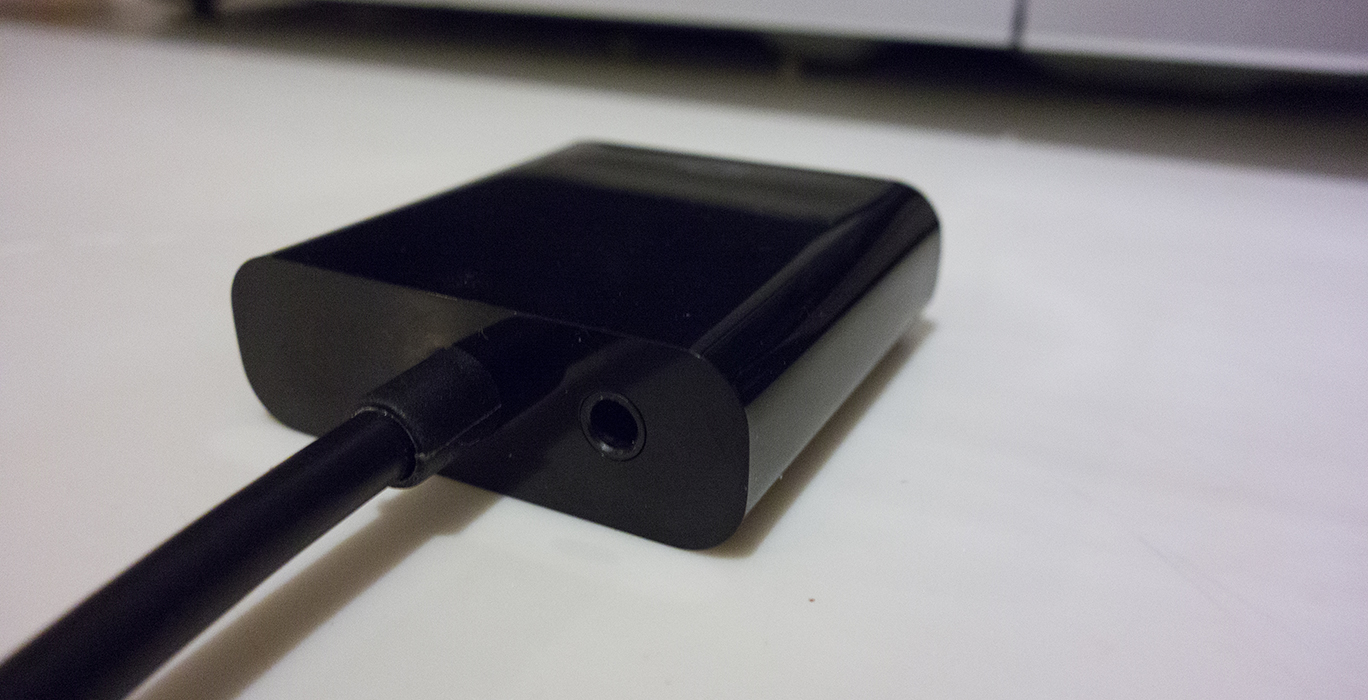
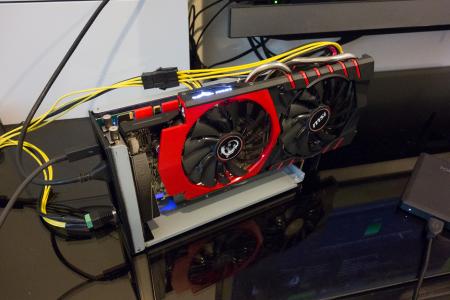
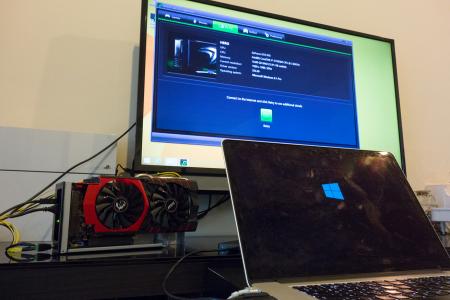
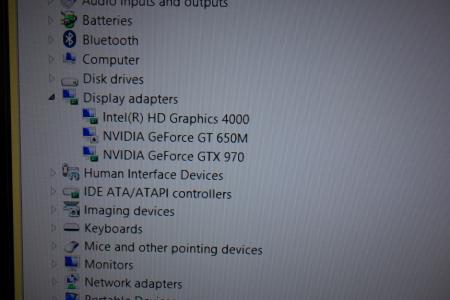
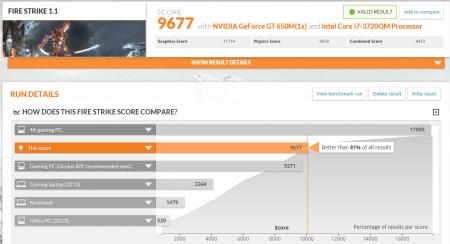
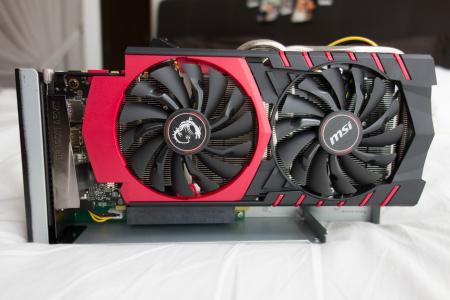
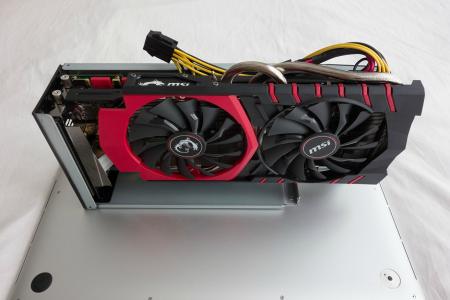
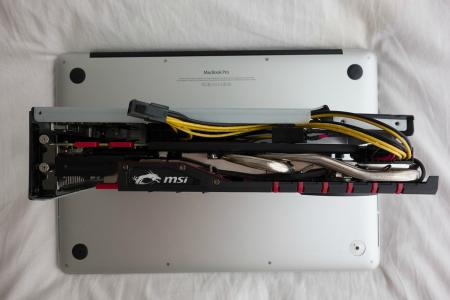
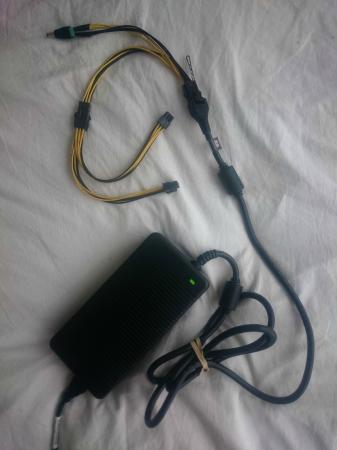
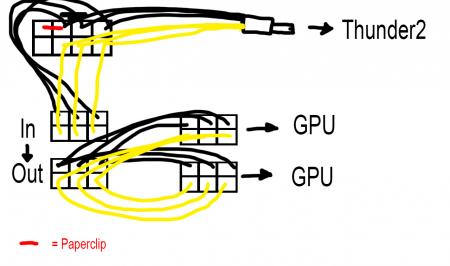
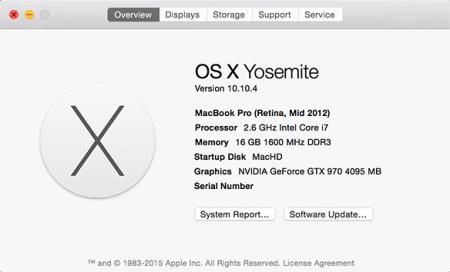
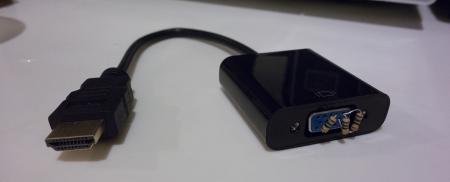
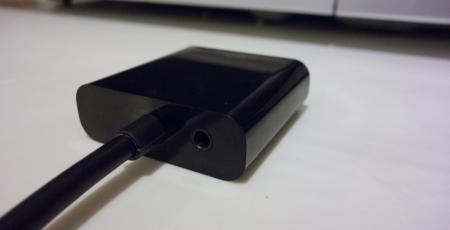
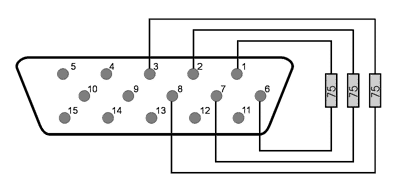
Firstly I just want to thank everyone in this community. It's thanks to this site with it's information provided by the community that has made this possible.Update #1 - Now working with OS X 10.10.4Update #2 - Internal display working (no need for external display) - No performance loss, no paid software and still have sound Update #3 (27th September 2016) - No longer using Windows 8.1 on EFI, now using Windows 10 on Bootcamp (BIOS)So here is my guide!I have a Mid 2012 15" Macbook Pro Retina with Intel HD4000 + GT650M inside.I am running Windows 8.1 Pro which was installed via EFI (Not Bootcamp).This guide requires no extra software (you get plug and play eGPU) and no soldering.Parts list:1x Akitio Thunder21x MSI GTX970 4G Gaming1x Dell DA-2 220w power supply2x PCI-e 6-pin Male to Dual 6-pin Female Power Y cable splitter1x 5.5mm x 2.5mm DC barrel screw terminal adapter1x Electrical tape 1x Hair Clip 1x 6pin to 8pin PCI cable (provided with graphics card as mine is 6+8pin) Cost: £429.02 ($668.03 / €601.07)First off, the software:I used bootcamp to create a USB stick with Windows 8.1 Pro on it. Do not get the bootcamp software! (This caused the first problem for me later).I then installed Windows on my Mac via the EFI boot option. I followed this excellent guide right here: https://www.reddit.com/r/mac/comment...bootcamp_guideThis was a long process as it meant making an up to date Time Machine backup of my OSX, wiping the whole drive, installing Windows and then reinstating OSX from my backup, so this took some time.The next step is getting the drivers in Windows. If you have the same Mac as me, remember this! Usually if you install Windows via bootcamp for this model, you would use the 5.1.5621 bootcamp software. Do not do this. To get my drivers working in Windows I had to use bootcamp drivers from version 5.0.5033 instead of version 5.1.5621.Also before you install those, go ahead and remove the Nvidia folder. Go into the bootcamp folder, into drivers and delete Nvidia. Now you can proceed to install the 5.0.5033 drivers.A known issue with this model when installing Windows in EFI mode is you will not have sound on the internal speakers. I am 99% that there is no way to fix this issue. However due to the fact that also with this model Optimus does not work, meaning you must use an external display, this problem is then solved as you get sound via the sound device built into the graphics card.So that's it for software. The benefit to installing Windows in EFI mode is that it makes the eGPU plug and play!Update #1 - I now have my eGPU successfully running in OS X 10.10.4 too. Thanks to @goalque and his excellent script which automates the whole install process.The eGPU will only work with an external screen connected however. You must connect from the eGPU to the display (not from the Macbook to the display).The only thing to note here is that under 'Displays' in the system preferences, my Mac told me that the GT650M was powering the external display but it certainly was not. Also under system information you should see you eGPU and your display will be listed within that.Hardware: First thing is to connect up the power cables. It's pretty simple and requires no soldering at all.You can see my photo below and a shitty diagram I made too. Feel free to reply if you need help explaining this.If you have the paperclip/hairclip in the right place you will get a green light when switching it on like in the picture.Then it's was as simple as plugging the graphics card into the Thunder2 enclosure, and connecting it all up.Next I switched on the power for the eGPU, plugged the Thunderbolt cable in and switched on my Mac, proceeding to boot in to Windows.First off it was not being recognised at all in Device Manager. (It should show up under display adapters).The solution after much frustration was to simply plug it into the other Thunderbolt port on my laptop and plug it into the other Thunderbolt port on the Thunder2.Then upon bootup I was greeted with 3 devices under display adapters. Happy times!The final step was to install the drivers.I downloaded the Nvidia drivers for the card from the Nvidia website and proceeded to install them. Half way through instillation - black screen - followed by system crash and reboot. Bad times.I booted back into Windows again, went into Device Manager and under the display adapters I disabled the GT650M, then tried to install the drivers again and it worked. Upon reboot the Device Manger showed all three graphics cards (named correctly) as well as GeForce Experience showing the GTX970.So that's about it!I installed MSI Afterburner and 3DMark and played around with the clocks. I managed 8923 in Fire Strike 1.1 before overclocking and 9677 after. But oddly the results show up as from my GT650M. The card does show up on the results page as a secondary card though, and of course there is no way my GT650M would get that score! Also the clock speeds in the results for the GT650M are my clock speeds for the GT970. A little weird but I don't really care about that.Update #2 - Internal display working (no need for external display)So the two main limitations with this model of Macbook are the fact that you need an external display, and that you have no sound with an EFI Windows instillation. So I got around those limitations with this little device and three resistors:It's a HDMI to VGA adapter with audio out. You can see the audio out here:All you need to do is put 3x 75ohm resistors inside the VGA port to create a fake external display. You can see where the resistors need to go with this image:So the deal with this is, any program started on the 'external screen' (being powered by the eGPU) will use the eGPU. So what you'll want to do is set the fake display as your main display. Then anything started on that display will be running from the eGPU. Now there is a little limitation here; only games that run in windowed mode will work (which is most). You'll want to start the game on the fake screen in windowed mode and then drag it over to your internal display.So how do you grab from a display you can't see? Well, I found this free program called Dual Monitor Tools (it's free right here: Dual Monitor Tools - Home )and what you can do in this program is set a keyboard shortcut to move the selected window over to the other display. So you click on the game in the task bar, and hit the shortcut you assigned and it'll pop over to the internal screen, but because it was launched on the fake screen, it'll be powered by the eGPU.Simple as that, there's no performance hit either as you're just dragging the game to the other screen.A good tip is to have the internal display set as default first, launch the game, go to options and set the game to windowed mode now, then quit and relaunch after you've changed the fake screen as your primary. Otherwise you might not be able to switch it with the shortcut while it's in full screen.An issue I have: I don't know if this will apply to others but I simply cannot boot in to Windows with my GT650M activated. My startup process is very odd, so I'll document it incase others have to do this.To make my Windows even boot, I must have my GT650M disabled in device manger. But when I do this I cannot boot without the eGPU plugged in at all.So what I have to do is make sure my GT650M is down (boot in safe mode to do this the first time, no need for eGPU attached when doing this).Then with the eGPU plugged in, start up my laptop and chose the Windows boot option. The only way I know that Windows has successfully booted is the spinning white dots under the Windows logo on bootup will freeze. When my internal display freezes, I know Windows has loaded (this is when the desktop would appear on the external display) but of course we can't see that because it's a fake display.So once the bootup freezes, I wait until my keyboard backlights come on, then I know the desktop has loaded on the fake display. (Or just wait about 10 seconds after the freeze). Now the next step is to activate the GT650M in device manger so that my internal screen works. Now for this I did the process on a proper external display to learn the key combination to do it blind. For me it as follows:(Press START - cmd key)type: device manENTERTABDown arrow x8ENTERTABENTERENTERAfter I have done that, the frozen Windows logo will disappear and the screen will flicker for about 5 - 10 seconds before displaying my desktop. Success! I can now control Windows from my internal display. Opening up the resolution tool will show 2 displays, the internal, and the fake external.The only thing to remember is when I'm done, I must deactivate the GT650M in device manager again before shutting down. Deactivating it will not shut off the internal display, so it's not a problem to do that and shut down.So that's it. I hope you don't have to do that process, but for me, that's the only way to do it. it's a slight pain but not too much bother, and it's certainly great not to have to use an external screen! Update 3 (Removed EFI Win8.1, now using Win10 BIOS): So I decided I want to use Windows 10 now for DirectX 12 gaming. This was a pretty simple process to setup. Hardware-wise it's all the same as above, software-wise is as follows. Get yourself a copy eGPU Setup 1.2 (not 1.3). Big shout out to @Tech Inferno Fan for making it. If you don't have EFI Windows on your Macbook, continue to the next paragraph. I had to wipe my whole mac hard drive clean as the EFI partition of Win8.1 gets installed before OSX. So I made a Time Machine backup. Now to wipe the whole hard drive you must boot from a USB otherwise you can't wipe the drive you're using with the recovery on it. But I really didn't want to download 4GB or whatever size the latest OSX is just so I can use the recovery option (I don't need OSX as I'm using a Time Machine backup with it already). What I did was downloaded a piece of software called Carbon Copy Cloner (you can get a 30-day free trial), on here you have an option to clone the Recovery HD partition from you MacHD to another drive (in this case a USB). So I did this saving me the time of downloading the whole OSX just for it's recovery. So all there was to do next is boot the recovery from the USB, wipe the entire drive and restore from my Time Machine backup. Once in OSX load up the Bootcamp Assistant, plug in a USB (8GB or bigger), burn on Windows 10, download the drivers and create a Windows 10 installation. It's pretty straight forward with Bootcamp, just follow it all until you're in Windows 10 on your desktop. Once on the desktop I installed the Bootcamp software and shut down the system. I then plugged in the eGPU (not sure if you have to but I felt I should while installing the drivers for it), booted back up and installed the latest Nvidia drivers for my eGPU then shut the system down again. For the next steps I basically followed @w4vz's guide. Particularly just this part (I made some slight changes to parts that didn't quite translate to what I was seeing on my screen, I underlined the ones I have modified): Unzip eGPU Setup 1.2 to c:\eGPU run setup-disk-image (as admin user) Restart and load eGPU Setup 1.2, select option 2 Do PCI compaction all exept sata etc etc. After it's all done make sure you have PCI WRITE and ALL ALLOC showing yes on the right side panel Optional: If freeze at the bootloader: edit PCI.BAT replacing a:x.x and b:x.x with 0a:x.x and 0b:x.x (I only found A occurences in mine) (in the editor alt/option+F to access the file menu) Optional: If the settings are not kept after reboot: edit Startup.bat by adding REM in front of all "call vidinit" like so: REM call vidinit... (in the editor alt/option+F to access the file menu) Run startup.bat, then Test Run Chainloader, then Test. After this you should be taken back to the main menu Select eGPU Setup 1.2 again and now select (default) option 1 From now on all you need to do to get your eGPU working is boot Windows, select eGPU Setup 1.2 and press 1 Any questions just ask and I'll help in any way I can.


 1 point
 -
Hi guys, I'd like to thank Nando for assisting with the DIY eGPU Setup 1.3, the eGPU was a great experience to do, it works perfectly and i didn't expected as much performance for a DIY. In my case, that it is the price worth paying Here's my specs : Notebook Dell Vostro 3460 - 14" - Early 2012 Motherboard HM77 Intel Core i7 3632QM @ 2,2 GHz (idle) up to 3,2 GHz (turbo) - (this is an upgrade from a i5 3210m) 8 GB RAM - 1600 MHz - Corsair Intel HD 4000 No dGPU Internal Screen - 1366 x 768 Windows 7 - 64 bits eGPU gear EXP GDC Beast mPCIe eGPU adapter (bought in June) MSI GTX 750 Ti Twin Frozr (OC version) - 2 Gb - Low consumption 60W - Very quiet Dell 220W DA 2 AC (Powersupply) - No ATX powersupply because the card's consumption is very low and it's directly powersupply by the PCI x16 slot DIY eGPU Setup 1.3 (error 12) DIY eGPU Setup 1.3 configuration PCI Compaction --> !Run Compaction --> eGPU Endpoint --> 4 GB / 56 bits Closeunusedbridges = ON 3DMark Results 3DMark11.GPU=4767 3DMark13-FS.GPU=3839 Video of my setup Comparison Planetside 2 with Intel HD 4000 : 25 - 50 FPS low with a lot of drop to 15 - 25 Planetside 2 with GTX 750 Ti eGPU : 40 - 60 FPS High/Ultra no drop ! Note : To install the mPCI device, it was quite hard and i had to remove one of my laptop's hinge to install it. But now, my laptop is fully closed end fully transportable. If you need any tutorial to do it, contact me !1 point
-
THIS IS A PROVISIONAL GUIDE THAT IS INCOMPLETE, CHANGES ARE BEING MADE CONSTANTLY, USE AT YOUR OWN RISK After about 3-4 days of researching, I'm confident enough to start a provisional guide for 2015 Edition Macbook Pro Retinas both 13" and 15" that have dedicated AMD GPUs instead of nVidia GPU's. A few people have stated that it is impossible to use an eGPU with the new 2015 Macbook's but I believe this is simply not true. After chatting with 2 different Apple engineers at a Genius Bar, I was told that no changes were made to the new 2015 line of Macbook's that would effect the application of a eGPU build, and that it's highly possible to do so. With this in mind I decided to continue with my project and was able to do some extensive research on what parts I would need and what I would need to do with the software. The hardware remains the same, meaning there's nothing extra you should buy, that you would not have bought if you were building an eGPU for any other Macbook. The software, from what I can see is where it gets tricky but I'll get to that later. First off I purchased these: Power Supply - Used to power parts. GPU/Graphics Card - The thing that's going to play Star Wars Battlefront on High Settings at 60 FPS (hopefully) Akitio Case - Used to make GPU thunderbolt Compatible. (You're connecting your thunderbolt cable to this, as GPU's don't have thunderbolt ports). Barrel Plug - Used to attach Dell DA-2 Power supply to Akitio Case and GPU. Super HD Drawing of how the Connections look like Imgur You set up the Hardware like you would any eGPU build. 1. Connect Graphics Card to Akitio Case. 2. Connect barrel plugs 8-pin PCIe end to the Dell DA-2's 8-pin plug. 3. Connect one of the 6 pin PCIe plugs coming from the Barrel into the Graphics Card 4. Connect the Barrel to the Akitio case in order to power the case. 5. You have now powered the GPU and the Akitio case. 6. Your hardware is ready. Now onto the provisional software guide: The software is currently being worked on until my eGPU parts come in to test if it actually works (thus this being a provisional guide) (Requirements: Windows 8.1) At first I thought that the software would be just like any other Apple e-GPU project. Meaning, connect eGPU, install drivers etc. However, the new 2015 line of MBPr's that have dedicated GPU's (dGPU), use AMD rather than nVidia. What this means is that you can no longer use nVidia's Optimus technology in order to connect the eGPU to the new Macbooks with dedicated GPU's. What Optimus does is if it detects that there are 2 nVidia cards connected to the device (the one in the Macbook and the eGPU), it switches to the one with the most power, which would be the eGPU, automatically disabling the default dGPU for you. This allows someone with a 2014 Macbook that has a dedicated GPU, to use the internal LCD screen (the Macbook screen). This is not the case with the new MBPr's with AMD dGPU's. So now, we have to figure out a way to disable the default AMD dGPU and enable the Intel iGPU, which should allow you too use the eGPU for the internal monitor. The problem is that device manager doesn't show the Intel iGPU by default, as that's the way Bootcamp is optimized. It is explained in more detail in the thread below. If you have one of the new 2015 MBPr's with a dGPU and you were to go into device manager on Windows, you would only see the AMD dGPU. You wouldn't see the Intel iGPU. In order to solve this issue I looked at THIS thread. This thread basically solved the whole problem, thanks to users @ah- for providing the file that makes it so device manager shows Intel's iGPU (Intel Iris Pro 5200). The instructions for device manager to show your iGPU are as follows: (Huge thanks to @juniordiscart , wouldn't be able to do this without him) 1. Install reFIND via Windows. 2. Reboot your computer, you should now see a new boot screen. You will see this every time you boot up from now on. Boot back into Windows. 3. Download THIS file and place it on your desktop. 4. Open up Command Prompt, run as administrator. 5. (Thanks to @juniordiscart for the clear and concise instruction) Enter the following commands: mountvol S: /S This will mount the EFI partition in Windows and assign it the drive letter S. You won't be able to see it appear in "My Computer" however, it remains hidden. S: cd EFI dir Check the output after these commands. If you see a directory for refind, then you have refind installed and you can proceed with the next set of commands. Otherwise, make sure you follow the installation instructions for rEFInd for Windows onthis link: The rEFInd Boot Manager: Installing rEFInd xcopy /E C:\Users\YOURUSERNAME\Desktop\apple_set_os.efi S:\EFI\custom\ This last one copies the efi file to the custom folder of the EFI partition. Make sure you get all of the "\" right and that your path to your apple_set_os.efi file is correct. It should ask you to create any custom directory if you don't have one already. 6. Now that you've done the hard part, when you reboot you should be brought to the reFIND boot screen and there should be a new option called something like "apple_set_os.efi". Open this up. 7. It should flash the screen quickly and bring you back to the reFIND boot screen. (If it opens up and stays on the screen for more then a minute, shut off your computer and try again) 8. Boot to Windows. 9. Check device manager. Your Intel iGPU should now show up. Congrats you've done the hard part! Now install your Intel Drivers ( https://downloadcenter.intel.com/ ) BUT WAIT------ While installing your Intel drivers your screen will flash black and most likely freeze up. Let it sit like that for a couple of minutes or so and shut down your computer by holding the power button till it turns off. Turn it back on, and REPEAT STEPS 6-7 above. Every time you shut down your computer you have to first start up the "apple_set" efi file, then start Windows. Or else your iGPU won't show. Now you have the latest Intel drivers. Disable your dGPU in Device Manager (right click it, disable), your Macbook should auto switch to the Intel iGPU. Personally, all of the above worked great for me. I was able to disable the dGPU and use my iGPU. The speed at which the 2880 resolution screen ran was evidence enough that it worked. Now, we wait Since my parts haven't come in yet I'm not able to see if connecting the eGPU will allow me to use the Mac's internal display, but they should be here soon so I'll update as soon as I get them. (To be continued.....) Edit: If anyone can explain to me what error 12 is and how it occurs please do . Thanks!1 point
-
Here's a working eGPU implementation on a Lenovo Ideapad Y410: http://forum.techinferno.com/provisional-guides/10391-14-lenovo-y410p-ideapad-gtx970%404gbps-c-mpcie2-pe4c-2-1-win8-1-a.html#post1379261 point
-
Yes actually I just got the gpu yesterday. Had a change of plans, Im now using an R9 280x. It works surprisingly well. Connected it, installed the amd driver and that was it. I have no troubles what so ever. I did have to disable the internal 755m because games would automatically choose it instead. I have not tried it with the second 755m yet so Ill have to see later today.1 point
-
Check out http://forum.techinferno.com/provisional-guides/10368-intel-nuc5i5ryk-gtx970%4016gbps-ngff-m2-p4sm2-win8-%5Bwormholev2%5D.html#post137598-1 points