Leaderboard


Popular Content
Showing content with the highest reputation on 03/29/15 in all areas
-
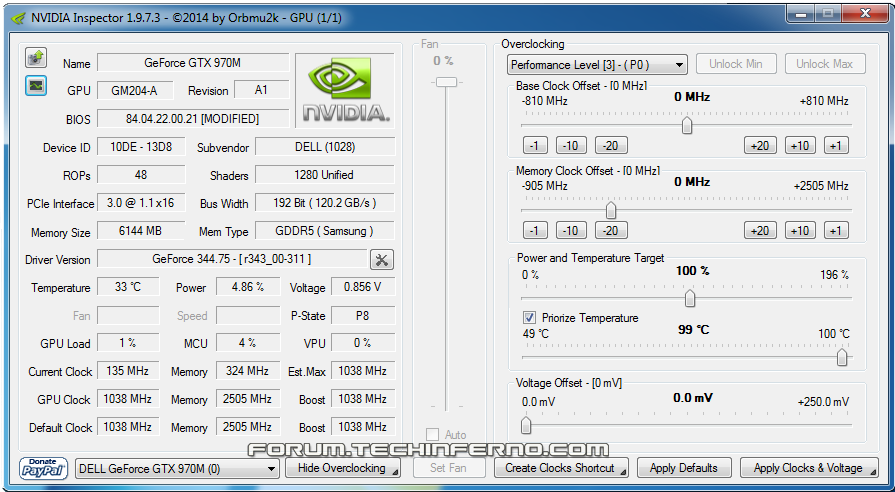
NVIDIA 'Maxwell' VBIOS mods Here you find modified VBIOS versions for the mobile parts of the Nvidia 'Maxwell' series. The VBIOS versions in this post are tweaked for performance and versatility. You'll get almost complete control over the performance parameters of your GPU. List of available VBIOS mods: Nvidia GTX 970m - 'OC edition' rev0 - >> 6 GB Version << - modified by @johnksss & svl7 -> see attachments Nvidia GTX 980m - 'OC edition' rev0 - >> 8 GB Version << - modified by @johnksss & svl7 -> see attachments Screenshot demonstrating the capabilities of the 970m versions: >> Read the instructions carefully before flashing! << If anything is unclear after reading or if you have additional remarks, please post in the thread. Flashing: - Go to the device manager -> 'Display Adapters' -> chooser your GPU, right click on it and choose disable - Flash the VBIOS with mnvflash, a modified version of nvflash (see attachments). Here are detailed instructions for nvflash in case you aren't familiar with it. - After the flashing is done: Enable the GPU once again in the device manager. - Reboot Do NOT use driver 347.09, it's broken and useless and won't allow you to overclock, even with the stock firmware. Don't distribute the files hosted here outside of Tech|Inferno. Don't modify the files you download here. mnvflash_windows_5.196.zip Nvidia GTX 980m - 'OC edition' rev0.zip Nvidia GTX 970m - 'OC edition' rev0.zip
 1 point
 -
I stopped trying in OSX, because my main goal was to get it working in Windows.1 point
-
@eleven: The first riser is PCI not PCIe, caution! 2nd and 3rd seem fine. I got this one: Delock 41788 (seems to be only available in europe).1 point
-
MSI made their own voltage table that is undervolted and my guess on the 860M is that nVidia saved that for Maxwell 2.01 point
-
Nvidia disabled undervolting on Maxwell vBIOS :/1 point
-
Fantastic job. Love it. Now wanting to backtrack and apply eeevan's which is now the 'best practice' in the previous post, linked from the opening page. Definitely. The yellow/black cable is too low gauge to safely pass 75W slot power. The fix is apply the mod at INFO: passing 75W slot power without a PCIe power. That is, solder two yellow cables 18AWG cables on the reverse of the J6 location and apply cellophane to first 6 pins of the x4 board.1 point
-
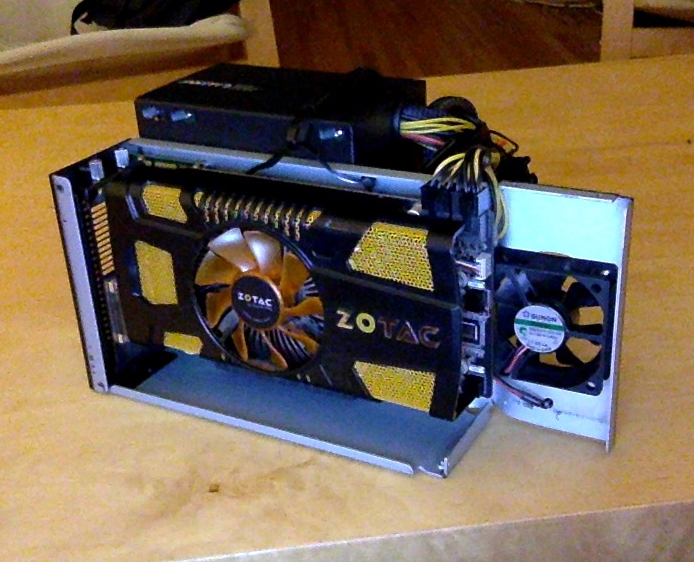
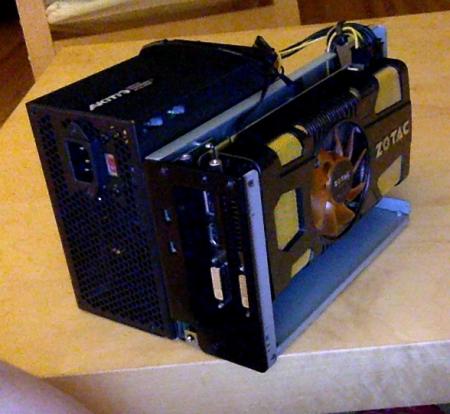
Hi, I built an external gpu combo this afternoon and encountered the same issue with the welded points. I have a slightly different solution that required far less effort; I went to the dollar store and bought a set of cheap jewelers screwdriver then used a hammer and the flathead tool to pry it open and break open the welded spots. Start with the smallest flathead to get some leverage then use the bigger one to crack it open It'll take a few minutes but it's not hard. Here was the end result of my build, I used lots of 3M double-sided foam tape Thx for all the great posts, Nando- I would have posted a guide, but I finished before your request.
 1 point
 -
23-May-2015: recommend w4vz PCIe splitter mod one post up as the more readily accessible and lower cost solution for most users.INFO: Using a BPlus SWEX to create a Dell DA-2 to 6P+8P PCIe + DC barrel adapterSAFETY WARNING!! This guide is presented in a technical manner so only those with the correct electrical/electronics engineering (EE) experience would be able to do it safely. We are dealing with high power here which can harm both the user and their equipment. Proceed with caution. If uncertain, pay someone with the right knowledge to do the mods in steps 1-5 below. Your safety is worth it.For sometime now have been contemplating what is the easiest way to create a ON/OFF switchable adapter that can accept a Dell DA-2 input and give two outputs (1) a DC barrel or molex lead to supply 75W PCIe slot power (2) a 6P+8P PCIe power outputs. Such an adapter would be very handy to power an AKiTiO Thunder2 enclosure with. Turns out I had all the bits in my repository all along to create such an adapter. A SWEX has keyed pins to allow connection of an input Dell DA-2 and output to 4 pins of a 6P PCIe lead and a 6P PCIe lead as seen below. So how to modify the SWEX to pass the input power to the output leads? Parts required- a BPlus SWEX on/off switch- a EXP GDC 6P cable as supplied with the EXP GDC eGPU adapter. Can source a standalone cable linked at http://forum.techinferno.com/enclosures-adapters/6643-exp-gdc-beast-ares-v7-v6-discussion.html .- a spare 6P PCIe power cable with no end, if intending to add a barrel connector like the non-solder variant as I did from http://forum.techinferno.com/enclosures-adapters/8317-%5Bguide%5D-making-molex-barrel-adapter.html#post113069 . . I sourced mine from an old ATX PSU wiring harness. Or a molex-to-6P PCIe power lead as can be found at your local computer shop + optional molex female-female gender converter- cable: 16AWG or 1.5mm electrical cable (15AWG) (AUD$0.40 per meter)- soldering: soldering iron, solder, flux paste- insulation: electrical tape At a glance wiring diagramShown below is front view of how the cabling works. The rearview with backplate removed shows the superimposed wiring diagram required to modify the SWEX.Details - if the picture above isn't clear Instead, I'd suggest just cut 2 pins leftmost pin of the 8P connector to make it a 6P connector so can use it in the same way as the 6P cable above.Left: PE4C 8P lead Right: EXP GDC 6P leadCan BPlus make us a variation of SWEX with above wiring for Dell DA-2 use?Was contemplated, but ceased due to w4vz PCIe splitter solution one post up being cheaper and more readily available. Correspondance with BPlus about this is in the spoiler: Date: Mon, May 18, 2015 at 6:35 PMSubject: RE: Dell DA-2 to molex+PCIe adapter with on/off switchTo: Nando Hi Nando,Thank you for your information.Our internal discuss, we will stop create Dell DA-2 SWEX.We think this cable is better than our SWEX for cost issue.If you have any question ,please feel free contact me.Thank you very much.Best Regards,Roger----From: Nando Sent: Monday, May 18, 2015 12:11 PMTo: Roger @BplusSubject: Re: Dell DA-2 to molex+PCIe adapter with on/off switchHi Roger,w4vz posts using 2x PCIe splitters to split off Dell DA-2 powerw4vz has worked out an easier way of getting a Dell DA-2 to PCIe power out using low cost and readily available PCIe splitters at http://forum.techinferno.com/enclosures-adapters/9426-220w-dell-da-2-ac-adapter-discussion.html#post122731You can see how cheap these are, with the user just needing two to get w4vz solution going: PCI-E 6pin splitter | eBay)Does this alter the plan to create a Dell DA-2 SWEX?Will this change your plans for creating a DA-2 SWEX? Our users are cost conscious so any BPlus solution/bundle would need to be a low cost item including shipping to be an alternative to w4vz' PCIe splitter solution. Maybe adding low profile PCIe connectors as an option?http://forum.techinferno.com/enclosures-adapters/9951-low-profile-pcie-connectors-discussion.html#post130496Regards,Nando1 point
-
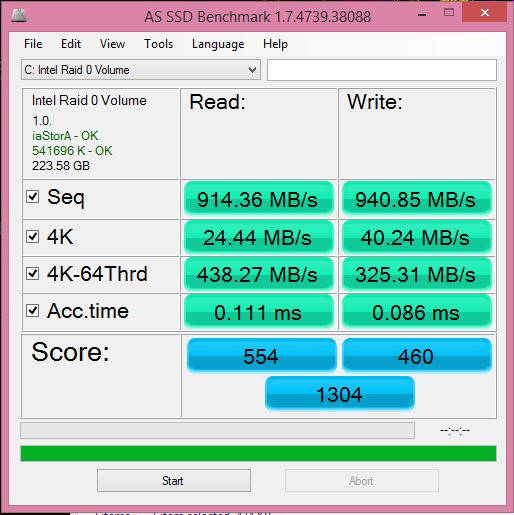
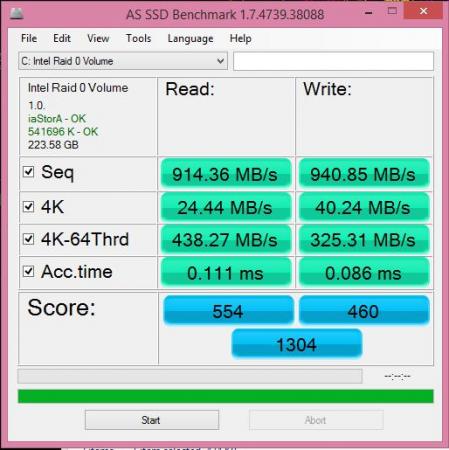
Hey all. This post has been a long-time in the waiting to be written as work doesn’t leave me much time to tinker on my 2570p anymore. But, in my free time over the last few months I’ve been able to do the following “mods,” if you will: RAID0 Samsung 840 EVO (120GB x2) Windows 8.1 UEFI install - better eGPU support than a MBR installation Grub2 + UEFI Ubuntu Install ASPM Tweak within Grub2 Here I wanted to consolidate all of the resources that I used in the event that someone (2570p or not) wanted to do the same. That and how to fix it when I break my setup. I had to use 5 or 6 resources to get the Grub2 and Ubuntu install to work correctly, and the significant ones will be included in their respective sections. I did all of this because I wanted UEFI Windows 8.1 to eventually have my eGPU up and running with hotplugging (not tested yet), and when I upgrade my OS I buy a new drive (in this case drives) so I don’t lose anything. In the @Tech Inferno Fan style, I’ll include everything in this post with spoilers to aid in reading. Thanks to @jacobsson for the RAID0 guide and motivation. Mods, feel free to do some format editing if you feel it’s necessary. Suggested software CrystalDiskInfo – can read the SMART status of each SSD, something the Samsung software won’t do CrystalDiskInfo - Software - Crystal Dew World GDisk – Can repair GPT disk errors within Windows. Needs both gdisk and fixpart. Best to run when everything's complete. GPT fdisk | SourceForge.net Suggested hardware Nimitz enclosure (cheaper on ebay). I removed the drive access LED. Amazon.com: Nimitz 2nd HDD SSD Hard Drive Caddy Adapter for Hp Elitebook 2560p 2570p with Bezel: Computers & Accessories StarTech eSATAp enclosure - If you’re pulling an existing drive and want to keep using it Amazon.com: StarTech.com eSATAp or USB 3.0 External 2.5-Inch SATA III 6Gbps Hard Drive/Solid State Drive Enclosure with UASP (S251SMU33EP): Computers & Accessories eSATAp cable Amazon.com: eSATAp Power Over eSATA Cable 5V and 12V - 3 Feet: Electronics (36inches) or Amazon.com: Power over eSATA Cable: Computers & Accessories (20inches) RAID0 Setup For RAID0, your sequential read and write speeds are significantly improved. If you do a lot (like, a lot a lot) of work with large files like databases or video editing then this is the setup for you. Or you want bragging rights or something different. I did it originally because I got the drives during a Black Friday sale and I wanted to cut the number of writes to each of the drives in half. Jacobsson did a great writeup that I followed here for how to install/configure RAID0 on a 2570p. One thing I didn’t see in there was that you should set your BIOS to “UEFI Native (without CSM)” which will make Windows install in UEFI mode, and probably is the reason that you've read this far. Basically, configure SATA mode to RAID, **change bios mode to UEFI Native (without CSM),** install drives, install windows to one of the drives (one might not take so use the other one), install Intel RST, configure drives to RAID0. If you're adding an enclosure to do this, then you may need to remove the diagnostic pin if you're having shutdown issues, as described here: HP Elitebook 8560p Won't Shutdown | NotebookReview Ubuntu Installation The Ubuntu install was a little more difficult. Apparently Intel RAIDs and EFI present their own problems when installing Ubuntu, so I had to figure out which one was creating issues and then find/apply the respective fix. This guide was the most helpful in getting Ubuntu up and running, with exceptions (detailed below): Install Ubuntu 14.04 alongside Windows 8.1 in 10 easy steps - Linux News ProLinux News Pro *Step 1 - Isn’t really necessary but will save time if you break something and have to start over *Step 2 - Won’t work on UEFI systems. Extract the Ubuntu ISO onto your USB device, or burn a DVD. You’ll probably have to use the "boot EFI file" F9 boot option and locate the .EFI file on your device yourself during boot. *Step 3 - I shrunk my Windows partition by 10GB for Ubuntu so I would have some space to install programs and play. Use the “Disk Management” program within Windows to do this. As a general rule, only modify Windows partitions within Windows, and Linux partitions within Linux. I’ve used gParted within Linux to modify Windows partitions, but only as a last resort and I had to fix errors on the next Windows boot. *Step 5 - I didn’t care about Secure Boot, and I couldn’t get setpci to work (for ASPM tweaks) with Secure Boot so I left it off instead of trying to fix it. *Step 6 - You’ll need to format your partition (10gb in my case) with gParted before installing Ubuntu while using the livelinux version. Leave a few mb at the end of the partition for your backup GPT table. I used the ext4 file system. Per https://help.ubuntu.com/community/FakeRaidHowto, you will need to install to the /dev/mapper/(random letters) partition. There is also a bug with the installer when you try to (re)format the drive using the installer because you’re using a fakeRAID (Intel software RAID), so don’t format it (again) and is the reason you did it before installing in the first place. *Step 7 - Don't use Boot Repair on your first attempt, as finding the Windows partition won’t work correctly with fakeRAIDs anyway. Only do as a last resort, and my fix for step 8 gives you a decent workaround for not booting to grub2 on the initial reboot that is addressed on steps 7 and 8. You will need to add your Windows 8 install within grub2 manually. Because of EFI and fakeRAID, the installer won’t be able to find your Windows 8 install partition. To add Windows 8 to your boot menu, follow the instructions at https://wiki.archlinux.org/index.php/Grub2 particularly the “Windows installed in UEFI-GPT Mode menu entry” paragraph. I ultimately ended up with the following entry in my 40_custom file, minus the setpci and pcie_aspm=force entries which were for the ASPM tweaks described below: menuentry "Microsoft Windows 8.1 UEFI-GPT" { insmod part_gpt insmod search_fs_uuid insmod chain insmod setpci search --fs-uuid --no-floppy --set=root 56EE-A46D setpci -s 0:1c.1 50.b=0x43 #expresscard setpci -s 0:1c.2 50.b=0x43 #Sd/mmc setpci -s 23:0.0 90.b=0x43 #Sd/mmc setpci -s 23:0.2 90.b=0x43 #Sd/mmc setpci -s 0:1c.3 50.b=0x43 #wifi setpci -s 24:0.0 50.b=0x43 #wifi new #setpci -s 24:0.0 f0.b=0x43 #wifi #pcie_aspm=force chainloader /EFI/Microsoft/Boot/bootmgfw.efi } I use and encourage the uuid method so that booting still works if you add drives to your system. You will have to change the Root UUID to whatever yours is following the instructions on the archlinux page. *Step 8 - YOU DON'T HAVE TO MESS WITH BCD TO MAKE GRUB2 WORK. Instead, enable Custom Boot in your BIOS as a boot option, then at the bottom, define the boot location as “\efi\ubuntu\shimx64.efi” and set Custom Boot as your first boot option. This way you can use the Windows Boot Manager to boot vanilla Windows 8 if your grub2 boot config isn’t working correctly and you don't break your entire computer. *Step 9 – Ubuntu will be the top entry. If you want Windows to be the top entry, you can rename 40_custom to something like 09_custom. Your backlight settings won’t work right now in Linux only. Change the LINUX_DEFAULT line with the following commands for backlight and powersave fixes: GRUB_CMDLINE_LINUX_DEFAULT="quiet splash acpi_backlight=vendor pcie_aspm=powersave" In the top of “\etc\default\grub” Run sudo update-grub You may be tempted to use Grub-Customizer or something similar. It broke my Grub2 (bad) and I had to fix it using my bootable usb. YMMV though, as maybe I was trying to do too many things at a time. I've also read reports that EasyBCD doesn't like EFI configurations, so use caution if using that software. ASPM Tweak This is old-school stuff from almost 4 years ago, but because HP won’t enable ASPMs on our laptops we need to do it from either grub2 or Setup 1.x if you want the power savings. I used to do this from Setup 1.x, and it was way easier to do so (worth the donation AND you get pacman!), but Setup 1.x doesn’t work with UEFI. Start here: https://wireless.wiki.kernel.org/en/users/Documentation/ASPM Review the “Enabling ASPM with setpci” section. Super convenient that you just installed Linux, huh? If you review above in my 40_custom entry, you’ll see that I double-tapped the PCIe port and device with force-enabling the ASPM. I haven’t tried if it will work without forcing both the port and device to use ASPM, but why not do both. The nice part is that you only should have to do this once for your WLAN device (unless you’re using a 7260 like me) as all of our other ports/devices should be the same. If you have a device that lives in your expresscard slot like one of these Amazon.com: GMYLE® ExpressCard 34mm to USB 3.0 Adapter (Dual Port): Computers & Accessories then you’ll have to do it another time for that one as well. I expect that the wifi device address (24…wifi part above) will be different if your wifi card is not a 7260, as Nando’s and mine were different and he's running something different. Results I’m not using a RAMDisk for my Firefox cache anymore as it wasn’t getting along with RST. I haven’t noticed a difference in load times in Firefox with the RAID0 setup. It also took a while to get used to a computer that was too quiet, but not that this is a problem anyway! Some benchmarks: I'm sure I took a performance hit by going with the 120GB 840 EVOs, but I don't need the space and the price premium for the 240GB versions wasn't worth it to me. If you want a good hack as to whether a RAID0 SSD array is good for you, check out here: RAID 0: Great For Benchmarks, Not So Much In The Real World - One SSD Vs. Two In RAID: Which Is Better?. I've idled at 4.9w before, but with firefox open it's usually somewhere in the 7-9 range. Before the ASPM tweaks, add 2-3W for each situation. Not bad, huh? Feel free to ask questions or make suggestions, this post is a compilation of things I've one since the end of November and my memory may be a bit fuzzy in some spots.
 1 point
 -
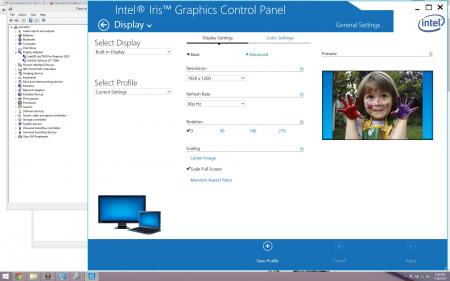
¡WARNING! This process will require you to wipe out your hard drive, you might get it to work with pre-installed systems but I haven't had the chance to do so. As of now, brightness is not working on bootcamp, I'll need to research the issue. Detailed step by step guide: 1. Create a Win 8.1 EFI bootable flash drive using Rufus. 2. Create an Arch Linux bootable flash drive using Rufus. 3. Create a OS X Yosemite bootable flash drive using createinstallmedia. 4. Boot your computer using the Win 8.1 install flash drive. 5. When you get to the Windows install screen, press shift+F10 to get to the MS Shell. 6. Execute the following commands: 7. Proceed with Windows Installation 8. Once in Windows, click on start menu then type "cmd" 9. Launch diskpart again 10, Create your OS X Partition with the following commands: 11. Restart your computer and boot into the OS X Yosemite installer 12. Launch Disk Utility 13. Erase your newly created partition using HFS+ as the filesystem 14. Close disk utility and install OS X in there. 15. Boot into OS X. 16. You'll now have both Windows 8.1 and OS X installed in EFI Mode, now you'll need to install Arch Linux. 17. Boot your computer into the Arch Linux installation USB. 18. Launch the Arch Console. 19. Execute the following commands: Now, the first time I installed the bootcamp drivers I just selected the windows partition while holding the option key at startup. This to avoid the dual video card config. Then I deactivated the nvidia card, executed the gpu-switch command, booted into windows and installed the newest intel drivers, this is how my device manager looks like: Enjoy! Greetings Jose M. References: https://wiki.archlinux.org/index.php/MacBookPro11,x https://wiki.archlinux.org/index.php/GRUB#Alternative_install_method http://www.tswartz.net/blog/how-to-install-packer-the-archlinux-aur-helper http://www.reddit.com/r/mac/comments/2fy3be/by_popular_demand_my_better_than_bootcamp_guide/ https://wiki.archlinux.org/index.php/installation_guide http://lists.gnu.org/archive/html/grub-devel/2013-12/msg00442.html https://github.com/0xbb/gpu-switch Special Thanks to Andreas Heider and Tre87! </dev></username></username></username></username>
 1 point