Leaderboard


Popular Content
Showing content with the highest reputation on 12/08/14 in all areas
-
Since many are experiencing throttling + issues, try out these. latest 'stable' drivers/modded inf -> nv_dispi.inf_v344.80 v337.88 (1) best driver so far (Kepler), 880M entries. v337.88 (2) 780M entries. v340.52 stable 34x.xx, 780M enries. (780M entries) v344.80 Introduced many specific fixes 980/970, nvidia only mentions/admits a few... nv_dispi.inf,(2) desktop 980/970 entries (single & SLI). All AW 17" & 18" supported (M17x/M18x included). Enable F8 Boot options 'Safe Mode' & 'Disabe driver signature enforcement'. cmd (Admin) bcdedit /set {default} bootmenupolicy legacy -> reboot -> F8 'Safe mode' run DDU "Clean and Restart" option -> F8 'Disable driver signing'. Extract driver w/ 7-Zip v9.25 x64 Extract to "3xx.xx-notebook-win8-win7-64bit-international-whql" Display.Driver folder, copy/overwrite nv_dispi.inf. Extracted driver folder -> run setup.exe GeForce 344.80 Beta @godfafa @Peter18x @mikecacho nv_dispi.inf_v344.80(2)_AW_GTX_980M.zip3 points
-
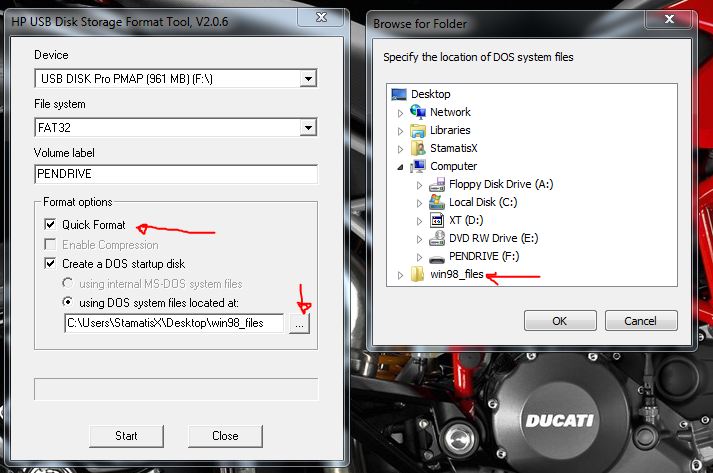
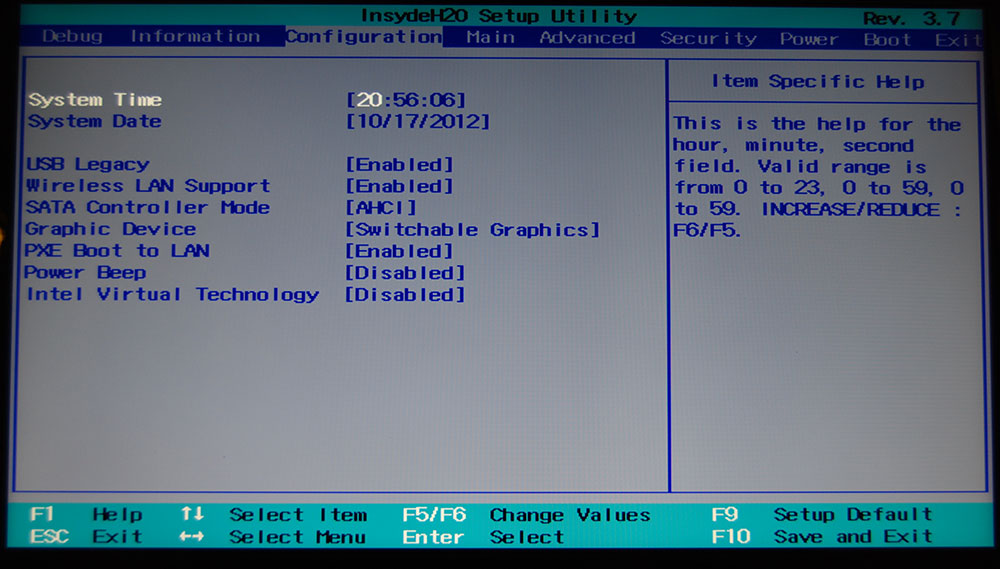
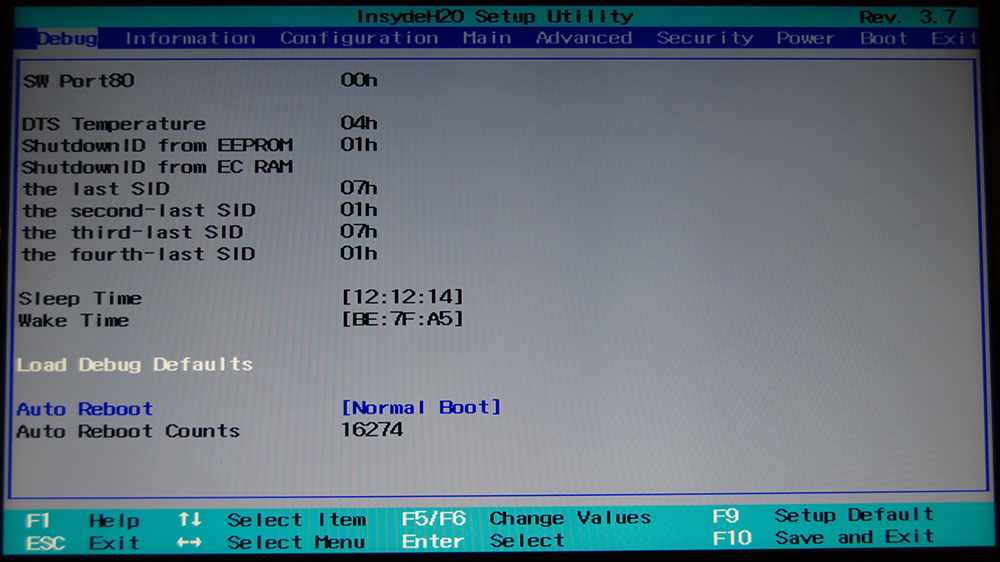
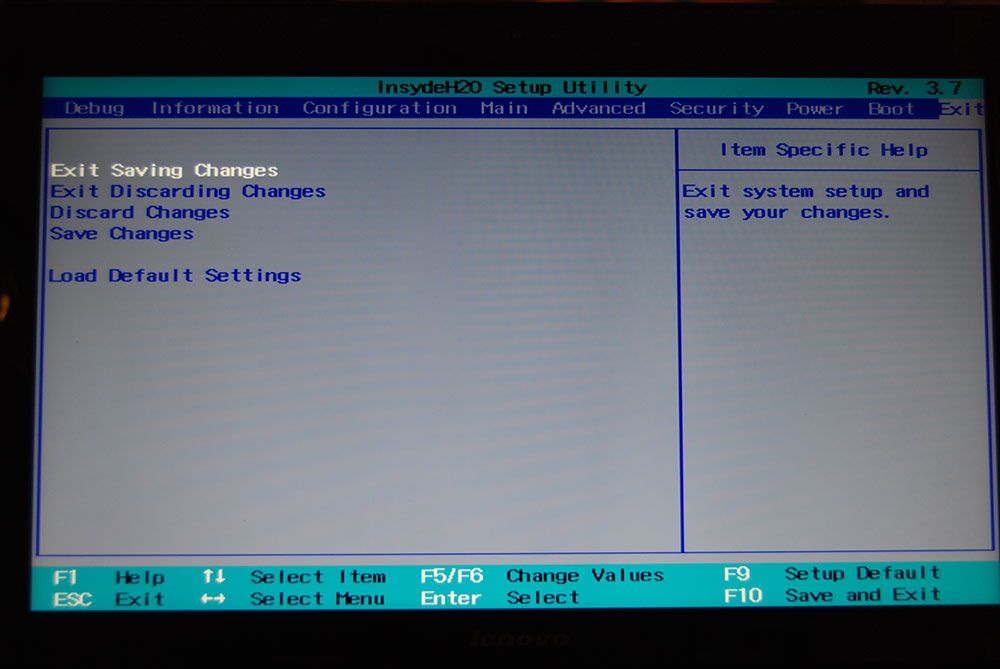
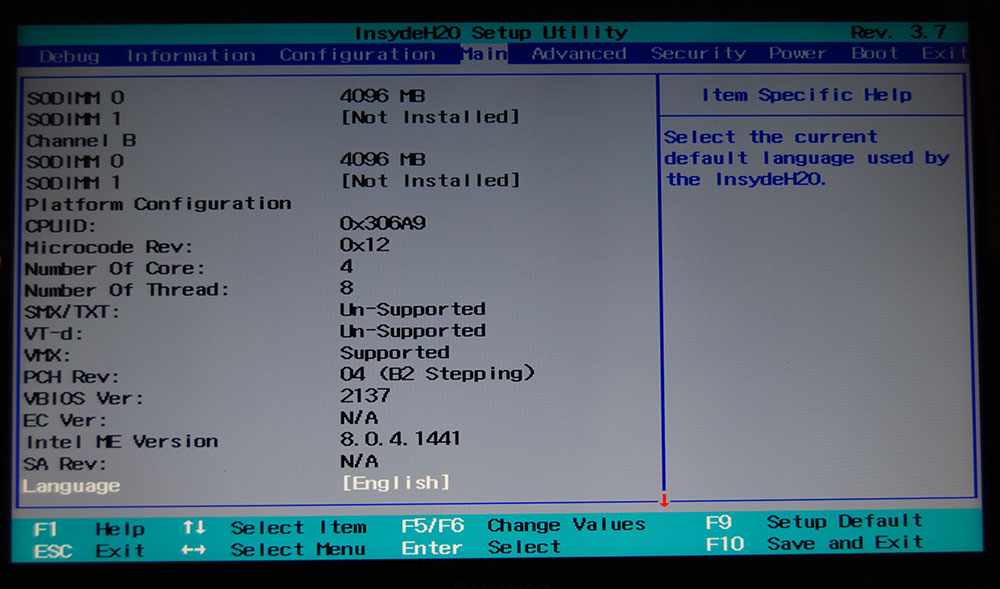
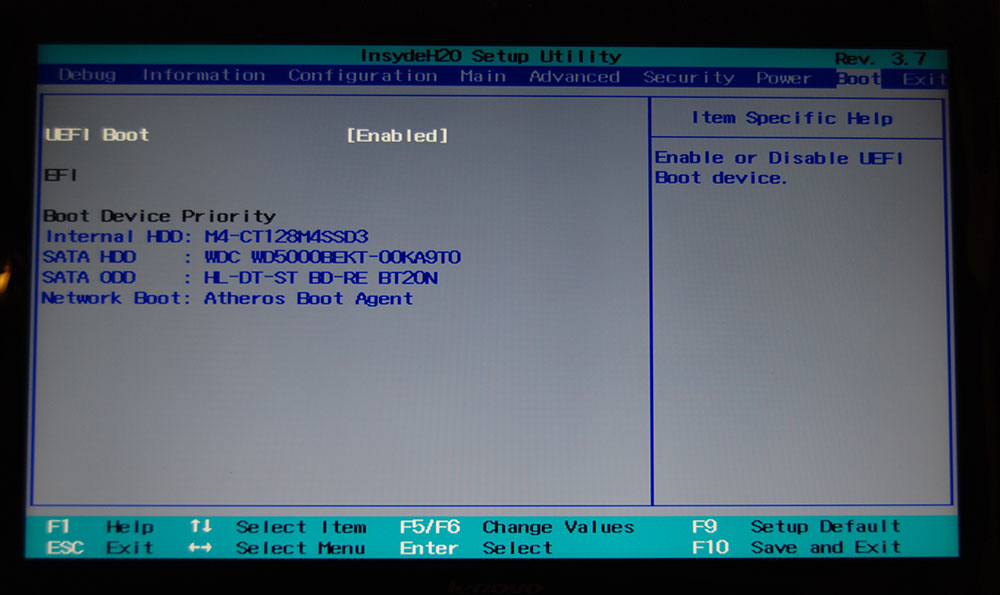
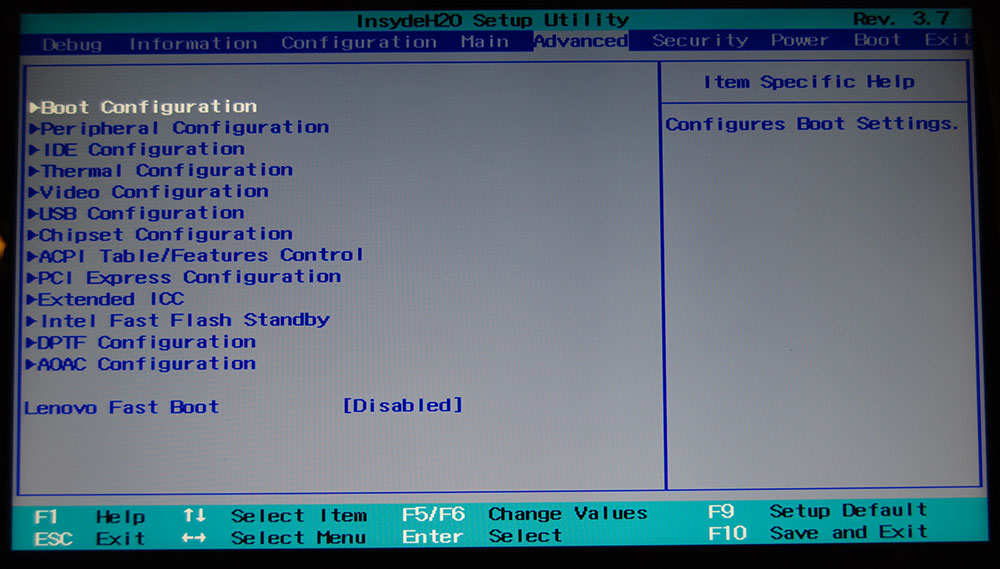
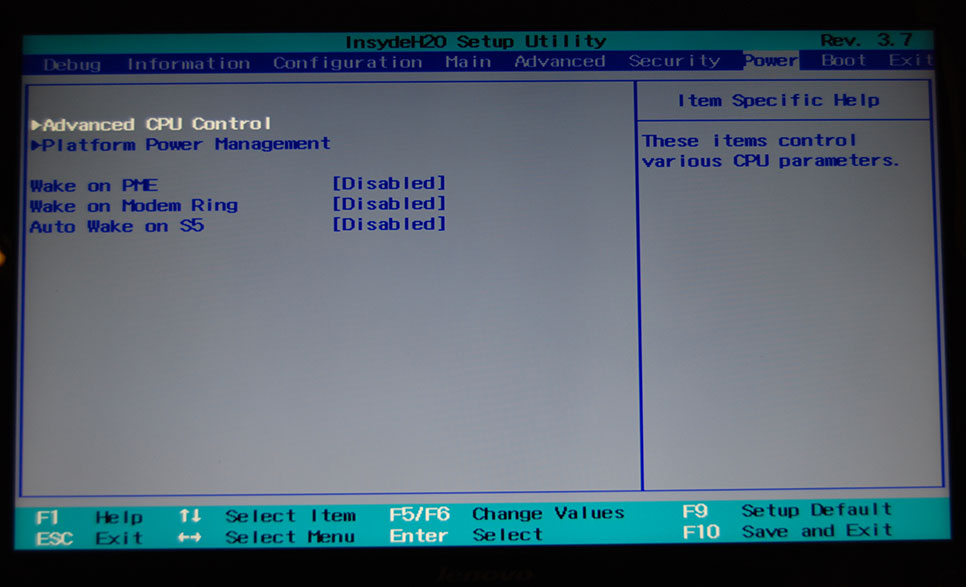
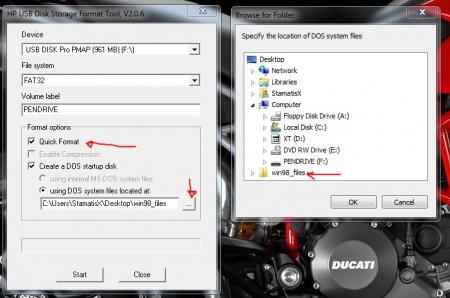
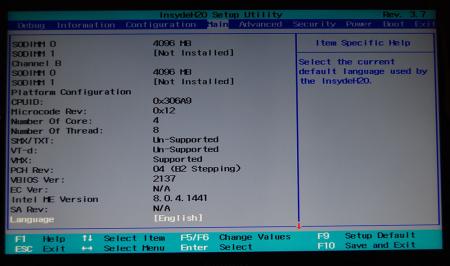
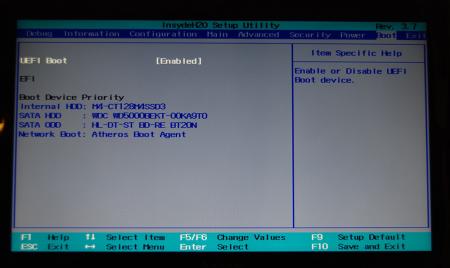
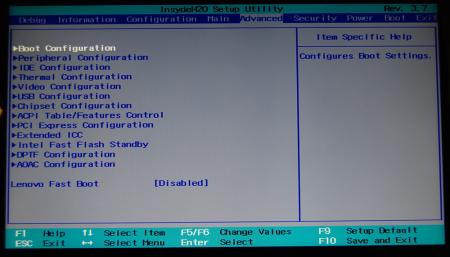
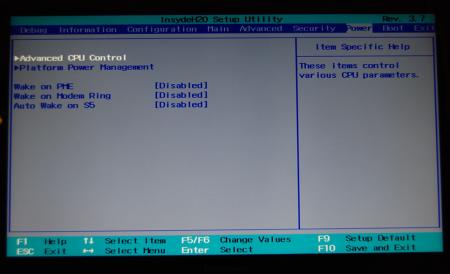
Lenovo Y500 - 'unlocked' BIOS / wwan-wlan whitelist removal The Lenovo Y580 / Y480 comes with a pretty locked down BIOS, and in addition to this with a whitelist which prevents the user from getting 3rd-party wwan/wlan cards to work properly. The modified BIOS versions here will take care of this. Keep in mind that not necessarily all options available in the modified bios will work. Some might not do anything at all, others could possibly leave your system in a state which will prevent it from booting. Use care when changing stuff in the modified bios, don't touch things you're not familiar with. Use all the mods and software posted here on your own risk. NOTE: This will only flash the bios region. It won't reset the nvars set in the bios. While it is technically possible to update from v2.0x to v8.01 by using the method described below, I can't really recommend it since the EC of your system won't get updated. While it might work (possibly even without any issues) I can't recommend it. Therefore if you're on v2.0x and want to update, the better option is to wait until Lenovo provides an official 8.xx firmware update with EC and BIOS. You can then still flash the modified version as described below, once you're on a proper v8.xx firmware. Attached you'll find a modified version of the Y580 / Y480 BIOS v8.01 (5DCN90WW). ----------------------------------------- >> For users with a v2.0x BIOS: << Download links Old version: Current 2.0x version: Lenovo Y580 / Y480 BIOS v2.07 (5DCN40WW) -> unlocked, whitelist removed, Nvidia 660m @ 1GHz default 3d clocks Flash with the included InsydeFlash utility. ----------------------------------------- >> Instructions for v8.0x BIOS users: << The attached BIOS ("Lenovo Y580 - Y480 BIOS v8.01 (5DCN90WW) - Mod") is unlocked, whitelist stuff removed and the 660m is tweaked to 1GHz default 3d core clock. The only way I know of which allows you to flash the modified BIOS for v8.01 users does unfortunately also describe certain information which you don't want to loose (serials, Windows licencse etc.). Don't worry, I got it all sorted out, but due to this the flashing procedure is a bit more complicated than usual. Make sure you follow the instructions carefully. Download the flash tool, for flashing you'll need the DOS version, but for creating the backup of your current BIOS the Win64 version will do as well, and it is faster. Get the prr tool as well. Grab the modified BIOS you want to flash and the Y580-Y480_BiosFix tool. Create a backup of your current BIOS using the flash tool you downloaded (first step) by runing the included backup.bat, or by using the Win or Dos version flash tool with this command: -d BackupBiosY500.bin -bios If you get and 'Error 104', grab 'Error 104' fix and replace the original fparts file with it. . Make sure you have the modified bios which you want to flash, the bios backup you just created and the "Y580-Y480_BiosFix" tool in the same folder. Run the Y580-Y480_BiosFix tool, follow the instructions on the screen. Enter the name of the files correctly, else you'll get an error. It will create a new file for you and will be named after the modified bios file you specified, with 'Fix' appended to it. Here's a screenshot of the tool in use (Y580 version looks the same). In the case shown here it will create a file called "modifiedBiosFix.bin" which you can find in the folder where you run the tool. Use that one for flashing. Put the fixed BIOS, the prr.exe tool and the fpt.exe (along with the fparts.txt file) on the root of your prepared DOS bootable USB drive, restart your system and boot from that drive. Execut the prr.exe, if you don't get an error message continue by pressing enter. Then flash the bios by using this command (filename.bin obviously needs to be replaced with the name of the file you want to flash). If you can't remember the name of your file, use the command dir to display all the files on your drive. Flash with this: fpt.exe -f filename.bin -bios NOTE: The name of the BIOS file mustn't exceed eight characters (not counting the extension)! That's a DOS limit, so make sure the name of your file isn't too long. Wait until the process is done. After flashing it will verify the data, in case there's something wrong with the flashed data it will tell you. In that case don't reboot, just flash again. It might look a bit complicated at first, but that's the easiest way I could think of. Let me know if anything is unclear. The attached v8.0x modified versions include: - unlocked menus - whitelist removed (wwan / wlan) - Nvidia 660m 'GHz edition' - 1000MHz default 3d clocks >> Here's the 'buy me a beer' link in case you like this. Modding makes me thirsty << Use at your own risk, you are responsible for your system and the changes you make on it. My programs come with absolutely no warranty to the extend permitted by applicable law. Thanks @X0pas1 for testing, and for some pics - see below: I'd appreciate it if someone could also post some pictures of the more interesting sub-menus, e.g. advanced CPU control, video settings and similar. UPDATE 1/17/16 DOWNLOAD LINK FOR FILES REFERENCED IN THIS POST:
 1 point
 -
Alienware M14x R2 - Modified BIOS versions containing tweaked VBIOS files Similar to the original M14x (aka R1 nowadays), the GPU of the M14x R2 is astonishingly powerful and has much more power than it reveals at stock settings. The relatively low default clock and base boost as well as the apparent +135MHz core overclock limit holds back a lot of GPU power. These BIOS versions here will unlock this software overclocking limit and / or increase the clocks of your GPU and allow you to get much more power from your system. Mods based on M14x R2 BIOS A03: - A03 @ stock clocks, unlocked overclocking limits - more to come Instructions are included, refer to the READ ME file. Please provide feedback and leave a comment. I'm also still looking for some versions to be tested once in a while, if you're interested please take a look at this thread: http://forum.techinferno.com/alienware-m14x/1787-%5Bm14x-r2%5D-vbios-mod-higher-boost-clocks-test-versions-only-5.html *************************************************************** F.A.Q.: Why do I need to flash the BIOS in order to get higher clocks? Isn't the VBIOS responsible for the GPU settings? Answer: How can I revert to the original Dell BIOS? Answer: What exactly got changed compared to the original BIOS? Answer: *************************************************************** Credits: I want to thank all the testers, especially @Stevenxowens792 and @deadbydawn, also @lh6kean, @thanats007 and all the guys I forgot to mention. And remember, you are responsible for the changes you make on your system, flash at your own risk. M14x_R2_BIOS_A03_-_[unlocked].zip
 1 point
 -
Consider this before purchase Tech Inferno Fan>> I recommend a slightly pricier BPlus PE4C V3.0 over any EXP GDC product as it has no Gen2 expresscard signalling issues when tested on my Dell E6440. The EXP GDC V6 does glitch occasionally with a "NVidia driver has stopped responding" with the manufacturer unwilling to supply an updated Beast product for review. I'm therefore assuming the problem isn't corrected in the newer version. 11-Nov >> Note: Beast product not integrated into purchasing guide below as yet. Comparison: EXP GDC Beast versus V7 (Ares) versus V6 -> Beast is the best!! The "BEAST" edition being the newest unit being that integrates all the desirable features of V6 (excellent connector positions, USB connector) with the best of the V7 (150W DC jack, x2 link support) and adding a new honeycomb acylic enclosure option as well as a new secondary boot delay (CTD - presumably CLKRUN). You'll note that Cloud is offering a Paypal purchase option in his aliexpress (English) store. These being the links of interest: Ê×Ò³-ÊýÂ빤³¡-ÌÔ±¦Íø (Chinese customers or Yoybuy taobao agents) hero cloud's store - Small Orders Online Store, Hot Selling set game card,mini iphone memory card,card reader writer software and more on Aliexpress.com (English/ROW customers) Comparison: EXP GDC V7 (Ares) versus V6 V7 has a 150W rated round DC socket, has a new NGFF.M2 (x2 2.0) adapter option and new enclosure options. V6 has better positioned power connectors AND has the USB port, though USB port has been reported as being flakey. No rating on the round DC socket suggests it's good for 75W slot power. Both use the same (BIG) 8pin jack for the DA-2 220W Dell AC adapter so will have no problems with either V6 or V7. V6 is better for standalone EC/mPCIe use with the 220W Dell DA-2 without an enclosure as gives a tidier cabling layout. The 220W DA-2 can power up to a GTX760/670/680/970/980. A 229W GTX770 could be accomodated if prepared to undervolt/underclock with MSI Afterburner software to get full load stability. V7 would be better if wanting to use say a smaller 150W AC adapter (GTX750Ti/660/970), use a NGFF.M2 PCIe slot, or want the new enclosure option. Why US$83-shipped 0W PE4C V2.1 is better than a US$50-shipped 0W EXP GDC V6? | Why US$134-shipped 220W PE4C V2.1 is better than a US$99-shipped 220W EXP GDC V6? Picture comparison: Download >> PE4CvsEXP + Tech Inferno Fan has found clean Gen2 signalling of the PE4C V2.1, whereas EXP GDC V6 has unreliable glitches + Has a PM4N socketted mPCIe option + BPlus have a history of delivering quality products to the DIY eGPU community. + Easier to purchase with quicker delivery + Has H1PA option -> can connect to a desktop PC to extend the slot + Has a x2 link option, though this is primary for users with 1st gen i-core or older systems. Intel locking down 2nd Gen i-core or newer systems to prevent that. + Has locking x16 slot + Support two delay switch (PCIe Reset Delay and CLKRUN) to avoid registration problems when booting + 0W BPlus offering includes the special PCIe power cable that the EXP GDC V6 0W package does not Why EXP GDC V6/V7s better than PE4C V2.1? + 0W US$50 offering is far more affordable. Their a user sources their own ATX PSU to drive the adapter. + import tax free for some EU countries + Dell DA-2 native input cable -> Customer can buy the PSU locally in their own country -> corrected in PE4C 2.1. It too has a native DA-8 8-pin input. + Rubber protected (re-enforced) mPCIe/EC cable + Very good shape of adapter + V7 has a x2 2.0 NGFF.M2 PCIe connector option + V7 has very stylish enclosure options Disadvantages: - V6 had some quality issues: USB port power, faulty mPCIe/EC cables, PCI Reset Delay faulty on some samples - logistics/delivery/purchase is more complex via Taobao agents like yoybuy - No x2 link option where can combine EC+mPCIe or mPCIe+mPCIe (Series-5 1st gen i-core or older chipsets) -No nasty surprises like crazy import taxes, unlike similar products! IMPORTANT: When buying from Taobao agents such as Yoybuy, ask the agent for the original Taobao order number! This is needed when contacting Cloud if the item is damaged/faulty NEWS "Say Hello" to EXP GDC V7.0: M.2 / NGFF support! Link to yoybuy Metal enclosure for the EXP GDC V7.0 or ask for V6.0 Link to yoybuy now accepting , Packages EXP GDC BEAST w/o power supply: US$50-$53 (incl. shipping and ATX-cable): banggood Store - IMPORTANT: The 6-pin PCI-e power cable is nowincluded! - IMPORTANT: The ATX power cable is included EXP GDC BEAST w/o power supply: US$68 (64 + $2 + $2) (incl. shipping): Aliexpress Store - IMPORTANT: Don't forget to add the 6-pin PCI-e power cable EXP GDC BEAST & V7 NGFF complete package (including 220W power supply and PCI-e cable): US$99 (incl. shipping): Yoybuy Store - IMPORTANT: (Optional) Don't forget to add the ATX power cable (if you intend to use GPU's higher rated than 220W) - IMPORTANT: When asked for extimated weight, use 2000g (2Kg) - IMPORTANT: 195W GTX680 would be the highest rated card to use with this 220W AC adapter. 229W GTX770 requires undervolting. - INFO: Sonek's post for images of complete package content. Accessories 6P-pin PCI-e power cable EU Coolermaster: 6-pin to 6+2pin, modular flat cable US Coolermaster: 6-pin to 6+2pin, modular flat cable US eBay: 6-pin to dual 6-pin, modular cable ATX power cable: Yoybuy Store Acrylic enclosure EXP GDC V6.0: Yoybuy Store | enclosure images by bichael and shared by Tech Inferno Fan Metal enclosure EXP GDC V7.0 (or ask for V6.0): Yoybuy Store WARNING: Some users had tried hooking up a regular PCIe 4-pin cable straight to the EXP GDC (8-pin/DA-2 power socket), this is very dangerous and will cause fire and harm/destroy your EXP GDC, GPU or System!!! The DA-2 interface has reverse polarity compared to PCIe power interface which means you will be shorting 12V -> GND & GND -> 12V. Use the ATX power cable: Yoybuy Store Video Review Donations for video? Recommend to not donate to the author of the video as he suggests. Instead donate to any of the members who have been pivotal in delivering eGPU content: Tech Inferno Fan, kizwan, angerthosenear, jacobsson to name a few. Metal enclosure for the new EXP GDC V7.0.
 1 point
 -
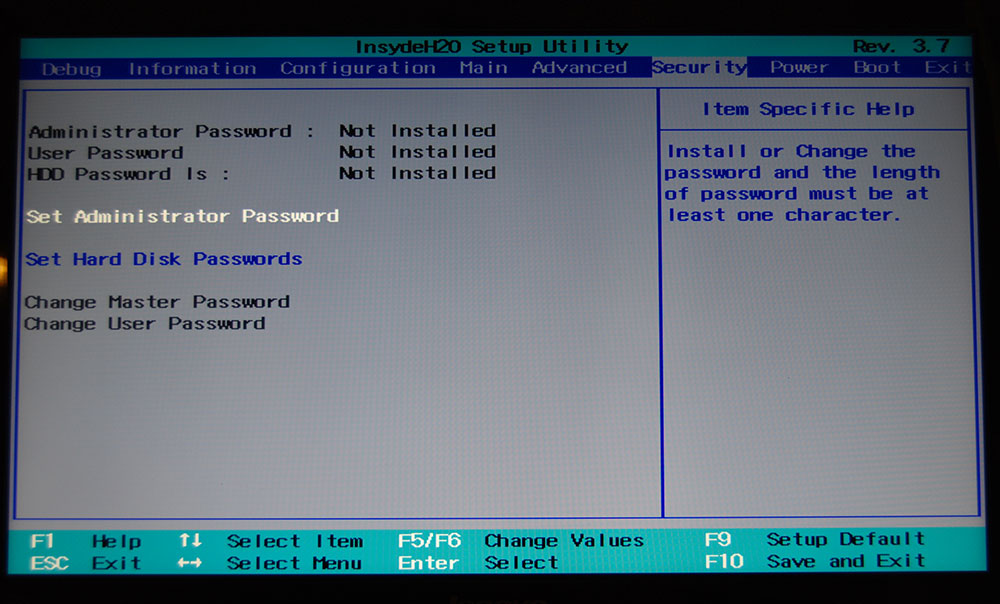
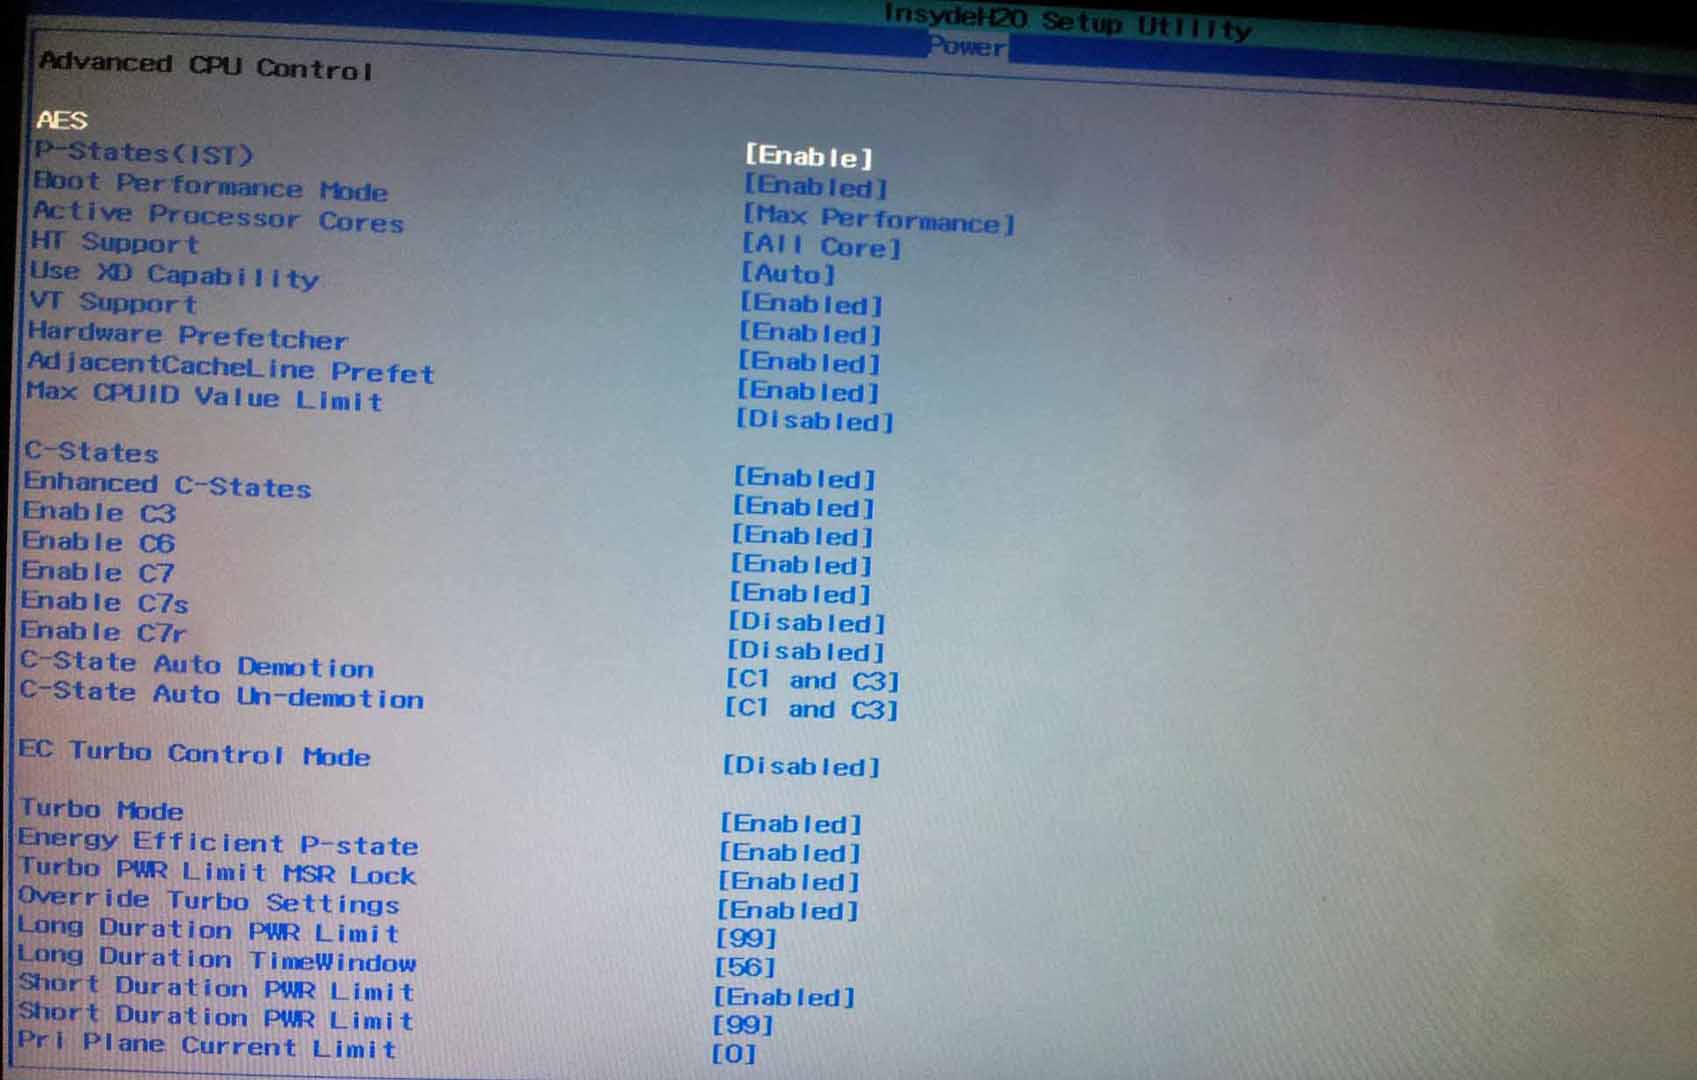
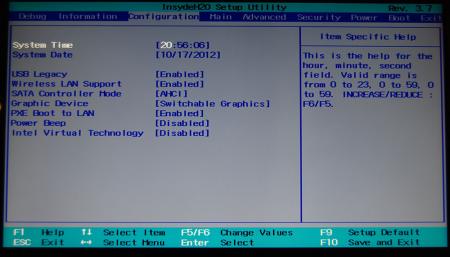
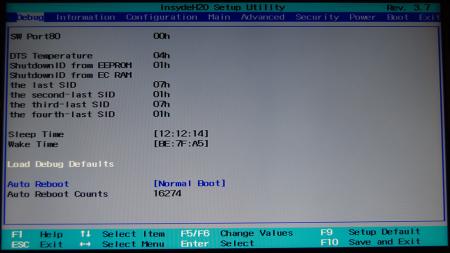
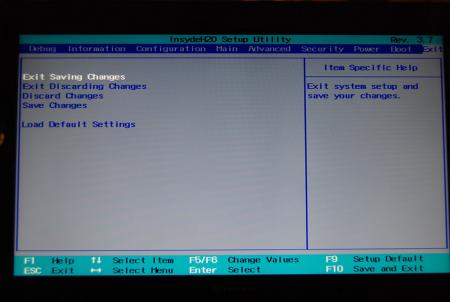
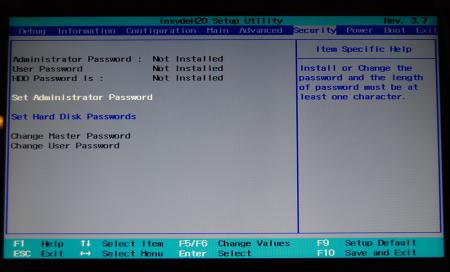
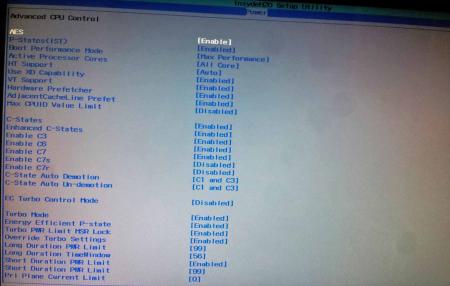
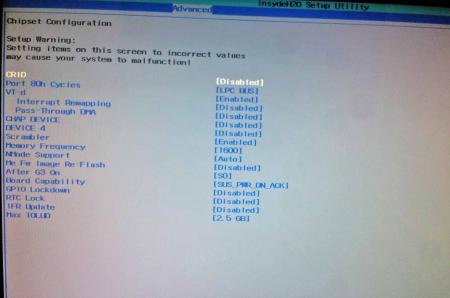
. Read this link before continuing: http://forum.techinferno.com/alienware/2252-information-about-bios-updates-a07-a08-higher-m14xr2-m17xr4-m18xr2.html M17x R4 and M18x R2 users already have the possibility to further tweak their systems with the help of a modified bios... so let's not forget about the M14x R2 users Dell has hidden a lot of options in the BIOS of the Alienware M14x R2, the modified BIOS versions here will show you all the hidden menus and allow you to further tweak your system and optimize its performance. Don't change anything you're not familiar with. There might be functions available which don't work on your system, so use this BIOS with care. It should only be used by advanced users. In case you mess up and your system refuses to boot after applying the changes you make, remove the AC adapter, battery and coin cell battery in order to clear the non-volatile ram of the BIOS. This should fix most issues. Believe it or not, creating such mods is rather time-consuming. If you appreciated this work feel free to buy me a beer * Donate * Download links for the unlocked M14x R2 BIOS versions: M14x_R2_BIOS_A03_-_[unlocked].zip Here some pictures of the most interesting options and menus. Thanks @Mehtaparth94 for providing the pictures! ********* Flash and use at your own risk. I don't take any responsibility for any possible damages on your system. ___ M14x_R2_BIOS_A03_-_[unlocked].zip
 1 point
 -
Hey guys, I know some of you wanted an unlocked A12/A13, so here it is! First off, this bios DOES NOT fix gpu throttling. Alienware needs to fix this. Anyways, I've been testing the A13 bios for @svl7 and @Michael; All credit goes to them for this. This bios provides unlocked menu in the bios and unlocks overclocking I have flashed using the FPT Method. I'll try to lay out the steps here: 1.) Make sure you are on an unmodified A13 Bios from Dell 2.) Download the [FPT] zip file in this post and open it up . You will see a .BIN file extract it and rename it to m14xr2.bin 3.) Next you are going to want to go into that bios at boot (f2) and make sure it's set to legacy boot and NOT UEFI. 4.) Then you are going to want to follow the instructions by svl7 (the second method, DOS flashing) and grab the rest of the files here: http://forum.techinferno.com/alienware-m18x-aw-18/1966-%5Bm18x-r2%5D-unlocked-bios-versions.html 5.) After you flash you have to change back to UEFI (secure boot + fast boot) if you are on windows 8 (and you installed windows using uefi, if not then skip this). I also had to change my raid type to AHCI. ********Disclaimer: I do not nor does svl7 or Michael take responsibility if something goes wrong. All responsibility for flashing and any damage done is on you.******** Finally, I'd like to once again thank svl7 and Michael for their work. It would not be possible without them, so show your thanks! [FPT]-[M14R2]-A13UnBiosUnVbios.zip1 point
-
When I'm posting testing version and you decided to use them, then I also expect something in return... Feedback! Else I can't improve these mods, I don't have an M14x. If I don't get feedback and some data I see no need in posting public testing versions but will rather give them to users of whom I know that they will provide me with the information I need.Thanks. EDIT: New way of flashing for versions labelled with [FPT] - Refer to the "Dos flashing" instructions found in this post for the tools and details. If you're going for the A11 mod then I recommend first flashing A11 stock, and then following the instructions in the link above. ******* Current test versions:M14x R2 - BIOS A10 - unlocked BIOS with 650m @ 950MHz core / 1400MHz memory for 3d clocks. Increased overclocking limits. No boost. M14x R2 - BIOS A11 - unlocked BIOS with 650m @ 950MHz core / 1400MHz memory for 3d clocks. Increased overclocking limits. No boost. [FPT][M14x R2] BIOS A11 'unlocked' - 650m 950-1400 - TEST-V2.zip [M14x R2] BIOS A10 'unlocked' - 650m 950-1400 - TEST.zip1 point
-
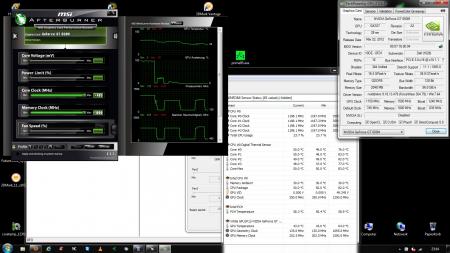
I think it's time to publish my official scores since the system it's pretty stable. System: 12" Lenovo X220 CPU: i5 2520M 2.5 RAM: 8GB eGPU: [email protected] Adapter: PE4C V2.0 Ports: QM67 EC2 OS: Win7/64 3dmk11.gpu: 7656 (AMD Radeon HD 7950 video card benchmark result - Intel Core i5-2520M Processor,LENOVO 429137G) vant.gpu: 24255 (AMD Radeon HD 7950 video card benchmark result - Intel Core i5-2520M Processor,LENOVO 429137G) 3dm6: 15585 (AMD Radeon HD 7950 video card benchmark result - Intel Core i5-2520M Processor,LENOVO 429137G) Cinebench R15 OpenGL: 63,46 fps Indigo Renderer (3.6.28, 3min Erotica test scene, PT, samples): CPU only: 242.72/pixel, 891k/s, +eGPU: 311.99/pixel, 1145k/s Indigo Renderer (4.0.30 3min McLaren test scene, PT, samples): CPU 0.265 Mil pix/sec, pure GPU: 2.259 Mil pix/sec HitFilm 3 Pro (3.0.3521, Sun test scene rendering min): iGPU 47:38, eGPU 3:09 Unreal Engine: <acronym title="To be discussed">TBD</acronym>1 point
-
Well done. I meant 4.0x4 and VID @ 0 or 10, but it won't take long...had enough 4.4GHz issues, not more.1 point
-
For those questions you'll have to wait until someone with more knowledge helps you. Sorry I can't help with those1 point
-
lol here you go1 point
-
@J95 @godfafa The nv_dispi.inf_v344.80 works great. Also ensure you are not placing a modded dispi.inf & nvdmi.inf in together, it will cause throttling, use one or the other "only" As for the windows updates causing issues, I am not experience that problem @godfafa @Peter.1 point
-
So AW guys would a alx18 or an m18xr2 be the best SLI 980m platform to run? I'm sorely tempted to get another alien just for the sake of variety more than anything. crazy but i consider the m18xr2 to be reasonably portable - - - Updated - - - Hmm i dont use throttle stop. - - - Updated - - - @godfafa whats your highest 3dmark 11 result to date? - - - Updated - - - What kinda score is he getting with it? 3dmark 11 graphics score only, physics will only mix it up as im hex core?1 point
-
its not huge but its there all the time but i never go over 62 degrees C so its certainly not temperature and if i increase voltage it throttles more so vbios issue no doubt1 point
-
Benching was all in 8.1 environment so win 7 probably would already surpass 30k havent bothered checking yet still investigating what it is about 3d thats not available on the 980m especially as it functions correctly with a monitor - - - Updated - - - both im affraid1 point
-
Both i have windows 7 x64 and windows 8.1 Dual boot1 point
-
The performance if sli 980m is mind numbing given a vbios upgrade i can see these eating sli 780m per card. Ive already passed 30k graphics score in 3dmark 11 and 14.9k physics with this raw power available on small form factor its about time desktop cards went half size single width again.1 point
-
!!!Up And Running!!! AKiTiO with the TITAN Z up and running. Here is my process. http://youtu.be/cPOB9qmPjaE http://youtu.be/cPOB9qmPjaE1 point
-
http://www.3dmark.com/3dm11/9081413. And thats throttling.....1 point
-
Your system aw 18 is pretty much what im after if i come across 1 up for grabs. Yes mine has FN+1 toggle but its not needed as bad as clevo fans are for spinning up late ive found this more than adiquate even at 6 cores 4600mhz and any video card overclocked as high as it can go... overvolting doesnt risk temps.1 point
-
cards installed photos taken will post shortly,no driver dramas windows 7 installed 980m drivers and enabled sli in about 20seconds flat. no modding inf nonesense.. <3 love you prema! - - - Updated - - - ok 1st off bios.... the ladys seen in there but not recognised correctly but no dramas - - - Updated - - - the girls tucked up in bed - - - Updated - - - side by side comparison of gtx780m next to a new gtx980m - - - Updated - - - btw prema primary card + secondary is bios 10. think you said you dont need 10+12 right? - - - Updated - - - btw prema primary card is bios 10. think you said you dont need 10+12 right? gpuz likes both cards and correctly detects them... idle temp is 32degrees C as i type none a/c house ambient 21 degrees c so far about 14 degrees cooler than the gtx780m fan noise is noticibly quieter1 point
-
... and M15x 980m and 970m, AW17 and M15x Sure, see attached files. Will only work for AW17 and M15x though. I don't know the AW18 and other device ideas by heart... nvcvi.zip
 1 point
 -
Yupee!! Fine! THX-A-LOT! Interest. When I registered the 64bit versions, the swap file size was double, however memory used 100%.... The reset assisted only... but CUDAenc is enabled.1 point