Leaderboard


Popular Content
Showing content with the highest reputation on 11/07/14 in all areas
-
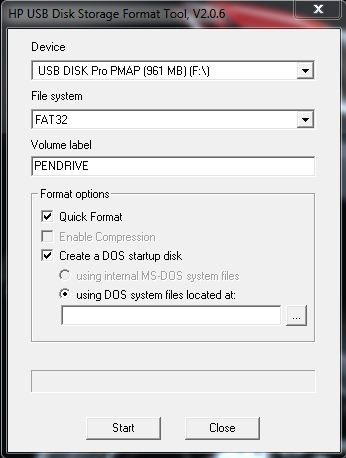
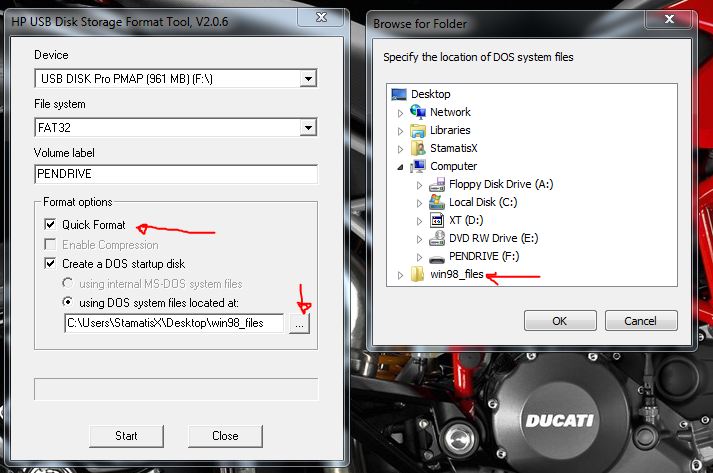
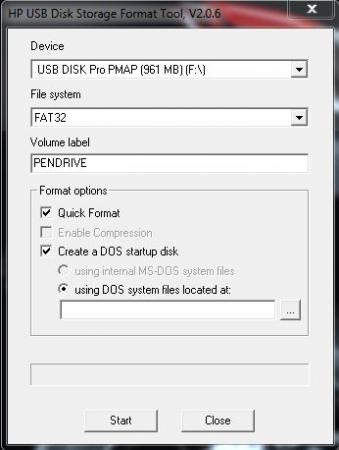
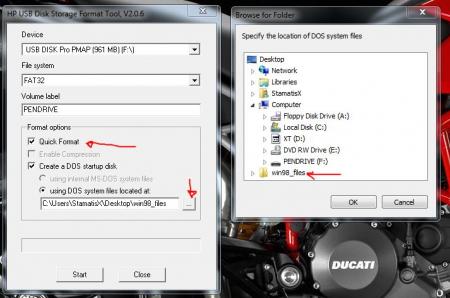
For those who don't like the restrictions Lenovo put on their system, here's a BIOS mod that will get you back at least some of the freedom you should have over your own hardware. Features: WLAN card whitelist removed, any (hardware-wise compatible) card should now work hidden BIOS menus unlocked VBIOS tweaked for more performance and better tuning possibilities Keep in mind that not necessarily all of the BIOS options available with this mod will be fully functional, so use the new available settings with care. If you're unsure about something don't change it and ask here, someone might be able to help. Available for v1.07 / v1.09 / v1.10 and v3.05. v2.04 and v2.07 added (only whitelist removal as for now) If you have a different BIOS (or more specific, a BIOS newer than 3.05) I will need a copy of it in order to make it work for your system. Instructions for flashing the modified BIOS v3.05: You need a USB stick prepared to run DOS, here is a guide you can follow in case you don't know how to do this: Guide by @StamatisX - thanks! >>> Before continuing make sure the AC adapter is connected to your laptop and your battery has at least 20% charge remaining. <<< (0) - NOTE: This step is Only necessary if your system isn't already using BIOS v3.05 Update to the official v3.05 BIOS provided by Lenovo . (1) - Create a backup of your own BIOS (now v3.05) by using Fptw64 tool. Extract the files and run the included .bat file from an admin command prompt. . (2) - Download Lenovo_Y510p-Y410p_[v3.05]_modified.zip and put the files of folder [1] to the root of your prepared USB DOS stick. Let the BiosFixer prepare your BIOS for flashing by drag and dropping your backup file on it. Put the created "v305mod.bin" file to the root of your USB DOS drive as well. . (3) - Now you need to downgrade the firmware back to v2.07 (Y510p-Y410p_v207_[stock].zip) in order to flash the mod. . (4) - Boot from your USB DOS drive, when you see the command prompt type BIOS and hit enter. Wait until the BIOS is flashed (you can safely ignore warnings about non-existing regions). . (5) - Once the BIOS flash completed with no errors, type EC and hit enter. Wait until the EC is flashed. Then reboot. . (6) - Go to the BIOS setup menu, load the default settings, apply and reboot. Done. In case you're using an ultra bay GPU follow the instructions in post #2 and flash the vbios.. NOTE: It's crucial that you flash both, BIOS and EC. Having different EC and BIOS versions can in certain situations lead to issues. IMPORTANT: If you want to go back to stock v3.05 you can do that easily by simply using the official update from Lenovo. That's it, nothing additional required in this case. Old instructions for users with v1.07 / v1.09 / v1.10 or v2.04 / v2.07 who for some reasons don't want to update to v3.05: Video walk-through of bios settings (thanks @allstone): My donation link in case you want to buy me a beer Download link for files referenced in this post:
 2 points
 -
Only IPS display options 1080p and 4k (except 120Hz TN) Better audio, internal and external No more dvd-roms At least MXM gpu, we know Sager does what Intel desires about CPUs, it could be soldered in the future with no options Little more modern design to compete with AW, MSI, Asus, no more flashing logos on touchpads Better materials, like brushed metal at least No less than 210W for 15" hi-end laptops, 240W and 330W for 17" seems fine Slimmer PSUs Risky, but no HDD drives, couple of m.2 ssds with RAID option Shareble HS for both CPU and GPU for single GPU machines with 3 slim fans (often CPU is way hotter the GPU) If Skylake is around 100W desktop version than not much sense to make it work in 15"-17" laptops wthout overheats and thick design. So x99 18" with dual gpu seems like the only logic desktop cpu option, imho) Sent from my Nexus 4 using Tapatalk2 points
-
Yeah, I couldn't believe the reduced feature set over the 880m! This is the first card from NV I have seen not supporting 3D Vision in many years - but I haven't followed mobile chips so can't be sure.Just to play devils advocate, NV must be dropping 3D Vision so didn't bother adding it in! 120hz should still work but as we know without an iGPU nobody has managed to get past POST .2 points
-
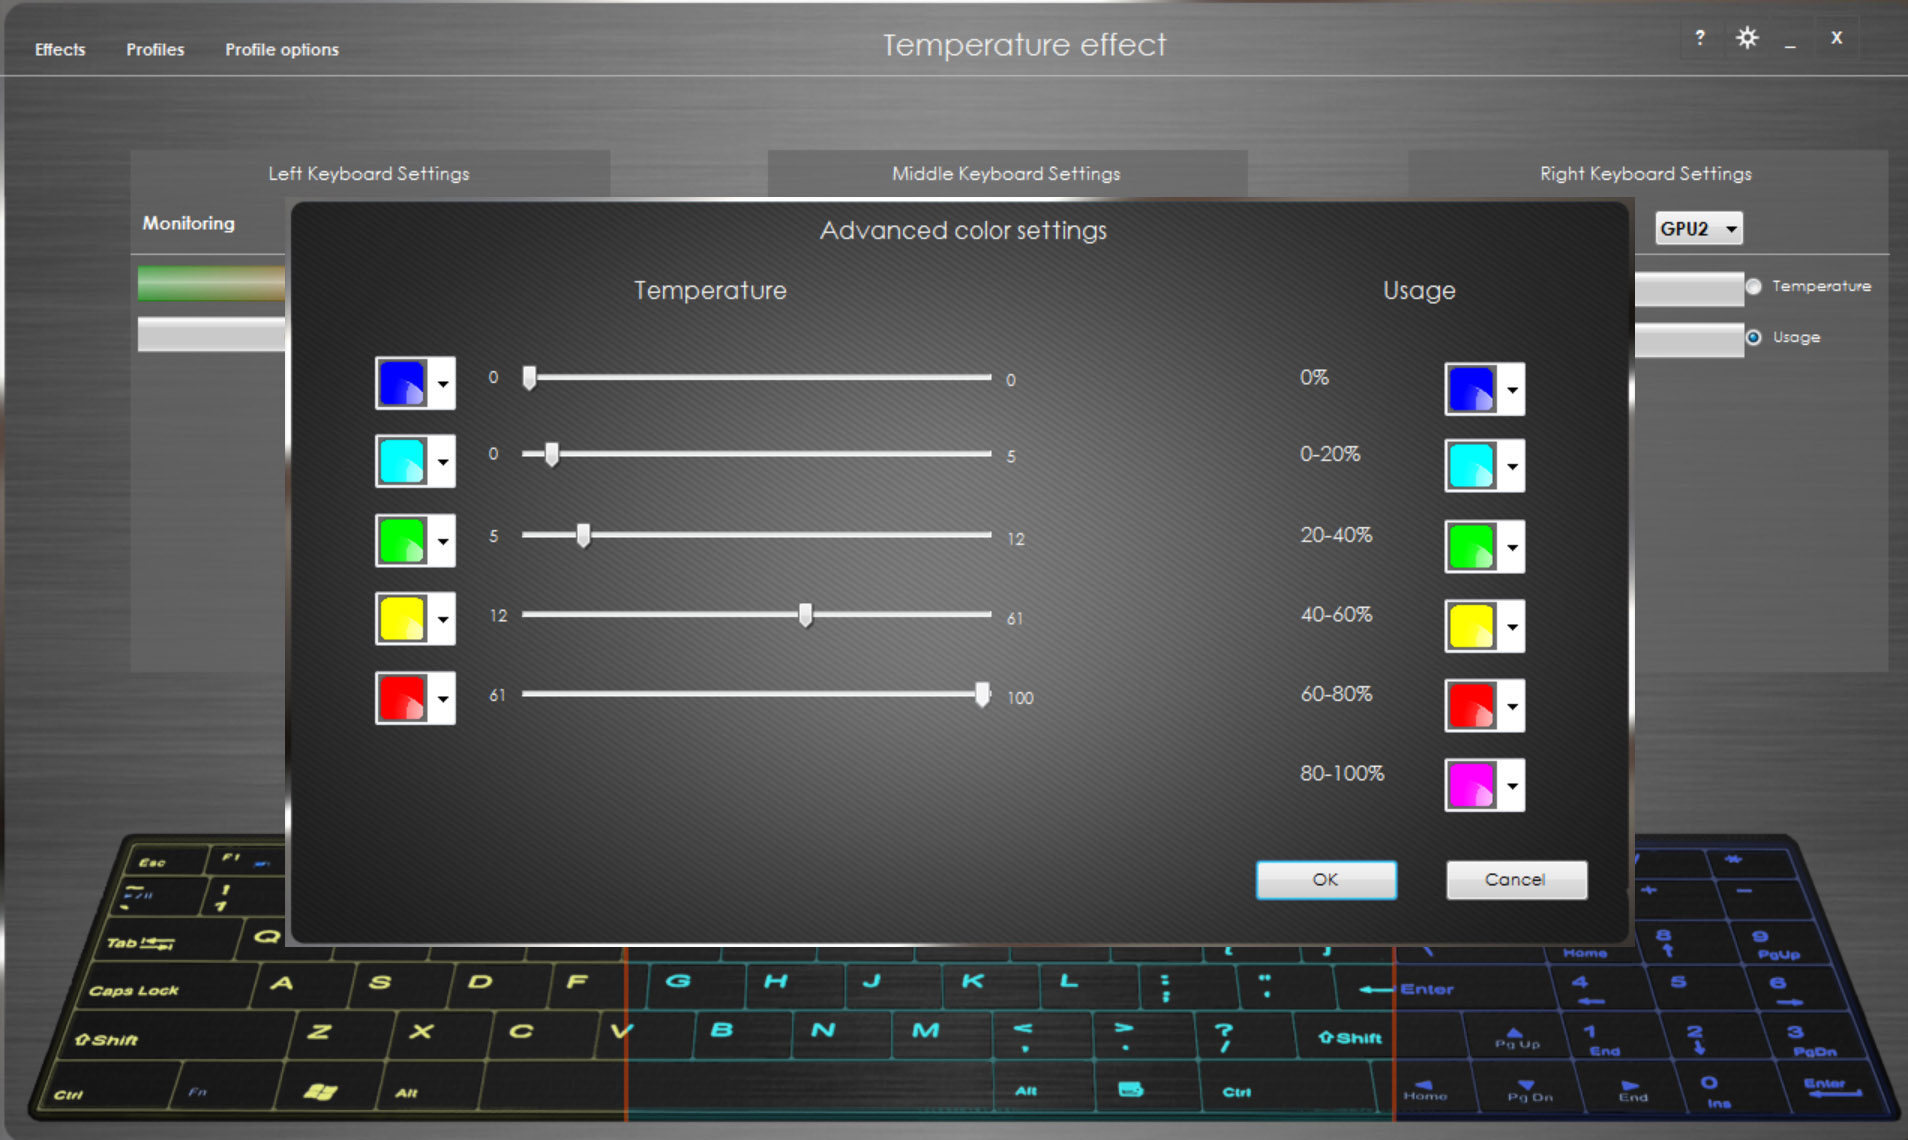
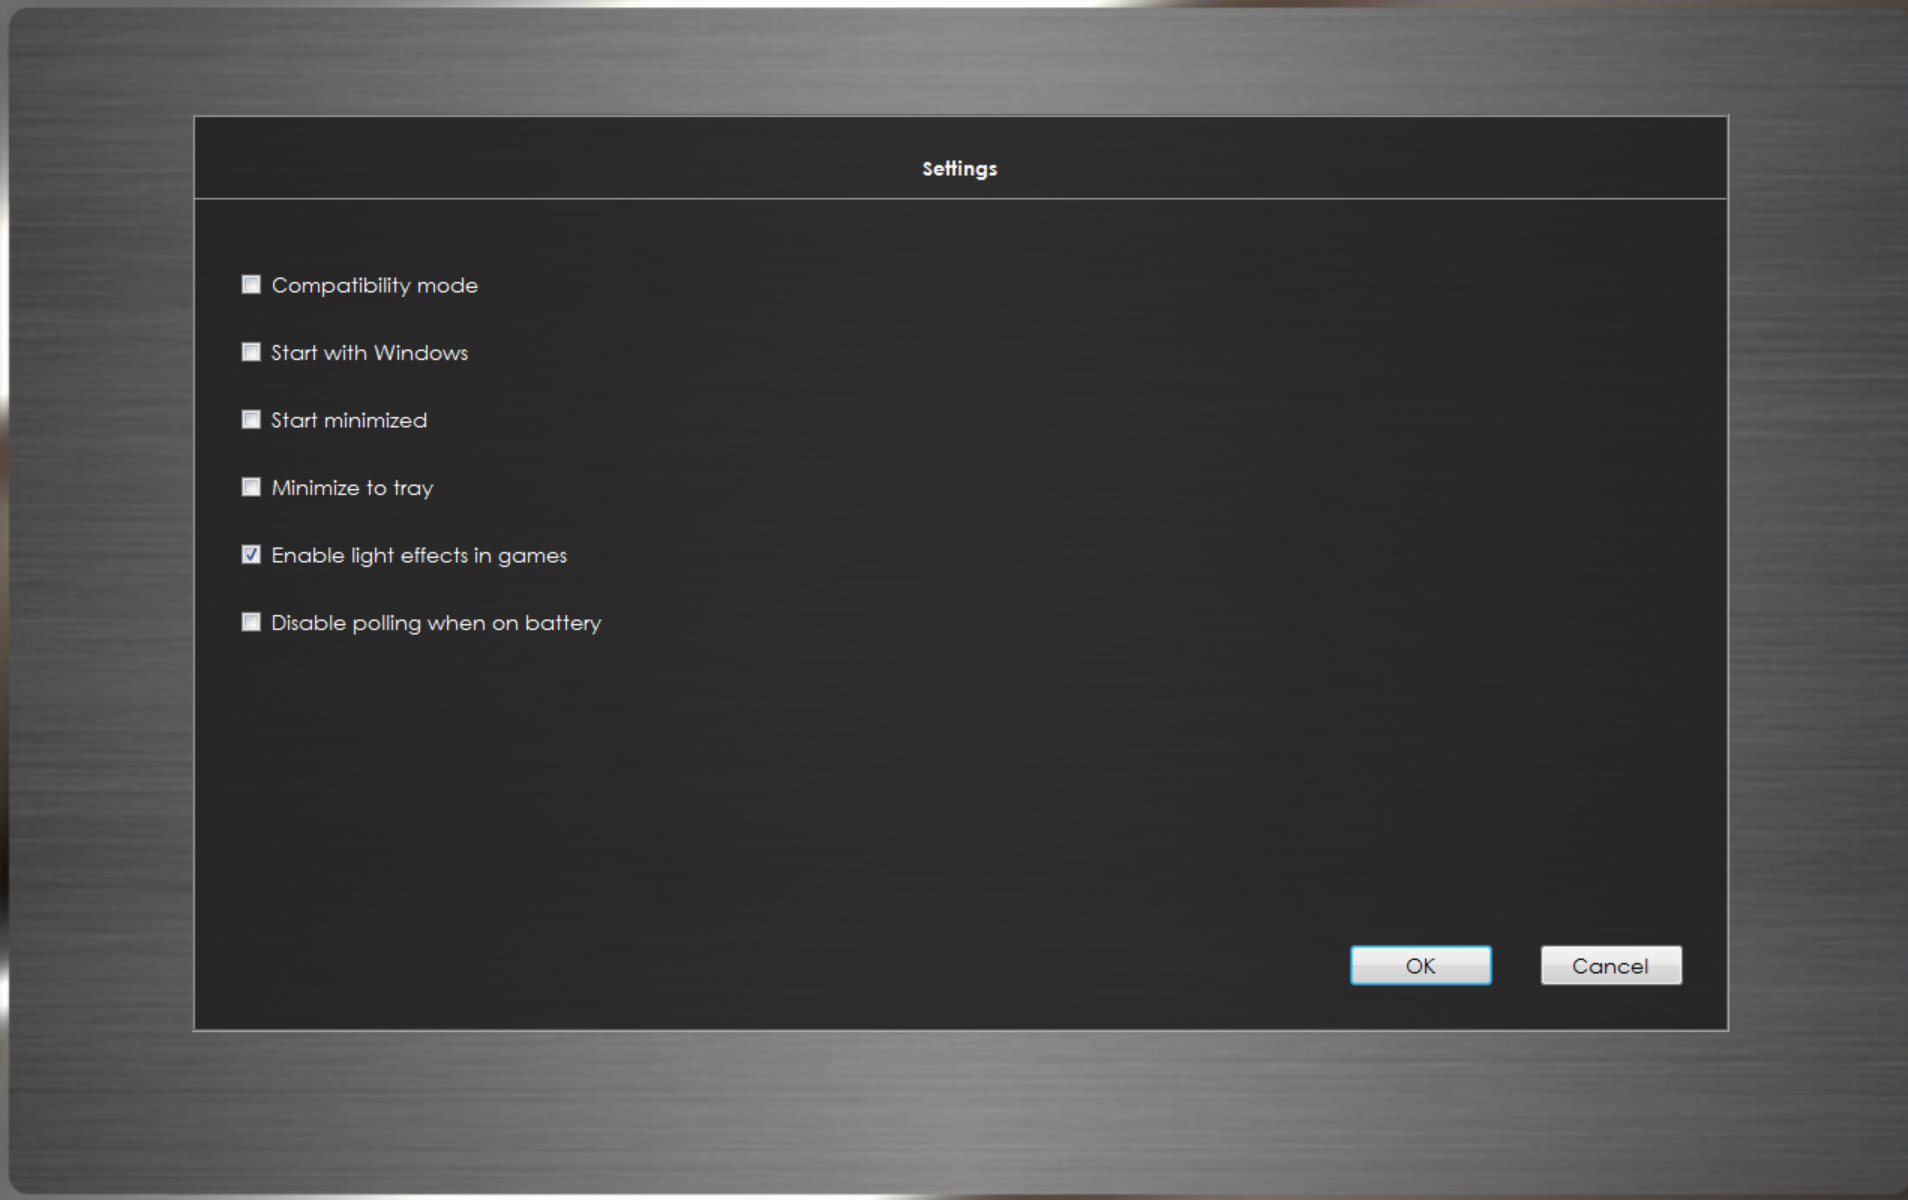
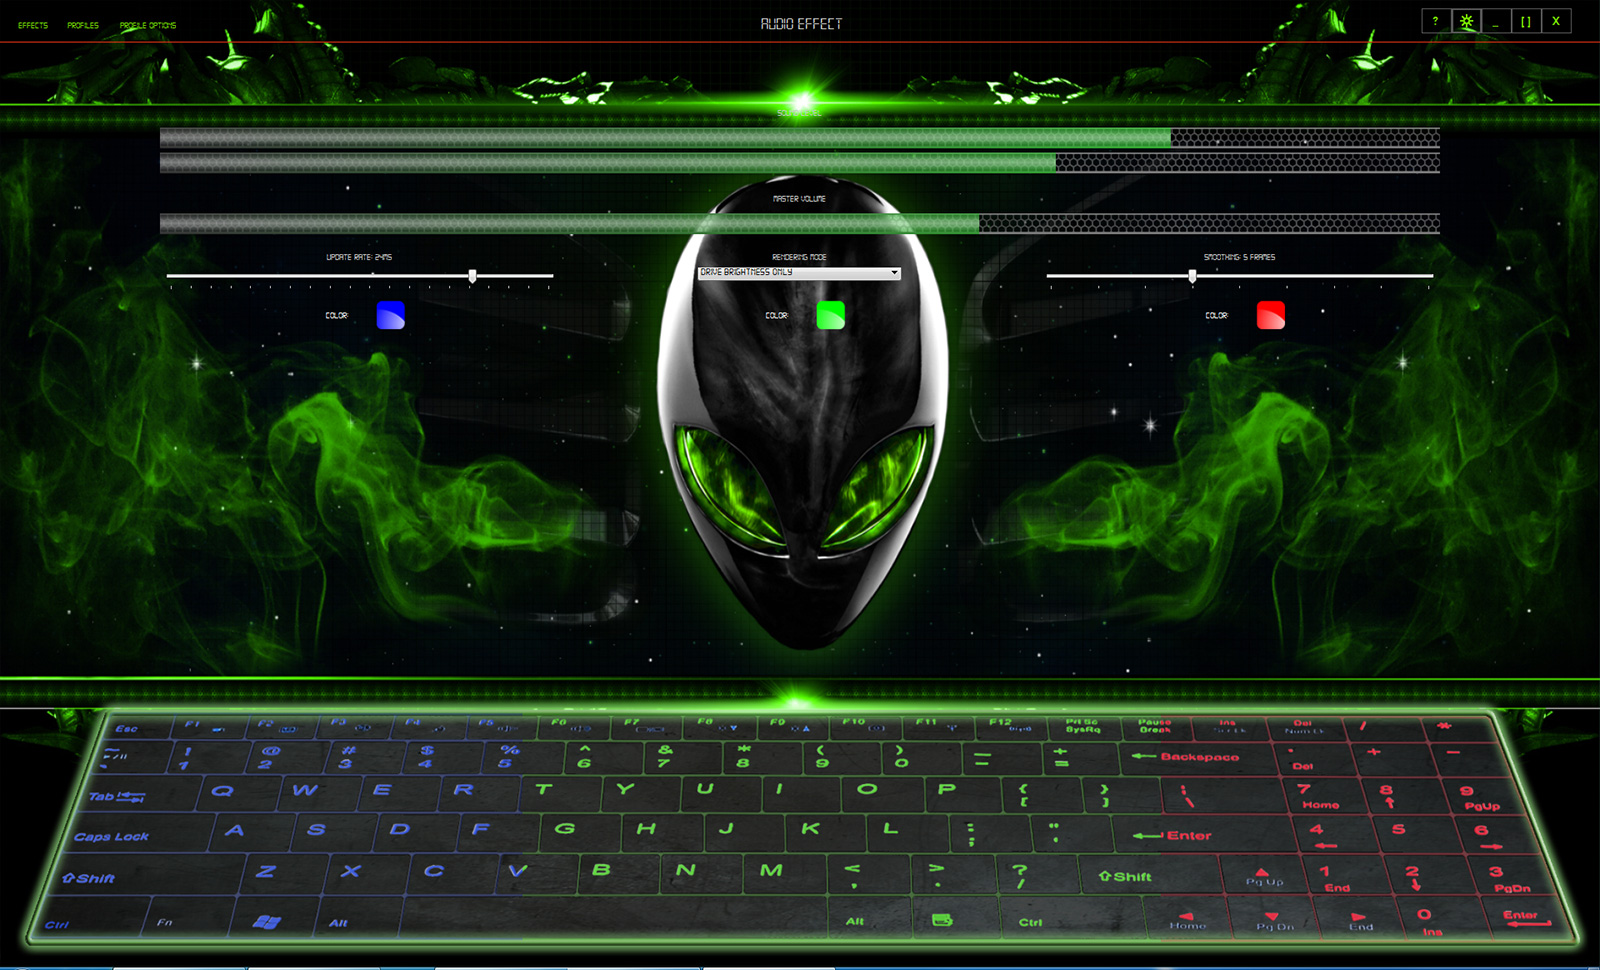
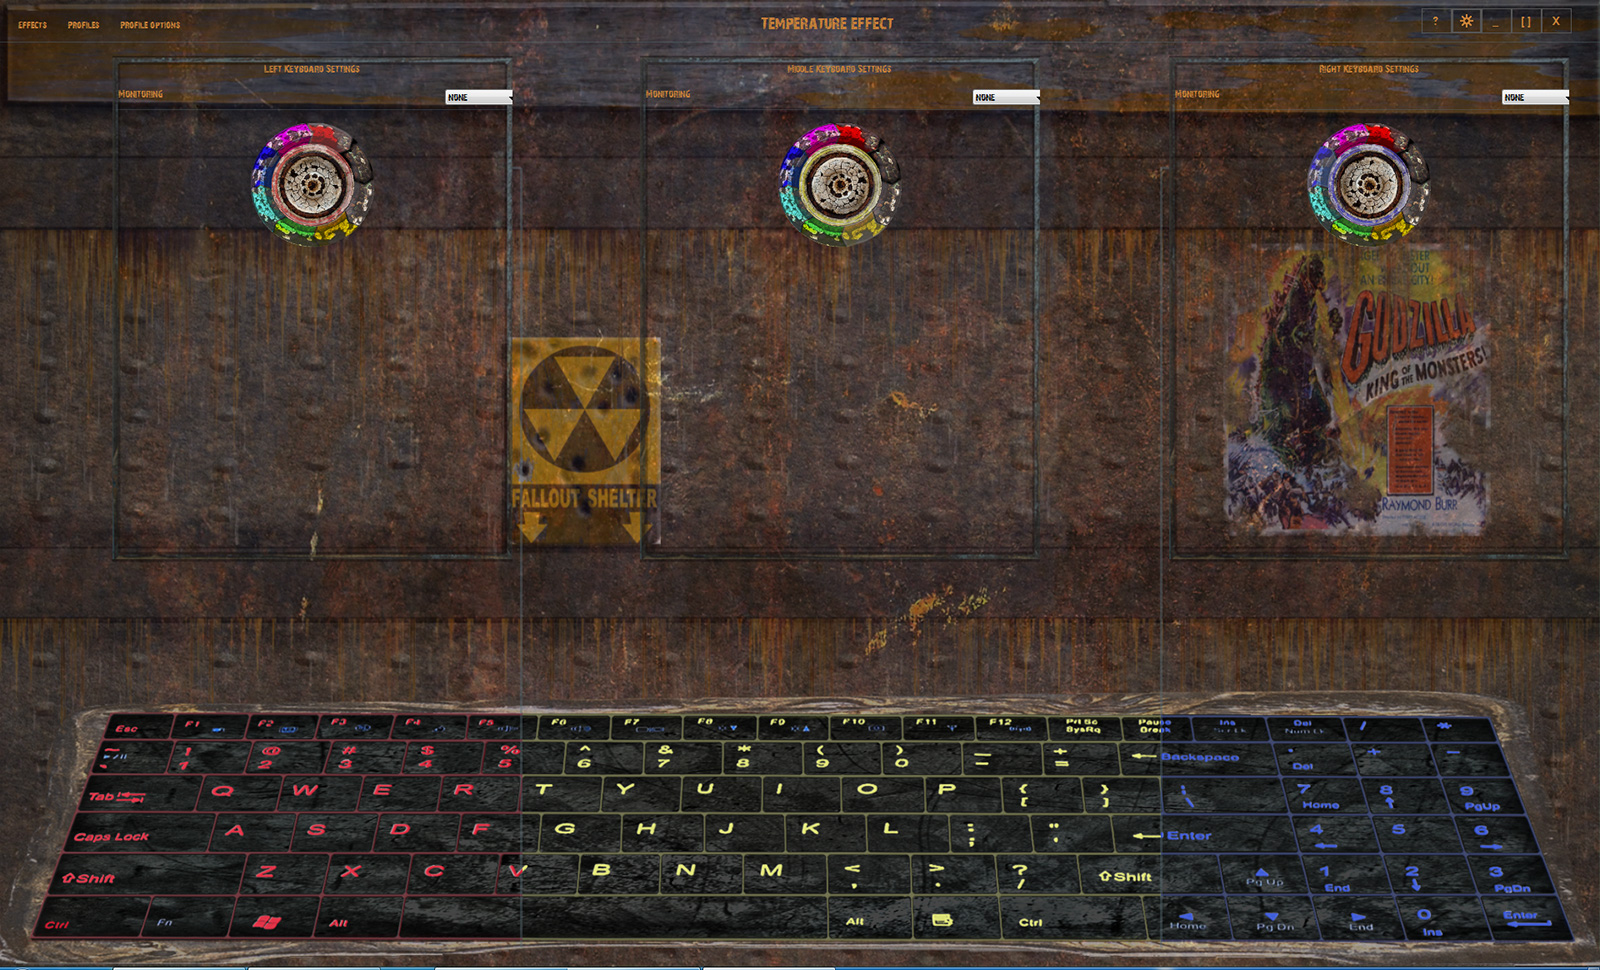
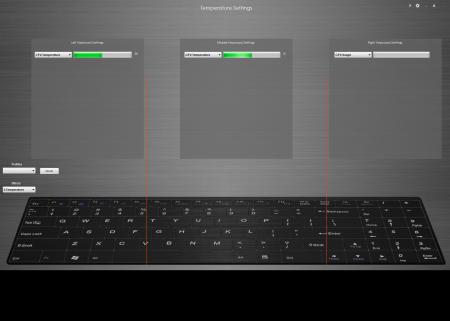
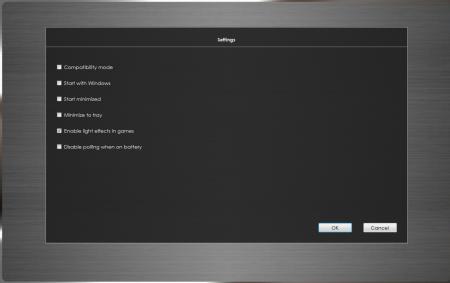
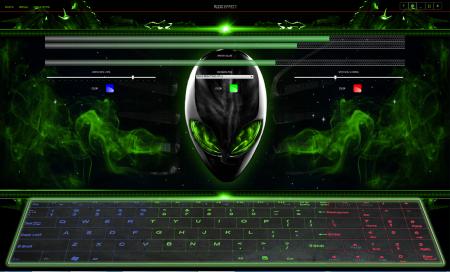
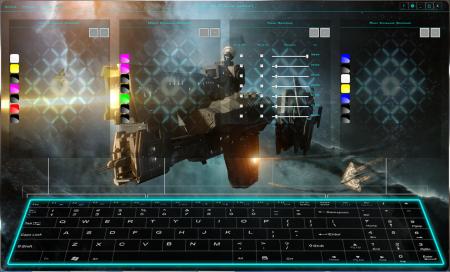
custom light controller (for 8 color keyboards only!) -What it is: This is a custom backlight controller intended for Clevo models with backlit keyboards. It is a replacement for the standard Clevo keyboard app. By default it works like the original. If you want to take advantage of some of the advanced effects you’ll have to set the app to start with windows (there are all sorts of option in the settings page, top right) -Project status: A first public beta is available for download -Issues/bugs: -Prerequisites: -Hotkey driver MUST be installed and working. -.NET 4.5 is required. Windows 8 have it by default. Other systems need to install it by hand. -Installation: Run the setup and follow the instructions -New effects So far we have 3 new effects: 1) Temperature/Usage lighting. Some of you will probably already know that one. It's using pizzadude223's code. Lights change depending on temperature of CPU/GPU. Dual GPU's supported 2) Audio lighting. Lights change depending on intensity of the music. Keep in mind that lowering the latency will increase CPU usage so try to find the sweet spot on your system 3) Heartbeat. Lights follow a heartbeat pattern that increases in speed according to CPU usage 4)Adaptive color effect This effect works for applications that run in non-exclusive mode. That means windows apps and games running in either windowed or borderless modes only (ie no fullscreen). This mode lets you color the keyboard based on what happens on the screen. You have 2 basic modes, “Aero” which basically colors the keyboard according to the aero color in windows and “Screen Average” which scans the screen to determine what the average color is. When you use Screen Average you have certain extra ways to tweak your color. You can choose whether to use a single color for the whole keyboard or use a different one for each keyboard region. When you use 3 colors, each color is decided based on what happens on the screen part that’s over that region. You can further tweak coloring by specifying what part of the screen will take place in the decision. You can have the whole screen or just the lower or upper half. That’s useful if for example you’re playing a game that most action takes place in only half the screen. For example in a racing game the upper half of the screen is usually just sky. There is an option that will affect the sensitivity to color changes, that’s what the minimum diversion does. Lower will be more sensitive. You can also choose whether you want brightness to vary with colors or not. The minimum brightness makes sure that the brightness will not fall under any circumstances bellow that limit. The update rate is like in other effects the speed by which the effect refreshes. A word of notice on this one, this effect is a very complex operation; it’s not a simple thing. If you overdo it you will get a SEVERE performance hit. I find that 50ms is a good compromise between speed and performance. Keep in mind that this is still a BETA. It means that bugs are normal to be found. We will try to address them in turn but you’ll have to be patient. I’d welcome any comments or bugs you may have to report but in order to make it easier I want you to always post your specs along with a detailed explanation of what you are reporting. Also make sure that the problem is repeatable. -Licenses This is freeware. You may use it freely. I would appreciate distributors interested contacting one us of first if you would like to support our effort: <form action="https://www.paypal.com/cgi-bin/webscr" method="post" target="_top"> <input name="cmd" value="_s-xclick" type="hidden"> <input name="hosted_button_id" value="DV2X6ELM4Q4SN" type="hidden"> <input src="https://www.paypalobjects.com/en_US/i/btn/btn_donate_LG.gif" name="submit" alt="PayPal - The safer, easier way to pay online!" border="0" type="image"> </form> -Themes Apart from the default themes (That you can switch via the settings menu) you can create your own too. The app’s theme engine is modular. It means that you can theme only the items you want, without the need to change everything. It is very flexible but it has it’s limits so be careful if you’re a newbie. If your theme crashes the app, just delete it and the functionality will be restored. The themes are each stored in a unique folder located in Hotkey’s installed location (c:\Program Files (x86)\Hotkey\themes). The theme’s name is its folder name. You will see that there is a “template” theme. It’s a guide to help you on your first steps. Be sure to read both the readme.txt as well as the theme.txt placed in there. They describe most of the stuff you’ll need… -Download You can download the app from here or from out site: clevomods | home of the Custom light controller and LightFX library -Changelog 0.0.6.0: 2/11/13 -added effect 'adaptive color'. Mode to drive colors/brightness based on aero color or average screen color -fixed colorwheel bug now showing properly on custom color panel -fixed not resuming after sleep bug -added tray access to effects& profiles 0.0.5.9: 14/10/13 -bugfix with non admin execution of app 0.0.5.8: 14/10/13 -added theme support -fixed colorwheel bug now showing properly on custom color cycle panel -added brightness driven only mode to audio panel 0.0.5.7: 25/9/13 -added new rendering modes to audio panel -added import/export in custom color cycles -added temperature/usage driven brightness in temperature panel -newer hardware monitoring library(better support for Haswell CPUs) -fixed application positioning when taskbar is in a position other than bottom -fixed tray icon bug missing sometimes -beat detection algorithm tweaks -audio panel tweaks -fixed flickering on progressbars 0.0.5.6: 12/9/13 -bugfixes crash during startup on some systems -better exception catching -better SM series compatibility -better tray temperature handling(for those who were experiencing hangs in temperature mode after running the app for some time) -better powersavings behavior -added installer -Also in this version you don't need to close ledkb in order for LightFX to work. When ledkb is running, it detects whether LightFX is in use. If it is, it "pauses" ledkb until LightFX is finished (i.e. you exit the game) and then resumes. 0.0.5.5: 5/9/13 -bugfixes hide from alt-tab when minimized to tray 0.0.5.4: 15/8/13 -bugfixes causing crash on startup 0.0.5.3: 12/8/13 -replaced colorstrip with an animated alienware style colorwheel -added brightness slider in custom color panel 0.0.5.2: 30/7/13 -Added new effect. Custom Color cycle. You can create a user specified sequence of lighting. -Added tray icons for temperatures in Temperature mode. 0.0.5.1: 17/7/13 -Fixed starting with Windows with Administrative rights (You will still need to run the app as Administrator in order to set this option) -Minor fixes in resizing -Fixes in trigger mechanism 0.0.5.0: 13/7/13 -Fixed Haswell CPUs temperature monitoring -Added windowed mode with floating resizable windows 0.0.4.9: 11/7/13 -Custom temperature colors and temperature ranges -Option to disable polling when on battery -Option to disable LightFX library (You still have to install it separately) -GUI is cleaner, most of the options are up top now Backlight Controller with LightFX v0.0.5.6.zip Backlight Controller with LightFX v0.0.5.7.zip Backlight Controller with LightFX v0.0.5.9.zip Backlight Controller with LightFX v0.0.6.0.zip

 1 point
 -
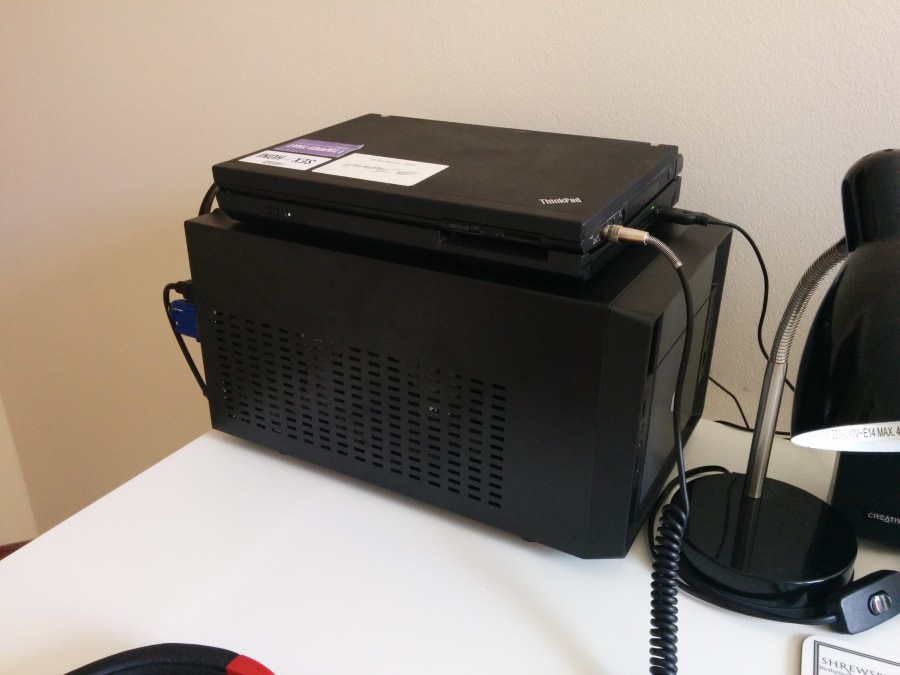
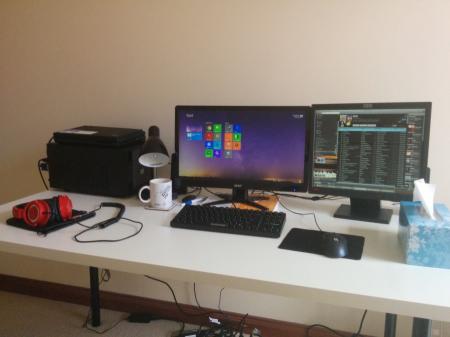
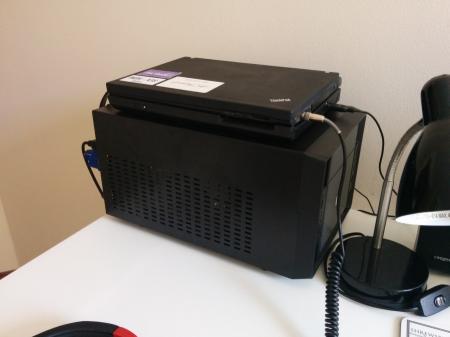
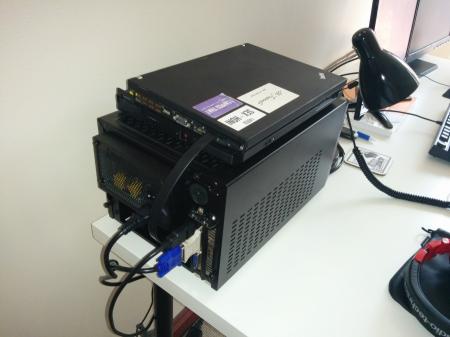
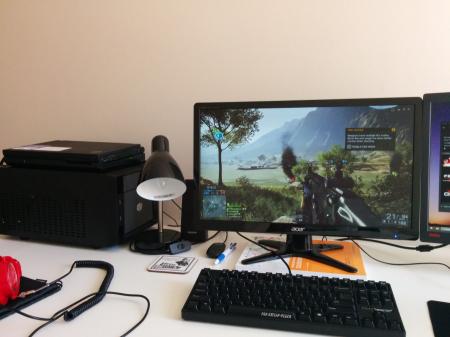
PHi guys. This was my first eGPU build, just thought I'd show for others interested in a similar setup. My goal was minimal time spent putting it together, and no software issues/dependency. Laptop specs: Lenovo ThinkPad X201 Intel Core i5-520m, 2.4GHz Intel HD Graphics (1st generation) ExpressCard 1.0 8GB RAM (2 x 4GB DDR3-1066) 256GB Samsung 830 SSD Ultrabase w/internal 1TB SATA drive Windows 8.1 Pro 64 bit eGPU specs: MSI GeForce 560 Ti Hawk w/1GB GDDR5 VRAM PE4L EC060A 2.1b Corsair CX430 PSU Cooler Master Elite 120 Advanced case The build process/design: The actual building was easy. I tested it all out of the case first to make sure there were no issues. The GPU is mounted normally in the case, propped up underneath by the PE4L. The PE4L is not screwed in, I have boosted it a little off the base of the case with a small bit of cardboard shoved underneath. The PSU is similarly mounted normally inside the case. Selected this PSU because it's quiet and modular (you'll struggle to fit all the cables for a non-modular PSU in this case). ExpressCard adapter comes out the back where the motherboard IO shield normally is. The way the adapter comes out works well since it just flips up right into the ExpressCard slot of my ThinkPad. Power is toggled by the main power switch on the PSU, the case button itself would only work if I kept it pressed in. The dock itself contains a SATA caddy, so I have an internal 1TB drive on that with all my games and video editing stuff. Docking and undocking: To undock, you need to open the laptop's screen, then disable the 560 Ti in device manager. Then you hit the undock button on the Ultrabase, disconnect the eGPU, and pull the laptop off. Docking is similar, just have to re-enable it in device manager. Means you never need to turn off the laptop or put it to sleep to dock/undock. Software: I couldn't find much in the way of answers to this online when I was setting mine up, but it's far simpler than the old resources you'll find imply. There are no notebook specific drivers you need to mod any more. Install the latest Nvidia desktop drivers for your GPU (mine were literally just the latest Forceware drivers) and it will automatically come to life. Optimus works so long as you have the right eGPU/iGPU combo, which I did. Nothing special needed, no boot procedures or programs. Issues: Chrome lags a lot on some websites. There seems to be no explanation for why some sites are very slow to scroll around, and some are fine. I've fiddled with the Chrome hardware acceleration flags, but something is definitely amiss. Has anyone else had a similar issue? It's fine at 1920x1080 if I am using my internal graphics. Performance is unpredictable, it depends on how the game or software works in terms of bandwidth demands. Battlefield 4 is great until you're on a large map and it's constantly streaming textures. Unreal Engine 3 games, Source Engine games etc all run maxed out at 1920x1080 without any issue, with something like 80-120 frames on things like Team Fortress 2, Mirror's Edge, and Mass Effect 2. Bodes well for Titanfall, which uses Source (just missed the chance to test the beta on the eGPU). Cost: I spent around $220 on parts besides the GPU, which was my desktop's old GPU. You could probably do it cheaper - the case is neat but unnecessary if you're not bothered or can build your own, the PSU was OTT and just a reliable and easy way to build it. You could probably salvage one and achieve the same results. Totally worth it though. Photos: The full setup on my desk. The case is sideways on the desk. Side view. Playing Battlefield 4.
 1 point
 -
Desktop CPU; eGPU enclosure Thunderbolt 2 or 3 by then;1 point
-
Finally Full Specification of CLEVO P751ZM revealed: here 230W AC Adapter confirmed !, 3,4 kg of weight. It looks like that I already know which my next notebook will be1 point
-
Optimus (by nVidia, AMD equivalence is Enduro) activates the integrated (Intel) graphic card when the laptop runs on battery mode. It's one of the main selling points that manufacturers of ultrabooks and business laptops vigorously promote. But like I said, it's pointless on a gaming rig, considering how bulky and power-hungry the beast is. On a 3D 120Hz Alienware the Intel integrated graphic chip is hardware-disabled by default and it runs solely on dGPU due to hardware restriction (at the moment iGPU only supports up to 60Hz refresh rate, whether that will change is entirely up to Intel).1 point
-
I will, this week end @Tech Inferno Fan.1 point
-
And Alienware just signs the death warrant to MXM upgrade to all 'previous gen' laptops. Another excuse to move on to on-board/soldered graphic cards.1 point
-
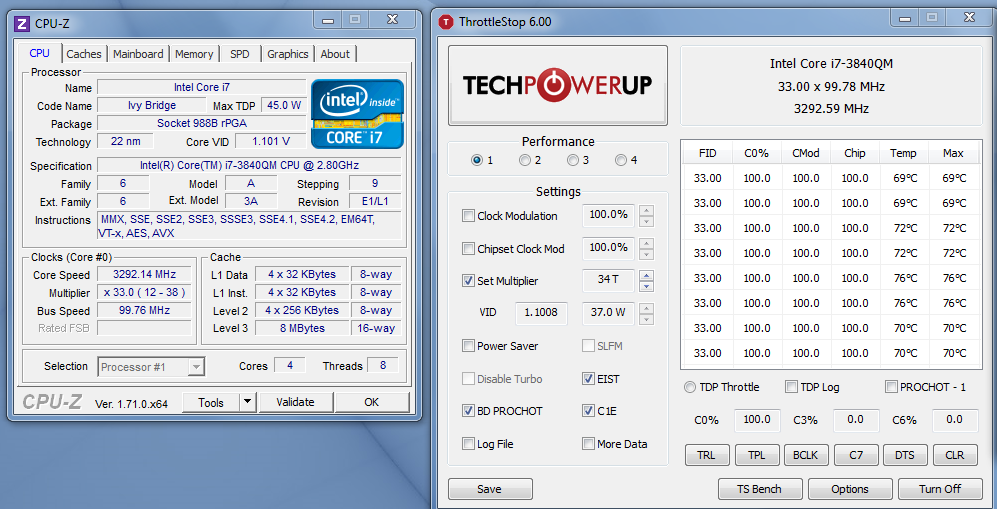
I got a brand new 3840qm OEM (for a good price), sadly not a very efficient one (only x33, veeeery sad face here).
 1 point
 -
This is our latest 3DMARK11 on P170SM-A & GTX 980M, stock NVIDIA GeForce GTX 980M video card benchmark result - Intel Core i7-4700MQ,Notebook P17SM-A1 point