Leaderboard


Popular Content
Showing content with the highest reputation on 10/28/14 in all areas
-
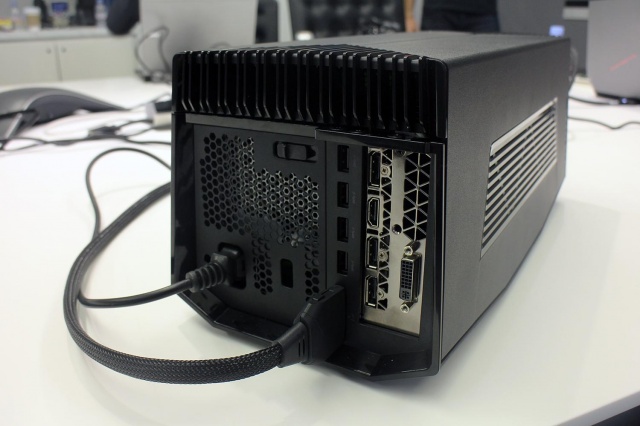
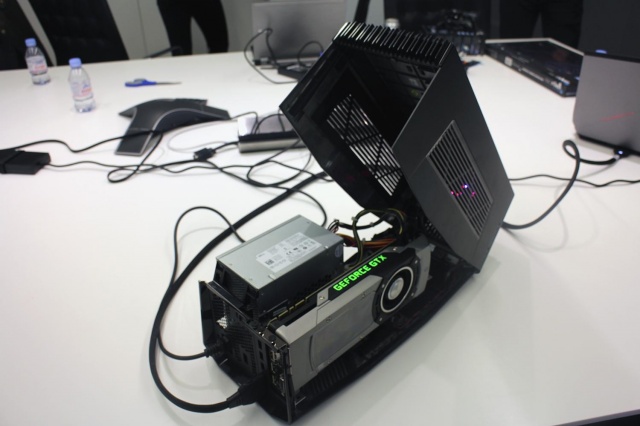
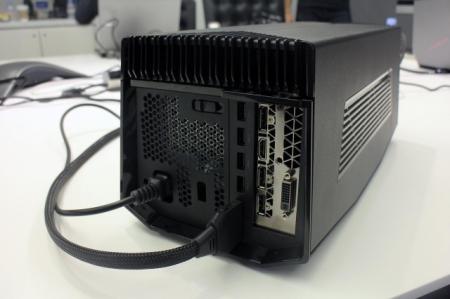
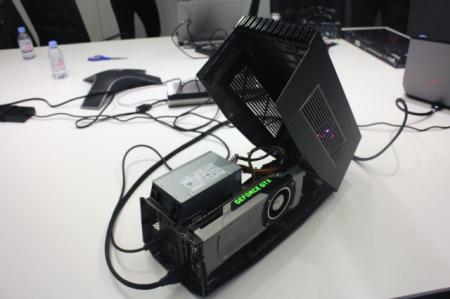
Hi all, This guy has started popping up around tech sites, and I thought it's interesting that another mainstream manufacturer has released an eGPU solution! This box is a compact solution that includes the PSU and enough space for any graphics card. Build quality seems average, but good enough compared to the frankenbuilds we've been making. Now I know that it uses a proprietary connector like the Vaio Z, but it appears to be some kind of PCIe connection. I'm curious as to whether this is Thunderbolt with a different connector, like they did with the Z. If so, could it be modified to fit a standard Thunderbolt cable? Another possibility is that it's on the market because Dell did not go have to seek Intel's approval because this is not Thunderbolt at all. Who knows, one may hope. Here's some pics and a link to one of many articles out there for those interested. http://www.anandtech.com/show/8653/alienware-graphics-amplifier (added AnandTech link) Hands on: Alienware graphics amplifier | Digital Trends
 3 points
 -
Alienware is making it's own eGPU setup available for preorder. Looks cool, but again they created kind of their own PCIe based plug and cable for that: Alienware 13 Review: The First Futureproof Gaming Laptop3 points
-
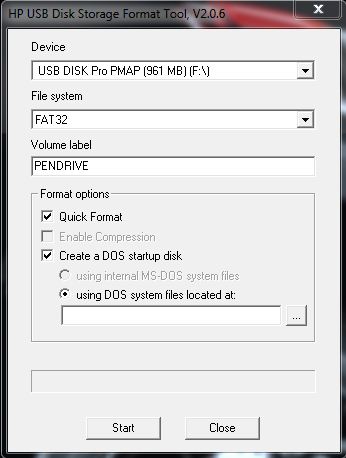
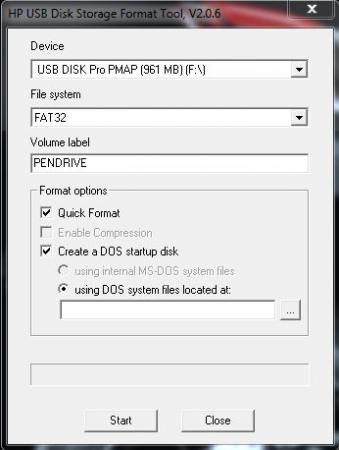
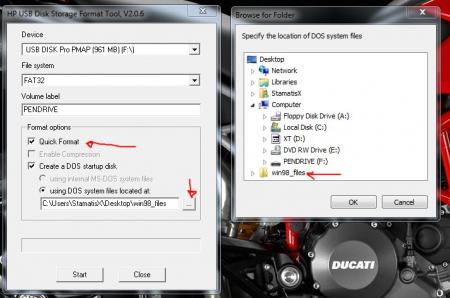
____________________________________________________________________________________________________________________________________________________________________________ *Note: This page is no longer updated, I am not taking requests anymore. Please do not PM me, because I will not respond. Other people have graciously posted their unlocked BIOS's within this thread, so you will have to do some searching to find the right one. I may come back to unlocked more later... I just don't have any time. Sorry. ____________________________________________________________________________________________________________________________________________________________________________ Welcome to my unlocked BIOS thread for MSI G-series gaming notebooks! Anytime you see an asterisk (*), it means that pictures for that part are included in the 2nd post. Introduction: In this thread you will find a list of MSI G-series gaming notebooks with their BIOS’ fully unlocked. Just about every feature that MSI has hidden is now available to be changed by the end user. This thread may be of particular interest to techies who love to squeeze every ounce of performance out of their notebooks or even the average person who is looking for a particular feature that has previously been locked. Should I Flash These BIOS? Anyone that owns one of the listed MSI G-Series notebooks is eligible. Who this does NOT apply to: - If you are afraid to brick your notebook, this is NOT for you. There is always a possibility for errors and accidents to occur. - If you do not understand what any or most of these acronyms mean, this is NOT for you. You will probably find little use for the unlocked features and the potential for risk is much greater than the reward. Who this applies to: - If you have an understanding of most of this thread and are willing to learn, continue reading. - If you are an enthusiast who loves modding and overclocking and have experience with this field, continue reading. Features: So what are these features that MSI had locked out? A short list would include: *- XMP RAM support (Up to 2133Mhz) [Warning: 4 DIMMs at 1866Mhz(+) may not be stable, 2 DIMMs are stable at 2133Mhz]. - BCLK Overclocking (Up to 5%, your mileage may vary, no guarantees). - TPL limits unlocked (With the combination of ThrottleStop, CPU throttling can be overcome). Necessary Tools & Knowledge: We’re going to need a couple things before we start flashing: 1. A bootable USB drive in DOS/ME/98. Guides can be found all over the internet. 2. The required BIOS file(s) for your specific notebook. 3. AC Adapter plugged into notebook. 4. Some common sense and bravery. Disclaimer: I claim no responsibility for any accident, damage, or brick caused by this, nor do I guarantee any technical assistance. Flash at your own risk. I am in no way affiliated to MSI, nor is MSI obligated to provide any support with these files. Proceed with caution! Your notebook's warranty will be compromised in the event of a repair! Redistribution of these files is not permitted without prior approval from me. You must contact me BEFORE you plan on hosting them. Thank you. Directions: 1. Add the three (3) files: "BIOS".ROM, AFUDOS.exe and update.bat to your flash drive. The root folder works best. Double check the READ ME.txt that you are about to flash the correct BIOS for your notebook. 2. Plug in USB drive and shut down your notebook. 3. Power on the notebook and during POST hit F11. This will bring up the boot menu, select your USB drive and hit enter. 4. In DOS, type:* This will start the flashing process. Warning: Once you hit enter, you CANNOT stop the flashing process. If you interrupt it via shutdown or remove its power source, you will brick your notebook with 100% certainty. 5. Sit back and wait for the process to complete itself. Note: Your fan will spin at 100% speed, it will be very loud. This is normal. Once your BootBlock has been verified and the command prompt comes back up, the process is complete.* Press Ctrl + Alt + Delete to restart your notebook and hit Delete to enter the BIOS. If your BIOS looks exactly the same as before and the flashing process came back with no errors, then you have to boot into Windows and shut down your notebook, NOT restart. Then check it out. Warning: The BIOS might reset the SATA mode into RAID. Please double check in the 'Advanced' tab that it is set to whichever mode you were using or else your boot manager may get corrupted. If this does happen, you will need to use your Windows 7 CD and repair the start-up process. Downloads: This part is under construction! More will be added. Taking requests as well. MSI Notebook Models: Version: Download Link: 1st-Gen Core-i Retail: MS-GX740(17''): 1.0F ms_gx740.zip Whitebook: MS-16F1(15.6''): 1.0L MSI 16F1 Unlocked.zip 2nd-Gen Core-i: Retail: MS-GT680/683(15.6''): .30Z MSI GT683 Unlocked.zip MS-GT780/783(17''): .30H MSI GT783 Unlocked.zip Whitebook: MS-16F2(15.6''): 3.05 MSI MS-16F2 Unlocked.zip MS-1761(17''): 3.06 MSI MS-1761 Unlocked.zip 3rd-Gen Core-i: Retail: MS-GT60(15.6''): .30M MSI GT60 Unlocked.zip MS-GT70(17''): .30M MSI GT70 Unlocked.zip Whitebook: MS-16F3(15.6''): MS-1762(17''): 3.0G MSI 1762 Unlocked.zip AMD APU MS-gx60(15.6'') 3.05 SecondGenAMDAPU.zip Recovery: Directions for making your notebook function properly if you encounter any errors. Case 1: In case of a GOOD flash, but you still cannot enter BIOS or boot into Windows: Common symptoms include: Endless looping reboots, inability to access the BIOS, permanent black screen, persistent BSODs in Windows or stuttering. The most likely cause was that your image was successfully overwritten, but some values may have changed internally and the BIOS may be having a hard time accepting them. If everything was a success and your notebook boots into one of the situations mentioned above, before trying a blind-flash recovery, UNPLUG the wire leading to your CMOS battery for 5-10 seconds.* This will RESET the stored values in the BIOS to their defaults. If this does not solve the problem, then a blind-flash will be required. Case 2: In case of a BAD flash, a blind-flash will be required. 1. Remove any files from your USB that aren't the necessary bootable DOS files. 2. Pick a ROM you want to flash (doesn't have to be the original), but it MUST be one for your notebook specifically. 3. Rename the file.ROM to AMIBOOT.ROM and put it on your flash drive. 4. Plug in your flash drive in a USB 2.0 slot. 5. As soon as your notebook turns on and nothing is displayed, spam Ctrl + Home (In my case, the MS-16F2 is Ctrl + Fn + PgUp or Ctrl + Shift + NumPad 7). 6. You should hear four (4) beeps and the BIOS should begin flashing itself. --------------------------------------------------------------------------------------------------------------------------- Redistribution of these files is not permitted without prior approval from me. You must contact me BEFORE you plan on hosting them. Thank you.1 point
-
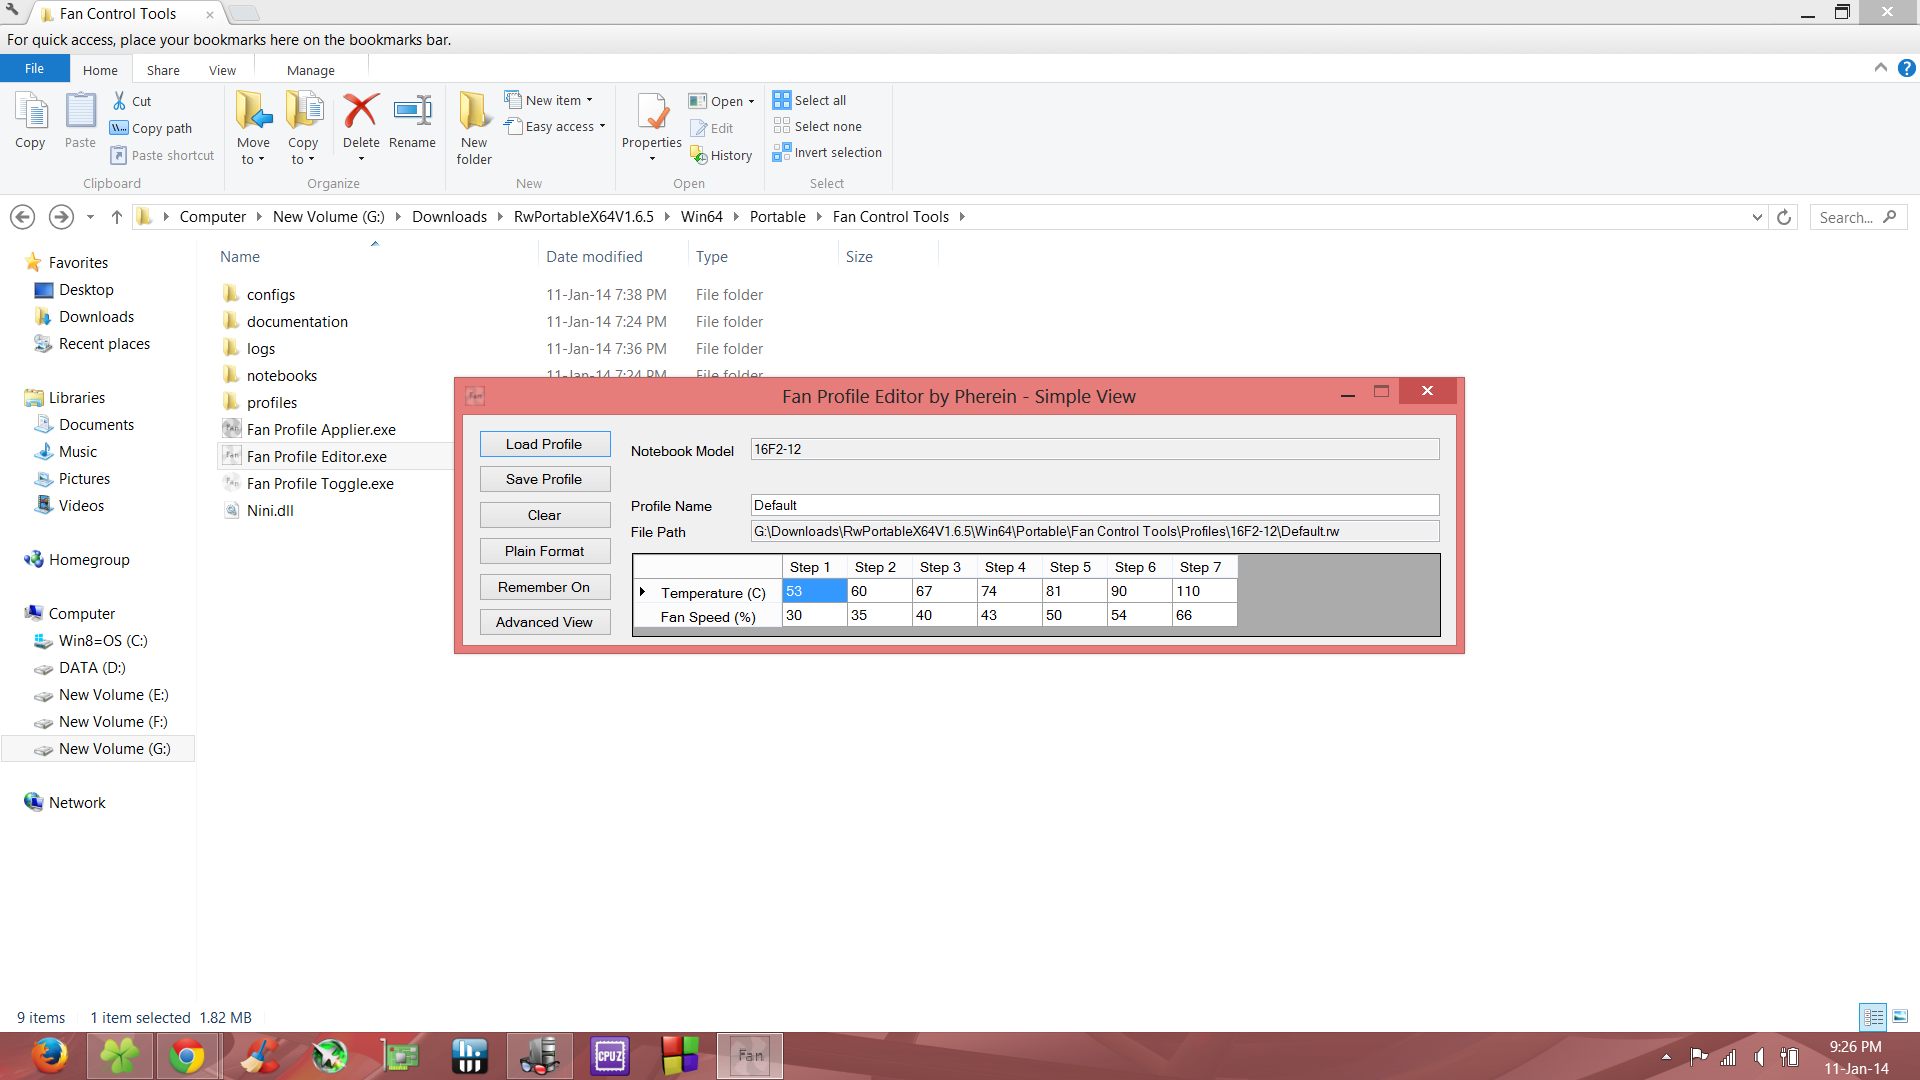
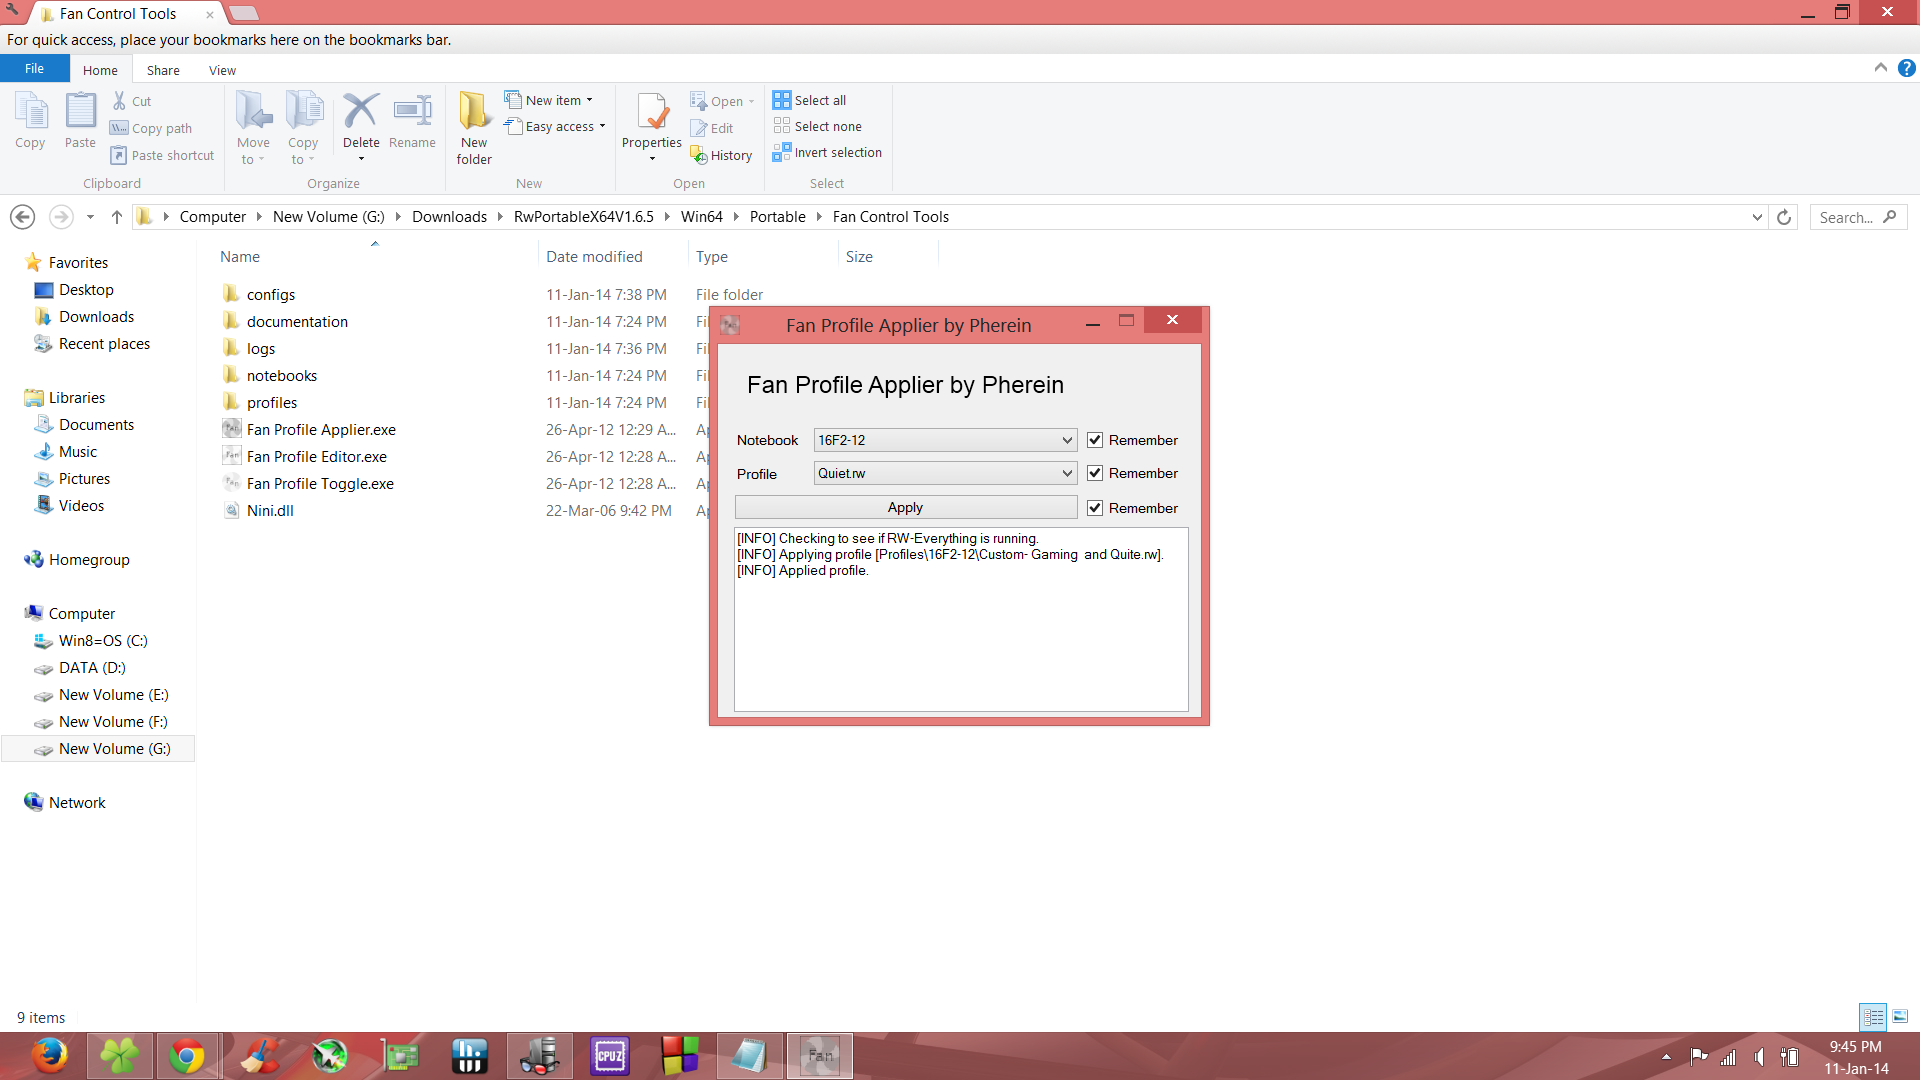
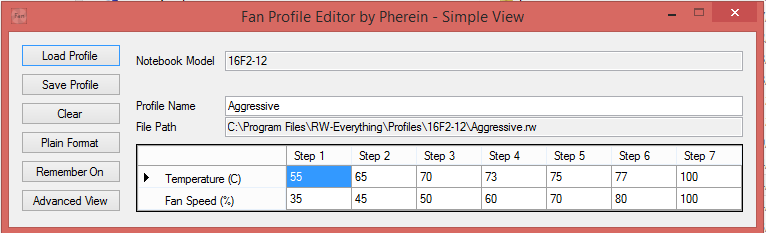
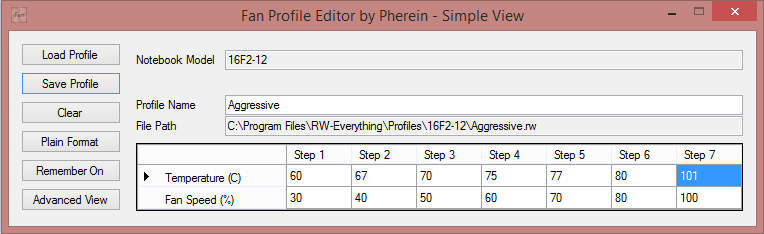
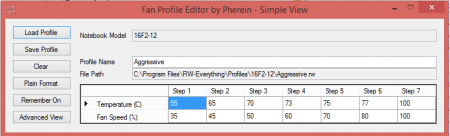
I don't know if this has been here posted before and I couldn't find anything after searching but if it has, then mods can please delete. NOTE: I didn't create any of these programs. I found it over here: http://portables4gamers.com/forum/topic/20998-tuto-comment-utiliser-le-fan-control-tools-by-pherein/ 1. Download the file attached, it contains RWeverything ver 1.6.5 portable and fan control tools by Pherein v1.03 all in one zip 2. Extract the folder "portable" to wherever you want. 3. Go to folder Portable\Fan Control Tools\configs and open Fanprofileapplier.ini and FanProfileEditor.ini and change RWeverythingpath = (point it to where rw.exe is) 4. Now to test if the app is actually working or not. Go to folder Portable\Fan Control Tools and open Fan profile Applier.exe 5. Choose notebook name as gt780DX or 16f2-12 for gt70, gt60 and ge60. Choose profile as Quite.rw ( Do NOT choose max.rw), check remember in all boxes. It should look like this : 6. Select apply and listen if your fan speed goes down. If it did, it worked !!! 7. Now to make your own profile, first open Fan profile editor.exe and choose notebook name and then simple (or complex if you want to mess around more). 8. Now click load profile and load whatever profile you want ( I prefer default) and change the values of temperature or fan speed to whatever you want. Do NOT put fan speed below 20% or above 80%. Especially NOT 100% or your pc will shut down. It should look something like this: I recommend opening profiles "aggressive" and "quite" to get some idea about how temps and fan % is set. 9. Now, change profile name to whatever you want. eg: Custom1, gaming etc and click save profile. 10. Now go to fan profile applier.exe and select the profile you created and hit apply. Dont forget to make sure all the "remember" boxes are checked. All changes will be reverted to default each time you restart the pc so don't worry about messing things up permanently. Tell me what you guys think MSI fan control.zip

 1 point
 -
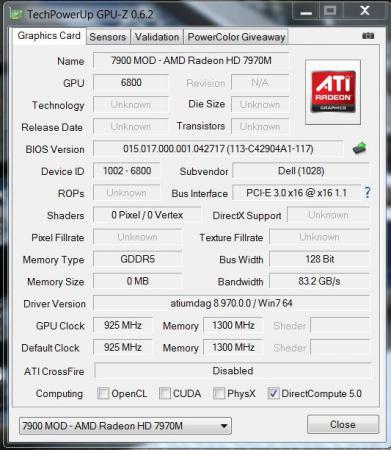
ADMIN EDIT 12/15/15: The original referenced zip pack is now restored. Did some tests with the VBIOS of the AMD 7970m, here's what I've got so far: - Overvolting: So far no success, when I increase the 3d voltage the card simply stays at the 2d profile. Fixed that Be aware that overvolting should only be done by experienced users and can seriously harm your GPU, shorten the life of its components and lead to unsuspected effects and / or system instability. I take no responsibility for any possible damages. Overvolting has been tested by me and @widezu69 (thanks!). It works, but can lead to instability, you need to find your limit. The M15x doesn't handle it well. I noticed similar behaviour as with my overvolted 6970m, drops in clocks, instability etc. At 1.15V even immediate crash at GPU load. The M17x R3 seems to handle it a bit better, there's probably more headroom in the voltage supply circuits which are providing the voltage for the GPU. I was able to run some vantage tests at 1Ghz with a 0.05V overvolt, my previous core clock limit was at about 950Mhz... so it definitely works. Different systems will behave in different ways, only way to find it out is to test it. Don't do it if you lack overclock experience. - Undervolting: Only did some quick tests, but it seems to work. The driver crashed all the time at clocks which normally worked fine. And at more sane clocks the card worked as expected. - Update: Yes, works very well - Core / memory clocks: Works fine so far, I only tested the 3d settings, but I assume it also works for the other clock profiles. In the GPU-Z screenshot you can see the changed clocks: A package with a selection of modified VBIOS files can be found here: AMD 7970M vbios pack There's quite a bit of work behind this, so just in case you want to buy me a beer... Here's a list of what the package contains. The names are pretty self-explanatory. "uv" for undervolt, "ov" for overvolt, clocks are "core-memory" Keep in mind that you need to rename the files before flashing due to the 8 character file name limit in DOS. Modified clocks: Dell7970m-900-1250.ROM Dell7970m-925-1300.ROM Dell7970m-940-1350.ROM Dell7970m-940-1400.ROM Dell7970m-950-1350.ROM Dell7970m-950-1400.ROM Undervolted: Dell7970m-uv-0950v.ROM Dell7970m-uv-0975v.ROM Dell7970m-uv-1000v.ROM Overvolted: Dell7970m-ov-1125v.ROM Dell7970m-ov-1150v.ROM Overvolted & modified clocks: Dell7970m-900-1300-ov1075v.ROM Dell7970m-900-1300-ov1100v.ROM Dell7970m-950-1400-ov1100v.ROM All files are based on the OEM Dell 7970m VBIOS. Instructions: For flashing refer to this guide: There's a list with the checksums of all files included in the VBIOS package, I highly recommend to check the integrity of the file before flashing it. This can easily be done with ATIflash, if you don't know how please check the guide linked above. And as always, flash on your own risk, you are responsible for your system and the changes you make on it. Feel free to ask questions, feedback is welcome as well!
 1 point
 -
- work in progress - Instructions for flashing the VBIOS of an AMD / ATI video card: You'll need: A VBIOS file you want to flash The latest version of ATIflash, a DOS utility to flash the VBIOS A USB drive, formatted to boot DOS, in order to use ATIflash How to create a bootable USB flash drive: Flashing procedure: Once you've prepared your USB drive, put ATIflash to the root of the drive, same with the VBIOS file you want to flash. NOTE:DOS has a limit of 8 characters per file name (not counting the extension). So make sure to rename your files appropriately before putting them on the USB drive. Reboot your system, go to the boot manager and choose to boot from the USB drive. As soon as you see the command line you're ready to go, write dir and hit enter to display all the files on the USB drive. Display all adapters, ATIflash will enumerate them. Remember the numbers of the devices you want to flash. atiflash -i Save a copy of your original VBIOS to the USB drive, "i" is the number of the adapter you checked before, if you only have one GPU it's going to be "0". "Filename" is going to be the name of the file, don't forget to add an extension (.rom). Keep in mind that there's a limit of 8 characters for a file name in DOS. atiflash -s i filename.rom Verify the integrity of the VBIOS you want to flash by calculating its checksum. Of course you need to know the correct checksum in advance. If the checksums don't match -> don't flash. atiflash -cf vbiosfile For example if the file you want to flash is called "modVbios.rom" the command for displaying the checksum would be "atiflash -cf modVbios.rom". Flash your VBIOS to the desired adapter "i". atiflash -p i vbiosfile E.g. "atiflash -p 0 modVbios.rom" flashes the file modVbios.rom to adapter 0. DON'T do anything with the system during the flash procedure. Restart the system when asked to do so and remove your USB drive. Pro tip: Using ATIflash: This will display a list of all valid atiflash commands, the associated parameters and explanations about how to use them: atiflash -h
 1 point
 -
If you are already seeing 93C you most likely will see higher temps with 1Ghz, and potentially see your computer shut off to protect the GPU. What you should do, even if you don't install the modded BIOS, is to repaste your laptop. I saw 93C (with artifacts) before I repasted and had temps drop roughly 20C afterwards using Tuniq TX-4, depending on the game. The highest I have seen it go at 1Ghz is around 78C.1 point
-
CPU heatsink is the same. Only the GPU heatsink is better.1 point
-
@Jakob I would install the 340.52 driver only for dGPU, then connect the eGPU and use the device manager method, pointing out the c:\nvidia\ ... \340.52. Sent from my iPhone1 point
-
Can comment since I heavily researched for exactly this reason: offload calculation (not only DX11 graphics) to GPU. GPU calculation it's a reality since many years in HPC, just look at top500 list and you can find a lot of GPU accelerated supercomputers. On graphics workstation market since the presentation of the new MacPro was clear Apple decided focusing more on GPU than CPU, otherwise why shipping an high end graphics machine with only one CPU but 2xGPU by default, as many "traditional" 3D pro are complaining for. Reason is Intel is slowing down CPU performance increase, vs GPU performance going higher and higher. Apple it's following the trend, using also his strategic move to retain customers with a tight hw+sw integration as usual, as example with his Final Cut Pro X already optimized to work with 2 GPU using OpenCL. Also Apple move being based on AMD GPU is pushing many vendors to adopt OpenCL (recent example the new Nuke 9), meaning even broader and cheaper GPU available power with AMD normally really price competitive, and the possibility for anyone to develop on open standard and not proprietary CUDA. There are also a huge movement among 3D renderer to offload computation to GPU, with some already finished solutions (Furryball) and some hybrid CPU+GPU approach (Indigorenderer and some few others, with Indigorenderer in the future will develop also pure GPU rendering option). This mean at least a x4-x6 speed increase vs CPU rendering, with some limitations due to limited available VRAM. Notice the recent availability of 8GB VRAM "gaming" cards, useful not only for 4k gaming! Just read some pro asking for Alienware Graphics Amplifier to be used on hybrid rendering solutions. Following this trend 3D professional are also considering to use 3D game engine as rendering engine vs traditional renders. Game engine such as Unreal Engine and CryEngine are able to present stunning visual in real time, leveraging the GPU power without almost any usage of the CPU. As example there are already many example of UE4 usage in interiors architecture rendering. Established renderer with the adoption of GPU rendering are just going on the same side of game engines, as game engines are pushing to adopt renderer technology such as global dynamic illumination now and realtime ray tracing in the near future. The separation among them will blur more and more. With available huge VRAM GPU and maybe the adoption of AMD hUMA architecture the transition from CPU centric to GPU centric (or at least hybrid) architecture will be complete. In my understanding this is the idea why Intel its preventing Thunderbolt eGPU: they win CPU race with AMD and refocus his R&D effort on the mobile market, only to find that high margin high end 3D graphics market it's going through GPU way where they didn't have any brand nor high end solution, and also in mobile market they need to compete with many ARM based architectures, again starting without any market recognition nor support. Thunderbolt eGPU will allow anyone to just maintain current hw for years, just upgrading the GPU as hUMA or equivalent solutions are gaining traction. To finish worth in my idea to underline AMD situation: they lose CPU war, but in fact adopt the right strategic move. They buy in non suspect times ATI, so they have now technology and brand to compete in GPU driven market. They also develop hUMA that can be the cornerstone for new general purpose GPU driven architectures. They push out Mantle API that force DirectX and OpenGL to pair, enabling even more the usage of low cost CPU with a strong GPU a side. They also partner with ARM, pushing the adoption of this energy efficient architecture in traditional server market. I think they have demonstrated really good strategic thinking and I personally really appreciate his GPU value with many workstation class features available at small price. The same discussion we made for Intel we can made for Nvidia, that is pushing to stop the adoption of OpenCL for evident reasons, as is introducing more and more proprietary features to retain his loyal sw vendors. Im not an AMD affiliate nor think AMD it's a no profit angel organization. I only think they better incarnate what we are doing here: intelligent solutions that enable new possibilities for many in the average and not only high end market, pushing for grow to more ambitious goals. I hope AMD move will start to pay, since this will mean IMHO also a push for broader eGPU technology availability.1 point
-
Alienware 13 Review: The First Futureproof Gaming Laptop There's a review on gizmodo, too1 point
-
Have-Disk method/nvdmi.inf. F8 "Disable Driver Signing Enforcement" "Azalia" (HDMI) it disables the sound card too. Second Advanced menu -> Peripheral Configuration -> Azalia -> Disabled. Eurocom has an AW (R3) as test machine Issues/BS included.1 point
-
Hello eGPUers, Today the Alienware 13 was announced (it launches tomorrow), which normally we wouldn't be too excited about. However, in addition to the Alienware 13, Dell is also releasing a $300 eGPU enclosure which a user can connect any GPU of their choosing. Essentially, this is the first commercial and mass-market (aka. affordable price) eGPU solution to come to light that is actually being released and that Intel cannot kill. Here's a review (there are tonnes of them out there): Alienware 13 Review: The First Futureproof Gaming Laptop The eGPU works nearly flawlessly according to the review (some issues with PhysX) with NVidia graphics cards. Probably some other reviewers used AMD cards, but I haven't read all of them yet. (@Tech Inferno Fan feel free to edit this post with whatever info you want to if you'd like to). As of right now, the Alienware 13 is the only laptop to support their eGPU implementation. It's being called "Graphics Amplifier". I see no reason for Dell not to just add the proprietary port, needed for connection between the eGPU and the laptop, to their other lines of laptops. I have a strong feeling that this will spark other companies to try and out-eGPU Alienware, particularly because other boutique builders like to compare themselves to Alienware so much (such as Origin PC). Honestly, Dell was the company I least expected to release a reasonably priced eGPU solution, so props to them for getting it to market. As an additional point for speculation, it's interesting to consider if Intel will retaliate in any way, and if so how.1 point
-
@krazyazy So you stopped using the Akitio Box? Im using the following riser cable: Riser Card Extention kabel PCI-E 16x naar 16x (+ Molex) 15cm - RC-16X-16X-15CM - Yorcom.nl @Tech Inferno Fan In addition to my previous post: I did a check with the GTX660ti in my desktop setup. It's running on the default manufacturer settings of 1059/1502mhz. When using the specific problematic program (Lumion) I find the GPU Load on 99%. Could tis be a problem for an eGPU setup?
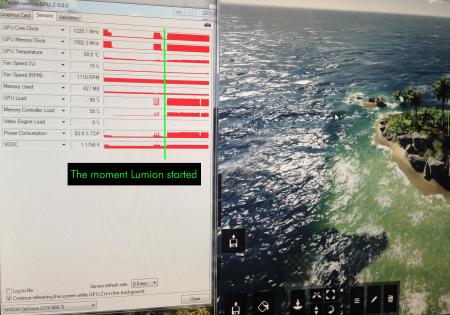 1 point
 -
Put here your backup of your native system bios from your laptop.1 point
-
I'd like to see more resellers with 120 Hz screens, they are so scarce at the moment, at the little amount of resellers that offer them usually do not offer different keyboard layouts (just the US one).1 point
-
I'm thinking you might have a defective Intel AC 7260 NIC. If your purchase is still protected by Amazon A-Z service I would file a claim as soon as possible for a replacement; or, you could try to contact the seller so that you can get a replacement. That being said, I'm thinking about getting the same NIC.1 point
-
I really like this as a way to tinker with the fan speeds. I have a GT70 in a very hot climate and like more aggressive cooling, for obvious reasons. I reckon I'll eventually modify the EC, once I find a good config and have enough posts to download the damn tool. Thanks for the heads-up on this, and yes, 100 shut my laptop down. hehehe Edit: To have this applied at startup, add a task under task scheduler to execute Fan Profile Applier.exe at logon with the argument: ProfilePath="Profiles\16F2-12\YOURPROFILE.rw" hideui exitonapply Edit 2: It seems settings are lost if the laptop enters suspend mode, so I've added a an event trigger on System log, ID 1, Power-Troubleshooter, 30 second delay. This will run the task when the computer wakes. Edit 3: That that last value is the thermal shutdown value, so I'd keep below my processor's thermal limit and above the GPU's max. (Thanks cresterk) This is what is working for me (GT70,3630QM, 680M) </snip>
 1 point