Leaderboard


Popular Content
Showing content with the highest reputation on 05/08/14 in all areas
-
BTW, (Обзор eGPU EXP GDC / Хабрахабр)I have done reivew the day I have recieved EXP GDC, and compared it with PE4L. It is in Russian, but I think google translate will help you.3 points
-
Alright guys, sorry for the delay... I have my setup working and almost all the bugs straightened out. I tested it buy running a Mining load on it all night (power supply test) I ran the Bioshock benchmark over and over and it's stable in those two tests.. So I'm pretty happy. I tried it both ways with Optimus Enabled and as just a third GPU and will post results of both this weekend with a 780Ti (as long as I don't break my freaking laptop AGAIN)2 points
-
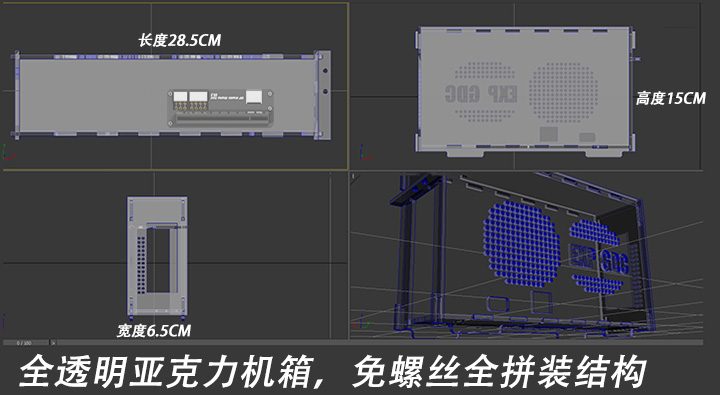
Yep, sorry for my English, it is pretty rusty. You can only fit a video card that meets this requirements: Only two options either you want used adapter, either you not. On their official taobao shop written "2、套装中包含的电源是二手的,成色不定,随机发货,一般9成新以上。", that means "The power adapter that comes with the package is second hand adapter, cannot guarantee the quality(of the adapter), it will be delivered on random basis, usually it is 90% new and above"
 2 points
 -
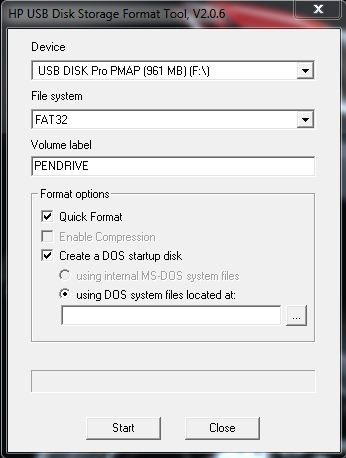
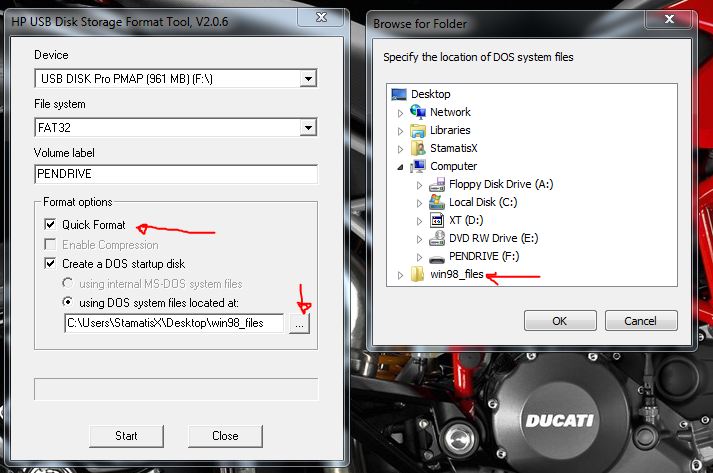
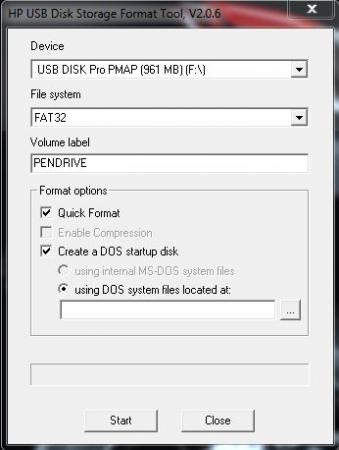
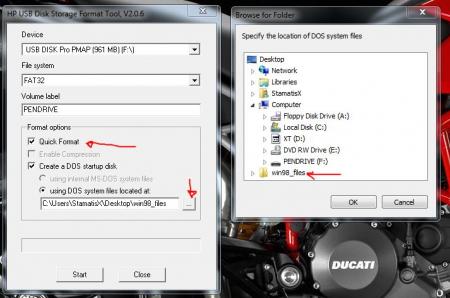
For those who don't like the restrictions Lenovo put on their system, here's a BIOS mod that will get you back at least some of the freedom you should have over your own hardware. Features: WLAN card whitelist removed, any (hardware-wise compatible) card should now work hidden BIOS menus unlocked VBIOS tweaked for more performance and better tuning possibilities Keep in mind that not necessarily all of the BIOS options available with this mod will be fully functional, so use the new available settings with care. If you're unsure about something don't change it and ask here, someone might be able to help. Available for v1.07 / v1.09 / v1.10 and v3.05. v2.04 and v2.07 added (only whitelist removal as for now) If you have a different BIOS (or more specific, a BIOS newer than 3.05) I will need a copy of it in order to make it work for your system. Instructions for flashing the modified BIOS v3.05: You need a USB stick prepared to run DOS, here is a guide you can follow in case you don't know how to do this: Guide by @StamatisX - thanks! >>> Before continuing make sure the AC adapter is connected to your laptop and your battery has at least 20% charge remaining. <<< (0) - NOTE: This step is Only necessary if your system isn't already using BIOS v3.05 Update to the official v3.05 BIOS provided by Lenovo . (1) - Create a backup of your own BIOS (now v3.05) by using Fptw64 tool. Extract the files and run the included .bat file from an admin command prompt. . (2) - Download Lenovo_Y510p-Y410p_[v3.05]_modified.zip and put the files of folder [1] to the root of your prepared USB DOS stick. Let the BiosFixer prepare your BIOS for flashing by drag and dropping your backup file on it. Put the created "v305mod.bin" file to the root of your USB DOS drive as well. . (3) - Now you need to downgrade the firmware back to v2.07 (Y510p-Y410p_v207_[stock].zip) in order to flash the mod. . (4) - Boot from your USB DOS drive, when you see the command prompt type BIOS and hit enter. Wait until the BIOS is flashed (you can safely ignore warnings about non-existing regions). . (5) - Once the BIOS flash completed with no errors, type EC and hit enter. Wait until the EC is flashed. Then reboot. . (6) - Go to the BIOS setup menu, load the default settings, apply and reboot. Done. In case you're using an ultra bay GPU follow the instructions in post #2 and flash the vbios.. NOTE: It's crucial that you flash both, BIOS and EC. Having different EC and BIOS versions can in certain situations lead to issues. IMPORTANT: If you want to go back to stock v3.05 you can do that easily by simply using the official update from Lenovo. That's it, nothing additional required in this case. Old instructions for users with v1.07 / v1.09 / v1.10 or v2.04 / v2.07 who for some reasons don't want to update to v3.05: Video walk-through of bios settings (thanks @allstone): My donation link in case you want to buy me a beer Download link for files referenced in this post:
 1 point
 -
Hi everyone. New to Tech Inferno. You can call me Stu. Nando asked me to post my setup and results which I'm happy to do. I'm going to keep this as simple as possible since this eGPU project has been just that, simple and awesome. In my eyes, this is where the eGPU game ends. Thunderbolt 2 (and TB3 coming soon), full-size chassis, fastest single GPU on the market, running at desktop speeds. I suppose the only caveat is cost but considering I only need to upgrade my GPU from this point on, it’s worth it. I live an hour away from Sonnet's headquarters in California and decided I had waited long enough to complete my eGPU experiment. The results surpassed expectations. Feel free to scroll down for specific benchmark and game results. Key Points Completely plug and play. Standard Bootcamp 5.1 install (*see below), connect everything up, boot Windows, install drivers, you’re done. eGPU vs Desktop performance: 85-90% Gaming: Max out virtually any game. 60FPS+ (with a few exceptions. e.g. Black Flag has weird PhysX that kills performance so I turn it off) Discrete 750M graphics = No Optimus/Internal display support. MBP w/Iris only = Optimus support but not fully plug and play (**see below) Simulated Optimus FPS loss: 5-20% (window drag method) eGPU Setup Cost (Not including MacBook): $1500 to $2000 depending on GPU purchase *It appears only 2013 MBPs w/newer PCIe flash storage defaults to UEFI/GPT-based windows installation with Bootcamp 5.1 .. 2012 rMBP (and possibly other macs/notebooks) will not format to GPT and therefore no plug and play **Conclusive Results for 2013 13" MacBook Pro - Optimus - Thunderbolt 2 - Plug and Play Configuration 2013 Macbook Pro 15” w/GT 750M [email protected] 16GB-DDR3L 512GB SSD US$2599 Sonnet Thunderbolt 2 III-D Chassis (US$979) EVGA Nvidia Geforce GTX 780 Ti Superclocked 3GB (US$720) Corsair RM450 (Silent) Power Supply (US$100) for 8-pin cable only (Jumped the 12V rail with small piece of metal. Google it) Standard Bootcamp 5.1 (UEFI) Installation Windows 8.1 w/latest Nvidia drivers MSI Afterburner with custom fan curve, gpu temp/fan speed match (e.g. 68 degrees/68% fan speed) — Performance and Benchmark Results — Maximum Overclock Scores: FireStrike Graphics: 11227 link *Surpasses Titan and 780 Ti graphics score (without overclock) by 1000+ points comparison [Note: This is only one sample] 3DMark11 Score: 12781 link 3DMark11 Graphics: 13996 link 3DMark-Vantage Graphics: 46629 link 3DMark06 Score: 29254 link Unigine Valley Extreme HD: 70FPS / 2924 Unigine Heaven 4.0 Extreme: 67FPS / 1683 BioShock Infinite Benchmark (UltraDX11): 126FPS Overall eGPU vs Desktop performance Fire Strike comparison (Desktop 780 Ti vs eGPU 780 Ti SC) Reference: link Graphics Score Desktop: 11096 eGPU: 10410 Ratio: 93% (take into account reference doesn't mention overclock) Unigine Valley comparison (Desktop vs eGPU) Reference: link Desktop FPS/Score: 73.1/3057 eGPU FPS/Score: 60.2/2520 Ratio: 82% (take into account desktop CPU which offsets results somewhat) Bioshock Infinite Reference: link Ratio: 80-93% (calculated at multiple frame stops) Another Unigine Valley Comparison Reference: link Ratio: 91% (no overclock mentioned) Overall eGPU Perfomance vs Desktop Performance: 80-95% (Games and Benchmarks consistently show this) Internal Display FPS Loss (window drag method) Overall internal display FPS loss: 5-20% Unigine Heaven: 16% 53FPS vs 63FPS Borderlands 2: 5-10% CUDA-Z Bandwidth Host to Device: 1258 MiB/s Device to Host: 1366 MiB/s Device to Device: 136 GiB/s Reference Host to Device TB1 10Gbps: 781MiB/s link TB1 8Gbps (x2 2.0): 697MiB/s link Unigine Heaven (Basic 720p) 107 FPS Score: 2716 Unigine Heaven (Extreme 1080p 4XAA) 62.7 FPS Score: 1580 Unigine Heaven (Extreme 1080p 8XAA) 54.2 FPS Score: 1364 Unigine Valley (Basic 720p) 80FPS Score: 3343 Unigine Valley (Extreme 1080p 2XAA) 78.6 FPS Score: 3290 Unigine Valley (Extreme HD 8XAA) 60.2 FPS Score: 2520 3DMark11 Score: 11269 link Graphics: 12576 Physics: 8395 3DMark (2013) Fire Strike Score: 8807 Graphics: 10410 Physics 8102 Cloud Gate Score: 18795 Graphics Score: 57882 Physics Score: 5588 Call of Duty: Ghosts Max settings 1080p 2x AA: 60FPS+ Tomb Raider Ultimate (Tess. hair off) 1080p: 60-100FPS Crysis 1 Very High (Maxed) 2xAA 1080p: 60-90FPS (Fly-through Benchmark) Crysis 3 Very High (Maxed) SMAA 1080p: 40-60FPS Nvidia Demo - A New Dawn: 31FPS BioShock Infinite Official Benchmark - 1080p UltraDX11: All scenes average: 108FPS What about SLI? SLI Success! 2x 780Ti + 2x Sonnet SEL on MacBook Pro @32Gbps TB2 (2x 16Gbps) External discussion about this post: AnandTech: Running An Nvidia GTX 780Ti over Thunderbolt 2 TechReport: Thunderbolt box mates MacBook Pro with GeForce GTX 780 Ti MacRumors: 2013 15" Macbook Pro + GTX780Ti@16Gbps Thunderbolt2 eGPU implementation YouTube: MacBook Pro running an NVIDIA GTX 780 Ti over Thunderbolt 2 PC Perspective: NVIDIA GTX 780 Ti on Thunderbolt 2 by DIYers Linustechtips: Running an NVIDIA GTX 780 Ti Over Thunderbolt 21 point
-
Use driver 327.23 (inf mod required). Also won't take much longer, up soon.1 point
-
This season is pretty interesting... Anime to watch Why (order of list is semi-important) Knights of Sidonia full well done CGI, best audio EVER (realistic noises, not that generic stuff, metal on metal sounds EXACTLY like metal on metal), even sounds good with audiophile equipment, story is very well written, no holds on sensitive matters / unnerving things (keep it at that). Just. Watch. It. I don't even like mecha things at all and I'm suggesting it heavily. Mahouka This MC is amazing. He is absurdly OP at what he does, but isn't rude or anything. He knows his limits and is VERY clever. The sister is mega annoying though, just ignore her. No Game No Life huehuehuehuehue, game competition type in an alternate world Blade and Soul based on MMO, turning out really good Black Bullet OP little girls (corrupted) that fight giant things, corruption widespread and causes said giant things M3 - Sono Kuroki Hagane dark, spoiler spoiler spoiler, dark ;D Captain Earth save the world with mecha, following in footsteps of his late father, pretty art Brynhildr in the Darkenss dubstep opening, magic girls with very very brutal restrictions, secret lab with not-so-nice research Akuma no Riddle assassin yuri girls Ryuugajou Nanana no Maizoukin series of silly intricate puzzles to find Nanana's collection of artifacts, and find out spoiler spoiler spoiler ;D1 point
-
I'd search in the main DIY eGPU thread. I think there is another E6430 implementation in there. I did my crossfire test with the E6420 under Ubuntu, and normal testing under Win7: http://forum.techinferno.com/diy-e-gpu-projects/5622-%5Bblog%5D-crossfire-testing.html#post82280 You'd have to look around for E6430. Do you know if you are using a MBR or UEFI/GPT install of Win8.1? Post the details in the main thread so more people can help you out.1 point
-
Noticed these things popping up on eBay. New USB 3.0 PCI-E 1x to 16x Powered 1M Express Extender Riser Adapter Card UK | eBay Not very useful for us at the moment, but it shows that: a) PCIE1x can be carried though USB3.0 Cable If a UK seller can sell this, at profit, with 1st class delivery, for £6, then it shows how much this kind of kit truly costs. It's also interesting to note that that adapter also looks like it has the 6pin through-hole mounting point for PCIe 6pin power connector, even though Molex is soldered on.1 point
-
[h=1]svl7's vBIOS Vantage P16182 Graphics Score 18647 [/h]Improved mechwarrior a nice little bit too.1 point
-
Defeat! Or at least troops withdrawn for now. As I noted before, followed the steps outlined in this and the original SVL7 sticky thread to backup bios, flashback from v3.05 to v2.7 BIOS, backup, mod v2.7, then flash modded v2.7. No hickups or issues during the process. New 7260AC wireless card worked! Note I've upgraded my Y501p to Win7 Ultimate 64bit (from POS Win8.1). However, as noted by others, SLEEP mode no longer functions, and that is a feature that I use/need a lot. I tried a number of device manager setting changes, but still could not get it to work. Then I noticed that whenever I did a restart or shutdown/startup, that I'd get hung in the BIOS screen for about 20 or so seconds and then the laptop would reboot and it would just blast into Windows desktop like it should (I'm running a Vertex V4 SSD). Note that I had none of these issues running stock v3.05 BIOS and stock 2230 wireless card with Win7 Ultimate installed. So, I decided to do a fresh Win7 build with the new Intel 7260AC wireless card and modded v2.7 BIOS. Went thru all that fun and it was restarting just fine until I did a wired LAN driver install, and then it started the 20 second hang in BIOS and then auto reboot with no issue... Checked and still no SLEEP working, so I said let's do this again! So another fresh Windows7 Ultimate 64bit install. Again, all good, but after a number of Windows and drivers updates (got further this time than last), then, the reboot BIOS hang happens. FTW? OK, so now that's blown much of an afternoon and into evening, so I reinstalled the stock BIOS v3.05; rebooted and got the hated Lenovo incompatible wireless card message; installed original 2230 PoS wireless card; and then did ANOTHER Win7 Ultimate clean install. Smooth as butter - no warnings, no BIOS hangs, and SLEEP works again. I suspect there was something in the v2.7 BIOS tables that just didn't like running on my v3.05 Y510p?? That said, someone (PLEASE!) needs to figure out a way to modify the 3.xx based BIOS so we can have our cake laptop and our 7260AC ice cream too!1 point
-
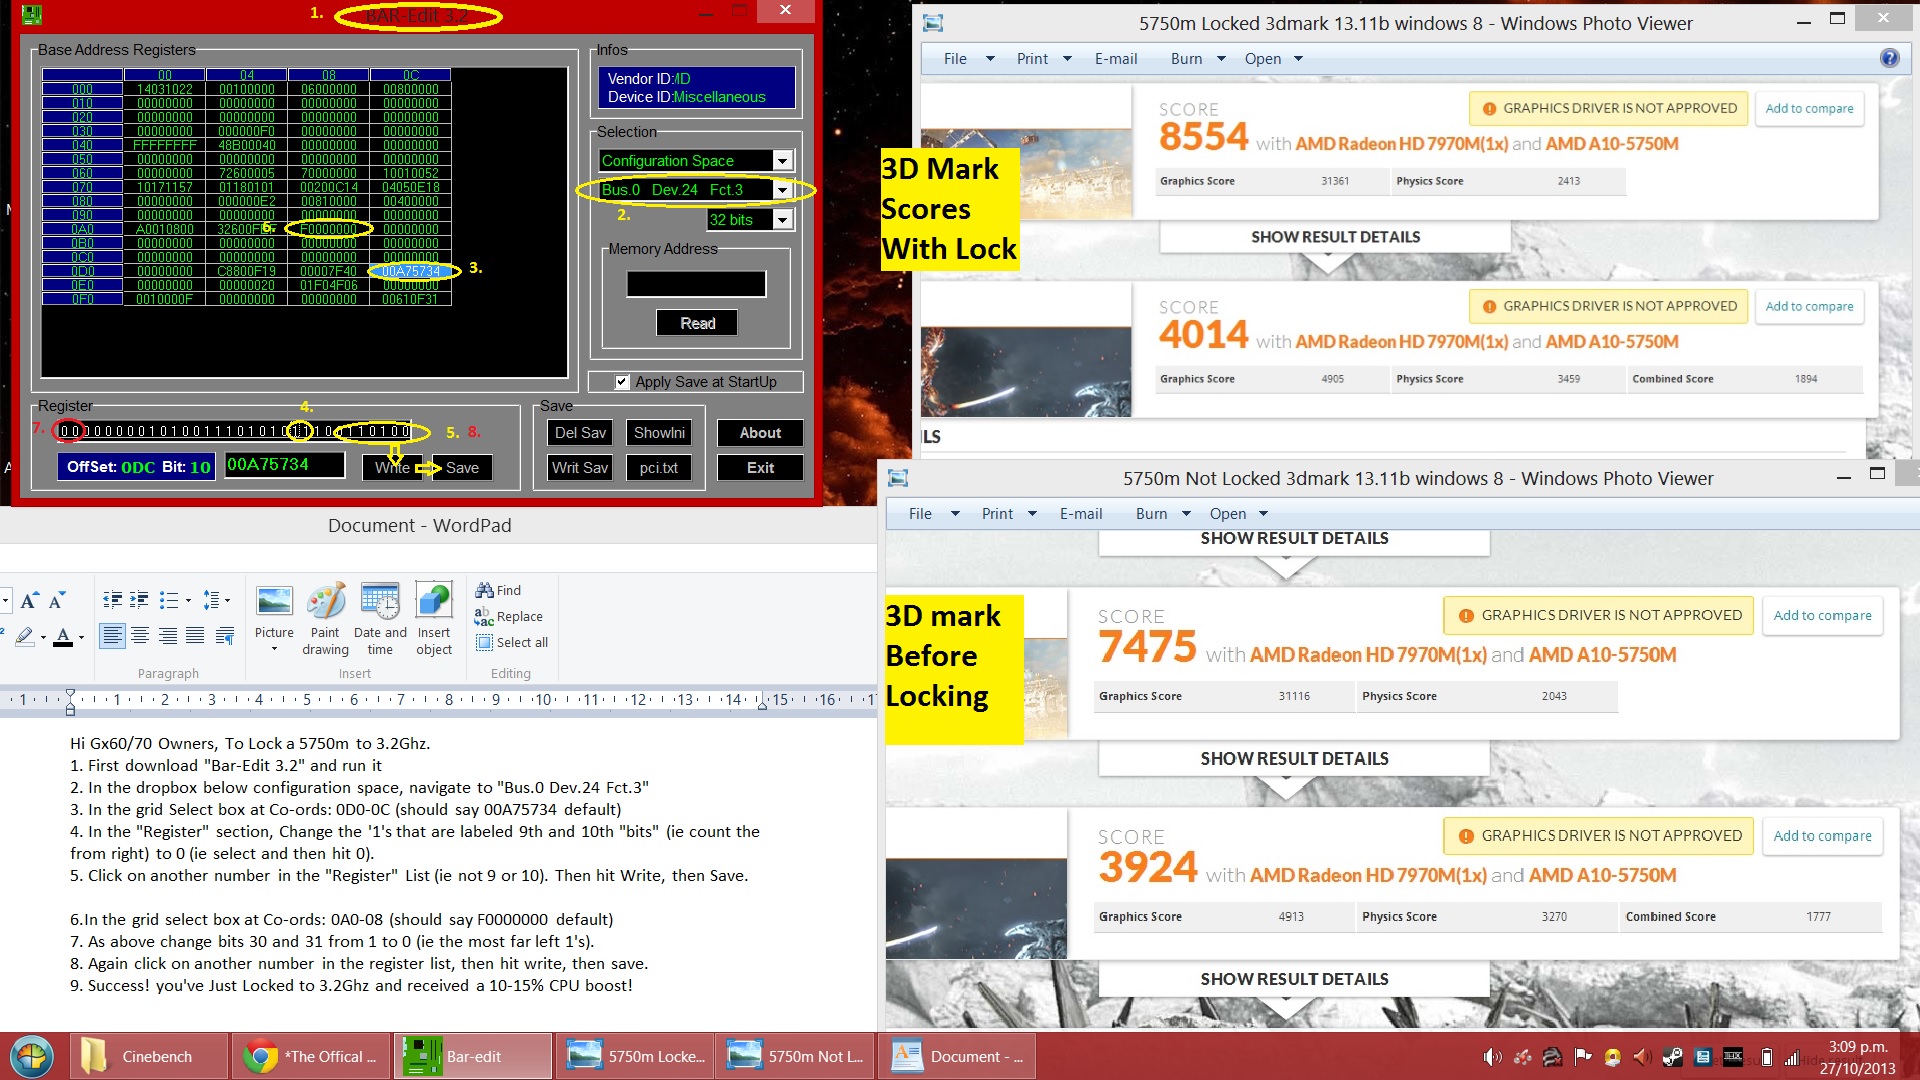
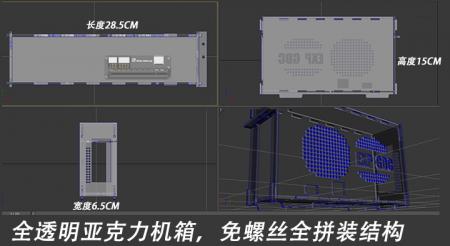
Hi Gx60 Owners, Kenglish's Method Gives the GX60/70 A great boost so in order to simplify the method for beginners I've Described the entire process with one Image, Enjoy!
 1 point