Leaderboard


Popular Content
Showing content with the highest reputation on 02/25/14 in all areas
-
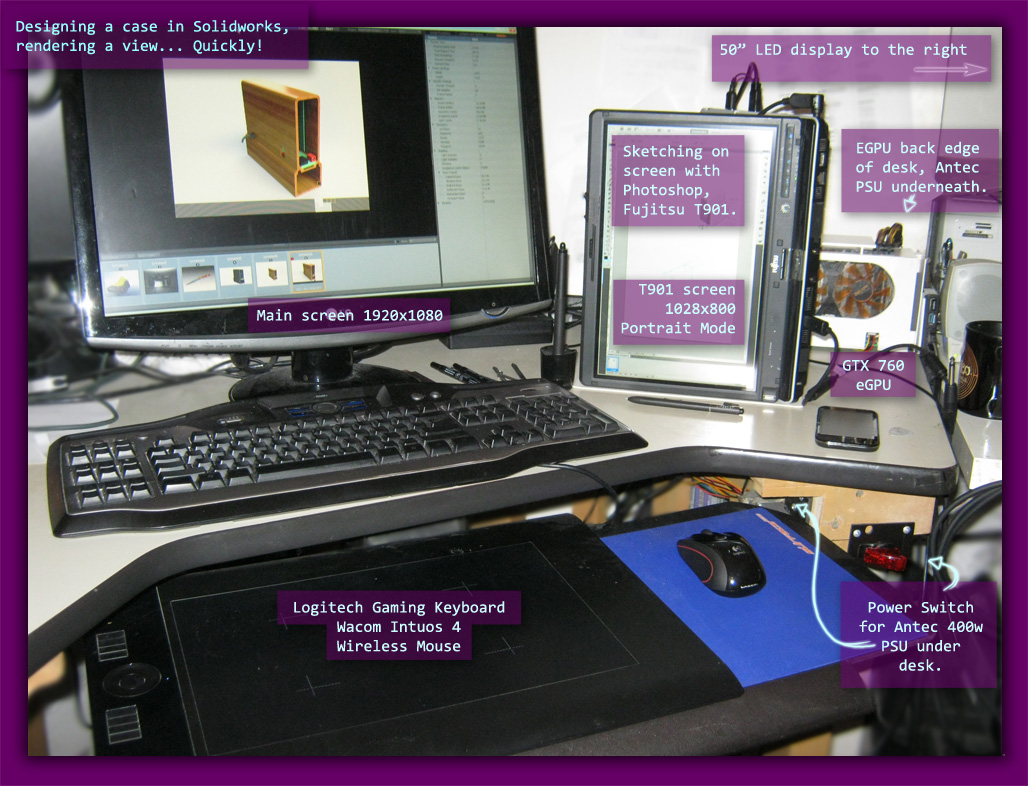
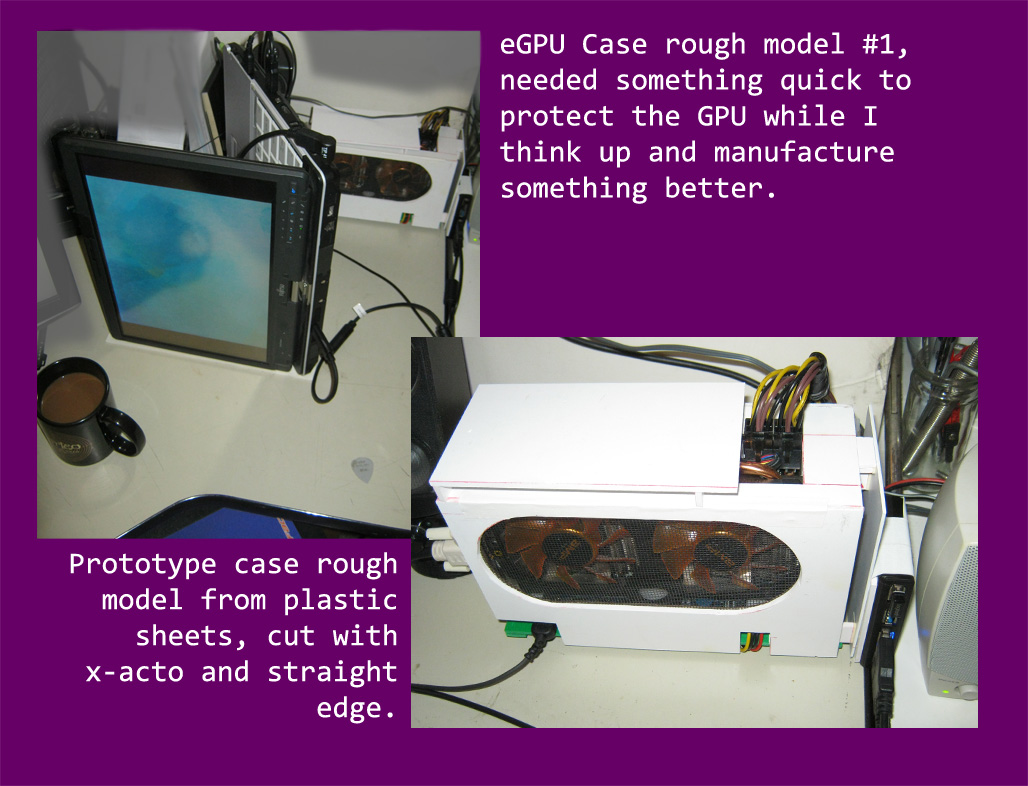
THANK YOU TECH INFERNO!!! AND ALL WHO CONTRIBUTE TO THE FORUMS!!! Here is my new setup, totally replacing my desktop yet instantly mobile! I am an industrial deign student, about to graduate. This arrangement of displays is improving productivity, I am loving it! Here is the eGPU... More to come, thanks again everyone! KenInSF P.S. the laptop is resting on a 2.5mm layer of padding, it seems happy with the hot air exhaust pointing up. There are no ports on the side facing down, just the extra battery in the CD drive bay. P.P.S. About the system T901: i7-2620m 16gb ram NVS4200m 500gb 7200rpm will be upgraded to an SSD... some day eGPU: Zotac gtx 760 Antec 400w PSU... The PSU was formerly used for 3 water cooling loops in my old desktop overclocking rig ([email protected] 24/7 for like 4 years, crossfired volt modded ati4850's, CPU-GPU's-RAM all water cooled, industrial AC and dehumidifier for benching ). Huge dedicated edifice on the desk is so 90's though... anyone want to buy a desktop pre rigged for water cooling? Kidding, as it really would be the entire desktop. The pumps and radiators are all mounted to the underside and tubing runs right into the base of the case through the desk. Everything is very custom... or full of oddly placed holes, depending on how much of a geek you are.

 2 points
 -
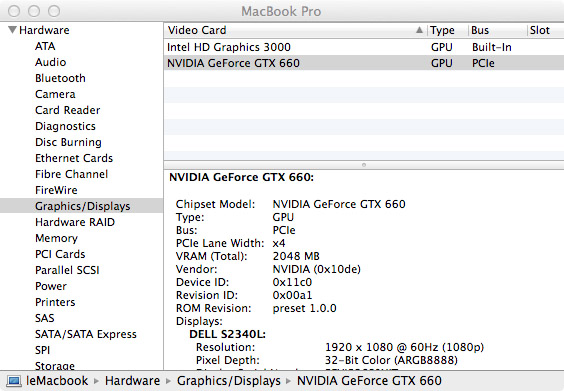
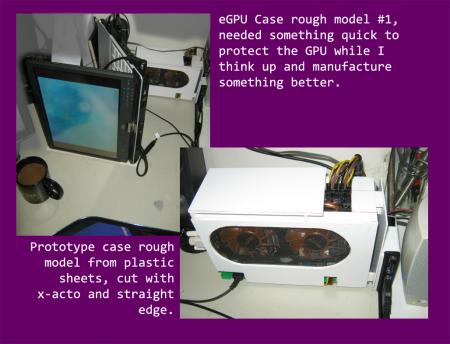
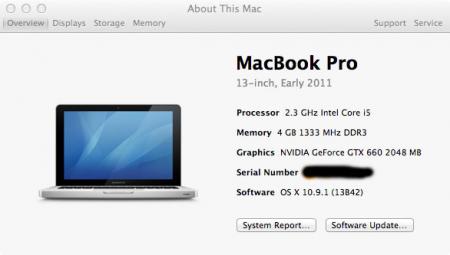
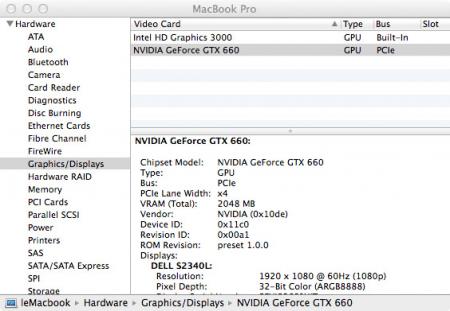
Hi everyone, Granted, I am not the first one to set up a native Thunderbolt eGPU system, but so far I have not come across a solder-free solution that works in OSX as well as Windows, so I wanted to write a little tutorial how I got my system running. My Setup Early 2011 13” MBP Sonnet Echo Express Pro (x16 mechanical interface and 150W internal PSU (including 75W aux connector) GTX 660 Not that it is particularly important which Thunderbolt extension bay is used, but the Sonnet pro line has got a couple of advantages: It has got two x16 pci-e slots, so there is no need to void your brand new enclosure’s warranty just to fit in your graphics card. It comes with a 75W auxiliary connector and 150W internal supply, so no extra psus, cables or whatnot scattered around, it’s a very neat and tidy solution It is recently discontinued which means you can get them for a fraction of the ridiculous price tag on ebay Disadvantages that I noticed: The thermal design is terrible, fans spin up quite loud early on and the ones it comes with as standard are very loud and annoying in particular (I hate you Sunon!). I fitted mine with Gelid Silent 5s as these are the only decent silent fans that come in 50mm. Overall noise is now acceptable and free from high pitched screeching even under hard gaming. To get it to work under OSX Nothing easier than that! All you have to do is tell OSX that the drivers are Thunderbolt enabled. This requires you to edit two kernel extensions: /System/Library/Extensions/NVDAStartup.kext /System/Library/Extensions/IONDRVSupport.kext In these files (use terminal command “sudo nano” to edit) look for sections beginning with <key><key><key>CFBundleIdentifier</key> </key></key> and just before this section is closed with </dict> add the two following lines: <true><true><key>IOPCITunnelCompatible</key> <true/> then close and save. Note that there are multiple of these entries in IONDRVSupport.kext. Here is an example of how the section in NVDAStartup.kext should look like: <key>NVDAStartup</key> <dict> <key>CFBundleIdentifier</key> […] <key>NVDAType</key> <string>Official</string> <key>IOPCITunnelCompatible</key> <true/> </dict> After that just reboot and you should be golden. Things that don’t work so well: Clamshell mode is a bit messed up now as the internal display cannot be switched off anymore. I got around the issue by installing NoSleep that prevents the system from going to sleep and just ignoring the ‘extra’ display. To get it to work under Windows Nobody likes Windows 8. But unfortunately unless you want to start fiddling about with extender cables, delay lines and extra boot loaders and make everything messy you need to run Windows in EFI mode which is very poor in Windows 7. So what you need is Windows 8 or 8.1 64 bit (32 bit has no EFI support). There are one or two tutorials on how to install Win8EFI on a MacBook out there, but it is pretty straight forward anyways: Go through initial bootcamp process: Create Windows USB installer, download bootcamp drivers and have them copied on the USB stick as well. Abort bootcamp after 1 is done, don’t let it create a partition. Open Disk Utility and create a partition for windows manually Reboot and hold option/alt. The windows USB drive should show in the bootable devices list. Install Windows and bootcamp drivers. Spend hours waiting for all Windows updates to install Once Windows is installed all that is left to do is download and install the newest Geforce drivers from NVidia. Here you go, native eGPU support in Windows as well! Things that don’t work so well: For some reason I did not manage to get the MBPs sound chip recognized in Windows. But do not worry, you have got two options: 1. Use a monitor that supports HDMI audio. 2. Use a USB sound card (‘cause it sounds better anyways, allegedly). Benchmarks: Don’t care about numbers Gaming experience: Superb. Games suddenly look good again! Concluding remarks: Is it worth it? Probably not. Would you do it again knowing that it’s not worth it? Definitely. </true></true> Performance benchmarks As apparently numbers are important to some, here are the 3DMark results of my little system: NVIDIA GeForce GTX 660 video card benchmark result - Intel Core i5-2415M Processor,Apple Inc. Mac-94245B3640C91C81
 1 point
 -
Feature Highlights of The AMD Catalyst™ 14.2 Beta V1.3 Driver for Windows® • Thief: Crossfire Profile update and performance improvements for single GPU configurations • Mantle: Multi-GPU configurations (up to 4 GPUs) running Battlefield 4 are now supported • Frame Pacing for Dual Graphics and non-XDMA configurations above 2560x1600 are now supported with Battlefield 3 and Battlefield 4 • Dual graphics DirectX 9 application issues have been resolved • Minecraft: Missing textures have been resolved • 3D applications no longer see intermittent hangs or application crashes • Resolves corruption issues seen in X-plane Known Issues • Notebooks based on AMD Enduro or PowerXpress™ technologies are currently not supported by the Mantle codepath • Thief does not render the right eye when CrossFire and Stereo 3D is enabled Installing The AMD Catalyst™ Software Driver • Current driver MUST be uninstalled before updating to AMD Catalyst™ 14.2 Beta V1.3 driver AMD Catalyst™ 14.2 Beta V1.3 Driver1 point
-
Do not worry. Just flash this vbios from MSI 560M, and all must work. MSI GTX 560M 1536 MB BIOS.zip1 point
-
Refer to this thread Thanks.1 point
-
@SpaceHippy1975 Enter BIOS, hold your laptop vertically (Make sure the CD driver on the side down) and push eject button. Good luck.1 point
-
@Jimbo Your RAM is 2fast4me ;-; ADATA XPG 2x8GB @ 2400. I did nothing but enable XMP (I'm completely new to OC'ing stuffs) Shizuku is pleased. --- Samsung 840 EVO 120GB. 36.8GB free. 2nd OS install. I didn't really close my applications. Had chrome, foobar (music on other drive), steam open. --- Samsung PM830 mSATA 64GB ( @deadbydawn thanks again!) . 32GB free1 point