Leaderboard


Popular Content
Showing content with the highest reputation on 05/31/13 in all areas
-
There was a new bios released for EVGA GTX 780's it is supposed to improve motherboard compatibility with older motherboards that do not support UEFI bios. Any chance you could also mod that bios it is v.80.10.37 and can be found here EVGA GeForce GTX 780 Firmware Update v80.10.37 - Updated 5/31/2013 Thanks2 points
-
Nvidia 'GTX Titan' - modified VBIOS files The Titan is a beast, no point denying it. Incredible performance for a single card, but there are still some things which I don't really like about it (in addition to the insane pricing ). "Boost 2.0" is one of the features I don't really like, especially for overclocking as you use proper control over the clocks. Without monitoring you'll never know what your card is actually running at, and you don't have any possibility to properly adjust it to your likes. The second point is the lack of an easy voltage control, tools like Nvidia Inspector get blocked and won't allow you to raise the voltage to the maximum vbios level. The following modified VBIOS version will take care of this and give you more control over your hardware. Features of the "OC edition": Boost 2.0 disabled - the card runs at the clocks you set it to . Voltage is adjustable up to 1.2125V . Default power target = 350W (so there should be no more need to adjust it manually per software) . Fan speed adjustable up to 100% . Clocks are stock, card idles normally at 2d voltage . v04 -> lower idle voltages, lower default 3d voltage . ************* Download links 'OC edition': 80.10.3E.00.01_-_GTX_Titan_'OC_edition'_v04.zip 80.10.3E.00.01_-_GTX_Titan_'OC_edition'_v04_[ACX].zip GTX_Titan_-_80.10.2C.00.06_-_'OC_edition_v03.zip GTX_Titan_-_80.10.2C.00.90'_-_'OC_edition'_v02_(SC_version).zip ************* ************* >>> NEW: 'OC edition' - Downsampling version <<< Some tweaks that will allow you to use higher custom resolutions through the Nvidia control panel, e.g. if you like to use extreme downsampling in games (3840x2400 @ 2560x1600@60hz or even 5120x2880 @ 2560x1440@60hz or similar). 80.10.3E.00.01_-_GTX_Titan_'OC_edition'_rev04.1_Downsampling_Version 80.10.3E.00.01_-_GTX_Titan_'OC_edition'_rev04.1_Downsampling_Version See attachments at the end of the post. ************ Here's a video of the vbios in use, demonstrated by @Brian: Instructions: In the unlikely case that you're reading this and don't know how to flash a vbios, check this: http://forum.techinferno.com/general-notebook-discussions/2166-%5Bguide%5D-nvidia-vbios-flashing.html Also I have to advise you against using any of the current Kepler vbios tweaking tools on these mods, you could run into issues if the tool is not properly implemented. First of all create a backup of your original vbios. Nvidia had the great idea to put the serial number of the card in the vbios, so you're better off keeping a backup of your original firmware. . Flash with the -6 flag in order to override an SSID mismatch if you flash a vbios from a different vendor (don't worry, it won't do any harm). . Reboot and have fun . Versions: I currently provide two versions, one is based on the EVGA SC vbios and therefore has slightly higher stock clocks. The other one is based on the Asus vbios and has the same features, but default clocks. Both versions will work on any current Titan, no matter which vendor. 'OC edition' rev03 and newer Undervolting per software now supported as well. Have fun overclocking! FAQ Here's my donation link in case you want to buy me a beer If there are any question, let me know. Do not under any circumstances mirror these bios files! 80.10.3E.00.01_-_GTX_Titan_'OC_edition'_rev04.1_Downsampling_Version.zip 80.10.3E.00.01_-_GTX_Titan_'OC_edition'_rev04.1_Downsampling_Version_[ACX].zip1 point
-
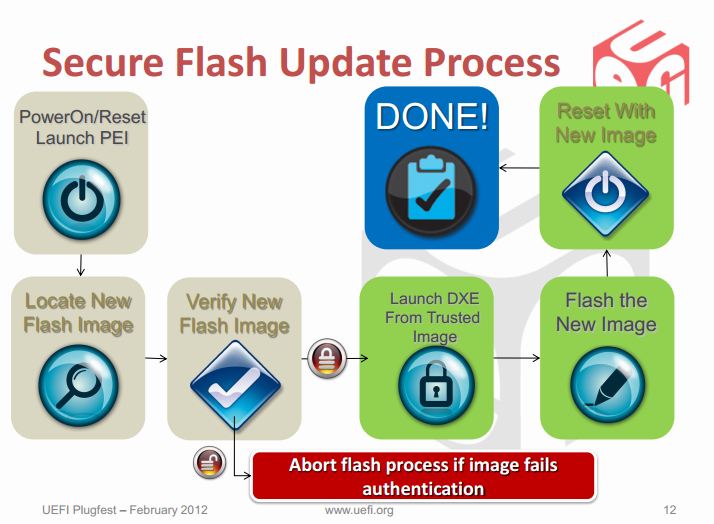
********** * This is only for systems with Intel chipsets. * * It still won't work for all of them, but for some it does. * This article is meant as an explanation for interested / advanced users. Since some of the more recent bios mods require the tool described below in order to allow flashing, I decided to share some information about it. Also I really don't like how users get locked out of their own hardware, this is a way to circumvent a couple of the more recent restrictions of certain systems. I hope this will be useful to some of you. If you know other ways to get around the current firmware updating restrictions (per software), please let me know. The problem: With the appearance of Windows 8 and Microsoft's requirement for OEMs to support 'secure boot' in order to get the Win8 certificate for their machines, a lot of the most recent systems (notebooks and desktops) use now firmware which is digitally signed. Since secure boot looses its purpose if firmware updates aren't verified and protected as well, the latest UEFI implementations come with a secure firmware upgrading procedure which makes sure that only properly signed and unmodified images can be flashed. This updating protections is active even if you don't enable secure boot. These two pictures explain the idea behind secure firmware updating very clearly: On the second picture you can see that the system verifies the firmware image even before it loads the drivers required for the flash. For bios modders or people who want to use modified firmware, the consequences of this are severe. It simply isn't possible anymore to flash digitally signed bios which have been modified, there's no way around the signature, at least not with the usual tools. The solution (at least for some systems): The only way to get around those new restrictions is to directly program the firmware flash memory and therefore leave out the verifying of the image. In Intel systems the flash chip is directly wired to the PCH, and it can be accessed by an Intel utility called Flash Programming Tool. It's a very powerful application which supports the most common flash memory chips. The requirement for it to work on a system are the following: - BIOS region of the flash memory must have write permissions - The OEM or BIOS vendor omitted to set an additional flash lock. - You can't flash an encapsulated firmware image, only the pure bios region. You will have access to the BIOS region for obvious reasons, but the second point can only be figured out by trying to flash a BIOS. If the tool comes up with an 'Error 28', download the attached 'prr' utility, as well as the DOS version of the flash tool. Put both on an USB drive which can boot DOS, boot from it and execute the prr.exe, if it manages to remove the protection on your system it will tell you 'ready to flash', in this case go ahead and directly flash with fpt, without rebooting before doing so. If prr can't remove the protection you're most likely out of luck, even though might be ways for certain systems, but the chances are pretty small. In order to flash a BIOS you will need to remove the capsule from the firmware image provided by your system manufacturer. You only want to update the bios. Then flash it by using this command: fptw64 -f FILE -bios (FILE stands for the image you want to flash) ***WARNING*** This tool is only for very advanced users. If you mess up it will override your BIOS without a warning or waiting for you to confirm. This means you can easily brick your system beyond any chance of recovery. You most likely don't need this tool. My BIOS mods which require this application for flashing will always come with a .bat file which will do the flashing for you. Again, for 99.9% of the users there's no need to mess with this. This version of the tool works only for 7 series chipsets. *InBeforeOmgMyYystemWontBootAnymore* The tool provided here by svl7 (prr2.exe and former prr.exe) may not be hosted anywhere outside of Tech|Inferno without the previous approval of the author. FPT_DOS.zip Fptw64.zip prr2.zip

 1 point
 -
So. Razer just announced their Blade 14. It is precisely the Haswell + Kepler combination that I described earlier in this topic. Gaming performance is a little better than the late last year M14xR2, as expected. It's notably thinner and lighter than the M14x at 4.3lbs vs the 6+lbs of the M14xR2. Note the lack of an optical drive bay. Note the single SSD; there's no option for a second SSD or a HDD+SSD cache configuration. Note the lack of wired Ethernet and the lack of SD card slot. And note the price: Blade 14 starts at $1800, a good $300-400 more than my mid-level configuration M14xR2. Almost a year later and the M14xR2 is still a better buy.1 point
-
Thanks for letting me that it should not cause any problem with the 350watt power target. I just posted the new v08.10.37.00.80 link to the evga page where you can get the SC ACX version from in my last post . If you have any problem downloading it please let know and I will send it to you. I will now provide you with the link to my current bios for my SC ACX which is v.08.10.36.00.80 I hope this can help you examine them and see if there are any differences. I back it up using GPU-Z 0.6.4. https://mega.co.nz/#!RRxi1Rgb!cK-64yEAF-3SB4nF9ILzl3zgPmw_71DdjcD8w-wZYAY Thanks P.S. Please let us know if you find anything different.1 point
-
Yes. I tested 770m in my 1761, it works very fine.1 point
-
Well had some spare time as iv been really busy away lately and started into the games again the other day since iv been back and decided to do a couple more benches and push this monster a little further! Very happy with the results and how it performs overall, best machine iv ever bought IMO. All benchmark tests were done with laptop sitting flat on my desk with NO additional cooling aids, its how i use the laptop everyday. I am pretty sure i could get more if i direct cool with A/C or run benches in a walk in fridge but these results are in normal honest environment as any normal person would use it so this really shows its true capability! Not bad for a notebook huh ? Special thanks to Prema and Svl7 for the mods and help! NVIDIA GeForce GTX 680M video card benchmark result - Intel Core i7-3930K Processor,Notebook P570WM score: P15405 3DMarks <<< No.1 in the world, Wooooooooooot!!1 point
-
Just to let people know. At max load, with CPU fully un-throttled (running at close to 56W, 53W on mine), and both GPU running at max load at 1.15V at 1250MHz, the 170W power supply DOES NOT provide enough power for the laptop. I have problems with the battery started discharging halfway when I am running benchmark (small FFT prime95 + Uningine Heaven). Even when playing Bioshock Infinite I had this problem. Have you seen before, negative charge rate on the battery because the laptop was sucking so much power from the power supply that it started sucking power from battery. For those who are running ThrottleStop and running full boost, without any modification to the power limit in TS or BIOS just note that the CPU is pulling close to 53-54W at full load. And if you have your GPU overvolted and overclocked, at full CPU and GPU load you will probably run into the same problem as me. Each GPU is rated at 45W, but overvolted they probably eat more than 50W. So, 56+50+50 is 156W. Assuming the PSU has 5% loss, providing about 160W of power, you will see that juice is running out fast. The 3630qm only lets me drop the power to 36W at its lowest though. With full load, 36W lets the CPU runs at 2.6GHz. At 45W, full load the CPU runs at 2.9GHz. At about 53W, the CPU boost fully up to 3.2GHz. I bought this Amazon.com: Dell Extra Slim 19.5V 12.3A 240W Replacement AC Adapter For Dell Alienware M17x, M17x10-1847DSB laptop, Dell Alienware M18x, AM18X-6732BAA: Computers & Accessories, the Alienware 240W power adapter, which has 7.4mm x 5.08mm tip. To convert to 5.5mm x 2.5mm which is what we have on the Y500, I bought this cable X75 Power Connector - 7.4 x 5.08mm Female Jack to 5.5 x 2.5mm Male Plug. One could also cut the cable and replace the connector, but when there's close to 10A of current flowing through it I don't trust my soldering.1 point
-
Honestly after owning many ASUS ROG high end laptops and recently a few Alienwares, my M14X R2 was worth EVERY single penny, and once you unlock the BIOS? Forget it.... its out of hand performance wise once you get everything set how youd like it.1 point
-
Hey guys, I have figured out how to avoid the throttling issue on GT650m. Below is my solution: Tool: Nvidia Inspector How: 1) Launch Nvidia Inspector. Navigate to Over Clock panel on the right side. Select "Performance Level 1 (P5). 2) Unlock max. Adjust gpu clock and memory clock for your own, I prefer 700-750 Mhz for GPU and 2000Mhz for Mem. 3) Create a shortcut for this settings, it is saved at Desktop by default so you just run this file next time and no need to launch Nvidia Inpector 4) Create a Bat file (e.g: Gaming.bat) and place it in Nvidia Inspector folder where nvidiaInspector.exe locate in. Paste the command below into the Bat file nvidiaInspector.exe -forcepstate:0,5 Run: Each time you want to play game, just run the Clock shortcut first then run the Bat file. It will force the GT650m always performs at your configured clock Result: I tested my own and it works perfectly although the temp increased quite high (70-80). 81 is max of my laptop (I am from Vietnam, a hot country ) but I think this temp is acceptable. The test is performed with default Bios A09 TRY IT and let me know your result.I guarantee it works. // Sorry for my English1 point