Leaderboard


Popular Content
Showing content with the highest reputation on 03/28/13 in all areas
-
To start with, check out the gameplay video - What do you guys think? I loved BF3 but got badly burned by MOH: Warfarter. I'll probably still preorder though, something about running over ex-COD noobs with a giant tank is hard to give up.2 points
-
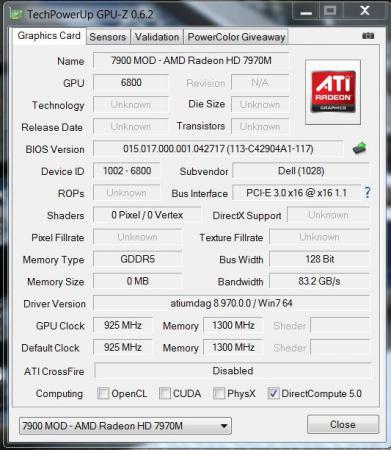
ADMIN EDIT 12/15/15: The original referenced zip pack is now restored. Did some tests with the VBIOS of the AMD 7970m, here's what I've got so far: - Overvolting: So far no success, when I increase the 3d voltage the card simply stays at the 2d profile. Fixed that Be aware that overvolting should only be done by experienced users and can seriously harm your GPU, shorten the life of its components and lead to unsuspected effects and / or system instability. I take no responsibility for any possible damages. Overvolting has been tested by me and @widezu69 (thanks!). It works, but can lead to instability, you need to find your limit. The M15x doesn't handle it well. I noticed similar behaviour as with my overvolted 6970m, drops in clocks, instability etc. At 1.15V even immediate crash at GPU load. The M17x R3 seems to handle it a bit better, there's probably more headroom in the voltage supply circuits which are providing the voltage for the GPU. I was able to run some vantage tests at 1Ghz with a 0.05V overvolt, my previous core clock limit was at about 950Mhz... so it definitely works. Different systems will behave in different ways, only way to find it out is to test it. Don't do it if you lack overclock experience. - Undervolting: Only did some quick tests, but it seems to work. The driver crashed all the time at clocks which normally worked fine. And at more sane clocks the card worked as expected. - Update: Yes, works very well - Core / memory clocks: Works fine so far, I only tested the 3d settings, but I assume it also works for the other clock profiles. In the GPU-Z screenshot you can see the changed clocks: A package with a selection of modified VBIOS files can be found here: AMD 7970M vbios pack There's quite a bit of work behind this, so just in case you want to buy me a beer... Here's a list of what the package contains. The names are pretty self-explanatory. "uv" for undervolt, "ov" for overvolt, clocks are "core-memory" Keep in mind that you need to rename the files before flashing due to the 8 character file name limit in DOS. Modified clocks: Dell7970m-900-1250.ROM Dell7970m-925-1300.ROM Dell7970m-940-1350.ROM Dell7970m-940-1400.ROM Dell7970m-950-1350.ROM Dell7970m-950-1400.ROM Undervolted: Dell7970m-uv-0950v.ROM Dell7970m-uv-0975v.ROM Dell7970m-uv-1000v.ROM Overvolted: Dell7970m-ov-1125v.ROM Dell7970m-ov-1150v.ROM Overvolted & modified clocks: Dell7970m-900-1300-ov1075v.ROM Dell7970m-900-1300-ov1100v.ROM Dell7970m-950-1400-ov1100v.ROM All files are based on the OEM Dell 7970m VBIOS. Instructions: For flashing refer to this guide: There's a list with the checksums of all files included in the VBIOS package, I highly recommend to check the integrity of the file before flashing it. This can easily be done with ATIflash, if you don't know how please check the guide linked above. And as always, flash on your own risk, you are responsible for your system and the changes you make on it. Feel free to ask questions, feedback is welcome as well!
 1 point
 -
Prior to flashing your BIOS, follow the instructions on this page to recover your BIOS in case any mistakes or accidents were to happen. It will save you allot of time and trouble. Recovering From A Bad Insyde Bios Flash After naming your backup BIOS file correctly, include it on your flash drive as you normally would. The instructions also tell you the proper keys to press in order to recover your BIOS if your computer will not POST.1 point
-
Yes. That shot me up to 80C - 81C During 3dMark 2011, TombRaider, BF 3 I still cap at 60C. Best, -Joshua1 point
-
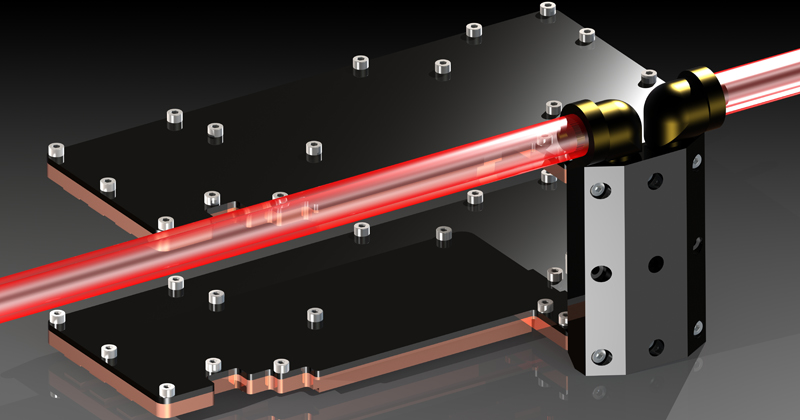
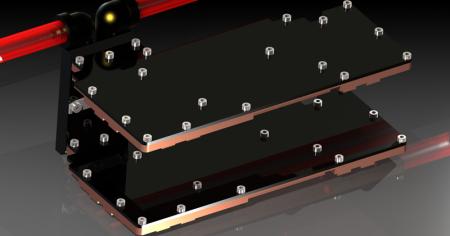
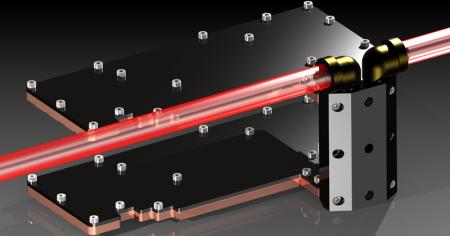
Update 28.03.2013: Pictures updated to the latest version and added a sketch with dimensions in millimeters. To get a better idea of how the water cooler will look like in the end, I added all required screws with approximate dimension entities. First I wanted to use this M4 screws. When I saw the rendered results, I thought I must have been taken leave of his thoughts at the time of purchase. It just looks crappy. So I went to a local craft store and ordered smaller black M3 screws. In the same step I have raised the height of the cover to 5mm to hide the new M3 screws completely. The new results look better many times. [ATTACH=CONFIG]6739[/ATTACH] [ATTACH=CONFIG]6740[/ATTACH] [ATTACH=CONFIG]6741[/ATTACH] [ATTACH=CONFIG]6742[/ATTACH] [ATTACH=CONFIG]6743[/ATTACH] As always everything at full resolution available on my SkyDrive folder.
 1 point