Leaderboard


Popular Content
Showing content with the highest reputation on 01/17/13 in all areas
-
Hi, Just Introducing myself. I am GrimMachine and have owned an MSI GT780DXR-621UK for 10 months. I have just changed the graphics card to a 7970M, installed a backlit keyboard and carried out a few other small mods to it. I also flashed the bios to Xonar's unlocked bios (thanks goes to Xonar for that). I have a keen interest in laptops and lately modding them (moving on from heavily modding desktop pc's) as I am a keen pc gamer and working away from home has ignited my interest in laptops as I needed to game on the go. Hi to all!3 points
-
Yeah if its especially pronounced when you move the mouse, I'd bet it's an electromagnetic interference from the mouse. I sometimes hear something on my Thinkpad X200T but you can only (and barely) hear it if you are in the room that's dead silent. I had a similar problem recently (noise when I moved the mouse) but I heard the sound on speakers and the reason you could hear the noise because the volume control in Windows was set to very low ~few % of the max and the speakers were set to almost max volume so any EM noise was amplified together with the signal coming from the computer. In that case the solution is to simply amplify the signal coming from the computer (~20%+ of the max volume) and the buzzing went away. In your case, it might be something else producing the noise, however.2 points
-
Hi! Looking to buy a Lenovo Y500 and researching things to be able to do to it here. You can find n1smo and I both bumping up a specific thread on the official lenovo forums because there's major problems with the laptop that needs attention from lenovo. lol2 points
-
Just wanted to say Hi and introduce myself. My name's Ratbag and I like to consider myself a tweaker. Not the "bad" sort of tweaker but the sort that just likes to tinker with stuff. Always taking things apart to see how they work etc. I think that's why I love computers because you can take and swap things around, mod things and do all sorts. Anyway, hi guys2 points
-
I purchased a Lenovo Y500 last month and enjoy this laptop immensely but joined this forum to hopefully help me bring out the true potential of this laptop. Thanks!2 points
-
I followed the youtube video Lenovo Y400 Y500 Full Disassembly - YouTube. However, the video was probably created with a prototype y500 because some of the layout of the laptop did not match mine. Most noticeably is that there are *three* screws holding the keyboard down not *two*, I almost ripped the keyboard trying to pull it off with one screw still in there. Also, a few of the ribbons are located in different places which I think is an improvement over the y500 in the video. Finally, the hardest part of the entire process was to remove the back cover because it is held on by plastic tabs facing in different directions so the best way is to wiggle it left and right while lifting and not lift directly up. That is just regular white thermal paste on the heatsinks. The OEM thermal paste resembled AS5 in color and thickness and I recommend that it be left alone if the temperatures are good. I have since replaced the cheap stuff I put on there with AS5 and still have not seen the temperatures I saw when it was stock (still 3-5C higher). Here is what I did to stop the twitchy touchpad (issue is well documented in the Lenovo support forum) and the random extra characters the keyboard would add while typing (less known issue).1 point
-
Here's my list: Full Metal Jackoff Missionary: Impossible Schindler's Fist Free Your Willy In Diana Jones Romeo in Juliet jk1 point
-
Here you go mate.. The files you want are inside. http://rapidshare.com/files/3644594327/OC%20Package.zip1 point
-
LOL, thanks! I had to dig deep for that one. j/k!1 point
-
The advantage of this vbios is to unleash the capacity of the GTX680m by allowing an Overclock superior than 854 Mhz ...1 point
-
Without flashing, you can safely OC to a max 854Mhz core (limit of your stock vbios) and 2200/2400 memory ... you need only an OC utility like MSI afterburner, with that software you can OC and check the stability and temperature of your card in game and benchmark. For the time being, I can't advise you the MSI 80.04.33.00.24 oc edition vbios, because of a bug that put the 3d voltage at 1.012v versus 0.987v of your stock vbios.1 point
-
Hiya guys, Wow, it's been a while since I posted - although I have lurked for a good while now. Just wanted to say that everyone here is doing a really great job. I'm gonna try and be more regular so I hope to be able to contribute more and be a valued member of T|I.1 point
-
More stuff exclusive for T|I users, voltage mods: All the vbios listed here are attached at the end of the post. ******************************** Nvidia 800m series: Nvidia GTX 880m (8GB version only): 'OC edition' -> unlocked overclocking limits, voltage adjustable, power target adjustable, optimized performance at higher clocks Can be used for all current 880m (Clevo, MSI and Dell). Nvidia GTX 870m: 'OC edition' -> see above Nvidia GTX 860m (GK104 variant): 'OC edition' -> see above. Refer to the file name to know which version is suited for your system. NOTE: Only for the Kepler version of the 860m. Silly Nvidia started giving different GPUs the same name. ******************************** Nvidia 700m series: Nvidia GTX 780m: 'OC edition' -> unlocked overclocking limits, voltage adjustable, power target adjustable, optimized performance at higher clocks Can be used for all current 780m (Clevo, MSI and Dell). Nvidia GTX 770m: 'OC edition' -> see above Nvidia GTX 765m: 'OC edition' -> see above. Refer to the file name to know which version is suited for your system. ********************************* Nvidia 600m series: MSI GTX 680m (4GB version): 'OC edition' revised -> higher limits for software overclocking, stock default clocks ----------------------- Dell GTX 680m (2GB version) vbios: 'OCedition' revised -> higher limits for software overclocking, stock default clocks same with increased 3d voltage ('OV') -> refer to the file name ----------------------- Clevo GTX 680m (4GB version) vbios: 'OCedition' revised -> higher limits for software overclocking, stock default clocks. For P1xxHM based systems I recommend only using version 80.04.29.00.01 !! Some users reported issue with other vbios versions (stock or modified, doesn't matter). EM users make sure you're on the latest BIOS / EC same with increased 3d voltage ('OV') -> refer to the file name (Same warning as above applies to P1xxHM users). ----------------------- K3000m: (Nvidia) K3000m - 80.04.3A.00.07 'OCedition' -> higher software overclocking limit Should work on all K3000m, unless you got a board ID mismatch. (HP) K3000m - 80.04.33.00.2E - 'OC edition' - > same as above, but probably the better choice if you use a HP machine ----------------------- K5000m: (Dell) K5000m - 80.04.33.00.35 - 'OCedition' -> higher software overclocking limit, stock 3d clocks 758MHz It's Dell but should work on all K5000m, unless you get a board ID mismatch. ----------------------- GTX 670mx: MSI 670mx (1.5GB) - 80.04.5B.00.A5_'OCedition'_rev00 -> higher software overclocking limits, tweaked performance at high clocks. Same board as the Clevo card. Clevo 670mx (3GB) - 80.04.58.00.03_'OC edition'_rev02 -> same as above, plus voltage is adjustable per software. ---------------------- MSI GTX 675mx: MSI 675mx (2GB) - 80.04.58.00.14_'OCedition'_rev00 -> higher software overclocking limits, tweaked performance at high clocks. MSI 675mx (4GB) - 80.04.58.00.0E_'OCedition'_rev00 -> same as above, vbios for 4GB card (!) ----------------------- Clevo GTX 675mx: Clevo 675mx (4GB) - 80.04.58.00.05_'OCedition'_rev00 -> higher software overclocking limits, tweaked performance at high clocks. ----------------------- ASUS G75VW BIOS: - 660m at 1000MHz core / 1400MHz memory - additional BIOS menus http://forum.techinferno.com/asus-gaming-notebook-forum/2538-%5Bg75vw%5D-modified-bios-vbios-higher-overclocking.html ------- Donation link in case you want to buy me a beer Thanks and cheers! *** FILE DOWNLOAD LOCATION:1 point
-
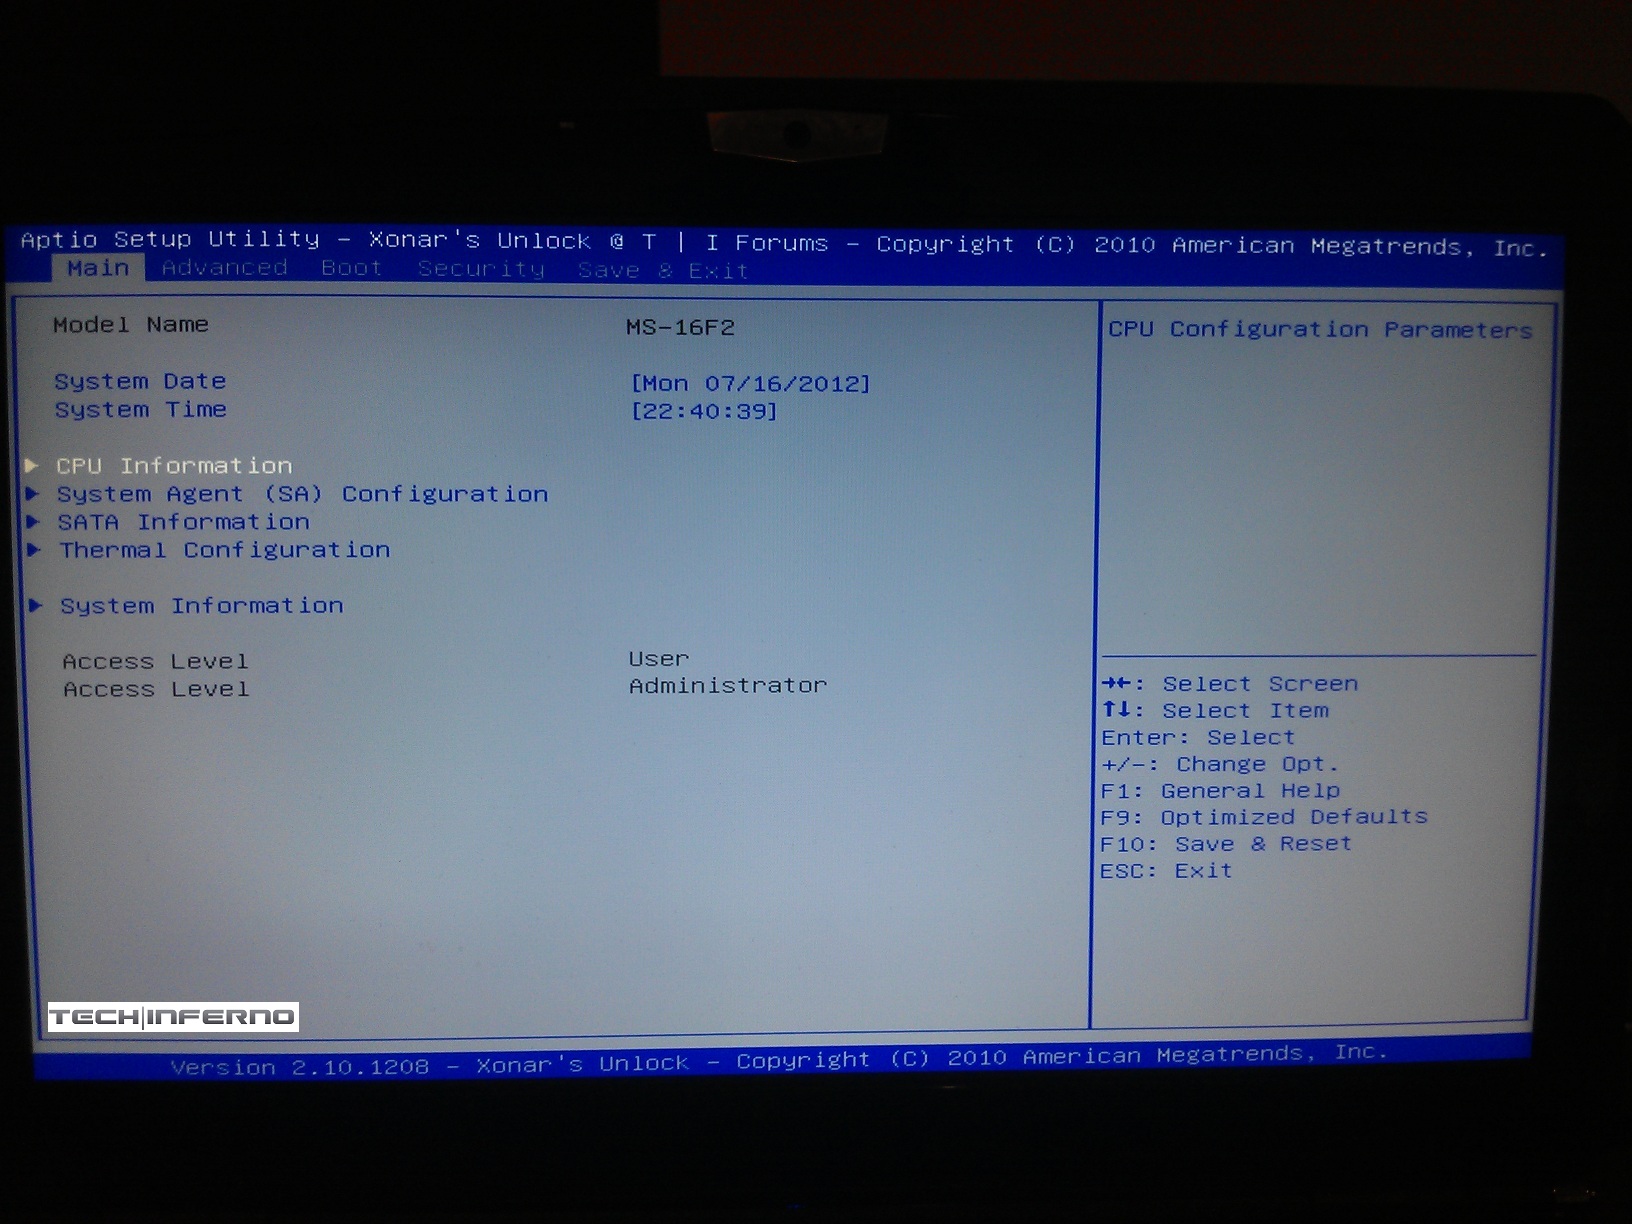
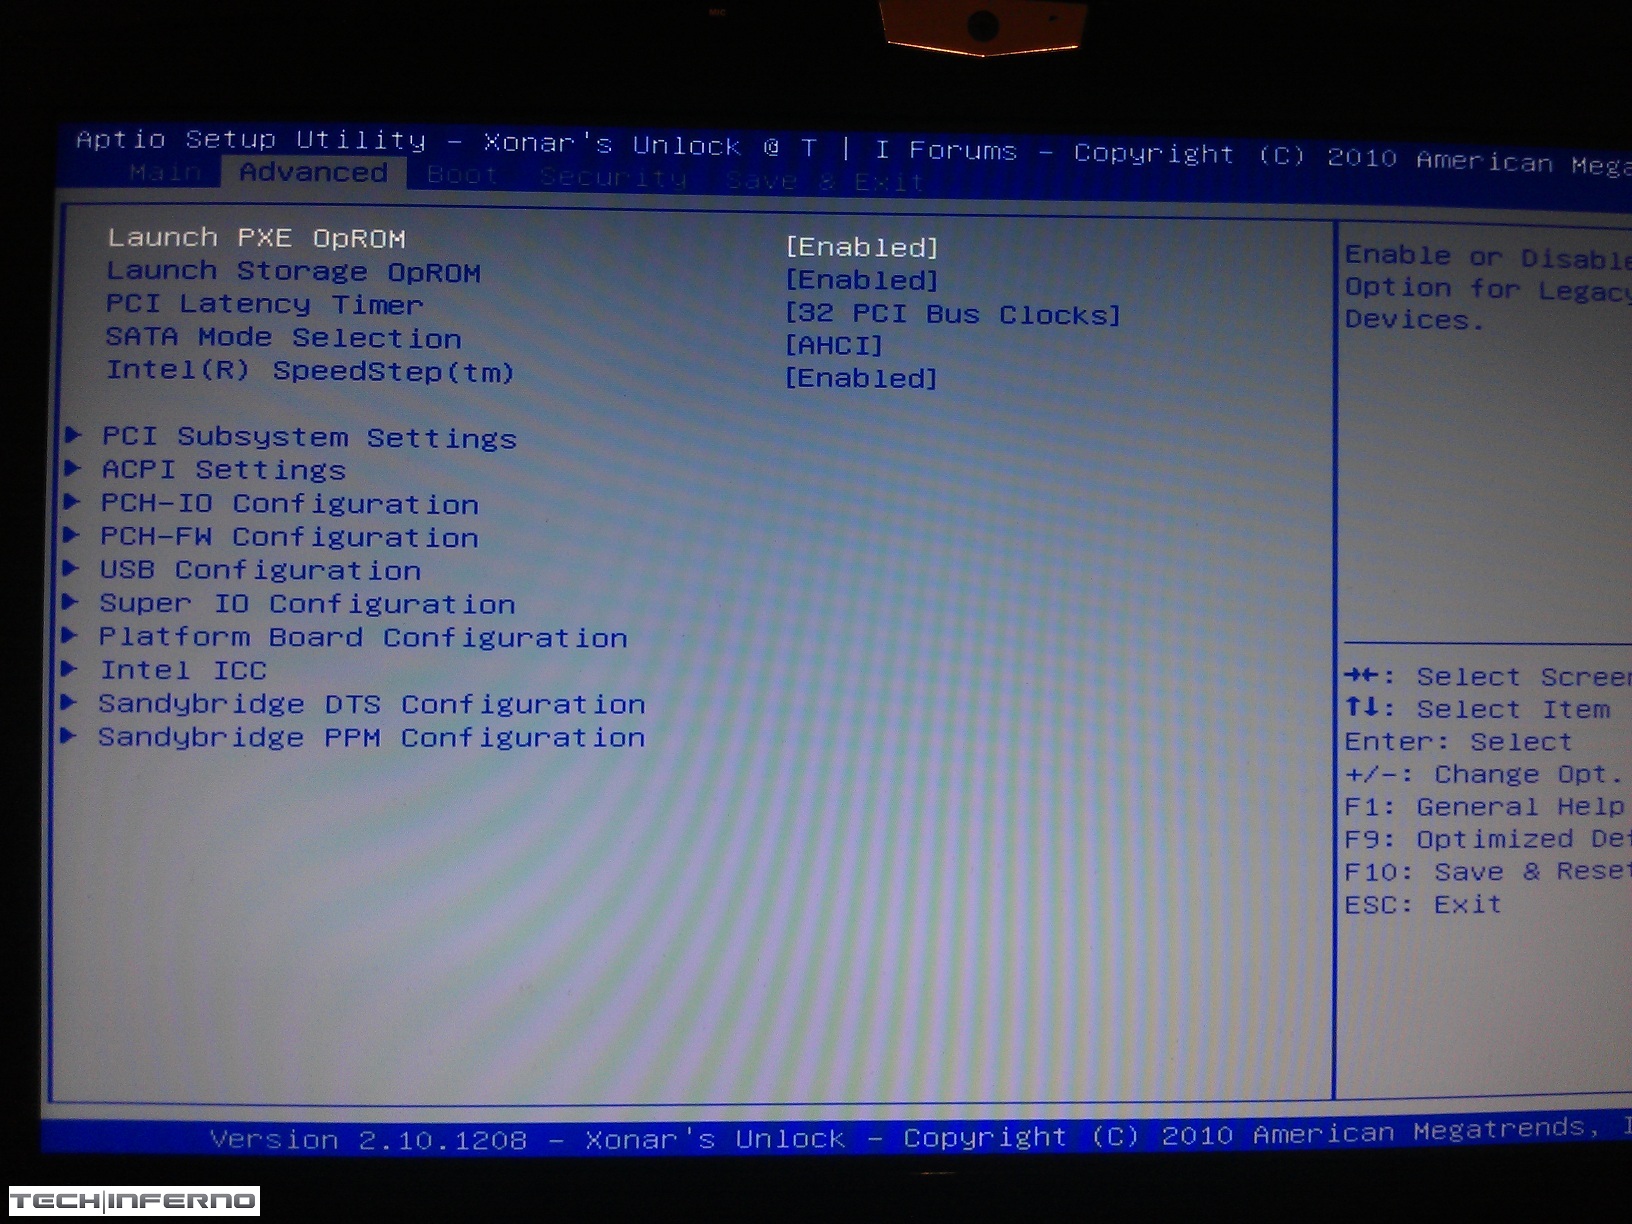
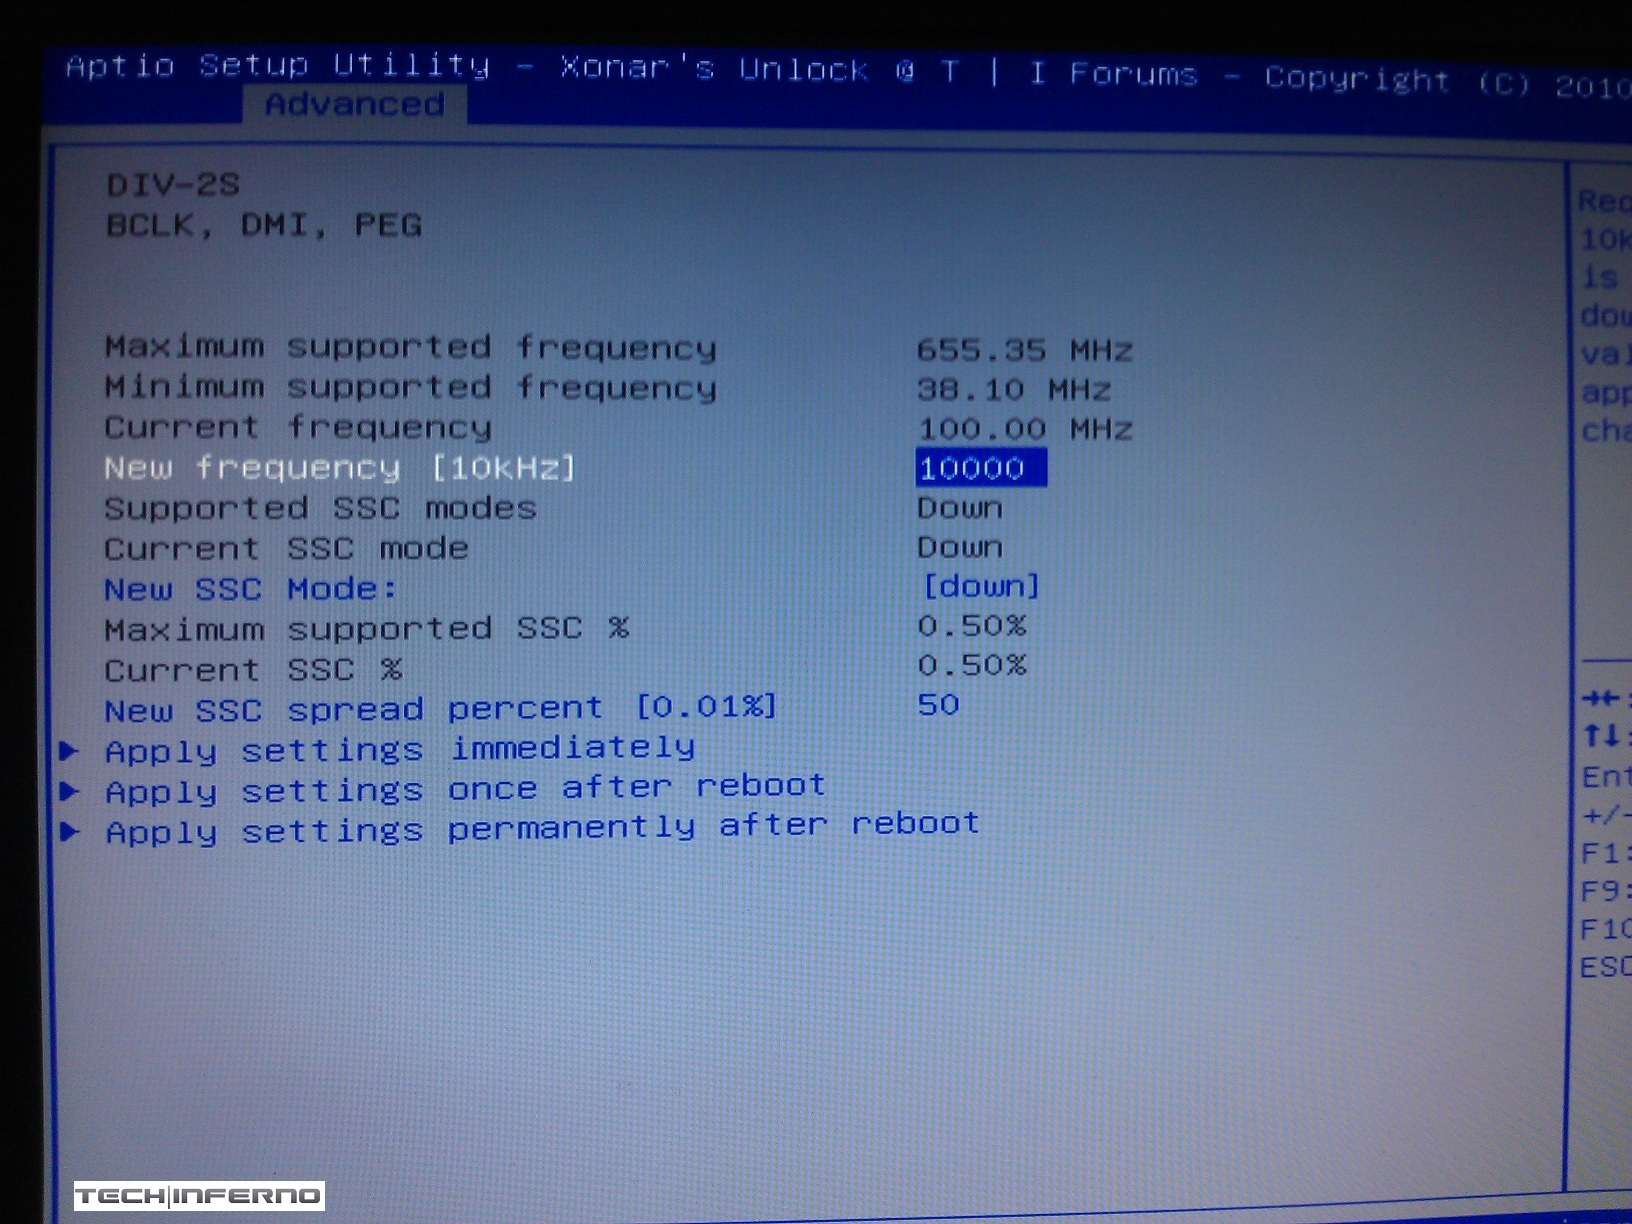
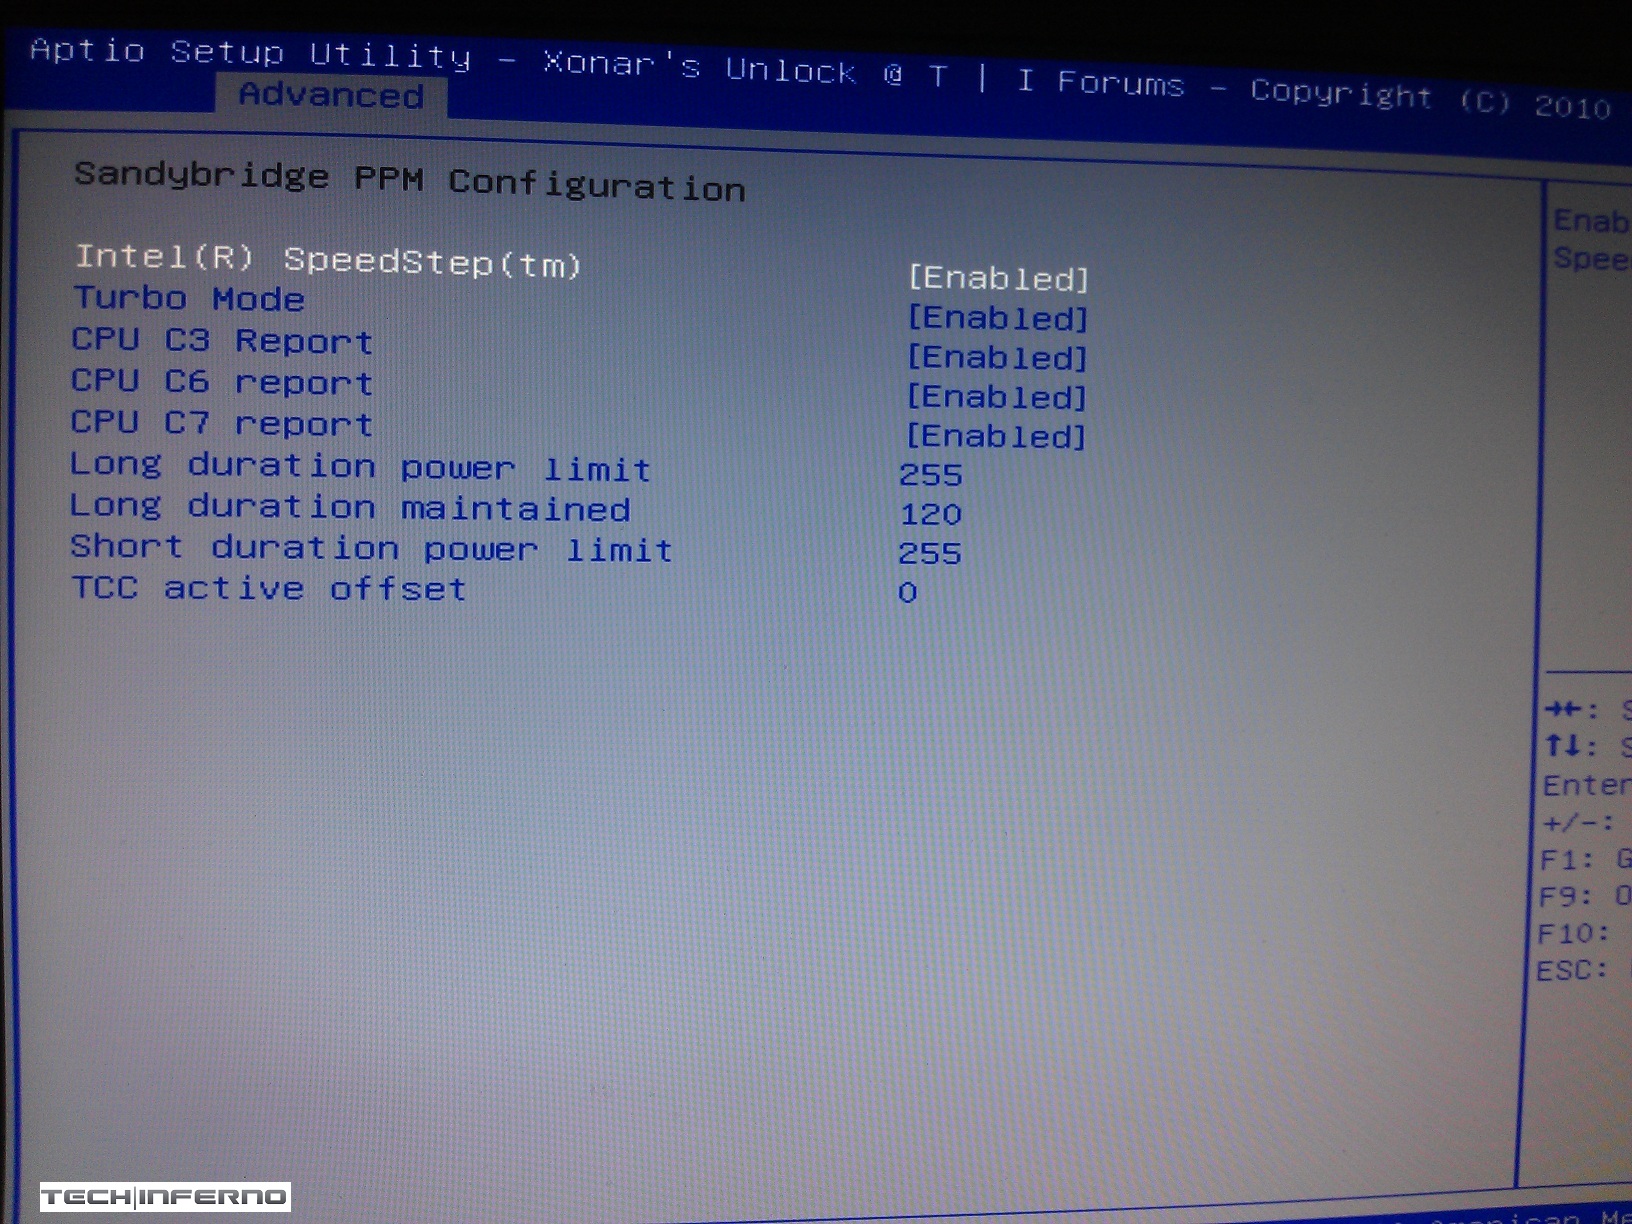
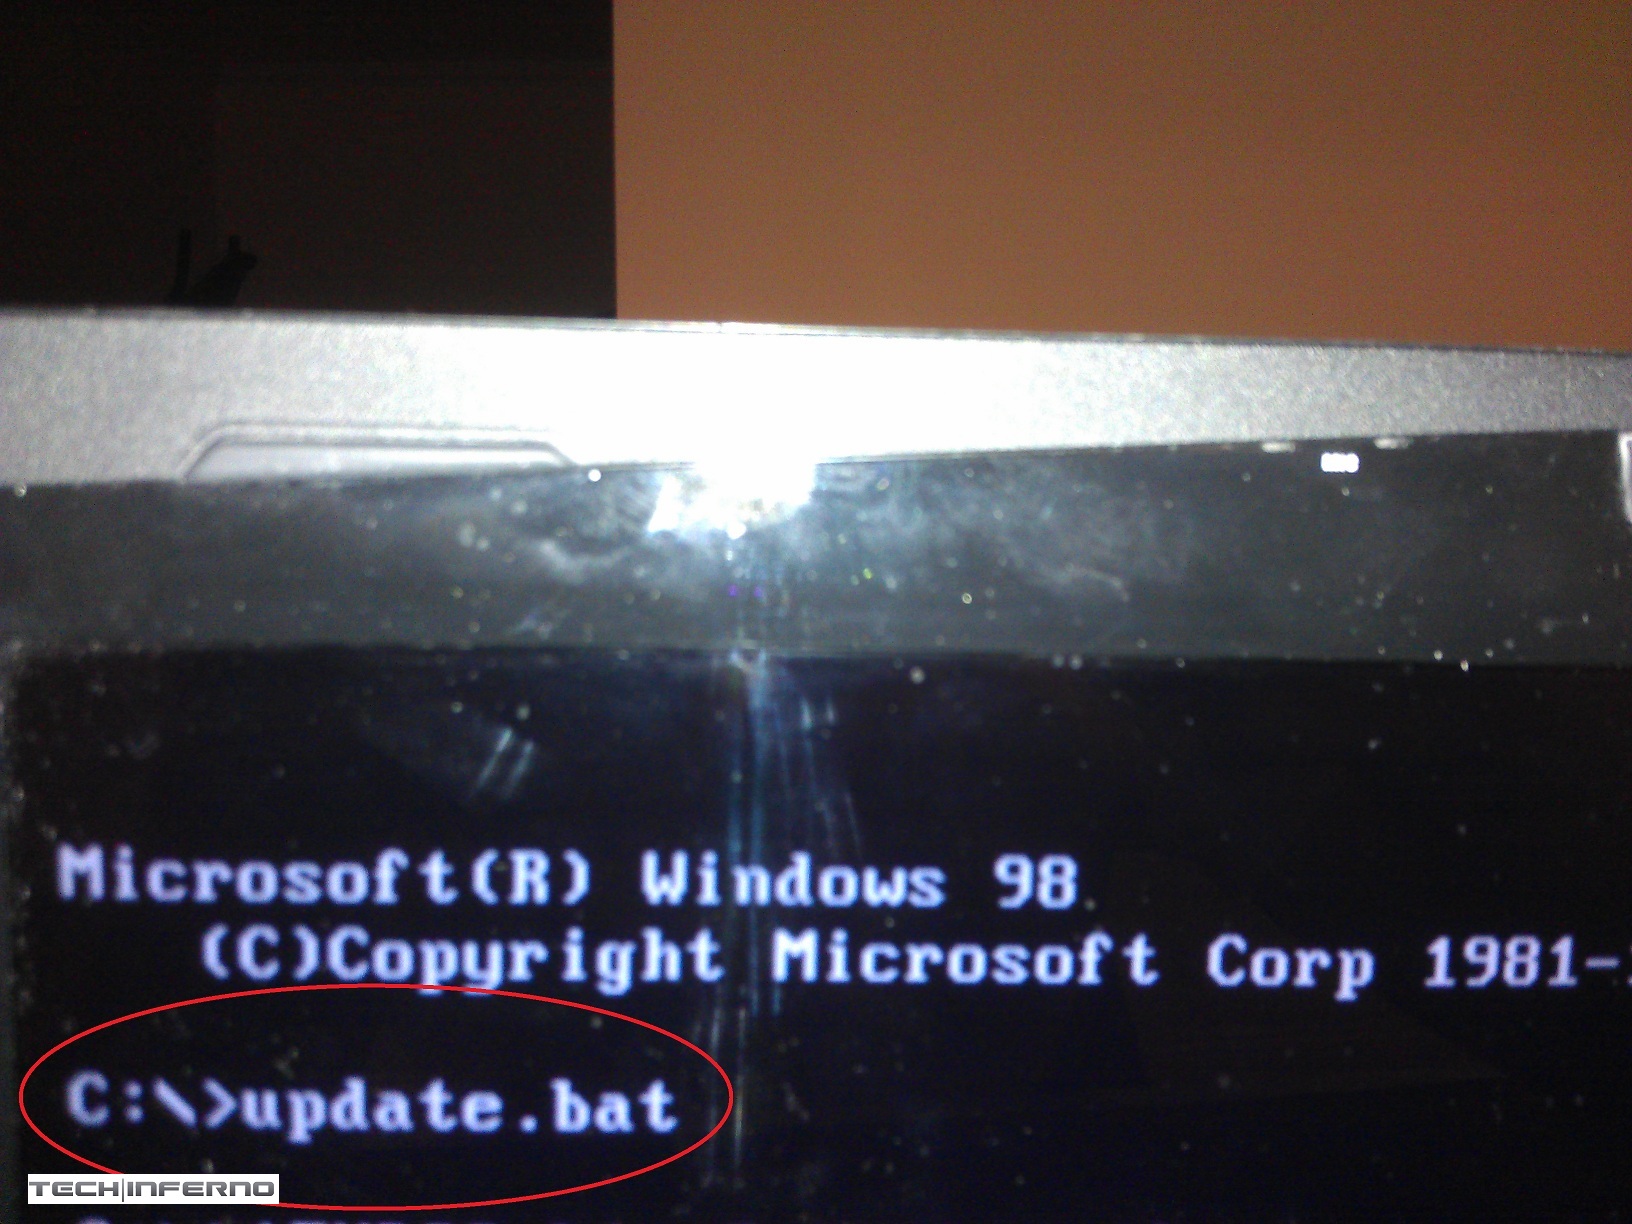
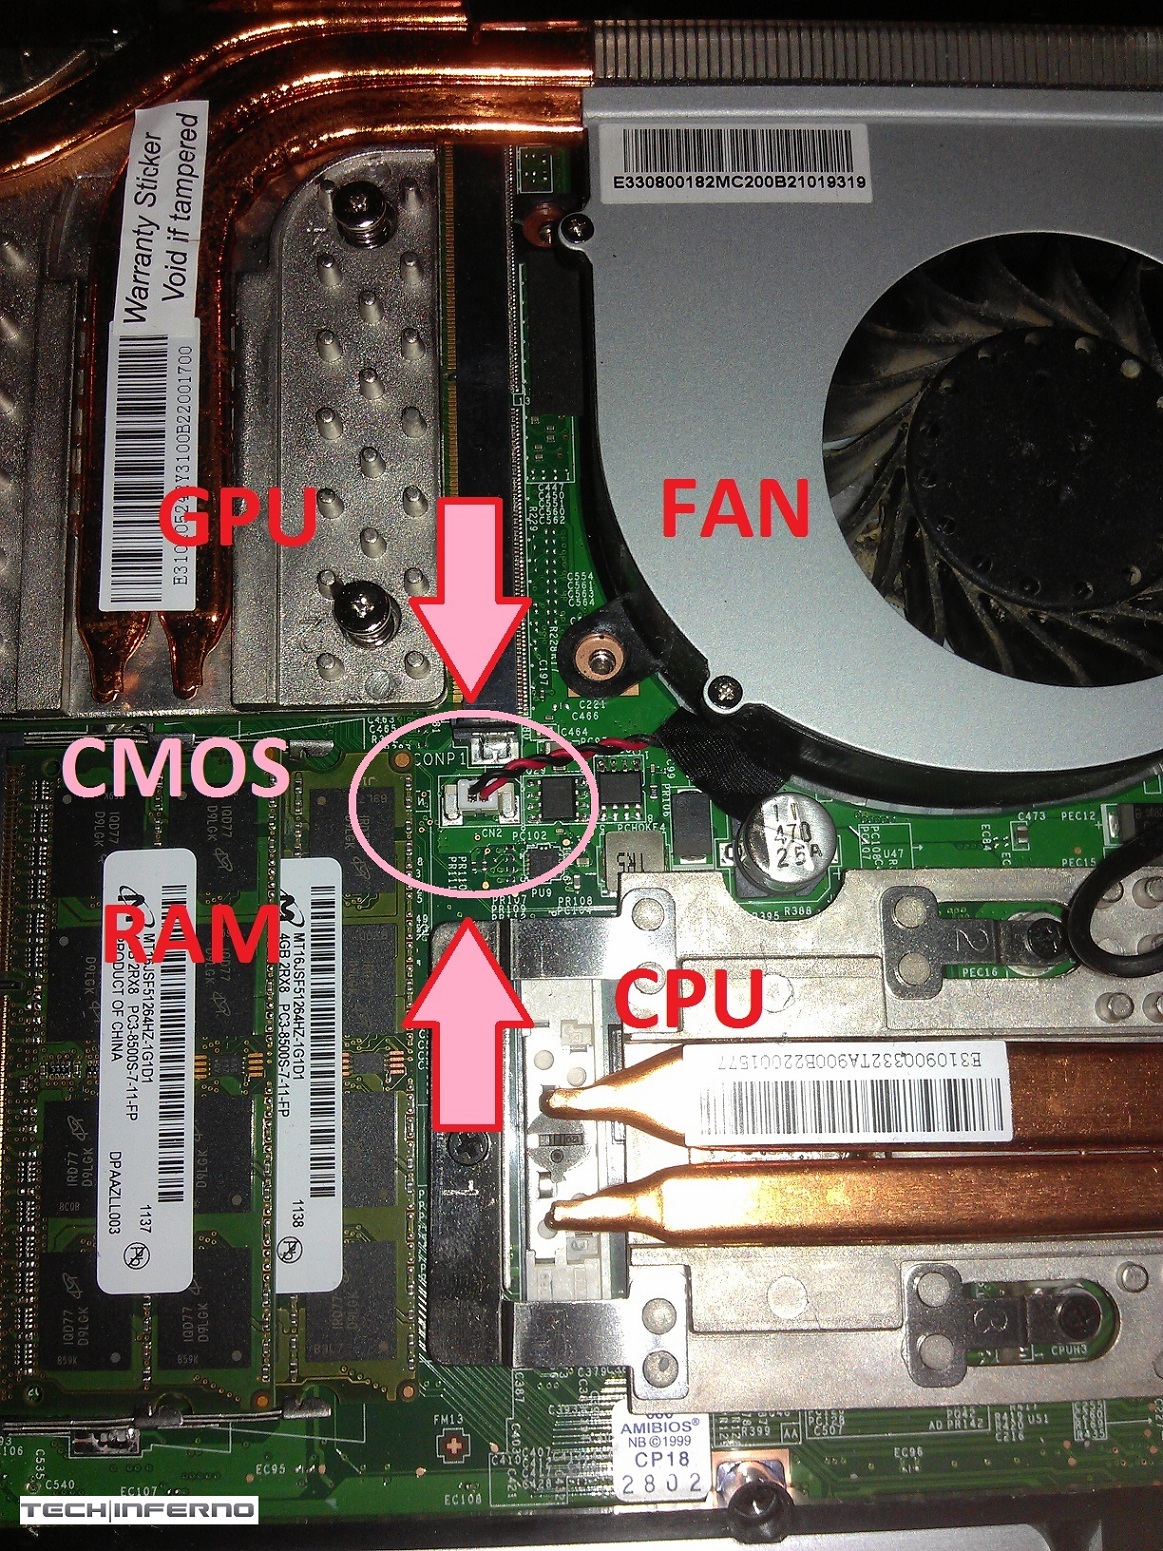
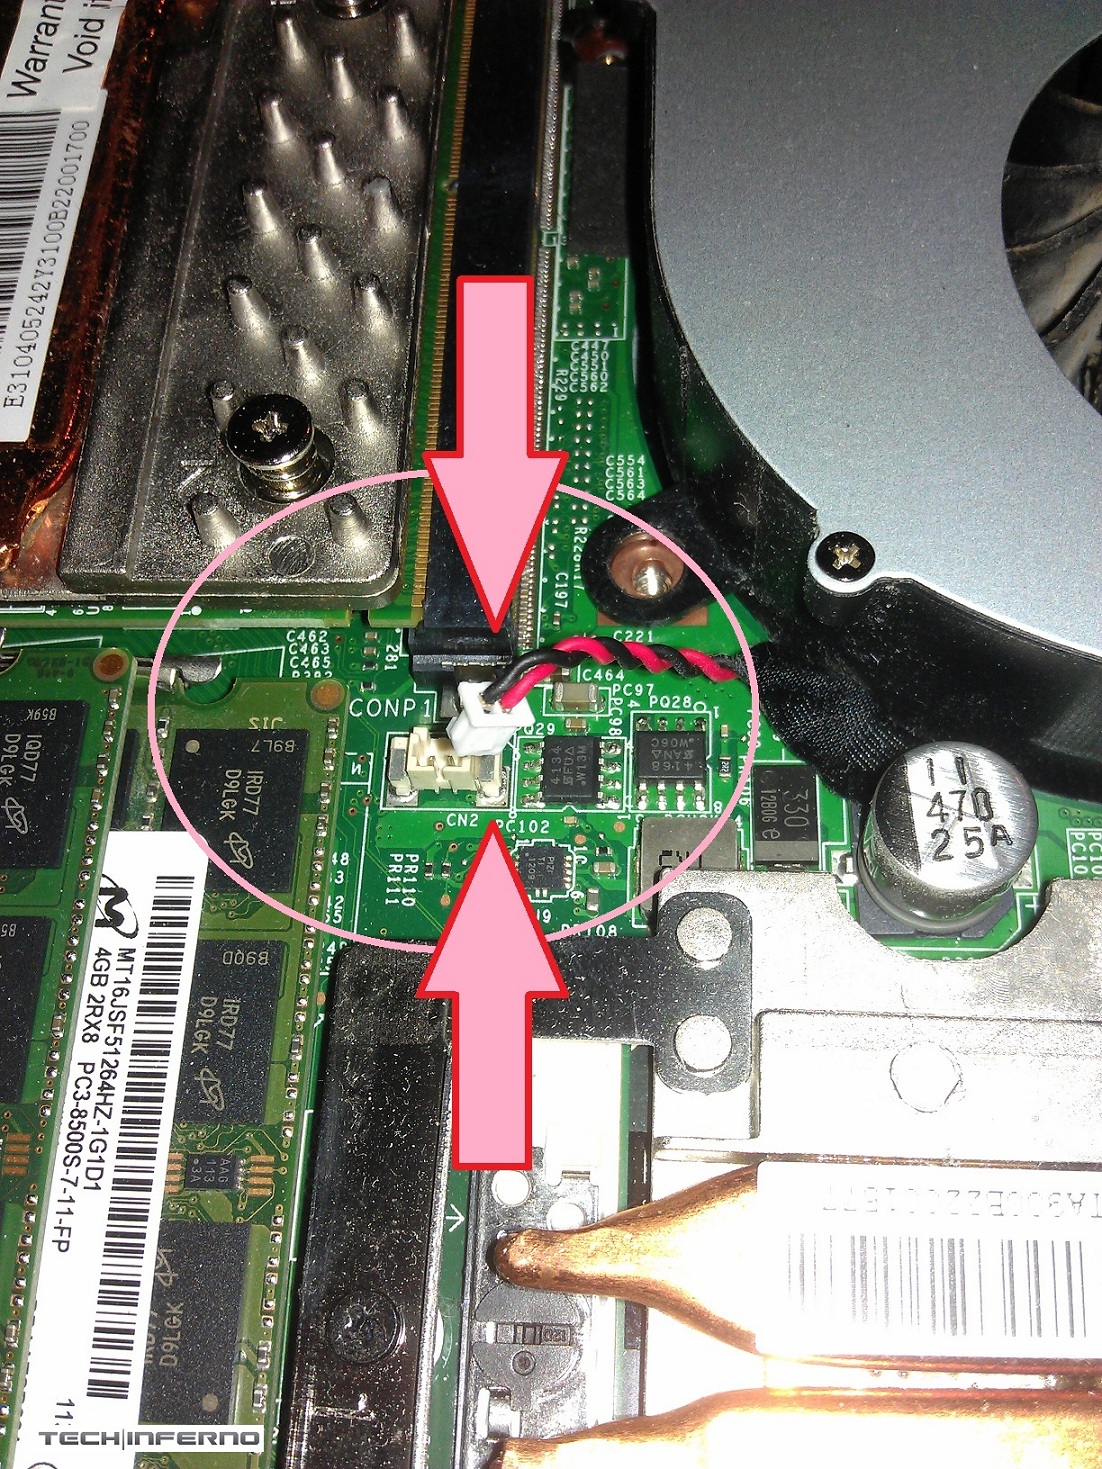
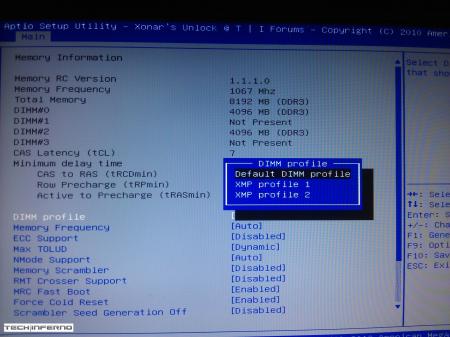
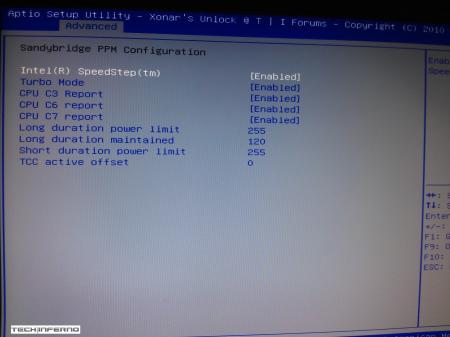
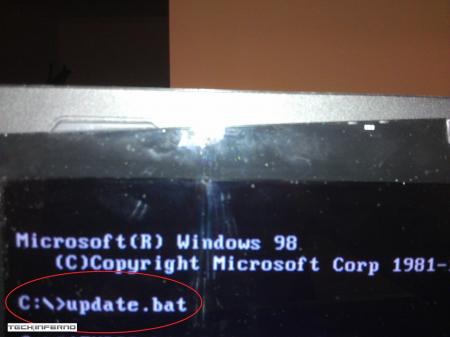
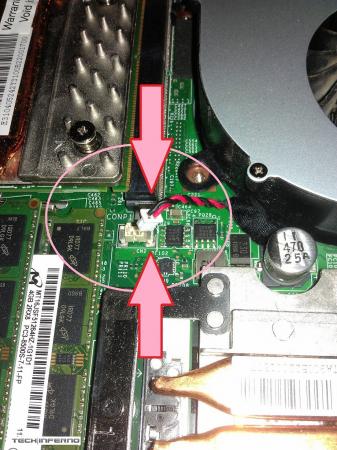
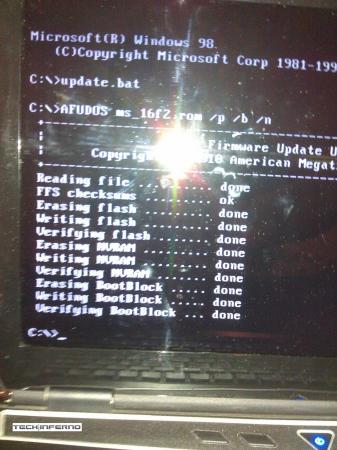
Pictures: Flashing Process: BIOS Options: Resetting CMOS Battery & Clearing the BIOS:


 1 point
 -
Album with desktop/laptop shots No smartarse comments about my cable (mis)management. ImageShack Album - 10 images1 point
-
Instructions for flashing the VBIOS of a NVIDIA video card: You'll need: A VBIOS file you want to flash The latest version of NVflash, a DOS utility to flash the VBIOS of Nvidia cards. A USB drive, formatted to boot DOS, in order to use NVflash How to create a bootable USB flash drive: The flashing procedure: Put the NVflash files to the root of your prepared (DOS bootable) USB drive. Do the same with the Vbios you want to flash. NOTE: DOS has a limit of 8 characters per file name (not counting the extension). So make sure to rename your files appropriately before putting them on the USB drive. Make sure the USB drive is plugged into a port which is active at boot, reboot the system and go to the boot manager. Choose to boot from your prepared USB drive. As soon as you see the command line you're ready to go, write dir and hit enter to display all the files on the USB drive. Display all Nvidia adapters in the system: nvflash -a or alternatively the longer version of the command: nvflash --list This command will return you a list with all Nvidia adapters present in your system. Here's an example output of this command run on my M15x with a 680m in it: NVIDIA Firmware Update Utility (Version 5.117) NVIDIA display adapters present in system: <0> N13E-GTX (10DE,11A0,1028,02A2) H:--:NRM B:02,PCI,D:00,F:00 The number in the <> brackets is the index of the corresponding device. SLI users will have more than one entry and flash each card separately. Backup your current VBIOS: Never forget to keep a backup of your original VBIOS before you flash anything non-stock. Use this command to save a copy of the firmware to your USB drive: nvflash -b filename.rom or with nvflash --save filename.rom Flash the VBIOS to your card(s): For a single card it's really straight forward, you don't need to worry about the adapter indices. Just use this command: nvflash -6 vbiosname.rom -6 will allow you to override mismatches of the PCI subsystem ID. In case of a mismatch you'll need to confirm the flash with 'y'. NOTE: Users with a non-US keyboard might need to press 'z' or similar, because the 'y' isn't at the same location for all keyboard layouts. SLI users will need to flash each card separately. The concept stays the same, but you will need to use the corresponding adapter index to flash a card. How to figure out the adapter nr. is described above. Flashing goes like this: nvflash -i[index] -6 vbios.rom [index] represents a number, namely the index you found with the 'nvflash -a' command. So a command example to flash a card which has index 0 is: 'nvflash -i0 -6 vbios.rom' When the flashing starts, just wait until it says that it's done. Then reboot with Ctrl+Alt+Del and remove your USB drive. Pro tip: Let me know if I missed anything important or if you have questions.-1 points