Leaderboard


Popular Content
Showing content with the highest reputation on 06/10/11 in all areas
-
- Guide by Ike C. Special thanks to Marco R., Brian K. and the rest of the Tech|Inferno community for their support. Also special thanks to NBR.com member Pkhetan for selling me these cards at a great price. So you have an M17x R2, but may secretly want the new M18x with dual AMD Radeon 6970Ms in CrossfireX, yet you’re bummed with the relative reduction of screen quality in the M18x and you’re also not a fan of the big move to 16:9. You really don’t want a bigger chassis and you don’t feel like going through the whole process of throwing down $2500+ on a M18x and selling your beloved M17x-R2 to cover the cost. What do you do? A. Break your piggy bank and buy/lease an M18x or B. Watch in silence as M18x owners have all the fun with those dual 6970Ms? Answer: C. Install two 6970Ms in your All-Powerful M17x-R2. IMPORTANT INFORMATION; Please read the following before continuing with this guide: The Radeon 6970m being installed in the Alienware All-Powerful M17x-R2 is not officially supported by Dell/Alienware and will most likely void the warranty on your system. The 6970m is a powerful card in single and in CrossfireX configurations; it will draw more power and produce more heat than the Mobility 5870 in the respective setups (or any other similar setups). Although the long term effects of the Radeon 6970M single and CrossfireX in the M17x-R2 are currently unknown, these cards will perform significantly better than any equivalent setups offered by Dell/Alienware for this particular system. Although the Alienware All-Powerful M17x-R2 and M17x-R1 are similar by design, their chipsets and BIOS firmware are different. Although I encourage anyone to try this on the M17x-R1 due to the similarities in chassis design with the R2, keep in mind the possibility that results may differ from those when tested in the newer R2. Different types of Radeon 6970M/VBIOSes and their effects on the M17x-R2: • 6970m Engineering Sample from MXM-upgrade.com (Please note that MXM-Upgrade.com now sells OEM 6970Ms now): Originally had display issues with the original VBIOS. This was rectified by reflashing the card to the VBIOS used in the M17x-R3 6970M. Also found out that this specific ES chip had 1120 shaders vs. the 960 shaders the original 6970M is supposed to have. Nonetheless, functionality was no different than the 960 shader (except for increased performance). While flashed, the system fans did NOT respond to temperature and was stuck on one speed. Also, the system would crash when shutting down, in sleep mode, in hibernation mode, or when unplugged from the PSU. • The card Dell uses in the M17x R3: Originally tested by Brian K. Same issues I experienced with the 1120 shader 6970M ES sample when reflashed to Dell VBIOS. • The card Dell uses in the M18x R1/VBIOS from M18x R1: Fixes the fan issue, but does not allow the system to shut down, sleep, hibernate, or remain unplugged without crashing. However, it does support audio over HDMI and DisplayPort. • Clevo (and resellers) 6970m (This is the recommended version and will be used in this guide): There are two versions of these type of cards; the cards meant for single GPU setups (Clevo P150hm, P151hm, P170hm) and the ones meant for Crossfire setups (Clevo X7200, X8100). Both cards look physically the same with the difference being the type of VBIOS they use. Thus, the Clevo cards meant for single GPU setups does NOT support CrossfireX and would need to be reflashed in order to gain that ability. However, both versions allow the system fans to respond to temperature and also allows the system to shut down, sleep, hibernate and go on battery mode without crashing. Both of these also give you access to ATi Overdrive in the Catalyst Control Center. This means that you don’t have to disable ULPS when overclocking in Crossfire mode. Unfortunately, these cards/VBIOSses do NOT support audio over HDMI/DisplayPort (but hopefully this could be fixed with a VBIOS update/mod). • Eurocom 6970M: Issues similar with the Dell 6970M; fans work but still has the sleep/hibernate/battery/shutdown issue. Also, the VBIOS limits you to a 1600x1200 resolution. Please note: You can flash any of Clevo/Eurocom/Reseller 6970Ms to the VBIOS that is recommended for this guide. Once I get confirmation that the Dell/AW 6970M cards are as flexible I will update this post. Things to do before proceeding with this tutorial: • Download the drivers. For this tutorial, I would recommend installing Catalyst 11.5 Mobility (or newer), readily available at AMD’s website. For those looking towards a CrossfireX setup, I would also recommend installing the latest Catalyst Application Profiles (CAP), also available at AMD’s website. • Download GPU-Z and or HWinfo32, both of which allow you to monitor some important information about the cards such as temperature, clock frequencies, voltage, etc. • Prepare a Bootable USB stick. You can refer to Zfactor’s guide on how to do this posted here. • Buy the proper thermal gear. This includes thermal paste and thermal pads. I personally use Tuniq TX-4 for thermal paste, but there are other good alternatives out there. As for thermal pads, anything other than the stock pads or thinner than the stock pads (I recommend using pads that are .5mm thick) are recommended. Be sure to use the stock pads to outline how you want to cut the new thermal pads. You can buy both thermal paste and thermal pads at FrozenCPU.com • Buy electrical tape (for CrossfireX setups only). This is going to be important because we are going to alter the Crossfire cable so that it accommodates the new pair of GPUs in the chassis. • Know what you’re doing. This is probably the most important thing to do because not knowing what you’re doing could change this experience from a great one to a not so great one if your system is rendered useless. So take precautions and please read/know how to disassemble your system before proceeding. Part I: Preparing your system for the upgrade Download and unzip my 6970m VBIOS pack in your Bootable USB stick. Link can be found below this post. Uninstall your current GPU drivers. Turn off and powerdrain your system by removing the power cord and the battery. Then press and hold down the power button for about 10-20 seconds. Disassemble your system until you remove all discrete GPUs from the board (1 GPU for single card setup, 2 GPUs for Crossfire setup). Remove the GPU heatsink(s) from the GPU. Locate the C-clips surrounding the screws that hold the heatsink(s) to the GPU (there should be 4 screws and consequently 4 C-Clips per heatsink). In order to remove the C-clips from the heatsink's retention clip, stick a fine pointed object (i.e. tip of a pointed knife, sharp screwdriver or scissors) between the gaps between the inner ring and the screw the C-clip is mounted on (this area is boxed in red) and try to pop them away from the opening of the C-clip): Legend (looking directly down at the tip of screw with C-Clip): Light Grey = Screw / Dark Grey = C-Clip Remove the screws from the retention bracket Afterwards, your heatsink's retention bracket(s) should look something like this: This is what we want because now you can use any set of screws to hold down the heatsink to the GPU as long as the screw is compatible with the GPU's retention bracket (if this card comes from Clevo, it should come with its own set of screws; we will use these screws to hold the R2 heatsinks to the 6970m(s)). Part II: CF Cable Modification and Card Installation Below is a diagram is how the 6970Ms in Crossfire would look like when installed in the M17x-R2 without modifying the Crossfire (CF) cable. Notice how certain parts of the cable bend out of the system. This will interfere with keyboard replacement, heatsink replacement on the 2nd GPU and it could also distort the Crossfire connectors on the cards. We want to prevent that. First, cut the cable wrapping outlined in red. This will address the cable interfering with the heatsink installation on the 2nd GPU: Before After On the other end of the cable, peel off the clear taping (boxed in red) until the blue mini-cables are exposed. Using a 1-2 inch piece of electrical tape, wrap the tape around the meeting point of the cable head and the mini-cables: While holding the mini-cables at a 90 degree angle (shown in the previous picture), wrap the rest of the bundle using about 4-6 inches of electrical tape (not shown) Connect both GPUs with your new CF cable BEFORE placing the heatsinks. You will not be able to effectively reconnect the CF cable to the cards once the heatsinks are placed on them. If you have thermal pads (presumably already cut out and ready to place), place them accordingly on the heatsinks. For these cards, I recommend using .5mm thick thermal pads; anything thicker would compromise contact between the heatsink and the GPU die. Apply your thermal compound on the respective GPU die. Place AND hold the heatsink with the GPU and fasten the heatsink to the GPU with the provided heatsink screws. For a good lock, rotate each heatsink screw 4 to 5 times, or until the heatsink mount starts to bend slightly. Do this for both GPUs while the CF cable is connected. Once the CF cable and heatsinks are installed, replace both cards accordingly in the system chassis. Be careful when replacing the second/slave GPU because the CF connector will fit tightly at the space where it is supposed to be. Be sure to press on the CF connection firmly so that the CF cable is tucked between that junction. The CF cable will bend a little bit at that junction, which is fine. After lining up the middle part of the CF cable with the chassis, your configuration should look something like this: Note: I used some tape to hold down certain parts of the CF cable that lost some of its original adhesive material. This is optional. Towards the slave end, tuck the taped part of the CF cable (boxed in red) under the small opening next to where the GPU meets the MXM mount: In the other end, contour the newly taped part of the CF cable so that it goes around the small plateau where the CF cable would go under originally: Optional: You can tape that end with additional electrical tape so that it doesn't pop out. However, the keyboard should keep it at bay once placed. At this point, you should be ready to reassemble your system. Part III: VBIOS and Driver Installation Depending on what setup and cards you have, you may need additional modifications to get the 6970Ms to work properly in your system. If you have a single Clevo 6970M (from the P150hm or the X7200) or dual Clevo 6970Ms (from the X7200 only) and you are satisfied with the stock Clevo ATi Overdrive limits (730mhz core, 1000mhz memory), then you just need to install the latest drivers or CAPs from AMD's website. If you do not fall under the aforementioned categories, read on. Before reflashing your VBIOS (if necessary), it is recommended that you save a copy of the original VBIOS of the 6970M you have. You can do this by opening GPU-Z and clicking on the extract VBIOS button (on the extreme right of the "BIOS Version" box in GPU-Z). Save this VBIOS under the 6970m folder we created in your bootable USB drive (save it as something easy to remember and something preferably other than "6970CX0.bin" or "6970CX1.bin"). Afterwards, shut down your computer. Plug in your bootable USB stick containing the ATiFlash utility and the required VBIOS files. Turn on your computer and log on to your boot menu by holding F12. Choose USB/Removable Media when presented the list. Once you are in DOS mode, type in the following command in italics: cd 6970m Afterwards, type in the following commands in italics (wait for confirmation of successful flashing after typing each line): atiflash -f -p 0 6970CX0.bin atiflash -f -p 1 6970CX1.bin (for CF users only) Restart your machine and install the latest AMD Catalyst drivers. If all goes well, you should be able to log on to GPU-Z and/or HWinfo32 to verify that the card(s) are installed properly. For CrossfireX users, make sure that CrossfireX is enabled under GPU-Z. Tips and Precautions: This upgrade is a relatively new upgrade, even though there have been successful upgrades to 6970Ms in other systems such as the Alienware M15x and the MSi GT660R. However, the added power consumption of these cards may require a higher rated power supply than the one provided for the original configuration. In our case, there exists the 330w PSU used in the Alienware M18x. Unfortunately, the M17x-R2 does not recognize the M18x PSU, even though the connector is compatible. Thus, it is not recommended to overclock your 6970Ms in CrossfireX to high levels when paired with a Core i7 Extreme processor with turbo mode on, throttle-stop active or the base clock overclocked using SetFSB. Hopefully, the guys at bios-mods.com can release a BIOS that removes this PSU check so that R2 owners would be able to use this 330w PSU. Because we used the Clevo x7200 VBIOS for the 6970M, we have access to ATi Overdrive, ATi's factory overclocking program. This is great for Crossfire users because you don't have to edit the registry or disable ULPS in order to overclock your cards. This utility can be accessed in the Catalyst Control Center under the Performance tab. You have to click on the key button in order to activate it. Keep in mind that you'll have to overclock both cards individually and although it gives you the option to control fan speed, it doesn't work. Benchmarks and Statistics: System Configuration: Dual AMD Radeon HD 6970M CrossfireX - Core i7 920XM with Turbo mode enabled - 2x2GB Kingston HyperX Intel XMP DDR3 modules - 1920x1200 RGB LED - 250GB 7200rpm HD - Intel Ultimate N 6300 Battery life: 1 hour 3 minutes Average power consumption during gaming: 220 watts GPU idle temperatures: GPU 1 = 48 degrees C / GPU 2 = 44 degrees C GPU web surf/video playback temperatures: GPU 1 = 64 degrees C / GPU 2 = 48 degrees C Maximum stable GPU overclock so far for both GPU: 820mhz Core /1050mhz Memory Stock 3Dmark Vantage run with temperatures: Vantage with GPU clocks at 750/1000 with temperatures (Ambient temperature was 81 degrees F during this run): Vantage with GPU clocks at 820/1050 with temperatures: Stock 3Dmark11 run: 3Dmark11 run with GPU clocks @ 820/1050 (Kill-a-Watt max reading: 278 watts): 20 minute Furmark run with GPU @ stock clocks (Kill-a-Watt average reading: 260 watts): 5 minute Furmark fun with GPU 820/1050 (Kill-a-Watt max average reading: 272 watts): 6970m.zip5 points
-
Old favourite of mine, Aussie guy with a HEAVILY modified and turbocharged Suzuki Hayabusa making 600hp+ to the ground, check out the acceleration when his front wheel drops and he can actually use more than 50% throttle. Note that he only hits full throttle at ~170mph. Big numbers on the speedo are MPH, don't believe the youtube idiots who think it's faked, I've seen this bike at the drags, it does mid 7 second passes. This is it on a solo pass And because I'm in a mood for bike videos, I give you Chris Pfeiffer2 points
-
Let's ban this dangerous dihydrogen monoxide.2 points
-
Hello guys, here is the collection of the Alienware M18X videos i made, i hope you will enjoy it M18X General Overview M18X Noise Level Test M18X HDMI-IN Test with a PS3 M18X Heaven Unigine Benchmark everything Extreme M18X Heaven Unigine Benchmark Standard Settings M18X CPU Heavy Rendering Test with Vue9 M18X The Witcher 2 first video M18X The Witcher 2 second video M18X The Witcher 2 third video M18X Crysis 2 Test M18X Melting the CPU M18X Melting the GPU M18X Overclocking guide for 6970M Crossfire M18X The Witcher 2 with 6970M CrossfireOverclocked1 point
-
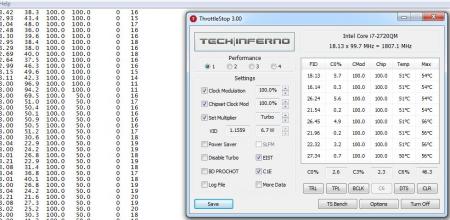
ok check the boxes like i have it, and make sure the set multi is set to the highest it can go. now test with your game to see if it helps.
 1 point
 -
Dont know if we have any Nightwish Fans here. I love them... Some refuse to acknowledge the new (4 yours later) lead singer but I love Annette. She's awesome in my book. http://www.youtube.com/watch?v=Z9MsW1b0QAA I present.. for your viewing pleasure... Amaranth1 point
-
As many would probably say, "You get what you pay for". I certainly go by that phrase a lot, and doing the change from the M14x to a Sager could mean some sacrifices you may regret having a bit more into the future. In my opinion the build quality of the Sager doesn't look as good as the Alienware either.1 point
-
Hmmmm.... 50/50 on that. Great clip, and I sometimes love Will Ferrell (Old school FTW!), but I have to be in the right mood. Even then, I'm sometimes sitting there wondering what's supposed to be so funny. "You won't go down 'cos my dick can float"1 point
-
Japzt- Look forward to some pics of the black. They are describing it as "gun metal" and should look awsome. The more light angles the better.1 point
-
Laptop is arriving today guys! Will make some pictures of the black one for the forum:)1 point
-
Thanks so much man, i am going to make more videos of course so the page will be in constant editing mode. If anyone as any requests for a special video you are welcome, this is how all of this started on youtube: users were requesting videos and i made them. Because of my job i get Ubisoft games easily so if you want to see any Ubisoft game performing on the Alienware M18X feel free to request it and i will make the video. If you have also a request for any non Ubisoft game feel free anyway to ask, i could buy it to show it to you anyway depending on the mood of the day For everything else, there is Mastercard.1 point
-
Holy crap! +rep! EDIT: Just saw it's your first post, Welcome to T|I - what an epic debut.1 point
-
No wonder we haven't seen you around much ever since you got the M18x!1 point
-
Cool listening to my Optimus headphones myself... maybe you should post some of that trance music in the "what music are you listening to?" thread. Glad to hear things sound amazing and work amazing on the M18x.1 point
-
Good to hear! My M18X is in production for 2 days now1 point