Leaderboard


Popular Content
Showing content with the highest reputation on 06/06/11 in all areas
-
Usually i mod my Alienware's to make them unique but in the case of the M18X is not much i can do because i love the Gunmetal" color so the only thing i tough would be good and protect the machine was this carbon fiber vinyl over the palmrest I didn't realize how good it feels and look until i install it makes the palmrest a lot better than the stock because is not sticky and there is no more fingerprints all over the place also protect the finish what i think is really important for a lot of people3 points
-
This is typical China - make cheap copies and pass it off as the real thing. I'm not surprised they faked a space walk to fool their 1 billion strong minions into thinking China is some superpower. The country is awesome for its cheap labor and factories but that's about it. Maybe one day the people there will see what a scam the Communist party is and overthrow them so they have some real freedom and decision making at their disposal--only then will China really grow.3 points
-
Yup i hate to be the bad news bear. Also the wirless display transmitter is also back order2 points
-
Hi all, So yeah, this faint hissing that some people get with their laptop, sometimes even a slight crackle occasionally, has proven to be annoying to me with wearing headphones. You hear this sound usually when nothing is playing, yet some devices are capable of not producing this background noise. Anyway, this post will hopefully help you: - Fix the problem - Download possibly newer Realtek drivers (this post is oriented towards the ALC665 audio) Driver date: 2011/6/3, assuming that's year/month/day then that's newer than the Dell driver I believe. I noticed a big difference when I went to the Playback Devices and disabled all enhancements there. Anyway... 1) Get the latest, and possibly newest Realtek audio driver if you're using ALC665, from Realtek. 2) Go to the Control Panel, Sounds, Playback Devices, Properties of your sound device listed there, Enhancements tab, and then check the 'Disable all enhancements' checkbox. Reboot if necessary and hopefully your hissing won't exist anymore, mine doesn't at least. Hope this helps. If you try this then please post feedback, if it has helped somewhat, completely, or not at all. I might have just been lucky. Remember the above is at your own risk. I discovered after disabling all enhancements that re-enabling them doesn't seem to work, unless I have to reboot which is probable. Either that or reinstall the driver.2 points
-
I don't think so if you use a hair dryer and slowly remove the film if some leftover adhesive is left you can use rubbing alcohol PD: in the worst case you can call DELL and tell them your touch pad stop working2 points
-
Ok, so awesome news: I just received two 6970Ms to test Crossfire. I haven't done that yet because of even more awesome news: The 6970M I received (bought from NBR member pkhetan who gets them directly from Clevo) apparently works with the fan and sleep issue fixed! I'm still testing everything out but yeah...fan spools up accordingly to temperature with no help from hwinfo (though I'm still going to use it) and when I close the lid and remove the PSU, the system doesn't freeze. BTW, these cards are for the P150HM. This basically means (unless I did something strange) that a single 6970M in a M17x R2 is a go! Edit: Here's a picture of one of the cards: And also, audio over DP/HDMI doesn't work with the original Clevo BIOS. To fix this, you'll have to flash the card with the M18X 6970M VBIOS, which is posted on the M18x section (thanks to Brian). However, using the M18X BIOS doesn't fix the sleep/shutdown issue (system will crash if you close lid and will hang up if you try to shut down).2 points
-
Thanks Steve, I wouldn't touch the i5 either. Granted I don't know what some of those settings are or just dont know the initals but as hard as I will game (not to hardcore and super fine images in game don't faze me) I will put it though some major workouts with my artwork and using to rip and convert digital movies. As for $$$ I will have @ least a nice $3,000 laptop budget. Shoot I am looking at a 500GB SSD and they run almost 1k. My last online config was $1768 of the m14 and I would have no issue spendin that. I do know its about 1-2months away and I can't wait to stop typing on a 7" tablet screen. The only hing that will suck is I am about 6 years behind in the FPS game world right now but that will change soon enough.2 points
-
I'd also like to test 470Ms after I get my 6970Ms in Crossfire (tomorrow hopefully).2 points
-
I posted this in NBR but I wanted to share the love here as well. It benefited me a lot since I don't have a need for an optical drive and my SSD is only 80 GB. This is the optical bay I bought... SATA Hard Drive Caddy Bay Macbook PRO 13" Unibody A1278 - eBay (item 260760330830 end time May-28-11 02:09:19 PDT) You do not have to buy the same optical HDD caddy but it does have to be 9.5mm in height. Anything bigger will not fit. Do this at your own risk. I take no responsibility for any mishaps you encounter along the way. Before you do this, install your SSD as you would normally, and install windows from the DVD with the optical disc drive still in the M14x. IF NOT THEN YOUR COMPUTER WILL BOOT FROM THE HARD DRIVE YOU HAVE WINDOWS OS ON REGARDLESS WHICH SATA SLOT IT IS IN. Step 1. Optical Bay I Purchase from eBay Step 2. Opening the bottom panel Step 3. This is the DVD optical disc bay that comes in the M14x Step 4. Removal of screws. (GO TO STEP 5 BEFORE REMOVING STRIP) Step 5. Careful removal of the SATA strip Step 6. Optical disc bay vs Optical HDD bay Step 7. How to remove the SATA strip from optical disc bay Step 8. The SATA strip Step 9. Removing the caddy from the optical disc drive Step 10. Attaching the strip on the optical HDD bay exaclty as it was on the optical disc bay. Step 11. The optical HDD bay with strip attached. Step 12. The gap filler provided with the optical bay. It's to fill the space between the HDD and the optical HDD bay. Step 13. What the gap filler looks like with the HDD in the optical HDD bay Step 14. Removal of black panel form optical HDD bay. * must be removed for it to fit inside the M14x * Step 15. Optical HDD bay with black panel removed. Step 16. Placement of optical HDD bay inside M14x Step 17. Drivers automatically installed. Step 18. Computer detecting secondary hard drive Step 19. HWinfo with the both the SSD the HDD in the info (Sata II 3Gb/s) I will fix it up and add any additional pictures if needed as time goes on. If you don't like the guide, please don't criticize. This is for the visual people out there who need help and want to enjoy the additional hard drive. If you have any questions, please feel free to ask1 point
-
Finally some takedown pics. This was provided by SmoothJ at NBR. RAM Upgrade - M18x (with pics)1 point
-
Found this on Slashdot, holy crap! Cheap GPUs are rendering strong passwords useless | ZDNet But I guess we can still get away with longer passwords...1 point
-
Original footage from CCTV is unedited, showing bubbles, verbal slips, and other evidence that China's launch into outer space was a fraud. It was filmed in a pool, a neutral buoyancy laboratory. A well-documented fact is that China PUBLISHED TRANSCRIPTS OF THE SPACE WALK HOURS BEFORE IT SUPPOSEDLY HAPPENED. NASA Scientist Confirms With New Evidence That China's Space Voyage Was A Fraud WTF??1 point
-
I will like to ad these, it seems it is possible to respow to a new smaller SDD driver Avoid System Image Restore Failures The error message "The system image restore failed. 0x80042403" will usually generate a large dialog box with several suggestions to resolve the problem, but Microsoft's syntax leaves even the most experienced technician confused. The solution is really quite simple: the destination drive is of a lower capacity than the image's source drive. You will either need to provide a larger destination drive, or shrink the volume partitions prior to creating the restore image. clik avobe1 point
-
Ok I call myself a pc gamer or at least I was, back when I played it was all about the frame rate and not about the max settings. Now it seems its all about having the game graphics extreme and settling for playable fps. Is this the way it is now?? If it is and people are getting playable fps with the highest settings that means I should get great to extreme fps with having my game graphics set to low-medium. For example a game most people should know Unreal Tournament. I would use the lowest game graphics settings and still keep it nice looking to achive 70+ fps but it seems if this game was new today everyone here would want high level game graphics and settle for 30-50 fps which seems a little strange to me or I am just getting old.1 point
-
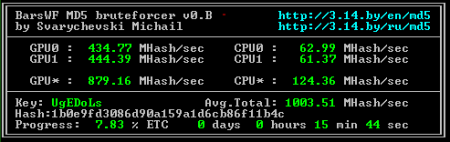
I used the program from the site listed below back in the days where I had my R1 with dual GTX 280M to find passwords from MD5 hashes World Fastest MD5 cracker BarsWF : Svarychevski Michail Aleksandrovich
 1 point
 -
Didn't want to start a new thread but was just on dells order page and they have changed a lot now that they have the i5 avail. seems I will have to make the order over the phone since I want to make changes they don't have options for and who knows what they will be when I order. I even looked at one comfig and the only ram options were 6 or 8. I hope things improve on the site as I totally hate ordering things by phone can't stand sales people trying to sell me stuff I don't want or need.1 point
-
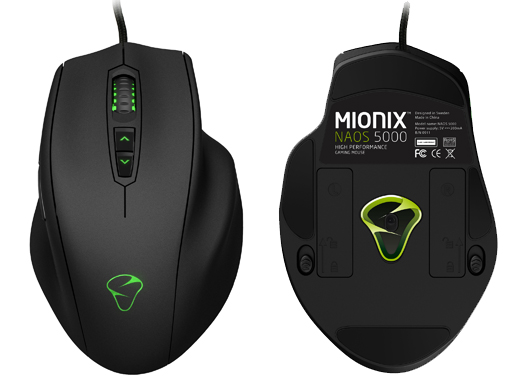
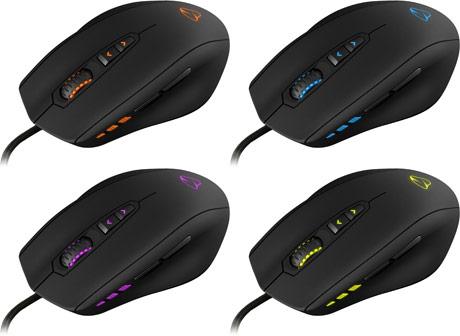
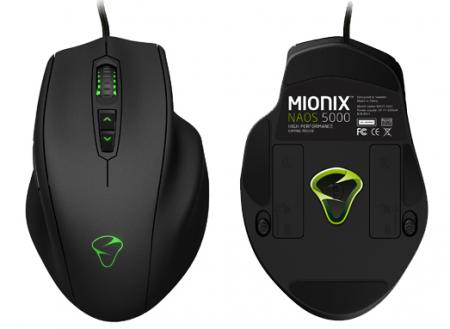
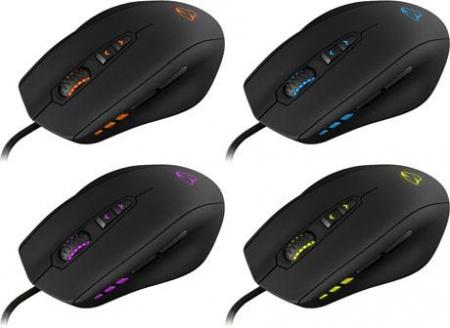
Another one: Mionix NAOS 5000 7 Buttons USB Laser 5040 dpi Mouse (LED lights are customizable to your liking) $79.99 on Newegg A passioned hunt for perfection has come to an end. Mionix Naos 5000 has seen its first light of day. Get ready to meet a gaming mouse with an incredible ergonomic comfort and stunning technology that offers an outstanding gaming experience. Mionix Naos 5000 features a new innovative weight tuning system for an optimal weight distribution of the mouse, carefully selected high-end components and leading laser technology. Stunning features such as adjustable lift-distance, 5 onboard profiles, extensive macro settings and customizable LED-lights give you the opportunity to customize the mouse exactly to your liking. Mionix Naos 5000 specifications: • Truly ergonomic design • Grip friendly rubber coating • 7 buttons (7 programmable) • 3 steps in-game dpi adjustment • Configurable dpi up to 5040 dpi • 6 integrated LEDs • Adjustable Polling rate • Large Teflon feets • Balanced weight tuning system (up to 40 grams) • Net Weight: 106 gr • Full speed USB 2.0 with Plug n Play • Cable length: 2 m (braided for durability) Naos Laser sensor specifications: • 5040 dpi gaming laser sensor • SQAT - Surface Quality Analyzer Tool • Adjustable lift distance • 1 ms response time • 12 000 frames / sec • Tracking speed: 5.1 m / sec (200 ips) • 10.6 megapixels / sec image processing • Acceleration: 30 g • 40 000 Hz sampling rate • True 16-bit data path
 1 point
 -
You may have heard a lot of talk about Solid State Drives (SSDs) recently. In the last six months or so they’ve really taken the mid-range to high end computing world by storm. If a manufacturer decides to include a solid state drive in their computer, they’ll make sure that you know it’s there. But what are they? Find out in Hard Drive of the Future: Your Guide to Solid State Drives. This guide, from Lachlan Roy, outlines everything you need to know about the future of storage technology. You’ll learn their history and what to look for when shopping for one. Remember: if you own a flash drive, you own a solid state drive. Soon all computers will use the exact same technology for internal drives. This amazing guide explains: The history of solid state drives Kinds of SSDs on the market How SSDs compare to conventional drives Whether you should buy an SSD Things to look out for when shopping. DOWNLOAD Hard Drive Of The Future: Your Guide To Solid State Drives (free PDF)1 point
-
I'm not sure how it works for vBulletin. I just used a regular MD5 hash generator online, and here's how fast it found a password "ti17ftw" BRB, I think I have to go change my passwords lol.....1 point
-
Less than a week before I'm ready to order one in red with wireless transmitter?? Please keep us updated with any news you hear.1 point
-
A new Catalyst version leaked somehow, 8.86 beta, maybe it's an early version of 11.6. Seems to fix some things and also improves performance according to some benchmarks. Here you can find the download links. Thanks goes to The @Revelator for spotting this.1 point
-
One benchmark that is affected by the timings of RAM (the tighter the better) is winrar. Download Winrar then go to tools -> Benchmark and hardware test. Try it stock first and then play with the timings (BCLK will greatly affect the performance of this benchmark as well)1 point
-
@Jimbo LOL yeah I know, if you break it to: sta - ma' - tis is easier... Indeed, protecting the SSD from excessive wear and tear is a good practice but I wouldn't be so worried about it... I mean you will probably have it replaced before it starts having problems. Checking SMART attributes once in a while will definitely help you detect potential failure of the SSD and protect you from a possible loss of data. For me it is more important to have an SSD with a reliable controller rather reliable NANDs, if NANDs start failing you can restore a big percentage of your data and have enough time to make a backup, if the controller fails though just paint it blue and throw it in the sea...1 point
-
I found a nice and complete review about a lot of TIM brands, Thermal Pastes Compared, TIM Application Methods, Application on HDT Coolers, Thermally Conductive Element Reference...and more 80-way Thermal Interface Material Performance Test1 point
-
PCFx 0.5 released, changes include: + Added integrated support for reading sensor data without depending on third party programs. + Added support for status lights. + Added a 64-bit version in addition to the 32-bit version of PCFx. * Changed temperature gradient to have a minimum low of 1C and a maximum high of 100C, colour depending on what the current temperature is of course. Previously this was low of 40C and high of 100C. * Changed GUI width to be wider, to allow for wider dropdown boxes due to the longer texts in them now. * Changed delay between updates from 200ms to 300ms, some hardware limitations made issues from too fast updates. - Removed dependency on CoreTemp for sensor data.1 point
-
First I want to say sorry because I wasn't able to post some in game videos of dirt3 yet. Time isn't on my side but I will post them on the weekend... As an old liquid nitrogen overclocker I want to say something: CPU's (intel) are build for temps around 74 degrees under load. Everything above will damage the cpu and result in slowing down processes. In my opinion the m14x has a really strong (and loud) fan. I never had temps over 71 degrees. alienware should remove the bios lock of the nv gpu so it will be possible to clock over 800 on the core... you can raise the core over that mark. But you never get more than 800 because vof its oc protection. Also they should allow to give the nv gpu a little bit of extra voltage. The gpu isn't on its limit... its far away from that... The next thing is the so called overclocking tab in bios... cmon guys... 3 MHz extra on the bus resulting in 40 MHz cpu speed... that's really a shame... There is so much power in that laptop and we are not able to use it in games...1 point
-
Thanks, I'll investigate a bit more in this, hope I can solve it. I'll let you know in case I make some effort.1 point
-
dam really wish i can help with the oc problem, but out of my league on this one.1 point
-
Even 470M works now? Wow, I guess there's a lot of incentive there for people to just grab a cheap outlet M15x + 6970M or 470M vs R3. Thanks for the guide svl7 and great job in figuring it out! +rep.1 point
-
Hmm... I tried to overclock the 470m now for some hours, so far I managed to raise VRAM and shader clocks, but not the core clock. I'm not sure what's causing this. The only program I was able to at least change the vram and shaders was Nvidia Inspector. That's probably because it allows me to choose the performance profile. Like I mentioned in the guide, I had to use the "lower 3d clocks" profile as the normal 3d clock profile, somehow the standard high performance profile stays unnoticed by the system. I thought I'd at least be able to OC the card per vbios mod... but no, the core stays at 540 MHz. Memory and shaders change work, even the voltage increase from 0.94V to 0.99V worked, but the core just stays where it is. If anyone has some idea or advice please let me know. Flashed my card about 10 times with different OC settings without success so far. I'm sure this can somehow be fixed, but I don't know the function of every number in the "Fermi Clocks" tool from nibitor and haven't found the info I'm looking for so far. What bothers me most is that the core slider is greyed out in Nvidia Inspector... why?1 point
-
So, basically ... this is the working caddy? There were few other folks around who had some issues doing this. Great guide, btw.1 point
-
Cool! awesome. Now I have to do this on my m14x and possibly get a sata to USB adapter to make the slot load drive portable? heheh1 point