Leaderboard


Popular Content
Showing content with the highest reputation on 03/12/11 in all areas
-
Ok guys at the request of a few people I'm doing a guide with pics on how to repaste your R3 and the results I got from doing so. First off keep in mind a few things: -Repasting is risky, if you don't know what you're doing you could harm your components which invalidates your warranty. Now as long as you have some technical skill and go slow you should be fine but as always I take NO RESPONSIBILITY if you damage your hardware. If you have a question ask it before proceeding to prevent damage. -Some of the steps below may be slightly different depending on what GPU you have, all of the CPU's will be the same however. -The temps I was getting and that most have reported with the Nvidia GTX 460m are very good even with stock paste, if you're not going to be benchmarking or applying heavy overclocks you don't need to do this unless you have experience and want the lower temps. Now that that's out of the way let's get on to the fun stuff Here are the items you'll need: -Paste: I recommend MX-4, TX-4, or OCZ Freeze. I used MX-4 in this guide. -Pads: The pads I used are Fujipoly Premium 0.5mm pads that I purchased from frozencpu.com. Depending on if you want to replace all the pads or not you may also need 1.0mm and 2.0mm pads(see below). -Either Arctic Clean -OR- Alcohol(not the drinking kind lol): I used Arctic Clean here but honestly after using both the Arctic Clean is no better and is more expensive than good high purity rubbing alcohol. If you use alcohol get 90% or higher as it cleans better and leaves less residue. -Cotton Swabs and Lint Free Cloth: The cotton swabs need to be quality tightly wound swabs or they'll leave cotton residue, also a good quality lint free cloth that hasn't been used on anything else to prevent residue. -Precision Screwdrivers: I can't stress how important it is to have a good set of precision screwdrivers, a bad set of screwdrivers or using non-precision size screwdrivers can easily strip screws and/or cause damage. If you don't have any you can pick them up at Radio Shack, Home Depot, Lowes, etc. Temps with Stock Paste: Below you can see the temps are very good for stock paste, but good is never enough and the temps could always be better. After running Prime 95 and Furmark at the same time the max CPU temps were 84 degrees and the max GPU temp was 75 degrees. These were at stock clocks on the GPU and a 100.0 BCLK on the CPU. I didn't take idle temps as idle temps are nice to compare, but really they don't matter on a gaming rig. Battery and Bottom Panel: First remove your battery, under it there will be two small screws that need to be removed to slide the bottom panel off. Once the screws are removed slide the panel toward the back of the computer(toward the heatsinks). Now you'll have a view of the internals of the laptop, the CPU and it's heatsink/fan are in yellow, the GPU and it's heatsink/fan are in green. GPU: First remove the screws highlighted in yellow on the fan, also disconnect the fan cable highlighted in green. Once those are disconnected remove the fan by lifting it on the end where the purple arrow is pointing then sliding it out. Once the fan is out you can remove the heatsink, the screws for the heatsink are circled in red. By each screw there will be a number, it's important to remove the screws in this order 4 - 3 - 2 - 1 by backing them out in small increments(1/4-1/2 turn) then moving to the next until they are all the way out to prevent bending/warping the heatsink. Once you have done this lift the heatsink on the same end as the fan carefully and pull the heatsink out. Once you get the heatsink off you'll see a bunch of funky colored pads on the heatsink, and a whole ton of gray molasses looking junk that Dell calls thermal paste on the heatsink and GPU core You'll need to remove the "paste" by placing a few drops of either alcohol or step 1 of the Arctic Clean on the paste on the heatsink and gpu core, be careful to get it on only the old paste as making a huge mess of the paste or cleaner can cause problems also avoid getting any on the pads as well. Allow the cleaner to soak for a minute or two then use the cotton swabs to wipe it off carefully, you'll likely have to repeat this multiple times until the swabs no longer have any gray/black color to them. If you are using Arctic Clean once you have a clean surface apply step 2, let it soak and wipe it clean. Once cleaned your gpu core and heatsink should look something like this: Now you'll need to cut and replace the pads, I used only .5mm pads and all of them will go directly on the heatsink and are gray colored in the picture. The only pad I didn't remove from the heatsink is the purple one outlined in the picture because it's in the 2-3mm thick range and seems to work just fine based on the results. Now the one thing that threw me for a loop were the pads on the backside of the card, yes underneath it. The pads underneath work just fine as I reused them so unless you're more experienced you can skip to the next step. There is a large, approximately 2mm thick pad that has a rubbery texture between the mobo and one bank of the Vram, there is also pads between part of the backing plate and the other bank of Vram. I really have to wonder what on earth Dell was thinking here especially on the Vram under the backing plate. Feel free to replace them if you want, I just left them there not wanting to mess with the backing plate and not having 2mm pads. Now that everything is cleaned and in place you need to apply the thermal paste to the GPU core. I used slightly more than a half of a grain of rice worth of paste right in the center of the core, once the heatsink is reapplied give it a slight(a few degrees is all you need) rotation and screw the heatsink down in the reverse method as you used to remove it. Then install the fan again and the GPU is done! :D CPU: Again the first step is to remove the fan by removing the screws in yellow. Then pull the cable in green and lift the fan on the end near the purple arrow to slide it out. Once the fan is out loosen the screws in red in the 4 - 3 - 2 - 1 order(1/4-1/2 turn each at a time) and lift the heatsink on the end near the arrow to slide the heatsink up and out. The pictures of the heatsink and CPU show more of what kind of mess you're in for that our good friends Dell have left behind. Apply the thermal material cleaner, let it soak, and wipe it off with the swabs. Repeat if necessary until the swabs are no longer gray/black. Again if you're using Arctic Clean apply step 2 now, let it soak, then wipe it clean. Once you're finished it will look something like this: Now that it's all clean you'll need to apply your thermal paste to the CPU. I used a line slightly thinner than a grain of rice, in the center of the CPU about 1/3-1/2 the length of the CPU. Once your paste is applied put the heatsink back on, give it a very very slight turn(again a few degrees), and retighten the screws in the opposite direction as what you took them off. 1 - 2 - 3 - 4 in very small increments(1/4-1/2 turn each) until tightened again. With the CPU try to have it as level as possible as if it's not flush with the CPU you may have to try again to achieve improved temps. Once you're done with that re-install the CPU fan, bottom panel, and battery and you're done. Here are my temps after repasting with both Furmark and Prime95 running simultaneously for 33 mins. You'll see the max temp of the CPU dropped to 74 degrees, an improvement of 10 degrees. The max temps of the GPU dropped to 67 degrees, an improvement of 8 degrees. As always if you have any questions or want to see anything else like: guides, synthetic or game benchmarks, etc just shoot me a PM or post something and I'll get it up.3 points
-
I've decided that it's time to open my beast after i've noticed that one of my 4870's memory climbed above 93 degrees while playing Mass Effect. The idea behind photographing the process is to allow a better perspective than what the service manual gives. What was done? Cleaning the fins on both video cards heatsinks with compressed air Replacing thermal paste on both GPUs and the CPU to Shin Etsu G751 Replacing memory thermal pads on both GPUs from crappy stock ones to those Modding the retention clip as described here. All Credit goes to Ashtefere please rep him for that, he deserves it! Tools used small Phillips screwdriver - it matches all the screws inside your Alienware can of compressed air a small plastic prying tool that Dell once sent me, i used it to pry open the center control cover. Materials used Shin Etsu G751 thermal paste - i bought mine on eBay, but there are a lot of places that sell it. The reason i used it is because according to a lot of reviews this is one of the best performing pastes, only problem is that it's a pain to apply (there are guides for that too ) Thermal pads Step by step (More or less) Ok, here we go. Try to remember the sizes of the screws you are pulling out, and store them somewhere so they don't get lost (i use a vodka shot glass ) Removing the Center control cover i started with placing a towel on my working area to make sure i do not scratch the laptop while i work on it and removed the charger and battery. Unscrew two screws as shown to remove the compartment door. Unscrew the two screws located on both sides of CPU Fan, they are marked as M2.5XL17. Now turn the laptop around and open the screen as far as possible. using the pry tool, or a flat screwdriver, gently pry the control cover up. I found that in my case it's best to start from the right side. Be careful as there's a cable you need to disconnect before you pull it out. EDIT: For those of you who struggle a lot with taking the cover out, make sure you read this mod by Aikimox. Keyboard Unscrew the 5 little screws holding the keyboard and then gently pull it up. lift the keyboard up,disconnect those two cables and remove the it. Video cards. Since both video cards are going to get the same treatment, i'll describe just the master. We are going to pull it out, remove the heatsink, clean it and perform Ashtefere's retention clip mod Keep in mind that it will void your warranty! Remove the bracket. unscrew both screws that hold the video card. Disconnect the CF cable from the card, i used my nails to do it. Note that the location of the CF connector on the second card is under the heatsink and you'll need to remove the heatsink before disconnecting the CF cable there. Now pull the card up from it's outer side to remove it and expose the fan. blow compressed air to clean the heatsink and the fan. Unscrew the 4 screws that hold the heatsink down, following the numeration next to those screws. Now, after unscrewing those screws, the heatsink will probably be still attached to the video card pretty hard. Pry it up gently using the pry tool but make sure to do so where there's no electronic stuff under the tool. This is what you'll see. Next, clean the old thermal paste using alcohol pads, and remove the old thermal pads from the memory. Reapply thermal paste on the video card. I replaced the old thermal pads with with new ones, Ashtefere suggests applying a thick thermal paste on the memory (Shin Etsu would work since it's very thick).. Next, Ash's retention clip mod. I will not repeat him, he explained it beautifully in his guide. This is just to demonstrate how the screw looks like with the washer on it. Follow his guide to reassemble the heatsink on top of the card and return the card to it's place. (Don't forget the crossfire cable). Repeat with the slave card. CPU To access the heatsink of the CPU we will be removing the palmrest and the magnesium cover. With both video cards back in place and screwed in, turn the laptop, and unscrew three screws inside the battery compartment that are marked M2.5XL5 to release the palmrest. With the pry tool pry the palmrest down and then lift it up to remove the little cable that connects the touchpad. Ok, here i forgot to take a number of pictures so I will explain everything on this one. Basically what we're going to do is remove the magnesium cover. before we do that we will need to: disconnect LCD/Wifi/BT cables. They are marked with yellow. Next we will need to open the 10 screws that hold the cover down, those screws are marked with red and with a P letter on the cover itself. Disconnect the Crossfire cable from the master video card so you can pull it out. Finally, after the cover is removed, we'll unscrew those four screws that hold the heatsink down. They are marked with blue Clean the CPU and the heatsink from the old thermal paste with alcohol pads. Next i reapplied Shin Etsu G751 thermal paste on the CPU and replaced the thermal pad on the heatsink with a new one. That's it. Next, reversing the steps i reassembled the whole thing. I had a hard time putting the LCD cable back in place, took me maybe 3 tries before i got it right. Results Those are readings before and after, both after about 30 minutes of playing mass effect 2 so to me this comparison looks valid. Thanks to Ashtefere's mod,replacement of thermal paste and pads to better ones and cleaning the dust I can see about 5-7 degrees temperature drop on the CPU, and i have reason to believe that it'll keep dropping as Shin Etsu has about 3 days settle in time 11-19 degrees GPU temperature drop (!!!) 11-18 degrees GPU DISP/IO temps drop 19-24 degrees GPU /IO temps drop 15-20 degrees Shader temps drop 5 Minutes Furmark run No game warms the GPUs as furmark does, so after running it for 5 minutes and seeing the temperatures stabilize where they did i am very happy overall. EDIT: Additional Resources M17x Service Manual1 point
-
Well we know some places don't allow this kind of discussion but this is Tech|Inferno, not only do we allow it, we encourage it! So I'll start first: M17x-R2 Pros: Dual 5870M is still FASTER than a single 6970M in most cases M17x-R2 RGB LED can't be matched The 920/940xm + TS combo beats a 2820qm and there is no 2920xm for R3 currently. Construction: Aluminum vs Trojan Rubber. 'Nuff said. Unlocked bios by TheWiz and possible GPU upgrades coming ala Crossfire 6970M. Has been around longer and is now a very stable system. You can grab it cheap on the Dell outlet. Better touch panel. IMO looks better than R3. M17x-R2 Cons: Older chipset + CPU architecture No official 6970M love from Dell Slightly heavier M17x-R3 Pros Sandy Bridge + Cougar Point (once it's revised haha) Newer design that may appeal to some. Lighter than R2 and thinner. Soft Touch Rubber 120 Hz 3D display technology Extended battery life thanks to graphics switching tech (optimius + amd manual switching) Low starting price M17x-R3 Cons: Soft touch rubber flakes off - rut roh! It has been reported that the CPU throttles (DaneGRClose can confirm this) No RGB LED No dual card support So there you have it, that's my list and my overall preference goes to the R2. R3 would have been in my sig if it had dual card support despite it's inferior build quality and lack of RGB LED. Don't like my reasons? Well bring it!1 point
-
and 'speculation' as to whether or not the subsequent thread on the M14x would survive over at nbr was just 'officially' validated - thread closed. i take it as a clear indication that sometimes speculative conversation based on historical evidence and tangible facts proves to be reasonable and rationale afterall... with that said, it seems anyone with continued interest in 'speculating' about the M14x are free to do so here: http://forum.techinferno.com/alienware/196-alienware-m14x.html1 point
-
This is a very nice prank http://www.youtube.com/watch?v=2rohN9rpho01 point
-
Soooo who called it??1 point
-
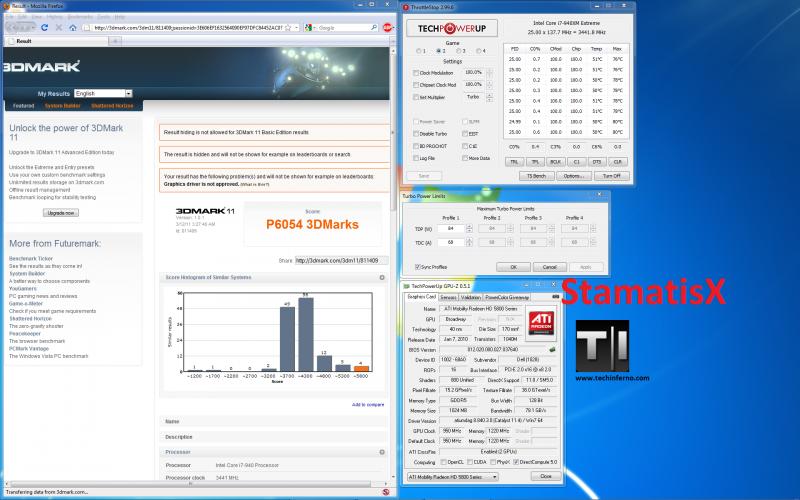
And.... we have a WINNER!!! 3DMark11: http://3dmark.com/3dm11/811409;jsessionid=3E606EF1632564090EF97DFC84452AC0?show_ads=true&page=%2F3dm11%2F811409%3Fkey%3DnDVuMWCkTxpk2TeJca7dpz4fkvYQKZ P6054 (keep in mind I had higher ambient temperature, lower clocks on my GPU than my last run and lower settings on ThrottleStop, ATI drivers 11.4 beta)
 1 point
 -
In here you don't have the right to remain silent1 point
-
I plead the 5th.1 point
-
1 point
-
Remi Gaillard - trust me this guy is unbelievable http://www.youtube.com/watch?v=g45ph_J_Ebc http://www.youtube.com/watch?v=gHCxdlZ7G18 http://www.youtube.com/watch?v=dzOz83ovf-s1 point