toxec
-
Posts
6 -
Joined
-
Last visited
toxec's Achievements
Curious Beginner (1/7)
12
Reputation
-
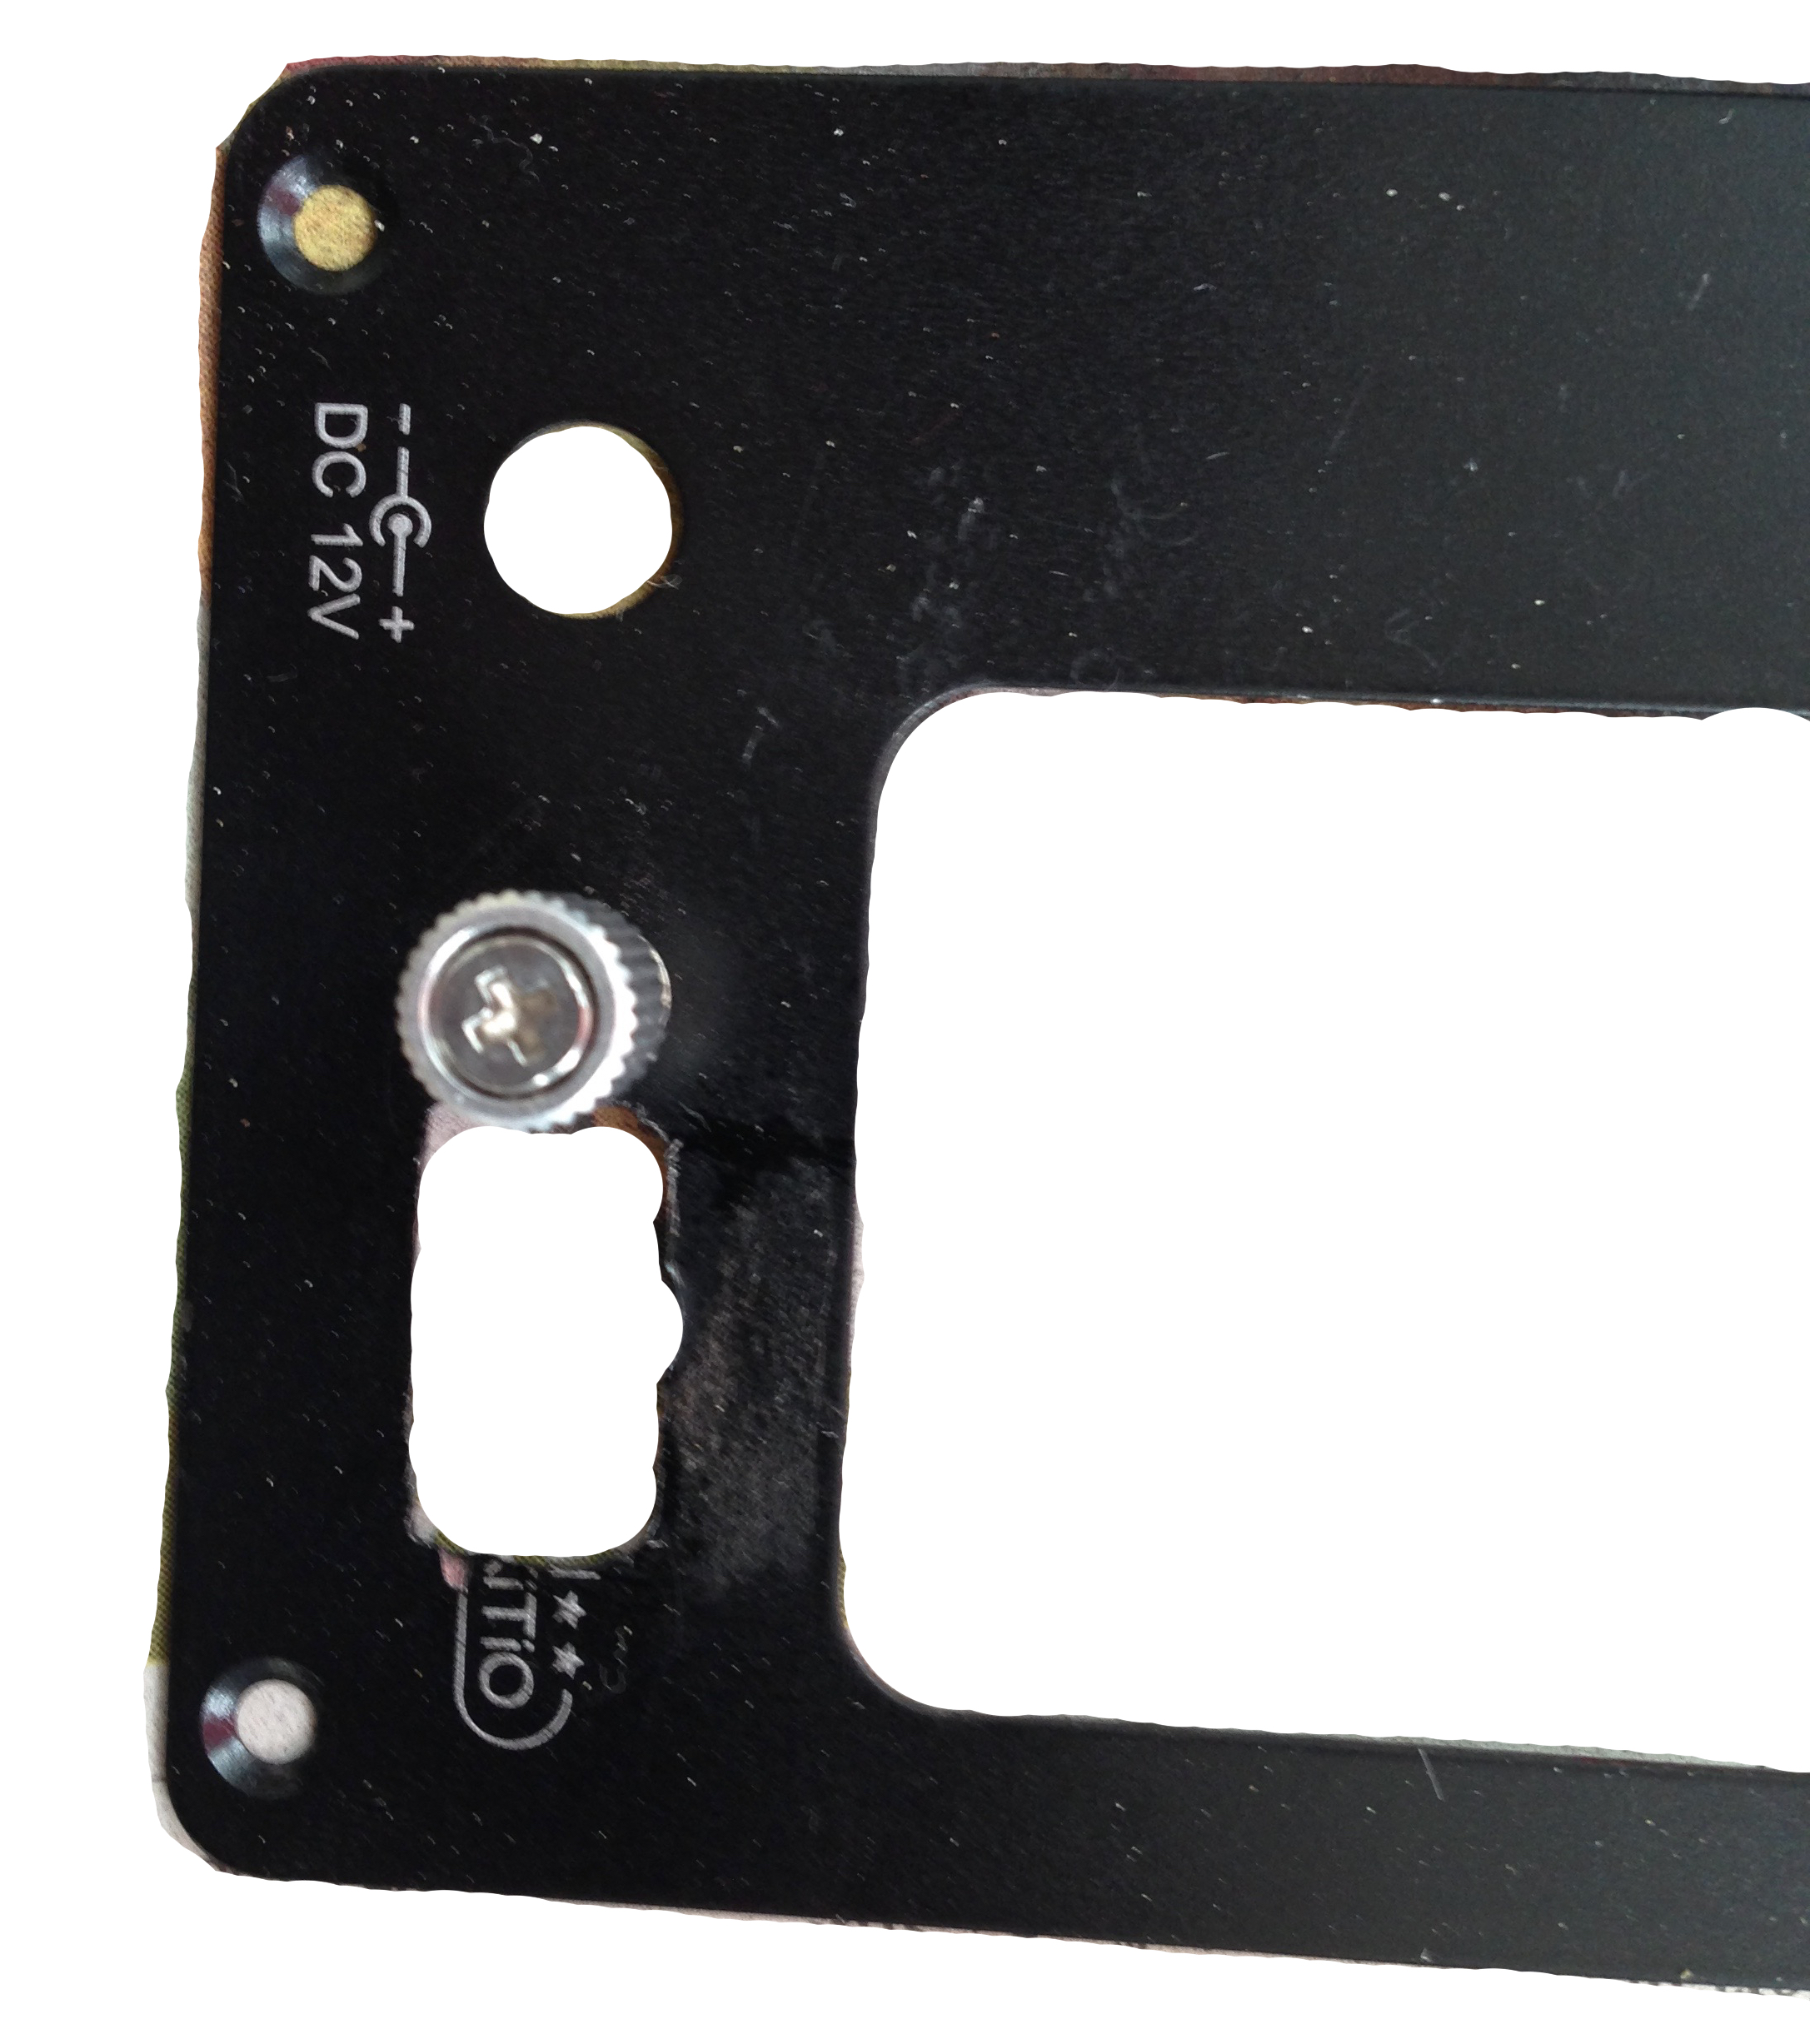
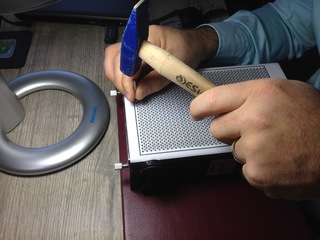
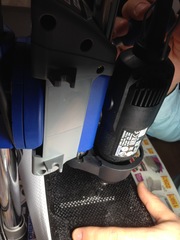
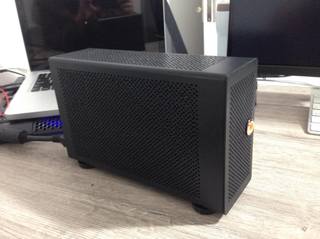
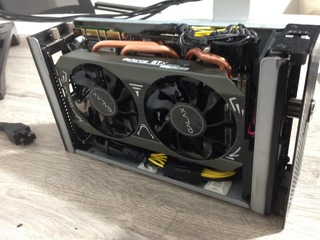
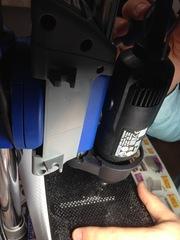
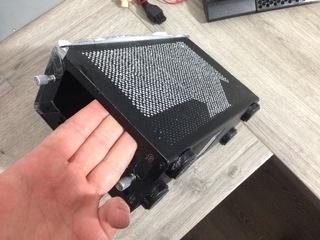
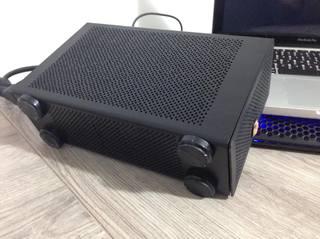
 Currently I have two different akitio thunder 2 setups and one runs with 970 (will be referred as setup 1) and other with 1060 (will be referred as setup 2). 970 uses a more basic cabling setup and it has wire mesh paper tray cut attached. The other one has 8pin male connector replacement for the adapter socket and drilled surface. In this post I would like to do a quick comparison in between those two for cooling and performance. BTW, I am just an amateur who enjoys playing rc toys, completely have an unrelated profession and wanted to build egpu setups as a hobby. Also, I have many macbooks around me and wanted to expand their lifespans increasing their graphical design, gaming and cuda computation capabilities. I could not have gone this far without @Dschijn @Nando @goalque and @seefew s setups and descriptive posts. To start with for sure you will need Akitio thunder 2 or preferably Thunder 3 and also a graphic card. I decided to fit graphics cards in to the boxes in order to carry them around with a camera bag (cheap canon or nikon camera bags are perfect to carry akitio setups and their adapters). My must have tool kit list: 1. Dremel rotary tool (even the cheapest will do the job), dremel work station with. Proxxon and bosch also have similar tools but the key is head should be capable of holding small cutting wheels for hobby crafting. 2. Soldering station capable of at least 350 degrees Celsius (if you are going to replace akitio thunder 2's adaptor socket you would need at least 350 for sure). 3. Heat gun to wrap cable tubes 4. A multimeter to mesure 5. Glue gun 6. Welding kit (if you will cut/expand the front but still make it use the front grill) Consumables: 1. Zip ties 2. Solder wire 3. Glue gun sticks 4. 2.5mm Drill bits (at least 20 for case drilling required) 5. Dremel metal cutting wheels (at least 5) and couple grinding and polishing heads. 6. PSU cables (18 AWG or something like that) Used parts and pieces in my Akitio setups (I have no endorsements or something like that from the brands but I will just write them so you guys can found them easily): 1. Frozencpu connectright 8pin male eps 12v p8 connector ( setup 1) $2.98 2. 4pin male and female connector (to attach capacitors with fashion) $0.55 each 3. Gold plated female and male pins - 4 pack and $0.99 for male and $0.99 for female 4. Mod/smart full pin removal kit (to remove back pin connectors if you will mess the cabling) 5. Full automated ksd9700 series thermal switch to attach to front fans (I preferred 70 degrees) 6. Noctua nf9x14pwm 92 x 14mm pwm fans $21.95 x 2 (you can fit 2 of those beasts and yes they are a game changer) 7. Moddiy.com 8-Pin CPU/EPS Male Header Connector - 90% Angled - Black 1.99 USD (setup 2) you need at least two in order to get couple extra long pin legs 8. Moddiy.com Mini 4-Pin GPU to 2 x 4-Pin PWM Fan Adapter (to connect noctua fans to graphic card's pwm socket to have digital spin controls) $5.99 9. Dell 220w DA-2 Ac Power supply adater $23.99 or Corsair sf450 mini psu $89 (Dell da2 are what I prefer for my setups but for larger graphics cards sf450 is the ideal) 10. 4700mf capacitors (I used 4) $0.8 each 11. 12v swich (I used round led switch for my setup 1 and stick switch for setup 2) $0.4 12. PCI-E 8 PIN Y SPLIT TO 90 DEGREE RIGHT LOW PROFILE PCI-E 6 AND 8 PIN (you can make one by yourself or buy one from ebay) 13. Cheap 60 x15mm fans (I used two of those) $4 Cabling for setup 1, takes around 4 hours to complete (I am going to describe only the difference between other setups posted in the forum): 1. Easiest way around is expanding low profile 8pin connector's cable to somewhere around 15-20 cms in order to make an L shape starting at the top where gpu's power socket rests and take it down to the akitio's power adapter sockets. At this point you can reduce the cables to one yellow and and one black and solder those two to the back of the power socket. Image below is from my setup 2 but it represents where you should solder the yellow and the black. 2. Bend left leg of the graphics card and place a 8 pin male connector and solder each yellow and black cables to get only one of each and solder those two cables to back of the akitio 2's power socket. So in total you would solder 2 sets of cables to the back to power the graphics card and to power the akitio's card using the power coming from the 8 pin connector. If you are using a psu such as corsair sf450 you can use all 4 black and 4 yellow cables to power the board but if you will use dell da2 you should use one for the power switch and other should be blank so only 6 cables will power the card. (this step is extensively described in other posts) 3. Cut back of the two plates in a rectangular 8pin shape using dremel rotary tool and steel cutting wheel. This step just requires attention but it is very easy to do in 3 minutes. Just use a pencil to draw the shape and slowly cut the plate. (image was on top of a document so I did a quick edit) . 4.I used a round led switch for my first setup and attached it to the front of the case. To fit the switch I first created a small hole with a 2.5mm drill bit and expanded that using a round dremel rotary head. Then attached one cable to one of the 8pin connector's line's to power dell da2's switch line and grounded it to one of the 3.4v sockets as the yellow cable at the right hand side of the card. 5. Cover all cables and sockets with tubes, or hot glue gun. Cabling for setup 2 takes around 4 hours to complete: 1. Using the soldering iron remove the existing power socket of the akitio from the board. Heat it from the back legs and it will drop. 2. Organize legs of Moddiy.com 8-Pin CPU/EPS Male Header Connector in order to match the holes. I soldered and grouped legs of 2s to fit only one positive and one neutral leg. 3. Soldered two separate cable lines to the legs to power gpu and attached a Y SPLIT TO 90 DEGREE RIGHT LOW PROFILE PCI-E 6 AND 8 PIN 4. Soldered 4 capacitors to 4pin connectors via cable then attached them to other soldered pair. 5. Soldered one yellow one black cable to the board in order to power front fans and soldered ksd9700 thermal switch to the black cable. 6. Paired two front fans cables with matching cables and soldered to the yellow cable (step6) and empty black cable coming from thermal switch. 7. Cover all cables and sockets with tubes, or hot glue gun. Ventilation for setup 1 takes around 2 hours to complete: 1. Cut the exterior of the box using steel cutting wheels following rectangular shape among yellow and blue sections of the diagram 2. Cut a rectangular mesh grill from the paper holder and slide it in to the box. 3. Stick mesh grill with a epoxy or weld it in. 4. Apply black spray paint (I took it to a auto paint shop for proper painting) Ventilation for setup 2: 1. Cut the front inner side in a rectangular shape to fit to 60mm fans on top of each other. To be able to do so you should weld sides of the front sides so it does not come apart. Place two fans. 2. First hit with a sharp steel to create small holes (punches) following the diagram. Then drill thousands of 2.5mm holes using dremel work station and rotary tool. (This step took my 22 hours) 3. Clean holes with sandpaper and paint. (In the attached image I was using it with the setup 1) Post will be edited soon...
-
- 2
-

-
- akitio
- thunderbolt
- (and 7 more)
-
toxec changed their profile photo
-
2011 Early MBP 13' 750ti randomly restart issue
toxec replied to Xaularis's topic in Apple eGPU discussion
I have two 2011 macbook pros and have two different akitio2 setups and I started to face the same problem with all different configurations. Egpu randomly restarts the machine or sometimes I return to win10 desktop with a gpu driver error message. I am cross testing two akitios currently but interestingly issue occurs randomly. I have run 2 hour stress tests and they haven't failed but when I play games or do graphical rendering, sometimes it instantly restarts but sometimes it takes several hours before any error. Comparing to several months before (I was using them without any issue) I have updated to latest win10 and using nvdia 364. My scenarios: Electric consumption exceeds power supply - I have one 750 ti and one 970 oc. Both have 220 watt da2 and 4x 4700mf capacitors. 750 ti does not have additional power socket. 970 not used to have any electric issues, during stress tests gpu runs at 94% full performance for the duration of the test (no issue recorded). During heaven benchmarks no issue occurred as well.I am testing with 57% less performance. CPU heat restarts macbook - I see temp tops 100 degrees occasionally. Lowering GPU performance reduces overall cpu heat as well. (CPU temp is my second best bet, couldn't reduce it much) Video Driver Failure - This is my best bet, I will downgrade to older drivers to test. I used to work fine with nvidia 350 - 359 series drivers. GPU Cooling- Not an issue for my setups. Both run at max at 60 degrees. Dell da2 socket - I am using 8 pin socket which is soldered to akitio's board. Maybe some of the pins moved back (I assume not). Cabling - No any issue -
I was running my akitio setup with nvidia 970 fine until 10.11.3 but after updating It I started facing problems and haven't found a solution yet (didn't pay much attention too). When I am running it on mac it recognizes it as an external display rather than a graphic card. Under windows It detects 970 and nvidia panel shows as everything works fine. Thus it is computing everything on the integrated gpu. Games do not detect directx and do not start up. Same results with both of my macbooks. I also wonder if anyone knows whats up.
-
@Dschijn I drilled around 3985 2mm holes at the top, bottom and side of the box as @seefew 's grey akitio setup. Drilling only the side increased the inner air pressure and limited air flow. Opening the top and the bottom helped a lot. Now on idle it works around 20-33℃ and on full load it works around 55-72℃. As mentioned above I am using 2X60mm fans in the front and stock 970 fan without overclock. On the other hand I am using a generic 8pin-6pin cable setup with dell adapter. The power switch is connected between a power line and adapter's pin. Thus cables are a bit longer than required (creating around 1-2 microfarad in total) and touching graphic card and board. Therefore I am considering direct soldering to the graphic card's back or at least a minimalist setup as @seefew to have efficient frequency. Thus I do not know whether I should get rid of the power switch. I like how it works but I worry if it charges electricity to the mac's thunderbolt socket when it starts first.(I am not using grounded magsafe so I guess it should be fine either way). I might solder a line between akitio's capacitor and dell adapter's switch pin to benefit 3V coming from mac's thunderbolt socket. Thus I wonder If waking akitio's board and the graphic card with mac's power will have an affect on the booting sequence resulting mac not to start on the external graphic unit.(always on unit is not an option) BTW does anyone tested magma roben 3tx?


-
Hello seefew. I am doing a similar akitio thunder 2 setup using galax 970. I wonder why you have only added 2X 4700 capacitors although you have plenty of space inside. What is your rationale?
-
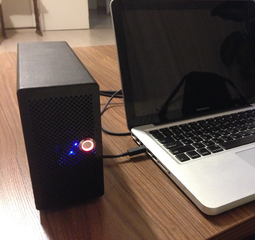
Dschijn thank you for you detailed guidelines. I have built a similar setup with galax 970. I also cut the side of akitio for 2 black 120mm akasa filters. Thus I am using stock fan with the 970 and I wonder if noctuas improved your cooling (I am ok with the sound) . Also I wonder if I should cut the top for exhaust exit. Although I haven't tested it with full load, it showed similar temperature figures. BTW 12V 16mm LED Power Push Button Switch fits perfectly to the front. I cut the corners of two 60mm fans and placed it in between. Unfortunately blue LED one's clicker died after 10 clicks and I switched to the red instead. Waiting your comments. Cheers!